We continue to be inspired by various creative ideas that can transform our dacha, make it more attractive, cozy and individual. IN landscape design Special attention is given to accents, for example, decorative bridges can attract attention, this will be a bright accent.
Wooden bridge over a dry stream
Even such a simple wooden bridge will significantly improve the perception of space at the dacha; it can even be thrown over a gravel path.
Decorative bridge with railings
A nice bridge spanning a dry stream. Solar-powered lamps are installed in the railing posts.
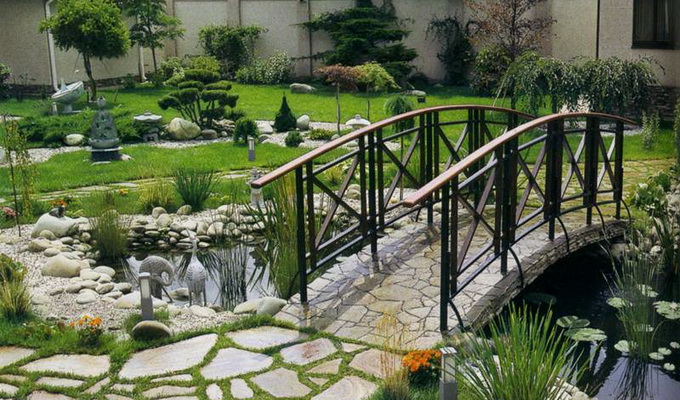
The idea of a bridge over a pond
You can often come across the idea of a bridge that is thrown across a pond in the narrowest place. This also logically divides the pond into two parts, and also gives you the opportunity to create additional interesting place, to which you can draw attention.
Wooden bridge with railings for a summer house
Bridge idea with double railings, top part single, and the bottom has vertical slats. To make the bridge last longer, it is recommended to treat it with protective impregnations.
A simple bridge from decking boards
A geometric pond requires an equally modern bridge. The idea is somewhat strict, it seems to me, but there are also such amateurs!
Decorative bridge with rope railings
If your landscape design is close to a rural country style, such a bridge may well become a decoration for your space. The railing posts are round, and the railings themselves are made of ropes.
Traditional style swing bridge
A beautiful idea of a bridge spanning a pond, decorated with flowers in tubs. The idea is complete dacha composition, there is even a fountain!
Bridge over a stream at the dacha
If you have a stream flowing through your area, then you can make a similar bridge in a narrow place. The design is traditional, classic, with two crossbars. However, even if there is an elongated pond on the site, a bridge would be quite appropriate.
Bridge as a transition
This bridge serves the purpose of logically connecting the patio and the rest of the garden. The structure is made of terrace boards and will last a long time. Pay attention to the lighting, which in the evening illuminates the space under the bridge, highlighting the silhouettes of rounded stones.
Small decorative country bridge
Similar bridges are common in Japanese gardens. This is a completely decorative design, the length can be only 30-50 cm. It can be placed on two stone slabs and used as decoration in a rocky flowerbed - rockery.
Humpbacked bridge for a summer residence
An element of the path in the form of a humpbacked bridge, under which a stream of pebbles “flows”. The path itself is made of stone slabs.
Long bridge with double railings
And this traditional bridge can be built even on street area, in the village, on the stream. Beautiful and stylish! A real pedestrian bridge that can support several adults.
Bridge with square posts
As you can see, the design principle of country decorative bridges is approximately the same - it is a “humpbacked” base of the platform, three or more support posts, railings, either single or double.
Convex bridge for a summer house
And here is the idea of a bridge, the railings of which repeat the convexity of the platform structure. An original, beautiful idea, I think.
Model of a functional bridge over a stream
Well, the last idea modeled by the designer in the program. An idea for a real full-fledged bridge over a stream, either flowing through your territory, or to connect your site and the roadway, through a ditch.
(17
ratings, average: 4,44
out of 5)
 Since time immemorial, people have used bridges to cross streams, ravines and rivers. Initially primitive designs beam type or wicker became more advanced, functional and decorative.
To date, garden bridges in landscape design, which are decorative wooden, forged structures, as well as stone or concrete structures installed across a stream or pond, have become widespread. Varied landscape bridges perform interesting element design and are indispensable for creating a unified space and style.
Wooden bridge
The most common material in creating garden bridges is still wood. It is especially convenient for self-made designs - easy to process and easy to assemble.
 Most often, wood is used in the construction of wooden bridges for summer cottages. coniferous species, of which the most accessible variety is pine. Its trunk is smooth and straight with a moderate number of knots. This material has good mechanical properties and resistant to rotting.
Wood products are selected at construction sites. These wood bases are round and sawn, they are basic list includes:
- log, cleaned round wood thickness of at least 12 centimeters and length from 4 to 9 meters;
- shop assistant, peeled round wood 8-12 centimeters thick;
- poles, the thickness of which is from 4 to 7 centimeters;
- plates or logs, sawn along the axis into 2 parts.
As well as logs and beams, which are a log hewn on two or four sides, and, of course, boards. In addition to the calibrated wood material, whetstone, slab, waste and sawing are widely used.
Beam garden bridge
Perhaps the simplest type. This type is used for spans up to 10 meters. The main elements are supports and spans or purlins that fill the distance from one support to another.
 Purlins of this design are the main load-bearing element project. These components work under variable bending load according to the beam principle, which is why the bridges themselves of the described design are called beam bridges. At the end of the work process, the working part of the bridge is laid on the spans. To build such a bridge it is enough homemade template for breakdown. It is made from boards connected in the form of a right triangle. The resulting hypotenuse of this triangle should be equal to ½ the width of the bridge.
Having marked axis future wooden bridge using pegs, you need to set aside the lines for the purlins with a template, and the beams should be closer to the axis. This inward displacement of the tracks is approximately equal to 5% of the total width of the future bridge on each side. Then you should select the soil along the markings for the beds, compact the trench with crushed stone, add crushed stone or gravel in a heap and lay the beds on this backfill, and then install the purlins.
To give the wood a bend, blanks for beams processed with a chisel and a jigsaw, achieving the desired profile. After this, assembling a decorative bridge for a summer house with your own hands occurs in the standard way.
Gallery: decorative bridges for the garden (25 photos)


Railing
 The decoration of the created bridge structure at the dacha will undoubtedly be the railings. Since the small bridge serves more of a decorative purpose, it is quite possible to make the railing yourself and additionally decorate it with inserts made of wicker, slats, rope or bamboo. Here the options can be very different.
You can also order railings for finished project in a carpentry workshop, where a pattern is turned or cut out on blanks and the desired design is realized decorative idea. In addition, carpentry workshops have their own sketches, designs and photographs of finished work.
Wood processing
All wooden elements must be dried. It is best when you are sure that the wood was dried industrially in special chambers. This point is very important for maintaining the quality of the finished garden structure.
In addition, the wood should be treated before installation. combined impregnation, preventing rotting and preventing the accumulation of moisture. If desired, the wood product can be treated with a fire-retardant compound and varnished for external use.
Forged construction
 Decorative forged metal bridge to the garden can be ordered from blacksmith workshops. Such atmospheric gizmos uniquely decorate the landscape and place the necessary accents. Similar forged metal garden bridges come in many varieties and differ:
- shapes and sizes;
- complexity of design;
- forged decor - from minimalist to complex openwork.
In workshops that make garden bridges from metal, there are always many forged samples. You can choose either a ready-made sketch or combine it according to at will from several elements. In addition, many masters undertake to perform individual projects. Blanks for forged elements serve profile pipes, channels, metal sheets and other metal bases. After manufacturing, the metal bridges are painted with reliable and durable blacksmith paint.
Other materials
A less common choice of materials for building a bridge in a garden or dacha are concrete and stone - both artificial and natural.
Stone
 Arched bridges made of stone that can withstand loads are quite difficult to construct. This kind of thing requires serious skill. construction work. But you can use the idea when stones laid on the bottom of a shallow reservoir or simply on turf or gravel are located at some distance from each other. As a result, flat large stones form the so-called step bridge
Having received a plot of land, many discover a ditch or even a small ravine on it, which is long and difficult to fill; it is easier to build bridges for landscaping the dacha with your own hands.
What is the best material to make a bridge from?
When it comes to materials for a bridge over a ditch, almost all owners begin to remember where the boards and timber are located, but at the same time someone begins to think about trusses from a corner or channel. Without any doubt, metal welded bridges for dachas are much stronger and more durable than wooden ones, but it is better to use them near water stainless steel, which is not cheap. Regular iron will rust even if painted regularly.
In addition, a corner or channel is more appropriate in technical structures, but not in decorative ones, and it is quite difficult to assemble structures from them with your own hands.
If metal seems like the best addition to your landscape design, choose forged products, which will not only allow you to install a beautiful bridge with openwork railings, but also create a composition with a similar gazebo. As supports, many are trying to install concrete “bulls” - supports in the middle of the bridge span, or metal piles. However, such a decision is justified only if the site is cut across by a deep and, most importantly, wide ravine.
It will be enough to span a span across a stream or a small ditch without intermediate supports, with a maximum of two abutments at the ends. That is why, to make a bridge with your own hands, a few long beams with a section of 15x15, and with a short span, 10x10, are enough. In fact, even an ordinary log with a longitudinal cut can serve as an excellent and durable foundation for a bridge.
If you are a proponent of thoroughness, you can use natural stone. Moreover, the straight and humpbacked spans spanning rivers and gorges look very picturesque. But when choosing this option, prepare yourself in advance for multi-day and rather complex construction. By the way, just when working with stone, or more precisely, with concrete, which will be needed for pouring the base, you will also need metal very useful, but not a channel, of course, but only an angle and steel reinforcement. If you prefer lightweight structures, you can get by with just boards, which, when placed on edge, are in no way inferior in strength to timber.
Which bridge design should you choose?
IN rural areas to overcome narrow obstacles, which, however, cannot be simply stepped over, 2-3 logs, tied or stapled, are often used. In such cases, as a railing, either a perch is placed on posts dug on both sides of a ditch or stream, or a stretched rope is tied. Such a decorative bridge looks organically against a pastoral background, and therefore can be used to decorate the landscape of your site.
Through a stream, ditch or small pond a log can be laid with a longitudinal cut, across which it is packed in the form of flooring wooden planks. The above options are the simplest, except for large flat stones placed at a short distance from each other across the stream bed. However, boulders as a replacement for a bridge are not always appropriate, in particular, they are unsuitable for walking, respectable and elderly people, and are also unsafe for children.
Therefore, large stones are best used as supports on which, for example, granite or basalt slabs with a rough surface. If the stream is shallow enough and there is no risk of falling from the resulting decorative bridge, you can do without railings.
More complex, but no less beautiful design can be knocked together from timber and regular boards, or assembled and welded from metal. The easiest option to implement is a straight platform with railings on one side. A humpbacked bridge for a dacha looks much more impressive, but not everyone can make it with their own hands. But an intermediate scheme for constructing a span is quite accessible, when several wide steps lead to the main deck from both ends (over a narrow stream you will get an almost humpbacked bridge). This type will tower over the area and provide an excellent vantage point.
Choosing a place for the bridge
It would seem that this question does not require clarification: there is a stream and a deck that can be thrown across the riverbed - everything is simple. However, if there is neither a water hazard nor a ravine on the site, then the decorative bridge at your dacha will no longer become a decoration of the garden? Of course, such a structure in the middle of a lawn will look ridiculous; the span should be thrown, if not over a ditch, then at least over a flower bed.
Let's look at several options for what to do when you want to add a bridge to your landscape design, but there is nothing to throw it over. Actually, there is already one solution - a transition over the flower bed. In this case, a humpback bridge or a stepped structure is suitable, or, as an option, a straight span with ramps at both ends.
If you don’t have a stream on your site, you can create one with your own hands by laying out an artificial riverbed from different-sized stones, very similar to the real one (if you don’t take into account such a trifle as the lack of water). To create the illusion of a stream, tint sand and small crushed stones blue and azure and place them between the cobblestones. Another option for installing a bridge is a small island in the center of a pond or even a swimming pool. If the area of the man-made reservoir is large, the size of the island can be made such that it can accommodate a table and a couple of benches.
Bridge construction work on a garden plot
To make the flooring you will need a frame, and you can make it yourself from wood in two ways: by installing the boards on edge or by laying them flat. The first option will require less lumber, but the span will most likely be straight, since bending the board along the plane is a long and difficult task. The maximum that can be done is to give it a slight bend by cutting off part of the edge along an arc. It is much easier to build wooden humpbacked bridges for a summer house from planks placed flat, so we will go this route, considering various assembly possibilities.
To fly through a narrow ditch, two boards with overall dimensions 3x18x200 centimeters. They are connected to each other by thinner crossbars, nailed to the bottom at the ends, as substrates. However, you can connect the foundation logs with two beams; they will also serve as “supports” for the bridge. If the flooring needs to be thrown over long distance, under the load-bearing boards, along the outer edge of the frame, it is advisable to fill beams of the appropriate length, with a cross-section of at least 10x10, and only then attach the cross members.
Next, we begin to form the ledges. To do this, we lay shorter boards of the same 3-centimeter thickness directly along the load-bearing joists of the frame at an equal distance from the ends. Thus, if your frame is 3 meters long and you want the steps to be 40 centimeters wide, the next board should be 0.8 meters shorter than the base. If you want higher steps, use 10x10 timber instead of the boards that form them (including load-bearing ones), this will only make the bridge stronger and more durable. True, it will be more difficult to put together such a frame, and, most likely, you will have to use metal plates from the inside of the frame to reliably connect the beams.
Now you can start laying the flooring. To do this, you need narrower boards, 10 centimeters (commensurate with the cross-section of the beam), with a thickness of at least 2 centimeters and a length exceeding or equal to the width of the base frame. You will need quite a lot of them, so it is logical that you need to stock up on all the materials before you get ready to build a bridge over a ditch or ravine in your country house. First, we fill the boards onto the ends of the ledges, starting from the very bottom, that is, from the frame if it was assembled from timber. If the steps are made of boards, then we immediately begin installing the flooring. The crossbars can be nailed closely or at small intervals.
Assembling balusters and handrails for the bridge
So, the span is ready, and completely made with your own hands, and if it is installed in the garden, how decorative element, then you can leave it like that. But when used for its intended purpose, that is, to overcome a stream or ditch, it is advisable to make a railing. This is what we will do now. The handrail posts themselves, or, in other words, wooden balusters, can be purchased ready-made, carved, or thin bars can be used. If the cross-section of the posts at the bottom is square, all that remains is to screw them with long screws to the base so that the upper ends are at the same level.
If the cross-section is round, it is better to carefully cut off the plane on one side and secure it with screws. If necessary, cut down part of the baluster from below. All that remains is to install the handrails, for which we take 2 bars and, having measured the spaces between the balusters on them, drill shallow holes in the appropriate places. Then we place them on posts and secure them to the side or top with screws. It is better to install the finished bridge not on the ground, but on pre-cast concrete platforms.
 Decorative bridges for the garden can not be found in every area, because this landscape element didn't receive this widespread, such as flower beds or flower beds. However, decorative bridges for a summer residence extremely enliven the area and add variety to the landscape. Bridges across a pond are built quite often, but this structure can be erected without having a waterway on the site. To do this, it is necessary to arrange a “dry” pond at the dacha.
Landscape bridges at the dacha
Bridges in the country are not just small decorative elements akin to garden figurines. The impression they make is much stronger. Even the smallest garden bridge is perceived as a full-fledged landscape object.


Look at the photo: decorative bridges for the garden are beautiful, and most importantly, effective elements of site design. Of course, in most cases there is no direct practical need for constructing bridges in a private garden, especially if there are no reservoirs, but from the point of view of landscape design they have a deep meaning.


Landscape bridges are vertical elements and a means of forming or highlighting the relief of a site. There are many elements with similar functions, but bridges have a special effect on our perception.
Firstly, because purely psychologically we perceive a landscape with such detail as larger in size, and space as more complex in structure. It's pleasing to the eyes.
Secondly, bridges are a decorative element, not a natural one, and it has many types and finishing options, it “catches” the eye and always decorates. In any garden, even the smallest one (2-3 acres), there is always room for at least a small decorative bridge. Try it and you will see immediate benefits!
Location of garden bridges (with photo)
Bridges are necessary if there is some kind of landscape object or relief feature on the site that needs to be stepped over or crossed. It can also be an object on a plane, the beauty of which needs to be emphasized.
The most common location of garden bridges is ponds, canals, and streams. Sometimes structures are placed in the most unusual places.


As you can see in the photo, garden bridges look just as impressive over “dry” ponds; over a sharp decrease in relief; in places with a beautiful view.
Decorative wooden bridge on a pond
There are many varieties of these structures, but the most important division is this: there are bridges functional purpose, that is, “real” and purely decorative.
Functional bridges can be safely used for their intended purpose: you can walk on them. First of all, this is, of course, regardless of their type. Then a decorative wooden bridge on a pond can be built across a stream, canal, pond or swamp, or you can make a bridge that only approaches the water or slightly “enters” the water. But a real body of water is not at all required condition for bridges.

Decorative bridges on a pond differ from functional ones in that they are smaller in size and cannot be walked on. They are installed “for beauty”. But in terms of their design role and the effect they produce, they are almost no different from large, real bridges. They can be installed over a small stream, or indeed in any beautiful corner of the garden.
Bridge structures across the pond
The designs of bridges across a pond can be different: high or low, straight, in the form of a simple deck, flat-curved, in the shape of an arc, consist of separate elements, have railings various shapes and designs.


As can be seen in the photo, decorative bridges are often made from wooden planks, logs, forged metal, brick, natural stone, made of concrete or can be combined, using several materials at the same time. Which bridge should you choose for your site? This issue is clearly resolved based on the prevailing shapes, lines and style of your garden.
How to make a decorative bridge at the dacha
Before making a decorative bridge, prepare a strong frame - it is most often made of metal and wood, but it can also be concrete. If this is a real bridge, especially over a body of water, it must have a foundation. Further installation takes place on the frame decorative materials and bridge finishing.
In some styles, for example, in Japanese, the bridge is simply large flat stones laid in a chain. Considering the heaviness of the stones and the simplicity of the design, a foundation is not required for such a bridge.
But if the same bridge is made from tree stumps large diameter, a foundation is needed. But making everything building regulations It is required only for functional bridges; decorative bridges do not need such serious “preparation”.
For example, a small decorative bridge from thin logs is made as follows: first, arched supports of the future bridge of the required dimensions are cut out of wood, then slots are sawed into them, into which thin logs are then installed. Any other elements can be installed in such slots. Railings for the bridge can be made, for example, from thick branches.
You can build a decorative bridge at your dacha yourself from beautiful brick or natural stone:

But the easiest option is to install a ready-made bridge in your style. Decorative bridges can be purchased at finished form or order.


Particularly beautiful are small forged bridges, as well as those in which skillful forging is combined with wooden elements.
Bridge over a dry pond
Construction of “dry reservoirs” - spectacular reception in landscape design and an excellent opportunity for those who, for some reason, cannot create a real pond on their site.
A dry pond is a symbol of water, its imitation using natural means of a different origin, for example, using pebbles, decorative gravel (natural color or tinted), tree bark, low flowers, and many other means.

If you want to make a “reservoir” from bulk materials, then you first need to mark the shape or bed of the future “reservoir”, remove a small layer of soil, lay down a black film and fill it with a layer of sand, and then fill it with material that imitates water. For example, you can make a stream from pebbles, or you can make a “pond” from blue gravel or greenish bark. If you want to make a pond bigger size, there is an effective technique: polyethylene film, and on it is a scattering of blue or white gravel. Despite the elementary nature of the material, the film will look impressive: in some places it will sparkle in the sun, creating the illusion of real water.

If you are planning a “flower pond,” then you need to dig up the bed of the future pond, dig a low flexible plastic border around the perimeter, and then densely, in clumps, plant the “bed” with flowers or herbs. It will be especially beautiful if they are plants of the same species with flowers of the same color, for example, a “stream” of ageratum, or a stream of white alyssum.
Bridges across a “dry body of water” are always functional. Even if there is no pond or stream on your site, you can build a bridge in an area of relief change, as a stand for something. Show your imagination and your garden will sparkle with new colors!

You can also use low ones with decorative foliage, for example, arrange a “stream” of miniature hostas of variegated colors.


