Most developers in suburban areas give preference to natural materials when creating. In these cases best alternative than using natural, natural stone, No.
When creating landscape design on a suburban area, most developers give preference to constructing garden paths using natural materials. It has natural beauty, naturalness and high strength characteristics.
Natural beauty, high strength characteristics and naturalness are the main advantages of this material.
Various materials are used, for example, flat natural stone or wild natural flagstone. Such natural material, if everything is done correctly, it is distinguished by reliability, quality and durability.
List of required materials and tools
The following materials are used in the construction of stone garden paths:
- sand;
- cement;
- crushed stone;
- special glue for stones;
- screening.

Tools for laying natural stone: shovel; mallet; Bulgarian; Master OK; building level; cord; brush.
List of required tools:
- shovel;
- mallet;
- concrete mixer;
- Bulgarian;
- Master OK;
- hard brush for special glue;
- special trowel for gluing stone;
- cutting wheels for stone;
- building level.
Back to index
Garden paths made of flat natural stone

To determine the size of the garden path, take four wooden pegs and mark the two sides with them. Pull the rope and, every one and a half meters, hammer in the wooden pegs necessary for further fastening the guides.
The construction of the track in this case includes two stages. The first stage is the designation of the outline of the future path. Its tortuosity and shape are determined only by the taste preferences and imagination of the owners of the suburban area. Then, using shovels, a ditch is torn off exactly along the contour. Its depth must be no less than the length equal to the metal part of the bayonet shovel. After removing the turf, a layer of coarse material is filled along the entire length of the ditch. This could be crushed stone, pebbles, slag or broken bricks. Any material used must be compacted. Then a layer of sand is poured along the entire length of the ditch, which, in turn, is also compacted with the obligatory use of water.
The second stage is direct, which can consist of two options. The first is a flat natural stone laid on sand. This option is much simpler, both in terms of financial and time costs, and in terms of the labor intensity of the process. The second option - natural stone is laid on concrete mortar. This option is more expensive and more difficult, but it is much more reliable.

The design of paths, covered with natural stones, the seams between which are filled with mortar (a), vegetable soil with sown grass (b) and roads for vehicles (c): 1 – natural stone; 2 - solution; 3 - sand; 4 – plant soil; 5 - monolithic concrete; 6 - crushed stone; 7 – rubble stone.
If developers decide to use the first option, then when laying it on sand it is necessary to press it harder; for this they sometimes use a rubber mallet. Then, in order to fix the laid material, you need to dilute sand and liquid cement mortar in a ratio of 3:1 and fill the gaps between the stones.
If the second option is used, then the prepared concrete solution, on a small area of the prepared base, is distributed around the entire perimeter in a layer of 10-12 cm. The material, as in the first case, must be laid evenly over the area, while slightly pressing down. After the stone has adhered to the concrete, as in the case described above, the gaps should be filled using cement mortar.
- a fairly simple process, but it still has its own tricks that you need to pay attention to. Firstly, the path must be properly edged with a curb so that it does not move apart in width. Secondly, so as not to accumulate rainwater, the path should protrude slightly above the ground level.
Back to index
Garden paths made of wild natural flagstone

Flagstone is layers of natural stone that have strength and a natural pattern.
The ideal building material for the construction of garden paths is torn unedged stone, in other words, flagstone. It is easy to process, relatively inexpensive, and resistant to external environment. It's completely environmentally friendly pure material. This natural stone can be used to make not only garden paths, but also entire areas. To do it right garden path, you need to know the installation technology, which, by and large, is not at all difficult.
Back to index
Preparing the base for installation
Preparing the base for laying flagstone involves filling the entire contour of the marked area with concrete in advance, i.e. manufactured concrete screed. While the concrete hardens, you can proceed directly to preparing the stones themselves, in our case flagstone.
Modern landscape design is unthinkable without natural materials. Increasingly, suburban areas, recreational areas and residential lands are being registered. And we’re not just talking about cladding.
After all, even when working with parking lots, entrances and garden paths, natural stone is used. It would seem, what is so difficult? I took several pallets of material and laid them on the solution. But there are developments and features when using natural stone. How to do it using technology, that’s the challenge!
What can you buy
There are breeds that are most appropriate for the garden path. We recommend taking a closer look at:

Various shapes
Eat specific types material, it is from them that builders start when choosing a convenient a natural stone to work:
- Flagstone. flat type. It is extremely inconvenient to install due to the varying thickness. Can often be found on children's playgrounds.
- Chip paving stones. Regular rectangular stones. Classic type natural material, for example, for pavements.
- cobblestones. Must have roundness. It is very difficult for women in heels to walk along such a path.
- boulders. Not the main natural material, because it is large in size. But it perfectly fills sharp changes and problem areas.

Path paved with marble tiles.
How to pave it yourself
The technology of work is not related to the type or breed of material. The only difference is in the installation methods.
- A cement solution is created, and the road surface is fixed into it. A shallow trench (up to 30 centimeters) is first prepared. Then the bottom layer is compacted and sprinkled with sand. The latter serves as a pillow. 10 centimeters per shock-absorbing layer is enough. After repeated compaction of sand, intermediate gravel is poured on top. Sometimes crushed stone or small construction waste is used. Next, concrete is poured with reinforcement for maximum strength. And only then comes the laying of the stone. This method is expensive, difficult and time-consuming; it is used only on difficult soil.
- It is much easier when there is no preliminary preparation. If you don’t need a deep trench, then make channels for the bayonet of a shovel. Then they compact it well and cover the very bottom with construction polyethylene. A layer of gravel is poured on top of it. And already a layer of sand (pillow) goes on the rough stone. So natural stones are laid on it.
Tools required for working with stone
In paving they use:
- Rubber mallets;
- Shovel and bayonet shovels;
- Levels;
- Trowels;
- Angle grinder with attachments for working on stone;
- Brushes;
- Rope markings;
- Tamping handle;
- Vibrating rammer (for industrial scale);
- Equipment for reinforcement;
- Devices for preparing concrete.
From by-product building materials you will need:
- Crushed stone;
- Cement;
- Sand.
Developments and rules
Any type of path made of natural stone begins to be created according to the same pattern:
Stage 1. We mark the territory. It is necessary to clear the future path or site from bushes, weeds, household waste and stones. Tension the thread even with significant tortuosity. We just put up pegs more often for fixation.
Stage 2. Carefully dig a trench the required depth with the expectation that the final layer of stone will be above surface water.
For your information! There is a third method of paving, called highly artistic.
It doesn't require a lot of work, but without an artistic touch the composition won't come together. The fact is that only the largest stones are bought for work, which are simply laid in place of the removed soil.
Over time, vegetation will appear in the seams of such stones, one might even say slabs. But that’s the designer’s move, and it’s more profitable for the budget.
Works of masters: 
The most complex compositions cannot be completed without the use of stones of different sizes and shades. 
Balance between regular cobblestones and carvings 
The classic style cannot be achieved without a border stone, therefore, when planning just such a style, it is better to stock up on a small square-shaped stone. 
During the installation process, craftsmen often use the following trick: cement-sand mortar put in a bag with the end cut off and, like experienced confectioners, work out each seam. 
Approximately, this is what a stone laid long ago looks like using the third paving method, when at least pre-training, and the stones are placed almost chaotically in place of the cut soil.
How to lay a path from thin natural stone
We are talking about a rock similar to sandstone or shale. Exactly thin and light stone tiles They try to lay it on stone dust. It is mixed with cement mortar. This combination has a beneficial effect on the shrinkage of lightweight materials.
Even for thin layers of stone, it is advisable to compact the gravel with maximum effort. And already on a hard and smooth plane you can lay the facing material.
Pros and cons of paths made of natural stones
From the positive:
- Choice of color and shape. There are no limits to the designer's imagination.
- Eco-friendly materials.
- With high-quality installation, a very durable and stable structure. Negative influences the external environment is not scary.
- Just figure out how to lay it yourself.
From the negative:
- Most breeds are very expensive.
- Wide slabs and large stones are heavy.
- There are breeds that are very difficult to assemble.
- Rocks with a low strength threshold cannot be used for parking lots, parking lots and driveways.
Estimated cost
Price for Moscow and the Moscow region for 2017:
- Sawn sandstone from 1400 rub/sq.m.
- Yellow sandstone from 500 rub/sq.m.
- Flagstone lemezite from 209 rubles/sq.m.
- Granite from 200 rub/sq.m.
- Lemesit from 200 rub/sq.m.
- Sandstone “paving stones” from RUB 2,199/sq.m.
- Burnt sandstone from 750 rub/sq.m.
- Flagstone paving stones from 990 rub/sq.m.
Results
A garden path in the private sector of a cottage community or in an elite country house is practical, aesthetically pleasing and durable.
Educational program on video
Instructions for creating a track - from Dmitry Chernak.
A garden path made of natural stone is serious. Definitely, no other material combines so much reliability and naturalness at the same time. It is probably possible to choose the right type of stone for any landscape.
However, along this path there are noticeable problems with the cost of the material and the complexity of installation. It is possible to overcome the indicated obstacles by doing the work yourself using inexpensive local natural material. Another way to reduce the cost is to use a thin flat stone as a covering.
Harmony of stone on paths with home decorationChoosing stone for paths
The ancient Romans, while building roads, extracted stone from a nearby quarry. We have the opportunity to make a choice according to our taste and coordinate our desires with the requirements of the landscape.
Stone paths are especially appropriate in the garden if there is an alpine hill or pond on the site.
Of course, it is necessary to take into account the conditions of use of the coating. The price of the material will also have to be taken into account. Basic possible options- these are granite, slate, sandstone and rubble stone. It is also possible to use artificial stone to construct a coating with your own hands. This material is noticeably cheaper and easier to install due to its standard dimensions.
Granite paving stones can withstand tanks
 Granite patterns in the yard
 We all watched how heavy armored vehicles move along the granite pavement of Red Square, so the reliability of the coverage does not raise any questions. Moreover, granite is amazing beautiful material, the color range of which ranges from dark red to dark gray. It is laid in the form of a herringbone, braid, arc or in a checkerboard pattern.
Most cheap option– a path made of untreated stone or cobblestones. Crushed granite is a little more expensive, but the path in the garden will be smooth and aesthetically pleasing. Sawn or sawn-split paving stones are noticeably more expensive, but provide the widest possibilities for laying stone. Granite for walkways is often used as a border or in combination with other materials.
Slate flagstone - reliable and beautiful
 The slate path is reliable and unique
 The stone extracted from slate slabs comes in a variety of thicknesses and colors. Flagstone can be yellow and golden, gray and burgundy, purple and black, green and brown. The stone extracted from different quarries has an individual pattern structure.
Flagstone is quite resistant to sun, moisture and low temperatures, has high mechanical strength. Sufficiently sharp protrusions on the surface of stones can harm shoes, so this circumstance should be taken into account when choosing a coating.
Sandstone plaster - quite inexpensive
 Beige classic of popular sandstone
 Sandstone plasterboard is used quite often for the construction of paths in the countryside. Thanks to the small thickness of the plates, from one to six centimeters, the material consumption is low, and accordingly the cost of paving becomes affordable.
The pattern and color saturation of natural materials can be very different. The most common colors are brown, light brown and burgundy. There are layers of blue and green, white and ash color.
Rubble stone - an affordable local material
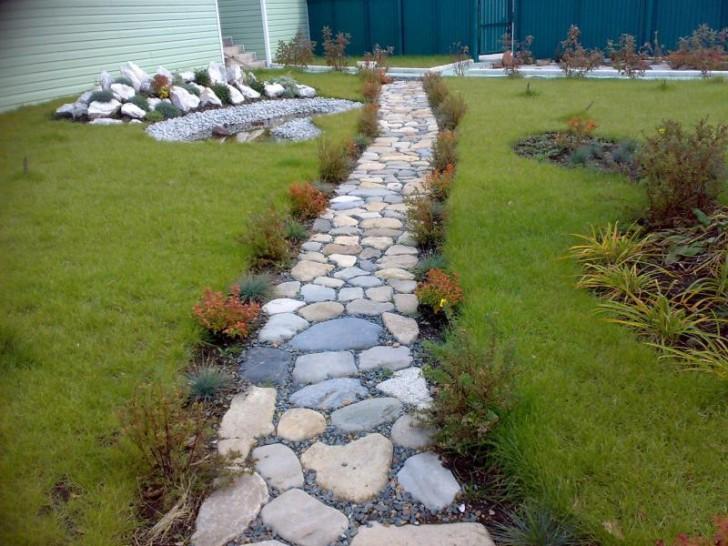
 Inexpensive and reliable path made of rubble stone
 Rubble stone cannot be attributed to any specific breed. It may contain limestone, sandstone or dolomite. This type of material is mined from local quarries. The only specific characteristic of the rubble is that the diameter is no more than 0.5 m.
The characteristics of rubble stone are directly related to its composition. In any case, a garden covering made from local material will be inexpensive and will last a long time. For paving, you need to select stones that are similar in size. In this case, it will be easier to build a path.
Round pebbles are a decent option
 A path made of loose pebbles can be very beautiful.
 Pebbles are the same stones, only small ones. So the covering for your home and garden made of rounded pebbles will last a long time. River pebbles are better suited for paths than sea pebbles, as they are rougher. The easiest way is to make a pebble coating in the form of a mound. At the same time, small pebbles crawl under the feet. To reduce this effect, do not lay a coating layer thicker than 70mm. Read more about embankment paths in a separate article.
 Non-woven carpet made of colorful pebbles
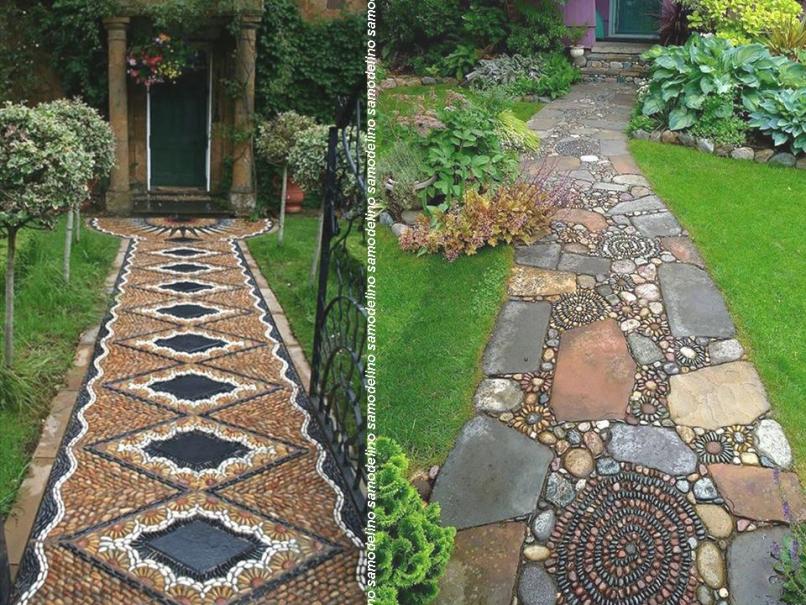
 You can create a real work of art with your own hands from pebbles laid on cement mortar in the form of a pattern. Of course, this will require significant effort. But there is an opportunity to realize it and get a beautiful and reliable trail without resorting to significant costs.
Having conceived a path with a certain pattern, it must be drawn on paper in advance. The work will speed up if the pebbles are pre-sorted by color and size.
Please note that pebbles with a diameter of more than 5 cm will not adhere well to the covering material.
Scroll necessary tool is given in the table.

Materials other than pebbles will require crushed stone, sand and cement. You should stock the curb if you plan to use it. For work, prepare a piece of board with a cross-section of approximately 30x120mm and a length equal to the width of the covering. You can make a pebble path with your own hands according to the following scheme:

 Options for pebble patterns
 Paving stone paths according to the rules
Paths made of thin stone slabs or plaster should be laid on concrete base. If the covering is installed on a car site, the concrete must be additionally reinforced.
Stone more than 5-7cm thick pedestrian paths can be laid on a bed of crushed stone and sand. In any case, the coating should be installed 2 cm above the ground level to ensure the drainage of water from its surface. When building paths made of natural stone, you will need the following tools:

Laying plasters on a concrete base
Path from wild stone can be done according to the following scheme:

Note that the edge of the path can be left uneven and the stones can be left uncut. However, this will complicate mowing the lawn if it is adjacent to the coating.

As follows from the photo, often the landscape does not require the use of paths with a continuous surface. For rare use, for example, on a lawn, near a pond, or in a flower garden, it is enough to lay a path of separate stone slabs.
In this case, a pit is prepared under each of the stones, 15 cm of crushed stone is filled in and compacted. Large stones are placed on cement mortar and hammered with a rubber hammer. Let the concrete cure securely for a week before using the path.
Stone paving on a bed of crushed stone and gravel
To pave a path made of natural stone without using cement, you will additionally need sand and crushed stone. The list of required tools is given in the table.

We lay a path made of thick wild stone on the sand according to the following scheme:
Options for designing seams on the coating
 The grass between the stones organically links the path and the lawn
 As follows from the photo, the gaps between stones on garden paths do not necessarily need to be filled with mortar, sand or crushed stone. Often, the use of “live” filler in the form of grass becomes more harmonious. For these purposes, the most commonly used are navel or creeping thyme. For small seams, a cuff is suitable. Wide gaps are planted with bryozoans.
In any case, the grass does not like too many people walking along the garden path. Upon completion of the paving, the seams between the stones are filled with fertile soil and compacted. A mixture of soil and grass seeds is poured into the space freed up after compaction and compacted again. The surface of the covering is covered with burlap and watered daily. The stone path you made with your own hands will delight everyone for decades.
To better familiarize yourself with the paving process, we recommend watching the following video.
Any summer cottage is not complete without paths. Along with a purely practical purpose, they serve as a kind of separators functional areas garden, mark the boundaries of lawns and flower beds. To make these landscape design elements attractive and durable, you should choose durable, wear-resistant materials for their creation. A properly made pebble path at the dacha will last for many years thanks to unique properties building material.
Natural material in landscape design
Rounded stones are often used in landscape design. An area decorated with pebbles looks natural and stylish. In addition, pebble paths can easily withstand considerable loads - you can walk and ride on them without fear garden carts.
Pebble paths look especially good in a country house decorated in Mediterranean or rustic style. In the first case, a variety of mosaic patterns made from pebbles of different colors and sizes would be appropriate. For a country-style garden, a simplified version is suitable, when plain pebbles are laid as a continuous sheet without unnecessary frills.
If there is a rock garden, alpine slide or pond on the site, paved stone paths will become a logical addition to the overall landscape. A garden decorated in this way will acquire a harmonious, complete appearance.

Path made of large pebbles in the garden
Garden path paving technology
In order for garden paths made of pebbles to serve for many years, it is important to take into account all the nuances, starting with the preparation and choice of stone.
Which pebbles to choose for paths
There are only two types of pebbles - natural, mined from a river or sea, and artificially made. Stones of natural origin are superior in quality to their industrial counterparts. Therefore, if possible, it is better to purchase natural material so that the laid canvas does not lose its decorative and functional qualities longer.
As a rule, pebbles are sold in bulk. In stores you can find ready-made pebble tiles or pebble mats with an elastic base. It is much easier to pave paths from prepared pebbles with your own hands, but this material costs an order of magnitude more. If there is a suitable body of water nearby, you can simply collect stones on the shore. This option will require minimal costs.

Combination of large stones and pebbles
What is required for work
In order to make a garden path from pebbles, you will need the following tools and materials:
- pebbles;
- sand, crushed stone, screenings;
- cement;
- border tiles or suitable stones;
- marking tools;
- building level;
- a piece of board along the width of the path, a hammer;
- shovel, rake, brush.
If you plan to lay out a complex pattern, you must first draw a sketch of it on paper. Before making a pebble path in your country house, it is better to sort the stones by color and size, this will make the work much faster and easier.

Example of a complex pattern
Stages of creating a pebble path
Following step by step instructions, even a beginner can build a pebble garden path:
- Mark the contours of the future path. This can be done using pegs and rope, or simply marking the outlines directly on the ground. The width of the covering should not be less than 50 cm, otherwise walking will be uncomfortable. The optimal width is 90–150 cm.
- A layer of earth is removed over the entire marked area to a depth of 15–20 cm. The larger the paving stones, the deeper the trench should be.
- A layer of sand is poured onto the bottom of the made ditch, and a layer of crushed stone is placed on top. The trench should be filled to two-thirds of its depth. A sand and gravel cushion is necessary so that the path has solid foundation and did not crack over time.
- Install border tiles or any other border material along the edges. Fill the entire area with cement mortar. To do this, mix 3-4 parts of sand with 1 part of cement and a sufficient amount of water. The concrete should not reach the edge of the curb a little. At this stage, be sure to check the horizontal orientation of the canvas using a level.
- While the cement is wet, they begin to lay out pebbles. If the path is without a pattern, everything is simple. The pebbles are placed close to each other, pressing them flat or edge-on into the solution to a third of the height. In the case when you need to pave the path with a mosaic pattern, proceed a little differently. Pebbles are laid out on the ground next to the path according to the sketch. Then they carefully transfer the pattern onto the concrete. Circular ornaments begin to be laid out from the middle. When working with stones different sizes First, large elements are fixed, and the rest of the space is filled with small ones.
- To ensure that the pebbles lie flat, they are pushed down using a board and a hammer. The board is selected according to the width of the canvas. They lay it across the path and tap it along the entire length with a hammer, leveling the pebble laying in one plane. The quality of work is checked by level.
- The paved canvas is left overnight, covered with film, so that the concrete hardens a little. After this, make a liquid cement mortar and pour it over the entire surface so as to smooth out the cracks between the stones. Excess solution is removed with a soft brush.
- The finished pebble path is again covered with film and then left to dry completely. You can walk on fresh surfaces only after 10–15 days, when the concrete has completely hardened.

Stunning pebble pattern
For real craftsmen, it will not be difficult to make beautiful paths in the countryside with your own hands from pebbles - the patterns only require painstaking care and artistic taste. And the result will be the main decoration of the garden for many years.
Fashion trend in design personal plot recently, it has become the manufacture of a pebble path in the country with their own hands. Market building materials offers big choice various materials. Pebbles are one of the few natural and environmentally friendly elements used for road surfaces.
What is it suitable for?
A variety of types of pebbles will emphasize the style inherent in your summer cottage. If the dacha is registered in mediterranean style, then it will be necessary to lay out various mosaic patterns, highlighting many shades and changing the size of the pebbles. When decorating a site in country style, it would be appropriate to use plain gray raw materials of a small, or better yet, very fine fraction.
These tracks have practical application
When the house is decorated in high-tech style, you can complement the existing main approaches to housing with thin paths made of small stones, dividing different areas of your garden according to their intended purpose. If there is a reservoir in the area or Alpine slide large pebbles and paths paved with them will be an excellent completion of the landscape design.
Video "Do-it-yourself pebble path"
From this video you will learn how to make in the country beautiful path from pebbles with your own hands:
Paving technology
If all the prescribed points are observed, any summer resident will be able to lay pebbles on his site:
- We will mark the path. We determine the width ourselves. Usually it is from 0.9 to 1.5 m. The terrain may not always allow this, then the minimum width should not be less than 50 cm. We use pegs and a cord.
- According to the marked width, we dig a trench to a depth of 20 cm. More or less depends on the size of the pebbles: the larger they are, the greater the depth, and vice versa.
- We lay geotextiles in two layers on the bottom. Its use will protect the path from the germination of weeds.
- We pour a layer of sand, and after that - crushed stone. We fill the volume of the trench with a sand-gravel mixture to two-thirds of the depth and be sure to wet it. The installation of such a cushion is necessary so that later during operation the track does not have cracks or other defects.
- We will install tiles or curb stones along the edges of the trench. Fill the entire area ready-made solution cement-sand mixture, in a ratio of 1:3/3.5. Using a level, check the horizontalness of the filled surface.
- We lay the pebbles using a board and a hammer. We put it halfway into the solution, which is still damp. The stones are placed as close to each other as possible. They can be installed either lengthwise or flat, depending on the design.
- We will take measures to allow the solution to harden slowly: cover it with film and water it periodically. This must be done so that our path does not have cracks.
After finishing the work, the path should stand under the film for several weeks and dry.
When performing this work you will need:
- shovel;
- rake;
- a beam whose length will correspond to the width of the path;
- level, construction corner;
- brush;
- hammer.
Material selection
To determine the material of the path, it is important to know that pebbles can be:
- marine;
- river;
- artificial.
 This material comes in several types
 Sea pebbles differ from river pebbles in a variety of sizes, colors and shades. River has a solid gray-brown tone and a smaller fraction. By size they are distinguished:
- small – up to 2.5 cm;
- medium – 2.5–5 cm;
- large – more than 5 cm.
Let's select the required faction. If we prefer making colored mosaics, then it would be more suitable fake diamond medium or large fraction. And if it’s only important functional use paths for their intended purpose, then small river pebbles will be enough. The use of natural material will allow it to last longer. If there is a pond in the immediate vicinity, you can use pebbles taken directly from the river. So you can save on the purchase of basic raw materials.
Direct installation
Before starting work, you need to make sure that all sections of the future path are horizontal. The installation work is carried out in a wet solution, so everything must be done before the mixture hardens. When doing mosaic laying, it is necessary to lay out the design next to the future location. If the pebble has various colors and sizes, you should pre-sort it. With wet laying without patterns, the pebbles are placed very tightly. With the help of a plank and a hammer, the surface of the future path is leveled.
If they are making a mosaic, then a sketch of the design, which is located nearby, is applied to the solution. Until the mixture has hardened, the drawing is carefully transferred to the planned place. Aligned with a hammer with a rail. When laying pebble mosaics, there is no need to clearly align each stone parallel to one another. If the drawing is done perfectly straight, it will lose its naturalness, so don’t waste your energy. Start paving round shapes of mosaics from the middle. This will keep the pattern fairly symmetrical. When using stones of different sizes, try to work out the larger elements first.
When laying, the mortar between the stones may be unevenly distributed. To avoid this, you need to smooth out all these irregularities with a brush. After everything is done, you need to thoroughly water the laid path and cover it until completely dry.
A properly laid pebble path is practical and requires minimal maintenance. After heavy rainfall, especially after winter, it is recommended to treat the seams of your walkway with a special impregnation to increase the elasticity of the cement coating. If you don't do this, then over time cement mixture will crack and the cracks will fill with earth or sand. If you did not use geotextiles when arranging the path, then after some time you will have to deal with removing weeds from your paths. If certain sections of the path are destroyed, they must be repaired using building mixtures and glue.
Now on your site there will be modern paths made of pebbles, which will allow you to maintain cleanliness and order in the street and in the house in any weather. Appearance the estate will become more solid and neat.
We advise you to read
 What is "desu"? And how to understand an anime fan? See what “desu” is in other dictionaries How desu is translated
 How many glasses of water a day should you drink - useful and dangerous doses
 Interpretation of dreams according to the best online dream books
 Meeting of the Coordinating Council in the Department of Education of the Kolomna City District