A wooden fence, along with all kinds of hedges, has always been an important design attribute. garden landscape. Such designs are quite multifunctional, because. serve as delimiters of private property, as well as decorative elements. On the one hand, the fence closes the area from the penetration of prying eyes, street animals and intruders. On the other hand, they are an aesthetic hedge, harmoniously combined with the landscape composition. How to make a fence from the boards will be discussed in this article.
- Checkerboard fence from terrace board. In this design, the processed boards are fastened with an overlap of 1/3 to the veins in a checkerboard pattern, regardless of the type of laying - vertical or horizontal.
- Solid fence - the most common type of fence, which will require material with a moisture content of more than 14%. During the construction of the boards are fixed closely so that there are no gaps and clearance.
- Ladder - a design in which boards are mounted overlapping each other, adhering to a horizontal orientation at a small angle.
- Palisade - stakes driven deep into the soil.
- Picket fence - a fence, during the installation of which a special board is fixed in a vertical position, leaving gaps between the wooden planks.
- Ranch - a type of fence, which consists of low pillars, to which rails (beams) are attached. This fence is decorative.
Board fence. Photo:


Advantages and disadvantages
The construction of a wooden fence remained relevant at all times. Owners of summer cottages and country cottages often prefer this type of fence, since it has such undeniable advantages as:
- Environmental friendliness. Unedged board fence is completely made of natural material, which has characteristic structure, color and even smell.
- Affordable cost. Wooden fences are much cheaper for site owners than metal or reinforced concrete counterparts.
- High aesthetic qualities. The fence can be made in absolutely any style, choosing for this a suitable type of wood with a unique texture.
- Ease of construction. Even a novice master can build a fence from boards with his own hands, because. the process does not require special skills, knowledge and the involvement of any equipment.
- Design variability. There are many design ideas wooden fence, as well as methods of its construction, which will allow you to choose the maximum suitable design under the general design of the garden landscape.
Of the shortcomings of this type fences can only be allocated a short service life, tk. a wooden fence will last an average of 7-10 years. However, these indicators are relative, since they depend on the individual characteristics of the soil and climate of a particular area. Weather conditions, insect damage, humidity, intensity solar radiation- all these factors negatively affect the condition of the wood. But in any case, there remains the option of caring for a fence made of natural material, which will be discussed below.

Choice of wood
Before proceeding with the construction of the structure, it is necessary to determine how many boards are needed for the fence and what type of material should be chosen. Experts recommend giving preference to such raw materials as:
- planed board (universal for all types of fences);
- decorative material (artificially aged);
- deck board for the fence;
- unedged material.
The best performance characteristics are observed in such types of wood as:
- pine;
- larch;
- cedar;
- alder;
- ash;
- aspen.

How to build a fence from boards: construction technique
Undoubtedly, a wooden fence is the most popular fence design due to its cost and ease of construction. However, it is worth considering the fact that the durability of the operation of the fence largely depends not only on care, but also on the correctness of its construction. Let us consider in more detail each stage of the installation of a wooden picket fence.
Support construction
- The initial task in the construction of the fence is the installation of strong load-bearing pillars. The material for their manufacture can be wood, metal or concrete. In this example, consider the installation of supports from a square metal profile, the length of which was 6 m, width - 6 cm.
- To begin with, the profile must be cut into separate fragments measuring 200x40 cm. An ordinary grinder is suitable for this purpose.
- Then with the help welding machine it is necessary to attach metal covers on top to prevent atmospheric precipitation from getting inside. For greater reliability, it is worth covering the pillars with paint.
- The part of the support that will be in the ground must be processed bituminous mastic to increase the service life.
- Next, we pull the cord in the area where the location of the supporting pillars is planned. We fasten the lace.
- Using a garden drill, we make indentations in the ground. The diameter of the auger should be at least 13 cm, and the depth of the hole should be 90 cm. To simplify the task and speed up the drilling process, attach a white electrical tape to the auger, which will determine the desired depth indicator. This eliminates the need to measure each cavity separately.
- Then you need to cut off a fragment of roofing material, roll it up and lower it into the resulting hole. This will provide waterproofing properties for the metal parts of the fence and extend their service life.
- After that, we align the supports vertically, fill them with gravel or gravel and ram them with a heavy crowbar or vibrating plate, if one is available.
- In order for the fence posts from the edged board to be at the same height of 150 cm above the ground, it is necessary to use a hydraulic level - a special device in the form of two flasks with water connected by a hose. The principle of operation is as follows: one flask is fixed on the first support, and another container is leaning against the second column. Raising or lowering the metal rod in the pit, the water level in both flasks is equalized. This makes it possible to set all supports at the same height.
- Next, we fix and fall asleep with gravel everything metal poles along the perimeter of the future fence.
- The next step is to install the veins on which the boards will be attached. To do this, you can use both wooden bars and metal profiles, processed and painted from the effects of precipitation. The latter are more reliable and durable.
- We fix the profile measuring 2 cm x 4 cm to the supports with bolts and nuts. To do this, drill holes, insert a bolt and tighten to the maximum with a nut.
- For even fastening, it is important to check the level of the horizontal lag.
- On this, the support for the wooden fence is ready and you can proceed with the installation of the boards.

Fastening boards
For the fence, we will prepare clefts measuring 600x10x2 cm. The edges must be processed with a planer, and the boards should be cut so that fragments 180 cm high are obtained. To save paint, it is advisable to process all the roughness and irregularities grinder or Bulgarian. Further actions are performed in the following sequence:
- We apply a special antiseptic impregnation to each board, which will protect the material from decay, damage by insects and the appearance of fungus. To do this, you can use the usual paint brush.
- After complete drying, it is necessary to paint the gaps with moisture-resistant paint or an oil-based composition. When the layer is completely dry, you can begin mounting the house on the frame.
- To fix the boards on the logs, you will need self-tapping screws with a drill at the end, the length of which will be 41 mm. For one board you will need 2 screws. The work is done with a screwdriver.
- If the holes are made with great difficulty, you must first make grooves with a drill, and then tighten the screw.
- We fasten wooden boards to the veins at a distance of 5-8 cm from each other. We check the height and location using the hydraulic level. We carry out the process along the entire length of the fence.
- At the end, it is necessary to prepare a nylon thread, which should be fixed with a cost stapler on last board fences.
- Align all the boards of the fence according to its height. This completes the fence construction process.
If desired, you can decorate the fence by placing bright flower pots or country-style elements (a cartwheel, ropes, a bench, etc.) around the perimeter.

Caring for a wooden fence
In order for a wicker fence made of boards to serve for more than a dozen years, it is necessary to properly care for it. The recommendations of experts are reduced to the following aspects:
- Without fail, the boards must be coated with an antiseptic composition or flame retardant, after which ordinary paint, varnish or stain is applied. Such solutions guarantee protection from harmful microorganisms, atmospheric precipitation, rotting, etc. undesirable phenomena.
- You can also treat the fence with fire retardant impregnation, which creates a protective barrier against wood fires.
- It is advisable to use galvanized fasteners, which should also be immersed in drying oil before fastening.
- If the affected areas are still found on the boards, they must be carefully cut off. After removal, the edges must be treated with a wood strengthening agent. After the final drying of the treated fragment, it must be puttied with a special compound for natural wood based on fiberglass.
- Impregnation with protective compounds is carried out every 2 years.
Board fence. Video:
Making and installing a wooden fence with your own hands allows you not only to save effort and money, but also to logically complete the site design ensemble. As a result, here, under the reliable protection of an attractive and durable fence, an atmosphere of genuine home peace, warmth and comfort will immediately settle down. But building a fence made of wood - a very capricious material - requires thorough preparation. And it is best to start it with a fascinating acquaintance with a variety of constructive and design solutions. After all, after making a choice it will not be difficult at all.
Wood in the construction of fences: advantages and disadvantages
Wood is an inexpensive and convenient material for technical processing and decoration, which is traditionally used in the construction of fences for private areas.
Despite the availability of more durable and practical material solutions - euro fence, metal, corrugated board, brick or stone - the demand for wooden fences will always be high.
The reason for this is the tree's list of virtues, which includes:
- environmental friendliness;
- unique decorative qualities;
- a wide selection of textures and shades of wood species;
- ease of processing;
- ease of installation;
- simple replacement of structural elements of the fence during operation;
- low cost.
Wood is an environmentally friendly natural material that is perfectly combined with other building materials and is able to harmoniously fit into any decision on the design of the fenced area. For the construction of a wooden fence, one, maximum two pairs of working hands is enough and no special knowledge, skills and tools are required. It is noteworthy that wooden fences are much cheaper than brick or metal ones, and their construction takes much more time. less strength and time. And most importantly: a wide variety of wood species, as well as design and decoration methods, open up the widest scope for design ideas not only during construction, but also directly during the operation of the fence.
Along with the advantages, the tree has a number of disadvantages, which must be taken into account when choosing this material.
The disadvantages of wooden fences include:
- Fire hazard.
- Low resistance to climatic factors.
- Attractiveness to pests.
- susceptibility to decay.
- Short service life (about 10 years).
To partially compensate for these shortcomings, the wood used in construction must be treated with flame retardant, antiseptic and pest repellents. In addition, the material must be reliably protected from moisture, dampness and sudden changes in temperature. All this attracts additional expenses money and time both at the construction stage and during the operation of the fence.
Good to know: In practice, various methods are used to increase the service life of wooden fences. So, in order to prevent soaking and rotting of the support poles (if they are made of wood) and the picket fence, their upper ends are closed with plastic plugs or other suitable material. For the same purpose, the lower edge of the fence canvas is placed at a height of at least 15 cm from the soil level. Finally, during the operation of the fence, it is necessary to regularly mow the grass growing nearby, not forgetting to carefully monitor the condition of the transverse logs and their attachment points to the supports.
Variety, types
So, the construction of the fence can be performed in order to:
- designation of the boundaries of the territory;
- ensuring privacy (protection of what is happening inside the perimeter from prying eyes and ears);
- protection against unauthorized entry;
- reducing the intensity of external noise or wind load;
- fencing of potentially dangerous areas (roads, cliffs along the banks of rivers and reservoirs, steep slopes etc.);
- decorative design of the site.
In accordance with the purpose of the fence, its design is selected, which can be:
- Deaf.
- Trellised (with gaps).
- Combined.
When choosing the type of fence construction, one should not forget about its design. The fence should fit into the existing landscape and be in harmony with the design of the objects located in the fenced area.
The most widely used are the following options for the design of wooden fences:
- "classic";
It is a simple solid or ventilated structure with metal or wooden supports installed in bottles or on concrete, wooden beam crossbeams and sheathing from standard edged boards.
- fence (vertical or horizontal);
As a sheathing for such a fence, a picket fence is used - a thin plank with a straight or beveled upper end. Sheathing can be installed both vertically and horizontally with or without clearance.
- lattice;
The sheathing of the lattice fence is equal-wide strips (slats) installed crosswise vertically, horizontally or at an angle of 45 °. Laths are mounted with a gap or close at the same distance from each other or in groups, which allows you to create a decorative pattern of the fence canvas.
- "chess" (deaf or with clearance);
A complicated version of the picket fence with a deaf or blown staggered arrangement of the skin on both sides of the fence. The elements of the staggered cladding are installed with a slight offset in a vertical, horizontal position or diagonally across the canvas.
- ladder (herringbone);
The cladding elements of such a fence are mounted with clearance or overlapped at a certain angle along the longitudinal axis (vertically or horizontally). The rotation of the fence boards is provided with the help of calibrated gaskets.
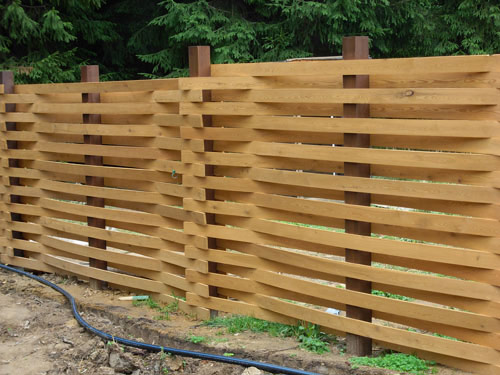
- network;
canvas wicker fence represents thin strips or branches of the vine, braiding vertical or horizontal edges load-bearing frame. Braid is quite difficult to manufacture, but provides high resistance to force and has bright decorative qualities.
- palisade;
The palisade fence is a solid canvas made of logs with pointed ends. Such fences are difficult to overcome and, moreover, to break, besides, they provide complete privacy of the territory inside the perimeter of the fence, as well as excellent sound and wind insulation.
- log paving;
The log fence is mounted from tightly fitting horizontally located logs. The latter can be solid or sawn along the longitudinal axis. Log paving is a serious barrier for intruders and provides reliable concealment of what is happening inside the perimeter of the fence from prying eyes and ears.
- "ranch";
An open-type fencing, the canvas of which consists of several crossbars, additionally fastened with lags located diagonally. Fences "ranch" serve to mark the boundaries private territory or protection against the penetration of large animals, although they can also perform decorative functions.
- "cross".
The supports of such a fence, which are installed in most cases on a separate or tape concrete base, are equipped with side grooves into which longitudinal sheathing elements are inserted - fence boards or beams of appropriate thickness. Another version of the cross-style fence has a horizontal sheathing, which is mounted on vertical crossbars, based on support pillars and a concrete foundation.
This is not the whole classification. So, fences of the “vertical picket fence” group are found in such varieties as:
- solid palisade;
- palisade with gaps;
- cat or dog ears;
- private;
- peak;
- concave or convex, etc.
Good to know: In practice, combinations are often used various types structures, which gives the fence an original appearance, and in some cases additional resistance to force.
Original designs in the photo: decorating a summer house or a private house
Wooden fence along the road  Deaf wooden fence with the functions of protection and ensuring the privacy of the territory
  Wooden fence with combined cladding
  Decorative vertical picket fence
  Concave vertical fence
  A solid canvas of a fence from a horizontal picket fence
  Combined style horizontal log fence
  Rounded wooden picket fence as part of a convex canvas of a wooden fence
  Fence in the style of "cross" with brick pillars
  Fence in the style of "ranch" for the protection of the suburban area
  Wooden fence with a horizontal log crate
  Wooden fence in the style of "solid palisade"
  Wooden fence with woven fabric construction
Preparation for construction
The construction of a wooden fence, like any other object, begins with the design. To solve this problem, you will need a cadastral plan of the fenced area, where the perimeter of the latter is indicated. If there is no plan at hand, the measurements will have to be performed independently.
The perimeter value is the basis for further design, so it must be calculated with maximum accuracy. The data obtained should be transferred to a pre-drawn diagram of the site on a scale. In the future, this will facilitate the task of calculating the size and number of sections of the fence, as well as creating a working sketch of the latter.
Territory marking
To mark the site for the future fence, you will need wooden or metal pegs about 60 cm long, twine (or linen rope) and a hammer. First of all, by driving a peg into the ground, you need to set the corner marks.
The next step is to determine the location of the gate and the entrance gate. As a rule, they are placed together. The standard width of the gate is 1–1.5 m, and the size of the gate is taken in the range of 2–2.5 m, but in practice it all depends on the needs of the site owner.
Please note: When marking the territory, it is necessary to take into account the thickness of the supports, and if they are planned to be installed on the foundation, then its width. To do this, you need to use 2 rows of marks - along the outer and inner edges of the supporting posts or foundation.
At the end of the design survey, the results obtained should be transferred to the plan of the fenced area. This will allow you to see the big picture and quickly eliminate errors made during planning.
What materials to choose?
The next step after the development of the main plan is the selection and calculation of materials for the construction of the fence. For this you need:
- decide what material the support pillars will be made of;
- accept the method of mounting supports;
- calculate the main parameters of the fence (number of supports, section sizes and the number of transverse logs);
- determine the material from which the skin will be made;
- calculate the volume of sheathing (the number of fence boards 1.8 m long);
- determine the method of installing transverse logs and cladding, as well as select the type and calculate the number of fasteners.
The choice of material for support poles is not difficult: the most preferred option is metal profile pipe section 60 * 60 mm (for corner supports) and 50 * 50 (for intermediate columns). Proper preparation for operation and proper installation will ensure the service life of such supports for at least 30 years.
If the soil in the fenced area belongs to the category of inactive, i.e. when the seasons change, its layers practically do not move, and groundwater occurs at great depths (below 1.5 m), the supporting pillars of a wooden fence can be installed by backfilling or partial concreting.
Finally, as a transverse log for a fence with a section length of 2.5 m and a web height of 1.8 m, it is advisable to use wooden bars with a cross section of at least 40 * 40 mm.
Calculation
When designing, a number of design requirements that apply to wooden fences should be taken into account. Strict observance of these requirements will allow you to create a truly reliable, strong and durable fence.
Basic design requirements:
- The size of the section should not exceed 2.5 m in order to avoid sagging of the transverse logs under the weight of the skin.
- Support posts are installed in the soil to a depth equal to the freezing depth of the latter (80–120 cm), but not less than a quarter of their total length. When choosing a method of mounting supports, you need to take into account the level ground water, as well as the soil composition, which affects the behavior of the soil during the change of seasons.
- To give the fence the necessary reliability and stability, the corner supports, as well as the side posts of the gates and gates, must be thicker than the intermediate ones.
- The bottom line of the fence canvas should be at least 15 cm above the soil level.
- Support posts should be at least 10 cm higher than the fence canvas.
Good to know: If there are irregularities or a slight slope on the site, it is advisable to level the soil. This will greatly simplify the task of installing the fence structure.
The calculation of the fence parameters is carried out in several stages:
- Let's assume that the plot has the shape of a trapezoid with bases 29 and 40 m long and sides measuring 25 and 20 m. The perimeter value is calculated by summing all sides of the figure:
P \u003d 29 + 40 + 20 + 25 \u003d 114 m;
- If the gate and the gate are installed side by side on the line of the small base of the trapezoid, the length of the fence on this side of the site will be the difference between the total length of the segment and the total width of the gate and the entrance:
l 1 \u003d 29 - (1.5 + 2.5) \u003d 25 m;
- In this case, the total length of the fence will be:
L \u003d 25 + 40 + 20 + 25 \u003d 110 m;
- Now you can count the number of fence sections, each of which is 2.5 m long:
n sections \u003d L / l sections \u003d 110 / 2.5 \u003d 44;
- Having the exact number of sections, we calculate the number of supporting pillars using the formula:
N supports = n + 1 = 44+ 1 = 45;
Please note: Corner supports and posts on the sides of the gate and wicket must be thicker than the intermediate ones. Their number is 6 pieces - 4 at the corners of the site and 2 at the entrance and gate. Accordingly, the number of intermediate supports will be equal to: 45 - 6 = 39 pcs.
- Next, you need to calculate the height of the support pillars. With a soil freezing depth of 80 cm, a fence height of 1.8 m, and also taking into account the requirements for the height of the supports, it turns out that the total length of each of them will be:
L supports \u003d 1.8 + 0.1 + 0.15 + 0.8 \u003d 2.85 m;
- The last step in the preliminary calculations is to determine the number of transverse lags of the fence. If we take the height of the latter equal to 1.8 m, 2 crossbars will be needed for each of the sections. Thus, the total number of lags will be:
n lag = n sections * 2 = 44 * 2 = 88;
As a result of the calculations, we get the exact number of structural elements of the fence:
- 39 intermediate supports;
- 6 corner supports;
- 88 transverse logs.
On this, the main calculations within the framework of the fencing project can be considered completed. To start practical implementation project, it remains to choose the skin material and calculate its volume.
What boards to choose for sheathing?
The choice of fence sheathing depends on the style of the latter, as well as on the method of protecting the wood. As a rule, conifers are chosen for outdoor fences with a predominantly protective function - pine, spruce or cedar.
If the priority in designing the appearance of the fence was given to its decorative qualities, hardwoods - oak, beech, ash and birch are much better suited for sheathing. The strength indicators of such a fence will be low, but with proper processing it will look very expressive.
Cedar belongs to expensive and rare conifers. It is distinguished by the presence of a bright and beautiful texture, as well as high wear resistance.
As for oak fences, they are not common - their construction is too expensive.
Other types of deciduous and coniferous trees although they have good flexibility and fracture strength, they are poorly resistant to moisture, so they are practically not used in the construction of fences.
The most affordable and cheapest wood is pine and spruce. It is densely saturated with resin, which is an excellent protection against dampness, mold and decay, and has an optimal humidity for outdoor use (15-20% when dried properly). Spruce wood is softer than pine, so it is easier to cut. But in terms of knotty material, spruce species are certainly in the lead: in pine, knots begin at a considerable height, while in spruce - almost immediately from the ground.
Please note: If spruce or pine is chosen for cladding a wooden fence, you should prepare in advance for the fact that these species show an increased tendency to crack. This spruce and pine wood is due to the nature of the fibers and the abundance of knots. This means that the material must be bought with some margin, since part of it will inevitably go to waste.
Fence sheathing calculation
The last step before going to the building materials store is to calculate the number of fence boards needed to create the canvas of the fence under construction. This value is calculated as follows:
- First you need to take the amount of clearance between the fences. Suppose it will be equal to 4 cm.
- We measure the width of one fence board. Let it be equal to 15 cm.
- The length of one section of the fence is known - it is 2.5 m, i.e. 250 cm. If the boards were installed closely, 16 units could go to the section. But with a 4 cm clearance, this number can be safely reduced to 13.
- We check the correctness of our choice. The total width of the boards will be: 13 * 15 \u003d 195 cm. Then the width of the gaps between the boards (taking into account the fact that there will be 1 more gaps than the picket) will be equal to: (13 + 1) * 4 \u003d 52 cm. Together it will come out: 195 + 56 = 251 cm, which differs by only 1 cm from the value of the length of the fence section, and this value can be easily compensated by increasing the size of the extreme gaps by 0.5 cm.
- We calculate the number of boards required for sheathing the entire fence (without the gate leaf and wicket): 13 * 44 \u003d 572 pcs.
Good to know: A standard wooden fence has a thickness of 1.5 - 2.5 cm. This value is important when calculating the volume of boards required for fence sheathing. So, with a fence height of 180 cm, a board width of 15 cm and a thickness of 2 cm, the sheathing volume will be: 180 * 15 * 2 * 572 \u003d 3,088,800 cm 3 or almost 3.1 cubic meters.
construction tool
Preparation for the construction of a wooden fence includes the collection of tools that will greatly simplify and greatly speed up the work. This list should include:
- jigsaw;
- circular saw with discs for metal;
- welding machine;
- wood saw;
- electric drill with a set of drills for wood and metal;
- shovel and crowbar;
- garden earth drill;
- hammer and pliers;
- a set of screwdrivers and wrenches;
- electric planer;
- emery on wood;
- brushes for processing wood with a protective compound and paint;
- building level and plumb;
- measuring cord (twine);
- construction tape.
Please note: In the process of building a fence, you will definitely need fasteners. For a simple fence, galvanized nails can be used, but self-tapping screws or bolted connections are much more durable. It is noteworthy that for the latter, you will have to prepare through holes in the picket fence and transverse lags in advance.
How to make a wooden fence with your own hands: step by step instructions
The construction of a wooden fence can be divided into three stages:
- Installation of supporting pillars.
- Installation of crossbars.
- Frame sheathing.
Each of them deserves a more detailed description.
Installation of supports
Let's assume that the soil in the fenced area allows the installation of supporting fence posts using the backfilling method. Consider how this is done using the example of one of the supports:
- Using a garden drill, a crowbar and a shovel, in one of the corners of the site we make a hole 1–1.2 m deep and 40–50 cm in diameter.
- At the bottom of the pit we lay and carefully tamp a sand cushion 10–15 cm thick.
- Place a support in the center of the hole. This is a profile pipe. square section, the outer edges of which should be parallel to both sleeves of the fence.
- At a height of 20-25 cm at the bottom of the pit, we pour a mixture of crushed stone with sand and carefully tamp it down.
- We check the vertical of the support and the parallelism of its faces to the sleeves of the fence.
- We fall asleep the next portion of the pillow of sand and gravel, tamp it down and again check the position of the support. And so to the very top of the pit.
Good to know: The sand-stone pillow will lie more densely during the backfilling process if it is abundantly moistened with water, while not forgetting to add sand.
Installation of transverse logs
Fence crossbars made of wooden beams are most conveniently mounted using homemade brackets. They are made of a metal corner 35*35 mm. But in order to save time and materials, ready-made brackets can simply be bought at the store.
Installing the lag is done as follows:

Please note: The distance between the lags can be reduced if necessary, but this will adversely affect the strength of the fence along the upper and lower edges of the web. The support should be at least 5-10 cm above the sheathing, and the bottom of the latter should be at least 10-15 cm from the soil line.
Frame sheathing
Before proceeding with the installation of fence boards, we note that there are at least two ways to solve this problem. One is that the fence is mounted on the logs before the latter are installed on the supports:
- First of all, you need to set the crossbars at the right distance from each other, observing a single plane. This can be done using pre-prepared coasters from improvised materials.
- It does not hurt to make templates in advance, with which it is convenient to lay out the gaps between the boards.
- The lower (or upper) edge of the canvas also does not hurt to put under the ruler. As such, you can use any of the remaining crossbars, set at the desired distance from the mounted one.
- Using self-tapping screws or bolts, we mount the fence boards on the transverse logs. In this case, care must be taken not to cause deflection or any other stress in the web structure.
- We raise the finished canvas of the fence and fix it with bolts on the previously welded brackets. This will require at least two pairs of working hands. In addition, you will have to prepare stands 10–15 cm high. With their help, it will be much easier to fix the canvas with lags on the brackets, which is necessary for successful landing bolted structures.
- If the fence boards were installed without deforming the crossbars, and the latter were set exactly, their ends will easily fit on the brackets.
Please note: The second way to install the sheathing is to install each board separately. With this approach, it becomes more difficult to place the fence boards in a strictly vertical position and at an equal distance from each other, and tension is also created in the web structure due to the deflection of the crossbars under the weight of the skin.
Protection and finishing: how to cover and paint
The wooden fence is operated in the open air all year round. This means that all structural elements need to be reliable protection from moisture, temperature fluctuations, pests, rust and fire.
Good to know: metal elements fence frame, especially in areas with welded and bolted connections must be primed and painted prior to installation. Before starting the main work, it also does not hurt to remember that the legs of the supporting pillars installed in the ground need additional waterproofing. It can be done with roofing felt or bitumen. But first, to isolate the internal space of the profile pipe, it is necessary to weld plugs on its lower and upper ends.
In addition to moisture, harmful microorganisms and pests, ultraviolet radiation leads to a decrease in the life of a wooden fence. It accelerates the oxidation of wood fibers and evaporates the moisture contained in it. As a result wooden elements fences lose not only their external attractiveness, but also their bearing capacity. To exclude premature wear of the structure, when applying the impregnation, it is recommended to use special additives - UV hardeners.
The impregnating composition is laid in several layers on the primer deep penetration. Primed and impregnated wooden surfaces are covered with moisture-resistant varnish or paint, which serve as the finishing touch in protecting the fence from aggressive operating factors.
Please note: Primers and impregnations change the color of wood, which must be taken into account when designing a wooden fence design.
The condition of the wooden fence must be closely monitored throughout the entire period of operation. Any damage or material wear should be repaired immediately, which will significantly increase the service life of the structure. As for the choice of how to design a wooden fence, it depends on many factors, the main ones being the aesthetic preferences of the site owner and his financial capabilities. For example, a finished fence can be decorated or even reinforced with forging, giving it an original color by experimenting with impregnations and top coat, decorate with glass or stone inserts, etc. At the same time, you can decorate the fence gradually, the main thing is to reliably protect it from destruction by moisture, pests and fading in the sun at the very beginning.
Video: We build a wooden fence on our own
Building a wooden fence with your own hands requires careful preparation. Even at the design stage, you need to carefully study the building materials market and try to determine the conditions under which the fence will be operated. By paying close attention to the basic design requirements as well as the vagaries of the underlying material independent construction fence will take a minimum of effort and bring maximum pleasure and benefit.
Wooden fences among the owners of summer cottages are extremely popular. Nevertheless, sometimes you can hear how wood is called a cheap material, boring and boring. Whereas true connoisseurs understand that natural material is always beautiful, environmentally friendly, modern and stylish. And if the owner of the site has a taste, a wooden fence can look expensive and really impressive.

Peculiarities
The fencing of the territory of the estate is one of the most necessary elements on garden plot, regardless of its size. Such structures can be extremely diverse: carry a decorative function or protect the territory from intruders, be expensive or low-cost, of complex configuration or an ordinary picket fence.
Wood is extremely popular. Wood as a raw material is more expensive than profiled sheet, but cheaper than brick or wrought iron. In favor of the choice of this material is evidenced by such a property as environmental friendliness.
In our age of high technology and a large number of industrial facilities, when the "black sky" regime over cities has become commonplace, many people opt for natural materials. The tree becomes an outlet for people who care about their well-being and that of their loved ones.


A wooden fence can be painted, decorated with unique carvings, which often add chic to the entire garden. But even unpainted wood looks very good. Of course, wood is not as durable as, for example, brick or concrete. However, there are special compounds to treat and protect a wooden fence from fungus or wood bugs. And this will significantly increase the life of the structure. In addition, you can cover the structure with varnish, drying oil or special paint enriched with protective substances. This will also increase its service life.
It is no coincidence that a wooden fence is considered one of the most beautiful. Any wooden houses: not only from a log house or timber, but also those in which only wood-like finishes are used, look very harmonious, complemented by a fence made of the same material. Usually, wood structures easily fit into any design solution.


Advantages and disadvantages
Wood has many advantages, and they are all quite significant.
- Wood is a natural and environmentally friendly material that does not litter the environment. It is light, lively, "breathing", which creates the feeling of a space filled with fresh air. In a plastic or glass interior, this cannot be experienced.
- A wooden fence does not require much effort to care for it; with the help of minimal skills, you can change a board that has failed, and in order to paint a structure, you just need to pick up a paint brush or roller.
- Practicality of structures made of wood. They protect from prying eyes and from bad weather, if properly cared for, they will last a long time. If you choose a durable species, such as larch, oak or ash, this will increase the life of the fence. At the same time, such structures pass air well and do not “suffocate”.
- natural material harmonizes with environment. A wooden fence can even become a real work of art if its owner has a taste. It is possible to decorate it as you like, and if you have the desire and ability, you can do it yourself.


- It is also important to take into account the relatively low cost, as well as simple installation. Even without resorting to the help of professionals, it is possible to create a fence on the site in the shortest possible time. There are very few designs and types that you can’t do yourself.
- A large number of options suitable for most different situations. Wooden fences are so different in appearance that in fact they have only one thing in common - wood material from which they are made.
- Wood is also friendly to other materials, it combines perfectly with them. This makes it possible to come up with more more options design.
- An important fact is that the tree absorbs sounds well. In summer cottages or cottage settlements, the construction of such a fence and getting rid of unnecessary noise can be a big plus.


The disadvantages traditionally include a short service life(maximum ten years), easy flammability if the material has not been subjected to fire protection impregnations, as well as a tendency to soak and rot. However, with proper care and regular treatment with special compounds, the “life” of a wooden fence can be significantly extended. In addition, in the event of damage to one or two boards, there is no need to disassemble the entire structure, it is enough to replace only the part that is out of order.
You also need to take into account the rather low protective ability of wooden fences, unless, of course, this is a stockade with pointed tops. The rest of the species still perform a more decorative function, decorating the site and complementing the architecture of the house building.
Accordingly, if there is a desire (or need) for the fence to protect, it may make sense to consider other, more durable materials or wooden fences in combination, for example, with brick supports.


Kinds
When choosing a fence for your site, each homeowner draws his own conclusions: how much it costs to build one or another type of fence, which types are most popular, and which ones are durable. It is the tree that unique material, from which, if desired, you can build a thousand fences, while never repeating.
There are several types of wooden fences:
- classical;
- palisade;
- log paving;
- fence;
- ladder (herringbone);
- blinds;
- ranch;
- wattle;
- lattice.


A classic wooden fence consists of boards fitted to each other with a solid canvas, which can be either vertical or horizontal. You can put it on a brick or stone foundation, or you can frame it with columns. This option is universal, applicable in almost any situation and for any site.
Unlike the classic picket fence, the canvas is formed strictly vertically. As the name suggests, this type consists of stakes driven into the ground. This is a very aggressive type of fence, especially if the upper ends of the logs are sharpened. In addition, due to the density, this fence requires a large amount of material, so it may not be too cheap. Of all types of wooden fences, this one gives the most better protection, since there are few people who want to climb over the sharp peaks of the palisade.
Modern palisades look lighter than traditional ones; stakes are not always butt-fitted to each other. There are some fun designs, like lances that are painted and sharpened like pencils. The elements of the palisade, framed by stone pillars and foundations, look original.


In log paving, logs tightly fitted to each other are laid horizontally, vertically or at an angle. In order to join more tightly, the logs are sawn in half.
As for the picket fence, it is traditionally used for fencing exclusively summer cottages. Protection is not its function, as a rule, this type of fence is low and sparse, most often it is installed to mark the site. Although you can give it the desired height and reduce the width of the gaps, in this way, the temporary fence will turn into a full-fledged fence.
You can increase the aesthetic appeal of the fence by creating the necessary combination of pattern, spacing between the planks and the shape of the top edge, suitable for a particular area. This type is easy to install and inexpensive, but does not withstand mechanical stress. A low picket fence is ideally complemented by climbing plants.


This kind of picket fence as a "checkerboard" is distinguished by some as an independent form. Since each side of it is front due to the installation of the crate on the longitudinal logs, this option is extremely attractive and also durable.
An interesting solution to the chessboard, when the bottom of the board is fitted tightly, and gaps are left on top. Thus, the design achieves a balance between privacy and openness.
When constructing a Christmas tree (ladder), the boards are installed horizontally and overlapped, and due to the specific design of the fence, complete opacity is ensured with excellent ventilation.


For the construction of blinds, the boards are placed vertically or horizontally with a slight slope and stacked on top of each other by 1 or 2 cm. This method reliably hides from prying eyes. At the same time, a fence of this design allows air to pass through well, therefore it is relevant for wetlands and areas located in lowlands. You can fix the structure on metal poles.
Wattle (tyn) - again, from the name it is clear that this is a structure woven from shrubs or tree shoots. She is very beautiful, elegant, but extremely fragile. To maintain an aesthetically attractive appearance, it is necessary to periodically “weave” broken branches into the structure and cut off shoots growing in the wrong direction.


Such a fence looks interesting when it is woven for a flower bed to protect it from animal access. It is even more original when several flower beds are braided in this way. Also, to create this kind of fence, you can use wooden boxes.
However, it would be wrong to say that a wicker fence cannot be made of boards. On the contrary, such fences are popular, although more expensive. The most durable and solid among them is a wicker fence with brick pillars. It is very expensive, and its installation takes a lot of time, but the result can exceed all expectations.
A wicker fence with metal posts looks very impressive. It is being built much faster and easier, much cheaper than even a similar design with false pillars.


Ranch - this type of fencing came from America, where it is very popular. In Russia, it is no less popular, although it is called "fence". It is used, as a rule, for zoning a front garden, as well as fencing a place for walking farm animals. The “ranch” option, installed on a stone support with stone pillars, does not look beaten.
The most decorative of all types is the lattice. Planks can be placed at an angle, crosswise or braided, in any case it will come out aesthetically attractive. If you combine several types of “weaving” planks on one canvas, the fence will look even more spectacular. The lattice used as a support looks very nice. climbing plants or decorated with small baskets of flowers.
Lattice fence is the most suitable type of fencing for decoration.


The listed species are the main ones, other subspecies are derived from them. You can list for a long time: cat ears, dog ears, peak, concave, double concave, convex - these are all types of fences. Each type performs its functions in accordance with the needs of the owner.
There are also options that combine two types of fences, for example, wickerwork and checkerboard or lattice and checkerboard.


materials
Most often, fences designed to protect the site are constructed using conifers: larch, spruce, cedar, pine. It should be borne in mind that pine is not the most durable material. To build a fence made of wood, any breed will do. The main thing is the quality of the wood.
If you need to get by with a minimum of funds, then perfect option- pine or spruce boards treated with an antiseptic, which contains olive oil. However, it must be remembered that spruce is an extremely knotty material, subject, like pine, to increased cracking. However, sawing these rocks is much easier due to their softness.
It should be noted that during the construction of a wooden fence there are two options: budget and expensive. The most expensive option is larch.


If you expect exclusively decorative qualities from the fence, it is better to opt for hardwood: birch, beech, ash. The strength of this design may be low, but it will look very attractive.
Support poles can be made of bricks, timber, metal profiles, pipes and screw piles. Preferably brick or piles.
Depending on the type of fence being constructed, the material for its sheathing is also selected - logs (rounded or not), timber, boards, picket fence.
Having stopped on a log, it should be remembered that the fence made of it is extremely heavy, requires a more solid support, but at the same time it is highly durable and reliable.


As for the beam, it is divided into several types:
- whole;
- profiled;
- glued;
- spliced;
- double.
A bar is also a massive material, which makes the fence very heavy and makes it durable. As with choosing a log, a log fence requires very strong supporting posts.

If you decide to use boards, there are three types suitable for fence sheathing:
- planed;
- decorative;
- unedged.

Most often, planed boards are used, they are universal, suitable for any fence. In addition, they are atraumatic, smooth and immediately ready for use.
For decorative boards, only the ends and sides are processed. Then they are aged with a special composition. This species is becoming more and more popular among sophisticated gardeners. The brushing method gives the wood an original texture. The only downside is the material is expensive.
Name " unedged board” speaks for itself - it is not processed by anything. This is economical, but is fraught with splinters, cuts and other minor injuries. Therefore, if this type is acquired, it is better to process it yourself.


The most, perhaps, cheap option for the construction of a wooden fence - this is a slab, that is, a side cut of a log. One side of it is sawn, and the other is raw. We can say that the slab is a type of woodworking waste. Having sanded and cleaned the material from the bark, it is easy to build a practical and beautiful fence. It can be laid both horizontally and vertically, with or without gaps.
It is important to consider that only business slabs can be used for fencing.
However, there is also a more expensive (and high-quality) version of this material - the so-called block house, which in fact is not a pure slab, but its imitation. It is made from coniferous species, it costs several times more. It certainly looks more impressive.


It may be that the owner decides to combine materials by making a fence, for example, from wood and stone. This classic version very attractive and interesting. Stone pillars act as support, they are connected by spans of wood.
If stone supports are not available for any reason, you can replace them with false pillars - metal structures with an indelible pattern that imitates stone or brick. Such poles look like real ones, they can be made according to the customer's sketch - for example, under a tree.


An interesting combination (and very innovative) is offered by designers to bold owners: stones are tightly poured into a double chain-link fence, and the structure is closed with wooden planks from above and below. This structure is called "gabion". It can also be used solo, dividing the space of the garden or recreation area into zones.


Regarding the quality of the material purchased for the construction of the fence, the following can be said.
- The plastic packaging in which the fence boards are located must be transparent. If it is not, then it is better not to make a purchase. In this case, a pig in a poke can not be purchased.
- If there are drops of water inside the package, then the boards are damp; when they dry, deformation may occur.
- Planed boards should not be rough or cracked. Also, they are unacceptable for the presence of chips.
- Screw curvature also speaks of marriage. The boards need to be level.
- Knotty wood is not good, even worse - if the knots fell out.
- The smell should be fresh, woody; the slightest hint of mold also means marriage, that is, rotting.
- The surface of the boards must not be wet.
- It is necessary to treat with doubt the presence of stains of unknown origin and the unnatural color of the boards, this also indicates poor quality material.


Style and design
The fence, both built around the house and located inside the site, should be in harmony directly with the house and other elements of the garden. It can be decorated in any style the owner wishes. Someone paints the fence, preferring this decor method to others. Someone decorates it with carved details, patterns, ornaments. Someone likes plants that twine a fence like a hedge.


You can decorate the fence as you like, as long as it does not change the sense of proportion and style. As for the design, at present, in addition to the standard forms of fencing, a lot of new ones are offered, original variants- convex, concave, wicker, puzzle gates, where each board is given an individual shape, and then they are all tightly fitted to each other in an intricate pattern.


Of course, wood carving remains the most popular solution chosen by owners to decorate their fence.
The thread can be:
- Geometric- this is a very difficult type of activity, since it is necessary to cut a pattern consisting of geometric shapes on the surface of the wood using a special knife and chisel;
- contour– also performed manually; the desired pattern is applied to the wood with a pencil, after which its contour is knocked out with a chisel. The result is a voluminous carved pattern, which can be given depth if the recesses are painted with one shade, and the rest with another;
- Lace- the simplest way, its essence is that on wooden blank apply a pattern. After that, a hole is drilled into which the jigsaw knife is installed, and then they only work with it.


Provence-style fences can be decorated with any elements that come to mind - from birdhouses to flower pots. Fans of country style should take a closer look at the darkened unpainted wood, of course, in good condition.
Regarding the rustic style, we can say that this is the simplest thing that exists, and a minimum of funds is enough to create a fence in this style - the same slab. The effect that such a fence creates, if it was created not hastily, but with taste and, as they say, with soul, is many times greater than the effort expended.


How to do it yourself?
It happens that the owner does not want to resort to the services of professionals, wanting to independently build a wooden fence in his garden. This is quite realistic if you calculate the amount of materials and meticulously follow the points. step by step instructions. Moreover, installing a fence with your own hands can turn into an exciting activity for one person or for the whole family.

Before starting work, you need to calculate how many boards you will need. It is not difficult. It is necessary to divide the length of the proposed fence by the width of the board - if it is planned, for example, to erect a palisade. If the fence is not continuous, then the width of the board is added to the width of the gap, then the length of the fence is divided by this number.
In any case, it is better to purchase boards a little more than required. Especially if they are non-trivial, and it will be difficult to buy them in case of shortage.
However experienced summer resident knows that the store does not sell boards, but cubic meters of wood. But that's not a problem. To find out how many cubic meters of wood will be needed for the construction, you must first multiply the length, width and thickness of one board. After that, we multiply the resulting number by the previously calculated number of boards. Everything is ready, cubic meters are calculated.


The easiest to perform is a picket fence with gaps. For its construction, one cannot do without drawing accessories - rulers, squares, pencils. In addition, you need a hacksaw for wood and, if you plan to cut curly elements, a jigsaw. To dig, you need a shovel; to drill, you need a drill. It is obvious.
The number of required accessories such as self-tapping screws and metal corners should be calculated in advance.


- The beginning of any construction is the marking of the territory and the determination of the line where the fence will pass. This area must be cleared and the old building, if any, dismantled.
- When the length and place are determined, you need to drive in pegs along the entire length of the future fence. As soon as the place for the gate (or gate, or both) is determined, the points of the supporting pillars are marked at a distance of 2 to 3 m between each.
- Next - time to install the base. It can be a foundation or the installation of support pillars. Pillars can be driven in or planted on a concrete base. The depth to which the supports are dug in should not be less than 0.7 m. At this stage, you need to control the height of the supports.
- Part of the supports that enter the ground is recommended to be treated with liquid bitumen, this will significantly strengthen the base, as well as extend the life of the fence as a whole.
- It is most reliable to fill the hole where the support is installed, liquid concrete. Then the supports will definitely not loosen.


- Two crossbars (upper and lower) are attached to the support posts on nails or self-tapping screws. If the fence is high, you can attach a third one - in the middle.
- Form the body of the fence by attaching the boards. The choice of the method of fastening the boards depends on the chosen type of fence and the desire of the owner. If you wish, you can not be limited to a simple horizontal or vertical layout by forming an ornament (having previously thought out how to do this).
- To give additional strength to the structure, it is recommended to attach the boards to pre-installed metal corners.
- After that, it remains to treat the fence with protective compounds, for example, impregnation from moisture.
- For the manufacture of the gate, the canvas is collected separately.


How to make a wooden fence with your own hands, see the following video.
In order for the fence to last as long as possible, it is necessary to properly care for it. Flame retardants and other substances, if treated with wood before installation, will protect it from decay, insects, and sunlight.
Through the use of various types of paint, you can both enhance the qualities of wood and decorate the fence. Currently, paints not only give color, but also carry out a number of protective functions. Before painting, the surface must be thoroughly cleaned and dried, if possible degreased. If there are traces of the old coating, they must be removed with a scraper or a stiff brush.
Most often, staining is done with a brush, less often with an airbrush. It is necessary to paint along the fibers, at least in 2 layers in case of primary painting. If you need to update the paint, one layer is enough. It is better not to start this kind of work in heat, rain or wind.
It must be remembered that not a single, even the most potent remedy, will always work. Therefore, the regularity of processing should become the rule for caring for the fence.


There are a few effective formulations, For example:
- Toplasur Belinka. Suitable for all types of wood. It is not subject to tinting, it is available in ready-made shades. Helps the material withstand adverse weather conditions.
- Holzlasur Gel JOBI. It has the property of repelling water, it adheres well to the surface. Prevents the development of wood diseases (fungus, rot and others). Translucent.
- Pinotex ultra. It has the same properties as the composition above. However, it is opaque, subject to tinting.
- Tikkurila valtti color extra. About 40 shades, protects from direct sunlight and precipitation.
- Olympus Omicron. Protects against factors such as mold, insects, moisture, UV. Has a small consumption, economical. Is tinted.


To extend the life of the fence during the construction period, the following conditions must be met:
- make sure that there are no anthills or overgrown bushes in the area where the fence is planned to be installed;
- impregnate the boards with antiseptics before starting installation;
- after finishing it, prime the entire surface; choose a warm day for this when the tree dries;
- the primer should be made with paint, which contains a lot of natural oils.


To provide the fence with additional protection, a visor is installed on the top of the fence, which is attached to additional slats. This will protect the fence from precipitation. It can be either a visor made of wood, or made of metal or metal-plastic. The color can be either tone-on-tone or contrast with the fence, depending on the general intention of the owner. The shape of the ridge can be different - either an angle, or a semicircular, or in the form of the letter P.
Constant removal of excess grass is necessary to protect the bottom of the fence. The more it grows near the fence, the higher the level of moisture, and this, in turn, can lead to decay. To avoid this, after the grass is removed, gravel can be poured.


Beautiful examples and options
Below are options for different wooden fences - for a private house, cottage, garden. Even in this small sample, you can see how diverse wood can be, harmoniously adapting to any style and side by side with any other material.
- Massive "antique" fences give solidity and status.
- Original wooden picket fence. The simple and elegant version of the lattice looks great on concrete foundation. It is thanks to concrete that the proximity to the lawn does not cause wood decay.


- And you can make a wicker fence made of hazel. The most interesting option Wattle is the original companion for the concrete pad.
- A horizontal fence made of boards, arranged according to the wattle principle, is a very interesting specimen. The upper metal bar in the shape of the letter U reliably protects the wood from precipitation.


- Slab fence on a concrete foundation. A great example of how expensive cheap material can be. Due to the tight fit of the boards to each other, an intricate pattern has developed on the canvas, and the ridge-bar on top protects from the destructive environmental factors.
- Antique wooden fence in country style with imitation of rope stitches. Deliberately simple technique at the same time looks very unusual.


- A wooden fence with brick pillars looks very massive. The construction is strong and durable. The concrete base gives additional solidity.
- And here is this inexpensive, original and attractive design: a fence made of wood (Euro fence) on false poles.


- Gabions are containers made of metal or plastic nets. The solution is innovative, unhackneyed and attractive in appearance. Suitable both for combination with other material in the fence canvas, and for self use- for zoning space.
Since ancient times, fences have been built in Rus'. They were mostly wooden. With the advent of new technologies, materials such as metal, reinforced concrete, polycarbonate, corrugated board, brick are increasingly replacing the aesthetic, but not so durable wooden fence from our lives. Who prefers environmentally friendly materials, creates a rustic design on his site or already has wooden house, picks and wooden fence. In addition, if you study the issue in detail, you will see how diverse wood fences differ. They can be one of the most impressive elements in your yard design.
Types of wooden fences

By a wooden fence, we often mean an ordinary picket fence, which we have long been accustomed to and which was quite common in Soviet times. Over time, the situation has changed dramatically and now wooden fences are a Christmas tree, and a cross, and chess, and a lattice. And an ordinary wooden picket fence looks great, equipped with brick posts.

Classic wooden fence

Pipes are installed along the perimeter of the site, which are concreted into the ground. Veins or girders are fastened between the pillars, made of timber with dimensions of 50x100 mm or so. Fence boards are nailed perpendicular to the veins either butt-to-butt, or at a short distance from each other.
Wooden fence ladder or herringbone

Similarly to the classic fence, pillars are concreted into the ground. Attached to their inner and outer sides decorative overlays from wood. They will become guides for the rest of the boards. Boards measuring 25X100mm are laid in the grooves between the overlays - horizontally overlapping. If you use calibrated pads, you can create a blown fence. And additional thin vertical metal stakes allow you to create another kind of such a fence.
The fence posts are covered with wooden decorative covers.
Fence "Cross"

It is possible to combine a wooden fence with reinforced concrete by constructing a Cross fence. The same 60X80 mm columns are installed in concrete-filled holes in the ground. The pillars are equipped with grooves in which decorative reinforced concrete slabs(their approximate size is 300x300x550), and then wooden blocks. Both the columns and the fence canvas are covered with decorative covers that prevent moisture from entering the structure.
Fence in a checkerboard pattern with clearance

Veins are laid between the pillars. Boards are attached to them in a checkerboard pattern - first on one side, then on the other. If you look from the side, then the fence is not “deaf”, but with gaps.
Fence "Lattice"

Foundation and load-bearing elements for this type of fence are similar - pillars. Between them, ready-made lattice sections knocked down from rails are installed. Reiki can be placed both parallel and perpendicular to the posts, and diagonally. Such a fence is enlightened, lets the sun through, does not close the space. Its function is more decorative.
Fence "Ranch"

It's a boom when on heavy wooden poles fastened horizontally with small gaps 2-4 wide boards. If you take well-crafted thin boards and a little more of them, you can build a beautiful fence for a wooden house.
Fence "Palisade"
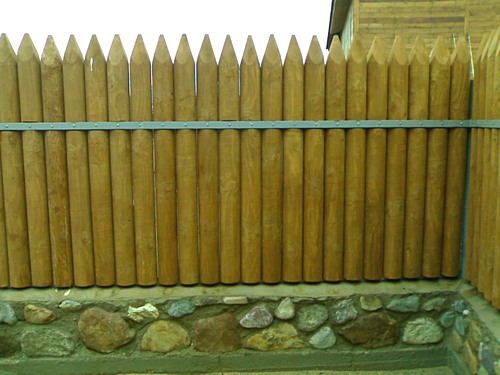
Processed, smooth, not too large in diameter logs are installed vertically to each other.
If you install the pillars and the entire structure on the foundation, then this will save the lower part from interacting with the ground and moisture, and, therefore, will significantly extend the life of the fence. Can serve as fence posts metal pipes concreted into the ground, stone or brick poles, prefabricated reinforced concrete poles or wooden logs.
Materials for the construction of the fence
The cost of a wooden fence depends on its type and what material will be chosen: a board, picket fence, beams, logs (for a palisade). Also, from the materials you will need: crossbars (wooden or metal), support pillars, formwork reinforcement, cement, sand, bricks and stones for erecting pillars, nails and screws, fire retardant and antiseptic impregnation for wooden surfaces, bitumen or creosote for processing wooden poles installed in a supporting or strip foundation.
Tools
To build a fence, stock up on the following tools:
- drill or shovel
- roulette
- stakes
- level
- screwdriver
- hammer
- jigsaw
- brush
- sandpaper
How to make a wooden fence?
Before you make a wooden fence with your own hands, you need to decide on its design and how much capital construction is planned. For a fence with a foundation, the sequence of actions will be as follows:
- markup;
- foundation construction;
- installation of poles;
- fixing wooden elements;
- processing of wooden surfaces.
markup
The marking for the future fence is carried out using a tape measure and a rope. We determine the place for the placement of the gate and gate. In the corners of the site we install in poles. Between them we stretch the laces so as not to deviate from the given line when determining the places for the location of the pillars.
Foundation

The most time-consuming in the process of building a wooden fence with your own hands is pouring a strip foundation. Under a light wooden fence, the foundation is not particularly deepened. To do this, they dig a trench (depth up to 1 meter, width - 30-80 cm), deep into which a sand cushion is poured. Next, the reinforcement is knitted, the formwork is created, the pillars are set according to the level and the foundation is poured. It can be either at zero level or higher - 30-50 cm above ground level. After it hardens (after 2-3 days), proceed to further work.

Pole installation

The more often the poles stand, the stronger the fence will be. Pillars are installed in the process of pouring concrete into the foundation. The distance between them is about 2 m. The fewer pillars, the more crossbars should be. If the foundation is not planned, then in the places determined for the placement of pillars, holes are dug 1-1.5 m deep, sand (20 cm) is poured into them and water is plentifully watered. Next, with the help of a level, pillars are installed in them and the recesses are poured with concrete.


Standard fence foundation

Foundation with stones
If the post is wooden, then its lower edge is treated with bitumen or creosote to protect the wood from moisture and decay.
If brick racks are planned instead of pillars, then a place must be provided for them. After all, they will occupy square areas with a side of 1.5 bricks. To decorate the rack at the very bottom and at the top, the masonry is expanded by a quarter of a brick. In the process of laying, crossbars are mounted in racks. In this case, it is important to use a level to check whether the rack is level.

Fence installation
Next comes the installation of a wooden fence. Reiki, boards are attached either to the crossbars, or installed in the grooves - depending on the type of fence chosen. An easier option is to install sections. If the poles are wooden, then grooves are made in them for laying the crossbars; if the poles are metal, then fasteners (corner) are welded to them, to which they will then be attached.
How to extend the life of the fence?
In order for a wooden fence to last for a long time, wooden elements must be coated with antiseptic solutions and fire retardants, and only then - with paint (oil and water-soluble are used), stain, varnish. Impregnation is applied even before the installation of the fence. Fire-retardant impregnations will prevent fire, and antiseptics will protect the wood from the settlement of microorganisms in it and subsequent decay. They extend the life of the fence up to 30 years, protect the wood from the sun and moisture, retain the natural texture and beautiful appearance.
Fasteners fit galvanized. Before hammering a nail, it is dipped in drying oil.
In the future, periodically, at least 1 time in 2-3 years, the wooden fence must be treated with protective impregnations.
Original wooden fences with their own hands - photo:


Fence from metal fence- this is an original, reliable and durable fence. The metal fence has a more spectacular design. European picket fences are an excellent choice at an affordable price.
The territory of a private house or cottage is always transformed when decorative vegetation spreads on it with green waves. The abundance of flowers, fruit trees, or neat beds with all your favorite vegetables, greens and berries, always pleases the eye. Using bio-primer, https://bio-grunt.ru/torf-kupit.html, it will not be difficult to grow and maintain all this in a more diverse, in the best condition. But it is also important to protect and preserve the site from uninvited guests and unwanted weeds. In this article, we will look at how to make a fence with your own hands that will protect the fragrant, green variety of your backyard.
It is not surprising that for people who have the opportunity to buy land plot and build a residential building on it, it will not be difficult and protect it. The only question is what material to do it?
Unlike cottages for several families, where the care of this lies on the shoulders of the construction organization, in the particular case, everything depends on the personal desire of the homeowner.

Quite a high percentage of owners country cottages today they choose corrugated board as the most economical option. This is done quickly and does not require large financial costs. However, in the end, the appearance of such a structure creates some kind of fence from the outside world. Trying to avoid the factor of a kind of isolation and monotony, they prefer to install wood fences.

Main functions and design solutions
Wood is a special material. Working with him gives birth to many design ideas. Sometimes it is very difficult to decide which design is most suitable. To facilitate the task, you need to decide what functions should be performed.


Most often, the main ones are: determining the boundaries of the site; protection against the penetration of strangers into the territory, as well as persons located within the personal territory; noise and wind protection; restriction of access to travel roads; creating a decorative background.

Design solutions are presented in three definitions external forms: deaf closed, lattice type with gaps and combined (for example, paired with a brick).

Choosing the type of fencing
An additional component is the choice of execution option. If you do not get carried away by listing all types and focus on one particular one, then, perhaps, most often they prefer the “classics”. Solid or with gaps, sheathed with edged boards.

Initial construction stage

If at the same time there are fears that you can accidentally capture part of someone else's territory, then for insurance it is better to get a cadastral plan. Be sure to set the height, size and place where the gate will stand on the diagram.

Can be applied conventions all overall structures, houses, extensions, and landing sites located on the site (garden, kitchen garden). This will help visualize the future picture and possibly make some adjustments.


Material selection
For corner support posts, a 60x60 mm square profile pipe is most often suitable. For the rest of the racks, which are located between the corner ones at an equal distance from each other, a profile pipe with a section of 50x50 mm is suitable.

For the "classics" coniferous spruce, cedar or pine are more suitable. Fine strong wood, without a doubt, is better for performing protective functions. Usually they are in the lead due to their protection from dampness and decay. An additional plus serves their low price.

The main stages of work on the construction of the fence
The direct construction itself includes three stages, which have already been mentioned above: the installation of support pillars, the fastening of the transverse logs and the sheathing of the frame.

Each of them contains a certain range of works. In general, the workflow includes the following steps:
- Wooden or metal pegs are driven into the markings. A twine is stretched between them;
- Holes are pre-dug to a depth of 0.8 meters. At the bottom of each of them, a sandy bed 10-15 centimeters thick is arranged. Next, the profile pipe is installed and fixed. The pit is covered with rubble to a height of twenty-five centimeters. Produce a thorough tamping. Fix the supports and pour them with concrete;
- Cross beams are being installed. Fastening is carried out using metal corners (35x35). Each support has two corners;
- They make either a solid sheathing of the frame, or with alternating boards. The top can be either a straight line, or with protrusions of supports above the skin by 10-15 centimeters;
- Since the material is wood, it is necessary to treat it with fire-fighting agents;


For painting, it is best to purchase special paint compositions recommended for such surfaces and designed for any atmospheric influence (sun, rain, wind).

Painting is considered an economical option. Dark tones are always more popular. After all, this is an outdoor structure and is not immune from dust and dirt, and accordingly light colors create a risk of repainting.

Advantages and disadvantages of a wooden fence
During the installation and operation of such a fence, one can come to a logical conclusion about the main advantages and evaluate them no longer unfounded, but taking into account one's direct participation in its construction.

The list of advantages includes the following components: environmental friendliness, variety of tree species, relatively low labor intensity for installation, easy solution to the problem of replacement.


In addition to the positive aspects, the design has its drawbacks. These include the following: fire hazard (special treatment is needed), susceptibility to decay (small pests can settle in the pores), low service life.

DIY wooden fence photo


We advise you to read
 What is "desu"? And how to understand anime? See what "desu" is in other dictionaries
 How many glasses of water a day should you drink - useful and dangerous doses
 Interpretation of sleep according to the best online dream books
 Meeting of the Coordinating Council in the Department of Education of the Kolomna City District