Chinese paper lanterns came to our culture not so long ago, but quickly won our love - they can come in different shapes, sizes, colors, to suit almost every taste. Traditional Chinese lantern on New Year– in the shape of a ball, red and gold colors.
Chinese paper lanterns are not difficult to make - after trying once, you can decorate your home and surprise your friends by delighting them with this gift. Children can and should be involved in the creation process - it’s interesting and educational.
So, let's try to make Chinese lanterns with our own hands, photos and detailed instructions help us with this!
To work you need:
- Sheet of red paper
- A pair of sheets of gold paper
- Ruler and pencil
- Scissors are regular and have a curly edge (if not, that’s okay)
- Scotch
- Stapler
Now that we've got everything ready necessary materials Let's start creating a Chinese paper lantern!
- Using a pencil and ruler, mark a sheet of red paper crosswise, bend the edges one and a half centimeters, then use scissors along the marked lines to cut the paper, slightly short of the fold.
- Glue tape along the edge of the paper, across the cuts - this is necessary so that the edges do not tear. Using curly scissors, cut strips of gold-colored paper - they should be about twice as narrow as the strips into which we cut the red paper. Coat the gold stripes with glue and carefully glue them onto the red sheet. It looks something like this:

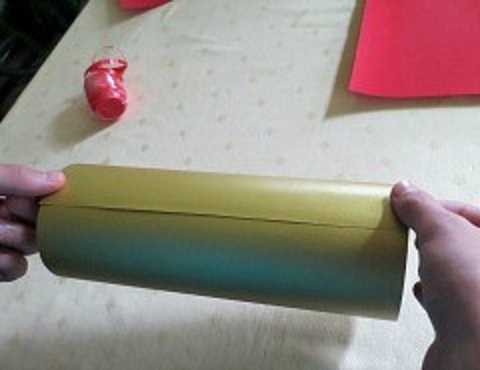
- While the strips are drying, let's work on the second sheet of gold paper. The length of this sheet should be slightly less than the red one. Apply glue along the short edge and roll it into a tube - like this. You can use a paperclip to hold the edge in place until the glue dries.
- We do the same with the red piece of paper - making sure that the glue is dry and the gold stripes stick well. We connect the edges and get this blank:

- You need to be careful, since our workpiece is quite fragile, despite the tape that we prudently used to glue the edges. Now the fun begins - it's time to connect the parts of our future flashlight. We carefully place the red paper blank on the golden cylinder - very carefully so as not to accidentally tear the strips. Here's what the process looks like:
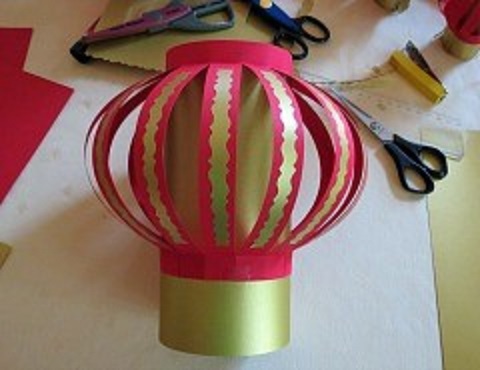
- The top edge of the red blank should be about half a centimeter below the gold edge. After this, we cut out two strips of gold paper a couple of centimeters wide and paste them onto the joints of the blanks - the photo clearly shows how this happens:

- Our Chinese paper lantern is almost ready! The finishing touches remain. Using scissors, we cut the visible part of the golden cylinder into a fringe - literally a couple of millimeters wide, so the flashlight will look much more interesting. And, of course, you need a loop - after all, the lantern is hanging! We will cut the strip for the loop from the same gold paper with curly scissors, but we will attach it to the flashlight with a stapler - it will be more reliable.

As you can see, there is nothing difficult in making a Chinese paper lantern with your own hands - you just need a little time and colored paper. But the result exceeds all expectations - especially if a child is involved in the process.
It’s very easy to find all the necessary materials and photos on how to make Chinese New Year lanterns, and there are also a lot of videos on this topic.
Give free rein to your imagination, don’t be afraid to experiment - play with colors, invent together with your children! We hope that our tutorial on how to make a Chinese paper lantern for the New Year was useful to you!
Sky lanterns- an amazing sight, thanks to very simple inventions. The flashlight has a very simple design, which means you can do it yourself! This will require very few materials, which nowadays cost mere pennies.
How to make a sky lantern with your own hands?
For the flashlight we will use:
Garbage bag;
Cocktail straws;
Once everything is ready, you can start creating.
1. We take the tubes and make a cross out of them. We fasten them together with tape or glue. Don't be too zealous with the tape, try to keep the design as light as possible.

2. We glue candles to the tubes. We used the lightest, most festive ones, and we also advise you to take them.

3. We attach the resulting structure to a garbage bag. Again we use tape or glue.

The flashlight is ready! You can start launching!
How to launch a sky lantern?
Launch a flashlight- it’s not an easy task, you need to follow several rules for the launch to be successful.
1. Spread the flashlight.
2. The launch is best carried out by two people. One holds the dome, the second sets it on fire.
3 . Keep it like this until it warms up well.
4. As soon as the flashlight heats up, lift it up, if it pulls out of your hands, then let go, if not, then hold it still. Repeat the up and down motion until the flashlight flies up.
Precautions: This project uses flammable materials. Children should only work on the project in the presence of an adult. Do not use a Chinese lantern in areas where there is a risk of fire. It is best to launch the balls over a large surface of water.
Step 1: Materials


- Five large pieces of wrapping paper or wax paper
- Scotch
- Rubbing alcohol or lighter fluid
- Kitchen sponge or similar absorbent material
- Scissors
- Wires
- Lighter or matches
Collect all the materials to assemble the sky lantern. To assemble it yourself you will need large sheets wrapping paper or waxed rice paper. The paper should be fairly light. Plain printer paper and most paper bags too heavy, and the heated air will not lift such a load. You will need tape to glue the sheets together.
For the fire you will need a small sponge, which will be placed in alcohol (except for a sponge, you can use any suitable material, which can absorb alcohol and will be quite light). For the project, I used a regular sponge and 91% isopropyl alcohol. The sponge will be connected to the paper ball with a light wire. The easiest way to light a fire is with a grill lighter. If you are not launching an air lantern alone, then one person can hold it, and the second will light the sponge. If you only fire one, place it on the ground and light the sponge while holding the top paper part suspended.
Step 2: Join the sheets of paper together

Place the sheets of paper one next to the other. The long sides of the sheets should lie one to the other. Lay the sheets overlapping so that they can be joined with tape. About a centimeter will be enough. Use tape to connect the sheets. The tape must be glued along the entire length of the paper so that the heated air does not escape from the ball. The four pieces of paper should become one large piece.
Step 3: Roll the ball into a cylinder


Take one short piece of paper and connect it to the other short end. Secure them with tape so that the paper becomes shaped like a hollow cylinder. Remember that there should be no gaps or gaps in the connections.
Step 4: Attaching the Top


Now you need to attach a top to the cylinder that holds hot air inside. You can use another sheet of paper for this. Fold the cylinder along the joints until it looks more like a box. Place one end of it on the floor and the other end facing you. Take a piece of paper and place the short end 10cm below the top of the cylinder. Next wrap long side on top, then it will be secured with tape. Run a strip of tape along the entire length of the sheet and secure it on one side. Rotate the structure and secure the opposite part of the sheet.
Step 5: Finishing the Roof
Rotate and secure each side of the roof. It should now only have one side open. Check again that there are no gaps in the connections.
Step 6: Making a Fire Source

The kitchen sponge needs to be cut to create a smaller piece so that it will fit and not weigh too much when soaked in alcohol. About 3 cm will be enough.
The sponge will be connected by two pieces of wire. The length of the wire should be approximately 3 cm longer than the width.
The wire must be passed through the sponge and placed in such a way that the side with the largest area faces the top of the structure. Make sure that there are pieces of wire equal in length on each side.
Tape the ends of the wire to the sides finished design. The sponge should be in the center of its open part so that the paper does not start to burn.
Step 7: Getting Ready to Rock
Soak the washcloth in alcohol or lighter mixture without touching the paper parts. This is easiest to do if you are not preparing the flashlight for launch alone. One person can hold and the other dab the sponge.
Sky lanterns that came to us from the Celestial Empire are called “Hum loy” or “Hum fairy” in their homeland. Such lanterns are very popular not only in Asian countries, but throughout the world. Chinese sky lanterns are used in many celebrations, flash mobs, and in Thailand there is even a separate holiday, during which residents and guests launch lanterns into the sky en masse. Recently, sky lanterns have become popular in our country. They can be purchased in various stores, but you can also make them yourself, which we will try right now.
So, before we start, let’s watch a video of the flashlight:
There are many ways to make sky lanterns, but the simplest one allows you to do it without special effort and costs.
We will need:
- Regular 30 liter garbage bags. (take packages larger size not recommended since they are usually made of thicker polyethylene);
- Stationery tape;
- Wire diameter 0.5 mm;
- And also a tablet of dry fuel.

The materials have been collected. You can begin the process of making a flashlight. The ball that we will launch into the sky is made from several packages. It is recommended to use two or three bags, depending on the air temperature. In winter, for example, you can be content with one package, on a summer evening a balloon of two will launch, and during the day in hot weather- out of three. First of all, we cut off the bags along the soldering line and insert one of them into the other. The resulting seam using tape.

Next we need to take care of the holder for our burner, which we will make from wire. To do this, we need two pieces of aluminum wire 40 cm long, which need to be twisted around the candle.

The bags will be attached to the holder, so special clamps need to be made at the ends.


Homemade sky lantern is ready.
All that remains is to take dry fuel, which we will use as fuel. One tablet needs to be broken into four even pieces. In some cases, the flashlight may not take off immediately. The reason for this may be the severity of the fuel. In such cases, you should wait a little until some of the fuel burns out.
24 29 426 0
This is not the first time we have encountered luminous fakes with our own hands. You already know how to do... Today we will learn how to make aerial “fireflies”.
Sky lanterns are a traditional holiday attribute that came to us from Japanese culture. With the help of this simple item you can decorate and diversify almost any celebration, ranging from a cheerful corporate party, ending or wedding.
You can buy such a holiday accessory for $5-10, depending on the quality and size.
But, you see, it’s much more pleasant to launch your own, homemade mini-balloon into flight. So if you want to make Chinese sky lanterns with your own hands, then be patient. free time, as well as some materials.
You will need:
Size and shape
First, estimate the approximate height of the finished flashlight. As a rule, one meter is enough. A flashlight of this size takes off well and does not get lost at altitude. After that, think about what shape it will be (eg heart, cylinder, etc.). 
Type and color
After this, we move on to the technical side of the choice - determining the type and color of paper. It must be not only durable, but also soft, light and thin, so that the flashlight can soar into the heavenly heights without hindrance
Consider one important point: if the paper weight is more than 25 grams per square meter, then the mini-balloon simply won’t take off.
So choose your paper carefully - this is one of the most important points.
Preparing the Paper
To begin, saturate the selected material with a fire retardant. This is necessary in order to prevent the possibility of the ball catching fire, and also to protect it from getting wet.

If you want to make a meter-high Chinese lantern, then cut the prepared paper into four pieces measuring 100 by 80 cm, which will be longer at the bottom and flattened at the top. Glue them together using regular glue PVA.
Making a burner
In order to make a paper lantern, which will later fly safely, we will definitely need a burner. To make it, melt the wax and dip a piece of lint-free cloth into it, saturating it with it.

Let the wax cool, and at this point the process of making the burner can be considered complete.
Frame making
We wrap two foil tubes onto a knitting needle. After this, we place these same tubes in a cross, and attach our burner to the center. We wrap all this with copper wire so that the structure does not fall apart.


