Everyone good afternoon! I decided to do something wooden handles for your tools - files, chisels, cutters. I began to figure out how to make them. Planing is simply too tedious, and it turns out ugly. That would be a wood lathe! And then it dawned on me. Why not? The main idea came straight away, the details came later. I want to show you what happened as a result and tell you how I did it.
Materials and tools I used
So, to make the machine I needed the following materials:- a board made of multilayer plywood, about 10 mm thick;
- a wooden block with a rectangular cross-section 35x50 mm or 40x60 mm, about 1 meter long;
- furniture driven nut – 4 pieces (thread size is the same as that of studs);
- two threaded rods M6 - M10 plus three ordinary nuts for them and two bolts;
- a screw clamp, its length should be sufficient to clasp a hand-held electric drill with a margin;
- wood glue, self-tapping screws.

Making a lathe from a hand-held electric drill
We begin work by making the machine frame. To do this, I cut a board from multi-layer plywood 60 centimeters long and 11 - 12 cm wide. I’ll immediately make a reservation about the dimensions. Variations are possible here. But you shouldn’t make the frame too long, since the machine will be quite light, and working with long parts will not be easy.
An important point is the ratio of the width of the plywood frame and the dimensions of the block. It will be good if the width of the plywood board can accommodate three bars with the smaller side of the cross section (you will understand why this is so later). So, if the block, like mine, is 35x50 mm, then the width of the frame should be about 11 cm or a little more. If you take a 40x60 mm block, then the frame is made 12 cm wide.

So, I cut out the base of the frame 11 cm wide and 60 cm long. After that, I sawed off a block along the length of the base, that is, also 60 cm. I cut the second block along the length of the drill body in such a way that it would not reach the chuck and subsequently not prevented him from rotating.


Using wood glue, I connect the bars with their smaller cross-sectional sides so that their ends are on the same line. I clamp the parts to be glued with clamps and let the glue harden. Our electric drive will be attached to this part of the frame, so, placing the drill on a short block, I mark the place for the hole for the clamp. I drill a hole into which the existing clamp can fit. In my case the diameter is about 10 mm.


Next, I mark a plywood board to place in the middle of its width a structure of two glued bars - long and short. Along the middle line of the board, I drill 7 - 8 holes for self-tapping screws evenly along the entire length.

Having attached the glued bars with clamps to the plywood base, I deepen the holes by drilling the block. Now I insert the screws and tighten them. The machine frame is ready.

After this, we proceed to the manufacture of the tailstock of the machine and the movable stop for the cutter. The headstock will hold the rotating part on the side opposite to the drive. It must move along the frame and be fixed in the desired position depending on the length of the clamped part. The cutter stop must also move freely along the workpiece. To make them, I used scraps of the same plywood and timber.


The movable base of the tailstock is a U-shaped structure made of two bars and a plywood rectangle. To the surface of the plywood base of the headstock, using self-tapping screws, we attach a plywood square of double thickness, obtained by gluing two square pieces of plywood. A centering bolt for clamping the workpiece will be secured in this square. I attached a single plywood rectangle with screws and glue to the bars. The result should be a structure that moves freely along the frame guide bar.


Let's move on to the electric drive side. We fix the electric drill using a screw clamp on the frame block. To clamp the workpiece, we need a threaded rod and nuts, regular and furniture driven. Holding the pin in the drill chuck, mark the required length (4 - 5 cm) and cut it off.


We sharpen the end of the hairpin using sandpaper and a drill together, clamping a piece of the hairpin into the chuck. The end of the pin must be very sharp, as it will have to go into wooden blank, centering it. Next, we modify the furniture nut by turning its pointed clamps 180 degrees with pliers. This part will be used to clamp the part and transmit torque from the electric drill to it.


We assemble the structure by screwing the nuts onto the stud. The sharp end of the pin should protrude a little further (1 - 2 mm) than the sharp fasteners of the furniture nut. This will make it easier to center the part. On the reverse side, the furniture nut is fixed with a regular one. We clamp the free end of the pin into the drill chuck. If necessary, adjust the position of the drill, achieving parallelism between the stud and the frame block.
Now you need to move the tailstock to the drive pin to determine where to attach the second centering bolt. We move the glued plywood square to the pointed pin, apply a light blow to it with a small hammer back side and get the required mark from a sharp pin.


We drill a hole of such a size that the sleeve of the second furniture nut fits into it. We do not modify it, but use it in normal mode, inserting the bushing into the hole and hammering the fasteners in with a hammer. If necessary, tighten the nut in a vice. We sharpen the second pin, screw it into the furniture nut on the tailstock and secure it with regular nuts. Having moved the headstock to the drive, we check and, if necessary, correct the alignment of the studs.
Similarly to the tailstock, we assemble the base of the stop for the cutter. The difference is that the plywood shelf of the stop protrudes from one side. We will screw a block here with self-tapping screws, on which the cutter will rest.
A drill is a universal type of tool with which you can drill holes. different diameters V various types materials. The disadvantage of this tool is the need to hold it with both hands when carrying out drilling activities. For stationary drilling of holes in a variety of materials and workpieces, it is more convenient to use a drilling machine. Not everyone can buy it specifically for such purposes, so you can build a drilling machine from a drill yourself. We will find out how this can be done in the material.
Before you start producing a homemade drilling machine from a drill, you should find out what types of devices there are. Products are divided into the following types:
- Radial drilling. Most efficient look machines for drilling holes in large and medium-sized parts. The vertical drilling type of machine is also called stationary, since such devices are often used in repair shops, workshops, garages and various enterprises. The drilling accuracy of such a unit is ensured by the fact that the drill is applied to the workpiece.
- Vertical drilling. The principle of operation is that the drill is stationary, and the workpiece itself moves.
- Horizontal drilling. They are used in production for processing long parts.
- Multi-spindle. They are used when it is necessary to simultaneously drill, tap and ream.
- Specialized. Units for deep drilling.
In the production of electronic boards they are used benchtop machines, in which cutting tool moves using a handle. For private use, it is recommended to make a radial drilling type of tool, where instead of a motor and pulleys, a conventional electric drill will be used.

How to make a simple drilling machine yourself
Advantage self-production drill machine is the possibility of upgrading the product. As an upgrade, you can create a machine with a vice for a drill, which will allow you to fix the workpiece and then process it. To build a homemade drill machine, there is no need to purchase special materials and components. All that is required to assemble the device is the available components that are available in every craftsman’s garage. To make a drill machine with your own hands, you will need to make the following components:
- Bed.
- The working mechanism is presented in the form of a drill.
- A vertical stand to which the drill will be attached.
- Handle or feed mechanism of the cutting element.
Do-it-yourself drawings for making a drilling machine from a drill will help speed up the production process of the device. But first you need to think through everything to the smallest detail, making sketches on paper. After this, you can turn everything into reality.
- As a fastening for a drill (block), you can use a material such as chipboard. The tool can be fastened with other similar materials, but it is important to take into account that the structure must be stationary and reliable.
- The massiveness of the frame plays an important role, as this will ensure the stability of the device. An ordinary workbench works well as a bed. Its weight will eliminate vibrations during operation.
- The vertical stand must be securely fixed to the frame. The main parts are the guides, through which the block and drill will be moved. The height of these guides and the entire rack must be selected based on how long drills you will use, and on the planned thickness of the blanks themselves.
- To secure the drill, it is recommended to use clamps or sheets of steel. To prevent vibrations, a rubber gasket should be placed between the drill and the connecting pads.
- Making a machine out of a drill is not at all a problem, especially if you have suitable materials. An important point is the mechanism responsible for moving the tool up and down. The schemes of such mechanisms may be different, but simplest design is the presence of a lever with a spring. The spring is fixed at one end to the stand, and at the other to the block.
If you do not plan to remove the drill from seat, then you can disassemble the tool and remove the “start” and “stop” buttons from it to a more convenient place using an additional switch. This will allow you to quickly respond in cases where the drill jams in the workpiece being drilled. Below are several options for ready-made homemade drilling machines from a drill.

Other options for drill machines
Having set myself the goal of making a drilling machine for home use, it is important to decide on the available set of components. This article is presented for informational purposes in order to give an idea for making a homemade machine. There are a huge number of options for the production of which, an old microscope, a jack, various tripods and other units can be used. What is taken as a basis is not so important as what you get in the end.
If you plan to work on a drilling machine with wood and metal up to 2-3 mm thick, then it can be built from wooden parts, which are not difficult to find.
If you plan to work primarily with metal workpieces, then it is better to make the device from steel components. Such a unit will be much more reliable, and most importantly, it will be able to cope with its purpose.
Even for a beginner it will not be difficult to make a homemade drilling machine for the home. The main thing is to have patience and time, and you will definitely succeed. And don’t forget that, be that as it may, such a unit is homemade, so follow safety precautions when working with it.
It is advisable to make a drilling machine with your own hands in situations where in a home workshop or garage there will be a need to drill holes in parts of various configurations, as well as those made of different materials. It should be noted that such a device makes it possible to obtain holes with sufficient high level quality.
When you need a homemade drilling machine
In production or repair enterprises, where the drilling operation is considered the most common, a special device is used to perform it, the models of which may have different functionality. So, it can be a compact desktop drilling machine, characterized by a simple design, or equipment equipped with several working spindles and numerical control.

For drilling holes in various materials, which is performed in a home workshop or garage, you can use home-made equipment. Naturally, for use at home you need a simple device that can be made from components and materials found in almost any garage or home workshop.
And in this article we will not leave unanswered the question of how to make a drilling machine at home, while spending a minimum of money. The drawings and experience of many craftsmen who have already walked this path will help us with this.
The need for such mini drilling equipment for metal, wood or plastic most often arises among those who are accustomed to independently performing various renovation work in your house or apartment. Also, quite often radio amateurs are puzzled by the construction.
It would seem that a conventional drill can be used to perform such an operation, but such a tool is not always able to provide the required quality and accuracy of drilling operations. Homemade, in addition to its compactness, has another important quality: it can install drills of various types.

Drilling machine from a conventional drill
To make a small but functional drilling machine for your home workshop, you do not need to purchase special materials and components. The design of such a convenient and useful desktop device contains the following components:
- the base, which is also called the bed;
- a mechanism that ensures rotation of the working tool (a conventional drill can be used as such a mechanism);
- device for providing supply;
- a vertical stand on which the rotation mechanism is fixed.

The stand on which the drill will be mounted can be made from chipboard sheet. This material is quite capable of supporting the weight of such a device. The bed of such a mini-machine should be more massive, since it protects the entire structure from vibrations, which can negatively affect both the quality and accuracy of the resulting hole, and the comfort of work.
As a material for this frame, you can use an ordinary furniture board, the thickness of which is more than 2 cm. It is most convenient to use the base of an old photographic enlarger for this, slightly modifying its design. Sometimes an old microscope is used, but this is a rather rare option, since such a unit will not be large enough and its use will be limited.

The quality and accuracy that a homemade drilling machine will provide depends primarily on how correctly and reliably the connection of its base and vertical stand. Important elements Such a micro machine consists of two guides along which the block with the drill attached to it will move. Such guides are best made from two strips of steel, which must be securely screwed to the rack using screws.
When making the block, it is advisable to use steel clamps that will securely fix the drill on it. In addition, in order to avoid unwanted vibration processes when drilling, a thick rubber gasket must be installed at the junction of the block and the drill.
After this, you need to make a feed mechanism for such a mini machine, which should ensure the movement of the electric drill in the vertical direction. The manufacturing schemes for such a mechanism can be different, but it traditionally contains in its design a lever and a spring, which is attached at one end to the stand, and at the other to the block with the drill. This spring gives the feed mechanism greater rigidity.
Drilling machine from a drill that is not planned to be removed from it, you can make it more convenient to use if you disassemble the original switch of the drill and mount a separate button on the frame of the mini equipment. This button will always be at your fingertips and will allow you to quickly turn the device on and off. As you can see, it’s not at all difficult to make a drilling machine from a drill; all you need to do is read these instructions carefully or watch the training videos in this article.
An example of a drill machine in more detail
As an example, let's look in more detail at one of the options for a homemade drill assembled at home.

Manufacturing a machine using an asynchronous motor
Lack of excess electric drill- this is not a reason to abandon the idea of making a drilling machine with your own hands. To drive the rotation mechanism of such equipment, you can use any electric motor. Such engines, which were previously installed on various techniques, will probably be found in the garage or workshop of any home craftsman.
Asynchronous motors, which are equipped with washing machines. If you have such a motor, you can confidently use it to make home drilling equipment. Making drilling equipment with such an engine at home is somewhat more difficult than using a drill, but the power of such a machine will be much higher.
Considering the fact that the weight of an asynchronous motor is greater than the mass conventional drill, you will need a stronger base and stand to accommodate the feed mechanism.
In order for such a mini drilling and attachment machine to vibrate less during operation, it is necessary to install the motor on a powerful base and place it as close to the stand as possible. But here it is important to maintain the correct distance, since the convenience of installing the belt drive depends on it, due to which the rotation from the motor will be transmitted to the drilling head.
In order for you to make such a machine at home, you will need the following structural elements:
- gear;
- a hexagon on which the pulley will be placed;
- two bearings;
- two tubes, one of which must have an internal thread;
- clamping ring, which must be made of durable steel.
The hexagon also connects to a metal tube, bearing and clamping ring. Such a connection must be very reliable so that the resulting assembly does not collapse during operation.
The mechanism necessary to ensure the feed of the tool in such a mini machine must consist of a tube on which cuts are first made, and a gear. The tube will move due to the connection of its teeth with these cuts. An axle with a hexagon is then pressed into this tube, the height of which must correspond to the amount of the required tool feed.
Allows you to work with hard materials, correctly center and make holes for different angles. The main operations are drilling, grinding, polishing, deburring, cutting out semicircles. You can make the device yourself. An unprofessional master will cope with the task in a few hours.
Basic materials for making a stand: timber 45x90 and 50x50, plywood 10 mm thick, furniture ball guides 30 cm long, extension spring.
Step-by-step instructions on how to make a drill stand with your own hands
1. Manufacturing of the machine frame

Attach the guide to a 45x90x300 mm block, mark with a pencil the places for drilling holes. Turn the segment 180 degrees and repeat. Drill two holes on each side.

Try on the guides, check, connect the parts with self-tapping screws. Repeat for the other side. After we have separated the parts of the guides, they must be additionally secured with a third screw.

We received the base of the drilling machine carriage.
We try on and mount the carriage to two pieces of timber 700 mm long.

Let's try the design in motion.

Try on the lower cross member made of 50x50 mm timber (it is needed to increase the rigidity of the structure), attach a plywood base, and trace with a pencil the joints with the ends of the racks.

Mark future holes for fasteners. Drill holes at the intersection points of verticals and horizontals.

Attach a cross member to the plywood base and secure with clamps. Drill holes in the designated places and secure with wood screws. The result was a foundation.

We mount the stand on the base.

Reinforce the frame at the top with a plywood strip for rigidity. Check for smooth running.

The manufacture of the frame is completed.

2. Making a drill holder
Out of nowhere I had a drill handle lying around (not my original one), I decided to use it to secure the drill. Let's continue.
Place the handle on a piece of board 20x90 mm, 30 cm long.

Trace the outer contour and hole with a pencil. Cut out the outline and seat with a jigsaw.

Attach the handle to the board with self-tapping screws.

Mark and drill holes in the bottom of the board.

Attach the board to the central carriage and check for ease of movement.

On the back side of the structure, drill holes for hooks for springs and assemble.

To increase the rigidity of the structure, force it with a block of 50x50x90 mm. Attach the piece to the drill holder, strengthen the structure at the top and bottom with self-tapping screws.

If necessary, use a clamp. Check the vertical axis of the drill stand.

3. Making a height-adjustable table
Make a wing nut from a piece of lath - draw diagonals, find the center, drill. Install the M8 mortise nut and drive it in with a hammer.

Also, using a mortise nut and an M8 pin, we make the base of the adjustable table.

Tighten the connection with a wrench.

Make a back plank from the remaining plywood, install it in place, and connect it.
Mark the places where the stand adjoins the walls. Make stops and fasten them with self-tapping screws.

Secure the table to the stand.
The most common drilling machine can be considered the one made from an ordinary or electric drill. In such a machine, the drill can be placed either permanently or made removable. In the first case, the power button can be moved to the drilling machine for greater convenience; in the second, the drill can be removed and used as a separate tool.
Components for a homemade drilling machine:
- Drill;
- Base;
- Rack;
- Drill mount;
- Feeding mechanism.
The base (bed) for a homemade drilling machine can be made of hard wood, chipboard or furniture board, but it’s better to use a channel, metal plate or brand. To ensure the stability of the structure and obtain a good result, the frame must be made massive so that it can compensate for vibration from drilling. The size for wooden satin is 600x600x30 mm, metal - 500x500x15 mm. There must be mounting holes on the base of the machine so that it can be mounted on a workbench.
The stand for the drilling machine can be made of timber, round or square steel pipe. You can also use an old frame of a photographic enlarger, an old school microscope or another device of a similar configuration that has a large mass and high strength.
The drill is secured using clamps or brackets. It is better to use a bracket with a central hole, this will allow you to achieve more good results when drilling.

The device of the drill feed mechanism on the machine.
Using this mechanism the drill can move vertically along the stand, it can be:
- Spring;
- Articulated;
- Similar to a screw jack.
Depending on the chosen mechanism, you will need to make a stand.
Photo diagrams and drawings show the main types of designs of homemade drilling machines on which a drill is used.


 A homemade machine made from a drill with a hinged, springless mechanism.


Video instructions for creating a homemade drilling machine with your own hands.
Video instructions for creating a cheap drilling machine from a drill with your own hands. The bed and stand are made of wood, the mechanism is a furniture guide.
Step-by-step video instructions for making a drill press from an old car jack.
How to make a spring-lever stand for a drill on a homemade machine.
Step-by-step instructions for making a steel stand.
The steering rack from a car is a fairly massive device, so the frame for it must be massive and attached to the workbench. All connections on such a machine are made by welding.

The thickness of the base should be about 5 mm; it can be welded from channels. The drain on which it is fixed steering rack should be 7 - 8 cm higher. It is attached through the eyes of the steering column.
Since such a homemade machine becomes massive, it is better to place the control unit separately from the drill.
Video of a homemade drilling machine based on a steering rack from a car.
The procedure for assembling such a homemade machine:
- Preparation of parts;
- Installing the stand on the frame;
- Assembling the moving device;
- Installing the device on a rack;
- Drill installation.
All joints must be securely fastened, preferably by welding. If guides are used, then you need to make sure that there is no transverse play. For greater convenience, such a machine can be equipped with a vice for fixing the workpiece for drilling.
In stores you can also find racks ready for drilling. When purchasing, you should pay attention to the dimensions of its frame and weight. Often inexpensive designs Only suitable for drilling thin plywood.
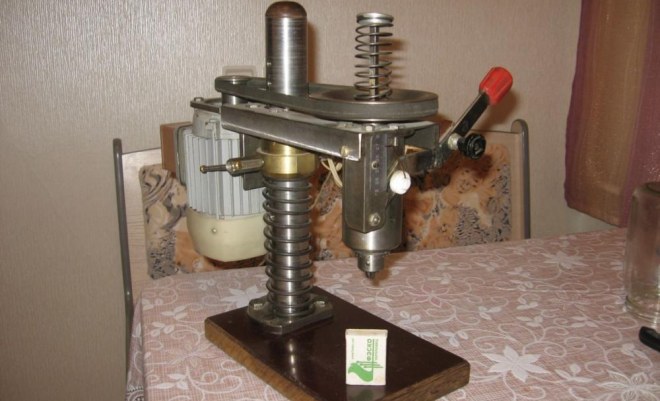
Homemade drilling machine based on an asynchronous motor.
Replace the drill in homemade machine Can asynchronous motor, for example from the old one washing machine. The manufacturing process for such a machine is complex, so it is better if it is done by a specialist with experience in turning and milling, and assembling electrical circuits.
Diagram and design of a machine based on a motor from household appliances.
Below are all the drawings, parts and their characteristics, and specifications.

A table of all the parts and materials needed to make the machine yourself.
| Pos. | Detail | Characteristic | Description |
| 1 | bed | Textolite plate, 300×175 mm, δ 16 mm | |
| 2 | Heel | Steel circle, Ø 80 mm | Can be welded |
| 3 | Main stand | Steel circle, Ø 28 mm, L = 430 mm | One end is turned to a length of 20 mm and has an M12 thread cut into it |
| 4 | Spring | L = 100–120 mm | |
| 5 | Sleeve | Steel circle, Ø 45 mm | |
| 6 | Locking screw | M6 with plastic head | |
| 7 | Lead screw | Tr16x2, L = 200 mm | From the clamp |
| 8 | Matrix nut | Tr16x2 | |
| 9 | Drive console | Steel sheet, δ 5 mm | |
| 10 | Lead screw bracket | Duralumin sheet, δ 10 mm | |
| 11 | Special nut | M12 | |
| 12 | Lead screw flywheel | Plastic | |
| 13 | Washers | ||
| 14 | Four-strand block of drive pulleys for V-belt transmission | Duralumin circle, Ø 69 mm | Changing the spindle speed is done by moving the drive belt from one stream to another |
| 15 | Electric motor | ||
| 16 | Capacitor block | ||
| 17 | Driven pulley block | Duralumin circle, Ø 98 mm | |
| 18 | Return spring limit rod | M5 screw with plastic mushroom | |
| 19 | Spindle return spring | L = 86, 8 turns, Ø25, from wire Ø1.2 | |
| 20 | Split clamp | Duralumin circle, Ø 76 mm | |
| 21 | Spindle head | see below | |
| 22 | Spindle head console | Duralumin sheet, δ 10 mm | |
| 23 | Drive belt | Profile 0 | The drive V-belt has a “zero” profile, so the grooves of the pulley block also have the same profile |
| 24 | Switch | ||
| 25 | Network cable with plug | ||
| 26 | Tool feed lever | Steel sheet, δ 4 mm | |
| 27 | Removable lever handle | Steel pipe, Ø 12 mm | |
| 28 | Cartridge | Tool chuck no. 2 | |
| 29 | Screw | M6 with washer |


The spindle head has its own base - a duralumin console and creates translational and rotational motion.
 Drawing of a spindle head for a homemade drilling machine.
 Materials and parts necessary for the manufacture of the spindle head.
| Pos. | Detail | Characteristic |
| 1 | Spindle | Steel circle Ø 12 mm |
| 2 | Running sleeve | Steel pipe Ø 28x3 mm |
| 3 | Bearing 2 pcs. | Radial rolling bearing No. 1000900 |
| 4 | Screw | M6 |
| 5 | Washers-spacers | Bronze |
| 6 | Lever | Steel sheet δ 4 mm |
| 7 | Bushing stopper | Special M6 screw with knurled button |
| 8 | screw | Low nut M12 |
| 9 | Stationary bushing | Steel circle Ø 50 mm or pipe Ø 50x11 mm |
| 10 | Bearing | Radial thrust |
| 11 | Split retaining ring | |
| 12 | End adapter sleeve | Steel circle Ø 20 mm |


The connection depends on the motor itself.

How to make a drilling machine for printed circuit boards with your own hands.
To manufacture a drilling machine for printing circuit boards, a low-power device drive is required. As a lever, you can use a mechanism from a photo cutter or a soldering iron. Illumination of the drilling site can be done using an LED flashlight. In general, this machine is rich in the flight of creative thoughts.


