Leafing through glossy magazines, you have probably paid attention more than once to photographs of interiors with niches shining with sky-blue light, framing crystal chandeliers or the dark blue halo of the ceilings, illuminating hi-tech apartments. For some, such solutions are relevant and fashionable, for others they seem like banal “dust collectors” and “electricity hogs”. We will leave aside debates about the aesthetics and practicality of hidden lighting; many “highly artistic essays” have already been written about this and will concentrate on purely technical problems.
So, let’s formulate the problem: we need to develop a hidden lighting system (aka reflected light, backlight, curtain light, etc.). A cornice for hidden lighting is the lower level of the ceiling or some kind of free-form shelf where cables are routed and light sources are installed. The main requirement for the design of the cornice is that the light source should not be within line of sight. To receive technical solution You need to first determine the type of lamps used for illumination. Don't forget that right choice lamps will allow you to get the desired illumination in the room, avoid the problem of replacing lamps and reduce energy costs. By choosing a light source, you can determine the power consumed by the backlight (it is more convenient to calculate the power per 1 m of length of the cornice, i.e. W/m) and the dimensions of the cornice.
When choosing a lamp, you should immediately decide whether the hidden lighting will play the role of the main light in the room or will it become only decorative illumination of the interior? Will the decorative lighting be static (one color) or dynamic?
Below we will sequentially analyze the advantages and disadvantages of the main types of lamps used for hidden lighting.
Incandescent lamps
Standard incandescent lamps are used by particularly economical builders. On the plus side, the range of lamps is most comfortable for humans, the minimum cost of materials, but high energy consumption (about 100 W/m), uneven illumination - “spots” of light, significant heat generation (up to 90% of power consumption) make them unsuitable for our purposes.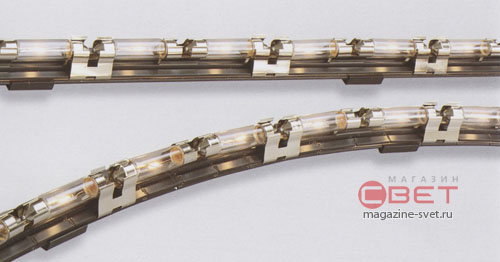
One of the varieties of incandescent lamps is low-voltage linear xenon lamps, which are quite rare and expensive for our country. They allow you to obtain uniform light of a comfortable spectrum, minimal dimensions, the ability to use for illumination of curved ceilings (minimum bending radius 450 mm), and have a long service life - up to 20 thousand hours. Cons: low energy efficiency (100 W/m, 80% of the power goes into heat), and low luminous flux. Such systems are produced by Targetti (Italy) - MiniCove and Agabekov (Sewing - Flex Xenon, cost about 5-6 thousand rubles per meter. They are used mainly for decorative lighting, in addition to the main lamps.
Discharge lamps
Due to their many advantages, fluorescent lamps have become the most common light sources: high luminous flux with low energy consumption (about 30 W/m), service life up to 15 thousand hours, low cost lamps and the opportunity to buy them at any construction market. The main disadvantage of these lamps is the interruption of the light line at the joints and the difficulty in lighting curved ceilings. In order not to get lost in the variety of lamps offered in retail trade, we advise you to pay attention to the power of the lamp (it corresponds to a certain length) and its color. Compliance with lamp standards is shown below.T8 form factor lamps

| T5 form factor lamps

|
Lamp color ( color temperature) is designated differently by each manufacturer, but three main colors should be distinguished: warm white - “yellowish” light, daylight - “standard” white, cool white (cool white) - “bluish” light. There are also colored lamps - red, yellow, green and blue.
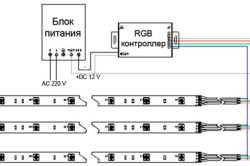
There are many lamps produced for these lamps, ranging from Chinese ones at 200 rubles apiece to European devices at 1500-3000 rubles. In the event that it is necessary to adjust the brightness of lamps, lamps with electronic ballasts (EPG) with control (dimming) capabilities are required. It will be more difficult to find lamps with adjustable electronic ballasts on the market or in a store; it is better to contact lighting companies. As an example, we can name the Tiller Dimmerable lamp produced by TLB Lighting (Italy) or the “5100” series lamp with a special asymmetric reflector produced (Slovenia). To develop a control system, we can recommend turning to specialists.
To summarize, we emphasize that today fluorescent lamps are the best option for creating systems of general lighting of premises with hidden light.
Neon lamps
This is one of the most popular light sources, used both in advertising and for decorative lighting. Uniform and soft glow along the entire length of the tube ( maximum size- 2 meters) and the ability to manufacture curved lamps made them indispensable tools designers at for a long time. Large selection colors - more than 60 shades and various shades white make it possible to create colored lighting.Long service life - up to 10 thousand hours, low energy consumption - 10 W/m and high brightness of the lamps complement a number of advantages. But at the same time, there are significant disadvantages of these lamps that are worth paying attention to. First of all, you need to clearly understand that each tube is a piece, not a serial product, made by a glassblower of a specific company, using only its own technology - various glasses, filling, cathodes. As a result, project development, manufacturing, installation and further maintenance must be entrusted to the manufacturer. Since the product is a one-piece product, the quality of the tube itself, and therefore its service life, depends on the professionalism of the glassblower (in contrast to standard lamps produced on machines using precise technology).
Neon lamps are powered through a high-voltage transformer (2-10 kV), the installation of which must be carried out by a professional electrician. Adjusting the brightness of neon lamps is permissible only if there are additional control units in the power circuit, however, manufacturers are quite pessimistic about such a tandem. To create dynamic lighting, parallel installation of more lamps is required: one lamp - one color.
The diameter of the tube used to make neon lamps is from 8 to 18 mm; the thinner the tube, the higher its brightness. The most commonly used are 10, 12 and 15 mm.
The cost of such lighting is relatively low - together with installation it will cost you 1000-1500 rubles/meter. You should not skimp on components - a low-quality tube will quickly fail, a cheap transformer (only an electronic one should be installed in the room!) can cause a lot of unpleasant moments - humming during operation, flickering lamps, etc.
LEDs
Production technology has stepped forward very significantly over the past 5 years, making them the most promising light sources. But they have become most popular in decorative lighting due to the wide range of possibilities for controlling color and brightness. For decorative lighting purposes, it is possible to use flexible LED strips or LED modules on a printed circuit board.LED products are durable (service life up to 50 thousand hours) and energy efficient (5-10 W/m). The length of the products is about several meters (flexible tape) with a width of 1 cm, flexibility and low-voltage power supply (12 or 24 V) make installation simple and safe. All these advantages have allowed LEDs to become a full-fledged competitor to neon lamps in the decorative illumination market. LEDs are a professional tool that allows you to create unique decorative effects in interiors.
But we are forced to add to such a “barrel of honey”... As mentioned above, LEDs are used mainly for decorative lighting, because for general lighting the luminous flux of these products is insufficient, and the “quality” itself white LEDs are very conditional - the production technology of white LEDs is still far from ideal.

When creating a color-dynamic installation, you should choose either three-in-one LED products - i.e. full-color LEDs, or products with LEDs various colors alternate on the board. In the first case, the product is significantly more expensive, but in both cases, quite noticeable breaks in the light strip appear from a short distance.
The main disadvantage of LEDs is their high price. Today, mass production of LED products has been established both in Asia and in European factories. Flexible tapes made in China will cost you from 600 to 1500 rubles/m, the price of European products, for example LINEARlight Flex from (Germany) will be 2-3 times higher.
It would be wrong to remain silent about the so-called super-bright LEDs used in professional lighting products, but today for our purposes they are exotic (10,000-15,000 rubles/m) and it is premature to talk about the widespread or even frequent use of these light sources.
Bottom line
Our goal was to compare some general parameters in a form accessible to the general reader to facilitate the selection of light sources. To present the results in general view We have summarized the most significant selection criteria in a single table.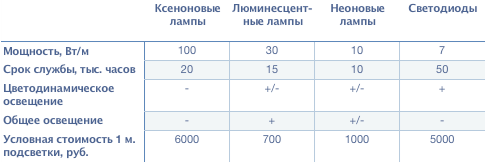
To answer the main question that the reader will have - “will the illumination be sufficient?”, a lighting calculation is required. The result depends on many factors: the dimensions of the room, its purpose, type of lamps, ceiling decoration and a number of others, so only a specialist can give a definite answer.
Concluding this review, I would like to note that this text does not claim to be absolutely accurate. technical characteristics and full coverage of the entire range of products. Outside the scope of this review, we left the issues of electrical installation, lighting control systems and the creation of color-dynamic effects, since each of these topics requires separate study.
- Do-it-yourself installation of hidden stretch ceiling lighting
When installing and sheathing drywall, you have to deal with electricity, and where it is, it is always dangerous. There should be no mistakes when working with electricity. It is better if the electrical wiring work is done by a professional electrician. But you decide to do all the work yourself, then follow and remember some advice from experienced electricians.
- Twisting of wires is prohibited;
- Aluminum wires cannot be twisted together with copper wires;
- The light switch always opens only the phase current;
- Behind the ceiling inside the box electrical cable it must be passed through the protective corrugation and carefully ensure that it does not touch the screw;
- If you have mounted complex system lighting, think maybe it should be run as a separate line to the power supply panel;
- Use spring terminals to connect wires;
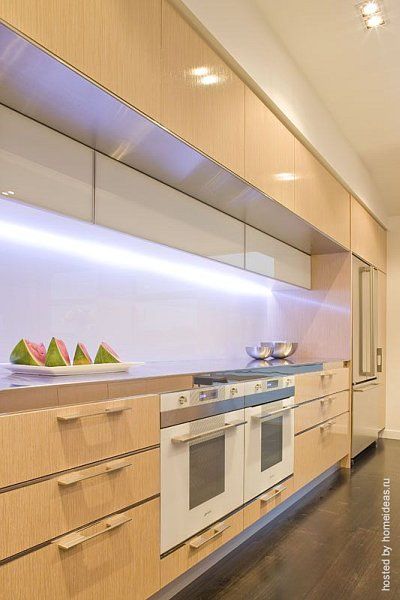
The main function of LEDs in the interior is illumination to highlight certain areas and interior elements:
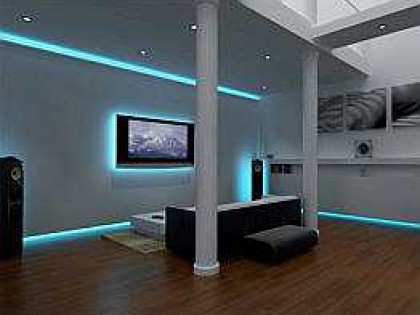
to highlight the TV area in the living room,

kitchen apron in the kitchen,
niches in the walls,

podiums, etc.
In addition to highlighting zones and elements, LEDs are used to decorate any objects and items, that is, LEDs in this case are used only for effectiveness and aesthetics. This is, for example, decorating the ceiling with colored lighting,

junction of floor and wall,

as well as furniture, giving the object a floating effect.

By illuminating the furniture, you can give it a visual novelty - the image of familiar objects will be transformed. At the same time, the room becomes festive, mysterious, with a special atmosphere.

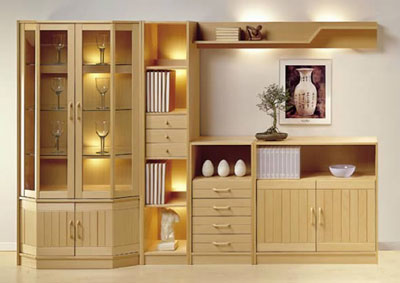
Almost any furniture can be illuminated: from the display case with collection items and the bar counter
to the bottom of the sofa
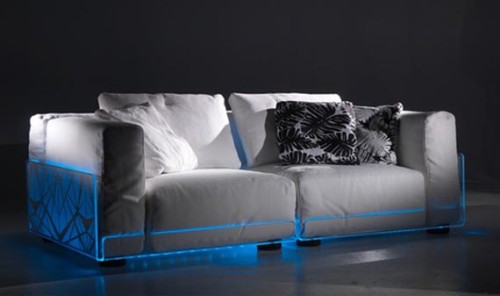

Most often, LEDs are mounted in cracks, recesses, niches, under the bottom of any objects - that is, in places where the light sources themselves will be invisible, and only a slight glow will be visible to the eye.
LEDs are convenient where at least light light is constantly needed - for example, on the stairs. If the steps are at least slightly illuminated, this increases comfort and convenience,

at the same time, the staircase becomes spectacular, the interior acquires a certain mystery.

The LED strip or cord can be fixed on the curtain rod, under the window sill, around the perimeter of the window behind the curtains,
![]()
along the perimeter of the poster or mirror,
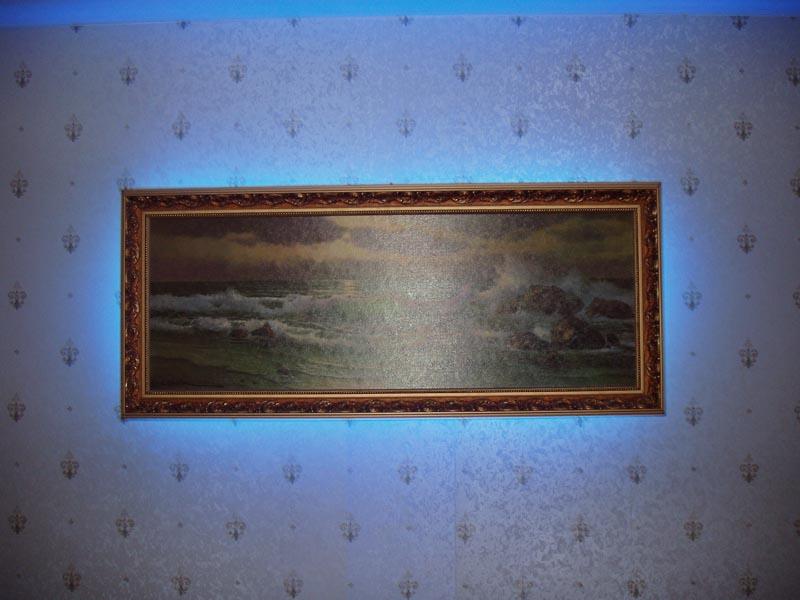
or other wall decoration,

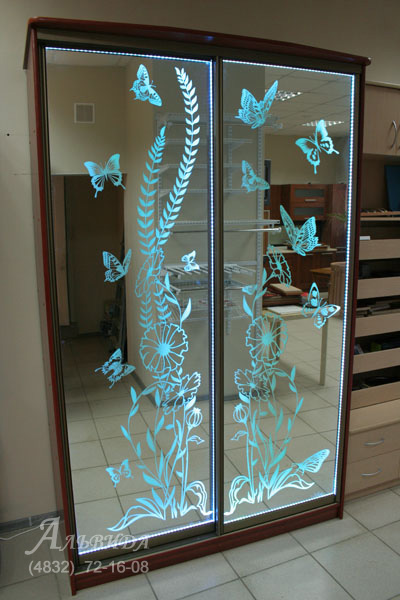
inside a cabinet with a glass door,
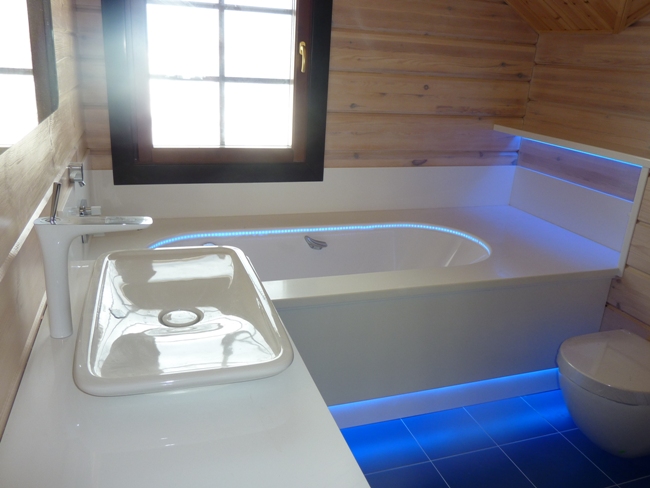
at the bottom of cabinets and even in the bathroom.

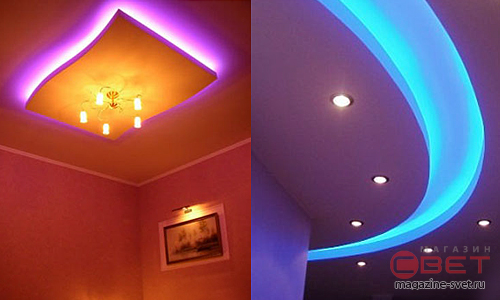
LED lighting will not be appropriate in all interiors. For example, in many ethnic styles(African, etc.), as well as in country-style interiors, the use of LED lighting, especially colored lighting, may be completely inappropriate.
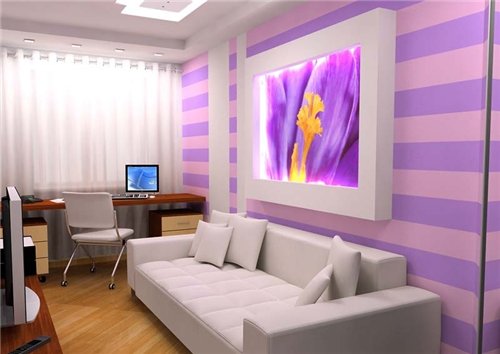
LEDs are most suitable for interiors in the style of futurism and minimalism. Futurism can also be used in interiors LED backlight the most different colors, even the most unusual shades. Use LED lamps Moscow and you will see how your interior will sparkle.
IN classic interiors bedrooms, living room, kitchen etc. colored lighting is rarely appropriate. It is better to choose white or warm LEDs yellow. The use of lighting in such interiors should be minimal - as a rule, LEDs are used to illuminate only the ceiling and niches.

- Principles of arranging hidden lighting on the ceiling
- Preparing for the installation of ceiling lighting
- Arrangement of illumination of polystyrene cornice on the ceiling
- How to install hidden lighting in a polystyrene cornice yourself
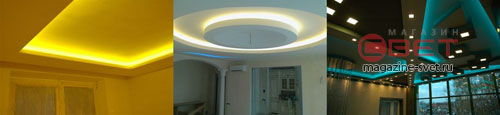
Today, one of the most trendy elements of decorating rooms inside the house is hidden ceiling lighting. Its main purpose is to create additional lighting in the end parts of the room. In order for the hidden backlight to respond modern requirements, it is necessary to equip it in accordance with all placement rules.
The main function of light illumination is additional illumination of the room.
Principles of arranging hidden lighting on the ceiling
Regardless of the ceiling configuration in your home, this type of lighting can be installed in any corner. This is achieved thanks to the flexibility of devices that provide hidden lighting.
There are 2 simplest methods for arranging additional lighting:
- illumination of the opening from a plasterboard box;
- illumination of polystyrene cornice.
With the first method, the plasterboard box must be placed along the edges of the entire ceiling area in a room under renovation. Lighting is subsequently installed inside this box. The advantage of installation using this method is the heat resistance of the plasterboard material, that is, it will withstand the influence of any lighting devices. The box stays under the ceiling much better than a polystyrene cornice. In addition, this method allows you to attach lighting fixtures directly to the profile. In addition to hiding the backlight, the plasterboard box can be used as a cladding for other elements of the electrical network that are undesirable to the eye.
Cons this method are the high cost and complexity of the installation process. It will require you to have certain knowledge in the field of renovation and architecture. It is worth considering that installing such a box in the kitchen is extremely undesirable. Due to increased humidity, plasterboard material may crack over time.
Return to contents
Preparing for the installation of ceiling lighting
Before starting work, you will need to prepare the following tools and accessories:
- electric drill;
- curly screwdriver;
- plane;
- small saw;
- scissors for cutting metal;
- roulette;
- level;
- self-tapping screws;
- plasterboard material and profile.

First of all, you need to select the type of opening that you want to arrange in the room being renovated. IN small spaces It is recommended to illuminate the ceiling in an open opening. In this case, there will be no need to arrange a border along its edges, and the distance to the ceiling will be minimal.
A closed opening involves placing a low border that hides the lighting fixtures; it will require installation 5 cm lower.
After this, you need to mark the next line for fastening on the ceiling, remembering to use a tape measure for accuracy. You need to drill holes along the line at intervals of 50 cm, insert plastic dowels into them and secure the UD profiles with hardware. The use of wood chips instead of plastic dowels is unacceptable, since they absorb liquid intensely and swell quickly, which contributes to their loss.

CD profiles are used as support posts, so they need to be cut and secured with self-tapping screws. Since the created sheathing will not be exposed to high pressure, the support posts do not have to be connected to the wall profiles.
In the process of attaching the plasterboard box, you need to monitor the seam between the two sheets of material; it must be placed on the same profile. To give the plasterboard material uniformity and accuracy, it is necessary to cut it using a small saw or hacksaw. In this case, the edges should be trimmed using a plane.
To complete the arrangement of the box, you will need to thoroughly putty the joints and holes that appeared as a result of screwing in self-tapping screws. Before puttying, the seams can be carefully processed masking tape. The putty used must be gypsum. If you paint the box yourself, don't forget to prime it.
Next you need to place and connect the lighting fixtures. Openings made of this material allow you to place various lamps and lamps. Modern plasterboard ceilings are usually equipped with LED strip. Its productivity exceeds the simplest lighting devices by 10 times, while the efficiency is 22%.
It is worth considering that such ceilings can only support a small amount of weight. Lighting devices must have a mass of no more than 10 kg, otherwise they may break off.
Return to contents
Arrangement of illumination of polystyrene cornice on the ceiling
As a rule, such work requires special tools and equipment, so they are often performed by qualified construction team. At the same time suspended ceilings can be created from polystyrene cornice, which will simplify the arrangement process. Such a ceiling can be created with your own hands.
Polystyrene cornice has a smaller margin of safety compared to plasterboard material, and it is also less heat-resistant. This means that the cornice can only be equipped with an LED strip; other lighting devices will ruin its surface. Its main advantages are ease of arrangement and low cost. Installation of polystyrene cornice can be completed in just 3-4 hours of work.
What tricks do designers go to in order to create a special, unusual and original environment in a room that you want to return to again and again! One of modern solutions for interior decoration is the use of hidden ceiling lighting. It can be either a single-level design - a niche or cornice, or multi-level plasterboard ceiling. Each form has its own individual characteristics, which you should pay attention to when planning the installation of such lighting.
What is special about hidden lighting?
First of all, it is worth remembering that it is used mostly as a design element, and not for the purpose of full lighting. Although, quite often, I use it in dark and far corners of the room for additional lighting.
Keeping in mind the decorative purpose, it is possible to create a surprisingly easy solution and even visually expand the ceiling with a certain touch of fabulousness and mystery.
Similar lighting is recommended for low ceilings, because it is able to expand the boundaries of reality, feeling as if the ceiling is floating in the sky. It is very beautiful, stylish and, perhaps, even fashionable, because the world’s most famous designers, fashion designers, actors, and creative personalities use it to decorate their homes. Having seen such a solution once, you immediately want to implement it in your home.
How can you build a hidden backlight?
Installation of hidden lighting
To do this, a plasterboard structure or polystyrene foam cornice is attached around the perimeter of the room ( stretch fabric). Each method has its pros and cons and is selected depending on the humidity in the room, wishes for the types of lighting lamps used, ceiling height and financial capabilities. Let's consider each option in more detail.
Plasterboard niche
In this case, we are talking about a galvanized frame around the perimeter of the room, onto which sheets of drywall are attached. Hidden ceiling lighting is mounted inside a niche. Here you can use open or closed version. The first is suitable for low ceilings, when there is no curb, thereby the distance to the main ceiling is as small as possible.
Drywall has a number of advantages over expanded polystyrene:
- It is more heat-resistant and allows you to mount lamps of almost any type, shape and power level.
- The lamps are installed directly on the plasterboard surface.
- In addition to light illumination, additional lamps can be mounted on the outer part of the niche to increase the level of illumination, for example, spot lamps LED lamps or full lamps.
However, there are also disadvantages:
- Complex installation of the structure, requiring the work of professionals.
- Quite a high cost.
If the choice falls on a plasterboard niche, then it is worth knowing about the main nuances of its installation.
Features of installing a plasterboard niche with hidden lighting
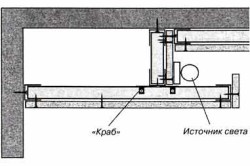
The principle of fastening is exactly the same as for a full-fledged level suspended structure. To do this, a plan is drawn on the drawing indicating the locations of the profiles, after which the marks are transferred to the walls, marking a horizontal line along the perimeter of the room using a level at a height of about 5 cm.
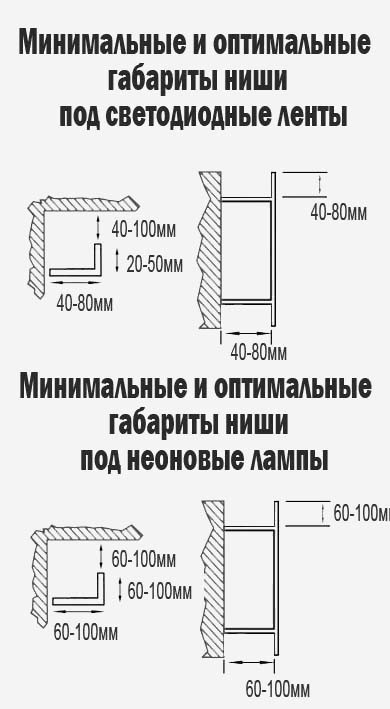
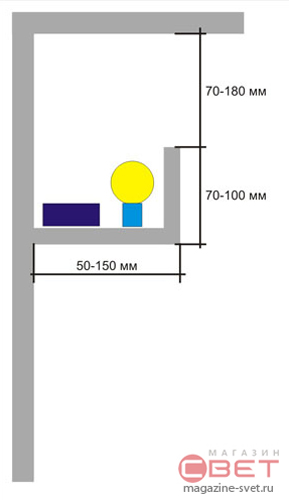
Minimum and optimal dimensions of the niche for different sources Sveta
Then the profiles are fastened to plastic dowels inserted into pre-prepared holes. After this, it is mandatory to install CD profiles - racks and horizontal sections.
Sheets of plasterboard, pre-cut to size, are laid on the frame in such a way that they fall into only one plane.
Finally held finishing work– putty, primer and painting (or wallpapering) the resulting box.
Finally, you can install the lamps. It is worth remembering to think in advance about how wires and other communications will be hidden.
Hidden lighting using polystyrene foam
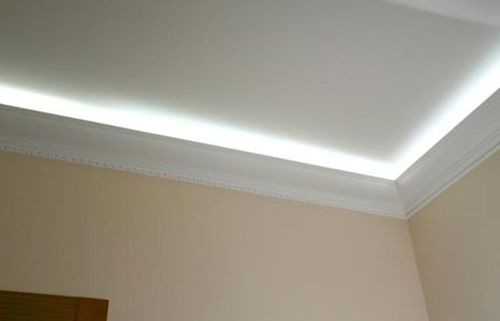
Ceiling plinth made of polystyrene foam with hidden neon lighting
Unlike the previous solution, its installation is very simple and takes minimal time. With the help of one person it can be accomplished within a few hours. It is possible to attach the cornice directly to the wallpaper, although it is ideal to remove the old plaster and prime it in advance. For this, any construction adhesive is used - liquid nails, titanium, acrylic and others.
It is not advisable to mount lighting fixtures inside the cornice, because it is not very heat-resistant, which can lead to a fire. It is best to use a nylon clamp to mount the daytime lamp block.
What type of lighting is preferable to use?
The most commonly used is neon or LED lighting. The first is more energy-intensive, but can create an original glow. LED is a leader in energy saving and is easy to install. Let's take a closer look at them.
Neon lighting
This type of lighting is possible thanks to the use of a phosphor that converts ultraviolet radiation into light of a certain spectrum. Depending on chemical composition neon lights will have different shades. Nowadays, electronic converters are increasingly being additionally installed, due to which you can independently adjust the color of neons.
In general, neon lighting is very soft and looks good both in large areas and in small rooms. It is worth remembering that the cold spectrum is suitable for large living rooms and halls, and warm shades look great in small-sized options. There are about 100 shade variations in total.
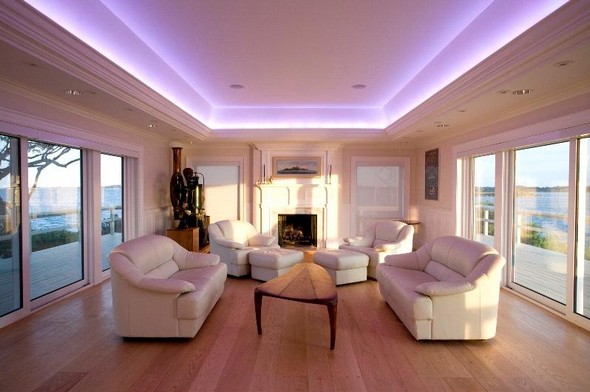
Neon lighting in the interior
Distinctive feature neon lighting– its durability (on average about 10 years). But there is also a significant disadvantage. They consume a sufficient amount of energy. But if you approach the issue “wisely” and install one converter at 15-20 meters, it can work out quite moderately.
LED lighting
It uses semiconductor LEDs. Their peculiarity is the ability to install in various rooms, including with high humidity. To do this, you should take care of purchasing specially adapted lamps.
By installing chiseled micro lamps around the perimeter or fixing an LED strip, you can create any shade from a million variations. Using an RGB controller will allow you to switch colors as you wish. Unlike neons, LEDs emit clear, unblurred colors. With their help you can even get pure white light.
![]()
LED lighting in the interior
A huge advantage is their budget, which allows you not to save on the number of lamps, but to place them in sufficient quantity for your discretion.
One of the varieties of this lighting is the use of LED strip. This is the cheapest way to create hidden ceiling lighting.
Features of using LED strip
It can be mounted on any surface, which means it is suitable for both plasterboard niches, and for structures made of polystyrene foam. Installation is quite simple and consists of marking the fastening lines along the perimeter of the wall of the tape and using a special adhesive surface to attach it to the base.

LED strip
The size is measured in linear meters, it is advisable to purchase it “with a plus” in order to be able to correct it. There are regular and moisture-resistant types LED strips, marked with the abbreviation IP. It is worth assessing in advance such an indicator as the density of lamps per one linear meter. Accordingly, the greater their number, the more powerful and brighter the light will be. For the kitchen, small rooms, bathtubs are optimal - about 50 pieces, higher - for living room areas, halls.
Choosing a ceiling with hidden lighting as design solution, pay attention to its use for zoning the territory. Particularly interesting are the multi-level figured illuminated ceilings, dividing the room into sections. In any case, even if you choose a budget solution as a polystyrene foam frame, you will get an original and unusual design decoration, capable of completely changing appearance rooms.


