We invite you to get creative and return a little to childhood, when any fluff is a ballerina, any box is a house, and any leaf is something magical and unusual. In childhood, imagination is very well developed. It’s better to make crafts on the theme of winter with your own hands for kindergarten together with your little ones. Children can suggest and come up with a lot, but the technical side of the issue is up to adults. Further in the article you will find descriptions of winter-themed crafts that you made yourself for kindergarten and many ideas and tips. All that remains is to set aside an evening and start creating magic together with your favorite little ones!
We associate winter with snow, snowflakes, snowdrifts and, of course, Happy New Year. Crafts for a competition or exhibition for a kindergarten on the theme of winter, which can be easily done with your own hands, should reflect these ideas. Based on this, we will select ideas and material for their implementation.
You can make a panel or a drawing. But this may not be a simple drawing, but made using an interesting technique. Here's what you can use to fill a canvas for a drawing or a panel on the theme of winter:
- Semolina drawing.
- Application made from cotton pads.
- Application made of cotton wool.
- Drawing from white crushed eggshell.
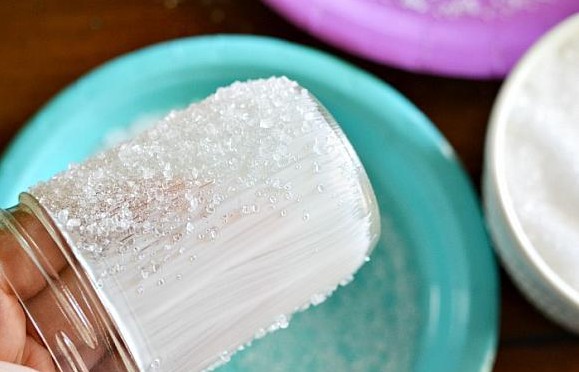
- Drawing with sugar.
All these types of designs and applications involve gluing ingredients onto a base with a pattern applied with glue.

New Year's installations are a favorite type of creativity for kids. For it, you can take an empty unnecessary box and cut off 2 walls from it. There will be a floor with two walls at an angle. This will be the basis for an amazing fairy-tale landscape or scene. Snow can be made from cotton wool, houses and trees can be made from cotton swabs or newspapers rolled into a tube, painted with brown paint, or original logs. Further in the article a master class of one of these installations will be given.
Do-it-yourself winter-themed crafts for kindergarten can be made from paper or empty plastic bottles, from burnt out light bulbs, and generally from anything you find at home. Next, consider a penguin made from an empty plastic bottle and dogs made from light bulbs.
You can also make crafts on the theme of winter for kindergarten with your own hands from threads; photos of such crafts with descriptions are further in the article.

Craft “Winter's Tale”
And now we suggest looking at a photo and a detailed description of how to make some crafts on the theme of winter with your own hands for kindergarten.
We make things from what we have at home
We suggest using for crafts everything that is unnecessary in the house, for example, a burnt out light bulb. If there is a big paw, that’s very good. Let's turn her into a real New Year's penguin. What is needed for such magic:
- burnt out light bulb (preferably larger);
- acrylic paints or gouache and brushes;
- some firth or fabric in black, red and white;
- ribbon;
- glue (use a heat gun if possible).

So let's begin:
- Paint the entire light bulb white and let it dry thoroughly.
- With a pencil we draw the front part: the face and belly, which will remain white, the rest is painted black, except for the place where the light bulb is screwed into the socket. We paint this place with red paint. Let it dry.
- Draw the eyes and beak and let dry.
- We cut out oval wings from black felt or thick fabric and glue them on both sides.
- Cut out a red rectangle for the scarf and cut the ends, tie the scarf.
- We attach a ribbon to the top of the head and cover it with a strip of white felt or fabric on top. You can attach a pompom to the top of your head.
The funny penguin is ready.
Penguin from a plastic bottle
Now let's see how to make a penguin or Santa Claus from a plastic bottle. The scheme is very similar and simple. For this craft you will need 2 empty identical bottles. We cut off only the bottom from one, and cut the second in half and glue the bottom of the first eggplant to it with tape or glue. It turned out to be such a block.

Now we paint it white and let it dry. Then, in the same way as with the light bulb, we draw the contours of the front part for the penguin or the face if we are making Santa Claus. We leave them white, paint the rest either black (for the penguin) or red (for Santa Claus). Then we draw the face and draw other necessary details. We put on a cap and a scarf, if we made Santa Claus, then we glue on a beard from cotton wool or felt. These are some interesting crafts you can make with your children from unnecessary things.
Panel “Snowman made of cotton pads”
What's winter without a snowman? Children love to build snowmen in the yards and poke around in the snow, rolling lumps for him. But they will also really like making such a winter hero at home from scrap materials. What is needed for the creative process:
- thick cardboard for the base, light blue or dark blue;
- cotton pads;
- colored paper or thin felt;
- white paper;
- paints and brush;
- scissors;
- PVA glue.

Let's start building a snowman:
- First, let's create a landscape around us. Cut out 2 colored rectangles from felt or paper and glue them onto cardboard. Cut out a brown tree trunk and glue it on.
- We glue snow roofs on houses or half a cotton pad. We make the base of the snowman from two cotton pads. Glue on the snowman a cap made of felt or colored paper and a scarf.
- We glue the discs as snowdrifts and snow on tree branches.
- Cut out small snowflakes from white paper and glue them randomly.
- Now all that remains is to paint the details: the snowman’s face, the windows.
A wonderful winter panel for the kindergarten is ready.
Winter panel made of semolina or sugar
Another fascinating and interesting option for a picture or panel on the theme of winter is painting with semolina or sugar. Kids will be delighted with this activity. To make such a panel, take colored cardboard, PVA glue, a simple pencil and sugar or semolina.
Draw any winter design on cardboard with a pencil. For children in kindergarten, you can do the simplest one. Then coat all the parts that need to be painted with glue. Now pour semolina or sugar boldly and thickly over the entire picture. You need to leave it like this until the glue dries. Then just lift and pour out all the remaining grains that did not stick.

You can make a panel with a winter theme from plasticine with your child. To do this, you will need thick cardboard as a base, plasticine and a simple pencil.
You need to draw a simple winter story on cardboard. Mom can help here. It could be a landscape, a Christmas tree, a snowman or any animal. And then decorate the picture, but not with paints, but with plasticine, as if rubbing small pieces of the desired color, filling in the details of the picture. A child can handle this well, only under the control of his mother.
A similar panel can be made from thread crumbs. Everything is exactly the same until the moment of coloring. Before coloring, you need to finely chop threads of different colors and place each color in its own container. Then coat each element of the design separately with PVA glue and apply crumbs of thread onto it. So we fill in all the elements of the picture.
Crafts from threads
Snowman made of threads
You can try to make a beautiful, openwork and large snowman from threads. What is needed for this:
- two balloons and polyethylene;
- white cotton threads;
- PVA glue;
- branches for pens;
- cap and scarf for decoration;
- buttons for eyes;
- orange paper to make the nose look like a carrot.
Let's start tinkering:
- We inflate the balloons and wrap them in polyethylene.
- Wrap the balls randomly with thread coated with PVA glue. The thread must be passed through a tube of glue and wound.
- Let the balloons dry, burst the air base, and pull out the balloons from the inside through any gap.
- Glue 2 balls together and place the snowman on a stable surface. To do this, you can glue a ring from a strip of thick cardboard.
- Now we decorate the snowman with a cap and a scarf, and glue twigs instead of hands.
- We glue the buttons in place of the eyes and nose with a carrot from a rolled up paper cone.

In general, you can decorate such a snowman at your own discretion.
Christmas trees made from balls of thread
Now let’s make a cozy, homely and Christmas tree from balls of thread. To do this you need:
- threads of different colors. It is better to take half-wool or acrylic;
- thick paper, from which we will make the base of a cone or a purchased polystyrene foam cone;
- any beads or flowers made from ribbons and tulle for decoration;
- thick wire;
- pot or empty low jar;
- fabric, mesh or tulle for decorating a pot.
- jute rope.
- glue in a gun.
- gypsum.
Let's start creating:
- Let's make the base. First, beautifully bend a small piece of wire for the leg of the Christmas tree and wrap it with jute rope.
- Dilute the gypsum thickly in a bowl and transfer the required amount into a Christmas tree pot, stick the stem in and wait until it dries.
- We decorate the pot with fabric and decorate it with a cone or flower.
- Now the Christmas tree itself. We make a cone out of paper or take a ready-made one from polystyrene foam and put it on the leg.
- We wind balls from different threads. You can involve children in this activity; they will be happy to help.
- Cover the cone tightly with balls, leaving no gaps.
- All that remains is to decorate our cozy woolen beauty. Glue on beads, fabric flowers, or whatever you want.

You can make such a Christmas tree without a base from a pot and a stem, just a cone of balls. It's both easier and faster. You can add sisal balls to the balls, if you have them, or make balls from coffee beans by simply pasting over thick lumps of paper colored brown with coffee beans.
Winter New Year's wreaths
Such wreaths are classics of the genre. They decorate the room in winter, preparing for the New Year. They can be made from whatever is at hand; they can be used:
- spruce branches;
- cones;
- chestnuts;
- pieces of paper or cardboard;
- acorns;
- bay leaves;
- dried flowers;
- coffee beans;
- paper flowers:
- flowers made of fabric or ribbons;
- just branches;
- New Year's balls of different sizes;
- the same skeins of thread and so on.

To make a wreath, the main thing is to understand the principle: first we make a base out of cardboard or buy a foam ring from a craft store and decorate the base as you wish. You need to stick the selected elements tightly onto the base, you can combine them, and then decorate them with a ribbon bow on the side and hang them on a string.

This wreath can be sprayed with glitter varnish or gold or silver spray paint.
Lyubov Lavrova
Master class on making family crafts “Winter's Tale”.
teacher LavrovaL. IN.
Every year, on the eve of the New Year holidays, our kindergarten hosts a family crafts competition. Parents and children take an active part, which brings parents, children and teachers closer together. Family crafts are full of creativity and originality. Many of the parents participated in the competition for the first time. The family of Dasha Malykhina presented their work “Winter's Tale”. This is a very labor-intensive job; it took more than a month to complete.
Dasha's family made a craft for the first time. Dasha is 3 years old, she just came to kindergarten, but the whole family took part in the production of “The Winter's Tale” - mom, dad, Dasha and even grandmother.
Dad, clearly having a very artistic taste, did the main work - the landscape, the trees. house, and most importantly, magical lighting: in the house, lanterns and lights on the Christmas tree. Mom, Dasha and grandmother - primed and glued. painted, made a snowman, gave new ideas. The friendly family worked many days and evenings. And now “The Winter's Tale” has come to life.
Craft material:
The box is large,
Ceiling tiles (house and estate fence,
Gypsum mixture (for landscape,
PVA glue,
Paints (gouache and a lot of white emulsion,
Baking soda (for snowpack,
Artificial snow
Green kitchen sponge for Christmas tree (rough part,
Wooden skewers (bridge),
The back of an old chair (railing for the bridge,
Foil (for a lake covered with ice)
Branches from a broom (reed)
Fir cone (for snowman)
Wire, (trees, bridge)
Cocktail straws (lanterns,
Electric garland,
LED bulbs, wires and batteries (for magic lighting).
And most importantly - GREAT PATIENCE AND FRIENDSHIP!
So, let's start creating together.
The trees are made of wire twisted in several layers.
This is a birch. The main thing is to correctly convey the shape - a slender, branched birch tree.

Primer with white paint with PVA, cover in several layers.

Using black gouache we convey the beauty of a birch trunk.

We also make a snow-covered tree.


We also twist the spruce from wire, giving the shape of the trunk and branches. Using brown and black gouache we convey the shades of the spruce trunk.

We make spruce needles from a green sponge, thinly and glue them on. Our trees are ready.
The fairytale house and fence were glued together from ceiling tiles.

Let's move on to the landscape of our "Winter's Tale". For this we need a board, plaster mixture, water, and most importantly creativity and imagination.

You need to imagine where the trees, the house and the lake will be.

We make a snowy background using glue and baking soda. Mirror Lake is made up of foil, reeds (broom branches) and snow.

All that remains is to make lanterns from cocktail tubes with wires and diode bulbs for illumination.

You can check the backlight. "Winter's Tale" comes to life

Let's walk across the bridge in a magical winter fairy tale. The bridge is made of wooden skewers, wire, the back of an old chair and painted with brown gouache.

Who lives in it? Answer me. Show yourself to the kids.

The gates to the fairytale house are always open!

This is the “Winter’s Tale” of Dasha Malykhina’s family.
Thank you for your attention!
Publications on the topic:
I would like to offer you my master class on making crafts for New Year’s competitions. Last year I was with my pupil Angelina.
As part of the work on self-education on the topic “Introducing preschool children to the origins of Russian culture through theatrical activities,” I propose.
This year, the kindergarten staff and I prepared a model of the Cossack courtyard. It was necessary to make a house for him. Purpose: to introduce.
The inhabitants of heaven, bright and light creatures “bringing news” ANGELS exist in the traditions of many peoples. Guardian Angel accompanies.
Recently, our group hosted the “Easter Week” project, during which we played folk Easter games with the guys and got to know each other.
Do you want to pleasantly surprise your friends and family? Then my master class will come in handy! I propose to make such a comic souvenir “Pig in a poke”.
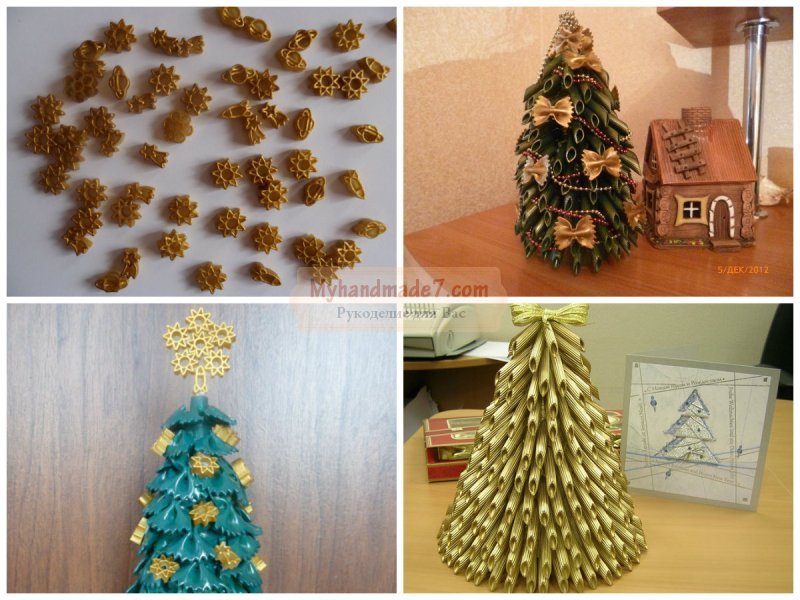
What could be more fun and exciting during the cold season than doing DIY crafts on the theme “Winter”. When it’s cold and snowy outside, the child has a lot of time for creativity, and besides, the weather itself gives inspiration. And the New Year holidays are approaching, so crafts will come in handy for decorating your apartment and Christmas tree. The baby has a variety of materials at his disposal, so you should not limit yourself to paper; for example, you can take pasta and use it to create a bright decorative Christmas tree.
DIY children's crafts on the theme "Winter"
Most Popular DIY children's crafts on the theme "Winter"- these are Christmas trees, but the materials that can be offered to a child to implement this idea can be very diverse. For example, you have at your disposal various shaped pasta, which will be an excellent material for decorating a magnificent New Year's beauty.
The basis will be a disposable wine glass; it has a conical shape, this is exactly the shape we need for the base for the Christmas tree. You can make the bases using cardboard or plastic, but a disposable wine glass is strong enough that it will not deform under the weight of the pasta and a layer of glue.
We will take pasta in the shape of small bows, with them the Christmas tree will turn out to be truly beautiful and lush. You should also prepare miniature pasta of different shapes, which will serve as decoration and become small Christmas tree balls that decorate our New Year’s beauty.
To ensure that the elements adhere securely to the base, ordinary PVA glue is not enough; it is advisable to use a hot glue gun. To make the craft realistic, we will need green spray paint, and for coloring - gold paint.
We need to separate the stem of the wine glass; we will need it at the very end of the craft. Turn the cone over with the wide side down and start gluing the elements from the very bottom. The pasta bows are fixed with a drop of hot glue.

“Bows” should be glued close to each other, arranging the rows in a checkerboard pattern. Make sure that there are no holes between the elements through which the plastic base of the wine glass can be seen. If there are any small gaps left, you will then paint them with green spray.
When you get closer to the top of the head, whole “bows” will no longer fit, so the top of the head can be filled in halves, as shown in the master class. Of course, while the pasta retains its natural color, the craft looks completely unattractive, but as soon as you paint it green, it will immediately take on a magical look. Additionally, the tips of the “twigs” can be decorated with sparkles.
When the paint is dry, you can glue the stand. The role of the stand will be played by two legs from a wine glass, glued together along a narrow base, as shown in the master class. Now the coasters need to be glued to the wide part of the wine glass using hot glue.
All that remains is to decorate the finished Christmas tree with small shaped pasta - first you need to paint them with a gold spray on both sides and let the paint dry. Then stick small elements in random order on top of the “bows” or fill the remaining gaps with them.
Several curly macarons can be glued together to form a star, which can be used to decorate the top of the head.
When making pasta with your children, you can take not only “bows”, but also other fancy-shaped pasta - spirals, shells and tubes. Depending on what form of pasta you use, your craft will be completely different. The base can be made from cardboard, rolled into a cone, or pasted over an empty glass bottle of champagne or mineral water with pasta. You can independently choose the color of paint in which to paint the finished craft.

Original DIY crafts on the theme “Winter”
Together with your children you can do original DIY crafts on the theme “Winter”, and these can be not just individual crafts, but entire winter compositions. What elements may be present in such a composition? Of course, a house with snow-covered roofs, which stands among bare trees and lush green fir trees in a snow-covered meadow. Next to the house there will be a snowman, who has been visited by forest guests - gnomes or hedgehogs.

As you can see, this is a complex and multi-stage work in which you can involve a group of children, each of whom will have their own task. And then the individual crafts will be combined into a whole composition.
The main element of the composition is the house, it is very interesting to make it, because the child will literally stack it log by log. The main element is snow; according to tradition, this role will be played by ordinary cotton wool, which must be fluffed with flakes. It is with cotton wool that we will cover the roof of the house and the clearing itself. Flakes can be used to cover bare tree branches and spruce branches. If you still have artificial snow in an aerosol that you used to decorate your windows for the New Year, you can also use it.

How to make crafts on the theme “Winter” with your own hands
Now that we have an idea, how to make crafts on the theme “Winter” with your own hands, you can start creating it. First we will make a paper house, it will be built from paper tubes. You can take plain white paper and then paint the walls of the house with brown paint, or immediately use brown paper (colored single-sided).
The A4 sheet must be cut into three parts along the length of the side, as a result you will get rectangles, each of which we will twist into a tube. You will need a lot of tubes - approximately 11 pieces on each side, the total number is about 50; if necessary, you can tighten the tubes while working. The edge of the thick tube must be coated with a glue stick and glued to form a tube.

Our foundation will be thick cardboard - you can cut a square or rectangle. Glue the tubes on all sides so that the tips of two peek out beyond the perimeter of the base. Long tubes will be on the sides, and two more should be shortened a little by cutting off the excess part, then gluing it to the base. Long tubes should alternate, for example, if in the first layer we laid long ones on both sides vertically, then in the next row the long ones should be horizontal. This way you will get the effect of a log cabin, exactly like in the picture.
When laying out the next row, it is necessary to coat the tubes of the previous row with a thin layer, and it is better to fix the corner joints with PVA glue for reliability. Once you have three rows on each side, it's time to decide where the door to your magic house will be located (who knows, you might end up with a house for Santa). Select one of the sides and mark the door in the middle - there should be a hole in this place. When you glue the next layers on this side, the tubes must be cut. Make sure that the cuts are at the same level along the entire height of the door on both sides.

The height of the windows should be half that of the door, but both the windows and the door should end at the same level. Therefore, when you have made three rows of doors, you can begin to form windows on the side walls.
After the walls have become solid again, you need to complete 2-3 more rows and begin forming the roof. For the roof, the tubes are installed only on two opposite sides in the form of a triangle. Each next row of tubes should be shorter than the previous one by only a few millimeters. In total, the attic will consist of 10 rows of tubes.

DIY crafts on the theme “Winter”: ideas
The main element of ours is almost ready, but it needs to be decorated so that the house looks like something out of a magical Christmas story. It is necessary to secure the door by gluing it together from tubes, but this time placing them vertically. The doorway can be decorated with brown cardboard with a carved edge, as shown in the master class.
Make a frame and shutters on the windows, and then use colored paper to glue the curtains together, securing them with double-sided tape on the back of the walls.

The roof will be made using thick colored cardboard; you can choose any color, but it is better to take a dark one so that its natural color can be seen under the snow. We will make not just a straight roof, but with tiles.
Of course, creating tiles is a long and painstaking process: you will need yellow, orange or terracotta construction paper, sharp scissors, and a piece of paper and a pencil to draw the template. The tile is a wide strip with a wavy edge, then the finished pieces must be glued overlapping, covering the entire surface of the roof.
As you can see, it’s not at all difficult to do DIY crafts on the theme “Winter”, ideas You can see the decoration in the photos.
For the house you need to decorate a snow-covered meadow, you can put our pasta Christmas tree next to it, and a few more hedgehog ones made from pine cones and plasticine. And, of course, there will be a cute New Year's snowman next to the house.

DIY crafts on the theme “Winter”
Probably the most important are various applications that depict Christmas trees, snowflakes and snowmen. The child has at his disposal various materials that will help him create a beautiful paper snowman. Children can use cotton swabs and cotton pads, then the craft will turn out to be voluminous.
You have already seen options for the proposed composition - DIY crafts on the theme “Winter”, photo we selected in our master class. A snowman must be present in the composition, otherwise, what kind of winter is this?!

Together with your mother, your child can make a truly adult craft - a bright and original snowman from a white sock. You can buy special terry socks for this craft, then the snowman will receive additional volume due to the specifics of the material. To make the snowman stable, it should be filled with heavy material, especially the very bottom. For example, you can use small grains, then the toy will also give an unforgettable tactile sensation. The rest of the snowman is filled with padding polyester.
And don’t forget about the main element of any winter decor - snowflakes, which you can cut out with the whole family, competing to see who can create the most beautiful snowflake. Ready-made snowflakes can be decorated in the form of a garland or glued to the window using a soap solution.
Hello, friends!
And the white winter began suddenly, It came out and swept, swept, swept! Ah, I’ll decide for myself what to do tomorrow, And tomorrow –…. Remember this song by Sofia Rotaru, for some reason I was humming it when I decided to take on one very fascinating topic. The article will be devoted to crafts for the New Year. Do you know why? Yes, because again we were asked to bring something interesting and unusual to the kindergarten and school for a competition. So again my mother had to sit and rack her brains.
By the way, if you don’t go far and be primitive, then you can do it for a New Year’s exhibition, for example, or maybe? Yeah, in my previous notes we already conjured on this topic. I think that even Santa Claus will be happy with such work))). Ah ha ha. What do you think?
Still, there is nothing more wonderful when we all begin to prepare for winter and decorate absolutely everything in the room with beautiful winter decor. Be it shops, apartments or child care facilities, etc. Thanks to all this, the mood rises and a festive mood reigns, which happens once a year. The smell of tangerines, the chimes and all this happens when we are all looking forward to it on the night from December 31 to January 1. Do you agree?
Well, let's start creating, take note of the work option you like and quickly get to work. Choose the material at your discretion, it can be absolutely anything, use improvised means or junk, in general, everything that is called
Well, friends, are you ready to go into the world of magic? Then quickly turn on your imagination and ingenuity, let's take unnecessary things and make masterpieces out of them. If you still don’t know how to do something like this, then these master classes and a bunch of ideas will help you. Go for it!
For the first craft we will need:
- glue gun
- tinsel
- sheet of paper
- wire
- CD disks - 12 pcs.

Stages:
1. Cut a pentagon from a sheet of paper with sides of 6.5 cm. Attach it to the disk, and where the vertices are, place points on the surface of the disk.

3. Now use a drill to drill according to the marks to make holes. Take the wire and fix all the pieces so that the ball eventually comes out.

4. This should be such a cute little thing, it already shines and shimmers.

5. Now all that remains is to do some magic, glue multi-colored tinsel along the contour of each circle.
Use a heat gun, just be careful not to burn your fingers.

6. In the end, the most wonderful charm awaits you, which is even a pity to give), and if you hang it on a chandelier or decorate a street Christmas tree with it, it will be absolutely wonderful.
In secret. You can take it with you to school or kindergarten and take first place at the exhibition. Good luck!

The next craft option for the New Year, or winter in general, so to speak, is a fairy-tale house. Wow, you say, I see how your eyes have already lit up. Do you want to create the same snow composition? Then contact me for templates, I will send them to everyone absolutely free.
These works are made in the style of vytynankas, but many people really like them. In addition, you can then decorate such products with tinsel or beads and sequins to create a festive atmosphere.

You will be given one template for the Christmas tree, but you will need to cut out two blanks from it, and then either coat them in the center with glue or sew them together. This is necessary for the volume effect.


If you don’t want that Christmas tree model, then take this newspaper beauty. In general, you know, I recently had a post on my blog, and there I gave so many amazing ideas on how to make a Christmas tree that wow, you will obviously be delighted. Therefore, if you want, you can go right now here. Well, if not, then do it this way:

The next cool option and you can even say a souvenir in the form of a deer. Moreover, it is made from an ordinary bottle of champagne or beer. You can take any fruit drink, depending on who you want to give it to later, or put it on the table on a festive night?

Next, the next point, you probably know that not a single winter is complete without snowflakes. So why not take advantage of this and make a whole mountain of them. They can be cut out using either a stencil or the accordion technique. This method allows you to make the product voluminous. Watch the instructions now. But in this article, you will find a lot more


So, the snowflake has been created, now what? The craft is of course ready. Or you can make 7-8 of these fluffs, of different sizes, and put them on a stick with a stand. Do you see what I'm getting at? Yeah, and make another New Year's masterpiece. Look, how do you like this miracle?

Charming and beautiful, see the next work, which is made of satin ribbons (can be replaced with paper strips). You need to fold each strip into a loop and glue it to a paper cone.

For preschool children, I suggest the work is approximately the same, but instead of needles there will be ordinary green balls.


If you want to amaze everyone with your ingenuity, then make toys from eggshells, and you can do this completely safely. Pierce two holes with a diameter of 5 mm and 2 mm in the egg on both sides, and then start pouring polyurethane foam into the largest hole.
That's the whole trick, from a small hole, then you will see foam as it appears, so stop filling the testicle.
Thus, such a “ball” will be strong and stable, and then decorate it with decoupage, as if you don’t know how to do this, you can read here, or wait for my next article on New Year’s toys. In a nutshell, you have to take a regular napkin with a pattern and separate all the layers, then leave only the last one, dip it in PVA and stick it on the egg, let it dry.


And now pay attention, another new product this year is a New Year’s craft made from salt dough. Wow, you fluff. This phrase stuck to me from a cartoon about the Barboskins. Well, glue a cone-shaped figure from cardboard; the inside of the almost finished product is already shown.

Do you know how to make dough? If not, then here is the recipe for you, written in the picture.

Using your hands, apply the dough onto the cone and smooth it out, making sure the layer is 1.5 cm thick.

Then use scissors to scratch the dough and it will look like needles and branches, like the crown of a tree.


Place a star on the top using a toothpick.


Well, after voila, into a preheated oven at 180 degrees.


You can decorate with beads or large beads; glue them to the workpiece.

For creative individuals, I suggest making magnets in this theme. To do this, take a cardboard and cut out a New Year's symbol from it.

Then tie it in a spiral with a thick thread and secure all ends with glue. Glue a magnet to one of the sides.

Now the most interesting thing remains, this is the design, I propose to do it this way in the form of coffee beans.

Or you can build a toy in the shape of a snowflake, use ice cream sticks as a base and glue them at the base.

And then glue colorful buttons.

Perhaps you will be blown away by another beauty from whom you will not take your eyes off))). Take a look.

By the way, they often make a little penguin in winter, just like from the Tororo cartoon, using plastic bottles.

Well, since in the coming year the symbol will be a rat, I propose to make it just that. And do you know from what? Yes, from ordinary socks. See all the work steps in these pictures.

Or take approximately the same scheme for the work of snowmen.

A ball will be an excellent gift, as well as a craft. Which you can paint with acrylic paints and draw absolutely any design.

Or do decoupage with your own hands. Remember how to do this? If you find it difficult, this is how we decorated eggs for Easter. In short, you need to take a napkin and separate all the layers, leaving only the last one with the picture. Dip it in glue and apply it to the workpiece, let it dry.

Or go the other way; transparent balls can be filled with anything, for example, rubber bands. Looks nice, huh?

Here are a couple more ideas.

A ball with a photo inside looks magical and beautiful.

You can glue any bows you like.

And look what I found - an asterisk. Which will fit perfectly on a forest beauty, or will act as a keychain on a bag.

Crazy little hands even made something out of walnuts.


You can create any pattern or snowflake using PVA glue, then let it dry and remove it from the parchment. You can add more colors and color the sketch.

I also offer a version of paper fluff, and it will be voluminous and with fringe. First, learn how to fold the sheet correctly, since this craft is made based on origami. If you have any questions, write or read more


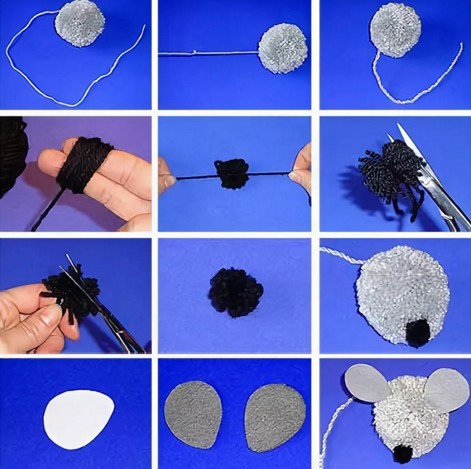
Now another toy, in the form of a snowman made of pompoms. The idea itself is quite simple, and the souvenir turns out lovely.


And by the way, you can use all the options discussed in the article for Christmas. For example, here is another masterpiece made from threads and glue, watch MK in this video and reel it in for yourself.
If you are interested in artistic activities, you can easily paint ordinary light bulbs and put knitted hats on them.

Crafts with the symbol of the year rat for New Year 2020
Friends, now let’s move on to the most important part of our article. Probably all of you are eager to receive a selection of crafts that will feature pigs made from improvised materials. In other words, from what is always at hand. So, I want to immediately remind you that I have a cool article on my blog on , if you need diagrams and descriptions, then contact me.

Another article will be published soon, in which you will find a bunch of new and cool ideas on how to make the main symbol of this year. By the way, is this a boar or a pig?
Well, for now, let me introduce such a character made of wool pompoms.
Probably the simplest option is a paper craft in the shape of a face.

Or create an applique with your children.

You can also make a postcard or greeting sheet.

A souvenir made from pine cones also looks wonderful, what cute little pine cones the author came up with. Bravo!

You can create a rat like this from polymer clay or modeling dough.
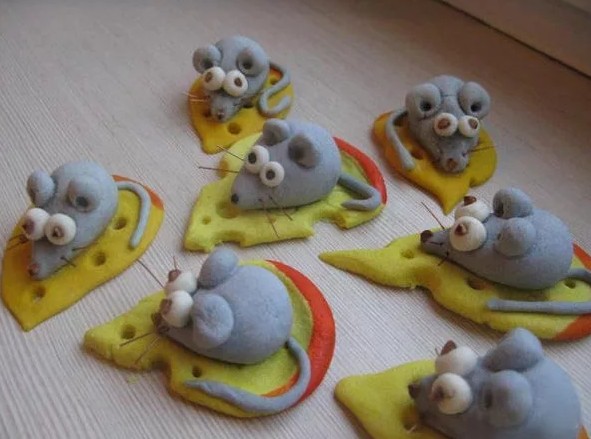
And if you want to find an easier job, look at this photo of a plasticine mouse:


Well, now friends, I want you to watch a couple of videos, maybe you can take something new and interesting from there as a basis. I tried to find a variety of stories for you.
Look what a magnificent mouse with flowers.
And this is a craft for our youngest children made from chenille wire, you can make it:
For those who are interested in soft fabric toys. Here are a couple of ideas for you.

Take felt, it turns out great work, look at the mouse). Moreover, it comes with a cutting diagram.

In general, choose the one you like.


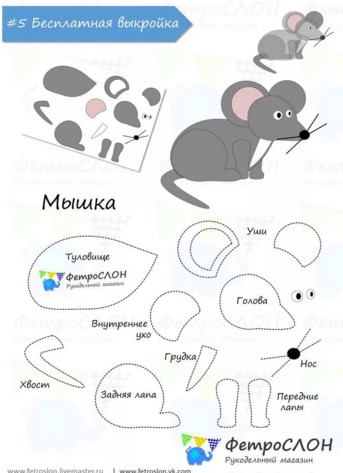

Do not forget that for volume, a felt toy must be filled with padding polyester or cotton wool.

Souvenirs made from pine and fir cones for the home
I think I’ll start introducing you to the easiest options first, and only then the more difficult ones. The first composition will be from an ordinary jar, tie the neck with threads, and hang real spruce or pine cones.

Fill the jar with pine branches and place a candle.


This work can be slightly complicated and all materials can be designed in an unusual way. Want to know more? Then see for yourself. A glass container can be decorated with regular semolina, which will look like a snowball on the product. To do this, paint the cereal white with chalk.

Then apply PVA glue to the jar and dip it into the semolina. Let dry.

After filling, decorate the neck and tie a bow.

Now decorate the cone with snow. Add more glitter to the semolina + and mix. You will need to dip the cone, and in order for it to stick to it, first dip the cone in PVA glue (a small piece of where the cereal will stick).

Thus, proceed according to plan, first dip in PVA, then in semolina and so on.


Another option, you can glue golden decorations, dip the cone into the glue, and then into them.

The product can be planted on the bark of a tree by gluing it with a heat gun, and you can also attach beads and a Christmas tree branch.


Using acrylic white paint will also make a nice souvenir.

Add a bow and beads.

In general, it will be a wonderful composition that everyone will go crazy about.

You can also easily cope with such a craft. Glue each cone into a decorative pot, but first paint them with acrylic paints.


Glue a star onto the top, as expected, so that the product reminds everyone of a Christmas tree.

Well, if you want a real beauty, then use a heat gun to glue the pine cones to the base in the form of a cone and decorate them with bows and other winter decor trinkets.


In addition, you can imagine such work as a wall decoration. Just remember that you need a foam ball.


Well, I couldn’t resist one more super option that I found on the gifts ru website: topiary. How charming and exciting it looks.

All work steps are written directly on the slides.


Master classes and ideas for paper crafts for the New Year
To be honest, last year we didn’t have much time to bring work to the exhibition. Therefore, we made this creation from cardboard and decorated it with plasticine. The stand was an ordinary plastic sour cream lid.

Or here’s another option: take a cardboard cone and glue any decorations on it.

And this year, the child was made by Thomas, they took an ordinary sleeve, covered it with paper and stuck on sweet souvenirs.

Well, what about Santa Claus, you can’t live without him, friends! Let's do it using origami technique.

Fold in the same way, I mean use the origami bunny technique.

Quite an unusual work in the form of a wreath, but it is attractive because it is made of paper arms, or maybe legs))).

Here's another idea, the work is made of corrugated paper. This is usually done for Christmas.

On one English-language website I saw such a work with wishes. You spin the circle, it rotates and a wish appears. To work, you will need two blanks of different diameters, on one of which a window will be cut.
To make the magic circle spin, make a hole in the center and glue a juice straw or toothpick to the largest circle. In fact, the idea is good, because you can use it to hold competitions and make jokes.

If you are interested in such a turntable, that is, all the templates and sketches are in Word format for printing, please contact me, I will send it by email for free.


It’s also easy to build a three-dimensional ball from newspaper tubes and cover them with aerosol paint. And then glue a ball or symbol of the year onto it.

Now I also want to introduce one work that you may recognize, it is from our childhood. For it, you will need to make templates on office paper in advance, choose, there are more or less. Due to this, the ball will have a different volume and size. Make 5 cuts with scissors along the lines of each piece.


Well, in conclusion to this chapter I want to show you one more ball, it’s quite delicate. You need to first cut out a sample in duplicate using the kirigami technique. And then glue or stitch two blanks.

Here are some designs for you to cut out.


And here is the finished product.

We have already tried it with our family in our spare time. Don't forget to decorate with rhinestones or sparkles.

DIY felt toys with patterns
Now for those who are interested in handicrafts, but I would like to note right away that I have another note on my blog that contains various . And now, as for New Year’s, I propose to perform such a miracle from pieces of felt.

Cut out squares from the materials, and then use a needle to collect them into one large pile.


Or take this Christmas tree as a basis.

By the way, you can make a huge green beauty and hang it on the wall.

If you love soft toys, then here are sketches and patterns for them.


The Christmas tree needs toys, these include balls, bells and crackers.


Also a winter house and reindeer.


Do whatever you want, but of course you can’t do without Grandfather Frost or Santa.

Beautiful works for the New Year's competition for school
Well, get ready to be surprised. Take these ideas and go ahead to take prizes. Look at the first masterpiece, it’s a jar, and from it the author created an amazing snowman. There is a battery-powered candle inside.

You can also build a winter composition, take an ordinary glass jar and decorate it, for example, put a car in it, and an artificial small Christmas tree on top of the car.

Tie the container with a ribbon or other decorative thread and hang the beads.


And then add any decor so that it is immediately clear that this is a New Year’s style vase. Now place the spruce branches and enjoy.

Quite an interesting idea to make a Christmas tree from coffee beans. They are glued to a paper cone rewound with dark threads. And then add decorations.


You can also create a miracle from candies. Take note for yourself too.

Here’s another button beauty, how do you like this masterpiece?


If you are an avid needlewoman, then you can also embroider a picture with your grandfather.

In addition, a masterpiece made of beads also looks great.


I have one more composition in my collection, but I will write a separate note about it and show you a master class. So don't miss it. A real masterpiece will come out in the form of a lamp, and you can imagine how cool it will look on New Year’s Eve.

Or make a Christmas tree like this, disguise a plastic bottle, pour plaster into the pot to secure the stick stem.


And if you want to charm the teacher, then present him with the following directly on the blackboard.

And now I propose to build a sweet ball, only it will not be edible. Glue the round-shaped jelly beans onto the foam blank with a glue gun.

Also don't forget to add a rope or ribbon in the form of a loop.


Similarly, decorate the same blank with beads. Or put the beads on a safety needle and stick them into the workpiece.


I think I'll show you a couple more ideas, this will be a tangerine topiary.


How to make a garland for a city Christmas tree
Probably the most affordable and budget option that remains for all time is a garland of colored paper in the form of rings. I remember how I sat and glued such round pieces as a child.

You can make a craft in the form of hearts, which are fastened together with a stapler, and the figure itself is made from paper or strips or decorative shiny paper.

You can do the work in a rainbow style using double-sided cardboard.

Well, paper novelties are in use.


By the way, if you want butterflies to flutter, then here is another cool idea. Watch this video and see for yourself. The author came up with a bright and very cool garland.
Or use regular cotton wool.

You can create something from scraps of fabric:

Of course, such options are more suitable for apartment premises, but a garland of buttons is perfect for the street.

They also make masterpieces from ice; they simply add dye or dye to the water and the pieces freeze. By the way, you need to immediately put the thread so that it also grabs.


Such a creation made from thread pompoms is suitable for home and street.

There is also an option that is suitable for those who knit and can easily master this pattern. Take the triangles from this snowflake as a basis and tie them around the disk, and then connect them into a chain.


Unusual crafts "Winter's Tale" for kindergarten for exhibition
You must understand that, after all, when a child brings a craft to kindergarten, he does it together with his parents or older children. Therefore, now I propose to consider different options for what you can bring. For example, take this grandfather in the shape of a star and decorate any winter composition with it. There is both applique and coloring here.

You can also use cotton swabs or disks to create something similar to a picture with your child.

Here's another souvenir that might also come in handy.

Such masterpieces are still created from threads and PVA glue.

I also like works made from plastic bottles or other utensils, such as spoons.


Now, as for winter compositions, you can create them from all sorts of things, it can be twigs and even plastic tiles, from which you will make Santa Claus’s house. Instead of snow, use cotton wool, and even make a Christmas tree out of pasta. See for yourself, friends.


Well, my favorite work, which has already been mentioned above, whoever needs blanks, write.

But at night she looks like a night light.

And finally, here’s one easy option for a New Year’s watch with candies, see the step-by-step instructions in pictures.


Beautiful cards for the New Year 2020 for children (MK and templates inside)
Postcards can be made from either paper or cardboard. You can take absolutely any story, even a coloring book, as a basis, and sign the necessary words or poem on the reverse side. Choose.


Among other things, you can design a postcard in the form of winter characters like this.


And also make a voluminous congratulatory card.


Friends, this is not all, soon a new article on this topic will be published on the blog, so come visit often and you will see many other creations. Make New Year's crafts and decorate your home and apartment with them. Bye everyone! See you again.
Long winter evenings, a quiet family atmosphere, New Year's holidays - and now your desire awakens in us
Winter crafts with and for children
12:26 November 27, 2017Long winter evenings, a quiet family atmosphere, New Year's holidays - and now the desire to create unprecedented beauty with our own hands awakens in us. And if you add to your own imagination the huge mass of ideas with which the Internet is simply overflowing, then you can actually become addicted to homemade products. Moreover, you don’t need any unusual materials for this. Just the opposite: on winter crafts Anything in the house will do.
Such funny snowmen made from felt, socks and even salt dough.

A funny penguin made of colored paper will amuse a child and teach the basics of geometry.
Snow-white winter is our favorite time of year for many of us, and New Year is one of the best holidays. Just imagine: it’s frosty outside, the roads are snowy, everything is covered with huge snowdrifts, and the whole family has gathered in a warm, cozy house on a day off. And when the kids start fiddling with colored paper and scissors, normal parents will not be able to stay away and will definitely join in the needlework, which will bring pleasure to both themselves and the kids. The desire to create awakens even more with the appearance of a fluffy Christmas tree. That’s when the children with mom and dad open a real workshop of Santa Claus, so many Christmas tree toys, garlands, snowflakes and decorations for gifts appear from under their hands. Not only is it beautiful, but it also brings great joy to those making crafts and those who see them.


If you remember, we wrote in detail how to make a solution for crystals.
Our inventive mothers, if desired or necessary, can adapt any item for decoration. This is how New Year’s crafts FROM FIGURED PASTA PRODUCTS have become very popular. You can get creative with your child and make unusual toys and funny garlands. Even if you simply paint them gold or white and sprinkle them with frosted pieces, the tree will sparkle from them, and the baby will be simply delighted. For the little ones, simple toys made from cardboard templates are suitable. The child will be able to cut out figures from paper, felt or foil. You can also use unnecessary beads and buttons found at home, different in shape and color. The child can sew them according to his own taste to previously made figures. Then they must be hung on the tree in the place of honor.

Winter crafts from pasta

For crafts you will need pasta of different shapes, glue and glitter.
Children's winter crafts
For older guys, we can offer more serious kids winter crafts, requiring certain skills. This way, younger schoolchildren can easily cope with a New Year’s craft - SLIPPERS WITH SANTA CLAUS. Of course, they can be made “in an adult way” - from thick felt, insoles, padding polyester. But in our case, a simpler one is suitable - a souvenir version of slippers that can be hung, for example, for combs in the hallway. They are made either from thick fabric or cardboard. In this case, the child traces his foot on cardboard and cuts out the base. Then he cuts out the top of the slipper from another piece of cardboard, and you can offer him to cut out its shape according to the template you made in advance. Before connecting both blanks, the upper part is decorated to resemble the face of Santa Claus. To do this, you can take a braid of a suitable tone, thick fabric, colored paper, two white buttons and two black beads from which the eyes are made, multi-colored yarn, padding polyester for mustaches, beards and the edges of a hat. You can decorate everything with white gouache and glitter. If your child gives such a souvenir to his beloved grandparents, then their happiness will know no bounds.

Winter theater made of felt.

Beautiful New Year card.

And here is another postcard with a snowman.
A fun version of a New Year's craft - Christmas tree decorations FROM EGGSHELLS. First, the white and yolk are carefully blown out of a whole (fresh) egg through punctures at its ends. Then the most creative stage begins - decorating the shell. The easiest way is to cover the entire surface of the eggshell with small pieces of colored paper. You can glue different applications from the same colored paper. If you add cotton hair, a mustache, a beard and a paper cap to the drawn mouth, nose and eyes, you can get a cute gnome, clown, Santa Claus or someone else. You can also cover the egg with glitter, decorate it with finely chopped “rain”, various ribbons, and absolutely anything else you can get your hands on. You can also simply paint the shell, but not with watercolors or gouache. They do not adhere well to the surface of the egg, so oil or acrylic paint is more suitable. A thread for hanging the toy, first threaded through both holes, is secured at the lower end of the egg, for example, with a thread tassel or bead.

Sugar snowmen.

Do you still not know how to properly use plastic bottles?
But for an APPLE OF PARADISE, everything in the kitchen will do. This way you can crumple the foil and give it the shape of a small apple. On top it needs to be wrapped with a finishing layer of the same foil. A peppercorn is glued into the recess at the bottom of the apple, and two holes are pierced in the upper recess into which a stalk, a leaf and a fastening thread will be inserted. For the cutting, you can use a twig, a real tail from an apple or a piece of twine, and the leaf can be successfully replaced with a bay leaf, which is better tinted for greater naturalness. Now all that remains is to sprinkle the apple with snow. It can be replaced with scraps of paper, small polystyrene foam balls, or even ordinary granulated sugar. To prevent the snow from falling off, the apple should be coated with glue or clear polish (nail polish) and rolled in snow material prepared ahead of time. Moreover, you do not need to roll the entire apple, but only one side or the top. When the apple is dry, it will be ready to hang on the tree.


Ball of corks


