In the interior of any room, be it a room, a kitchen or a bathroom, fixed corner ones look very harmonious. This element of furniture, with its simplicity, plays both a practical and aesthetic role. It can be used to arrange books in the living room, children's room or office, installed in the kitchen to arrange kitchen utensils, jars for bulk products or cute trinkets, or arrange convenient places in the bathroom for placing personal hygiene products and cosmetics.
Thanks to this design, you can rationally use the space in the premises small area, and also smooth out the corners. Such shelves, not being the main elements of furniture, will add emphasis to the interior design, effectively decorating it.
What materials are corner shelves made of?
Nowadays, stores have a huge assortment of different shelves, which makes it possible to perfectly match them to any room interior. Manufacturers offer products made from different materials, all kinds of designs, sizes and shapes. Despite this, many are not averse to making corner shelves on the wall themselves.
But in any case, you should know which materials are most suitable for the manufacture of such structures.
- Solid wood. This natural material has always been and will be very popular for the production of furniture, including shelves.
- and chipboard. They consist of recycled wood raw materials, to which formaldehyde has been added, and are well suited for the manufacture of cabinet furniture and its accessories, both in factories and at home. Surface finished products it is then covered with veneer or film.
- Metal. Used for making shelves different profiles, from which racks and transverse load-bearing elements are made. Various polymer coatings are used to protect against corrosion.
- Glass. For such shelves, impact-resistant glass is used, and bearing structures made of metal.
- Plastic. Corner shelves on the wall made of this material are structures in which the transverse elements and racks are made entirely of polymers.
Corner shelves for the kitchen
When decorating a kitchen, such shelves are used not so much for decoration as for convenience. As a rule, they are placed above work surface taking into account the rules of ergonomics. The photo will reveal in full what the corner shelves hung on the wall look like.

They have L-shape and can only occupy a corner or continue along the length of the wall. Often such an element, placed in the corner, connects hanging cabinets located on adjacent walls. For small kitchens, they are an excellent alternative to bulky cabinets and are used to place certain types of food, cookware and other utensils.
They can be made from all of the materials listed above, but more organically in kitchen interior An attached corner shelf on a wooden wall looks great, especially if the room is decorated in styles such as classic, Provence or country.
Corner shelves for bathroom
It's no secret that most bathrooms are small in size, and the issue of saving space is very acute. But in this room you should conveniently place bath accessories, shampoos and shower gels, cosmetics and perfumes, as well as all kinds of detergents for washing and cleaning.

That's why different suspended structures are simply irreplaceable here. The best option- hang the corner ones on the wall. They go well with mirrors, look elegant and suit almost any bathroom decor. And if you consider that the humidity in this room is always high, then you cannot find a better material for shelves.
Although plastic shelves would be no less appropriate here. Their design consists of a stand, which is installed in the spacer between the edge of the bathtub and the ceiling, and four shelves with perforations (for water drainage). For convenience, the shelves are equipped with hanging soap dishes and hooks for washcloths.
Also in the bathroom you can hang corner shelves on a metal wall. Such structures are usually made of stainless or chrome-plated steel.
Corner bookshelves
Shelves for books are present in every home. On the one hand, they are very comfortable, and on the other hand, they complement the interior of the room well. The design of these structures is striking in its diversity and originality.
Corner shelves for the wall in the room are made in both classic and non-traditional versions.
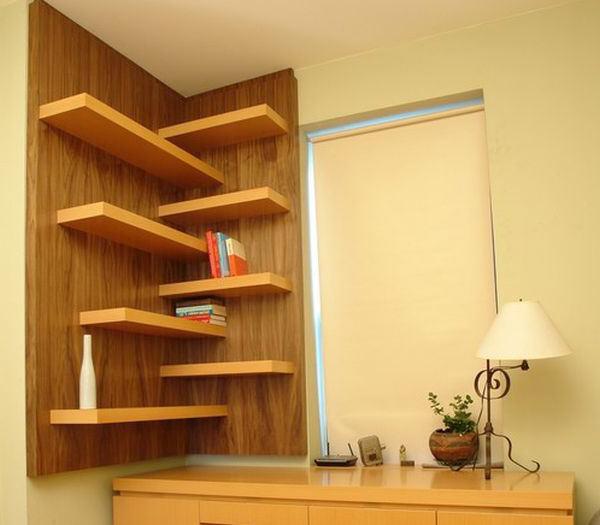
But even classics can be somewhat unusual. A wooden shelf looks impressive, the elements of which are alternately adjacent to one side of the corner, then to the other. The book surfaces have rectangular shape, rounded at the corners, and located at equal distances from each other.
Open shelves look more monumental. Usually, each side of such a cabinet is divided into compartments of different widths, in which the transverse shelves are located at different distances. Such corner shelves on the wall, photos of which are shown below, have a small depth, while remaining very convenient and spacious structures.
This type of shelves for a children's room looks interesting. They have an L-shape with the same length of transverse elements from the angle. But their highlight is that they can accommodate both books and toys, for which there are semicircular vertical compartments at the ends of the shelves.
Original corner shelves on the wall in a minimalist style are now very popular. They are made of wood. The base also has a rather L-shaped narrow shape, at the ends of which sides are installed as book holders.
How to make corner shelves yourself?
Since shelves are a fairly simple design, many people prefer to make them themselves. There are plenty of advantages to this. Firstly, you can really save money, and secondly, you can make the desired design to your taste, which will fit perfectly into the required corner. And you don’t need any special knowledge, skills or expensive equipment here.

Corner ones can be made from any material, as discussed above. And having decided on it, you just need to choose necessary tools.
Glass corner shelves
If you decide to make a glass shelf, you need to prepare the following set of tools:
- glass with a thickness of at least 7 mm;
- Pelican fasteners based on 2 pcs. for 1 transverse element;
- drill;
- glass cutter;
- grinder with a grinding wheel;
- building level;
- file;
- pliers;
- rubber hammer;
- polishing paste;
- tape measure, ruler, scissors;
- pencil (marker), cardboard for template.
Glass shelf manufacturing technology

The manufacturing process of such a shelf consists of several stages:
- Open the template. It is cut out of cardboard in full size, slightly rounding the corner where it joins the wall. This will make it possible to install the shelf more tightly to the wall in the future.
- Glass preparation. It is cleaned of contamination using soda or detergents. Please note that for further work the glass should be at room temperature.
- Manufacturing of cross load-bearing element. Having covered flat surface cloth, place glass on it. Having attached the template, the element is cut out with a glass cutter.
- Sanding the edges. Wear cloth gloves and, using a file dipped in kerosene (turpentine), clean the edges.
- Edge grinding. To do this, use a grinder and then polish the edge with a grinder and a felt wheel, using polishing paste.
- Installing a shelf on the wall. This requires a pelican mount. First, places for self-tapping screws are marked on the wall, then holes are drilled with a drill, dowels are hammered in, after which fasteners are installed and the glass shelves are fixed in them with special screws.
Wooden corner shelf
You can also make such a shelf yourself if you have some carpentry skills. The best material For its manufacture there will be chipboard, MDF or plywood.

To work you will need the following tools:
- saw with small teeth;
- electric jigsaw;
- drill;
- hacksaw and knife;
- compass;
- glue "Moment";
- slats to increase rigidity.
Wooden shelf manufacturing technology
A corner shelf on a wooden wall is made in the following way:
- from chipboards cut out a transverse element (shelf) - draw a circle with a compass, divide it into 4 parts and cut out each with a hacksaw or jigsaw;
- on the rack-rack, places for each shelf are marked and grooves are made for the required recess, for this they use a saw and a knife;
- on each shelf, mark an area for a cut near the base corner, corresponding to the size of the groove; They also use a saw and knife for this;
- after this, the shelves are ground and checked for fit into the grooves;
- the rack-rack is attached to the wall with glue and tape and left for 1 hour for better adhesion;
- then insert the shelves into the grooves without additional fixation.
Knowing all these subtleties, making corner shelves on a wooden wall is not so difficult. This kind of work will take you several hours. A comfortable and beautiful shelf will serve you for many years.
Creating coziness and comfort in your home is a very pleasant experience. And if hand-made items are used in the interior, this brings a certain warmth to the home environment. Imagine, experiment, make your own decor - and you will bring joy to yourself and your loved ones.
How often in Everyday life You have to think about choosing a wall mount for shelves. There are a huge number of types of wall shelves. A wide variety of durable materials are used in production.
The main ones: natural wood, chipboard and MDF made of plastic, metal or glass are also gaining popularity among consumers.
These composite, figured or multi-tiered structures have become firmly established in our environment.
Therefore, everyone often has the question of how to hang a shelf on the wall using available methods fastenings
Types of fastening for wall shelves:
- Hidden (using hidden fasteners);
- Brackets;
- Corners and loops;
- Holders for glass models.
You can use all these methods of attaching a shelf to a wall yourself without the help of professionals.
It is most convenient to hang the structure on hidden fasteners.
Anyone with hands can also use brackets and corners. But before hanging a shelf on a glass wall, you need to check everything carefully and it is advisable to consult with knowledgeable people.
Hidden fastener mount

Fastenings of this kind allow the owner to hide all fastening components while creating an aesthetic, neat, weightless composition in any apartment for any interior.
For installation you can use:
- block attached to the wall;
- iron rods;
- hidden loops.
Wooden and plywood can be hung on the wall using timber pre-attached with dowels.
So that the bar does not stand out, it must be installed in size and also match in color.
An internal hollow shelf, shaped like a box, is placed over the timber and secured with self-tapping screws. Reinforcing pins for installing the structure are selected according to the size of the shelf itself. The required length must be at least 30 percent.
In order to clearly align the holes in the wall with the shelf, use a template. For creating robust construction for a long time you should resort to superglue.
If the shelf is enough large sizes, then hidden hinges can be used for fastening. Required condition so that the loops are small and do not protrude significantly. Before starting work, you need to clearly mark the distances between the central parts of the loops.
According to the markings, they drill holes, insert a plug into them, and then tighten the screws, which are attached directly to the hinges on the shelf.
Installing shelves on brackets
This method can be used if there is no need to hide the fasteners. To save money, you can choose plastic or iron corners, although decorative fasteners are more common.
You should always purchase at least a couple of brackets. Their number depends on the thickness of the shelf.
The bracket comes complete with all necessary fittings. This kind of fastener will not fit into every interior. They will look best in standard interior solutions without any frills.
This is defined as unusual carved patterns, with which the bracket is equipped.
There are also the most innovative modifications, called pelicans, and fortifications in the form of precise geometric configurations.
They are perfect for minimalist and modern interiors.
Option color range for them, small - matte or polished chrome.
The installation process is very similar to installing hidden fasteners, but much faster. In addition, the wall must be marked according to the horizontal level. The bracket is installed strictly in the designated places.
It is important to remember that any bracket for a removable structure must be extensive in order to firmly hold the wall shelf.
Corners and loops
This type of fastening is most common among consumers. It is quite simple, fast, and neat. Suitable for any interior. Unlike the bracket, corners and hinges small sizes and don't really stand out.
First you need to decide on the place where you need to attach the shelf to the wall.
Of course, it will be better if the selected area is not previously cluttered with paintings or portraits. Set necessary materials can be purchased at any hardware store. We attach them to a pre-marked place on the outer bottom of the product.
For installation, self-tapping screws of various lengths and widths are used.
After installing the screws, the shelf must be attached so that the drilled holes in the corners (or eyelets) coincide with the marked places.
If everything matches, then you can tighten the screws, trying to do this as evenly as possible, carefully and smoothly.
Fasteners for glass products
A glass shelf in any room always looks beautiful, and most importantly, appropriate. This piece of furniture creates a unique atmosphere, filling everything with sun rays and light appearances.
Fastenings of such structures should highlight the elegance and crystalline nature of the shelf, while ensuring its strength and stability for a long time.
If you carefully follow all the instructions, you can fix a difficult glass structure on the wall. The most popular type of fastener is a specialized bracket.
The small thickness (four to twelve millimeters) and fragility of the shelves leads to the use of soft gaskets designed to protect the glass from all kinds of deformation.
The fastenings for such shelves are made in such a way that the surface is protected in the installation area at the bottom and at the top.
To keep the upper area open, use various devices with suction cups. They must be secured to the bottom of the glass structure.
Installation features
- Before installation, you need to make sure that all the necessary tools are at hand and you won’t have to look for something at the most crucial moment. A building level and a pencil for determining and marking a horizontal line, a hammer drill for drilling holes. We use a screwdriver, hammer and screwdriver if necessary. It is also necessary to check that all materials and gaskets included in the kits are fully suitable.
- Using a pencil and level we determine the boundaries of placement wall structure. We mark the middle of the installation and the ends on both sides, as well as the fastening points.
- In the marked place, drill required quantity holes using a hammer drill. The depth of the holes should not exceed 60 mm. To do this, you need to insert a D8 drill bit into the tool (before drilling, double check all the marked dimensions).
- Plastic dowels should be installed in the resulting holes (most often included in the kit).
- Then you need to attach the fasteners so that there is a hole at the bottom. For greater convenience, use a screwdriver.
- The shelf must be placed on the brackets using smooth, careful movements so as not to pinch your fingers.
- If necessary, use superglue for better reliability.
When installing structures, you need to pay attention to the tight fit of the shelf to the wall so that it does not swing or hang, because if there are children or pets at home, an unstable structure may be unsafe for their health.
Installation Rules
We choose the right place where your design will look most advantageous. Firstly, before starting installation you need to take measurements desired shelf, in order to know exactly its thickness, and, accordingly, the level of load.
This is necessary to determine the number and location of fasteners.
Eg, bookshelf will be more loaded than a shelf with souvenirs. Secondly, it is necessary to determine (at least visually) the thickness and strength of the wall to which the selected structure is attached. If the wall is concrete or brick, then there is no need to worry.
But if it is thin (less than 10 cm) and made of plasterboard, then it is better to hang anything on it yourself, or at least consult with installers. Basically, only decorative finishes are attached to such walls.
Regardless of the selected method and devices, it is necessary to draw a clearly straight line on the selected wall. To do this, use a building level or spirit level.
It is important to do everything smoothly, because this line determines the location for installing the fasteners. Reliability is the main rule of installation.
Fixing the structure with construction dowels is the safest. The only drawback of this type is that slight difficulties arise during dismantling.
The strength of fastening the shelf to the wall also depends on correctly sized construction screws and dowels.
Conclusion on the topic
So we figured out the basic methods and material options.
Now you can hang the shelves yourself without any problems. Good luck with the renovation!
There is nothing better than shelves for organizing space in rooms, as well as for decorating the interior. Comfortable, functional, original form, they help to conveniently arrange a lot of things and give the rooms a more comfortable look. Making shelves on the wall with your own hands is not at all difficult, and you can use a wide variety of materials - wood, fiberboard, glass, pieces of tin, plywood.


| Types of Wall Shelves | Description |
|---|---|
| Classic | This type of shelves is the most common due to its simplicity, aesthetic appearance and ease of installation. They represent a huge flight of fancy: from simple square to creative asymmetrical shapes |
| Corner | This type of wall shelves differs in the method of fastening - it is carried out on adjacent adjacent walls. Most often they are mounted in utility rooms and bathrooms |
| Hanging | This original way of creating a shelf involves attaching a simple structure to the ceiling using cables or vertical posts. |
| Floor | This wall shelf It is a structure with a floor support. This type of product is especially relevant in hallways, as well as large rooms, where you don’t have to think about wasting space. |
| Open and closed shelves on the wall | Wall shelves can be designed, for example, with or without glass |

Wood is the most comfortable material for work. Wooden shelves There are simple, complex shapes, open and closed, vertical, horizontal and angular. Taking the basic option as a basis, you can assemble a shelf from several modules and give it the most incredible look. In order for the product to serve for a long time, you should choose the right wood: the boards must be perfectly flat, completely dry, without cracks, voids or traces of mold.

During the assembly process you will need:
- hacksaw;
- drill;
- building level;
- pencil and ruler;
- boards 16 mm thick;
- stain;
- wood varnish;
- sander;
- screws, brackets, dowels.
The example used is a simple rectangular shelf 250mm wide, 300mm high and 1100mm long.

Step 1. Marking
The boards are laid flat on the table and the measurements are transferred from the drawing. The height of the side walls should be 268 mm, since they will be located between the top and bottom: wall height + board thickness x 2 = 300 mm.
Step 2. Cutting the boards

If the markings exactly match the diagram, you can start cutting. It is best to use a jigsaw for this, then the cuts will be perfectly smooth and neat. You should end up with 2 long pieces and 2 short ones.
Step 3. Processing of blanks

Before starting assembly, each workpiece must be sanded, stained and varnished. If you plan to simply paint a shelf, the blanks are processed - this increases their service life and makes the paint apply more evenly.
Step 4. Assembling the product

The bottom board is laid flat on a flat surface. From the ends of the workpiece, retreat 8 mm and draw 2 straight lines parallel to the cuts. Now on these lines you need to mark two points at a distance of 5 cm from the edge, and drill holes there for the screws. The same is done with the top blank. When all the holes are ready, install the side blanks on the bottom board and tighten the screws. Place a second board on top and also fix the side walls with self-tapping screws.

Brackets are attached to the ends of the side walls, holes are drilled in the wall for dowels, self-tapping screws are inserted and tightened so that they protrude by about 5 mm. The dowels must be positioned strictly horizontally, so before drilling, mark a line using a level. Now all that remains is to attach the brackets to the fasteners and hang the shelf. If desired, the back wall of the product can be filled with a piece of plywood, and glass can be inserted in front.


To make such a simple shelf more original, you can replace one side wall with a stump of a thick branch. To do this, choose an even branch with a diameter of about 7-8 cm with smooth, clean bark, saw off a piece 28 cm long, and cut off all the side shoots. The chock is treated with a primer, dried and varnished. There is no need to remove the bark. After the varnish has dried, the workpiece is inserted between the upper and lower boards and screwed tightly with self-tapping screws.

Based on this drawing you can make various variations wall shelves. For example, reduce the length to 400 mm and make 3-4 blocks at once. Then install them on top of each other in a checkerboard pattern and secure them together using metal plates. Or simply mount them on the wall separately, placing them at a short distance from each other.

Often, to save space, shelves are made corner, and they can be mounted both in the inner and outer corners.


The blanks are made according to the scheme described above, only the upper and lower boards consist of two elements, with the ends cut at an angle. The process of making such a shelf is quite simple:
- the halves of the top board are coated at the ends with glue and clamped with clamps;
- repeat the same actions with the bottom board;
- when the glue dries, all workpieces are covered with stain or primed;
- Attachment lines are marked on the upper and lower workpieces and holes are drilled;
- insert the side walls and secure them with self-tapping screws.

| Wall shelf materials | Advantages and disadvantages |
|---|---|
| Wood: plywood, chipboard, MDF and others | This material is relatively easy to work with, it looks beautiful, natural and impressive, its service life is quite long, especially if pre-processed |
| Plastic | This material is the most versatile; it can imitate both wood and stone, while eliminating their shortcomings |
| Metal | Such wall shelves will be very strong, reliable and durable, but classic interior They will fit in with difficulty. In addition, corrosion can also be a problem, so metal products Requires special processing and conditions |
| Glass | Transparent wall shelves will create an atmosphere of lightness and comfort in your home. Of course, it will be quite difficult to make a glass structure with your own hands, but if you nevertheless decide to do all the work yourself, then you will have to work with glass for quite a long time and very carefully, especially if various cutouts are planned in the shelf design |
Original shelves for books
Shelves non-standard shape are in increasing demand, so if you wish, you can try to collect something original. For example, a bookshelf in the form of a simplified labyrinth is used.
To make it you will need:
- edged board 20 mm thick;
- wood glue;
- clamps;
- roulette;
- hacksaw;
- miter box;
- Sander;
- stain;
- furniture screws, self-tapping screws;
- decorative shelf holders.
If you have everything you need, you can start making the shelf.
Step 1. Marking
On the prepared boards, mark the cut lines with a pencil under a ruler. Measurements should be taken very carefully, since all horizontal parts have different lengths.
Step 2. Trimming the blanks
The ends of each workpiece are cut at an angle of 45 or 90 degrees. The diagram shows the first option, so you will need a miter box for sawing. It is very important to correctly install the miter box on the board so that the cuts are symmetrical. If the ends are cut off incorrectly, you will not be able to fold the shelf.
Step 3. Assembling the structure
The ends of the parts are smeared with glue, pressed tightly and additionally secured with slotted furniture screws. Ordinary self-tapping screws are not suitable here. Each joint will require at least 2 screws. Both parts of the shelf are applied to the wall, leveled and the attachment points are marked with a pencil. After this, holes are drilled for the dowels, brackets are screwed to the shelf with self-tapping screws and the structure is hung on the wall. Instead of brackets, decorative pelican shelf holders are often used.


Hanging shelf with straps
If you need a decorative shelf for small items, the following option is perfect - a board suspended on straps.


To make a shelf you will need:
- 2 edged boards 300x750 mm, thickness 30 mm;
- 4 leather belts, 75 cm long;
- 4 long screws with plastic dowels;
- 4 short screws;
- building level;
- ruler;
- sharp knife;
- drill.
Step 1: Preparing the belts
The cuts of the belts must be perfectly even, so if necessary they are trimmed with a knife. Fold each belt in half, press the ends to the table, step back 2 cm from the edge and drill a neat hole through hole. The same is done with the remaining three.
Step 2. Attaching the straps to the wall
Using a level, two points are determined on the wall at a distance of 60 cm. Holes are drilled and plastic dowels are inserted. The belt folded in half is applied to one of the holes and secured with a long screw - you get a large loop on the wall. Another such loop is attached nearby.
Step 3. Installing the shelf
A sanded board is inserted into the loops and aligned horizontally. To prevent the shelf from moving, the parts of the belts adjacent to the wall near the board itself are screwed with short self-tapping screws. Now another shelf is hung under this shelf, exactly repeating the steps described above. The result is a light and neat two-tier shelf. If desired, you can add another 1-2 tiers.
To make the shelves described above, you can use not only wood, but also plywood, as well as laminated chipboard sheets. The last option is used most often, since laminated chipboard is lightweight, high strength, practicality and durability. When assembling shelves from this material, all sections must be covered with a melamine edge to match the color of the sheet.


Making a glass shelf

Glass shelves fit harmoniously into any interior, and the installation process does not take much time. To work you will need:
- strained glass;
- hammer;
- electric drill;
- building level;
- aluminum profile;
- dowels;
- adhesive tape;
- ruler;
- pencil.
Not everyone knows how to cut glass correctly, and therefore it is better to order the cutting of blanks in a workshop. There they will also grind and polish the edges so that when installing the shelf you will not cut yourself on sharp edges. You can do everything else yourself.

Step 1. Marking for fasteners

The section of the wall where the shelf will hang should be as large as possible. Using a building level, draw a horizontal line on the wall with a pencil. The locations of the fasteners are marked on the line and holes are drilled.

Step 2. Installing profiles


An aluminum profile is applied to the wall surface and the alignment of the fastening marks is checked. Then insert dowels into the holes, attach the profile with one screw and level it horizontally. After this, tighten the remaining screws.


Instead of a drill, insert a bracket screw

Screw in the bracket screw

Leave the bracket screw protruding from the wall


Checking the position

Arranging the shelves
Step 3. Attaching the shelf
The rear edge of the glass shelf is covered with adhesive tape. You can use separate spacers made of tape, placing them where the glass will touch the screw heads. The shelf is inserted into the profile, the edges of the profile are covered with protective caps. If two shelves touch on the sides, their edges are fastened with metal fittings.
If there free time and a desire to experiment, you can create very unusual shelves on the wall from scrap materials. For example, a corner shelf made of plastic pipes. To make it you will need pieces sewer pipes and corner cuts. The shelf is attached to the wall with screws and dowels.


Old suitcases and briefcases also make great wall shelves. To do this, they are cut to half their height, covered with plywood at the back and secured to the wall with screws or on brackets.

Drawers from unnecessary bedside tables are quite suitable for making shelves. To give them an elegant look, the boxes should be thoroughly sanded, primed and painted. bright colors. Then they are leaned against the surface with the back wall, the attachment points are marked and holes are drilled for them. Even one such shelf looks very original, and a composition of 2-3 drawers will become a real decoration.


Video - DIY wall shelves
Interesting wooden shelf. Master Class

You will need:
- Rope;
- Board at least 2 cm thick;
- 2 corners (mounts) for shelves;
- Steel washers;
- Lighter;
- Drill;
- Saw.


The corners in the room almost always remain unoccupied, and yet there is enough space there to place a small shelf, rack or hanging. From a design point of view, the angular arrangement provides some advantage, because such articulation of the walls expands the possibilities of using various structural configurations and the fasteners used. If you compare regular and corner shelves, you can immediately notice how much more diverse and attractive the latter look. Let's try to decorate our home with such a corner shelf.
The most popular materials for making shelves are wood, furniture board, MDF, laminated chipboard, etc. Sometimes shelves are made from improvised materials - laminate, plastic or even drywall. Let's not change traditions and use furniture board as a raw material. To work you will need a jigsaw, drill, various fasteners, tape measure and pencil. First you need to make a sketch of the future shelf for clarity of work processes.

The shelf will be about 70 cm high with three sections. It will be attached through vertical elements using dowel-nails, and the parts will be connected to each other with confirmations.

The first thing you need to do is mark all the parts on the plate. This is usually done with a pencil, but if the slab has a dark surface, then the pencil mark will not be noticeable; in this case, you can use a knife. You need to use the blade, without pressing too hard, to draw it along the cut line, after which a thin, white, noticeable line will appear, along which it will be easy to cut.

You can use a jigsaw to cut out shelf elements. The saw blade must have a fine tooth and be designed for woodworking. The sawing speed regulator on the jigsaw should be set to the minimum value, and the mode selection knob should be set to “0”. To facilitate the assembly of the shelf, it is necessary to number the parts in the drawing, and then put the corresponding values on the structural elements themselves.

After all the parts are cut, you need to drill holes in them for connecting with confirmations. It's much easier to do this consistently. First you need to make holes in the shelf, and then drill through these holes corresponding to them in the supporting element. If not special drill for confirmations, then you must use 3 conventional drills With different diameters– under the screw part, thickening and head of the Euroscrew.


Immediately at this stage you can make holes for attaching the shelf to the wall. It will be fastened with 6x80 mm dowel nails through the supporting elements. All holes must be countersunk, this is necessary so that the nail head is flush with the surface.

When all the parts have been cut, you can start decorating the edges. First, we clean all edges from dust and sawdust formed during sawing. Then we apply edging tape to the ends and, using a heated iron (preferably using an old, unused one), glue it to the open surfaces.
This type of trimming tape is produced standard width 1.8 mm, and the thickness of the furniture board is only 1.5 cm, so part of the tape remains superfluous and must be removed. We cut off the excess part of the edge using a regular wallpaper knife.


We clean the resulting edge sandpaper with fine grain. You can close the ends with any other accessible method, for example, use decorative cord, braid, special paper or cardboard.
Now you need to assemble the shelf. We assemble in accordance with the numbered diagram. To tighten the confirmations, we use a hex wrench.
Trying it on assembled structure to the place intended for it and mark the mounting points on the wall. For drilling in concrete or stone walls, we use a drill with a Pobedit tip. On the tip of the drill, you can pre-mark the drilling depth required for the prepared dowel. To prevent dust generated during drilling from flying around, you can glue a paper “pocket” to the wall under the work area.


After graduation drilling work you need to insert the dowels into the holes and secure it with screw nails through the corresponding elements of the shelf, recessing the caps. This can be done with a hammer or a regular Phillips screwdriver.


You can decorate the open heads of fasteners using special plastic plugs of a suitable color.
Perhaps such a shelf will turn out to be too simple in appearance, but we made it from materials that often gather dust in our pantry or live out their days in the country. The design can be changed at your discretion, for example, the supporting elements can be made longer and then the shelves can be used as book shelves. Or choose a different outline of the end parts, in which case the shelf will acquire additional decorativeness. In any case, a hand-made item will serve as an example of the individual skill of the owners of the house.

The problem of space is relevant for small and large apartments. It is very difficult to fit everything you need into limited square meters.It is almost impossible to imagine a home, office or apartment without convenient shelves. The element performs an aesthetic, decorative role.
Shelves help free up space and diversify familiar interior premises.
Shelves are used in absolutely any room and for completely different purposes. Look great in bathrooms, kitchens and living rooms.

Let's consider the features and advantages of building corner shelves yourself.
Previously, handicraft production of any furniture was considered the lot of the poor. Wealthy people preferred to purchase interior elements in stores. But everything there had almost the same design, so thirty years ago the interiors in different houses were almost identical.

Today original furniture self-made is a source of real pride.
In modern stores there are dozens various models furniture, but even among such a variety it is difficult to choose one option that can meet all the preferences of the owner of the house. In this case, there are only two options: order furniture directly from the manufacturer, or build it yourself.

Making shelves on the wall with your own hands is not at all difficult, and you can use a wide variety of materials.
The first option may seem ideal. However, not every master will be able to make furniture of high quality, inexpensively and take into account all your wishes. Finding such a specialist is not easy, and there is no point in searching if you need a simple wall shelf.

This design element is easier to build on your own.
Making your own shelves has many advantages.

Making a shelf yourself: how to decide on the design and materials?
Any wall shelf can have a different shape and design. They can be complex (with additional elements), or simple. Simple shelves can be used in the kitchen.

They are used to store seasonings or kitchen utensils, so come up with complex design it makes no sense.
It’s very easy to make semicircular shelves. This option is ideal if you don’t have the time or desire to do something more complicated. Also, simple shelves can be used in apartments and houses decorated in minimalist styles.

Similar styles are not welcome complex shapes and intricate designs.
Shelves with additional elements can be used in living rooms. They may consist of several sections, or have unusual shape, for example, in the form of the letter “G”.

Often such furniture occupies not only a corner, but also some part of the wall.
You can decorate such furniture in an original way cutting, if you have experience in this matter. The shelves located in the corner also differ in availability back wall. It may be present or replaced by a wall. If you want to preserve the wall decoration, then furniture wall still better to build.

It doesn't require much effort.
In this article we will look at the process of constructing a corner shelf classic shape. This form is very simple and versatile. It won't even take two hours to make.

To get started, you need to decide not only on the shape of the product, but also on the material.
Let's look at the types of materials and their advantages.

To quickly decide on raw materials, be sure to consider comparative characteristics presented in the table.
| Characteristics | Materials | |||
| Tree | Plastic | Glass | Metal | |
| Aesthetics | + | + | + | +/- |
| Durability | + | – | + | + |
| Ease of processing | + | + | – | – |
| Price | high | low | high | low |
| Moisture resistance | + | +/- | + | – |
| High temperature resistance | + | – | + | + |
| Strength | + | – | +/- | + |
After analyzing all the characteristics, you can see that it is simpler and easier to create corner shelf made of wood.

In this article we will look at detailed instructions production of such furniture.
Tools
To make a shelf out of wood, you need to properly prepare the raw materials and tools. You should start by preparing the tools. To build a corner shelf made of wood, you need to find:
- Electric jigsaw;
- A regular 50 cm ruler;
- Hacksaw;
- Glue;
- Drill;
- Building level;
- Sandpaper;
- Fastening for shelves.

Tools for making shelves.
Materials
The main raw material for creating a shelf is an ordinary board that was lying around on the balcony after renovation. You can also use leftovers old furniture, or purchase a board in a store. When choosing the main raw materials, consider several criteria:
- Design. The board should have a suitable color and beautiful ornament;
- Quality. It is better not to use rotten and old boards;
- Integrity. The sheet for making furniture should not have scratches or dents.

You need to cut out blanks from the prepared board.
Cut the pieces of plywood diagonally, sand the edges. You can cut four posts from the remaining wood. They must be the same size.
Manufacturing process: step-by-step instructions
As you can see, the shelf manufacturing process does not require special costs and tools that are difficult to find at home. Almost all materials and equipment are available to any owner. In this section we will look in more detail at how to make a corner shelf.

VIDEO: Master class on making a corner shelf.
Corner shelves in the interior - 50 photo ideas:


