Garage owners decide to install overhead gates made with your own hands. Buying a ready-made option is not a cheap pleasure, but anyone can assemble the structure themselves. You just need to familiarize yourself with the drawings and the principle of operation of the mechanism. Photos and videos will help you understand how overhead garage doors work and design them yourself.
Lifting garage doors step by step according to drawings and diagrams
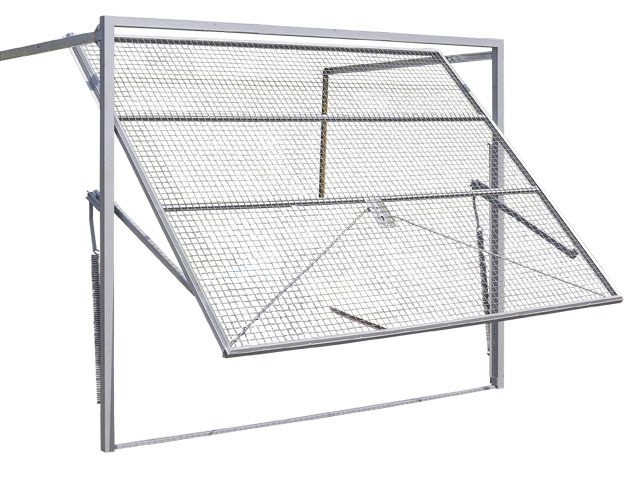
Do garage doors using a lifting mechanism with your own hands is quite simple if you have a simple drawing and photo on hand assembled mechanism. The standard design contains the following basic elements:
- The frame on which all the gate elements are attached. It must be strong enough and securely attached to the walls of the building.
- Vertical and horizontal rails along which the structure moves.
- Bracket for fastening the return springs of the lifting mechanism.
- Rollers and levers on which garage doors are fixed to the rails.
- Automatic drive for sash movement.

Installing do-it-yourself overhead gates is the dream of many garage owners.
The frame is made taking into account the dimensions of the doorway in the garage. Used as a basis steel sheet, which with outside sheathed plastic panels. The inner part is insulated. Recommended to use basalt wool or other fire-resistant insulation materials. To set the mechanism in motion, a hinge-lever device is most often used.

Overhead garage doors have a number of advantages
When assembling the structure with your own hands, we recommend using the drawings and following this sequence of work step by step. These include:
- Assembling the frame and installing it in the garage opening, maintaining horizontal and vertical alignment. All structural parts are attached to the walls using anchors.
- Installation of ceiling tracks – important stage. In this case, you need to check the reliability of the fastening.
- Attaching hinges to door leaves and installing gates on rails.
- Installation of springs for smooth opening of gates. Next, the springs are adjusted and adjusted to open the garage without much physical effort.

Scheme of a garage door with a lifting mechanism
We invite you to watch a video about the rules for installing garage doors equipped with a lifting mechanism:
Advantages and disadvantages of overhead gates
Overhead garage doors have a number of advantages and disadvantages. Experts consider the following aspects to be the main advantages:
- high degree of protection and safety;
- durability and reliability of the design;
- good tightness;
- small size;
- presence of a system against hacking.

The assembled garage door lift mechanism is heavy.
However lifting mechanism When assembled it has disadvantages. Among the main ones, it is worth mentioning the large weight of the structure. Given this feature, you need to pay due attention to the strength of the frame and the reliability of the fasteners. If the quality suffers, vibration during movement may result in a fall or damage to the mechanism and guides. For owners of large cars, a significant drawback will be the loss of about 30 cm in the height of the opening. Some garage owners, if the blade breaks down or is damaged, are forced to completely dismantle the mechanism for repair, which is time-consuming and labor-intensive.

Drawing of a garage door with a lifting mechanism
Video on how to assemble a garage door with a lifting mechanism with your own hands:
If you decide to make a garage door with your own hands, the drawings, videos and recommendations in the article are guaranteed to help even people without experience and skills in the field of construction and repair cope with this feasible task. Undoubtedly, overhead gates are reliable, high-quality and aesthetic designs that every owner of a country house should have.
Every car owner who has built a garage wonders whether it is possible make homemade garage doors Or is it better to buy a ready-made design?
The type of gate must be determined when designing the garage.
Making your own garage door is not that difficult, just follow our instructions exactly.
Also, when designing, take into account the provision fire safety, take care of reliable protection from burglary, and a system that prevents the gate from jamming.
Typically, many car owners build simple ones with their own hands - they are primitive and easy to manufacture and install.
But if you decide to make a lifting garage door with your own hands, then keep in mind that such gates must be securely locked and maintain the required microclimate in the garage.
Overhead garage doors have complex design, so it is not recommended to make them yourself from scratch. It is best to use standard ready-made elements, then all you have to do is mount the structure yourself.
Standard mechanisms and automatic mechanisms can be purchased at specialized stores where gates are sold.
If you plan to equip the overhead garage doors with automatic mechanisms, then to ensure safety, it is advisable to entrust this work to specialists.
Do it yourself
After all, if the automation fails, the garage door may crash and, even worse, injure people. Homemade overhead garage doors are made in the following sequence:
- First, a profile welded frame for the canvas is made. If necessary, you can schedule a wicket;
- install durable guides;
- then, weld a vertical guide from the corners so that the roller can pass freely inside;
- Next you need to make a horizontal guide. It is easiest to build from a corner turned upward;
- Brackets for rollers are welded to the frame;
- the guides are positioned so that they are at a slight angle;
- perform a counterweight mechanism. The ease of opening garage doors depends on it. For these purposes, a winch cable is usually used.
The cable is attached to the bottom corner of the garage door and passed through a block that is located near the ceiling. A counterweight is attached to its opposite end.
Stands out among its peers in some ways advantages. Firstly, they are made from whole cloth, which can be made very resistant to hacking attempts. Secondly, up and over gates V open form do not take up as much space in the space in front of the garage as swing doors do.
Thirdly, with sufficient experience and skill in working with sensors and electric drives, they can be made automatic that open when you press the remote control.
An additional, but nevertheless important advantage of self-made overhead garage doors is the large number of options to choose from. decor– gates can be covered with clapboard, plastic panels, steel and much more.
Overhead garage doors - dimensions:
But in addition to the advantages, you need to remember shortcomings. The main disadvantage of up and over gates is that in the open position they are installed horizontally under the ceiling, taking away about 20 cm on the height of the opening, which in some situations can cause inconvenience (for example, when you are trying to drive into a garage in a tall SUV).
A significant disadvantage of a solid canvas is that if it is damaged, it will be necessary to replace not a separate element, but the entire structure at once. In addition, it can be quite heavy, which puts a lot of stress on the frame and lifting system.
Lifting garage doors have one more disadvantage: they can only be used in rectangular openings. But here it should be remembered that garages with arched or other shaped openings are extremely rare.
Do-it-yourself up-and-over garage doors - drawings:
We buy everything you need
Now it's time to take a pen, a few sheets of paper and make a list of everything you need to make overhead gates to the garage with your own hands. All this can be purchased at the nearest construction department store, so there shouldn’t be any big problems finding materials and tools.
So for homemade overhead gates for the garage we need:
- Wooden beam section 100x100 And 120x80 mm. They can be replaced steel profile comparative strength.
- Corners 40x40 and thickness 4 mm.
- Channel 40x80 mm.
- Material for canvas: thick boards 25 mm, corrugated sheets or plastic panels.
- Steel rod diameter 8 mm.
- Two springs with inner diameter 30 mm.
- Anchor bolts and screws.
As for tools, first of all, we need a tape measure, an angle and a level to carefully check that the dimensions of the overhead garage door are correct.
To work with metal we need an angle grinder (also better known as an angle grinder) and welding machine. In addition, we need to saw wooden beam and carry out other work with it, which means we need electric jigsaw, drill and screwdriver. Well, what would a repair be without a hammer, screwdrivers and wrenches?
Pre-planning
How to do overhead gates to the garage yourself? Together with a tape measure and a level, you should go to the opening to find out the dimensions of your homemade garage door. This is a very important stage, which further determines whether your work will be successful.
After this, you can take a sheet of paper and start making your own drawings overhead garage doors. So, they will consist of a solid canvas, an opening, a frame under the ceiling and moving mechanisms.
First of all, you need to carefully measure the drawing lifting garage doors in all sizes, so that in the future there will be no inconsistencies and problems during manufacturing. It will be useful to make a plan from several views, including isometry.
If at this stage you have difficulties, try to find a friend with experience in compiling drawings and, even better, gate making. Made with your own hands drawings overhead garage doors? Now it's time to take action!
Do-it-yourself garage doors - drawings:
Do-it-yourself lifting garage doors: step-by-step instructions
How to do up and over gates to the garage with your own hands?
- First of all, we need to equip opening. Vertical supports made of 120x80 mm timber should be dug into the garage (if it is already filled) or the ground (if not yet) by 20-30 millimeters; for greater reliability, the depth can be increased. Both vertical and horizontal beams will be attached to the walls of the garage using anchor bolts.
- Assembling the frame for ceiling. To do this, a horizontal beam for the guides should be installed from the opening at a distance of approximately the length of the gate. It is important that it is parallel to the horizontal beam of the opening and is the same in height throughout its entire length; distortions are unacceptable.
- It is assembled from two metal corners by welding guide rail, along which the roller mounted on the canvas will move. The distances between the corner vertices should be carefully monitored during assembly. Two such rails must be attached to the upper beams; for this you can use metal fittings and self-tapping screws.
- We manufacture canvas frame. For it, you can take a wooden beam, or metal corners welded into a square profile. For better durability of the canvas, transverse or diagonal beams can be welded (or attached) to the main frame. Don't forget about the rollers at the top of the structure.
- When using fastening material, you need sheathe the canvas the material you have chosen.
- This point in the manufacture of overhead gates is very important and great attention should be paid to it. Using corners and fasteners, you need to make movable brackets on both support beams. The levers of their channels should be attached to them, which will push the blade upward.
- To keep the gate open, you need springs. They are attached to the bottom of the supports, to the bracket and to the end of the channel. When the door is raised, the spring is compressed and does not allow spontaneous lowering: closing the gate will require considerable effort. It would not be superfluous to equip the fastening of the spring to the bracket and channel with a tension regulator.
- Final stage gate manufacturing– installation of all elements, insulation of the canvas and fastening of the decorative covering to the sheathing.
Do-it-yourself lifting garage doors (from profile): 
In the future up and over gates for a garage can be improved by adding the ability automatic opening and closing. For this it will be necessary electric drive, signal receiver and control panel. As the latter, you can use a key fob for a car alarm, and as a drive - either a reverse winch or a power window mechanism.
Don't forget to install a reliable locking system, which will protect your garage from illegal entry. If you often come here and you don’t need to lift the canvas every time, then you can make a cutout in it for the door.
In addition, you can make inserts in the canvas from glass or any other light-transmitting material, so you will save on the garage during daylight hours.
As you can see, do it yourself up and over gates getting into the garage is not so difficult, the main thing is not even good skills in working with metal and wood, but careful planning and compliance with the dimensions of the garage overhead gates. If everything was done correctly, such gates will serve you for a very long time.
Useful video
Watch the video on how to do it up and over gates for the garage with your own hands:
Most experienced car enthusiasts prefer old swing or sash gate options, considering them the most secure and reliable due to the heavy weight and thickness of the metal. But, as practice shows, leaf systems have a worthy competitor, namely, folding garage doors. The popularity of the tilt-up design is such that today it accounts for approximately three-quarters of garage doors sold. It is worth understanding the reasons.
Advantages and disadvantages of overhead garage doors
To understand the difference in using lift-and-fold systems and the old swing structure, you need to try them out in practice at least a couple of times to knowledgeable person the difference is visible to the naked eye:
- The hinged door system allows you to avoid the formation of a “blind” zone when leaving the garage. Lift systems do not have doors that block the view, which is why dozens of cars crash in garage cooperatives every year;
- The absence of swing doors when opening the doors increases the space for maneuver in front of the gate; there is no need to park the car a couple of meters from the doorway in order to be able to open and close the garage.
For your information! Often, drivers decide to change regular gates to folding ones for only one reason: in a strong wind, there is a chance of getting hit by the gate on the car body at the time of departure.
Folding gates are cheaper to manufacture, they are more convenient to use, and their simple device allows you to build them yourself. But it is not possible to install such a system in every garage; at a minimum, you need free space in the ceiling above the entrance to the garage.
We build folding garage doors with our own hands
The structure and operating principle of the gate are clear from the diagram and drawing below:
- Structurally, the gate consists of two frames - the shield itself, or the panel covering the doorway, and the load-bearing support frame with guide elements;
- When opening upper part folding gates deflects and moves on rollers or bearings along two guides until the panel is completely on two horizontal beams;
- The bottom edge of the panel rises up and is fixed in this position.
The plane of the folding gate makes a movement reminiscent of rolling around a conventional cylindrical surface of large radius. To make it easier to lift steel or wood panel folding gates, the design uses compensation springs or counterweights in the form of a load suspended on cables.
Important! Unlike swing systems, folding gates do not have external hinges that can be easily cut with a grinder. In this case, the panel covering the doorway is adjacent to the supporting frame from the inside, therefore, it is much more difficult for intruders to pull out the garage door with a cable hooked to the tow bar of a pickup truck or tractor.
Manufacturing of hinged gate assemblies
The easiest way to make a folding gate design is from steel angle and channel. Initially, you will need to measure the dimensions of the doorway, cut it from the channel and weld the frame of the garage doorway.
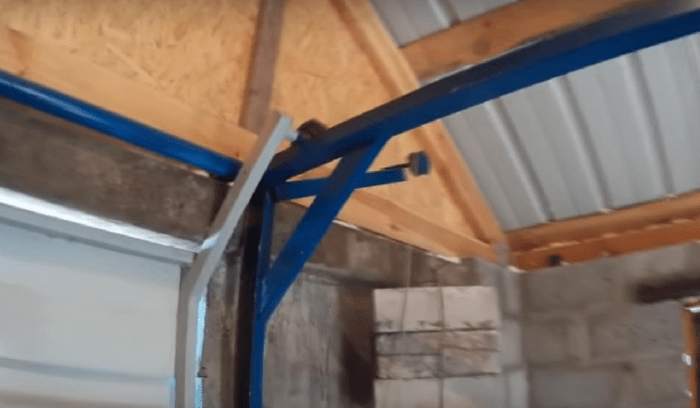
At the top of the frame, two horizontal corners with a flange width of at least 40-50 mm are welded. The length of each corner is more than two meters, so perform welding work and the assembly of the entire structure must be “on the ground”, before installing the folding gate system in the doorway.
The angle of attachment of the corner to the frame must be adjusted to the building level. After welding to the frame, each corner is strengthened with a temporary strut made from a board or wooden slats to avoid deformation of the structure at the time of its installation in the garage doorway.
If a lift in the form of loads suspended on cables will be used in the folding gate system, one pin with a groove roller with a diameter of 30-50 mm must be welded to the upper part of the frame.
Particular attention should be paid to the manufacture of the main panel of the folding gate. Structurally, the folding panel is a frame made of a pipe or a metal tubular profile with outriggers-brackets welded to the lower and upper parts.
The tubular frame of the panel must be marked and welded exactly to the dimensions of the stationary frame. The main condition is to carry out welding in three steps so that the frame of the folding panel does not turn out like a “propeller” due to overheating.
First, the cut pieces of the profile are laid out on a flat area and fixed together spot welding. At the second stage, the joints are boiled on one side of the folding frame, after 30 minutes they are turned over and boiled from reverse side. If the panel frame turns out to be strictly in one plane, you can attach sheet metal, otherwise you will need careful straightening using blowtorch and sledgehammers.

Assembly and installation of folding gates
Before installing the tilt gate system, you will need to perform preliminary assembly of the structure. To do this, a stationary frame with welded corner guides is laid out on a flat horizontal platform. A freshly welded movable panel is placed on top of the frame, its position is aligned so that it will stand in the closed position in doorway garage.
To connect the two parts of the gate, you will need to weld oblique brackets with roller or bearing rollers to the upper profile of the panel.
The reliability and smooth operation of the lifting mechanism depends on how accurately the supports are installed. Groove rollers are placed on the studs welded to the stationary frame. Additional panels are welded to the bottom beam L-shaped brackets, to which the support gate lift-lift cable will be attached.
All that remains is to install the stationary frame in the garage doorway and secure it with anchor bolts to the side walls of the garage. Subsequently, the fastening points will need to be carefully filled concrete mortar and plaster. Until the stationary frame is finally fixed, it will be necessary to align its position to the building level. Next, you need to make a U-shaped device, with which the ends of the corner guides are fixed to the ceiling.


