Suspended ceilings are the most common in the world. This is explained by both their diversity and ease of use: the space between the main and decorative ceiling used for invisible laying of any communications necessary for a comfortable life. Therefore, many are interested in how to do suspended ceiling with your own hands.
All suspended ceilings are structures made of suspensions, load-bearing frame and cladding elements. Therefore, they are all installed using the same technology with minor differences.
We’ll talk about how to properly make a suspended ceiling in this article.
Types of suspended ceilings
The difference between some suspension systems and others is determined, first of all, by the shape of the cladding modules. These can be tiles, panels, slats, cassettes, gratings, which give the name to the entire structure. What the suspended ceilings are made from also matters.
Tiled suspended ceilings
The brightest representative is, facing tiles which are made from mineral fiber. This type of suspended ceiling decoration is most often used in public buildings, as it looks quite cold and formal.
But using the same principle, you can mount the ceiling with your own hands with other facing slabs, cutting them from plasterboard, MDF, glass, mirror or even foam.
Panel suspended ceilings
Most often you can find do-it-yourself ones - plastic or MDF panels. Sometimes wooden lining is used instead.

The principle of connecting all panels to each other is the same: one panel with its thinner edge is inserted into the groove of the other. After which a continuous surface is formed without cracks or visible joints.
Slatted suspended ceilings
Laths are long steel or aluminum panels. If you are deciding how to make it yourself, then this is the most affordable option for beginners. The frame for such a ceiling consists only of longitudinal support rails, and the slats are attached to them by snapping onto the protrusions of the profile. That is, without the use of any fastening hardware.

Slat ceiling
Cassette and cellular ceilings
Main elements cassette ceilings are metal cassettes (modules) made of steel or aluminum. If you already know how to make a suspended ceiling from tiles with your own hands, then you can easily cope with the installation of cassette hanging systems.
In cellular (lattice) ceilings, the facing modules are square lattices made of aluminum profiles.

For reference. Plasterboard ceilings are also considered suspended, since sheets of plasterboard are attached to a frame suspended from the ceiling. But their design does not end there: the mounted surface also requires decorative finishing. Therefore, in this article we will only talk about how suspended ceilings are made, which can be used immediately after installation.
If you have already decided which of these options suits you best than the others, it’s time to find out how to make a suspended ceiling with your own hands. Our improvised repair school will help you with this. A few lessons and you can confidently begin to act.
Installation of suspended ceilings
Let's divide the whole process into several main stages, and tell you about each of them in detail.
Stage 1 – design
At this stage you need to resolve the following issues:
- How far the suspended ceiling will drop relative to the base surface. It depends on what systems will be installed in the ceiling space. Most often these are air conditioning ducts and electrical wiring placed in corrugated sleeves.

- How the light sources will be located on the ceiling.
- In which direction will the cladding be attached: parallel to the walls or diagonally.
- If you want to create a pattern on the ceiling from facing slabs of different colors and textures, then modeling the ceiling is best done in a computer program to choose the most optimal option.
Before making suspended ceilings, sketch (or print) the finished project to scale. The drawing will help you to determine required quantity all materials.
Stage 2 – marking
Regardless of what type of finishing you choose, first mark the level of the new ceiling around the perimeter of the room (along the walls). How are markings made?
- First, using a laser or hydraulic level at a convenient height for you, draw a horizontal line along all the walls of the room.
- Then, using a tape measure, take simple measurements from the drawn line to the ceiling to find the lowest point of the base surface.
- From the found point, set down the distance by which you decided to lower the ceiling, and put a mark on the wall.

- Using the mark as a guide, again use the level to draw a new horizontal line on the walls.
Important! If you did everything correctly, the resulting line should go along all the walls and close on the mark.
Stage 3 – installation of the frame
Installation begins with the installation of guide profiles, which are applied to the intended horizon line with the lower edge and attached to the walls with dowels, anchors or ordinary self-tapping screws. It depends on the material of the walls.

Attention! Installation of panel suspended ceilings does not require the installation of guides.
How are tags made? A tape measure is stretched along the guide profile, and vertical lines are made under it at a given distance from each other. The same should be repeated on the opposite wall.
The distance between the supporting profiles depends on the type of ceiling covering.
- If it is a panel ceiling, then the profiles are installed perpendicular to the direction of fastening the cladding in increments of 40-60 cm. The first profile is attached close to the wall.
Attention! For installation of lining or panels MDF frame better not to do it metal profile, but from wooden slats.
- The supporting rails for the slatted ceiling are also located parallel to each other and perpendicular to the direction of the slats. The distance from the wall to the first tire is 40 cm, the distance between the tires is 120 cm.
- The distance between the guides for cassette, tiled and cellular ceilings is usually 60 cm - this is the size of standard facing elements. But the frame of such ceilings has more complex design, which, in addition to longitudinal ones, also includes transverse profiles. Therefore, markings should be made in all directions.

Now let’s talk about how to make suspended ceilings so that they don’t sag. To do this, the frame must be rigidly connected to the base ceiling using adjustable hangers. They are attached to the ceilings using anchors or dowels exactly along the line of the load-bearing profiles.
The profile is then connected to the hangers through special holes, and the latter are adjustable in length so that the entire frame is maintained in a horizontal plane.

Advice. If the distance between the base and decorative surface is less than 10 cm, then you can use direct hangers.
If the ceiling design provides for the installation of transverse profiles, then they are attached to the longitudinal ones after their installation. Most modern suspension systems have special locking connections for extending the profile along the length and connecting it with transverse inserts. Therefore, there should be no problems with this.
Before you make your own suspended ceiling, or rather, before covering it, you need to make sure once again that the technological distances between the load-bearing profiles are maintained, and that the entire frame is located in the same plane.
Stage 4 - cladding the frame
This is the easiest step if the frame is mounted correctly.
- The slatted ceiling cladding panels simply snap onto the guides.
- The same thing happens with cassettes and grilles if a closed suspension system. Otherwise, the modules are simply inserted into a frame cell, like the tiles of a tiled ceiling.

- Some difficulty may arise with the question of how a suspended ceiling is made from panels, since each panel must be secured to the frame with hardware.
Conclusion
This article provides only general description how to make a false ceiling. More detailed information For each type of ceiling you will find in other materials on the site.
In an effort to comfortably arrange their living space, many people prefer non-standard design solutions. They are able to bring originality to familiar interior, provide additional comfort. These items include hanging chairs that you can make yourself.
What kind of hanging chairs you can make yourself
Among the variety of hanging chairs, there are models that you can make yourself. Such options will become the highlight of your interior. Besides, self-production allows you to bring to life an individual plan, which is based on proven and reliable designs.
Hanging swing
Unusual swing chairs are made from various materials. The peculiarity of such structures is their elegance, simplicity and the ability to use both hard and soft frames. These chairs can become stylish decoration country house, an unusual addition to the interior of a bedroom, living room, children's room or veranda.
Wicker cocoon
No less popular is the cocoon chair or egg chair. A special feature of the model is the presence of walls that hide the internal space by about 2/3. These chairs allow you to enjoy privacy; they are most popular among children due to their resemblance to a hanging house suitable for games. Usually cocoons are made from natural materials, intended for weaving.
Nest chair made of hoop
As the most popular homemade model protrudes a nest chair made on the basis of a frame made of hoop. This model can be equipped with many decorative elements, and its shape fits harmoniously into the living space modern apartments. A variety of weaving techniques are used to make a nesting chair.
Materials and techniques for making home chairs
When choosing the materials needed to make hanging chairs, first of all take into account the features of the model you are interested in.
- Thick textiles and synthetic ropes are suitable for swing chairs. various types and wooden blocks.
- A cocoon chair is made from rattan, willow twigs, bast, willow or bird cherry, which have the necessary flexibility.
- To make a nest chair, you need plastic or steel hoops to ensure structural rigidity. You also cannot do without wear-resistant textiles, synthetic fillers, decorative cords for weaving and wooden blocks of different sizes.
To create the seats of hanging chairs, craftsmen use various techniques:
- macrame. The artistic interweaving of rope and rope knots gives the chairs airiness, providing an impeccable appearance;
- patchwork. To ensure the strength of the seat, the patchwork fabric is sewn on top of a dense wear-resistant material;
- knitting. The combination of durable cords of various colors allows you to implement unusual design solutions;
- Tatting. Thanks to their openwork, these designs look weightless, instantly attracting attention.
Remember that the materials chosen must be able to withstand certain weight loads. Fabric that is too thin or lace can tear under the weight of a large person. Special attention and fastening elements also deserve testing for strength: chains, ropes, braid on which the structure is suspended.
DIY hanging chairs - gallery
A hanging swing chair made of fabric is a convenient addition to a country house  Children will love this cocoon chair made of thick fabric.
  Rattan hanging cocoon chair is strong and durable
  A hanging nest chair made of thick fabric is suitable for relaxing on summer cottage
  A simple model of a swing chair is easy to make with your own hands
  An original handmade hanging chair will become a source of pride for its owners.
  A hanging swing chair woven using macrame technique adds coziness and comfort.
  Openwork seat for hanging chair can be woven from thick cord
  Hanging chairs can be used as a cradle for a baby
Step-by-step instructions for making a hanging swing chair
The swing chair can rightfully be called one of the most simple models that you can do yourself. To create it you will need:
- 2 meters of dense fabric (canvas, satin, trouser fabric);
- a wooden stick about 1 m long and 5–6 cm in diameter;
- drill and twist drill (15–20 mm);
- carbines (11 cm) with a load capacity of 160 kg;
- rope for static belay with a thickness of 10–11.5 mm with a breaking load from 2600 to 3200 kgf;
- sewing machine, scissors, ruler.
- paint, brushes, iron and durable synthetic fiber threads.
Having prepared everything you need, you can start making an unusual interior detail.
- Fold the selected fabric in half, then count 18 cm from the top corner.
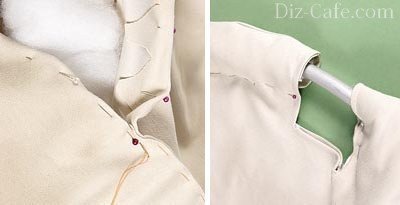
- Carefully cut off the resulting triangle (photo 1).
- Hem all sides of the fabric cut, bending the edges by 1.5 cm (photo 2).
- Create pockets for the ropes (Photo 3). On long side fold the edges of the workpiece by 4 cm and sew them up using sewing machine(photos 4 and 5).
- Make two holes on both sides of the wooden stick at a distance of 5 cm from each other, and the distance between pairs of these holes should be about 80 cm (photo 6).
- Thread a rope into the holes located closer to the center of the stick and secure it with knots. At the same time, in the center of the cable, also tie a knot necessary for attaching the carabiner.
- Pass the sections of cable hanging under the stick through the fabric blank, and insert its ends into the free holes located closer to the edges of the stick. Secure them with a secure knot (photo 8).
- Attach two carabiners connected to each other to a hook pre-fixed to the ceiling. This will ensure you can rock safely in the chair. Thread the cable into the lower carabiner.
The resulting hanging swing chair can be additionally equipped with soft cushions that provide comfort.
How to make a hanging hammock yourself from a hoop and fabric - video
Drawings and diagrams for a cocoon-shaped structure
To make an original model of a hanging chair you will need:
- rattan or willow rods with a diameter of 10 or 15 mm, approximately 450 pcs.;
- a ready-made metal hoop, metal pipes or several thick vine branches woven together in the form of a circle;
- strong rope and glue, which will be needed for tying the frame;
- knife, ruler, pruning shears and awl;
- nylon cord with a cross-section of 4 mm, used for weaving the back (it can also be made from wicker);
- ropes, chains or cords for hanging finished design to the ceiling.
Beginners will need a ready-made cocoon diagram, which allows them to correctly calculate the dimensions of the future chair.
When manufacturing, follow the instructions.
- Cut the vine, peel the bark and steam it, then beat it thoroughly. These manipulations will provide her with the flexibility necessary for weaving.
- Then proceed to forming the frame of the future chair. You can do it from metal pipes or a slightly flattened hoop if the final shape of the product should be oval. If using a pipe, connect its ends using inserts.
- To the pipe, which acts as a frame base, attach all the remaining elements one by one. If the chair is mounted vertically, use rods 6–8 mm thick, the length of which should exceed the height of the chair by 250–400 mm.
- Attach each of the rods to upper parts frame so that a gradual separation is maintained between them. In the middle of the back the distance should be 20 - 25 mm.
- By bending the rods, give the future chair depth and shape. Make sure that they are reassembled at the bottom of the structure.
- When using horizontal rods in the process of creating a frame, secure them to the sides of the workpiece. Install them at a distance of 20–25 mm from each other, then give them the desired shape.
- To secure the vine, carefully bend it through the pipe from the inside of the chair to the outside. Secure the ends with a rope.
- Weave the finished structure with thinner rods, moving from bottom to top.
- If you need to braid the frame from horizontally fixed rods, start work from the middle of the back in both directions. Bend the end of the rod that is on the pipe and twist it around the base.
- Press each new layer of thin twigs as hard as possible against the previous one.
- Braid the entire basket. Bend the end of the last rod, tuck it in and securely fasten it in the main weave.
To give additional comfort to the seat of such a chair, you can use a thick pillow.
You can braid the frame in different ways. Beginners can use simple techniques that provide a firm base for sitting.
Simple twig weaving techniques - gallery
 Even beginners can cope with such weaving
  Various schemes weaving can be used to make hanging rocking chairs
  Using twig weaving you can create a dense base for a chair
How to make a nesting chair with a knitted bottom
To create a nesting chair that will become exquisite decoration apartment or garden, you need to prepare the following materials:
- metal hoop with a diameter of 90 to 110 cm, a cross-section of at least 35 mm;
- 700–800 m of polyester cord with a diameter of 4.5–5 mm;
- crochet hook No. 8–9;
- slings - 12 meters;
- roulette;
- scissors.
Wrap the hoop used as a base with strong twine, securing every tenth turn with a knot; this will prevent the cord from unraveling.
To create the bottom, you can use a variety of crochet techniques. To make such a seat you will need from 120 to 160 m of cord. The exact quantity depends on the knitting pattern chosen.
- Start working from the center. Knit the circle as tightly as possible using single crochets and chain stitches.
- Start forming the seat with 6–7 circles, after which move on to the back in the form of a knitted mesh.
- Stretch the finished napkin onto the hoop, spreading it evenly over the entire base. The resulting structure should not sag. Attach to the hoop from the side of tight knitting, without cutting the cord.
- Attach slings to the finished product.
Making a seat using the macrame technique
For this version of a hanging chair you will need:
- 7 threads of 6 m;
- 4 threads of 5 m;
- 4 threads of 4.5 m each;
- 2 threads of 4 m;
- 2 metal hoop diameter 90 and 110 cm.
Having prepared the cords of the required length, proceed to attach them to the hoop.
- Starting from the center, fasten 7 long threads in pairs at a distance of 6 cm from each other.
- Continue fastening the threads along the sides of the warp. As a result, on one side there should be 2 threads of 5 m each, 2 threads of 4.5 m each and 1 thread whose length is 4 m.
- Then start weaving the pattern from the center of the workpiece.
- As a result of your work, you should get an openwork circle.
- To prevent the cable from moving in a circle, secure each thread with a flat knot.
- When knitting, maintain tension at all times, placing knots at 6 cm intervals.
If it is necessary to create a fringe, the length of the threads should be increased by about a meter and, at the end of the work, do not cut the remaining cord.
Additionally, equip the resulting structure with reliable slings and a soft cushion.
Hanging hammock chair using macrame technique - video
Hanging mounting options
Attaching a hanging chair can be done in different ways. One of the options is ceiling mount on the hook. Finished product suspended in this way can swing in different directions, but moving it to another part of the room is very problematic.
This method can only be used if there is high-quality concrete floor or when coffered ceilings allowing fastening directly to the beams.
No less popular is mounting to a rack, which can be purchased at specialized stores. This design is equipped with circular platforms that provide stability. The chair on the stand can be easily moved around the apartment and even taken outside.
Another option is axial fastening, which allows you to fix the structure between the ceiling and the floor. This method is suitable for decorating children's rooms.
If the ceiling in your home is not reliable enough and is hollow, you can install a hanging chair using a chemical anchor. This method involves injecting a polymer paste into the ceiling cavity from a syringe, after which the product is installed.
Simple options for making a hanging chair at home are available even to novice craftsmen. Unusual designs decorate the interior, give the room originality and comfort. Good luck with your work and have fun creating!
It is hardly possible to meet a person who would not feel the desire to settle down in a comfortable chair and feel the smooth rocking movements suspended structure. Comfortable swings have always been very popular. Today, the range of hanging seats has been significantly expanded: hanging sofas and armchairs decorate many suburban areas, easily fitting into the landscape design.
The basis for the manufacture of hanging seats was ordinary rocking chairs. Wicker structures made of rattan or wicker have become the most promising for furniture experiments, because they weigh quite little, but at the same time have excellent strength.

As a result of such furniture experiments, designers created hanging chairs resembling half a ball in shape.
Semicircular structures are attractive because they allow you to evenly distribute the entire load. In addition, they are convenient to hang, installing the device at the highest point.
The frame of hanging chairs can have several options.

Wicker chairs made of wicker, rattan, transparent acrylic or plastic have a rigid body. For convenience, they are supplemented decorative pillows and soft mattresses

The hammock chair is more soft version suspended structure. On the swinging soft pillows You can always pamper yourself in moments of relaxation

A cocoon chair covered on three sides with wicker walls is ideal for privacy and abstraction from the outside bustle.
Instead of traditional rattan or wicker, synthetic materials are increasingly being used when designing hanging chairs, making the structures lighter, more flexible and quieter.
As you can see, there are many options. We will specifically look at 2 examples.
It is not difficult to build such a chair. You just need to master the basic technique of weaving macrame.
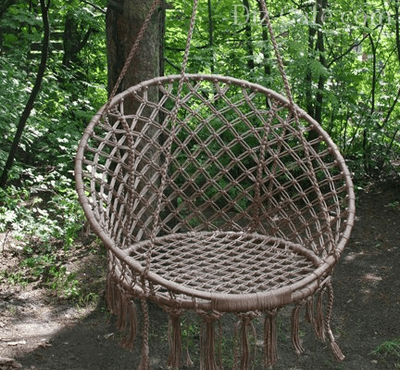
Such a hanging chair will create a special atmosphere on the site, conducive to peace and tranquility
To make a chair we will need:
- Two metal hoops different diameters(for seat D=70 cm, for back D=110 cm);
- 900 meters of cord for weaving;
- 12 meters of slings;
- 2 thick cords for connecting rings;
- 2 wooden rods;
- Scissors, tape measure;
- Work gloves.
To decorate the chair, it is better to use hoops made from metal-plastic pipes with a cross-section of 35 mm. Metal-plastic pipes of this thickness have a metal braid inside and are able to provide sufficient strength to the suspended structure.
To make a hoop from a pipe, first determine the length of the segment using the formula S = 3.14xD, where S is the length of the pipe, D is the required diameter of the hoop. For example: to make a hoop D = 110 cm, you need to measure 110x3.14 = 345 cm of pipe.

Wooden or plastic internal inserts of the appropriate diameter are ideal for connecting the ends of pipes; they can be secured with ordinary screws.
For weaving, a polyamide cord with a 4 mm thick polypropylene core, which can be purchased at a hardware store, is ideal. It is good because it has a soft surface, but unlike cotton fibers, when knitting it is able to create denser knots that will not “creep” during use. To avoid discrepancies in the color and texture of the material, it is advisable to purchase the entire volume of cord at once.
Stage #1 – creating a wrap for hoops
Our task is to completely cover metal surface hoops. To decorate 1 meter of hoop with tight turns it takes about 40 meters of cord. We make the turns slowly with good tension, laying the cord evenly and neatly.
To make the winding more dense, tighten it every 20 turns, twisting them forcefully in the direction of the winding until it stops. As a result, we should get a smooth and dense surface of the braid. And yes, to protect your hands from calluses, it is better to carry out this work with gloves.
Stage #2 – mesh weaving
When creating a grid, you can use any macrame pattern you like. The easiest way is to take a “chess” with flat knots as a basis.
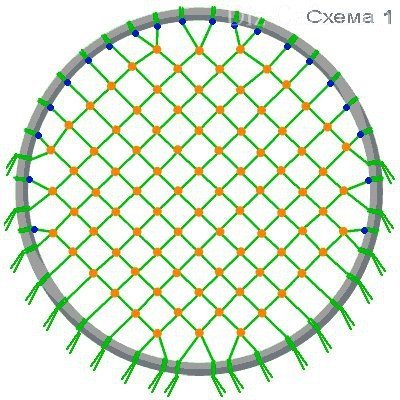
We weave the mesh with double polyamide cord, attaching it to the braided hoop with double knots
While weaving, monitor the tension of the cord. The elasticity of the finished mesh will depend on this. The free ends of the knots should not be cut off yet. You can use them to form a fringe.
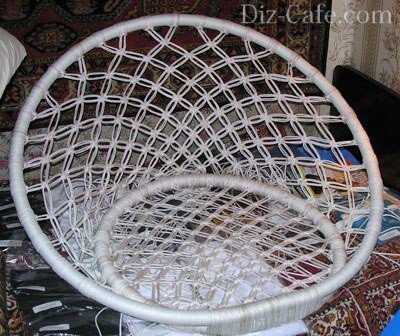
Stage #3 – assembly of the structure
We assemble the braided hoops into a single structure. To do this, we fasten them at one edge, wrapping them together with one cord.

From the opposite edge of the winding we place two wooden rods vertically, which will serve as support for the back of the structure
The length of the support rods can be any and is determined only by the selected backrest height. To prevent the hoops from slipping, we make shallow cuts at the four ends of the wooden rods.
Stage #4 – design of the back of the chair
The weaving pattern for the back can also be any. Weaving begins from the upper part of the back. Gradually lowering yourself to a seat.
We tighten the free ends of the cords on the lower ring, collecting their hanging edges into loose tassels
When the pattern is braided, we fix the ends of the threads in the lower part of the back and decorate them with fringe. The structure will be strengthened by two thick cords that connect the backrest to the seat. An elegant hanging chair is ready. All that remains is to attach the slings and hang the chair in the chosen place.
Hanging chair with cover
If you don’t want to weave, or for some other reason the first option didn’t suit you, then this one might be suitable.
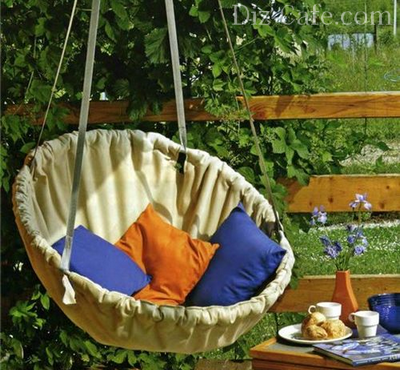
A cozy, gently rocking nest - perfect place where you can relax, forget about your problems, or just take a nap
To make such a hanging chair, we will need:
- Hoop D=90 cm;
- A piece of durable fabric 3-1.5 m;
- Non-woven fabric, double fabric or trouser tape;
- Metal buckles – 4 pcs.;
- Sling – 8 m;
- Metal ring (for hanging the chair);
- Sewing machine and essential tailoring supplies.
You can make a hoop from metal-plastic pipe, which is sold as a rolled coil, or from bent wood. But when using wood, you should be prepared for the fact that under the influence of temperature changes, the hoop can quickly dry out and become deformed.
Stage #1 – cutting out the cover
From a three-meter cut we cut two equal squares, each measuring 1.5 x 1.5 meters. We fold each of the squares separately four times. To make a circle out of it, draw a circle from the central corner with a radius of 65 cm and cut it out. Using the same principle, we make and cut out a circle from another square. On each of the resulting circles, stepping back from the edges by 4 cm, we outline the inner contour with a dashed line.
We mark the holes for the slings: fold the circle in four and iron it so that the folds are guidelines. The first pair of lines will be located relative to the bend at an angle of 45 0, the second - 30 0. Having marked the corners for the slots for the slings, we lay out both circles again and iron them.

We make rectangular slits measuring 15x10 cm along the intended four axes. We make the slits along the contour of the Y-shaped marking made inside the rectangles
To make the same slits on both circles, we connect the pieces of fabric and pin them together. Along the contour of the finished cuts of the first circle, we make slits on the second piece of fabric.

We bend the petals of the slots inside out, gluing the edges with non-woven material. Only after this we make a full slit, stitching it along the edge, retreating 3 cm
Stage #2 – connecting elements
Sew both circles together along the previously marked dashed line, leaving a hole for inserting a hoop. We cut out the free allowance using cloves. We turn the finished cover inside out and iron it.

From the filling material we cut out strips 6-8 cm wide, with which we cover the hoop. The sheathed frame is inserted into the case
Having retreated 5-7 cm from the edge, we sweep both sides together. Turn the edges of the hole left for inserting the hoop inside out.
We pin off the unstitched allowances from the front side, and sew the edges, stepping back from the edge by 2-3 cm. Using the same technology, we process the entire edge of the cover
We fill the case with padding polyester, stretching strips of filler and fixing their edges with a hidden seam. To strengthen the cover on the hoop, we quilt the fabric in several places.
Sling mode for four sections 2 meters long. To prevent the threads from unraveling, we melt the edges of the slings.

We pull the melted ends of the slings through the slots, form loops from them and stitch them 2-3 times
To be able to adjust the height and angle of the hanging chair, we put buckles on the free ends of the slings. We collect all the slings into one suspension, securing them to a metal ring.
Methods for arranging a suspension system
This chair can be placed in the garden, hanging from a thick branch of a spreading tree. If you plan to make a hanging chair a functional decoration for a veranda or gazebo, you will need to build a hanging structure.
The suspension system must support not only the weight of the chair itself, but also the weight of the person sitting on it.

To secure a simple hanging chair, the weight of which, together with the person sitting in it, is no more than 100 kilograms, it is enough to install a simple anchor bolt
With this method of fastening, one should take into account the maximum load on the ceiling, which is measured in kg/m2, because the entire suspension system will act on this area. If the permissible load less weight obtained in the calculation, it is necessary to distribute the load across the ceiling by constructing a load-bearing frame combining several anchor bolts.
Make such a chair, and you will get an excellent opportunity to relax at any time, enjoying pleasant rocking movements, while gaining peace and a philosophical attitude towards all troubles.
A hanging gutter garden is a great way to take advantage of the vertical space around your home to grow flowers, edibles and create a stylish space divider or garden screen without spending too much money.
Materials
1 - 8 " white PVC rain gutter cut into 3 sections 32"
6 - white PVC plugs for gutters
2 - 1/8" steel cables cut to required length
6 - Clamps (see image below)
6 - 1/8" steel rods
2 - Galvanized hooks
Tools
Cordless drill/driver
Hand saw or wire cutters
Right Angle Ruler
Roulette
Permanent marker

1. Locate the center of your gutters and mark (otherwise your gutter won't hang straight).

2. Mark and drill holes for the steel cable rods. Find a drill with a diameter equal to the diameter of the cable to minimize the space for maneuver.
3. Drill holes a few sizes larger, making sure you get good drainage (plant roots don't like to sit in water for long periods of time).


4. Find a place that gets at least 4 hours of sun. I placed my gutters on a gazebo I built a couple of years ago.

5. Drill pilot holes (the hole is slightly smaller in diameter than the auger diameter) to make screwing in the hooks easier. Make sure the holes are evenly spaced so the cable hangs straight down.
6. Pull the gutters through the holes and secure them with cross clamps at the desired height. You'll notice that I placed mesh (commonly used for drywall joints) left over from another project over the drainage holes to keep the soil from seeping through. However, I think the holes are small enough that this step is optional. I did it out of habit.
7. Secure the gutter with cross clamps and semi-circular steel rods.


Now you are ready to fill with organic soil and plant the small rooted plants of your choice.
If you liked this material, then we offer you a selection of the most the best materials our site according to our readers. Selection - TOP about existing eco-villages, Family estates, their creation stories and everything about eco-houses you can find where it is most convenient for youFrom this article you will learn about the advantages and disadvantages of foundations built using TISE technology.
We will tell you how to build a foundation with your own hands, we will give step by step instructions. You will be able to learn about the nuances of a monolithic pile grillage and the piles themselves.Individual ecological construction pursues many goals, one of which is respect for natural resources. Gentle technology allows you to get the desired result - a high-quality, durable house, without wasting unnecessary energy and raw materials. We will tell you about the foundation, the construction of which can be completed by an average craftsman, even alone.
Technology basis
The main advantage, or as they say today, “trick,” of such a foundation is that it does not come into contact with the ground. More precisely, the contact area is minimal and is reduced to the surface of the piles. The tape grillage rests on them and is in a suspended state. This provides the following advantages:
- Reinforced foundation waterproofing is not required. For all waterproofing work, 5-6 rolls of ordinary inexpensive roofing felt are sufficient.
- Seasonal heaving of the soil* does not affect the grillage tape. This factor often causes breakage of strip foundations.
- Minimum amount of excavation work.
- The ventilated space under the ceiling is reliable protection from dampness and moisture.
- The energy of the soil is used. At proper organization the basement and ventilation under the house in the underground cavity will maintain a constant temperature.

* Soil heaving is the property of soil to change volume when temperature changes. Depends on soil moisture and temperature.
The disadvantages can be called conditional:
- More boards will be needed to form the beams.
- It is necessary to wait at least 21 days before stripping.
A “hanging” grillage does not differ structurally from a buried grillage. The only difference between them is the level of placement.
TISE piles
The peculiarity of TISE piles is that they have a developed supporting part in the form of an extension along the radius of the pile. It’s hard to call it a novelty - this design has been used in industrial construction since the mid-18th century. The main problem - increasing the space in the bottom part of the pile pit - was solved in different ways - from special attachments to the drill rod to the explosive method.
TISE engineers took the work of industrial mechanisms as a basis and created a special drill with a folding knife. No other way to make an expansion at a depth of 1.8 meters under these conditions has yet been invented. The drill itself has quite primitive design and consists of the following elements:
- Vertical rod with handles.
- A soil collector equipped with cutters at the bottom for cutting into the ground.
- Folding knife with pull to the handle.

Drilling a hole under a pile occurs simply - having reached the required level with conventional drilling, the operator tilts the knife back with the help of traction and selects a cavity, continuing to rotate the drill. The soil is collected in a soil collector container and the operator removes it to the surface. The depth of the piles is determined by a single rule: the supporting part of the pile must be completely below the freezing level of the soil.
Currently on sale you can find two original drills TISE-F200, F250 and F300, as well as countless copies and analogues of them. The numbers in the name indicate the diameter of the hole in millimeters. Cost of drills:
- TISE-F200 - 75 USD. e.
- TISE-F250 - 80 USD e.
- TISE-F300 - 85 USD. e.
TISE piles and drill on video
Construction of the foundation
The TISE foundation consists of two structural elements- pile row and grillage-beam, respectively, and the work will be divided into two stages. First you need to arrange all the piles, and then make a grillage.
Concreting piles
After drilling all the holes, you should begin preparing the frames for the piles. These can be simple frames made of A3 Ø 12 reinforcement - 3–4 working rods per pile. Take the length with a margin of 400–600 mm. Tie the working rods with clamps.
Work progress:
- We make a footing - add at least 50 mm of concrete to each hole. If your work requires precision, at this stage you need to level the horizon at depth. To do this, stretch the cord horizontally so that it does not interfere with work, and adjust the level with a layer of concrete, focusing on the cord.
- We install the frames and concrete the pile headstock.
- We install a “shirt” made of roofing felt.
Video - how to make a sleeve for a pile
- We concrete the piles through the conductor, as shown in the video. The height of the pillar on concrete is from 100 to 200 mm above ground level.
Concreting TISE piles on video
Further steps will vary depending on the material of the grillage. If it is wooden, like the rest of the house, then the piles can be trimmed with a grinder to the desired level after hardening. If the grillage is monolithic, when concreting it is necessary to focus on the tensioned cord so that the concrete level of the pile is appropriate.
Concreting the grillage
After the solution has hardened (3 days), you can continue building the foundation.
Work progress:
- Fill the space between the piles with soil or sand/slag flush with the concrete level (horizon) to a width equal to the width of the tape + 200 mm. Compact with boards or a hand tamper.
- Lay the contact surface with roofing material or polyethylene.
- Bend the outlets of the pile reinforcement at the level of the future working rods of the beam frame.
- Tie the frame in accordance with the reinforcement requirements. In this case, the outlets of the pile frame must be tied into the beam frame.
- We install formwork according to the requirements for formwork.
- We concrete the beams, focusing on the horizon, which is better transferred to inner side sides. To do this, use high-quality concrete from pure raw materials with proportions of 1/3/3–4. When laying, use a vibrator - hanging beams must be reliable.

After laying concrete, it is necessary to wait at least 7 days to continue work. After removing the formwork, after 21 days you need to remove the bedding from under the beams. The terrain will level out and gaps will appear between the bottom of the beam and the ground level. The beam can be coated with one layer liquid waterproofing(except for the contact surface during the further construction of TISE walls).
Final view of the TISE foundation on video
Further operation of the foundation will require the organization of underground ventilation. This can be done by bridging the gap with a perforated sheet of laminated galvanized metal. The described technology is extremely economical. Attempts to make it even cheaper by using low-quality raw materials will inevitably lead to big troubles that will start from the foundation. Decent concrete and sufficient reinforcement will extend the life of the foundation to 180 years.
Vitaly Dolbinov, rmnt.ru


