For brick houses, it can sometimes be difficult to choose a material for a fence. A solid brick fence will look too massive, and a wooden one may simply not fit into the architecture of the building. In such cases, combined structures come to the rescue.
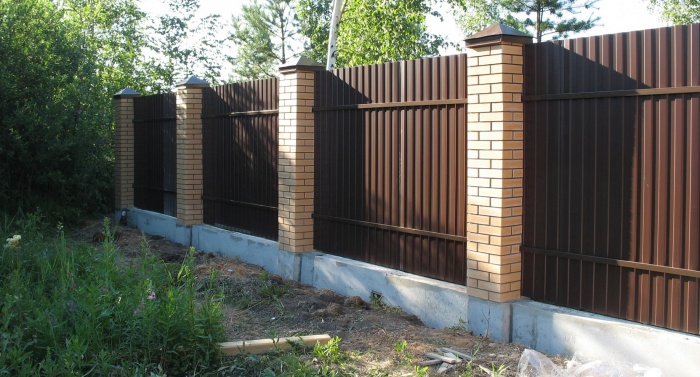
A fence made of brick and corrugated sheets will harmoniously fit into the architecture of brick and block buildings. This type of fencing is considered one of the most durable. The popularity of fences made of brick and corrugated board is ensured by the good compatibility of these materials. Quality fencing is worth the money you have to invest in it.
Fencing design and material
To facilitate construction, it is necessary to draw up detailed plan further work. The project must take into account all the design, material and landscape features of the site. Among other things, the following features must be taken into account:
- the fence should not extend beyond the boundaries of the land;
- in areas with a slope, individual sectors of the fence are mounted in pieces to maintain one structure;
- the length of the spans between the brick supports where the corrugated sheeting is mounted should be from 3 meters.

After drawing up a work plan, it is necessary to prepare everything for the construction of the fence. The minimum set of tools includes:
- welding equipment;
- drill,
- concrete mixer
- shovel;
- crowbar and set of screwdrivers;
- construction scissors.
For spans between brick racks, polyvinyl chloride sheets are used. The material does not corrode and is designed for long-term use. There are several dimensional lines of corrugated sheets; C10 and 8 are most often used for fences. Minimum thickness sheets 0.5 mm.
Today they produce a huge amount of corrugated sheets with various patterns and colors, including brick patterns. You can order corrugated board with imitation wood or to match brick house on your site.

Start of construction
The construction of a fence from corrugated sheets begins with markings. You also need to do detailed drawing fence In addition, it is worth calculating the number of pillars and the length of the spans between them.

A brief plan for building a fence made of brick and corrugated board includes:
- site measurements;
- foundation preparation;
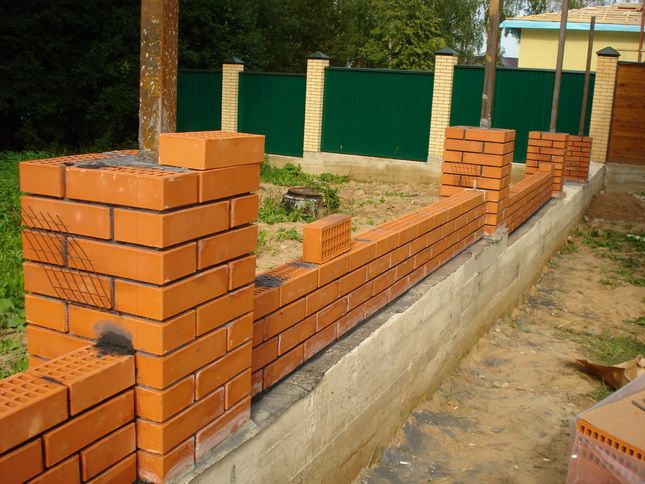
- installation of brick supports;
- corrugated sheet fastening.
After studying the features of the site and leveling the soil, a place for future columns is marked. Pegs and string are used as guides. At the site of future brick supports, small wooden pegs are driven in and a thread is pulled over them.
For simple fence A masonry thickness of one brick is sufficient. Such pillars are reinforced with reinforcement and a pipe, which is installed with inside fence

Soil preparation
Brick in combination with corrugated sheets have considerable weight. Therefore, a fence made of such materials requires strip foundation. A shallow (from 30 cm) trench is dug under it. Its width and height depend on the weight and thickness of the future fence.

To prepare the site for the foundation of the fence, the top layer of soil is removed from the soil. For such work, you should not hire special transport. It’s easier to do it yourself or hire a couple of workers. Workers will dig a small trench with a volume of 4 cubic meters or more in 6 hours with breaks.
At self-construction All work on the fence can be completed in several approaches.
Pay attention! Top layer soil removed under the foundation of the fence may be needed for fertilization or further improvement of the site.

Formwork
The formwork for the foundation of the fence is assembled for the base 15-20 cm below ground level. For this, a slab or any other recyclable wood is used. Assembling the formwork begins with the top board.

For strength, reinforcing bars with a cross-section of 1 cm and a pitch of 1 to 1.5 m are mounted in the formwork. When fastening the bars with reinforcing wire 1 mm thick, a frame is obtained. It is lowered to the bottom of the formwork.
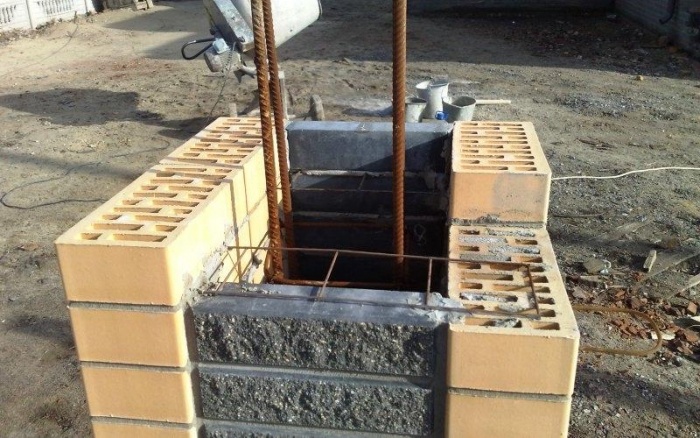
In order for the brick fence posts to sit firmly in the foundation, metal pipes or corners are installed in the formwork in place of the future posts. They are also attached to the reinforcing mesh. They are secured with boards and leveled.
The distance between the vertical rods is 1 m, and the horizontal ones - 10 cm from the bottom and 5 from the top of the foundation. The reinforcement bars are overlapped.
Pouring the foundation
The solution for pouring the foundation of the fence is kneaded in a concrete mixer. The installation must be located next to the formwork. It is best to dilute only half the solution from the volume of the concrete mixer. This speeds up the process and reduces installation workload.
Pay attention! To improve the frost-resistant qualities of concrete at the mixing stage, it is recommended to add household chemicals to it. liquid soap(10 ml per bucket of solution).

The solution can be made without the use of a concrete mixer. To do this, you will need a container with a volume of 100 liters and a sheet of steel. 3 buckets of cement and a bucket of sand are poured into the container and mixed with a rake. At this time, they pour into the bucket clean water and add liquid soap until dense, abundant foam is formed. When a lot of foam forms, water is poured into sand and cement. Immediately pour 6 buckets of crushed stone into the resulting mixture and mix.

Concrete made in this way has lower strength. But for the foundation for a fence, these indicators are suitable. The preparation time for this recipe takes about 30 minutes.
After pouring the solution into the formwork, it is covered with polyethylene. The film is removed after about 7-10 days. This is necessary to prevent the concrete from cracking from dry air. The film will also protect the concrete from rain.
Construction of pillars
To attach bricks to fence posts, use cement-sand mortar(1:3). To make the mixture more viscous and elastic, add a small amount of liquid soap. Every day the masonry can be erected to a height of no more than half a meter. Each row of brick is laid with reinforcing mesh.

The height of the fence posts is individual - it depends on the thickness and load of the corrugated sheet, the design and height of the fence. To attach the corrugated sheeting to the posts, use a special plate and corners at three points: in the center, at the bottom and at the very top.
The height of the fence depends on the design of the site, wind load and the height of the profiled sheets.
Installation of covers

A fence with rectangular brick posts looks unfinished. Once the installation of the pillars is complete, galvanized covers are mounted on them. In addition to the aesthetic function, the element performs a protective function. The cover is attached to the fence post using dowels.

If the fence supports are built of concrete, then concrete covers are used. When choosing them, you should pay attention to the pigment - it should be mineral. This paint does not lose saturation from contact with environment. Concrete covers are attached to fence posts using a mortar of sand and cement.
Frame
After the foundation of the future fence has dried, they begin to assemble the frame for the corrugated sheet. A metal pipe is used for this. It is cut with a grinder and welded welding machine rectangular frames. The finished frame of the fence spans is painted alkyd enamel.

After installing the frames on the fence posts, corrugated sheeting is attached to them. For this purpose, special fasteners are used to prevent metal corrosion.
Before starting work on the construction of the fence, the foundation should be covered with cardboard. This measure will avoid damage to the profiled panels. Mark the places where the screws are screwed in using a felt-tip pen. Fastening is carried out through one wave using galvanized self-tapping screws 4.8x30 mm. The sheets on the fence are joined together with an overlap.

During the work, certain difficulties may arise. The following tricks will help you avoid many installation mistakes:
- the strip foundation is covered with cardboard during the installation of corrugated sheets so as not to bend the metal sheets;
- self-tapping screws are used approximately 6 pieces per 1 m2;
- sheets of corrugated sheets are laid overlapping;
- corrugated sheeting is installed with a drill at low power;
- Through one wave, rubber gaskets are used on the fasteners.
Installation of an average fence, up to 20 meters long, takes approximately 12-15 days. The construction of such a fence involves many subtleties, so it is better to entrust such work as installing brick pillars to a professional. But you can handle the installation of corrugated sheets yourself. This will require the ability to work with a drill. Connecting structural elements is not difficult.
Results
Before starting work, it is necessary to decide on the design of the fence. Then work is carried out on the construction of the foundation and the erection of brick supports. Only at the last stage of work is a frame constructed to which the corrugated sheet is screwed.

When carrying out work, it is important to take into account a few tips from experienced builders. For example, you should not tighten screws with a drill set at high speed. It is also worth remembering that it is better to entrust brick laying to an experienced specialist. If there is a mistake, the strength of the entire fence will be in question.
In this article we will look at the sequence in which you can build a fence from corrugated board with brick pillars. In practice, using this type of material is more cost-effective than constructing similar structures, for example, from expensive brick or concrete-monolithic blocks, while not inferior to them in strength and reliability. This is because the construction of a fence made of corrugated sheets with brick posts uses masonry technologies that contain galvanized metal in the form of meshes. Plus, the brick pillars give the entire structure significant architectural weight.
Brick pillars give the fence additional stability, while corrugated sheeting is excellent inexpensive material to fill openings.
Making calculations
Before you begin constructing a fence, you need to draw up its design, as well as determine its exact location, thickness and level at which the foundation will be laid.
Moreover, the project can be done with your own hands. To do this, it is necessary to install wooden stakes at the locations of the corners of the future and stretch them with nylon thread. Next, use a tape measure to measure the required distances and enter them into the project plan.

In the construction of columns it is used facing brick. You can hire an experienced bricklayer for the work.
Now comes the foundation. You need to design it and, before building the foundation, take into account important nuances. For example, if there are differences in ground height in the area where the construction will take place, serious overuse of concrete is possible. To prevent this from happening, the foundation can be divided into separate areas with different altitude levels. In this case, the distance from the ground to the top edge should exceed 0.1 meters. After measurements and inclusion in the project, it is necessary to dig a trench line for the future foundation. To do this, you can use construction equipment or (if the amount of work is insignificant) make a trench under the foundation by hand. The height of the recess along its entire length is approximately 0.5 meters, however, in places where posts with rod fastenings for gates will be installed, the depth should be approximately 1 m.
It is worth noting that the trench under the foundation along its entire length must be expanded in depth. This is necessary to counteract the forces of soil heaving, which can push out individual sections of the foundation structure and lead to its partial destruction.
It is important to remember that in the locations of future brick pillars it is necessary to install vertically reinforced pipes, secured at the base with metal corners. They will become the basis for the future frame and brick pillars.
Formwork and excess soil

It must be remembered that during the process of forming a trench under the foundation, the issue of removal will irreversibly arise. open ground. There are many options for resolving this issue, including obtaining commercial benefits. After solving the problem with excess earth, you can begin to reinforce the foundation line and construct the formwork. Reinforcement is done using steel structures from reinforcing mesh, installed inside the trench under the foundation. The formwork is made from half-cut boards in accordance with the dimensions of the foundation. Along the entire length of the structure, the formwork must be securely fastened and have sufficient strength before starting concrete pouring work.
Plastic and durable concrete
To carry out the work of pouring the foundation, you will need a concrete mixture with high workability, in other words, highly plastic concrete. Such characteristics are necessary for high-quality and most uniform laying of the foundation base. There are several ways to obtain plastic concrete for the construction of fences made of corrugated sheets with brick pillars:

The most suitable foundation for brick pillars is strip reinforced concrete, which can support the weight of brick pillars.
- using a concrete mixer;
- mixing concrete with your own hands.
It is worth noting that concrete produced using an automatic (semi-automatic) concrete mixer is approximately 20% stronger than concrete mixed manually. Obtaining high indicators of plasticity of the mixture is achieved by adding liquid soap or special plasticizer additives to the mixture. If soap is used, its percentage to the amount of cement is approximately 0.2%. When working with additives, you must follow technological requirements manufacturer. For fences made of corrugated sheets with brick pillars, it is permissible to use fine crushed stone in the concrete mixture.
Steel frame and facing bricks

The final stage decorative design fence is the installation of covers (hoods) on fence posts. This makes the columns especially expressive and protects the ends of the column from water getting inside.
Now you need to start welding steel frame. The frame underneath with brick pillars is formed using arc welding and profile pipes made of steel. The task is to weld to pre-installed vertical pipes two parallel steel profiles: one - from above, the second - from below. When welding joints, it is necessary to control the position of the pipes using a level. Once the frame is installed, it can be painted with enamel or paint. Ours is almost ready.
Now you can start building columns from facing bricks. It is also necessary to resolve the issue of ordering profiled sheets. For work, a masonry mortar of medium plasticity is required. If desired, you can install decorative caps from steel sheet. Upon completion, we proceed to install the corrugated sheeting. Its fastening is carried out using galvanized profile screws. It is worth remembering that you must first take measurements and drill holes in the fastening areas. Installation can be done by two people with their own hands.
Approximately in this sequence, a fence is built from corrugated sheets and brick pillars.
List of required tools
- construction level;
- bayonet and shovel shovels;
- roulette;
- tension nylon thread;
- perforator;
- metal drills;
- screwdriver/screwdriver;
- hammer;
- autonomous concrete mixer;
- spatula, brushes;
- welding inverter.
With a combination of “brick and corrugated sheeting”. And this is quite logical.
This solution for cottages is in perfect harmony with any landscape design And architectural style. Creation similar fence will also bring economic benefits. And the result will be long lasting if everything is done correctly.
Where do they start?
Corrugated sheets are purchased. They are made of steel. They are covered with a protective layer against corrosion: colored polymer or galvanized.
The advantages of this material:
- High reliability.
- Good strength and elasticity.
- If the sheet is damaged, it can easily be replaced with an analogue.
- 25-30 years of service.
- Powerful resistance to ultraviolet radiation, thermal shocks, natural and mechanical influences.
- Good color range.
Fence with brick pillars. The highlight is that the corrugated board is decorated to resemble a brick.
Installation process
Fences with the specified combination are installed very quickly, since this material is of relatively low mass. There is no need for special equipment here. are powerful reinforcements for the fence. And it will be extremely difficult for villains to climb over such a fence and get past its sharp edges.
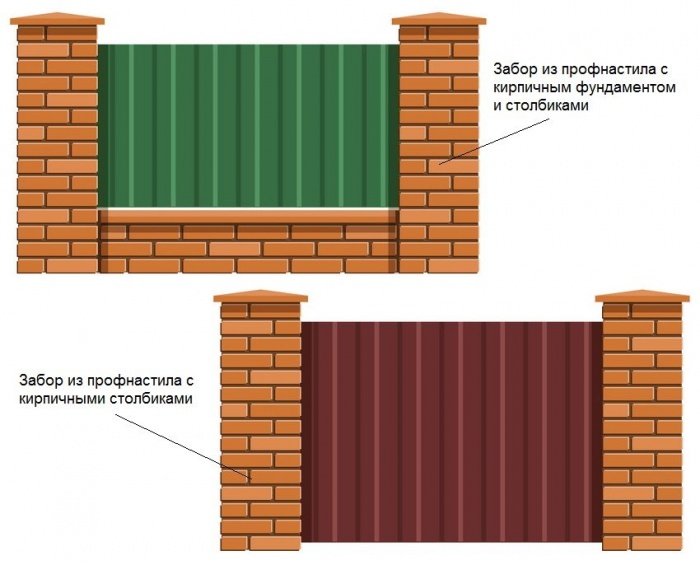
Fasten the corrugated sheet to combined fence You can use one of these methods:
- Sheets cover the entire structure
- The sheets are located between the pillars.
The second method is most often used.
Here's how to do everything step by step:
- Choice of corrugated sheets.
- Perimeter calculations.
- Work on the foundation.
- Creating columns.
- Installation of corrugated sheets.
Choosing hardware according to the rules
You must choose taking into account the following criteria:
- Coating: polyvinyl chloride or painting. The first option creates a thick and very durable outer layer. Type of invoice: smooth and unsmooth. Such sheets are powerfully protected from corrosion and other negative factors, but after 2-3 years they fade. The second option is determined by the dyeing agents used. Modern varnishes and paints can create good protection and interesting color implementations.
- The protective layer should be on both sides of the sheet.
- The selection of colors matches the color scheme of the house facades.
- Sheet thickness – at least 5 mm.
- The height of the profile reaches the following parameters: C10 – C8.
Some color examples material: 
Perimeter calculations
A construction zone is designated. Pegs are placed at the positions of the future corners of the fence. A thread is stretched over them (it is better to take a strong nylon type). Take a tape measure and measure the distance of the pegs from each other. A draft of the intended design is drawn up. The thickness of future pillars is taken into account. The most economical option is considered to be: The thickness of the side is 1 brick, the front is 1.5 bricks. To strengthen the pillar, profile pipes are used. Their parameters: 4 x 4 x 0.2 cm. Every second masonry line is reinforced. For this purpose, a special galvanized steel mesh. Its parameters: 2.5 x 2.5 x 0.1 cm. Here is an example:

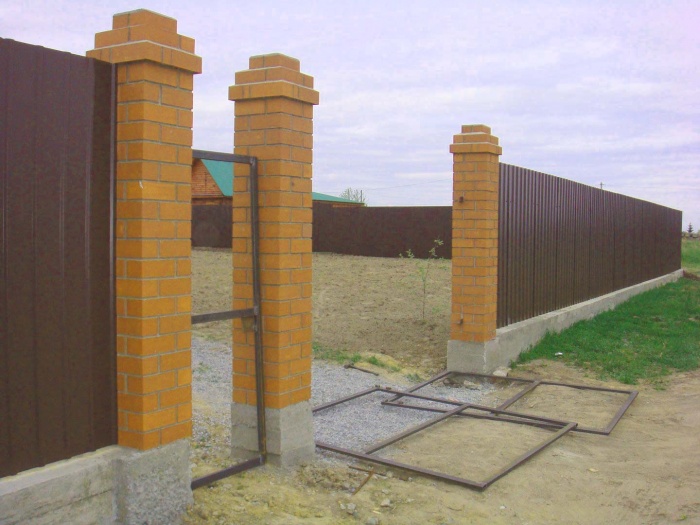
If you need to mount a gate, you need to use pillars with embedded components. They need to be strengthened steel pipe 8 x 0.28 cm.
Land works
Before erecting the fence, you need to dig trenches. In this case, a large volume of excavated soil is formed, about 3 cubic meters. It is better to place it in special bags (40-50 kg) and take it away.
For earthworks here you need two shovels: a shovel and a bayonet, as well as a crowbar.
You can dig a trench, working together, in 4-6 hours, taking into account pauses.
Formwork can be created immediately after digging the trench. An example of high-quality formwork:

For the foundation, formwork can be made only for the basement component, that is, 10-20 cm below superficial level land. The walls of the formwork are created from construction semi-edged boards.
Assembly is carried out using the following tools: electric drill, wood screws.
Advice! Important to consider high action concrete on formwork.
Therefore, to fasten the boards you will need wooden lintels and brick supports. They are introduced only before the foundation is poured. It will be extremely difficult to fix anything later.
- Collect shields while in the trench.
- It starts with the board itself. It is arranged along a thread stretched between stakes.
- To strengthen the foundation, use reinforcing bars 1 cm thick.
- Place vertical rods every one and a half meters in the trench.
- The foundation must be reinforced horizontally with the same rods. They are laid out on both sides at a distance of 10 cm, rising along the trench.
- On both sides they must be laid 5 cm from the concrete surface.
- The reinforcing frame is assembled on the surface. And in finished form placed in formwork.
To fasten the rods you need annealed wire. Its diameter is 1 mm. After introducing the frame into the formwork, reinforcing elements can be mounted there: a corner or a pipe. Level them and secure them with boards.
Example:

Foundation work
His suitable look– strip reinforced concrete. The width of the base corresponds to the width of the pillars. If discrepancies are found in the foundation levels, then it is necessary to divide the base tape into separate sections. Each level is at least 10 cm.
The depth of the foundation for the planned pillars is equal to the depth of soil freezing in a given geographical area. IN the above example this value is 1 m. In areas under corrugated sheeting, the depth of the base can be reduced to 50 cm.
To create resistance to soil heaving, the shape of the foundation must be expanded towards the bottom of the pit. This will extend the life of your fence.
Activities with concrete composition
To create a high-quality composition you need a concrete mixer. It is placed near the formwork.
The algorithm for mixing concrete here is as follows:
- The concrete mixer is placed at an angle of 35-45 degrees, covered with crushed stone (6 parts). Crushed stone is an excellent filler and prevents cement from sticking to sand and walls.
- The composition includes: an additive for air entrainment (about.1%), water (0.7 shares) and sand (3 shares). Sand is poured only after the crushed stone is mixed with water. Mixing duration is 30 seconds.
- The angle of the concrete mixer changes to 60-70 degrees. This will prevent dry sand and cement from sticking to the walls.
- Cement (grade PTs-400) and the rest of the sand are introduced.
- The angle of the concrete mixer returns to its initial values. The remaining water should be added.
- Mix thoroughly until there are no lumps.
- Unloading a concrete mixer.
The given proportions are calculated from 1 part of cement. Instead of an additive, you can introduce liquid soap. Its proportion: 10 ml per 12 l. cement. This will give the foundation strong resistance to frost.
After pouring, immediately cover the concrete with polyethylene. Concrete surface should not dry out quickly.
In hot weather, complete removal of formwork is carried out in about a week.
Creating brick pillars
For this purpose it is usually used facing brick, for example “Bassoon”. The brick is placed on a cement-sand composition.
Composition proportions: 1 share of cement and 3 - other components. For plasticity, you can introduce liquid soap.
In one day, it is optimal to lay out 50 cm of masonry (in height).
In parallel with the masonry, it is necessary to fill the space between the brick and the steel column with the same composition. All rows are strengthened (reinforced) with a special mesh. Its parameters: 5 x 5 x 0.4 cm.
The required distance between the pillars is no more than 3 meters. Their height is affected by: the design of the site, the appearance of the fence, wind load, and the height of the corrugated sheet.
Masonry pattern:

This material is fixed in the masonry using embedded plates and corners. Their positions: middle, bottom and top of the columns.
The usual length of sheets is 3 m. And to securely fasten them together, you can use only logs.
After the pillars are erected, protective covers (caps) are attached to them. The caps also give the pillars a complete look.
If you choose concrete caps, it is better to take versions painted with mineral dye. The paint will not wash off from them in difficult weather conditions, and the top layer will not fade. Concrete options placed on top of the posts on a cement-sand composition.
For your information, steel analogues are attached with dowels from below to the brick.
Creating a steel frame
It begins 2-3 days from the moment the formwork is filled with concrete. For assembly you need a profile pipe 2 x 4 x 0.2 cm. They must be welded using the manual arc method. The corrugated sheet is then mounted to the frame.
Frame template (correct pipe positions):

Assembly algorithm:
- Profile pipes are cut into the required lengths. The position of these segments is vertical.
- They indicate the places where the pipe will be welded. From each edge of the fence you need to keep a reserve of 30 cm.
- At the designated points, the pipes are already held in a horizontal position by welding. The grip is on one side only. Here it is better to work with an assistant.
- Checking the correct position of the pipes. Need a level.
- Final welding of pipes in a horizontal position.
Advice! For such welding, equipment with a parameter of 6500 W is better suited.
The welded frame should be coated with a protective compound and alkyd enamel, for example PF-115.
Installation of corrugated sheets
Scheme:

Before this stage, the foundation is covered with cardboard. This way there is less chance of damage to the bottom edge of the corrugated sheet.
Installation plan:
- Marks are made to place the screws. Need a marker.
- The corrugated sheet is attached to the profile pipe (2 x 4 x 0.2 cm) at the bottom of the corrugation. You need to follow through one wave. Here you need galvanized roofing screws having rubber gaskets. Their parameters: 0.48 x 3 cm. To mount 1 meter of corrugated sheeting you need 6 of these screws.
Type of connection - overlap. To screw in self-tapping screws, you should use an electric drill at modest speeds. This will prevent the cutting plane of the screw from overheating and grinding down.
Price factors
Such fences take about a couple of weeks to create. And this does not take into account possible pauses in work.
Costs here can reach up to 50,000 rubles. Calculation for 6 pillars and a nine-meter fence. But it is cheaper than a brick fence with forged elements.
To correctly calculate costs, divide the length of the fence by the length of the selected material (corrugated sheeting).
It is also worth considering the costs of creating concrete composition, reinforcing elements, fasteners, pipes and tools.
Bottom line
Such fences are often built on their own. The issue is not only price, but also quality. It happens that owners do not trust some of the processes to unfamiliar employees. In any case, when people build, pour and install something for themselves, the result is pleasing to the eye, and their soul is much calmer.
How to do it “with one hand”?
A fence made of brick and corrugated board is one of the most durable types of fences. Clients have the opportunity to choose different color solutions barriers and combinations of the fence with the general landscape of the site and architectural buildings on it.

Fans choose it for its ease of maintenance, durability and laconic design. Caring for a combined brick and corrugated fence is simple – just wash it with a garden hose. No coating with any anti-corrosion mixtures is required. Thanks to special technology assembly, in case of damage, structural elements The fences are very easy to replace. Galvanized corrugated sheeting as an integral element of the fence allows us to confidently declare that the fence is resistant to high and low temperatures.


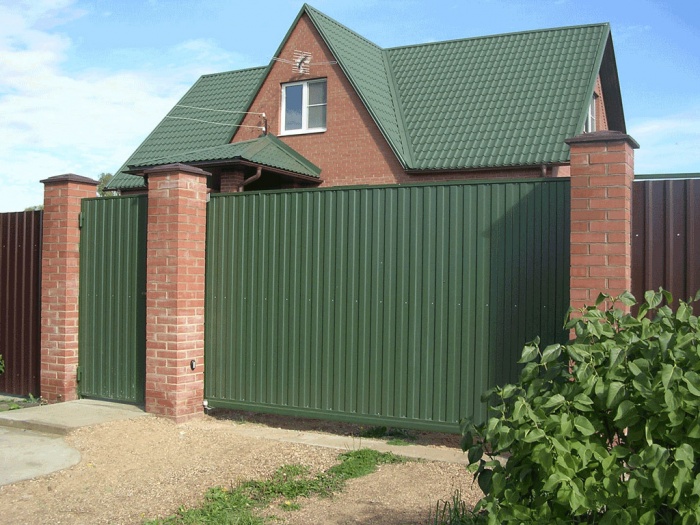
A fence made of brick and corrugated board looks very elegant, although in operation it does not cause much trouble for the owners. The most popular shades of corrugated sheets are dark green, cherry and brown. These colors combine well with brickwork; fencing gives the landscape a unique charm.
You can choose corrugated sheeting with one-sided or two-sided painting. On small ones summer cottages One-sided material looks good, as it visually makes the space larger. And if the profiled sheet is stylized to look like wood or stone, then you get a classic fence that can decorate any landscape design.
Main design elements
A corrugated fence consists of the following structural elements:
- Metal support posts round or square section. Choose different sizes - from 60*60 to 80*80 mm. The pillars are equipped with special plugs on top so that snow or rainwater did not get inside the pipe.
- Profile pipes of standard section 40*20 mm.
- Profiled metal sheets made of galvanized steel with polymer coating.
- Fastening elements. Usually self-tapping screws are used, the color of which is matched to the color of the corrugated sheets.
Brick pillars are installed on a pre-prepared strip or strip-column foundation. A profile pipe is placed at the base of the brick pillar. At the intended installation locations of the pillars, holes are drilled at a distance of approximately 2.5 m. Using the foundation, the fence is combined into a rigid monolithic structure.
Prices for fences made of brick and corrugated board
The price of a fence made of brick and corrugated board may vary depending on its design and external characteristics.
Fence cost made of corrugated sheet S-20, brick pillars on a strip foundation Price per 1 m.p. with material and work (rub.) |
||
| Height (meters) | Smooth brick | Brick RUST |
| one-sided polymer coating | ||
| 1,8 | 9 100 | 9 250 |
| 2,0 | 9 650 | 9 820 |
| 2,5 | 11 600 | 11 750 |
| 3,0 | 14 850 | 15 000 |
| double-sided polymer coating | ||
| 1,8 | 9 170 | 9 350 |
| 2,0 | 9 740 | 9 890 |
| 2,5 | 11 680 | 11 870 |
| 3,0 | 15 000 | 15 350 |
|
||
Cost of one brick pillar with a cap with materials and labor (rub.) |
||
| Height (meters) | Smooth brick | Brick RUST |
| 1,5 | 9 000 | 10 000 |
| 1,8 | 10 000 | 12 000 |
| 2,0 | 11 000 | 13 000 |
| 2,5 | 13 500 | 15 500 |
| 3,0 | 16 000 | 18 000 |
|
||
Prices may vary due to ongoing promotions and market volatility.
Currently, the presence of a fence on the site has great value. It defines the boundaries of areas, closes it from prying eyes, and prevents the entry of uninvited guests. There are various types of fences - simple wooden, modest brick, pompous monolithic. In summer cottages, fences are often built from corrugated sheets in combination with brickwork. As a rule, support pillars and foundations are made of brick, and corrugated sheeting is installed in the gaps. This method allows you to create fences that are not similar to their neighbors.
Pouring the foundation for a combined fence
A combined fence is usually built so that it matches the appearance of other buildings on the site. The same material is used for the pillars as for the walls of the buildings. Metal caps of pillars and corrugated sheeting are matched to the color of the roof of the buildings.
With the help of a combined fence, you can give your site the necessary individuality, as well as emphasize the architecture of buildings. Of course, the cost of such a fence will be significantly higher than a fence with steel posts, but appearance will completely justify her. The high cost is due to the need for a foundation and brickwork of pillars.
To build fence made of brick and corrugated board, you must first dig a trench for the foundation. Its depth must be at least one meter. Then you need to mark the location of the support pillars, gates and gates. The step between the pillars should be no more than three meters. After this we build the formwork. Pipes or corners should be installed in place of future pillars to enhance their strength. The next step is pouring the foundation concrete mixture and crushed stone.
The width of the foundation can be the same along its entire length or different. For example, under the posts you can make it full width, and under the corrugated sheets - narrow. In this case, the amount of concrete is saved, the volume is reduced earthworks, but the assembly of the formwork becomes more complicated.
After three days you can begin assembling the frame. It is made from profile pipes that fasten spot welding. The frame should be painted.
Construction of brick columns
After this, they begin to build brick columns. Pillars perform two main functions – supporting and aesthetic. Brick pillars can provide the fence structure with the necessary reliability and make it strong and durable. For pillars, facing bricks are usually used. Brick laying should be done gradually, laying 50-70 centimeters per day. This way you get an absolutely even column.
The height of the brick pillars is determined by the height of the future fence. Most often, the pillars are made two to three meters high and with a cross-section of 380x380 millimeters (one and a half bricks). A section of two bricks (510x510 mm) is used much less frequently. You should put special caps on top of the finished posts, which can be bought at a hardware store. They will protect brickwork from destruction.
Installation of corrugated sheets to the frame of a fence made of bricks and panels
The final stage of fencing manufacturing is the fastening of the corrugated sheet. However, before installing the corrugated sheeting, marks are made on the material indicating the locations of the screws, and the surface of the strip foundation is covered with cardboard or rags, which prevent damage to the material during installation.

Next, the sheets are set in a given position, and they are fastened to the frame elements, for which galvanized self-tapping screws with a 4.8x30mm rubberized head are used. To screw in the fasteners, you should use a drill or screwdriver, and fasteners should only be made to the lower corrugation of the corrugated sheet through the wave. Likewise All remaining materials are fixed, with the sheets overlapped.
Construction of a fence made of brick and corrugated board: basic recommendations
In order for a self-made fence with brick posts to have higher performance characteristics, during its manufacture you should adhere to certain recommendations:
- In the places where gates and gates are fastened, provide for the installation of embedded elements in the post structure;
- Traumatic operations (cutting corrugated sheets, bricks) should be performed only with the use of protective equipment (glasses, gloves);
- It is advisable to equip the end faces of the sheets with a decorative profile for mechanical protection of the flooring.
Video on how to build a fence from corrugated board and brick with your own hands
Read on and find out more!

4 years ago
I want to build such a fence in the village instead of the old one that has long since rotted away. How to pour the foundation is clear. I can also handle the gate area myself. In principle, if desired, you can build a combined fence yourself. The question is at the gate. It's a pity there are no tips for installing them...
I've been thinking about replacing the fence at my dacha for a long time. Build it from corrugated sheets, good idea, and strengthening it with brick pillars is very original. it is quite possible for anyone to do it independently, without additional expenses stop the brigade.
I made my fence using a similar technology, only instead metal pipes took a leak concrete pillars with a reinforced frame inside.
The formwork was made from collapsible OSB sheets.
And when casting the foundation for the fence, I laid the reinforcement to which the frame of the post was attached, then everything was covered with bricks as in the description.


