Telephone consultation
For free
Our managers will conduct a consultation over the phone, answer all questions, find out your wishes and agree on a convenient time for a technologist to visit the site.
The conversation time is not limited, you can ask any questions you are interested in and receive comprehensive advice, even if you do not sign up for a measurement right now. We know that you will return to us.
1 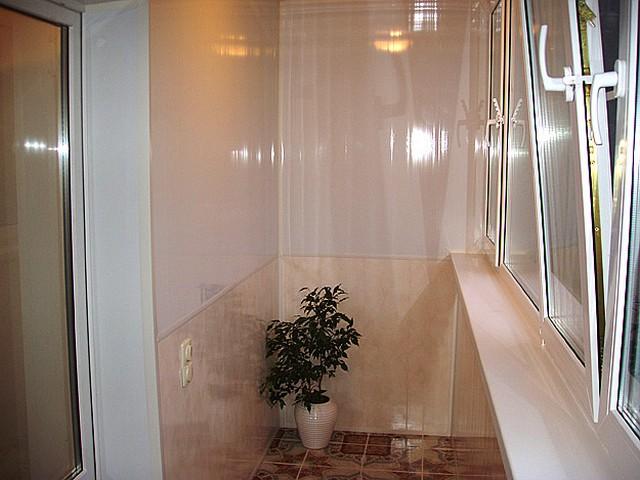
Departure of the estimator-technologist to the site
30-60 minutes
For free
A qualified estimator-technologist will carry out all the necessary measurements, perform calculations, assess the possibility of realizing your ideas and give useful advice. practical recommendations. Departure for measurements and preparation of estimates is always for free.
Will come for measurement professional builder , not a sales manager. This guarantees you an accurate estimate and enough time to make a decision. We will not put pressure on you, we are confident in our prices and quality of work and we know that our offer will be competitive.
2 
Drawing up and signing an agreement
For free
Signing the contract: the contract specifies all the duties and responsibilities of the contractor to the customer, warranty obligations, and fixed start and end dates repair work. Your interests are protected legally.
Signing the estimate: we fix the final cost for all work according to the estimate. We guarantee that the estimate will remain unchanged until the very end.
Signing the work schedule: calendar plan records the timing of all work according to the estimate, the date of delivery of rough and finishing materials to the site, the timing of work performed by third parties - installation of windows, air conditioners, entrance doors. The entire repair process is under your control.
3 
Check-in at the site
No later than 5 days from the date of signing the contract
For free
The project manager who will accompany you during the renovation will introduce you to the foreman and the team that will work at your site. We will meet at the site and agree on all the points again to make sure there is complete mutual understanding.
We will deliver all the tools necessary for work to your site. Our craftsmen are working only with professional certified tools.
4 
Dismantling works
Savings up to RUB 50,000.
Our experts will dismantle it without causing any damage. load-bearing structures, will independently pack all construction waste and prepare it for disposal. We care about the environment Therefore, we use specialized services for disposal and never throw garbage into the street. We order a container, the garbage is removed during the day - quickly, conveniently, no problems with neighbors or the management company.
Prices for seamless panels became available for the average buyer, as a result of which there is an increased demand for finishing premises using these materials.
To carry out work on wall cladding with plastic not necessary attract specialists.
By following a certain sequence of actions, you can do everything with your own hands.
Before deciding to purchase plastic panels, it is worth understanding in all its subtleties their use.
The whole truth about plastic:
- Plastic panels are harmless. Technologies that used toxic substances such as asbestos or cadmium and the like have sunk into oblivion.
- The beauty of plastic panels is due to the richness and variety of such coatings.
- The use of plastic panels allows you to create the maximum "home" interior.
- An image or self-adhesive film can be applied to the plastic coating, which makes it possible to realize individual design preferences.
- If you have to cover inconvenient elements (for example, niches), then plastic is the most suitable solution.
- If you want to make changes to the decor, this can be easily done on a plastic panel. You can rehang the picture, curtain brackets several times, and the old place of fastenings can be smoothed out very simply, for example, using an ordinary teaspoon.
- Technical elements combine very well with plastic panels.
- Even with a minimum of care plastic panels they will last up to 12 years, even in an aggressive environment (balcony or bathroom).
What you shouldn't believe:
- Statements that plastic panels can be installed on any walls are not entirely correct. If there are significant irregularities, then a labor-intensive operation will be required to level the sheathing.
- Installing plastic does not require any special skills. On the contrary, all operations must be performed with utmost precision and using special tools.
- Claims about plastic being hygienic are completely meaningless. It does not breathe, glares, and harmful microorganisms can settle in panel voids.
- Plastic panels do not burn. The biggest misconception. It is indeed very difficult to set them on fire, but the resulting flame is maintained perfectly. At the same time, poisonous gas is released in a very large volume.
The panel material has great coefficient of thermal expansion. When performing installation, you should ensure a gap equal to half the width narrow shelf installation profile. For fastening, it is recommended to use self-tapping screws with thermal washers.
How to cover walls with PVC panels yourself
Today, to create an interior they use various materials.
One of most popular A way that you can implement on your own is to cover the walls with plastic panels.
How to carry out installation correctly PVC panels and what should be on hand will be considered below.
Elements required for installation
Start and finish profile. A wide shelf is attached to the sheathing, and a narrow one serves to hold the board. Required for installation such materials:
- Angles – external and internal. The outer one should be one number larger than the standard size of the panels.
- Connecting profile.
- Skirting board. Most often it is attached with glue.
- Combined installation profile. It has a perpendicular shelf onto which the plinth is glued.
- The corner is simple.
- To carry out work on wall cladding with plastic panels, the following set of tools is required. Circular saw or electric jigsaw with a file (disc) for a clean cut (with fine teeth). Staple gun for fastening panels. Rubber mallet for planting elements in place. A pair of 120 mm plaster spatulas for bending the flange of the finishing profile.
Installation of sheathing
 Lathing- This is the basis on which all other cladding elements will be mounted.
For it, C-profiles made of metal are used, you can use wooden slats.
The sheathing is attached to the wall either with dowels or staples. The distance between adjacent elements is maintained within 30-50 cm.
Mandatory sheathing alignment using a level and plumb line. To adjust the plane, scraps of plywood or rubber are used. This lathing design is also used for cladding with MDF panels.
The sheathing should frame the perimeter of the wall and the existing openings in it. If the wall surface is fairly flat, then you can install plastic cladding panels on the so-called "soft" sheathing. For these purposes, double-sided foam tape is used. It is glued to the wall at the same distance as for conventional lathing.
Important! You need to work quickly with tape. After removing the protective tape, the contact time of the adhesive layer with air should be minimal. Therefore, it is better to do this work together.
The process of installing plastic panels
When installing plastic panels necessary:
- It is necessary to install on the finished sheathing special profiles– starting, guiding and finishing.
- The first panel is installed in the lower profile, after which it is bent in an arc for subsequent fastening in the upper profile.
- Using a mallet, you should ensure that the board is tightly installed in the direction of the starting profile.
- All subsequent facing elements, with the exception of the last panel, are installed in a similar way. The installation of the remaining board should be carried out very carefully. It must be cut on the side where the large mounting shelf is located. In this case, it is necessary to leave a reserve in case of thermal expansion.
- To install the bottom last board you need to bend the finishing profile panel. It is necessary to ensure that the element fits tightly into the profile. This job better to do with a partner. This is done as follows. It is necessary to remove part of the finishing profile and bring the panel to the upper corner. Then the shelves of the finishing and mounting profiles are bent and the final installation of the plastic element is made.
- Using a construction stapler, we attach the finishing profile and facing panel to the sheathing.
- After completing this work, you should start arranging the skirting boards.
About the finishing profile
In the entire procedure of cladding with plastic panels special difficulty causes the installation of elements to the finishing profile. There are often cases when the finishing profile is not installed. Instead, a corner is used, one of the shelves of which is pre-cut using metal scissors to a width of 10 mm. After this, it is glued to the last installed panel.
Master class on how to cover walls PVC panels look at the video:
Installation of PVC panels directly on the wall without guides is possible - watch the video:
In order to spend time on your balcony drinking a cup of tea or reading books, you should make the environment there as comfortable as possible. PVC technology occupy more and more industries and products are produced in a huge range. For wall decoration, there are PVC panels, their variety is very wide. You can choose the color, pattern and even the necessary properties that they should have.
Types of PVC moldings
When installing plastic with your own hands, you can add insulation and wall insulation to the structure to make staying on the balcony even more enjoyable. Since covering a balcony with plastic panels is a fairly easy process, you can do everything yourself, without any help. You just need to read this article and you will no longer have questions about how to cover a balcony with plastic panels.
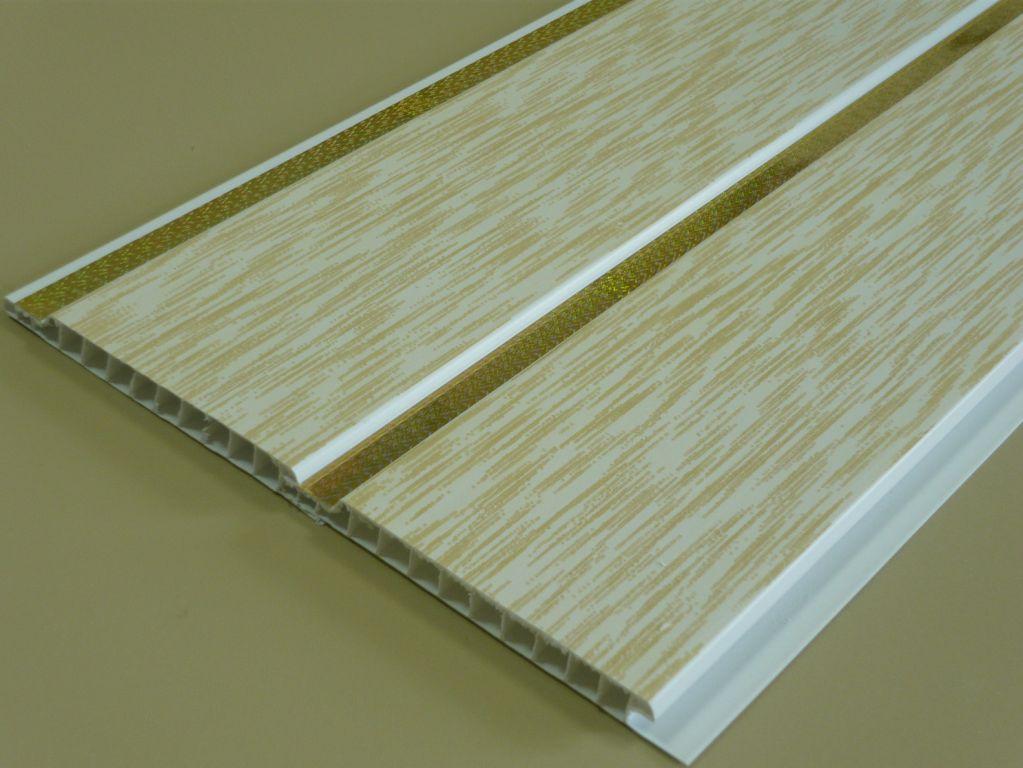
Types of PVC panels:
- The slats are assembled into a single structure using grooves. Can be used as wall or ceiling mounts and are very easy to install. To create the effect of a tall room wall panels installed vertically.
- Plastic panels imitating tiles.
- Sheet finishing materials. They are similar in appearance to plywood, with a pattern or plain color applied to the surface. At interior decoration, installed on adhesive mixtures or screwed with small self-tapping screws. The joints are then covered to match the paint color.
The first thing you should choose is a color, there are a lot of them, so the process may take a long time. To create unique interior You can combine colors to create a specific pattern.
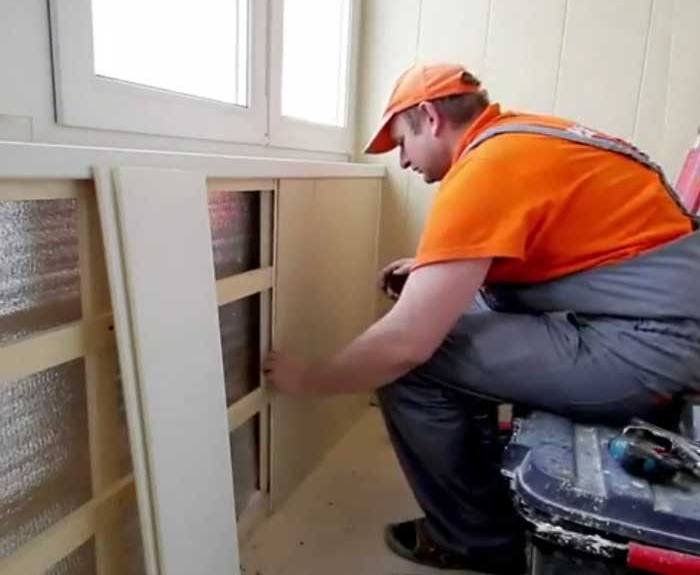
We install the sheathing ourselves
Work on internal lining walls begins with assembling the sheathing under the PVC panels. It is done very simply, anyone can assemble the sheathing with their own hands. The material from which it is made is wooden slats or metal profiles. The wall sheathing is attached using a self-tapping screw with a dowel, right through to the wall panel. Then all installed slats must be leveled so that the structure is level.
 Wooden slats of 10x50 mm are suitable for the frame; they can also be used to level the surfaces of the walls; all wooden parts must be treated with an antiseptic.
 Make the frame in increments of 30-50 centimeters, the design is quite simple and linear, there are no special tricks in it. It is necessary to make a frame along the entire wall; it is unacceptable for the ends of the PVC panels to hang in the air, they must be completely secured. For insulation or additional insulation, the necessary material can be added to empty openings.
If the walls are very uneven, shims should be installed in places where the lath does not adhere to the wall. To reduce noise, a special seal can be added under the slats.
Installation of corners and moldings
The work of installing corners with your own hands is very simple, it occurs in the following sequence:
- Cut off the required length.
- Apply it exactly to the corner.
- Secure with nails or self-tapping screws to the frame slats. The fastening step is 30-40 centimeters, it is necessary to fasten to both sides of the corner.
Installation of moldings occurs in almost the same way as the corner. You will only fasten it on one side; the other has a threaded ornament that cannot be touched so as not to damage the aesthetic appearance.
The molding can also be installed using a special mounting adhesive for PVC. Apply the adhesive mixture to the surface of the element and apply it to the desired location. It’s better not to press right away. First of all, make sure that everything is even, if you correct something wrong, the glue will allow you to do this without difficulty.
 Fastening panels with a clamp
 After final calibration, you can press tightly and leave to dry for a certain time. The time for complete drying of the glue is indicated on the packaging; be sure to adhere to this indicator.
Installing plastic panels
PVC wall panels are installed very simply, the process is somewhat difficult, but monotonous and slow. Here you should do everything very carefully and slowly, since the panels can crack or bend, and in the case of plastic this is irreparable.
 How to do corner panel, master's guide
 The finishing of the balcony with plastic panels occurs in the following sequence:
- Cut to required size. It is necessary to cut everything very accurately and evenly, in order to avoid lack of size or jamming, in case of an uneven and sloppy cut. Here it’s really better to measure seven times and carefully cut once.
- It should be brought to the place using two ends; the use of third-party objects such as a rule or a mallet is unacceptable.
- In case of peeling off, the protective film should be glued back, but if it makes it very difficult to carefully cut off the interfering part.
- The edge of the plastic panel is secured with nails, screws or a special stapler using staples.
The work of fastening is a tedious task, since it is necessary to fasten each wall panel from paste with a step of 20-30 centimeters between the screws. Please note that plastic balcony panels secured in this way cannot be reused. During dismantling, their integrity will most likely be compromised.
You can also fix it with glue, but this method is less reliable. No matter how the manufacturers claim, when exposed to sunlight, such glue may begin to peel off.
To improve cutting quality, install wall panels face up for easier cutting. To cut, use a hacksaw or construction knife. You can also take an electric jigsaw with a metal file and cut at the lowest speed.
It is better to apply glue to the wall in a continuous layer. To make the task easier, draw a straight line along which to apply glue. If you use nails for fastening, you should use the hammer very carefully so as not to hit the cladding. For care, use any detergent, should be wiped with a soft cloth or napkin so as not to scratch the surface of the walls.
This completes the do-it-yourself wall cladding with plastic panels. Now you know all the features indoor installation and steps on how to do the installation yourself. Get to the practical part and install the interior wall cladding of your balcony and create a beautiful and comfortable design.
Over the last ten years, plastic panels used to cover the walls of a home have become incredibly popular. This happens primarily because the cost of such products is relatively low, and the appearance of the room can be made completely diverse. In addition, the cladding PVC walls is quite simple process. At the same time, such work must take into account many details that should be paid attention to by everyone who wants to decorate their home with similar material.
Some time ago, there was a popular opinion that plastic negatively affects human health, especially if it is used in the home. It is worth noting that today there are practically no such problems. Manufacturers have modern technologies, which allow you to get rid of toxicity. Despite this, too cheap PVC panels for walls may have a strong odor and other unpleasant features - such a product should be avoided.
One of the main advantages of such products can be considered the variety of external components. In most hardware stores, plastic panels have hundreds of options for shapes and graphic designs.
The seamless design of the materials allows them to be used in residential buildings. Drawings and patterns on the panels can be perfectly combined with other interior elements. Nowadays you can often find manufacturers who can easily apply exactly the pattern you need onto the coating. Despite this, prices for such PVC panels for walls will not differ much from the cost classic options products. Appearance panels is limited only by the owner’s imagination, so this product can safely be considered universal.
The disadvantage of most finishing materials is the fact that they are very difficult to finish hard to reach places. Such zones include various protrusions, transitions, and corners. PVC sheet panels for walls have simplest structure, which allows installation even in the most difficult cases. It is very easy to cut the material, and if necessary, you can replace one fragment with another, and at any time.
Many people remember that the first plastic panels were quite fragile. Even small loads could seriously damage the material. Now the situation has changed. The special production technology of such a coating allows it to withstand heavy weight. Often, owners attach massive paintings to panels, as well as other decorative elements. Fixing any objects is carried out using classical technology - using brackets and other fasteners.
Those who use plastic panels in their homes know that this material combines wonderfully with other elements of the house. Plastic sockets, ventilation grilles and many other home details look great with a similar coating. The metal attributes of the room also go well with this versatile material.
Modern technological solutions allow the plastic to serve for several decades without losing its initial properties. It is also interesting that PVC panels are easily transported low temperatures, so without them unnecessary problems you can sheathe the walls on the balcony.
Controversial issues regarding plastic panels
Many owners mistakenly believe that plastic elements suitable for any surface. However, it is important to understand that in order to create smooth walls some work needs to be done. Poor quality lathing can be a serious problem; after covering the wall with plastic, it will look somewhat convex, but this should not be allowed. Experts advise using a level to prevent even the slightest unevenness. The structure of most panels will immediately reveal surface imperfections. Plaster can also be a source of problems, but unlike lathing, fixing plaster will be much more difficult and time-consuming.
Despite the fact that the process of applying plaster is quite simple, a beginner may not be able to cope with many tasks. To do this, you just need to know certain subtleties that will help simplify some processes and install the panels exactly so that they look good and last as long as possible.
Negative sides of PVC
Almost everyone building material has certain negative aspects. Covering walls with PVC panels can also cause some problems. First of all, you need to know that plastic is unhygienic. It is for this reason that this material is practically not used to decorate children’s rooms and premises. medical institutions. Plastic also polarizes reflected light.
To ensure that the use of the coating does not harm anyone, it should be cleaned regularly. This is done extremely simply. All you need is a cloth and cleaning solution. It is especially important to pay attention to panels with massive seams, as they become very dirty if not cleaned regularly. Seamless coatings are extremely easy to clean. It is very important to install the fragments so that no voids are formed - they become an attractive home for insects. At the same time, sealing the material is also not good decision. After some time, the panels and sheathing can become significantly deformed and become unusable.
The fireproof properties of plastic are also, to put it mildly, not the best. Of course, setting it on fire will not be easy at all, but you should understand that in the event of a fire, the panels will turn out to be a serious source of fire, which will also emit dangerous gases. Obviously, in this situation, decorating the entire apartment with this material is not best idea. You should especially not install PVC panels in the kitchen, because there is a fire source there.

Installation of PVC panels
The overall ease of installation of the panels is one of the main features of the material. A large mounting shelf is attached to the sheathing using staples or screws. On the other side of the material there is a small fastening shelf that hangs over the sheathing. There are many profiles that help attach fragments. Classic corners are considered the most popular; without them, it will not be possible to carry out the entire volume of work. Skirting boards are also important profiles that need to be fixed at the bottom of the panels - at floor level. Most of the area that is finished with plastic must be equipped with starting and finishing profiles. They don't have to be the same color as the panels, as long as all the elements match well.

Tools needed for finishing walls with plastic
- To adjust the sizes of individual elements, we need to use a jigsaw. This tool will ideally cut any part of the panels without leaving any damage or burrs. Often used and circular saw. In large-scale works it is even preferable.
- A construction stapler will be needed if plastic fragments are attached to wood sheathing.
- When using a jigsaw, a miter box is useful, which will help securely secure the tool for cutting panels.
- The need for a plaster spatula is so that during the process you can easily bend part of the finishing profile with it. Often other tools are used in this case, but it is the spatula that will provide maximum convenience.
- A rubber mallet will help you easily pull the panels into place. You will not be able to do this with your hands securely enough, since there will still be a possibility of pulling out the main profile.
Installation process of plastic panels
As mentioned earlier, installing plastic panels is a fairly simple process, but it includes many steps that you should remember.
- At the beginning of the work, you will need to make a sheathing on which the panels will be attached.
- After this, you need to install the profiles: guide, start and finish.
- The first sheet of the panel is installed in the lower profile, then bent in an arc and installed in the upper profile.
- Using a mallet, the sheet is tightly installed towards the starting profile.
- Next, the remaining fragments of plastic except the last one are attached in exactly the same way. When it is the turn of the remaining element, you need to be especially careful. This panel will need to be cut from the side of the large mounting shelf. You should make a small reserve for expansion, which often occurs in warm times year.
- By bending the finishing profile panel, the lower part of the last element is installed. You need to make sure that it fits tightly into the profile. This will require at least two people. First, part of the finishing profile is removed, and then the panel is wound up to the upper corner. At the end, you will need to bend the shelves of the mounting and finishing profiles and finally secure the plastic fragment.
- Next, we need to secure the panel and finishing profile to the sheathing using a construction stapler.
- After the main part of the work, you will need to install the baseboards.
Features of creating lathing
Many believe that there is no particular need for lathing, but it is worth saying that with the help of this element in the future it will be possible to quickly replace plastic panels and securely fasten them.
The sheathing is made from wooden blocks, less often - from metal profile. The small cells that are located behind it can be used to apply insulating materials. The sheathing is secured to the wall surface with self-tapping screws in dowels or clamps.
Quite often you can find the use of such an element on the ceiling. This greatly simplifies the process of fixing plastic or metal profiles, as well as creating lighting. The fastening parts of the sheathing must be installed in increments of up to half a meter. The distance between the bars should be such that the coating insulating material It turned out to be as simple as possible.
Other aspects of the process of covering a room with PVC panels
Definitely, covering walls with PVC panels is an excellent option that will help save a lot of money and transform your home. Also, this product is incredibly practical, unlike tiles, decorative stone and many other materials.
The prices of PVC panels for walls are very varied, however, you can always find best option, which would satisfy in terms of quality and cost. Anyway, main feature this product is considered huge selection options that no other finishing material has.
Today there is a wide choice on the finishing materials market. Consumers often choose PVC plastic panels as a covering. Installation of this material is quite simple and quick. There is no need to carry out expensive and time-consuming preparatory work, level or plaster surfaces.
Where is the finish applied?
Installation of plastic wall panels is carried out in rooms with high humidity. The material has the ability to repel water. Therefore, it is often used in bathrooms, kitchens, and bathrooms. However, installation of plastic panels can be done in any other room of the apartment. The material is easy to care for. In this regard, it is also used in rooms with high traffic. For example, the walls of a hallway, vestibule or corridor are often decorated.
Laying features
Installation of plastic panels can be carried out horizontally, diagonally or vertically. Using different colors and shades, you can achieve an original pattern on the surface. Before installing plastic panels, you should familiarize yourself with some nuances. It is not recommended to lay the material in rooms where the temperature is above 20 degrees. The finishing itself is carried out at 10 ˚С. Before installing plastic panels, you should let them sit indoors for at least two days. The material can be laid either on the sheathing or using glue.
Necessary tools and equipment
What do you need to install plastic panels yourself? Do-it-yourself installation on the sheathing is carried out using the following tools:
- Drills and pobedite drills.
- Dowel-nails.
- Hacksaws for metal or wood.
- Level.
- Marker or pencil.
- Roulettes.
- A screwdriver and self-tapping screws, a furniture stapler and 10mm staples or nails with a hammer.
Additional items:

Preparatory stage
First you need to make calculations and determine the number of panels, as well as wooden slats, from which the sheathing will be made. The material will be attached vertically. Therefore, the length of the panel must correspond to the height of the wall. To determine the amount of material, a simple calculation should be made. The length of the wall must be divided by the width of one panel. The result will be required quantity. The calculation of the planks for installing the sheathing is done somewhat differently. First of all, it is worth noting that the installation of wooden slats should be carried out perpendicular to the panels. Minimum size bars - 20 x 20 cm. The distance between the slats should not exceed 50 cm. This means that the height of the room should be divided by 70 (the width of the bar plus the gap). In addition, it should be remembered that there should be one more rail under the ceiling and at the junction with the floor. Additional bars must be installed where the shelves are supposed to be placed, wall cabinets or other items.
Lathing
Before attaching wooden blocks, they should be treated with special solutions that prevent the occurrence and spread of fungus or mold. In some cases, the installation of plastic panels in the bathroom, for example, is carried out on a frame made of a metal profile. Installation of the sheathing begins from the corners. In each of them special corners are attached. And the bottom and top slats are fixed with a stapler to the finishing profiles. These elements have special grooves. The panels will actually be inserted into them. ![]()
Work progress
After preparing the sheathing, you can begin installing plastic panels. Do-it-yourself installation begins from the left corner. It is very important to install the first element correctly. Before fixing the panel, you need to make sure that it is strictly vertical. To level, you must use a level. The panel is fixed using clamps. The metal holder is placed at the intersection of the material and the sheathing. The clamp is secured using nails. The next panel is inserted into the groove of the previous one. Its free edge is fixed as described above. The last panel is cut to 1 cm. It is inserted into the finishing profile. There is no need to fix the panel.
Fixation method
Installation of plastic panels on walls can be carried out using various connecting elements. The fastest and in a convenient way Fixing the material with construction staples is considered. This method only applies to wooden sheathing. There is no need to use additional holders. Fastening with nails or screws can be carried out either with or without the use of clamps. Glue is also used as a connecting material. With its help, you can install plastic panels on the sheathing. In general, the technology for laying the material in this case remains the same. However this method not so convenient, since the glue must be allowed to “set.” 
Easy and simple way
You can also purchase special strips in stores. They are the easiest way to install plastic panels on walls. The planks are attached to the wall using self-tapping screws in the same way as the sheathing. A fastening clip is inserted into the groove of each element. To fix the panel, just press connecting element on one side, then insert the edge finishing material and click. This method is convenient because, if necessary, you can easily disassemble the cladding. You can also place wiring in the mounting strip. The material from which the elements are made is resistant to corrosion and fire.
Using glue
In this case, plastic panels are mounted directly on the surface. However, this cladding option is not universal. The fact is that the surface of the wall in this case must be perfectly flat and the room must be dry. In bathrooms, finishing is done only on the sheathing. In order to glue the material, you can use compounds such as “Titan”, “Moment-Montazh”. Many craftsmen use liquid nails. When working with the Moment-Montazh composition, it is recommended to use a special gun. The tool allows you to accurately dose the glue and apply it exactly in the places where it is needed. "Titan" is available in bottles. Before gluing the panels, the surfaces should be degreased. This can be done with a solution of soap or dish soap and water. The gluing areas on the walls and panels are thoroughly washed and then wiped. The surface must be dry. Glue is applied in a zigzag or dotted manner. In the latter case, the distance between the sections is about 30 cm. After application adhesive composition You should wait 1-2 minutes for it to be absorbed. Then you should attach the panel to the wall and press it. The surface is smoothed from the center to the edges. 
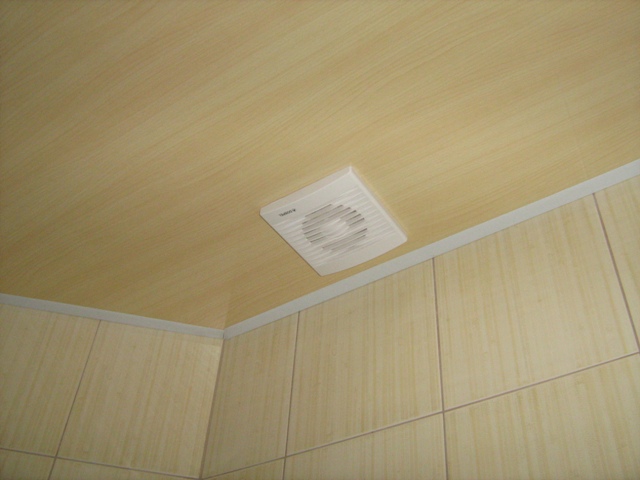
Installation of plastic panels on the ceiling
Before carrying out any work, it is necessary to decide how much the surface will be lowered during finishing. It is also necessary to take into account the location of the lamps. For example, the distance will be 12 cm.
Marking
Installation of plastic panels on the ceiling is carried out on the lathing. To attach it, you need to make markings. Marks are placed along the perimeter of the walls using a building level. To install the frame, metal guides are required. Two extreme profiles are mounted on two opposite walls. To do this, holes are made according to the markings in increments of 60 cm. Dowels will be inserted into them to fix the two main profiles. After fixing them, you should install guides along the entire ceiling. They are inserted into the installed main profiles and fixed with self-tapping screws. The sheathing can also be made from wooden blocks. In any case, the distance between the slats or profiles should be 30-40 cm. Next, you need to bring out the wires for lighting. Lay, for example, 4 cables from the main one located in the center. As a rule, ceilings in small rooms are finished with plastic, so there should not be any difficulties. It is not recommended to use glue as fasteners. ![]()
Work progress
Before installing plastic panels on the ceiling, they must be adjusted to the size of the surface. Installation of the material can begin without using special corners. In this case, the first panel is fixed on both sides using self-tapping screws. The next element is inserted into a special groove. The second side is also fixed with self-tapping screws. The entire ceiling should be finished this way. The last element is installed in the same way as the first. The panel is inserted into the penultimate one with one side, and the other is fixed with self-tapping screws on the sheathing.
Installation of lamps
It is recommended that novice craftsmen make holes for lamps after the entire ceiling has been covered. To do this, mark three points located at the same distance from each other. Precision is required here. The holes are made using a milling cutter. The size of the lamp to be installed can be measured with a tape measure. The diameter of the hole and the lamp must match. It is better to entrust the connection itself to a professional.
Finishing
After the ceiling cladding work is completed, you can begin installation decorative corners. These elements will allow you to close the joints. For their installation, liquid nails are usually used. It should be remembered that the color of the materials should organically fit into the interior of the room. 
Additional information
Can be used to cut plastic panels special cutters. They are sold in construction stores. Some craftsmen use a grinder. With a regular knife cutting the material will not work. If you need to adjust several panels to one size at once, you can use a jigsaw. To maintain the cleanliness of the material, it is enough to wipe it regularly damp cloth. Plastic panels do not require any special care.
In conclusion
Installation ceiling panels(plastic) - the task is not that difficult. The work can be done independently. To do this, you just need to follow the recommendations above. Finishing the walls with material is even easier. However, if you have doubts about your abilities, it is better to entrust the cladding to professionals. Many companies offer to install plastic panels. The cost of installation ranges from 400 to 600 rubles per square meter. Much depends on the configuration of the room. The simpler it is, the cheaper it is, accordingly. As a rule, the price of finishing the ceiling includes the cost of electrical wiring and lighting installation. For finishing small room you won't need a large amount.


