Landscaping is a very exciting activity, although not always easy. It is especially interesting to create decorative elements for your garden or local area. Original flowerpots made by yourself are the simplest, but very effective option for decorating the landscape. You can make them from car tires, concrete, stumps and even from old dishes.
Any tires are suitable for making flowerpots, but it is easier to cut winter tires without studs, which have soft, pliable rubber. The tire must have a wheel rim that serves as a stand for the flowerpot.

To work you will need:
- sander;
- very sharp knife;
- pencil or piece of chalk;
- soap solution;
- primer;
- dye;
- paint brush.
Step 1. Marking

Take the tire, clean it of dirt and lay it flat on a flat surface. Around the metal disk, mark a cut line for the side part with a pencil or chalk. The line can be smooth, wavy, zigzag - as your imagination dictates. If the cut is curly, all the protrusions must have the same shape and size, otherwise the edging of the flowerpot will look sloppy.
Step 2. Cutting along the contour


Now, along the drawn line, you need to cut off the upper sidewall of the tire. To facilitate the cutting process, the knife should be periodically moistened with soapy solution. To cut out a shaped contour, it is better to use a jigsaw, the blade of which must also be dipped in a soap solution.
Step 3. Turning the tire out

The tire is turned over with the cut side down, they step on the wheel rim with their foot, pry up a small section of rubber on the cut and begin to turn the product inside out. This will require considerable physical effort, but the more the tire is turned out, the easier the process is.
Step 4. Processing the slices
The flowerpot is almost ready, all that remains is to give the ideal shape to the cuts and decorate the outside. Figured edging can be made in the form of sharp or rounded petals, fringes, triangles, using the same knife. After this, it is recommended to sand the sections to make the edges perfectly smooth.
Step 5. Decorating the flowerpot


The outer surface of the flowerpot is cleaned of dust, degreased and coated with a primer. When the rubber is dry, you can start painting. There are a lot of options here: you can make the flowerpot one-color, two-color, striped, draw ornaments or flowers on it, or decorate the flowerpot itself in the form of a flower. Nitro paints, oil and enamel paints, as well as automotive paints in spray cans, are excellent for painting rubber. It is also recommended to paint the inside of the edging, since it is clearly visible from the side.
Step 6. Filling the flowerpot

The finished pot is placed on permanent place, a dense agro-fabric is laid on the bottom, a layer of sand is poured for drainage and the container is filled with fertile soil. After this, you can plant flowers and admire the work of your hands.

There are other options for such flowerpots. For example, you can use the tire itself, without the rim, and use an empty smaller car ramp as a stand. Flowerpots of different diameters stacked on top of each other, as well as hanging items made from figuratively carved slopes, look beautiful.

Making flowerpots from concrete with your own hands is also easy. For filling, purchased plastic forms are used, as well as cardboard boxes, wicker baskets, old bowls, buckets or basins.
To work you will need:
- cement and sand;
- container for mixing the solution;
- two shapes of different sizes;
- plastic tube with a diameter of 1.5-2 cm and a length of 20 cm;
- spray bottle or brush;
- vegetable oil;
- water.
Here, 2 plastic bowls of different diameters are used as forms.

Step 1. Mixing the solution
2 parts of cement and 3 parts of clean sand are poured into the container, mixed and water is gradually poured in. Stir the solution thoroughly so that no lumps remain. To make the flowerpot more decorative, you can add a concrete pigment to the solution. Ready mix should be homogeneous and moderately thick.

Step 2. Preparing the mold
Bowl larger size coated with vegetable oil on the inside, and the other on the outside. The plastic tube is cut into 4 pieces 5 cm long.
Step 3. Pouring the solution
 Pouring concrete into a mold
 A layer of solution 2-3 cm thick is poured into the bottom of a large bowl, and then pieces of tube are inserted into it closer to the center of the container. When the solution has noticeably set, a smaller bowl is placed in a larger container, on top of the tubes, and the space between the walls is filled with the remaining solution. To prevent the inside of the bowl from moving when pouring, place a stone or brick in it. The top of the solution is leveled with a trowel and the structure is left for a day.

After a day, the inner container is carefully removed so as not to damage the edges of the future flowerpot, moistened with water and wrapped in film. Throughout the week, the pot should be periodically moistened and protected from direct sunlight. After a week, the container with concrete is opened, turned over, and carefully knocked out of the mold.
If there are no suitable bowls for making a flowerpot, you can use two boxes made of thick cardboard:
- the seams on both boxes are reinforced with tape;
- in a smaller box, cut out the bottom;
- poured into the bottom of a large box thin layer clean sand;
- pour part of the solution to a height of 2-3 cm;
- a box without a bottom is placed on top;
- the space between the walls of the boxes is filled with solution;
- after 7 days, the boxes are removed and the bottom of the flowerpot is drilled for drainage.

Concrete flowerpots are made in a similar way in old buckets, wicker baskets and any other containers. To give concrete surface interesting texture, you can line the walls of the mold with embossed leaves, flowers, thin spruce branches. After painting, such products look simply great.


Such flowerpots look very natural and harmonious in any garden. For their manufacture, smooth stumps or saw cuts with a diameter of up to 40 cm are best suited. Birch stumps are considered the most decorative.


During the work you will need:
- circular saw;
- pencil;
- drill;
- chisel;
Step 1. Stump treatment
The top part of the stump is cut off with a saw to get a clean smooth surface. The bark should remain in place, so the flowerpot will look more natural. A circle is marked on the cut, departing from the edges by about 7-8 cm. Holes up to 10 cm deep are drilled along the perimeter of the marking, and then the core of the stump is knocked out with a chisel.

Step 2. Preparing the base
The walls of the stump are leveled vertically, all the chips are removed, and the bottom is compacted. Then drill several drainage holes at the base.
Step 3. Filling the flowerpot

Fertile soil is poured inside the homemade flowerpot, compacted slightly and left for several days. During this time, the earth will settle a little more, so you will have to add more. After filling, you can plant flowers. To extend the life of such a flowerpot, it is recommended to fill with soil not the stump itself, but any suitable container that can be installed there.

If there is an unnecessary old barrel on the site, it will make an excellent flowerpot. To make it, you will need very little:


- sheet of thick plywood;
- electric drill;
- self-tapping screws;
- circular saw;
- primer or waste oil;
First, a circle is cut out of plywood along the diameter of the bottom of the barrel. The barrel itself is cut in height to the required size, and if necessary, the walls are strengthened with additional hoop. Treat the barrel with an antiseptic primer or treatment to protect it from rotting. The plywood is also impregnated with a protective compound, after which it is screwed from the outside to the bottom of the barrel. Next, drill the bottom along with the plywood in several places to ensure drainage. Now all that remains is to paint the outside of the flowerpot and fill it with soil.

So that such a large flowerpot can be easily moved, small wheels on metal brackets are attached to the bottom. They are bolted to the plywood; For normal stability, three wheels located at an equal distance from each other are enough for one flowerpot.

These and other options for homemade flowerpots will not require large expenses, because they are made from unnecessary things that are found on every site. If you try and use your imagination, you can make a work of art out of any object.

Video - DIY concrete flowerpots
Video - DIY flowerpots made from tires
Outdoor flowerpots are miniature flower beds that can have a wide variety of shapes. Quite unexpected things are used to make them. An old wheelbarrow, a leaky barrel, or “bald” car tires can be used as a flower stand. Some craftsmen make flowerpots from metal or concrete, using their skills and imagination.
 Outdoor flowerpots are miniature flower beds that can have a wide variety of shapes
 Decorative containers are designed to perform a single function: to decorate the area where they are installed. Most often, flowerpots are placed where it is not possible to make ordinary flower beds. Entrance group where the floor is laid paving slabs, a seating area with a boardwalk, a dining area or a gazebo - these are the proposed places where decorative coasters for flowers will find their use. But they can also be installed in an irregular garden with tall grass and ornamental shrub, near the benches or garden swing, where it is difficult to make a large flower garden. Flowerpots and hanging planters for flowers in miniature gardens: it is difficult to create flower beds there, but installing a small container with several tiers is quite affordable.

Another possibility for decorative flowerpots (outdoor and indoor) is the creation suitable conditions for flower crops. Sometimes it happens that the climate of the area or the soil in the garden does not allow for growing demanding plants. But you should not refuse to purchase the crops you like. You can plant them in flowerpots by placing the required soil in the containers and placing the containers in the house for the winter.

Currently, gardening stores offer huge selection beautiful plastic products. Among them there are very small flower pots (volume 5-10 l), but if you wish, you can choose and order large stands (up to 70 l). Such flowerpots are quite mobile, and their capacity allows you to plant quite large plants (hydrangeas, hibiscus, palm trees or orange trees) outdoors. The use of decorative containers in garden design expands the possibilities of gardeners in choosing beautiful plants for site design.

But purchased flowerpots are not suitable for everyone. Some people want originality, some believe that plastic containers will not look as solid as stone vases, and many are guided by considerations of economy. Therefore, every designer sometimes has a logical question about how to make a flowerpot with your own hands.
Gallery: DIY outdoor flowerpots (25 photos)


How to make flowerpots with your own hands (video)
What can you make a mini-flower bed from?
For an irregular garden or playground in a fairytale style, for a rustic landscape and naive retro or country, even stumps and tree cuts, old logs and driftwood driftwood are suitable. How to make and design such products is dictated by their shape.
 Decorative containers are designed to perform a single function: to decorate the area where they are installed.
A stump from an old tree uprooted in your own garden can be turned into a wonderful decoration for a recreation area by moving it to the site. Of course, you will have to work on it a little, it requires:
- Clean the driftwood from dirt. The bark can be removed or left, depending on its preservation and the desire of the designer.
- Based on the shape of the woody remains, choose a place with a volume sufficient to make a container. For work, prepare a chisel and a hammer.
- The shape of the recess in which the flowers will be planted for an impromptu flower bed can be any: it is not at all necessary to try to hollow out an even circle or other shape. It is best to take a closer look at the outlines of the stump or snag itself. By hitting the handle of the chisel with a hammer, you need to remove the wood layer by layer from the inside of the future wooden flowerpot. It's a tedious and time-consuming process, but the results are worth the effort. If the stump has a rotten core, the work will be easier, but you need to try to remove all the rot, leaving only dense tissue.
- To ensure soil drainage in a stump pot, you need to make through holes at its bottom. A drill with a thick drill bit or an existing chisel is suitable for this.
- Treat the wood with antiseptic impregnation. A variety of products can be purchased at a hardware store. This measure will help the flowerpot last quite a long time, protecting the wood from rotting when in contact with wet soil inside. If you want to save money, used automobile oil will play a good role as an impregnation.
After the new pot has been processed and dried (instructions are always included with each specific preparation), it can be placed in the chosen location and filled with soil. It is best to choose flowers for flowerpots made from driftwood that are bright, but not exotic. Nasturtiums, alyssum, and petunias will look beautiful, forming a cascade of greenery and flowers.

For vertical and oblique lines, you can select aromatic varieties fragrant tobacco or mignonette, which will not interfere hanging plants. If there are small natural or artificial recesses on the driftwood where flowers will not fit, you can easily decorate it with ordinary moss or miniature rosettes of sedums, titanopsis, faucaria, lithops and other indoor succulents.

Concrete products
An unprepossessing material in itself, but surprisingly easy to work with, is concrete. It has the strength of stone, so the casting can last a very long time. The availability and relative cheapness of the components of the solution makes concrete especially desirable for those who want to create flowerpots with their own hands.
Street concrete structures can be installed in a garden of almost any style: they can be designed in the form of stone bowls for classical gardens of a regular type, imitate stone and driftwood for rustic landscapes, make strict, geometrically correct flower beds even for a garden in the minimalist style. Concrete is especially attractive for those who like to create the atmosphere of a fairy-tale forest on their site: sculpting any shapes is not difficult.

To make a concrete stand you will need the following:
- cement M-400 or M-500;
- fine sand (you can buy ready-made, seeded and clean);
- a large mold for the outer surface and a smaller one for the recess;
- plastic tube (a piece of water pipe, half an inch in diameter);
- trowel;
- oil (vegetable or automotive waste).
Pebbles and fragments of ceramics, paint for external works, glass bottles etc. You can add color to concrete mortar, to paint the entire mass of stone in the color of terracotta or another, not very light shade.

Concrete work begins with preparing forms and mixing mortar. At the bottom of a large mold you need to install a short plastic tube vertically, gluing it to the bottom with plasticine. To make the casting easy to remove, all inner surface Larger molds require generous grease. If the mechanic has a car, then he will probably have used oil. This one is harmful to surrounding nature the material can be used effectively, using it to lubricate formwork and molds for casting various products.
The solution is prepared from 2 parts cement and 3 parts sifted river sand. You need to add enough water to get a viscous mass that can take the shape of the container into which it is poured. It would be correct to immediately pour in an amount of water equal to ½ part, and then add a little as needed. The color is poured into the solution at the mixing stage.

Fill the mold to the level of the top cut of the tube. Prepare a smaller mold: grease its outer surface, which will be in contact with the solution, with oil. Select a weight (stone or brick) so that the shape does not push upward. During this time, the concrete in the mold will set a little and become denser. Place a small form on it, press it down with a weight and fill the space between the walls of the larger and smaller containers with the solution, lightly tamping it with your hand. If you want to decorate the edge of the product, you can immediately place fragments, shells or other decor on it.

Leave the casting for 24 hours to harden. After this, remove the inner mold and leave the product for another 7-10 days until completely cured. To prevent cracks from forming in the concrete, it can be periodically moistened with water or covered with a damp cloth and polyethylene.

Remove the finished casting from the mold. It can be used in natural form for the design of minimalist landscapes. To give the products unusual shapes, do-it-yourself flowerpots are complemented with stucco. You can stick decorative shards of glass or ceramics or bottle caps on them, creating a mosaic pattern. The glue is the same concrete solution, mixed again. Decorative flower pots can be simply painted. After this, soil is poured inside and plants are planted.
DIY flower pots (video)
How to make a metal flowerpot?
If the master has welding skills, then he will have no problems cutting parts the desired shape, and then combine them into a product. Some craftsmen create things of extraordinary beauty by bending, cutting, welding corrugated pipe and sheet metal. But even a housewife can make simple metal flowerpots using ready-made containers that have served their original purpose.
By improvising and using maximum imagination when combining an old bucket and a holey basin, using a tin watering can or jar, you can independently make very picturesque flowerpots for the garden in retro and country style, create a fabulous design in a green corner on own dacha. Any tin product is a ready-made container of an interesting shape.

Flowers in flowerpots at the dacha always look interesting if these flowerpots are made from old coffee pots or teapots, polished to a shine. An old basin can be painted and painted to imitate a mosaic. If you arm yourself with metal scissors, then an ordinary galvanized bucket can turn into an original hanging composition of bright flowers. It is enough to cut holes in its walls, fill it with soil and plant small, but beautiful flowering plants into the holes. The following compositions using petunias work well: bright flowers and the ampelous shape of the stems quickly hide the tin base.

Ideas for creating metal flowerpots
Making your own metal container is not particularly difficult. In the case of using small containers, you have to deal with tin, which is not particularly thick and is easily subject to the force of the average person.
Flat galvanized basins and buckets can be dented by hitting them with a hammer. Then fill the containers with soil and make a pyramid out of them, placing the tiers on top of each other. The use of creeping and hanging flowers (purslane, nasturtium, vines) in combination with erect stems of carnations, annual ornamental grasses, bulbous and other beautiful crops will help create a real alpine hill, even if there is not a large amount of decorative stone nearby. The gray color and uneven texture of old tin can successfully replace it, appearing from under the mass of flowers and leaves. To make it more decorative hardware You can also tint it in the desired color, imitating stone chips.

By picking up metal scissors, a drill, a punch, or even a thick nail, you can use ordinary old basins and buckets to make compositions that are not inferior in beauty to the creations of blacksmiths. Thin sheet metal and galvanized steel are easy to cut and pierce. Having made flat patterns in the form of leaves, feathers, and other fancy details, it is easy to bend them with pliers or a hammer, giving volume and the desired shape. From thick wire you can make parts of other shapes: stems, braids, etc. You can attach such decor to the main container with a bolt and nut, after first punching a hole. Even a woman can handle this job. Ready-made unusual flowerpot made with my own hands, can be filled with soil and selected colors.
 The choice of material depends on the needs of the designer
 If you use other materials for finishing, then any tin container can be finished with mosaics or shells, pebbles, wood cuts, etc. For this you need a reinforcing mesh and glue for tiles. A bucket or other metal container must be tightly wrapped with a mesh, secured and a layer of tile adhesive applied, covering the reinforcement well. Attach to the top of the solution decorative elements, dry the flowerpot and wipe the gaps with the same glue. Treat the surface damp cloth to clean the decor.

The choice of material depends on the needs of the designer. Creatively gifted people use the simplest objects and available means to create beautiful things. Very often, decorative flower stands are created literally from garbage.
Attention, TODAY only!
Flowerpots – interesting option decoration of your site, giving wide scope for creative ideas. To bring these ideas to life, you can buy flowerpots, or you can... make them yourself.
First, here are some tips on using flowerpots.
Combine the shape and size of the flower pot with the size and appearance of the plant: do not plant miniature flowers in bulky tubs, and vice versa. Use massive flowerpots to decorate only large areas. By the way, large modules can be used to differentiate functional . Excessive pretentiousness when decorating the walls of a flowerpot can create disharmony with the composition of plants or with. Do not use a flowerpot finish that is brighter than the plant itself.
Making flowerpots for the garden with your own hands is not difficult. Let's consider the most popular materials and methods.
Concrete
A concrete flowerpot is durable and frost-resistant. Its walls retain heat and water in the ground for a long time. In addition, manufacturing does not take much effort and money. The heavy weight of concrete flowerpots deprives them of mobility, so it is necessary to carefully plan their placement. Only a truck crane can move a module filled with soil and plants.
In factory production, special molds are used. A pre-prepared cement solution is poured into them. To increase strength, a reinforcing mesh is installed inside the container. The material for the mold is polyvinyl chloride, silicone, plastic, gypsum, wax, etc. After the concrete acquires hardness, it is broken.
A mold for making a concrete flowerpot with your own hands can be made from a variety of materials. The main thing is that it does not get wet or change when filling it with solution. For small and medium-sized flower girls, thick packaging cardboard, plastic bowls and bottles, glasses, and trays are suitable. The bowling ball will become great solution to create a round flowerpot: it is smooth and heavy, it will be easy to remove from the hardened cement.
You can also assemble the mold yourself from wooden boards or plywood.
How to make flowerpots from concrete with your own hands?
You will need:

Optimal temperature for working with cement mortar from +20°C. High humidity is desirable.
Manufacturing process:

Result:

To prevent plant roots from rotting, a drainage layer of coarse sand 5-7 cm thick is placed on the bottom of the flowerpot.
Original flowerpots can be obtained by using decorative concrete . You can find it in the store under different names: architectural, artistic, acrylic concrete, art concrete, polymer concrete. It will vary in appearance and composition. For example, small fragments of natural minerals and dyes are added to architectural concrete, making its surface more textured.
As an option, you can get by with just one container and sculpt the flowerpot by hand, see video.
The design of a concrete flowerpot will depend on the decorative methods used. You can use one of the following options.
- Finish the walls mosaic- suitable for this ceramic tiles or pebbles. Carefully lay it on a layer of specialized glue 5-6 mm thick. Once dry, seal the joints with narrow tile joints.
- The flowerpot can also be decorated painted: Draw a pattern on the freshly primed surface.
- Another artistic technique - thread using a special tool. Apply the pattern to them a day after removing the mold.
- To create an unusual relief before the solution hardens, use wicker basket. Its prints will look original on the surface of the walls.
- You can also attach it to the inside of the form plant leaf with a pronounced texture. Hold it with your hands while pouring and remove it after hardening. Decorate the recess with acrylic paints.
Silicate blocks
You can make your own flowerpots from hollow building blocks. They look unusual and fit well into a garden style. When creating them, carefully consider the shape of the structure. It must be sustainable and fit well with the external environment. A sketch prepared in advance will greatly facilitate production.
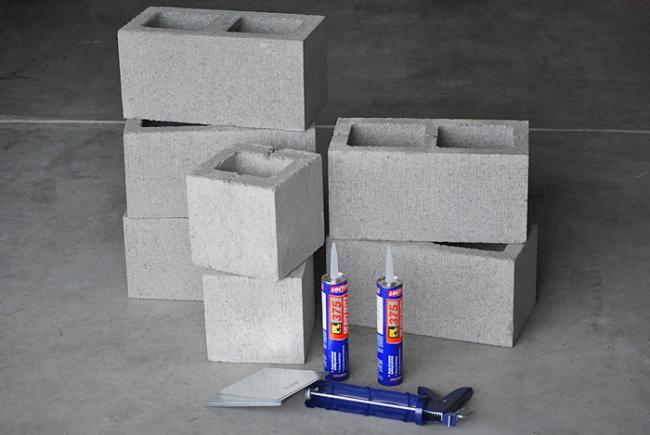
You will need:
- blocks;
- glue;
- plastic or wooden base.
Manufacturing process:
Gypsum
It’s easy to make cute flowerpots with your own hands from plaster. This material will allow plant roots to receive oxygen, but it does not retain moisture well. Therefore, it is better to choose a shady place for the gypsum module. It will not be difficult for you to vary the accents in the garden by rearranging the flower beds, because they are very light and mobile.
You will need:
- cardboard box in the shape of a cube or parallelepiped;
- sandpaper;
- plaster or medical bandage;
- gypsum powder;
- brush;
- white acrylic paint for the base;
- white enamel.
Manufacturing process:
- Measure the height of the flowerpot from the bottom of the box, adding 1.5 cm. Cut off the excess part.
- If the surface of the mold is too smooth, it is recommended to sand it for better adhesion to the plaster.
- Cut the plaster bandage into strips. Or make a solution of gypsum with water in a separate container. Its consistency should be like thick sour cream. And dip a medical bandage into the solution.
- Remove excess by passing the bandage between the index and middle fingers. Wrap the sides of the mold, starting from the top.
- Dry the workpiece. Remove irregularities with sandpaper. Pull out the form.
- Cover the surface with white acrylic paint. After it dries, apply white enamel.
- Apply a final coat of paint or varnish over the enamel.
- To decorate a plaster flowerpot, use pebbles, shells, buttons, beads, rope, pasta, etc.

This product can be used as a flowerpot for a plastic pot with plants. In order for flowers to be planted directly into a flowerpot, a drainage hole must be made in its bottom.
Tree
The natural origin of the material allows outdoor flowerpots to fit harmoniously into the garden setting. Wooden flower boxes are easy to make with your own hands, so this budget option widely in demand. It is important to remember that due to the high hygroscopicity of the material, finished products must always be treated with varnish and an antifungal solution.
There are several options for making this design yourself:
1. From a stump
A stump, log and other pieces of wood can serve as the basis for a flower plant. The sample must be selected in accordance with the plants being designed: the larger the root system, the larger the flowerpot itself should be. As a rule, the height is about 40 cm.

You will need:
- stump or log;
- saw;
- drill;
- chisel;
- polyethylene.
Manufacturing process:
- Cut the log to the desired length.
- Using a drill with a 25 cm drill and a diameter of 20 mm, drill several holes in the upper plane at the same distance from the walls. Make a series of nests in the center to break the core.
- Remove the wood with a chisel, forming a container for soil and plants. If a log or stump has large diameter, use an ax or pickaxe. Form smooth, strong walls.
- Treat the inside of the stump with a moisture-proof solution and cover it with polyethylene. Then fill in the drainage and soil mixture. You can place a plastic or ceramic pot in an untreated container to act as a moisture barrier.


2. From timber and boards
To ensure that the wood retains its original appearance for a long time and does not turn gray, use special oil. It will also protect your product from infection by fungi and insects. The shapes are divided into: rectangular, cubic (the most commonly used), hexagonal, trapezoidal.
You will need:
- timber from 20x20 mm;
- plywood or boards with a thickness of 10 mm;
- fasteners - nails, screws;
- wood glue;
- wood protection products;
- varnish or paint.
Manufacturing process:

When assembling the structure, it is necessary to take into account that when watering the tree will swell, so the boards are not nailed very tightly to each other.
A flower pot made entirely of timber also looks good.

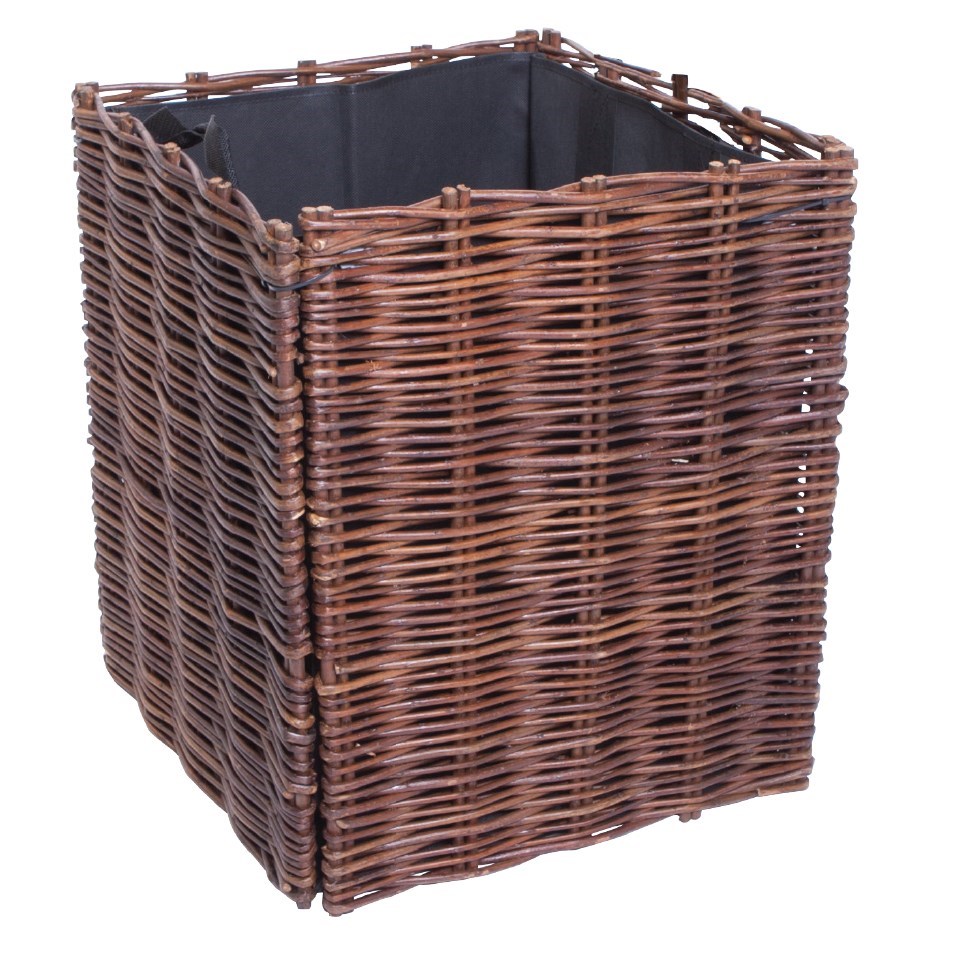
3. From the vine
You will need:
- special willow vine for weaving;
- a small piece of plywood;
- awl;
- sharp knife;
- drill;
- round nose pliers.
Manufacturing process:
- Soak the vine in water until it becomes flexible.
- Cut a blank for the bottom from plywood. Using a drill, drill small holes at equal distances along the edges of the workpiece.
- Form a frame by inserting thick twigs into the holes.
- Place the vine between the twigs, pressing with an awl. There are many installation methods, combining which you can create different textures for the surface of the pots.
- Upon reaching the required height, cut the frame rods.
- Dry, treat with moisture-proof impregnation and varnish.
- You can fill such a flowerpot with soil, having previously lined it with polyethylene, and plant plants, or simply put a plastic pot with a flower and use it as a flowerpot.
4. From a barrel or tub
You will need:
- barrel or tub;
- sandpaper;
- drill or grinder;
- varnish, paint or oil for wood;
- moisture-proof solution;
- saw.
Manufacturing process:
- Cut the barrel either lengthwise or crosswise. (If you cut it lengthwise, the planks are nailed together for strength).
- Sand the surface with sandpaper. This can be done manually or using a drill or grinder.
- Paint or varnish. Treat with a moisture-proof solution.
- Place a suitable sized pot of .


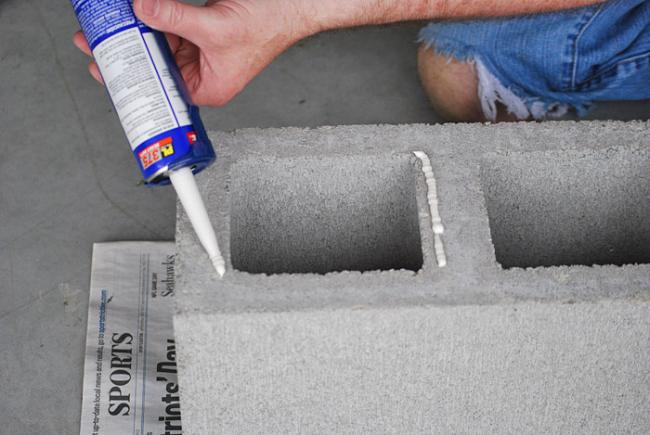
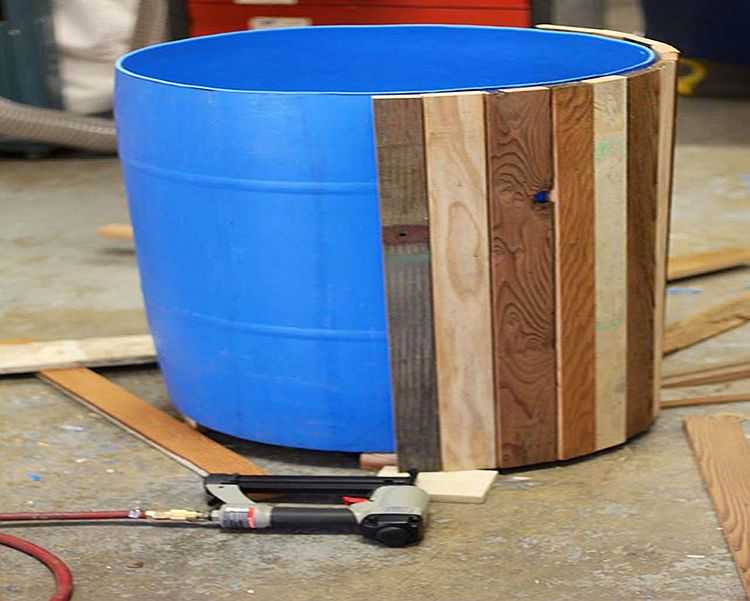
5. Made of plastic with wood paneling
You can also make flowerpots from plastic with wooden lining.
You will need:
- plastic container - bucket, tank;
- narrow wooden boards, select the size of the container to be glued;
- antiseptic;
- paint or varnish;
- drill;
- bolts;
- nails;
- nail gun;
- hammer;
- universal glue for gluing plastic and wood or nails, gun and hammer.
Manufacturing process:

5. Made from plywood
You will need:
- moisture-resistant plywood;
- self-tapping screws;
- a drill with a drill diameter 1-2 mm smaller than the diameter of the screws.
Manufacturing process:
- Cut four identical pieces with a cross section of 20-25 mm. Use them as ribs of the structure.
- Cut out the side boards.
- Place the sidewall against the rib and drill a hole at a distance of 1 cm from the edge.
- Fasten with self-tapping screws.
- Place a suitable sized pot with the plant in the barrel.
Car tires
In small gardens, near the entrances of residential buildings, flowerpots made of tires are often found. Elastic rubber allows you to give them a fancy shape. The creation process does not require special effort, skills and costs. This is the reason for their popularity.
So how to make these interesting flower beds that will decorate your garden? Studless summer tires are best. The wheel rim inside will serve as a stand.
You will need:
- car tire with a wheel rim inside;
- grinding machine;
- shoe knife or jigsaw;
- a piece of chalk;
- oil paint, enamel paint or nitro paint; car spray paint is also suitable;
- soap solution;
- paint brush;
- degreasing solution;
- primer.
Manufacturing process:

Stone
Flowerpots made of stone are highly durable and durable. They are very decorative and are able to retain moisture in the soil well. Their large mass allows them to remain stable, but deprives them of mobility. Choose the location of the stone flower girl in advance.
For hand made Making a stone flowerpot requires skill, patience and the appropriate tools. Below is a master class that should help a beginner cope with this task.
When choosing a stone, it is better to give preference to sandstone or limestone.
You will need:
- bushhammer;
- bit;
- a piece of sandstone or limestone;
- support for installing stone;
- pencil;
- brush;
- Bulgarian;
- grinding machine.
Manufacturing process:
- Draw the outline of the recess in which the plants are supposed to be planted. To prevent the edge of the flowerpot from collapsing, leave 50 mm between the line and the border.
- Drill out the hole using a hammer and chisel.
- Use a brush to sweep away stone chips and dust.
- Using a grinder, make cuts, gradually deepening the tool along the edges.
- Make a drainage hole in the resulting bottom.
- Sand out rough grooves.
Stone processing is made easier by using special power tools, see video.
It is much easier to make flower modules decorated with smooth river stones.
You will need:
- river stones;
- plastic pot;
- glue gun
Manufacturing process:
- Turn the pot upside down.
- With the help glue gun Gradually attach stones to the walls. Try to select them so that there are no empty gaps.

There are many in various ways make flowerpots with your own hands. Some are easy to make from scrap materials, others will require more preparation and experience. When creating a flower girl yourself, you can show your imagination and develop unique design, which will suit your personal tastes.
Carefully organizing plants in your garden is easier than it might seem at first glance. Do street flowerpots for any flowers you can do it yourself in just one weekend. At the same time necessary materials I'm sure you already have it on hand. Simple ones to help you step by step instructions in the article below.
Making concrete flowerpots step by step
Concrete flowerpots are the most common street version. They fit well in any direction landscape design.
Making such flowerpots is easy and simple yourself, and the limitations in size and shape depend only on your imagination. Follow simple instructions below.
Required materials
- plastic containers (of the size and shape you want future flowerpots to be);
- vegetable oil;
- good concrete mix;
- drill;
- concrete drill;
- trowel.
Let's get started
Plastic containers must be made of dense plastic and retain their shape as the concrete hardens. Thin and shaky walls of a fragile container can bend, and the flowerpots will come out in a bizarre shape (although this can easily be attributed to an individual design decision).
Advice! It is necessary to choose finely ground cement concrete for your flowerpot. Concrete with the addition of large pieces of stone (gravel or crushed stone) is not suitable, as the final appearance may not be very aesthetic.
Lubricate the sides of the container very generously with vegetable oil so that you can easily remove the frozen forms later. Don’t be afraid to overdo it: it will be much worse if you don’t add oil and the concrete sticks to the walls.

Pouring the solution into molds
Pour the mixture into a container, and now place another smaller one in it. The smaller container should be oiled inside and out. You can place more solution in a small container, and another smaller one in the middle.
And so on as long as there is enough space. Fill the last container with pebbles to weigh it down. See the photo below for what it looks like.

Level the surface of future flowerpots well. Leave them to dry for a day. Then remove the concrete from the containers, shaking gently. If you took the time to oil the containers enough at the beginning, removing the molds will be easy.

How to drain a pot?
Allow the finished planters to cure for another week to allow the concrete to set and be ready for drilling. Using a concrete drill bit, drill holes at the bottom for drainage.
Plant plants of your choice in flowerpots and feel free to decorate your dacha space.

Flowerpots made of fabric and cement for the street or yard
Other interesting solution country landscape design - figured flowerpots made of fabric and cement.

What materials will you need?
To make them yourself, prepare the following materials:
- dry Portland cement (or other finely ground);
- volumetric cuts of cotton fabric;
- a container that will serve as the basis for drying the composition (for example, an old bucket);
- polyethylene;
- thin wire.
The fabric base for a durable flowerpot should be:
- dense and inextensible;
- absorbent;
- large enough to accommodate the desired plant with roots.
The color does not matter, since the concrete coating will not leave a trace of the original print. Therefore, feel free to waste unnecessary faded towels, tablecloths or curtains on flowerpots for the garden. Synthetics will not work.
Step-by-step instructions for performing the work
Prepare the frame: wrap a bucket or other container in polyethylene and secure with wire. Try on the fabric and trim off excess pieces if necessary. If an even shape of the edge of the flowerpot is desired, round the corners of the fabric.
Photo selection:

Prepare cement mixture according to the instructions on the package. Soak the fabric well in the solution and cover the bucket so that you get a beautiful vase. Arrange the folds to your artistic liking.
Leave the product to dry for several days. Then remove from the base, turn over and let dry for another day or two before making holes for drainage.

What to plant in flowerpots standing outside?
After the man-made containers for the plants are ready, all that remains is to decide which flowers to plant in the flowerpots at the dacha so that they bloom all summer.
Try planting something from the list below:
- Perennial swamp hibiscus.
- Petunia.
- Zinnias.
- Globular gomphrene.
- Feverweed.
- Day-lily.
- Iberis evergreen.
- Purple Echinacea.
Do not forget to consult with a specialist in a gardening store, because each of these plants requires a separate approach. But all of them, of course, will delight you with flowering throughout summer season, and will decorate the flowerpots that you made with your own hands.

Step-by-step video instructions
We also invite you to watch several videos on the topic of the article. From them you will get even more ideas on how to arrange a summer cottage space with your own hands.
Traditionally, a garden or yard is decorated with flower beds, but their design depends only on the flight of thought of the designer or owner of the house. You can simply plant a carpet of herbaceous or bush flowers, or you can show your imagination and make flowerpots with your own hands. But here a lot of questions arise - what should street flower pots look like? what materials to make them from; how to decorate so that they can withstand the weather? Let's figure it out.
Features of outdoor flowerpots
Outdoor flowerpots perform the same role as - to hide an unsightly pot. Although the functions are the same, street flowerpots still have a number of features:
- they must be heavy so that the wind or a careless garden visitor does not accidentally knock them over;
- moisture resistant;
- with drainage holes (regardless of whether flowers are planted in them or flowerpots serve only as decoration).
By design, flowerpots can be stationary or portable, floor-standing, hanging, or wall-mounted.


Materials for making outdoor flowerpots
Unlike, the choice of materials for outdoor flowerpots is limited, since it must not only correlate with overall design garden and your preferences, but also withstand the vagaries of the weather. Preferred:
- natural stone;
- tree;
- concrete;
- clay;
- plastic;
- car tires.
You can also show your imagination and adapt almost any household item and even old furniture into a flowerpot.


There are many options for making outdoor flowerpots with your own hands. We will analyze in detail several basic techniques on the basis of which you can create beauty.
Please note that objects made from clay require firing in a kiln, so this material is not very suitable for home crafts, although pots made from ceramics turn out very beautiful. If you like Mediterranean style interior, you can use mosaics, or simply decorate any container.


You will need:
- automobile wheel, namely rim;
- fragments of tiles, dishes, glass, beads, jewelry or whatever your imagination dictates;
- tile adhesive for exterior use, which contains an indication that it glues iron;
- grout for tiles - choose any color;
- polyethylene or non-woven fabric for gardening;
- basket or rug made of coconut fiber.
Important! Do not use silicone-based glue or hot melt adhesive - when exposed to moisture, it will lose its properties and your mosaic will crumble.

Stages of work:
- Clean the wheel from dust, dirt and grease, wash and dry it.
- Coat with anti-corrosion primer according to the instructions on the package.
- Paste the mosaic. You can apply glue to the tile or to the wheel.
- Fill the seams with colored grout. After half an hour, wipe, and after a day, wash and dry the finished product.
- Place a film on the bottom, make drainage holes in it, and put a coconut basket on top.
- Now you can add soil and plant flowers.
If you want to put a flower pot inside, then choose it according to the size of the wheel. You can also put a board on the bottom and a layer on the sides so that the pot fits evenly and does not warp.
Natural stone

Flowerpots made from natural stone. Such structures are made for more than one year, so their creation should be approached responsibly. The material can also be pebbles, granite fragments and even facing brick. The process is very simple, but will require physical effort:
- Clear and level the area for the future flower garden.
- Mix a solution of one part PC400 cement and three parts sifted river sand to the consistency of a viscous dough.
- Place the first layer of mortar on the ground in the form of a low border, marking the boundaries of the flowerpot.
- Lay a layer of stone, exposing the more decorative edge outward.
- Alternate layers of mortar and stone, forming a flowerpot.
In order for the structure to grip more firmly, it must be watered for a week.
Wood
Flowerpots made of wood will look more natural than other materials in the garden; besides, this material is very easy to process, and you can use any type of blanks:
- boards,
- logs,
- plywood sheets,
- trunk cuts,
And also any wooden products, for example, old dried out tubs and barrels.
Option 1 - boards or plywood

The design is similar to a regular box, in which the sides are covered with boards or sheets of plywood. The shape can be chosen straight or conical.
This video shows in detail how easy it is to make a wooden flowerpot. If you don't have special equipment, a regular hacksaw will do just fine.
Video from the channel DIY— DIY flowerpot (wooden)
However, to ensure that your flowerpot lasts a long time, follow a few simple tips:
- The wood must be coated - this can be paint or colorless varnish, which will protect the pores from moisture, the development of mold, fungi and insects.
- Any wooden flowerpot must be raised on legs - this will prevent the bottom from rotting. Can vertical racks make them a little longer, or screw metal corners to them in the finished flowerpot, forming legs.
- If you plan to directly plant flowers in the box, you will need to drill drainage holes in the bottom.
- Since wood swells from moisture, the sheathing strips should be nailed with small gaps so that they do not bend.
Option 2 – stumps, logs and trunks

Untreated parts of wood make excellent decorative flowerpots. To do this, you need to carefully remove the core, leaving the outer shell without damaging the bark. Of course, you will have to tinker, and you will need skills in working with a drill and special tool: feather drills, chisel, chisel. Work order:
1. Cut off the required piece of log or select a suitable stump.
2. Using a drill and a special drill, drill many holes - first along the contour, and then towards the middle. The more holes, the easier it will be to remove excess wood.

3. Then, using a chisel and a chisel, hitting them with a hammer, remove the destroyed inner layers of wood.
4. The final stage is leveling the inner edges and treating them against pests with any antiseptic impregnation.

5. For beauty, you can paint the outside of the bark with colorless varnish or stain.
Option 3 – barrels and tubs
If you have an old wooden tub or barrel that can no longer be used for its intended purpose, then it will make an excellent flowerpot; it doesn’t even need to be decorated with anything.

It is enough to simply clean the particularly rusty areas with sandpaper, treat them with a rust remover, and varnish the wooden parts. Or you can leave everything as it is – as natural as possible.

And this small barrel was made specifically for flowers. Using a jigsaw, cut out two round bottoms from the planks, which in our case will become the sides, then cut planks of the same length and several small squares. Screw all this along the perimeter of the bottoms, forming the structure of the barrel.
For assembly, you should use wood screws, since nails can split the boards and the circle.
Concrete
But the most durable outdoor flowerpots can be made from concrete. This one is simple and available material takes any shape, withstands weather conditions, is easy to decorate, and products made from it are durable. As a form, you can use any container, for example, silicone. You just need to select the dimensions so that the wall thickness is at least 3 cm, and the flower is not cramped in such a flowerpot.

Another original technique is working with fabric soaked in cement mortar. For example, these cute “bags” are made using this technique.

Step-by-step manufacturing process in the master class Hüseyin Güler:
You can decorate concrete flowerpots in several ways:
- By coloring. The surface must first be primed and only then painted. Paint should be selected for outdoor use.
- Laying out a mosaic of part of the flowerpot or the entire flowerpot. While the solution has not hardened, the desired pattern is laid out on the surface of the flowerpot.

- Pebbles. The process is very labor-intensive and painstaking, but the result is amazing. The pebbles need to be attached with tile adhesive, covering only small areas of the flowerpot with a 5mm layer into which the pebbles are pressed.

The most patient can make a flowerpot with their own hands from individual concrete leaves that are placed on an inflatable ball. Surprised? Watch this video and everything will become clear to you.
We place concrete sheets on an inflatable ball. Instructions from the Indians:
Second life for old things
As for indoor flowerpots, and for outdoor flowerpots, recyclable materials are perfect - an inexhaustible source of creative ideas and creativity. An outdoor flowerpot can be seen in almost any object...
Flowerpot made from old tires
In this video from the channel GARDEN, VEGETABLE GARDEN, WITH YOUR HANDS you will find a simple explanation of how to turn a tire into the shape of a flowerpot, and the decoration is everyone’s imagination and skill.
And here is a flower basket made from tires from the channel Kaleidoscope will be a great decoration for your garden.
Examples of designing an ideal flower garden
Using these techniques, you can create a real fairy tale or minimalist decor in your garden, all in your hands. For example, foam blocks with large cells will serve perfectly as flowerpots.

Both kids and adults will be delighted with this mini-train

And a fairy must definitely live in this stump, well, it simply cannot be otherwise!

Such a flowerpot is the size of a real flower bed and these modest but stylish flower beds will be appropriate both in a private garden and in a city park.


Whatever decor option you choose, handmade flowerpots will breathe soul into your garden and fill it with homeliness.
If you liked our ideas, read other articles in the series!
Categories


