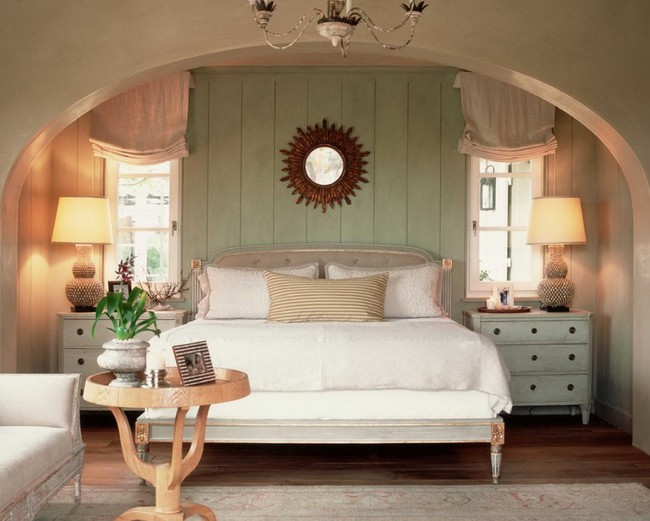
To improve the appearance of premises, designers very often offer their clients to create doorways in the form of arches. This solution seriously refreshes the interior of the room. The rooms are divided rather conventionally, which has a positive effect on the feeling of the internal volume of the premises.
Possible finishing options
There are many ways to finish an arch. Decorative finishing of an arch in an apartment does not limit designers’ imagination, because there are enough materials for such work. True, here you need to understand that finishing the arch is a rather labor-intensive process.
It is especially difficult to finish an arch according to inside, where you have to dodge to properly seal the opening. After all, the inside of the arch is constantly bending, which significantly complicates the process.
The three most popular materials are used for decorative finishing.
- Decorating arches in an apartment with wallpaper considered the simplest and most cost-effective solution. Wallpaper is very cheap and quite easy to use. Even a person without experience in the repair field can glue them on. Another big plus is the ability to use a huge number of designs and patterns that are painted on wallpaper.
- Decorating arches with artificial stone- this is already much more expensive and luxury option. Artificial or decorative stone is a material for interior and exterior finishing premises. The shape of the installation resembles a tile. Its thickness is only 1-3 cm. Finishing arches with stone is expensive, but the result will please you. The stone is easy to wash and clean from dirt. Even more expensive and interesting option– this is the decoration of arches with wild stone. Wild stone has arbitrary shapes and a bunch of possible colors. It is made from natural materials, which will naturally increase the cost of such products.
- Decorative finishing The arches in the apartment are made through the use of decorative plaster. This type of plaster is used to create textured and relief patterns on walls. Using plaster is quite simple, especially considering the fact that when working with arches you have to finish curving surfaces. Value for money decorative finishing arches are considered the best option. Among the disadvantages, one can note a poor reaction to moisture.
There are other finishing options. For example, finishing with tiles or mosaics. But such solutions are very inconvenient and do not look so impressive. The process turns out to be unnecessarily expensive and labor-intensive, and the result is rarely better than traditional arch finishing with decorative stone or plaster.
When choosing solutions for finishing arches, you should always pay attention to the main design directions that have already been used in your apartment. Arches with stone trim always look great, but against the background of walls made of wallpaper or ordinary white putty, the result will not be so impressive.
A similar situation arises with decorative plaster and wallpaper. Therefore, the choice of materials must be approached responsibly.
It is advisable to use the wallpaper pattern for the entire room. This material is glued in one layer, so calculating their quantity will be quite simple. True, you will have to trim up to 40% of the material. This is necessary if you intend to perfectly match the patterns to each other.
As a rule, 2-3 m2 for a medium-sized arch will be enough.
Arches trimmed with stone look great in houses with expensive furniture and fittings. They also pair well with wood trim. It is advisable to paint the walls in warm colors. Perfect fit beige tone with a slight hint of gold and mahogany.
But decorating the arches with decorative stone will cost you a pretty penny. After all, a good decorative stone is expensive.
Calculating the amount of stone is much more difficult. The arch is laid with stone on both sides. On each side the stones are laid in one row. There can be two rows on the internal opening. Although, it all depends on its width. It is worth understanding that decorating an arch with stone is beyond the power of an ordinary person.

When working with this material, you need to have basic experience and know all the secrets of installation.
But don’t forget about the benefits of decorative stone. It boasts extreme durability and ease of use. The stone is not afraid of moisture, temperature changes or exposure to ultraviolet radiation. Once finished, the arch will delight you for decades.
The usual decorative finishing of arches using relief plaster is an excellent choice in any situation. makes it possible to create a unique relief on the wall.
There is no need to clarify the fact that the decorative decoration of the arch will look best in a room where the walls are decorated with a similar material. It is better to refrain from using such materials in the kitchen and bathroom.
The place for decorative plaster is in the living room, hallway and bedroom, where there is no excessive moisture and a lot of dust.
Decorative plaster has to be applied in several layers, which lengthens the installation process. This must also be taken into account, since each layer must dry for several tens of hours. If you don't have that much time, then it's better to choose something else.
Decorative decoration of an arch in an apartment does not require additional calculations. After all, with plaster you can finish any surface without any problems. It is believed that the average amount of solution for 2 m2 is enough to finish an arch of any size.
Stages of work
Various materials provide various technologies finishing. You can use wallpaper and decorative plaster yourself. But finishing an arch with stone is only possible if it is done by a professional who knows everything about how to decorate an arch with stone with maximum efficiency.
Wallpaper usage:
- We dilute the glue, observing all the requirements indicated on the packaging. The glue must have the correct consistency. The presence of lumps and foreign elements unacceptable.
- Preparing the surface by cleaning and degreasing it. You can use Knauf primer as a rough finishing layer - then the wallpaper will be much easier to glue.
- First, stick the strip near the wall. Then we cut it along an arc. It is advisable to leave an allowance of 2-3 cm wide. It is cut diagonally in increments of 5-7 centimeters and wrapped on the inside of the arch.
- We glue the remaining sides of the arch in the same way.
- We seal the arch arch with a strip of the same width. The strip may be a little longer. This will allow you to easily move it so that you can correctly apply the design. In some cases, two strips are used. They converge at the top point, where they are glued overlapping.
- At the last stage smooth the wallpaper and achieve good adhesion of the glue to the wall.
Use of stone:

- Decorating arches in an apartment with stone begins with surface preparation. It is advisable to create an even work surface without flaws. We prime the wall and give it time to dry.
- Mixing the glue and place it on the back of the stone. We place the first stone on the lower border of the arch.
- Place the stones in one row. It is imperative to maintain the distance and radius of the arch. The material will have to be cut so that the stones form a beautiful semicircle pattern. Used for circumcision grinder and a stone file.
- The inner part of the arch lay with smaller stones. Its width and height should not be more than 5cm.
- After completion of all work We cover the seams with a special solution (grout).
Use of decorative plaster:
- Plastering the arch and level the work surface.
- We seal all the joints and flaws.
- Prime the surface to improve adhesion.
- Applying plaster and form the relief using special tools. In some cases, it is necessary to apply several layers for a better decorative effect.
- A day after application, paint and sand the plaster.
Finishing process (video)
Prices for services
Finishing arches using wallpaper is the cheapest. One linear meter This material costs 1-2 dollars. And here we mean expensive and high quality embossed wallpaper with an excellent design. Pasting the arch will cost 1.5-2 dollars per 1 m 2.
The use of decorative plaster also cannot be called too expensive. The price of plaster is 2-3 dollars per 1 m2. It is quite possible to finish the arch for a similar amount. If you mean working with complex shapes and at altitude, the price will increase to 3-4 dollars per 1 m 2.
Decorative stone will cost much more. Its price starts from $7 per 1 m2. Laying it is very difficult, especially if you need to work with complex shapes, where you have to spend a huge amount of time adjusting and cutting stones.
The average price for finishing arches with stone is 15-20 dollars per 1 m2. The finer and more complex the stone design, the more the price for the work will increase. And it costs the same wooden surface To finishing and wall decoration in the apartment.
- Finishing materials
- Finishing an arched doorway
- Some useful tips
The arch is very in an efficient way revive the interior of the apartment. This building brings freshness and novelty to appearance home, makes it beautiful and original. Arches have a wide variety of shapes and sizes.
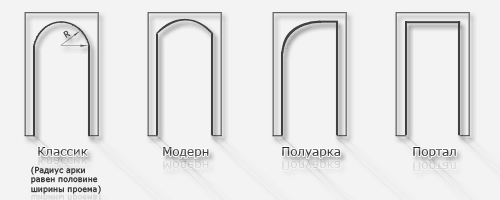
Scheme of types of arches.
The structure takes on its finished form only after finishing has been completed.
Decorative decoration of arches can make the door arch opening a real decoration of the house.
Every owner can decorate an arch with his own hands.
The final finishing of arched structures is carried out in different ways. For cladding door arches use wild stone, decorative plaster, wallpaper, polystyrene overlays. You can simply paint it the color you want. To do this, it is recommended to cover the arched structure with fiberglass, which is well glued with PVA glue. This preliminary finishing of the arches is suitable for further painting, applying thin plaster, and wallpapering.
Finishing materials
Decorative elements for finishing arches can be bought in stores. The industry produces all kinds of arched elements made of wood and MDF, polyurethane baguettes and components made of natural and artificial stone in the form of locks, vault expanders.
You can decorate an arch with your own hands using the following materials:
- decorative stone (brick);
- ceramic (tile) tiles;
- mirrors;
- mosaic;
- textiles;
- stopper;
- decorative plaster;
- wallpaper;
- polystyrene;
- polystyrene foam;
- polyurethane;
- tree;
- plastic;
- plastic or wooden lining;
- laminated or parquet boards.
Return to contents
Finishing an arched doorway

Scheme of a classic arch.
One of the most simple ways– cover it with wallpaper that will be used for covering the walls. Work begins with preparing the glue. It should be somewhat thicker than for pasting walls. A strip of wallpaper is glued to the wall next to the arch. The next piece of wallpaper is applied so as to cover part of the arch opening. After gluing the strip, the protruding part of the wallpaper is cut off, leaving an allowance of about 25 mm. Cuts are made on it every 20 mm, which are folded and glued to the slope.
To cover the arch arch, cut out a strip of wallpaper equal in width to the depth of the arch opening. The length of the strip must be greater than the required size in order for the wallpaper patterns to match. The glued wallpaper is carefully smoothed so that no air bubbles form under it.
You can trim the arch with cork. This method is environmentally friendly and natural. The material is sold in panels and rolls. To finish the arch, it is better to purchase a rolled cork. You can replace it with cork wallpaper. They may have a self-adhesive backing. If there is no such base, then use acrylic glue.
![]()
Diagram of the arch structure.
Before finishing, the finished arched structure must be carefully puttied, leveled and dried. The process of finishing a structure with cork is similar to a sticker. regular wallpaper. The glue is applied to the wall and to the cork. The material is glued without any gaps. You need to make sure that there are no air bubbles left.
In rooms with high humidity a cork coated with a layer of wax is used. It repels moisture from itself. You can additionally coat the cork with varnish.
An arch trimmed with stone looks good. Especially when the arched opening and a small part of the wall next to it are lined. This cladding can be asymmetrical or symmetrical. For stone cladding, it is better to choose narrow tiles. Their front side is selected according to color and texture in accordance with the wishes of the owners. You can choose imitation sandstone, brick or marble. If the arch is made of plasterboard, then facing materials should be fairly light. In order for the tiles to adhere well to the surface, the arch should first be plastered, then primed and notched.
Assembly diagram of the arch.
To decorate an arch with tiles made of artificial or natural stone, preparing cement mortar. Sand, lime and glue are added to it. Can the solution be replaced? liquid nails. They begin to cover the opening from below, from the floor. Rounding the arch requires a special approach. The dry tile is applied to the opening, and the cut line is marked on the back side with a pencil. Carry out the marking line several times construction knife. Next, use pliers to break off the unnecessary part, and smooth out the irregularities with a file and sandpaper. To cut in a straight line, you can use a regular hacksaw or circular saw. A day later, the seams are sealed with mortar.
How to decorate an arch with decorative plaster? When choosing this finishing method, work begins with rough plaster of the plasterboard from which the arch is mounted. After drying, the rough layer is sanded and primed. A day later, decorative plaster is applied. A relief is formed on a fresh layer with a grater, sponge or spatula. After complete drying, the surface is painted. If decorative plaster mortar was tinted, then instead of painting they are limited to applying a protective layer of varnish or decorative metallic.
Lately it has become fashion trend do not use interior doors for their intended purpose. Instead of interior doors, decorative arches are used, which primarily complement the sophisticated interior and serve as a unifying element.
Finishing interior arches do it yourself has become no less popular than using the structure itself.
Many people refuse to use doors; this trend is due to the fact that most users have very small premises. Doors are left only in those places where they are really needed, for example, in the living room.
Need or better create decorative element, in the form of an arch, this is largely a matter of aesthetic preference. This design will visually expand the space, which is important for small rooms.
We will look together at how to finish an arch in an apartment, what material to choose and how to complete the structure itself using the example of a plasterboard structure.
Preparing a decorative hole for the arch
Before finishing the arch in the apartment, you need to perform simple markings. Here you will need the basics of geometry; the main difficulty lies in the presence of radial lines of the decorative arch.
Will need homemade compass made from profile:
- 2 holes with the required radius are drilled in the profile, and a profile with a design point is screwed through one hole.
- A pencil is inserted into another hole and the required arc is drawn.
- The remaining straight sections are drawn using a ruler or a regular rack level.
Attention. Considering that the arch is a symmetrical structure, it is necessary to draw it twice on both sheets with a mirror reflection.
Once all lines have been drawn, excess drywall is removed using a hand or electric jigsaw. Let's start making the figure itself with our own hands.
Making a frame for a decorative arch
When thinking about how to beautifully decorate an arch in an apartment, you should pay attention to the manufacture of the frame. The quality of the entire structure, its strength and reliability directly depend on the frame.
This situation is simplified by ready-made contours made earlier. Making the frame comes down to duplicating the cutout shapes.
Here you will have to tinker with cutting the profile and smooth bending.
Advice. During work, you should remember about the racks; without them, the future decorative structure will lose its rigidity. The racks are installed at a distance of 30 cm.
The shape of the arch can be different, if it does not allow installing profiles in the required places, then CW profiles are installed where possible.
Finishing interior arches, last stage
Advice. You should take care of hidden electrical communications and fill the internal space with thermal insulation. It is advisable to install insulation to avoid hollow objects.
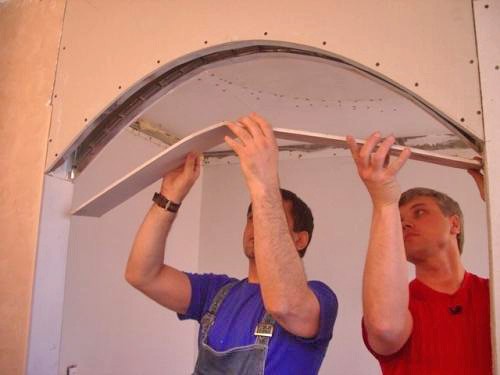
When covering an arch with plasterboard, many may have difficulty bending the material. Narrow strips will not be difficult; if the strips are wide, then it is better to first watch an instructional video on how to handle the material so as not to damage it.
Small strips are bent in stages, without sudden movements, just gently press the plaster into the arc, while simultaneously screwing it to the profile.
Conclusion of finishing, instructions
The options in the apartment are different and the most used various materials, depending on personal preferences and the overall interior of the apartment or house.

Almost any decorative material will do:
- Decorative stone.
- Plaster of any kind.
- Wallpaper.
- Painting.
- Tree.
- Acrylic paint.
As an example, let’s consider the material for finishing arches in an apartment: acrylic paint. In this case, the drywall is carefully puttied and then cleaned with abrasive paper.
The next stage is a thorough primer and only after that it is covered with two layers of acrylic paint.
It is important to use exactly the material for finishing that will fit harmoniously into the interior.
As a piece of advice, I would like to draw your attention to some nuances:
- It is recommended to devote special attention frame strength. The design provides a certain number of cutouts and through holes.
In some cases, in order to strengthen the frame, the structure is sheathed with two layers of plasterboard. - In order for the structure to have an excellent appearance, even before finishing it is necessary to think through every detail, and it is best to make a preliminary sketch.
- Before you start independent work, read the instructions several times or watch an instructional video.
Types of decorative arches
Thanks to modern trends and design developments, today there are many decorative arches, which can replace interior doors. Overall, this move gives the room a feeling of spaciousness, elegance and individuality.
But still, among the many proposed arched structures Some types can be distinguished:
- The classic design is distinguished by its elegance and correct radius of curvature. Suitable for any interior and doorways. It looks especially great when the opening is high.
- A decorative arch in the form of an ellipse has the usual shape of an irregular or regular oval.
- Decorative arch in romantic style It is distinguished by a gentle rounding of the lower radius. Perfect for wide openings, and roundings are used only in the corners.
- The Art Nouveau arch is characterized by an elongated rise. Gives openness to the room. It is recommended for use in rooms with low ceilings.
- The portal is not pretentious, the arch is simple, without curves. Gives the interior a certain rigor.
A few words about finishing materials
Using decorative plaster for finishing and decoration, you have the opportunity to choose any color palette and texture, which will allow you to implement almost any design idea. The arch can be decorated with brick or stone, decorated with paintings, or simply painted to match the adjacent walls.
Today, finishing with decorative plaster is popular not only for decoration interior openings and the entire room as a whole. , made with plaster, will solve the issue of conditionally dividing the living area.
It doesn’t matter what type of plaster is chosen, you will still get a pleasant effect at the end. The price of the material is actually the same, since the composition for each type is not particularly different.
Any chosen option will help to implement any extraordinary solutions.


