Recently, decoration has become very popular modern interiors"infinity mirrors" The design is based on led strip, which is often used by interior designers to translate their most daring and creative ideas into reality.
In this article we will reveal all the nuances of making such an unusual lighting design the rooms are like an endless well of light. You will learn what it is and how to make such a mirror yourself.
From the article you will learn how many mirror surfaces are needed to create a light tunnel with luminous points, as well as what materials are needed and how to make a lamp with an eternal effect with your own hands.
What is a mirror tunnel with 3D lighting in reflection?
An infinity mirror is a reflective surface in which we see multiple reflections that do not actually exist.
This effect can be achieved by using bright light from third-party sources and their repeated reflection in 2 mirrors that are installed parallel to each other.
Theoretical basis of the infinity effect
 More our ancestors used the illusory effect of an infinity mirror(during fortune-telling at Christmastime, the girls placed a burning candle between two mirrors). Infinity in reflection from a mirror surface arose due to multiple reflection of the light source from a real and imaginary mirror.
If you are interested in how a real and imaginary reflective surface have the same optical properties, a textbook on studying quantum physics will help you.
How to do it yourself?
Your task is to create a flat reflective surface, looking at which the optical illusion of an infinite mirror will appear. To make it you will need:
- Mirrors (2 pcs).
- Light source.
Naturally, you can always resort to old methods our grandmothers, and build a mirror system open type, in which the focus of the viewer's gaze will be parallel to the mirror planes. In this case, the height of the lamp will be equal to the width of the reflective surface, which a priori will not be very convenient.
Our goal is a mirror plane that will not reduce the height of the room. To create it you need an optical system closed type, in it the person’s gaze will be directed perpendicular to the mirror surfaces.
One of the mirrors must allow a portion of photon ducts from the light source to pass through; if you do not follow this point, you will not be able to do or see infinity mirror.
For self-made light well you will need:

Implementation of 3D design
You can build a structure with the optical illusion effect of an “infinity mirror” in different ways, depending on the type, quantity and quality of materials you have. Further in the article you will learn one of the most simple ways to create a light tunnel.
Mirror surface
To get started, buy a classic mirror(you can cut existing ones to the required size). Then, the question arises - where can I get a second reflective surface with a partial mirror effect?
The answer is quite simple - you will need glass with a density of 3-4 mm; a translucent reflective surface can be obtained by covering it with automotive window tinting film. Ideal option– a film that transmits 50% of light.
Frame
To make a base that will hold the mirror system, purchase wooden blocks, the side of which will be equal to 2-3 cm. In order to qualitatively and reliably attach such a frame to a mirror surface, use a silicone-based sealant, ideally if it is colorless.
Before you begin, you need to make a hole in the frame made of wooden blocks using a drill, which will be parallel to the mirror plane. Through the hole you need to pass the power supplies of the diode wire.
Do not rush to attach all the slats at the same time; glue them one by one, parallelly aligning the bars along the outer edges of the mirror surface.
Source
 After completing the assembly process, the cavity of the optical illusion system will become airtight and as airtight as possible.
The only light source in such a system can be one that does not emit heat. The most suitable option for such a design there is a strip with LEDs, ideally RGB - it will allow you to create various optical effects in the tunnel.
Also pay attention to the operating voltage rating of the LED strip, it should be equal to 24 volts. Such tapes are among the brightest, which will allow them to penetrate as much as possible through such an obstacle as a tint film.
Assembly
Let's take a step-by-step look at the process of assembling a light tunnel. You are required to be extremely careful, attentive, and have all of the following materials at hand.
- Armed silicone sealant, glue the frame slats one by one to the mirror (from the side of the reflective surface).
- Take RGB LED tape, and carefully attach it to the surface of the frame from the inside, pass the power cord through the hole in the rail, which must be made before assembling the frame.
- Cut a piece of tint film that matches the width of the frame structure.
- Apply silicone-based sealant to the wooden frame, then place the glass covered with film on top so that it rests with the mirror side inside.
And finally final stage assembly of the structure. In it you will learn what to do with the ends that are left open, and what is needed to close the wooden frame.
- If the wooden blocks were well processed and the work was done carefully, you can simply paint them over, choosing the appropriate shade.
- If your interior is made in Hi-Tech style, you can decorate the light tunnel stylishly and beautifully using a regular aluminum profile.
- Also ends wooden frame can be covered using a plastic cable duct after removing the cover.
Silicone-based sealant is ideal for fastening all of the above materials.
Belt design options
 The most simple option The location of the LED strip is to run it along the entire perimeter of the wooden frame. The visual effect with this arrangement will look like many identical rows of light, standing next to each other.
If you want to make a more interesting and effective light tunnel, attach several geometric or some other shapes to the mirror surface using sealant; they must be made from the same wooden slats.
Attach a strip of LEDs along the entire perimeter of your inserts. Be sure to pay attention to ensure that its length is a multiple of the distance between all mounting points along which it will be possible to cut in the right place.
Using a diamond-coated drill, you need to make a hole in the mirror and pass the light source power wire through it.
Connecting LED strip
When the RGB LED strip is connected directly to the power supply, it will emit white light. When connected using a controller, you can create a variety of color effects. This the control device works in tandem with the remote control. But if you want to see color music, you need to choose models that are compatible with a computer.
Useful video
We invite you to watch a video on how to make a mirror with an infinity effect with your own hands:
The effect of endless reflections is achieved by using a mirror, mirrored translucent glass and a light source between them. Most often, such lamps are used for decorative purposes; they increase volume very well.
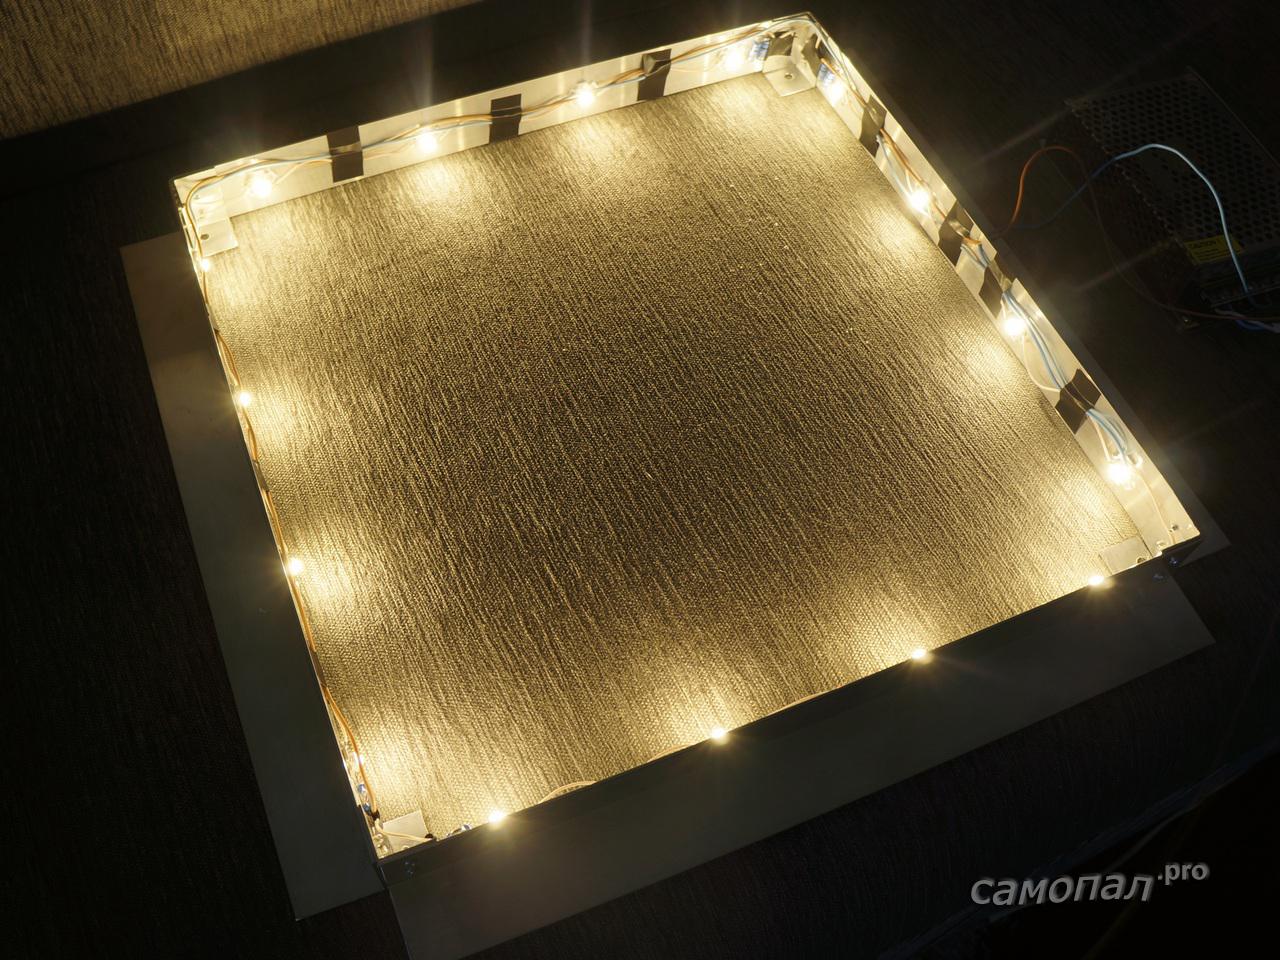
I designed a chandelier with a similar effect, but with the function of being the main light in the room. I ordered glass and mirror from the Glass Cutter store. A translucent mirror made from ordinary glass and mirror car film
Materials
- Mirror 500×500 and glass 500×500 with the necessary holes (ordered at the Stelorez store) ~ 950 rub.
- Mirror film (bought at the car market) 1×3m ~ 150 rub.
- Aluminum corner 40mm 4m ~ 350 RUR
- 40 pcs ~ 600 rub.
- Power supply 12V 10A with voltage regulation ~ 450 RUR
- Studs, nuts and other materials ~ 200 rub.
Characteristics
- Dimensions: 500 x 500 x 90
- Number of LEDs 32 x warm white 3W, 8 x cool white 3W
- Power consumption 14V * 600mA *10 = 84W
- Number of sections - 3 (16, 16 and 8 diodes)
- Control: three RF315MHz channels, soft start, dimming possible (did not implement), LED overheating control
Manufacturing
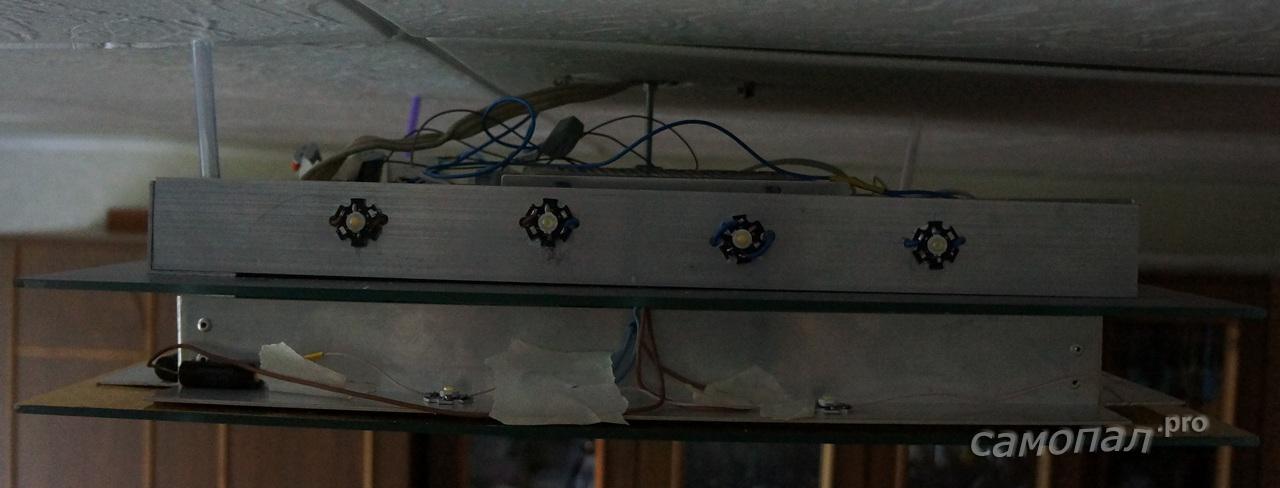
The frame is made from aluminum angle and fastened by riveting


We connect all LEDs in groups of 4 in series. We put a 1 Ohm 4W resistor on each group, then adjust the voltage to the power supplies so that the current in each group of diodes is ~ 600 mA. For what?
Firstly, I had such a power supply (I bought it with a $15 coupon on ebay)
Secondly, this solution allows you to control the brightness/power of the LEDs using PWM
The disadvantage is approximately 5 W of excess power, which is dissipated in resistors.

We assemble the second (upper) frame.
We attach LEDs to it.
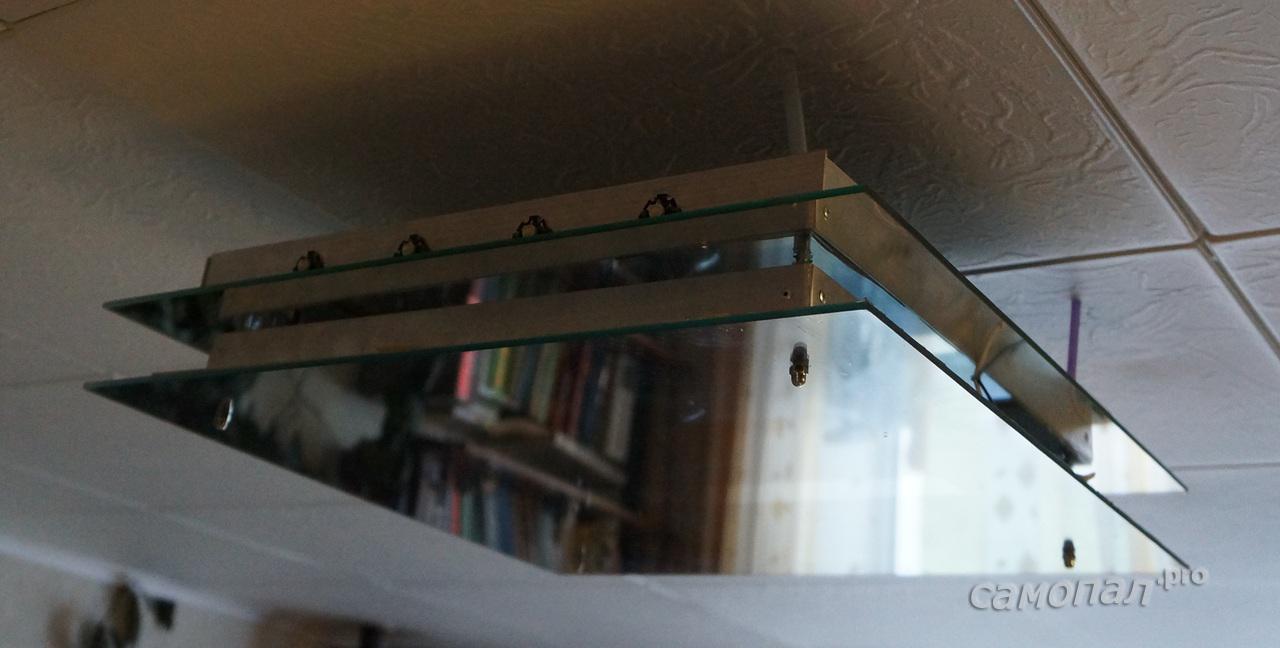
We assemble the entire sandwich: bottom glass, bottom frame, mirror, top frame using studs and 5mm nuts.
We push all the wires through the holes in the mirror to the top.
We install all the electrics and the control controller.

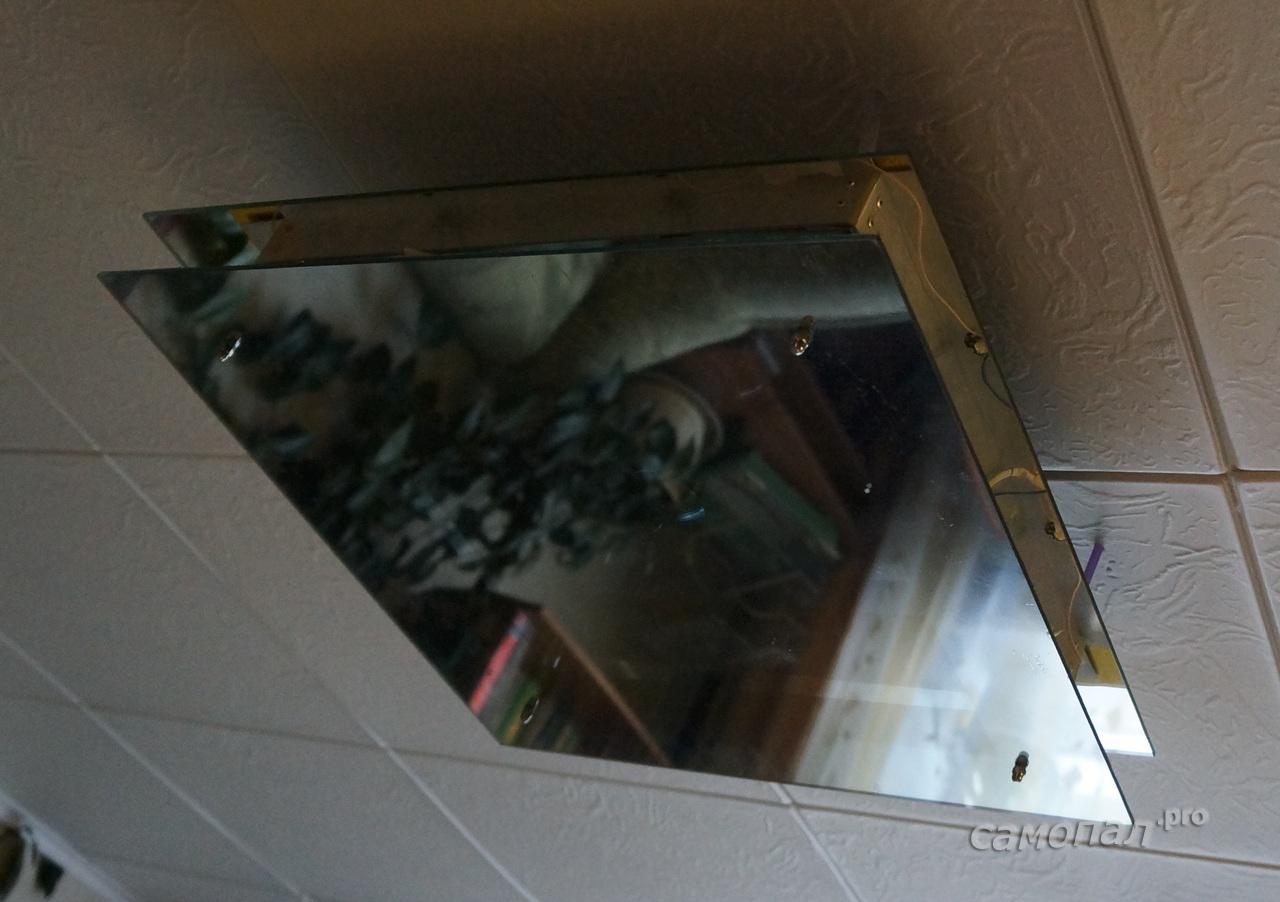
We hang it on the ceiling and connect it

We fix the wires with construction tape so as not to become an eyesore from below.

Result


There is a lot of light in the room. Only under the chandelier itself is it a bit dark due to the low light transmittance of the tint film
The infinity effect has been achieved. Guests look up and down for a long time, entering a trance :)
Testing
The thermal imager showed fairly uniform heating of the LEDs with a maximum heating of the crystals of 58C

The glass heats up to 35C and should not crack.
The cat wonders how much time was wasted for a good sleep 😉

By
Ideal pocket light for makeup application
Illuminated mirror for daily skin care and cosmetic application
Small pocket mirror with bright LED backlight will help you put your makeup in order even in pitch darkness. The lower mirror is a magnifying one. A pocket mirror with light is an indispensable accessory for facial care while traveling.
BUY FOR 212 - 217 RUBLES with free delivery by Russian Post
BUY FOR 213 - 219 RUBLES with free delivery by Russian Post
By
DIY illuminated mirror In this project, I will show you how to make an elegant, real bathroom mirror with hidden LED lighting. Firstly, it looks very beautiful, and secondly, it is an excellent decorative element for the bathroom. Quite simple to make and if you have hands, it should not cause any particular difficulties. So let's get started!
First, I purchased a regular ready-made mirror, with a polished edge, measuring 91.4 x 76.2 cm.
Then I picked up necessary tool: Reinforced tape, electrical tape, knife, plastic packaging film, 1m long metal ruler, respirator and safety glasses. Please note that the knife must be stiff and very sharp; it is best to use a utility knife with a thick blade and a metal blade holder. You will also need a small sandblasting machine and an air compressor.
For sandblasting machine, it is best to use dry, white quartz sand. But since I didn’t have it, I used regular yellow, after sifting it through a fine metal mesh to remove debris and large fractions.
Then, turning the mirror over with its back side up, using reinforced tape, I made a preliminary stripe, which will later be illuminated from the front side. The inside of the square on the mirror is covered with fabric or any other suitable material. To prevent it from flying away, I taped it with adhesive tape. To prevent unsealed areas, I also covered the middle of the broken strip with adhesive tape.
Having secured the metal ruler with clamps, I cut through the reinforced tape, according to the markings I had made earlier. I advise you to be sure to securely fasten the ruler, otherwise it may move and the knife blade will move to the side. Also, to make a perfectly even cut, I recommend using an additional block with which you will hold the knife blade on the other side of the ruler. Be very careful at this stage, as any unnecessary scratch will then be clearly visible from the front side of the mirror, and this will not be corrected!
Then remove the tape from the cut areas. You should get an even strip around the entire perimeter. Make sure that the entire remaining surface is securely sealed, as this strip will be sandblasted later.
Using a sandblaster, remove the back coating from the mirror around the entire perimeter within the cut strip. I had the mirror covered in two coats, blue paint and a reflective silver coating. Therefore, in order not to damage the glass, I removed both coatings in two steps. When working with a sandblasting machine, be sure to use a respirator, safety glasses and gloves, as you will even get sand in your ears!
After finishing processing the mirror, you should get something like this:
Next, empirically select the internal distance around the perimeter from the transparent strip at which it is best for you to place the LED strip. By changing the distance, you can optimally select the brightness of the backlight.
I then made the back frame from red oak lumber. You can use the size of the bars at your discretion, the main thing is that they are higher than inner sheet MDF (will be discussed later). Using a cutter, I made grooves on the bars in advance for tight installation of the back cover and opened them with black paint and varnish on the end and back outside. The size of the back frame is determined based on the size of your mirror; my frame, for example, is 3 cm smaller than the mirror itself around the entire perimeter.
Cut the back cover to fit your back frame. In order for the lid to fit tightly into the frame, at the last stage, you specially made grooves in the bars, i.e. your lid fits flush with the frame. For the lid I used an old piece of plastic, but Any will do another strong material that can support the weight of the mirror.
Then, to install the LEDs, I cut out rectangular piece made from 1/2" thick MDF sheet. The size of this piece depends on the internal distance from the transparent strip where you decide to install the LEDs. In my case, the rectangle turned out to be 1.5 cm smaller than the perimeter of the transparent strip. I carefully glued a cut piece of MDF in the center of the mirror, keeping equal indentations on each side, using mastic (you can use suitable glue or epoxy resin). Then I glued the outer rear frame in the same way.
From the inside, on the end of the outer and inner frames, I glued LED strips with a warm white glow. The transformer for powering the LEDs was moved outside the mirror, although if you tried, it could have been placed inside. The wire from the LEDs was brought out through back wall, so that it is not visible.
Then I installed it on the wall and the back cover homemade mount. The mount is on the back cover, secured with short self-tapping screws that reach the MDF, but do not reach the mirror. I recessed the transformer into the niche where the socket is located, since I specifically installed such a socket. As a result, after connecting the transformer and connecting it to the outlet, I got this unique mirror!
I'll make it custom infinity mirror according to your measurements and needs. From order to finished product no more than 14 days. Delivery to all regions of Russia by the best transport companies with 100% insurance.
Advantages of ordering an infinity mirror from Sofia-Led
The first and most important thing is that I work alone.
From all this it follows that the cost of my infinity mirror will be much lower than competitors. I have my own workshop, my own tools and no other “unnecessary” employees. I make the entire journey of the infinity mirror from the layout to the finished product.
I have been making infinity mirrors for over 5 years. During this time, I learned how to assemble options efficiently and inexpensively different sizes with a wide variety of glow patterns. It has long erased the boundaries of making mirrors; they don’t get hot, they shine brightly and for a long time. Here are my advantages:
Mirror frame options
I generally make three versions of frames for the infinity mirror. Their use is determined by the location of the product. For the living room and living room, wood is the most practical; for the bathroom, sealed aluminum or plastic is suitable.
When installing the power supply inside the frame, I use only aluminum or plastic. Wood prevents full ventilation of the heating power supply unit.
Another important difference between my mirrors is that I strictly measure the inner perimeter of the frame so that the LED strip fits exactly where the cut is made. Thus, I achieve an ideal light contour without gaps or overlaps.
What is an "infinity mirror"
Essentially, it is a composite object consisting of at least three layers:
The light emitted from the source is reflected in the mirror and translucent glass, forming a tunnel of reflections, tending inward and towards the center. IN ideal conditions Using two ordinary amalgam mirrors, you can achieve almost infinite convergence of reflections. But this option is unrealistic - a person cannot see through reverse side an ordinary mirror. Therefore, on the side that will be directed towards the person, a translucent mirror is used. Already based on its name, it is clear that it will be where the main reflection losses will occur, so each reflection from it will be weaker by a percentage bandwidth such glass. There are several options for making such mirrors, and I initially use the best ones.
At correct location All three layers achieve an infinity effect, or an “infinity tunnel”, as many are accustomed to calling it. Of course, it is not infinite, but it can be brought closer to it.
Often, during manufacturing, many people neglect the rules and laws of optics, which greatly limits the operation of the mirror and its effect. I calculate the layers of the finished tunnel mirror with millimeter accuracy, thereby achieving great success.
By the way, the most common option is a mirror with an infinity effect on the wall. I recommend ordering this for your specific size. Why hang a piece of furniture standard size and watch an empty field of wallpaper around you, when you can use empty space for good!
Infinity Tunnel Lighting Options
I use several options for light sources. In 100% of cases they are LED:
I discuss each order with the client, carefully listen to his wishes and operating conditions for the item with the infinity effect. Based on his requirements and my experience, I find the most correct option making an infinity mirror.
“Sofia-Led” offers to order a mirror with an infinity effect of any parameters. For the manufacture of each light tunnel, high-quality, durable materials with a high degree of strength are used.
Remember! The more complex the project, the more interesting it is for me! Don’t forget also that you can buy an infinity mirror as a gift to your friends. They will definitely be grateful to you!
Information for managers and various organizations carrying out repair or restoration work at the facilities where my products are planned to be ordered. Follow the link and read the requirements.
Infinity mirror on the ceiling
Recently, orders for the manufacture and installation of an infinite mirror in the ceiling, including a suspended one, have become popular. Having developed my own concept, which is completely different from the usual one, I now proudly declare - I will make for you an infinite mirror that can be built into a ceiling of any complexity. This type placement is not dangerous for residents, since I calculate all the loads and make a 50% safety margin.
Due to the fact that they usually want to install a large infinity mirror in the ceiling, the weight general design which can exceed 200 kg and above, I do not recommend using a solid mirror. In this case, I recommend using several elements whose dimensions are approximately equal to 1 sq.m.


