Nowadays, it is increasingly possible to see private owners building swimming pools on their plots. It is not only a means of entertainment and relaxation, but also part of the interior of the entire home. Building a pool with your own hands is not so easy. When making it, special attention should be paid to filling the floor and walls. Most often concrete is used for these purposes. It is an artificial building material consisting of several components: sand, cement powder, crushed stone or gravel and water. It has high strength and is widely used in construction. Thanks to the introduction of special additives into its composition: stabilizers, sealants, water repellents, it is possible to obtain a material with the desired properties.
Today it has become popular to build a swimming pool in your country house. Particular attention during construction is paid to the foundation. The floor and walls are usually poured.
For example, pouring is only relevant if the bowl will not allow moisture to pass through. Hygroscopicity is a very important property. Since the pool is built directly on the ground and in its upper layer, the structure will be exposed to both surface and groundwater. Therefore, its durability, strength and moisture resistance will largely depend on the quality of the fill. Let's take a closer look at how pouring is carried out and its main stages.
Preparatory work
Pouring a pool also requires additional work. These include the design of formwork.

Construction of a swimming pool requires the construction of formwork.
Installing formwork is a very important part of the work, and the thickness of the protective layer will need to be observed. The formwork can be made of wood or plywood. Reusable formwork will be required when constructing from reinforced concrete; for steps and slopes, disposable formwork is optimal. Before pouring, you will need to pour an underlying layer in the form of sand, crushed stone or gravel 100 - 200 mm thick. Next, reinforcement is carried out with steel mesh.
To fill a pool with mortar, you will need a whole set of raw materials and tools. First of all, this is a concrete mixer, mixing containers, buckets, a shovel, purified river sand without clay impurities, tap water or well water, high-grade cement powder and crushed stone (gravel). It is necessary to prepare the solution, observing all proportions. The mixture is prepared as follows: take 1 part of cement, for example, grade 500, and mix it with water. You need to take the same amount of water as cement or a little less. All this is thoroughly mixed, half the required volume of sand is added, that is, 1 part, then 2 buckets of crushed stone and the rest of the sand are added. The ratio of components depends on the brand of cement and the required brand. It must be remembered that after preparing the concrete, it must be used within 1 to 3 hours.
Pouring technology
Filling a pool is a fairly simple matter; the main thing is to comply with all the basic requirements. We pour concrete into the prepared formwork up to the top board of the shield. This work involves gradually pouring first the bottom of the bowl and then its walls.

Pouring a pool involves filling it in stages: first the pool bowl, and then its walls.
To fill the bottom, use a mixture of a grade of at least B 15 in terms of strength, and a grade of at least W 15 in terms of water permeability.
For the open version, a quality indicator such as frost resistance will be very important. The grade allowed for it is no lower than F 100 – F 150. It is advisable to introduce anti-corrosion additives, strength stabilizers and water repellents into the mixture.
There are 2 main ways to fill a pool: continuous and in 2 steps. In the first case, the work is carried out in 1 step, resulting in a monolithic block. With it, the next layer adheres to the previous one without cold joints. This method is bad because it may require special equipment: concrete pumps and concrete mixers. This concreting is carried out using submersible vibrators.
Method in 2 steps
If it is impossible to organize a continuous supply, then use the second method.

Construction of a reinforced concrete pool bowl: 1. Class A-I, A-III fittings
2. Anti-corrosion coating of fittings. 3. Concrete M350V25W6-8
4. Sealing the cold seam. 5. Primer. 6. Leveling plaster layer. 7. Waterproofing using mesh. 8. Tile adhesive
9. Mosaic. 10. Grouting joints. 11. Floor tiles. 12. Termoshov.
It is based on the use of a special key, which ensures tightness at the junction of two layers of concrete: hardened and fresh. Thus, the use of a cold joint takes place here. The bottom is poured first, and only then the sides. A self-expanding cord with a diameter of 2–3 cm is placed at the joints of two layers of solution. The mass is poured onto it. The tightness of the structure is ensured due to the fact that in an aquatic environment the cord sharply increases in size, closing all possible gaps and thereby preventing water from passing through.
There is also the so-called layer-by-layer pouring of concrete. In this case, after the first poured layer has hardened, the wooden panels are removed. They are moved higher so that the lower edge of the shield remains 20 mm below the poured layer. The panels are secured with nails or dowels. After the poured concrete is leveled to the ground, the shields are placed at a height of about 30 cm from the ground level. At a distance of 300 mm from the internal one, an external shield is installed along the entire perimeter, the shields are fastened together. Between the panels there are 2 layers of reinforcing mesh and a layer of reinforcing bars. Finally, fill the thickest part of the pool walls. After pouring, the entire surface is rubbed down.
Fans of water treatments sooner or later come up with the idea of building their own swimming pool on a dacha or country plot. There are a lot of options for its arrangement, and there are inflatable and frame pools on sale, which are inexpensive and can be installed very quickly. If the main requirement for a pool is durability, strength and ability to withstand frost, temperature changes and mechanical damage, then it is better to opt for concrete bowl. You won’t be able to buy a ready-made one, so you’ll have to get confused and fill a pool of a certain shape. This can be done by resorting to the services of specialists, or you can do it on your own - the process, although labor-intensive, is quite doable if you have some skills, and the savings are significant. So, what are the stages of constructing a concrete pool and what materials can be used to finish the walls and bottom of the pool? We study the intricacies of the process and assessing our own strengths to decide whether it will be possible to do all the work yourself, or whether you will need at least partial help from professionals.
Before you start arranging a permanent concrete pool, make sure once again that this is the best option, and it fully meets the requirements of the family and the frequency of recreation by the water:
No. 1. Advantages and disadvantages of a concrete pool
Owners of country houses and suburban areas make a choice in favor of concrete pools thanks to their numerous benefits:
- durability. The structure will last at least 25 years, and during this time about a dozen inflatable pools and 3-4 frame ones will become unusable. The benefit is obvious;
- aesthetics. For finishing the walls and bottom, you can choose a material of any color, and tiles or mosaics will last a long time;
- Possibility to install a swimming pool any size and shape;
- comfort.
The main disadvantages are cost of arrangement and complexity of the process. In addition, the functionality and durability of the pool will largely depend on a properly designed project, the choice of finishing materials and the quality of all technological processes. 
No. 2. Is a permit required to build a concrete pool?
In most cases, you can do without approval with government services, but if you plan to build a large-scale structure, it is better to register it accordingly with the BTI, otherwise the pool will not be on the certificate of ownership. In the future, an already constructed facility may be legalized, but it is easier and cheaper to coordinate everything in advance.
If a pool is being constructed with a depth of more than 2.2 m, a length of more than 4 m and a width of more than 2.2 m, which will be equipped with a starting stand or will be used for board diving, then it will be necessary permission from the Ministry of Emergency Situations and Consumer Supervision. In cases where the pool has a decent depth and is equipped diving tower, it will be necessary to approve the project in sports authorities, and entrust the construction to specialists, but this is understandable - it is impossible to build such a structure on your own. It’s not difficult to build a small pool for family use on your own, and you don’t need to fill out any paperwork. 
No. 3. Preparatory work and design
The first stage on the path to building a concrete pool is creating a project and thinking through all the technical details of the future facility. It is important to immediately decide size and shape of the structure: these parameters directly depend on what space is allocated for construction and how many people will swim in the pool. For a comfortable stay, a pool with a depth of 1.5 m and a length of 5.5 m is quite suitable, but if a diving tower is installed, the depth of the bowl should be at least 2.5 m. Do not forget to take into account that there should be space around the pool for normal access to him or for arrangement. In addition, it is necessary to provide space for the installation of all necessary equipment.
It is not recommended to place the pool too close to it so that the shade does not interfere with the natural heating of the water. The structure should also not be erected under the canopy of trees to make future maintenance of the pool easier. 
To create the correct pool project it is necessary to know the characteristics of the soil, the groundwater level, and also take into account the load on the walls and bottom of the pool, which determines their thickness. It is worth taking into account the proximity of neighboring ones, as well as the depth of underground communications, the distance to the points of water supply and drainage, and many other points. If you plan to build a more or less large pool, it is better to consult with specialists or even order the design of a future pool from them. 
At the preparatory stage It is advisable to decide on a budget, choose a facing material for the walls, and also think about purchasing a filtration system, an electric heater, a chlorine generator, arranging a staircase, a canopy and lighting. Also at this stage they are considering water exchange system, which could be:

No. 5. Arrangement of sand cushion and waterproofing
The gravel-sand cushion ensures uniform load distribution and high-quality concrete pouring. To create a reliable foundation under the concrete pool bowl, first pour layer of sand 20-25 cm thick, or better yet 30 cm, and compact it thoroughly. Then they pour layer of crushed stone 10-20 cm thick and a fraction size of 20*40 mm, it is also carefully compacted. Important when backfilling and compacting do not disturb the bottom angle. If desired, you can use sand between a layer of sand, which will serve to further strengthen the structure. 
Next stage - creating a concrete base. To do this, use ready-made concrete, which is delivered to the site with a special mixer, or homemade concrete. Since you will need a lot of it, it is better to use. For footings you can use. You can independently prepare a suitable concrete composition at the rate of 325 kg, 625 kg of sand, 1250 kg of crushed stone and 170 liters of water per 1 m 3. The thickness is 10-15 cm, and the concrete base should be 2-5 cm larger on each edge of the future concrete bowl. If the level of the concrete foundation is below the groundwater level, you will have to additionally equip drainage, for which a trench 25-50 cm wide is dug around the perimeter and filled with coarse gravel. 
A layer is placed on top of the concrete waterproofing, for which it is suitable (lay with an overlap of 15-20 cm), bitumen, or PVC membrane. should extend 25-30 cm onto the walls. A cement-sand screed is laid on top of the waterproofing. 
No. 6. Reinforcement and arrangement of formwork
In essence, the construction of a concrete pool bowl is the creation of a typical reinforced concrete structure consisting of reinforcing metal and concrete. For reinforcement choose ribbed steel rod with a cross section of 8-14 mm, to form an oval-shaped bowl, you can use a rod with a diameter of 10 mm, which is sold in coils and has no length limitation. arranged with cells 20*20 cm. Reinforcement is carried out in two tiers; it is advisable to place debris under the bars of the bottom of the bowl so that when concrete is poured, they remain in the thickness of the solution. Don't forget to make reinforcement outlets for attaching the wall frame. 
Wall reinforcement frame is constructed in exactly the same way as the bottom. When assembling the frame, it is important not to forget to leave windows for placing embedded parts of pool equipment. To fill the walls you need formwork, which determines the shape of the bowl. It is most convenient to make it from moisture resistant or laminated plywood– the material bends well and will allow you to create any shape of the pool. An alternative is unified metal formwork. The individual formwork elements are connected to each other with screws, metal corners or. Internal struts and external supports are secured carefully, since the weight of the concrete is significant, the distance between them is about 50 cm. Pouring is carried out with belts of 50-60 cm with mandatory vibration compaction and deaeration. 
No. 7. Features of pouring concrete
Since the bowl of a concrete pool will constantly be exposed to water, the choice of concrete is approached especially carefully. He must withstand exposure to water, be frost-resistant and very durable. Concrete grade B25 and higher in strength, W6 and higher in water resistance and F100-150 in frost resistance are suitable.
Concreting the pool bowl is done in one of the following ways:
- continuous pouring;
- casting in two stages.
Continuous pour allows you to get a monolithic bowl - this is a big plus. But to implement the idea, you will need the coordinated work of several pieces of equipment, including a concrete mixer and a concrete pump.
Most often used pouring concrete in two stages: first make the bottom, then the walls of the bowl. The most dangerous place in this case is the joint, through which water can flow. To avoid such consequences, use a self-expanding cord with a cross-section of 2.5-3.5 cm. When immersed in water, such a cord significantly increases in volume and covers all the cracks. While the concrete is hardening, it is better to periodically moisten it with water. 
Do not forget that for embedded elements it is necessary to equip windows and make formwork. The entrance and other elements are attached to the frame using wires, otherwise they may be moved when pouring concrete. If the project involves the arrangement of a smooth entrance to the water in the form steps, then they move on to their arrangement after the concrete thicket is ready. The principle is the same: installation of formwork from plywood and.
No. 8. Leveling and waterproofing
After the concrete has hardened, you can remove the formwork and iron it with cement laitance, for which 3-4 handfuls of cement are dissolved in a bucket of water. The solution is constantly shaken and applied to the surface with a plaster brush. Unevenness must be leveled out using, which is carried out in one of the following ways:
- mesh plaster. In this case, it uses conventional sand-cement, which provides better adhesion and strength to a pre-attached steel plaster mesh;
- applying plaster to glue. The method involves treating the concrete surface with special impregnations with deep penetration. Due to the components that are included in their composition, adhesion to the applied layer of plaster, which includes an adhesive polymer, increases.
 After plastering it is carried out sanding and cleaning. Then it executes waterproofing what you can use it for:
- acrylic and epoxy resins, which, after application, when hardened, form a continuous polymer film;
- penetrating waterproofing. Such products are distinguished by the presence of active chemical components in their composition, which penetrate into the mass of concrete, react with calcium hydroxide, forming insoluble compounds based on it. They fill capillaries and all microcracks up to 0.4 mm in size;
- two-component cement-polymer compositions used for waterproofing large swimming pools. They contain cement and elasticizers, so they can be used to isolate even cracks up to 1 mm;
- sealing tapes can be used to seal the joints between walls and bottom.
When performing waterproofing, special attention is paid to the junction of walls and bottom, seams that appeared when pouring concrete, recesses, cracks and places where communications enter. The choice of waterproofing method largely depends on the final finishing material: it should be ideal for tiles and mosaics, and when using PVC film, all waterproofing work is reduced to a minimum. 
No. 9. Pool made of concrete rings and blocks
To make their life easier, many summer residents resort to tricks. Not wanting to deal with formwork and concrete mortar, some use ready-made concrete blocks. In this case, the installation process boils down to pouring a flat base and installing block walls. They are held together with mortar, and every third row is reinforced with mesh. After all this, all that remains is to carry out waterproofing and finishing. 
Another option is to use a ready-made one designed for constructing wells or sewers. It is mounted on a layer of cement mortar, then, as usual: waterproofing and finishing. 
No. 10. Pool wall finishing
The tiles are laid for special adhesives. If the bottom and walls are decorated with the same tiles, then you can start finishing from the bottom. When the drain is on one side, the tiles can be laid in rows, taking into account the angle of inclination. If the drain is located in the center of the bowl, then installation is carried out at the corners of the triangle. To do this, first determine the lines leading from the corners of the pool to the opposite corners of the drain hole. The bottom will be divided into four conventional triangles, along which the tiles are installed in order to better take into account the slope. The tiles begin to be laid from the wall row, then the lighthouse row is laid perpendicular to it, and then proceed to the installation of horizontal rows. 
On pool walls tiles, checking the level and making identical seams. Lay the tiles in horizontal rows, and if symmetry is especially important, then start from the middle of the row. The only difference is that the seams must be made thicker so that water pressure does not cause cracks in the tiles. The seams are treated with frost and moisture resistant.
Mosaic finishing
Installing mosaics is a lot like installing tiles. This is a wear-resistant, durable material with an excellent appearance. The best choice - glass mosaic, which absolutely does not absorb moisture and is characterized by record durability, however, such material is not cheap. A more affordable solution is ceramic mosaic. Using mosaics, you can create interesting ornaments, lay out panels, and some people combine tiles with mosaics to reduce the cost. 
The thickness of the film, as a rule, reaches 1-1.5 mm; it consists of 4 layers, one of which must be a durable synthetic material, for example, polyester or Kevlar. Currently, the following types of films are used to equip swimming pools:

It is important to use under film. The material itself is mounted with an overlap, secured by hot welding, and the seams are sealed with hot PVC. This is followed by stretching the coating along the walls of the bowl and welding it to a pre-mounted fastening strip. The final stage is welding the film in the inner corners of the pool. Everything is clearly described in a clear manner.
No. 11. What else to consider?
Consider the need canopy: it will not only protect the pool from some contaminants, but will also keep the water warm. You can choose a ready-made folding canopy - these are not very expensive structures that are difficult to create yourself. An alternative is the construction of a metal frame and installation, in the end you will get something like.
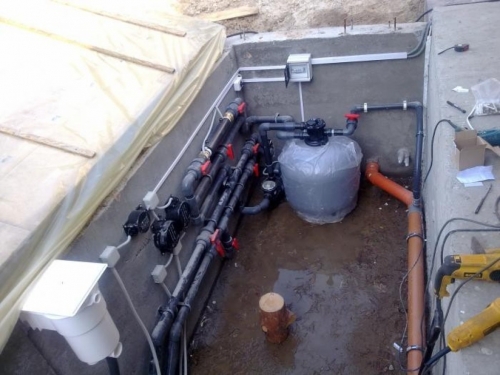
After the construction of the concrete bowl and its lining, all the necessary equipment for filtering and heating water is installed. The hydraulic design of the pool is similar, but the drainage is somewhat different. It is equipped with the help of a damper and a multi-turn shut-off valve: when releasing water, you will first need to move the damper and then open the valve; a siphon is not installed on the drain; the outlet pipe must be at least 60 mm in diameter. As for heating water, they usually use a boiler, sometimes to save money - special for swimming pools. Also think about the pool.
To paraphrase the classic, we can say that installing a swimming pool in a house, on a personal plot or in a country house is not a luxury, it is a necessity.
The construction of private swimming pools on an individual plot has become standard, like the construction of or.
The only difference is in the design and scale: a small pool in a bathhouse, a decorative pool in the yard as part of a landscape design composition, or a structure of large size and volume - indoor and outdoor swimming pools, which are located on the street, with all the accompanying fixtures and accessories.
Briefly about the main thing - how to get a swimming pool
You can get what you want in two ways:
- First, buy a ready-made pool.
But before purchasing, please consider the following:
It costs expensive;
It is impossible to buy a concrete pool ready-made. This means you will have to pay for the project, for materials and for labor. Also, return VAT to the state;
- Secondly, make the pool yourself.
This seems like a difficult task only at first glance. In fact, you already have everything you need: desire, opportunity and our instructions. This means that building a swimming pool should not cause any difficulties.
And physical fatigue will quickly pass when you splash around in the pool, which you made with your own hands.
Which pool is better to choose for a summer residence - types and types

Requires special knowledge for arrangement

It is cheap, convenient to carry and store, but is not very practical and has an extremely short service life.

Sold ready-made.

Purchasing such a structure (especially a large one) entails difficulties with delivery and installation, which cannot be done without special equipment (trailer, crane, excavator).
 Plus, it involves digging a pit, which is also quite problematic.
Lightweight and durable. The design principle is similar to the previous version. Causes difficulties during transportation and installation.

The best and most justified option of all of the above.
This pool is ideal for a summer house or country house, where you will use it seasonally.
 It can be made from concrete blocks, but it is better to pour a monolithic one. Despite the fact that this is the most complex and expensive design, its reliability and durability are beyond doubt.
 Disadvantages of a concrete pool and how to eliminate them
- problems with the water supply system. As a rule, they appear as a result of errors during their laying and installation of pipeline systems. If the work is carried out correctly, no difficulties arise;
- Possible water leakage. This significant problem can be eliminated with the help of several layers of good waterproofing, the use of high-quality concrete and compliance with all rules for their installation;
- peeling of ceramic tiles or mosaics. Eliminated by using high-quality special-purpose glue;
- spread of fungus.
 The appearance of fungus can be easily eliminated by regular cleaning and treating the surface of the bowl with special disinfection solutions.
Regular care and implementation of the above actions is the prevention of fungus formation.
Permission to build a swimming pool
In fact, an outdoor pool in a yard or plot can be built without approval from Rostechnadzor.According to Article 51 (clause 17) of the Town Planning Code of the Russian Federation, auxiliary use facilities do not require a documentary permit for construction. But there are some nuances here, it all depends on the parameters of the structure, if it is a small decorative or children’s pool, then no questions asked, but if it is a permanent building for swimming, i.e. sufficient depth, length and width, then it is better to draw up documents.
If the pool is not registered in the BTI, accordingly, it will not be on the certificate of ownership, and it will not be included in the technical passport. In the future it will be possible to legalize it, but it will cost more than registering it right away.
Building a concrete pool with your own hands - instructions

Installation work - construction of a concrete bowl for a swimming pool
Preparing the site
To do this, standard procedures are followed: clear the area of bushes and trees, and also cut off branches that may hang over the pool. Material from the site
Excavation work - digging a pit for a swimming pool
 Of course, digging a pit can be done without the use of special equipment. But only if you have a small and shallow pool, you have a lot of time, effort and help.
 As a rule, the cost of renting an excavator and digging services will be approximately the same, the difference is in time.
 Construction of a pit for a swimming pool
- increase the dimensions of the pit. They should be larger than the size of the future bowl. This is done in order to place technical equipment there and arrange a cushion under the concrete. And also for the construction of formwork.
- presence of an angle. When digging walls, make sure that there is an angle of their deviation relative to the vertical. This method will prevent soil from falling into an already dug pit.
- the presence of drainage systems. To ensure that the water that splashes out of the pool does not turn into puddles and does not destroy the landscape design, it is necessary to provide a place for its drainage.
- First of all, it is necessary to lay all hydraulic communications.
- provide for the possibility of draining water.
 To drain, the bottom of the pool is sloped at 5-7% (2-3 cm of slope per 1 meter of bottom), which should be directed towards the drain hole.

Arrangement of the pillow
(concrete footing)A gravel-sand cushion is needed to ensure better pouring of concrete. Usually it is a mixture of sand and crushed stone, which compacts well. Cushion height 300-350 mm.

Bottom waterproofing
The more options for possible leakage we take into account and prevent, the longer the service life of the concrete pool will be.
It will come in handy.
For an oval pool, reinforcement no thicker than 10 mm is used. This is due to the fact that reinforcement of this diameter is sold in coils. And, therefore, you can independently adjust its length. The spacing of the reinforcing tracks is 200x250 mm.
 For a rectangular pool, arbitrary installation of reinforcement with piping in increments of 200x200 cm is allowed.
You need to put something under the reinforcement, for example, a brick, so that it remains in the middle of the concrete base during the process of pouring the concrete solution.
 After installing the reinforced frame, fill the bottom of the pool with concrete solution. When pouring, try to avoid the presence of voids filled with air - this will reduce the quality of the surface.
 We are waiting until the concrete dries and you can safely move on it.

The principle of reinforcement is identical to the previous one.
The number of tiers is determined by the height of the bowl.
Installation of formwork for a swimming pool
The material used for formwork is a wooden board (painted or oiled) or, more conveniently, plywood (preferably moisture-resistant or laminated). The use of plywood allows you to create bent shapes with a minimum of effort, which is important when building a pool of complex or oval shape.


In order to avoid deformation of the formwork under the pressure of the weight of the concrete solution, it is recommended to install stiffeners and spacers at a distance of 500 mm. A beam with a cross section of 50x50 is suitable for spacers.
Installing plywood formwork is more expensive, but the surface quality of the concrete bowl is almost perfect.

Note:
the sheathing for the steps is mounted separately.
Pouring the walls of the pool bowl with concrete
 We wait until the concrete hardens. In this case, it is better to cover it with something to avoid destruction from exposure to temperature or moisture. And also periodically moisten with water.

If you do not plan to use a metal ladder, but want to make the procedure of immersion in water smooth, you need to provide concrete steps.
The formwork for the steps is installed when the entire concrete bowl for the pool is ready.
It is better to use plywood for the manufacture of formwork, because... it allows you to create bent shapes and does not require additional cleaning.
Construction of a concrete pool - video on pouring a concrete bowl
Finishing and lining of the pool bowl
The stage involves a set of activities:
Sanding pool walls
 Grouting is done manually or using a special grinder.
Waterproofing is applied using special liquid solutions, between the layers of which reinforcing fabric (mesh) is laid.


When performing this type of work, special attention should be paid to:
- seams between the bottom and walls of the structure;
- seams that appeared when pouring concrete;
- place of communications entry;
- chips, gouges and cracks.
Finishing
Before doing this, it is important to check the quality of the waterproofing. To do this, you need to fill the pool with water. Measure the water level. Then wait 10-12 days. And measure the water level again. Changes in this parameter are an alarming sign. This means that the waterproofing was done poorly and there is a leak somewhere.
The amount by which these two indicators differ can say a lot. For example, a slight discrepancy would indicate that the water could simply evaporate under the influence of heat.
The following materials are usually used for finishing:
 facing tiles;
 mosaic;
 PVC film (the cheapest option).

The choice of finishing material is influenced by factors such as:
Easy to care for;
- availability;
- ease of installation;
- price;
- possibility of replacement;
- appearance.

Today, more and more owners of personal plots are trying to equip a recreation area with maximum comfort, where the pool occupies a dominant place. A large selection of ready-made structures offered by manufacturers allows you to install any type of pool in a fairly short period. However, if reliability and durability are needed, then your choice should be to cast a concrete bowl yourself. Thanks to this technology, you can build a pool of any shape, and even supplement it with equipment and accessories in accordance with personal preferences. This article will discuss how to make a concrete pool.
Monolithic pool bowl - all the pros and cons
The technology of a concrete pool involves high costs. Here it will be necessary to develop a project, rent special equipment for digging a pit and mixing concrete mortar. You will also need space for a technical room where rigid PVC pipes and additional equipment will be placed.

However, all efforts will be more than rewarded, because this design has:
- durability. The service life will be at least half a century; no pool made from cutting-edge materials can boast such performance characteristics;
- aesthetics. For finishing, you can choose any cladding, including ceramic tiles or porcelain mosaic. The materials are distinguished by an unlimited choice of colors. And they will last ten times longer than, for example, a film coating;
- originality. The shape of the bowl can be absolutely any, even a non-standard configuration. The size of the pool depends on the aesthetic preferences of the owner and the free space on the site;
- functionality. The pool can be made into a skimmer or overflow. This means that the design will allow for the placement of all the required equipment (filtration system, automatic top-up, heating, circulation pump, etc.);
- comfort. The physical and technical properties of concrete can muffle noise and reduce vibration of operating devices. This is an important factor when operating a pool.
All the positive aspects of a concrete pool will take place only with the right approach:
- to project development;
- to the choice of finishing materials;
- to carry out all technological processes.
Cost of building concrete pools
The approximate cost of a pool can only be found out during the design process. The final price will become known only upon completion of all work, because during the construction process any ideas may arise that affect the cost of the project.
In any case, the following factors influence the price level.
Bowl size and shape
- As a rule, a 2-cube bowl is sufficient for relaxing treatments. The most popular pools hold about 8 cubic meters of water. For swimming, you will need a bowl that can hold 30 cubic meters.
- The recommended depth of the pool for children is 1 meter, for adults - 1.6 m. If you plan to install a diving tower, then the depth of the thicket should be at least 2.5 m.

- Rectangular concrete bowl with a volume of 30 cubic meters. will cost approximately 450,000 rubles. The more complex the configuration, the more expensive the construction will be.
Facing material
Various materials are used to finish the surface of the bowl. Their price is per 1 sq. m will determine the total cost of the cladding. For example, let's take three options located in different price segments.
- Budget. Russian ceramic tiles can be purchased for 400-600 rubles/sq.m; they fully correspond to the expression “cheap and cheerful”. This also includes Chinese glass mosaic, its price is 500-700 rubles.
- Middle segment. This category includes polypropylene film (with or without a pattern). Its cost ranges from 1,000 to 1,500 rubles. (Russia). Material with patterns from foreign companies is twice as expensive.
- Premium class. This segment involves cladding made from ceramic products from Italian manufacturers. The cheapest ceramic tile costs 1,500 rubles. per sq.m., but the maximum cost is 70,000 rubles (handmade).

Pool type
The amount of funds required to purchase the appropriate equipment will depend on what type of pool was preferred (skimmer or overflow). It is impossible to list all the components of the system, so here are only the main elements necessary for cleaning and heating water.
- A domestically produced filtration system will cost 7-10 thousand rubles. Imported equipment will cost from 25,000 rubles and above.
- The price of the simplest electric heater ranges from 20,000-40,000 rubles.
- The cost of a chlorine generator, which will make water crystal clear and safe, is approximately 7,000 rubles.
- Hydromassage equipment will increase costs by 200,000 rubles.
Additional accessories
- Various accessories will help fill the relaxation area with real comfort: a vacuum cleaner, chemicals, protective film, stairs, handrails and much more. An artificial waterfall for a recreation area (from 40,000 to 500,000 rubles) will help emphasize the respectability of the owner.
- You can hide from the hot sun and at the same time protect the water surface from leaves using a canopy (awning) or covered pavilion. The material and complexity of the supporting structure will determine the total cost. According to the most conservative estimates, the canopy will cost 20,000 rubles.

- For internal illumination of the pool bowl, you can purchase LED spotlights with moisture-proof properties. The price of a cheap lighting device is 2,200 rubles.
Concrete pool design
The versatility of this technology is amazing. A concrete bowl can be cast not only for the construction of a full-fledged swimming pool, but also for garden ponds and for children’s “paddling pools”. The choice of shape and size is limited only to:
- free area;
- terrain;
- landscape design;
- the owner's imagination.
In most cases, pools are built in the form of a regular rectangle, popular sizes: 5x10, 6x3 and 8x4 m. A non-standard configuration will require more complex formwork, but this will be justified if the bowl needs to be placed in a limited area.
DIY concrete pool construction
Choosing a location for a swimming pool
- The area intended for construction must exceed the actual dimensions of the bowl. This is due to the fact that for the functionality of the pool it is necessary to lay underground communications, as well as provide space for installing a technical room.
- You should not place it near buildings. The absence of shade will allow the sun's heat to be used to warm the water. It is not recommended to choose a place near trees - foliage and dry twigs will quickly clog the water surface.
- When developing a project, it is important to take into account the location of the foundations, including buildings in neighboring areas. Take into account the depth of underground communications.
The water exchange system can be of 2 types.
- Skimmer. This system is relevant for pools with right angles. Contaminated water, under the action of a circulation pump, passes through the skimmer and bottom drain and enters the filtering equipment. After rough cleaning, heating and disinfection, the water returns through special holes to the pool bowl. The waterline is located in the middle of the skimmer window. The bottom of the pool is cleaned of debris with a vacuum cleaner.

- Overflow. The water in such a pool reaches its edge. Excess is removed through overflow gutters. Water enters a container equipped with an automatic top-up device. From the storage tank, water moves into the cleaning and heating system, and then again enters the bowl.
An overflow pool will cost more than a skimmer pool, but this system provides a higher degree of water purification.
Marking the area for the pit
- The boundaries of the future pool bowl are marked with a strong rope. In this case, the length, width and depth increase by 1 m. For routine inspection or repair of the pool, it is recommended to make hollow sections in the places where pipes and important components pass.
- The thickness of the bowl walls for an average volume of water is 40 cm; for a children’s “paddling pool” and small reservoirs, walls about 30 cm thick are allowed.
- The depth of the pit for the technical room must exceed the lower level of the pool. For convenient operation, the height of the room is made about 170 cm.
- When excavating soil, a slope of 5-7º is maintained on the walls of the pit. This technique will prevent them from falling off during ongoing work. It is also necessary to slope the bottom of the bowl towards the drainage system; this parameter should be within 3-4 cm per meter.
- Crushed stone will serve as additional drainage. To do this, a small hole is dug at the bottom of the pit, which is filled with coarse gravel. The workpiece is compacted tightly.

- Next, a sand cushion with a thickness of at least 30 cm is installed. For reliability, reinforced concrete piles can be laid on top of the sand; they can prevent uneven subsidence of the sand under the influence of the weight of the finished bowl. The next 10 cm layer is crushed stone 20x40. When filling and compacting materials, it is important not to “lose” the slope of the bottom.
Waterproofing concrete in a swimming pool
- Waterproofing the bottom of the pit is done using conventional bitumen-based roofing felt. The sheets of material should extend onto the walls by at least 25-30 cm. Ruberoid is laid with an overlap of 10 cm.
- If possible, you can use more modern materials with waterproofing properties. For example: rubberized coating, film or membrane.
- The bottom of the pit is reinforced with thin concrete. For final alignment, beacons are used, which are installed at the desired slope. The concrete solution is distributed evenly as a rule. After the mixture has set, the guides are dismantled.
Formwork
- To construct a structure for pouring walls with concrete, waterproof plywood with a thickness of 20-40 mm is used. If the shape of the bowl is complex, then edged lumber with a thickness of at least 40 mm is used. All boards are subject to processing, they are covered with paint, drying oil or varnish.

- The bowl is reinforced with steel reinforcement with a diameter of 8 to 14 mm. For rectangular pools, the rods are fastened with knitting wire in the form of a mesh with cells of 20x20 cm. For other cases, the metal rods are welded according to the shape of the bowl.
- The armored belt should cover not only the bottom of the formwork, but also extend to the entire height of the double-sided walls. To ensure that the rods remain in the thickness of the concrete, clamps and metal stands are used. For the bottom of the pool, you can take pieces of broken brick.
- All formwork elements are tightly connected to each other with screws, nails, and metal corners. Internal struts must be installed, as well as external supports, and the more often the better. This stage should be given due attention, because the concrete mixture has quite an impressive mass.
Pouring a concrete pool bowl
- The grade of concrete for the pool is selected to be at least M250. If mixing will be done manually, it is recommended to use cement grade no lower than 500. The proportion of sand and Portland cement is 2:1.
- So for 1 cu. mortar needed: 260 kg of cement; 440 kg of sand; 800 kg of crushed stone or gravel; 150 liters of water.
- Before starting work, you should provide for the depth of the bowl (when dividing into an adult and a children's compartment), technological openings for the passage of pipes, equipment, lighting, etc.

- To achieve a monolithic structure, pouring is performed without interruption. As the formwork is filled, the mixture is “punched” with a shovel or metal pin. It is mandatory to compact the mass using a vibrator.
- Such equipment will allow you to get rid of the formed air gaps, thereby increasing the strength of the walls. When the level drops, the solution is added and re-exposed to a vibrator.
Internal waterproofing
- After the concrete has hardened, the formwork elements are dismantled. Next, all equipment components are connected, the functionality of each element and the system as a whole is checked.
- The inside of the bowl should be treated with special solutions. As a rule, before this, the cement surface is cleaned of dust and other contaminants.
- The waterproofing is applied with a brush with synthetic bristles onto slightly damp concrete. The second layer is applied after the previous one has dried. The treated surface should not be exposed to sub-zero temperatures and mechanical stress for 3-4 days.
- At the same time, the coating must be periodically moistened by spraying water. Peeling and cracking indicate a violation of the application technology.
- More detailed instructions are indicated by manufacturers on each package of waterproofing material.

Pool lining made of concrete
- Among the finishing materials, ceramic tiles and mosaics are especially popular. A wide range of colors of these materials makes it possible to realize your wildest fantasies. The only requirement for such types of coating is the presence of an anti-slip layer.
- Before applying moisture-resistant tile adhesive, a reinforcing mesh is attached to the surface. The lining starts from the bottom of the bowl. In order to have entire tiles in the visible area, it is necessary to calculate how many elements will fit in a vertical row. In this case, the bottom tiles are simply cut to the required dimensions. In your calculations, do not forget to take into account the seams between the tiles.
- The joints are sealed with grout, which must withstand moisture and temperature changes. The color of the grout material is matched to the tile or you can play with contrasts.
Lighting
It is better to invite professional electricians to connect lighting fixtures. After all, lighting should be safe first and only then effective.

- The selection of spotlights is simply huge. It is worth noting that special devices have an IP54 index. Typically, cases are made of stainless steel or plastic; for more expensive models, bronze is used.
- The lighting elements are halogen lamps and LEDs. The cost of the latter option is undoubtedly higher, but LED lighting is more economical in terms of power consumption and is more durable.
Pool safety covers
- Covered canopies will not only protect the water surface from leaves and small debris, but will also help to significantly reduce energy costs. The principle of arranging a greenhouse is applied here. This approach will extend the life of the pool.
- Metal-plastic or polycarbonate are perfect for these purposes. Of course, these canopies cannot be classified as budget options.
- In winter, the pool is covered with an awning; ready-made solutions are presented in a huge range. A similar design can be made on your own. A metal frame is installed around the perimeter of the bowl, and a polypropylene film is stretched over it.
Pool made of concrete video
The popularity of swimming pools in local areas is just beginning to gain momentum. Today there are many specialized companies ready to complete a project of any complexity. However, the cost of installation is beyond the reach of many site owners.
Anyone can build a “primitive” pool on their own; significant difficulties may arise if a complex hydraulic structure is planned. There are big costs ahead: labor, materials, time, but nevertheless, the return in the form of a wonderful vacation spot for many decades is guaranteed in the future.
Practicality and long service life have long made concrete pools a desirable building in residential areas. The advantages of a concrete bowl cannot be counted - first of all, it makes it possible to bring unusual ideas to life using irregular shapes. During the creation process, you decide for yourself what the pool will look like, and with basic knowledge in construction, it is quite possible to implement unique projects. A do-it-yourself concrete pool will become a decoration for your dacha and a place for family recreation on hot summer days.
“Concrete” pool - general characteristics
The construction for the dacha is distinguished by its durability, which is approaching the 100 year mark. Naturally, everything depends on the specifics of the project, proper care and the quality of the selected materials. A concrete structure can consist of separate parts or be monolithic. In both cases, it is necessary to use a multi-layer structure technique for external and internal waterproofing. A concrete pool is a classic type of reinforced concrete structure, but at the same time it is possible to change the shape, add bends, and install technological applications to increase the level of comfort.
Types of pools
The flexibility of project implementation and ample opportunities for constructing a concrete pool lead to the need to classify structures. Speaking about the differences regarding individual characteristics, the following types of concrete pools are distinguished:
- depending on the location - external, internal, standing near the sun canopy;
- depending on size – decorative, for dipping, for splashing, swimming;
- from the shape - rectangular, round, oval, figured;
- on the method of constructing the bowl - monolithic, cast, prefabricated;
- depending on the design features - overflow, skimmer.
Before you begin construction, you need to understand the structural features of a concrete pool. The standard design consists of the following parts:
- bowl;
- waterproofing layer;
- water supply and outlet system;
- filters;
- external finishing;
- decorative elements.
 The bowl is the concrete base of the pool. The thickness directly depends on the dimensions of the future structure, but should not be less than 10 cm. There is a general formula for calculation - (3.1415926*R2*Depth)*2/10 = cm. The thickness of the walls of the bowl must withstand water pressure on one side and the pressure of dense soil on the other.
Waterproofing protects concrete in swimming pools from constant contact with water. In principle, concrete is not susceptible to high humidity, but with prolonged exposure the material loses its dense structure, falls apart and is subject to erosion.
Monolithic concrete pools are filled in two ways - using a hose or installing a water supply system. The first method is a budget option, but it takes too long and there is no way to control water quality. Speaking about special systems, it is worth taking into account the presence of filters that improve the properties of the water used. The process of filling the pool occurs with less time. A necessary part is a drainage system - this allows you to easily remove water when you need to clean the pool or repair it.
The installation of filters must be planned in advance and installed at the initial stage of production. Good cleaning systems take up a lot of space; when designing and marking out the space for a pool, you should pay special attention to this issue.
Exterior finishing - laying tiles, grouting joints - is an important stage of construction. You can make another coating, but in practice it has been proven that tiles are the most suitable option. Any type of tile can be used for wall cladding; non-slip tiles are preferably chosen for flooring.
The decorating stage is the final stage of pool construction, which includes the manufacture of stairs, handrails and other details to aesthetically improve the appearance of the pool.
Having decided on the type of structure, it is necessary to draw up detailed drawings, each point of the process is carefully planned. It is better to make several sketches and choose the best option that will match the landscape and size of the dacha.
Composite pool or concrete?
 Composite pools are based on a special coke-polyester bowl.
 Nowadays, composite materials are widely used - modern substitutes for concrete, its artificial analogues. The peculiarity of such materials is that they combine the advantages of several materials, neutralizing the disadvantages.
The first composite material to be used is reinforced concrete. The reinforcement makes the structure more durable, and the concrete protects the metal components from corrosion. Reinforcement techniques are used to produce durable polymers. Such composite materials are stronger than reinforced concrete, but they do not retain their original dimensions - they sag under external influences. Another disadvantage of composite materials is the difficulty in eliminating scratches, the appearance of which is guaranteed during operation. For repairs, it is necessary to dismantle the entire bowl. In addition, composite materials are short-lived, they lose their initial properties under the influence of ultraviolet radiation and chemicals - fungal microorganisms develop in the cracks formed. The main disadvantage is the lack of color variety and the ability to independently choose the shape of the structure. Based on the disadvantages of composite materials, we can conclude that concrete structures have an undeniable advantage over them.
Main building material
Naturally, this is concrete. The classic version is the M350-M400 brand. Brand F100, in addition to standard properties, has frost-resistant characteristics, and W6 is waterproof. Independent modeling of a concrete bowl occurs using heavy concrete with plasticizers and hydrophobic components.
Concrete for a swimming pool can be ordered ready-made from industrial enterprises - supplying cement mixtures is a fairly common practice. You can also make the solution yourself using the following recipe. For one cubic meter of volume you need to mix:
- 600 kg of cement grade M600;
- 1600 kg of medium-grained sand;
- 60 kg microsilica;
- 800 kg of fiber fiber;
- 1 kg plasticizer;
- the amount of water in relation to cement is 0.3.
The solution is mixed in a concrete mixer, the components are added, starting with water.
The right technology is the key to quality
 Preparing the base for the bowl.
 If you decide to make a concrete pool with your own hands, you should unconditionally follow the recommendations for work at each stage of construction. The following steps are mandatory:
- project development, execution of drawings;
- preparation of the base;
- installation of technical systems;
- formwork installation;
- strengthening the finished pit;
- concreting in several stages;
- waterproofing;
- finishing and decoration of the adjacent space.
Two well-known technologies are used for concreting:
- creating a monolithic structure using formwork;
- pouring concrete mortar into polystyrene foam structure.
Technology and construction stages
As mentioned earlier, construction is divided into several separate stages. It is important to maintain consistency and approach the process with all seriousness - a defect in the future can lead to problems with operation or premature destruction.
Construction of the bowl
 Scheme of the formwork of the pool bowl.
 The construction of the bowl, in turn, consists of the following stages:
- pit preparation;
- erection of formwork;
- fill;
- installation of bedding.
The dimensions of the pit should be slightly larger than the expected parameters of the pool - about 20 cm. This margin implies the width of the backfill and the thickness of the pool fill. Mostly the pit is created using an excavator, but if the project is designed for small dimensions, you can use a regular shovel.
We fill the walls of the bowl using formwork. After finishing work with the walls, you can start pouring the floor - the concrete mixture is poured onto the bedding or directly onto the ground. In fact, the production of the floor occurs after the construction of the formwork. The construction of formwork occurs in the following sequence:
- construction of shields;
- construction of sheathing;
- attaching shields to the frame;
- tying support stakes;
- installation of supports.
Now you can start pouring the walls; the formwork will be dismantled in a week. All work must be carried out at a temperature of 10 degrees or more, otherwise the concrete will not harden well. As soon as the walls harden, it’s time to pour the floor. After 10 days, the pool floor is ready for installation of the bedding. For backfilling, use sand cleared of shells and pebbles.


