By making an inspection hole in your garage, you will greatly expand your capabilities regarding independent repair and maintenance of your car. Moreover, contrary to popular belief, repairing a car parked in a pit is often much more convenient than using a lift.
In addition, to build an inspection hole in the garage with your own hands, you do not need to purchase expensive equipment. Although when stirring cement mortar, for example, it is much more convenient to use a mixer, but, firstly, it is not so expensive, and, secondly, all the work can be done manually.
But let's talk about everything in order, and, first of all, it is necessary to determine optimal sizes inspection hole in the garage.
And one more thing - we will proceed from the fact that the garage has already been built, that is, the use of earth-moving equipment, which would greatly simplify the task of constructing an inspection pit, is excluded.

Each car owner determines all dimensions of the inspection hole independently
Let's start with the fact that everything that will be said below applies to an ordinary car enthusiast who owns a passenger car and an ordinary garage. Owners of freight and passenger vehicles, as a rule, already have their own service stations or use paid services specialized car services equipped with everything necessary. Therefore, all recommendations will relate to the size of the inspection hole for a passenger car.
You will have to do everything yourself, including calculating the size of the hole, taking into account the size of the garage and car, therefore, without indicating the exact dimensions, we will limit ourselves to recommendations, taking into account which you will independently make the necessary calculations.
First of all, decide on the location of the hole. A car placed on it for repairs should not interfere with the closing of the gate or rest against the workbench. The entrance to the pit itself must be accessible, and, at a minimum, driver's door should open freely.
Perhaps, to comply with these conditions, you will have to remodel the garage - move the workbench, remove unnecessary items, etc.
Width of inspection hole
First of all, you will need to measure the distances between internal surfaces wheels But calculate the distance from the edges of the wheels to the edges of the hole in such a way that it is convenient to lift the car with a jack. It's no secret that the bottoms and sills of modern cars quickly lose their rigidity, which makes it difficult to lift them with a jack.
Therefore, if possible, when calculating the indentation, provide possible options jacking up the car in such a way that the jack can be used either by placing it on the edge of a hole, or on a strong board placed across it.
In addition, consider the possibility that when changing cars, it will have a smaller track width.
Usually the width of the pit is 80 cm, but, again, you can slightly adjust this value.
Depth of inspection hole
The depth is usually made “at the height” of a person. This allows you to carry out repair work without holding your back for a long time in a “crooked” position, which is very tiring. If necessary, during repairs of components located higher up, you can use a pre-prepared stable stand.
How to dig a viewing hole in the garage

Often you have to dig a viewing hole manually
The dimensions of the pit for the inspection pit are determined by the material from which you decide to make its floor and walls.
In addition, it is necessary to ensure that the outer walls of the pit are filled with sand, clay or granulated slag, and before pouring the floor (or laying it out of brick), it is imperative to prepare the bottom of the pit, first filling it with coarse gravel or slag, and then with several layers of compacted sand. If you plan to equip the inspection pit with ventilation, when digging the pit, take care to provide a place for installation ventilation pipes.
The beginning of digging can be complicated by the need to remove the garage floor covering (to fit the size of the pit).
The most difficult thing in this case seems to be removing the concrete floor - you will also need jackhammer(or professional hammer drill), and a “grinder” - for cutting reinforcement.
The speed of the digging itself primarily depends on the properties of the soil.
But before we move on to the description in various ways construction of pits, consider the greatest difficulty that could become a hindrance - this high level groundwater.
Inspection hole in a garage with groundwater

Groundwater in the inspection hole
A high groundwater level is a serious obstacle to the construction of an inspection pit.
We bring to your attention ways to cope with the problem, developed by the people:
- the pit is made as an iron box welded from sheet metal 5 mm thick and “anchored” by channels welded perpendicularly;
- the same option, but with it brought out drainage pipe, welded from below. In this case, the floor can be made double by making a flooring of boards above the level of the pipe;
- make a viewing hole from concrete with a waterproof grade of W6, providing additional waterproofing of the viewing hole with the highest quality materials;
- do with outside the so-called “pit”, having equipped it drain pump;
- - equip the pit with a drainage pump that turns on automatically - from a float switch.
Inspection pit made of concrete and other materials

Filling the inspection hole with concrete
Pouring should also be carried out in such a way that the concrete layer completely covers the reinforcement.
Construction begins with pouring the floor. It must first be covered with crushed stone, then moistened with sand. The total thickness of the bedding should be about 20 cm, and the sand must be thoroughly compacted.
It is best to waterproof the inspection pit immediately, before pouring the floor, so that it protects the entire “concrete box”. To do this, it is laid throughout the entire volume of the pit and fixed at the top - for which the material (polyethylene, roofing felt or a more “progressive” coating) is purchased and laid with a reserve - in order to be able to press it from above along the perimeter of the pit.
Next, you should reinforce the floor of the inspection pit, either using a ready-made reinforcing mesh, or by tying it yourself. The reinforcement must be placed on supports 5-8 cm thick - otherwise, after pouring, it will end up lying on the bedding and will not play its strengthening role. Pouring should also be carried out in such a way that the concrete layer completely covers the reinforcement.
Concrete is easily leveled with a tool representing a board attached at an angle to a handle.
Before starting subsequent work, the concrete floor must “stand”, that is, dry completely. Provided that the work is carried out in summer time, this will take about 5-7 days. IN hot weather It is best to cover it with thick synthetic fabric and water it periodically for the first two days - this way you can avoid the formation of microcracks and achieve maximum strength of the screed.
Walls

Brickwork of inspection pit walls
Your further actions depend on what material you will use to build the walls of the inspection pit.
The most common options:
- inspection pit made of cinder blocks;
- inspection pit made of brick.
If you decide to make the pit walls from concrete, then you need to take care of the material for the formwork (and, of course, for the reinforcement). In addition, you can reinforce the inspection pit to its entire size at once - this way you will achieve greater strength. But there are several nuances to consider:
- The formwork material (OSB, plywood) must have sufficient strength. As a guide, when constructing monolithic structures made of reinforced concrete, builders use plywood 18-20 mm thick. However, to fill a viewing hole with thinner walls, you can use 10 mm plywood, placing spacers between the inner walls at least half a meter apart;
- It is advisable to fill the walls “stepwise” - starting from the bottom, in 3-4 steps. So, without a construction vibrator, you will achieve maximum filling of the space between the formwork sheets with mortar;
- Always make sure that the waterproofing fits tightly to the formwork sheets (from the concrete side) - this way you will provide better protection and eliminate possible leaks of the solution - why waste building materials in vain;
- When pouring the next “stage”, moisten the previous one with water - for better adhesion and to avoid cracks and leaks;
- Along the length of the pit, the formwork panels for the inspection pit can be tightened with threaded rods.
When building pit walls from cinder blocks or bricks, the main thing is to control their size and horizontality using a building level. In terms of waterproofing and other quality requirements, their construction is not so difficult. We can only recommend reinforcing the wall through 2-3 layers, laying reinforcement between the layers.
Equipment
Ventilation
To construct ventilation, it is enough to use plumbing PVC pipes. To ensure that they “fit” into the inspection hole, it is enough to leave the required size holes when pouring walls with concrete or laying bricks. For example, when pouring concrete, insert pieces of wood corresponding to the diameter. It is recommended to set the height of the supply pipe at a distance of 15 cm from the floor, and the hood at a distance of 25 cm from the top edge.
Many car owners (and owners of small car repair shops) do not do ventilation at all. In order to keep the floor in the pit clean, they simply fill it up sawdust, which also greatly contributes to its cleanliness and dryness.
Lighting
For lighting, it is strictly forbidden to use a 220 Volt network, and this is fair - during the process of repairing a car, you can inadvertently “drive” into the lighting fixture with a metal tool, which can end disastrously for the repairman. But it is also unreasonable to complicate life by planning to install stationary lighting fixtures when building a pit.
It is enough to bring out several sockets from a 12-36 volt transformer under the floor (when building a pit) and make them different places(in accordance with my experience) power sources are safe for life. You can also make metal embedded plates for magnetic lamps.
Ladder to the inspection pit
As practice shows, it is better to make a staircase from wood - when repairing a car, people often fall on it technical fluids, and with the help of sawdust and rags wooden staircase becomes “safe”, that is, non-slip.
How to close
As practice shows, cutting boards of 25-30 mm are best suited for this purpose. But the most creative people connect these boards with a cable, which allows the entire flooring to be rolled up like a rug.
However, if the pit is constantly “in operation”, why close it?
It would seem that building a viewing hole + in the garage is as easy as shelling pears. However, this event is associated with a lot of various subtleties, ignorance of which often leads to disastrous consequences, for example, corrosion of the bottom of the car. To avoid unpleasant surprises, you should approach both the planning stage, preparatory work, and actual construction very carefully.
Planning the inspection pit
Strange as it may seem, before building an inspection hole, it is necessary to think through a number of details that have a significant impact on the comfortable conditions for inspecting or repairing a car.
pit dimensions
An inspection hole, the size of which does not allow you to straighten up to your full height or move freely even when inspecting a car, has no value, since renovation work can last quite a long time, and the lack of minimum necessary comfort will lead to frequent breaks for rest, or contacting a car service. Based on this, the dimensions of the pit must correspond to the following parameters:
- The depth of the inspection hole consists of the height of the car owner + 15-20 cm;
- Width depends on the make of the car, so to determine it you need to measure the distance between the front or rear wheels. In this case, the width of the hole should be slightly less than the obtained value in order to safely drive into the hole without fear of falling into it. In addition, you should not ignore the fact of a possible change of car to another model. Based on these considerations, the optimal width of the inspection hole is 70-75 cm;
- Length - calculated from the length of the car + 1 m for free descent into the pit and ascent from it. At the same time, it is not worth making the length of the pit less than 2 m.
When constructing a pit, the obtained data must be increased by the amount of allowances, including the width of the waterproofing and thermal insulation layer, as well as the thickness of the concrete layer or brickwork. On average, the allowance varies between 20-30 cm.
waterproofing
The variety of waterproofing materials differs in both installation method, service life, and cost. In addition, the thickness various types waterproofing is not the same, so choose waterproofing material necessary at the planning stage in order to leave the necessary allowance when determining the dimensions of the pit.
The following materials can be used as waterproofing for the inspection pit:
- Bituminous, represented by roofing felt, euroroofing felt, rubemast, etc. In this case, the material is laid on bitumen mastic in 2 layers. In this case, the joints are overlapped by 20-25 cm and glued with hot bitumen. The service life of this category of waterproofing is 10-15 years;
- Polymer single-layer or multilayer membranes have a longer service life, exceeding 50 years. Laying membranes requires a reinforced frame with 10x10cm cells, covered with geotextile. In this case, the membranes are overlapped by 10 cm, if any self-adhesive base, or by 30 cm in its absence. The resulting joints must be glued using special equipment. Relatively recently, polymer geomembranes appeared on the market, already including a geotextile layer;
- Penetrating compositions are represented by dry mixtures diluted with water before direct use. They are applied on top of the concrete layer, penetrating deep into its structure and blocking the seepage of water to the surface. However this method often used as an additional waterproofing layer;
- A mixture of fatty clay in combination with oil refining waste as an independent waterproofing agent is used quite rarely against the background modern materials, significantly superior to the clay mixture both in terms of service life and degree of tightness. However, in combination with other types of waterproofing it often occurs.
thermal insulation
For insulation of the inspection pit, polystyrene is an ideal heat insulator, since it has excellent thermal insulation characteristics and minimal water absorption. At the same time, humid conditions do not in any way affect the reduction in the level of thermal insulation properties.

niches in the wall of the pit
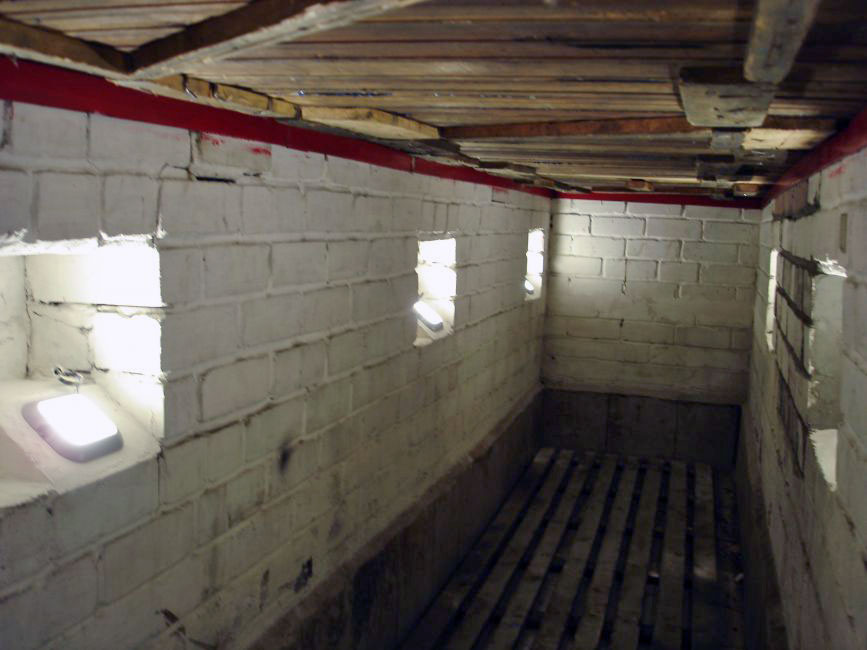
Inspection, and especially car repair, involves the use of various types of tools. In order not to have to go up to the garage every time to get the necessary equipment or to avoid tripping over the tools scattered at the bottom of the pit, along the entire perimeter of the pit or in some places, you can arrange niches of various sizes where the necessary devices and parts for repairs will be located. Thus, the presence of niches contributes to the speed and convenience of repair work.
lighting
If a portable lamp is used for lighting, then planning in this case is eliminated. However, lighting the inspection pit with stationary lighting devices requires wiring into the pit and the presence of a recess in the wall for installing an outlet, so here it is worth deciding on the location of the light device and its power source.
ventilation
Even a heated garage will not save the inspection pit from condensation. In addition to creating a certain microclimate in the pit, ventilation promotes the influx of fresh air and outflow essential oils and other chemicals used in car repairs. The easiest way to build ventilation for an inspection pit is to install a small-diameter flexible air duct from it to a height of 25-30 cm from the garage floor. In this case, the removed end of the ventilation must be covered with a mesh and a lid to prevent various debris from getting into it.

Based on the above, preliminary accounting even the smallest details will significantly save time and financial resources.
Technology for constructing an inspection pit
After the details of the future structure have been thought out and purchased necessary materials, you can proceed to the implementation of the plan, observing the following order of work.
pit preparation
- We mark on the surface of the floor or ground the area intended for the inspection hole.
- We remove the soil to the required depth and level the bottom of the hole.
- We take out soil for niches in the wall or along the perimeter of the walls.
- We compact the bottom of the pit.
floor arrangement
- On earth soil lay a 10 cm layer of crushed stone and compact it.
- Pour a 5 cm layer of sand on top of the crushed stone and compact it as well.
- Apply fatty clay 20-30 cm thick.
- We lay reinforced mesh.
- Mix a concrete mortar of sand and cement, maintaining a 3:1 ratio, and fill the floor with a thickness of 6-7 cm.
- After the concrete has hardened, apply a layer bitumen mastic and lay the roofing material, not forgetting to glue the joints with hot bitumen.
- Lay a layer of polystyrene foam.
- Fill in concrete mortar 10-15 cm thick and let dry completely.
arrangement of walls
- We coat the walls with greasy clay and cover them with polyethylene.
- We put roofing felt on top of the film and glue its joints with hot bitumen.
- We attach foam plastic to the walls using adhesive.
- We erect formwork from boards or plywood at a distance of 6-7 cm from the wall.
- We reinforce the walls around the perimeter.
- We fill the walls with concrete mortar gradually, pouring the mixture daily to a height of 15-20 cm.
- After the concrete has completely hardened, the formwork is removed.
arrangement of niches
We reinforce the top, bottom and walls of the niches with wire and coat them with clay, after which the niches have dried, they can be lined with brick or ceramic tiles.
safety
We make the inspection hole protected from accidental collision by a car by installing a T-shaped iron rail at the level of the main floor of the garage. In addition, this rail will serve as a frame when covering the pit during idle periods with separate boards, or you can immediately put together a lid from the boards.
So, the inspection hole + with your own hands is ready. All that remains is to arrange ventilation, install light and lower the ladder into the pit. In addition, a month after the last pouring of concrete, it will be possible to line the inspection hole with ceramic tiles, bricks, or other finishing materials.
The article will tell you how to properly install a viewing hole in the garage. You will learn about the features of this structure, popular errors and methods for eliminating them. In addition, we will describe step by step guide with photographs for the construction of a reinforced inspection pit.
With sufficient skill of its owner, a garage gradually turns into a service station, where the car is repaired and maintained by the caring hands of the owner, and here one cannot do without arranging an inspection hole. Its design is a rectangular longitudinal recess along the garage with a width of 600-800 mm and a depth of average human height. The length of the pit is determined by local conditions, but usually they try to make it as long as possible.
Elements of the inspection pit
Despite its apparent simplicity, the garage pit has characteristic features that need to be understood in advance:
- Waterproofing (GI). An unconditional and obligatory hidden element, neglect of which risks making the pit impossible to use. Main problem any pits and cellars - dampness: a car standing over a damp pit will itself become damp and rot.
Note. The groundwater level (GWL) can become an obstacle to the construction of a pit, since a floodable reservoir is an unacceptable structure for a garage.
- Power circuit along the upper perimeter. Usually it is made from a corner to which reinforcement, mesh or simply “tails” are welded, which are launched into the reinforcement with screeds. This steel frame is needed in order to contain the pressure from the car in dynamics and statics. Without it, the wheels will simply push through the screed (which is rarely thicker than 50 mm) and it will collapse and fall into the hole. The steel contour also serves as a stop for the jack and a place for laying the ceiling board.
- Niches. They provide 200% ease of use. The more there are, the more convenient it is to work. Sufficient size - height 300-400 mm, depth 150-250 mm, length 400-500 mm. Usually, a maximum of 4 niches are made for a pit under a passenger car - approximately under each wheel.
- Additional stops. In the area of the wheels, when installing the power circuit, you can lay additional I-beams or channels (90-120 mm high) for the convenience of moving the jack in height. Practice has shown that such manipulations in the hub area are a frequent need.
- Lighting. Pros know that the light in such pits must be powered by 36 volts. This eliminates the possibility of ignition of fuel vapors and fuel and lubricants. When powered by 220 volts, a short circuit or a broken lamp can cause an accident, since it is quite difficult to quickly get out of a hole blocked by a car.
An insignificant feature is the staircase, the steps of which can be made monolithic, integral with the walls. This kind of march is most often done in large garages with holes more than 5 m in length. In private households, to save space, ordinary ladders are used.
Features of the inspection pit design
When designing an inspection pit for your own needs, focus on ease of use for yourself. First of all, this is the height of the working space or the depth of the pit. Here they are divided into two types:
- "Standing." Designed to work standing, at full height.
- "Sedentary." Operations are performed while sitting on a transverse seat. It can be installed on rollers, and guides can be placed along the walls and easily moved around the pit. This method saves 500-600 mm of depth and wall material.
In both cases, the edge of the pit should be approximately at the level of the master's shoulder. This principle does not affect the design, only the depth.
Popular mistakes when constructing an inspection hole yourself
We will consider the shortcomings at the very simple version with brick walls:
- Concreting the floor in front of the walls. The bulk of the mixture for the screed or lying floor slab should be laid after the first rows have been erected. In other words, the slab should be inside the walls, and not the walls standing on the slab. The slab inside will hold the load from the ground and additionally protect the “box” from deformation. For walls, it is enough to make a mini-foundation of 60-80 mm.
- Pit without screed. When making this mistake, the pit is made of stone or concrete, and the screed is not made to save money or is put off “for later,” that is, forever. The best solution- make a tie to tie the power circuit of the pit, even if it is not particularly necessary.
- Neglecting the strength of the soil. Often this mistake becomes fatal - movements at a depth below the bottom of the garage foundation are not felt on the surface. By removing soil from a hole, a person violates its natural structure, and the soil tends to fill the cavity (this is his natural property). So use everything available funds reinforcement - masonry mesh, reinforced belt, embedded parts, anchors.
- Neglect of reinforcement. Underground structures should be reinforced twice as thick as above-ground ones. The stable soil argument is complacency because soil behavior is unpredictable and can change due to climatic conditions. In other words, the soil may begin to put pressure on the walls - in this case, the situation will be saved by reinforcement every 2-3 rows with obligatory tying of the corners.
Guide to installing a pit in a garage
In this part of the article we will talk about how to build a pit with your own hands, or rather, about the sequence of work. It is proposed to make the “box” using half-brick masonry with a reinforced concrete reinforced belt. This will be the maximum gain option.
1. Remove soil. Pit dimensions: length - based on the capabilities of the garage; width - inner size(700 mm) plus one 200 mm brick. Total 1100 mm. Place waterproofing in the mini-trench under the foundation walls and concrete it. From the extreme edge of the foundation, release the reinforcement for the connection with the reinforced belt.
2. Line the pit with waterproofing. Several layers of polyethylene, or a special film. Ideal option— PVC membrane. It is easily soldered with a hairdryer and creates voluminous corners.

3. Tie vertical and horizontal rods Ø 10-14 mm to the reinforcement outlets so that you get a mesh with a cell of approximately 150x150. This should be a rigid single-layer spatial frame located in a 100 mm cavity between the masonry and the ground, covered with waterproofing.
4. The masonry walls can be raised by 3-4 rows, being sure to tie them together with a masonry mesh, and the floor slab can be concreted. You can remove the masonry to the end, laying out niches along the way, and then concrete the floor.
5. As the masonry progresses, the cavity can be concreted every 500-700 mm.
6. After the mortar and concrete have dried, the power circuit can be installed. It is welded from a corner and installed on top of the masonry. Weld fittings or embedded parts to the corners.


7. Then tie a mesh screed to the embedded parts and concrete the garage floor.

8. The structure should be provided with ventilation for 21 days.
We can say with confidence that a pit built using this technology will withstand any heaving of the soil, will not leak or become damp.
Other pit design options
On stable, dry soils, for example, when a garage is located on a mountain, you can avoid making a powerful armored belt and arrange a simpler solution. This can be thin-layer concreting with “sliding formwork”.

This is called concreting only conditionally - rather, it is a method of applying a thick layer of plaster, which is needed to strengthen the soil section.

Instead of laying out a stone one, you can make an all-metal tank. This is a completely viable option if you have the material and the ability to weld metal hermetically.

An absolute guarantee of protection against flooding, but the metal itself must be reinforced with stiffeners and protected from moisture. Such a “glass” is simply installed in the pit and the sinuses are concreted. An absolute plus is that you don’t have to tie the container to the screed.

There is no particular difficulty in building a garage pit. The main thing is to clearly understand your needs and compare them with the capabilities of the garage. For everything else, you can rely on the materials in this article, created based on the experience of many masters.
Every car enthusiast sooner or later faced the issue of repairing his “iron horse”. In case of serious damage, the car has to be driven to a service station. In case of a minor breakdown, you can do everything yourself. But in this case, you will have to work hard to find a place where you can get to all the hard-to-reach parts of your car. Your own inspection pit will help solve this issue, allowing you to carry out all the repair work yourself without spending a penny on renting a ramp. In addition, by doing everything yourself, you will save on expensive construction teams.
Before proceeding with the actual construction of a garage pit, we suggest paying attention to all the main features of this object. Consider all the advantages and disadvantages of inspection pits. Determine for yourself the purpose that this auxiliary room will serve you. Any stage of construction monolithic structures provides for one or another technology of work. The service life of the garage pit depends on how accurately everything is done.
Purpose of inspection pits
Sometimes while driving, various kinds of incidents happen. When driving along an uneven dirt road, you may hear an unpleasant sound, or even worse, feel a bump. The dimensions of the car do not always allow access to its underbody. In addition, after every suspicion, you will not go to a familiar car mechanic, but rather inspect everything yourself. If your car is low-slung, access to open parts is limited. If you simply don’t have time to install a jack, then an inspection hole will help you.
The garage inspection pit is designed to help the car owner solve the following problems:
- gain access to damaged parts of the body;
- dismantle or install parts (muffler, gearbox, driveshaft, engine, fuel tank, crankcase protection, etc.);
- replace consumables (drain oil, change fuel and air filter etc);
- carry out anti-corrosion works car underbody;
- increase access to mechanisms and parts in case of joint repair work.

As you can see, you can use a garage pit in different ways. Important feature This room is - convenience. If you decide to equip your garage with an inspection hole, then you are not afraid of any minor repairs. In addition, all work will go much faster, since you will not need to resort to using additional mechanisms to gain access to the bottom of your car.
Advantages of inspection pits
In addition to their useful purpose, inspection pits have a number of advantages that allow motorists to save on calling a car mechanic.

The advantages of garage pits include the following:
- Yama makes it easier do-it-yourself repair car, since it increases access to parts located in “difficult” places.
- By building a hole in an “L” shape, you can create a small usable space. It can be used for storing tools and consumables, or use as a cellar for home twists.
- Since the room is located below ground level, the temperature in it all year round practically does not change. This makes work easier during hot periods.
- A garage containing a viewing hole significantly increases the value of the building, thereby paying off all construction activities in case you decide to sell it.
- With skillful use and location in the garage, you can set up your own service station. If it is located on a plot near the house, it will help to save a lot. In this case, you will not spend money on travel to work, and you will not pay a penny for renting the premises.
By equipping your own parking space with an inspection hole, you will not only save on repair work, for which you will have to pay other people, but also free up a small space, which is always so lacking in the garage.
Inspection pit size
Before starting construction work, the arrangement of a pit in the garage begins with setting its dimensions. It often happens that the garage turns mostly into a warehouse of unnecessary things, which so cover all the usable space that there is very little space left for the car.
In order to correctly plan the size of the future pit, we advise you to pay attention to the following parameters:
- pit size (take into account this value, which should be 300-350 mm larger than the width of the finished pit);
- depth of the pit (this figure varies depending on the height of the owner of the garage. But it is better to take this value with a margin of 10-20 cm. The main thing is that, standing on the floor of the pit, you can freely reach any part located in the lower part of the car. In if necessary, the height can be compensated by installing small wooden floors on the floor);
- the width of the hole (should be 20 cm less than the distance between the internal parts of the slopes of your car. This is a safety requirement that reduces the possibility of a wheel running directly into the hole);
- length of the pit (to calculate this parameter, just add at least 1 m to the length of the car. But keep in mind that the garage does not always allow you to arrange a pit of the desired length. In addition, the shape of the base of the car may block access to the pit. In any case, it should be such a length that you can go down into it while the car is parked in the garage. Consider this parameter if you plan to equip two parking spaces at once);
- proximity of groundwater (it’s better to find out about this right away than to get an unpleasant surprise later in the form of a flooded hole. If they are close, the dimensions will have to be changed, and sometimes this idea will have to be abandoned altogether).

When calculating the length of the pit, take into account the size of the ladder along which you will go down. Once inside, the width should not limit your movements, and your head should not touch the bottom of the car. Also pay attention to the size of the pit, which may vary depending on the material of the walls. When arranging a pit, keep in mind that it must be increased depending on the material of the wall surface.
Let's look at these indicators for different types building materials, namely:
- concrete wall (the width of the pit increases by 12-15 cm in each direction);
- wall made of gas silicate blocks (the pit increases by 20 cm).
In addition, consider drainage and a waterproofing layer. In this case, the width of the pit increases by another 15-17 cm. It is also convenient to arrange small niches in the walls of the inspection pit. When carrying out repair work, it will be convenient for you to put the tool there. If the level of drainage water is higher than 2.5 m, then it will be necessary to additionally install drainage system, which will drain excess water into the sewer. On the preliminary drawing, be sure to mark all the additional details that you would like to see in your pit, then you will get an excellent result.
DIY inspection hole in the garage. Preparatory work
When starting to build a pit in the garage, you need to thoroughly prepare. This process is quite delicate, and also requires compliance correct sequence actions. To make all the work easier, it is better to immediately acquire everything you need, then the result will be to your delight.
Tools and materials
Almost any type construction work requires additional help. To make the whole process easier, we advise you to immediately get an assistant, with whom things will go twice as fast. The right choice building materials and auxiliary tool– the key to a quality result.
- concrete mixer, jackhammer, hammer drill, grinder;
- welding machine, screwdriver, concrete vibrator, tamper;
- pliers, crochet hook, hammer, set of keys, construction knife;
- shovels, metal buckets, bath, spatula, ladle, grater, grater;
- level, usually roulette.

In addition to the above tools, you will need the following materials:
- sand, cement, crushed stone;
- timber 30x30 mm or 40x40 mm, inch board or moisture resistant plywood 10-15 mm thick, planed board 40-45 mm;
- reinforcement 10-12 mm, wire rod 6-8 mm, knitting wire 1.8-3 mm, metal corner 50x50 mm, corrugated pipe 50 mm;
- primer, anti-frost plasticizer, waterproofing material (film, roofing felt or mastic), bitumen tape, primer for metal;
- dowel bit, fly brush, ph2 bit, wood screws, nails, pins, drills, wood discs;
- PVC pipes d=100 mm, elbows and connectors for the ventilation system;
- cable, corrugated pipe, terminal blocks, tin, rosin, lighting elements, electrical fittings;
- plaster, tile adhesive, jointing.

If you take our advice and get everything you need, you will significantly speed up construction process. It would also be a good idea to take care of an extra pair of hands, since some installation processes cannot be accomplished alone.
Pit planning
Ideally, it is better to build the pit before installing the garage walls. This is done at the same time as the construction of the foundation, having previously planned everything. The construction of an inspection pit in a finished room complicates the whole process a little, but this option is also possible. But we still advise you to take care of everything in advance. Starting the construction of a garage by arranging a pit will make your work easier.
To dig a pit in an open area, you can use the services of construction equipment, such as a tractor or a hydraulic hammer. If you start digging a hole in a finished structure, then you will have to do everything yourself. In addition, if the garage is located on hard rock, you will have to carve a hole of the required size in the rock for a long time. Sometimes it is better to move the building a short distance than to suffer over digging a hole for a long time.

This will require strong physical strength, and it can quickly destroy the jackhammer, which is already expensive. To remove several cubes of soil, you will have to carry out a huge number of walks with buckets containing heavy soil. When planning to dig a pit, be sure to take into account the presence of groundwater. It is better to contact local surveyors with this question. Otherwise, your building may simply sag or collapse.
Marking the inspection hole
Work at this stage involves marking both inside the finished garage and immediately before the start of its construction. When starting to mark the inspection hole, pay attention to the peculiarities of such work for each case. When setting up a pit in a built garage, keep in mind that its outline must be at least 1 m from each edge of the building. In this case, the markings are carried out using chalk, which is used to apply future dimensions to the garage floor. This will help you imagine the future dimensions of the pit.

In the case of outdoor work, you can use the services of heavy construction equipment. In addition, cases cannot be ruled out when a hole has to be dug in difficult soil, then calling a pneumatic hammer cannot be avoided. Please also note that during work it may rain, which will flood your hole. Then you will have to wait until the water seeps into the soil and the hole dries completely. To mark a garage pit directly on the site, proceed in the same way as for similar work with the foundation. It is enough to have several metal rods, which are installed in the corners of the future pit, after which the thread is pulled.
In any case, when starting work of this kind, it is better to consult with surveyors. Check with them about the availability of nearby soils. Inquire about the properties of the soil. Sometimes it happens that digging a hole in some areas is not possible.
DIY inspection hole. Step by step instructions
When everything preparatory work completed, you can begin the main stage of construction of the garage pit. We advise you to ask specialists in advance about the quality and nature of the soil. Don't forget to also get everything necessary tool and material so as not to slow down the work process. It is worth noting that help will also not hurt you, so worry about an assistant in advance, or better yet, two.
Construction of the pit
Once you have marked the pit, you can begin digging trenches. This process is the most time-consuming and difficult, as it will require strong physical strength. Depending on the size of the hole, you will have to dig and drag from 6 to 12 cubes of soil. If the soil allows you to dig a pit with your own hands, then you can save on calling special equipment. But keep in mind that in this case the duration of excavation work will increase several times.
Helpful advice: if while digging a pit you find a layer of clay, do not rush to throw it into the general pile. It is better to store it separately; it is perfect for sealing external sinuses around the walls of the pit.

To properly equip a foundation pit for a future pit, proceed as follows:
- Compact the bottom of the pit using a hand tamper.
- Fill gravel around the perimeter of the pit to a layer of at least 10 cm.
- Now add sand. A layer of 5 cm will be enough.
- Compact the previous layer, then add gravel again. The better each layer is compacted, the more reliable the garage foundation will be.
- Cover the pit with waterproofing. It should completely cover the entire surface of the floor and walls. If you are using thick plastic film(200 microns), then keep in mind that the material should not lie stretched.
- Now you need to mount ventilation system. Fix one channel at a height of 10-15 cm from the floor. Bring the second one to the upper edge of the pit to a height of 100-150 mm so that it is located near the future wall.
- Tie an armored belt from 6-8 mm reinforcement and knitting wire. It should cover the entire surface of the bottom of the pit. It is placed at a height of 5-7 cm from the bottom. To do this, you can lay it on several pieces of brick, they are just 6 cm thick.
- Knead cement-sand mortar with the addition of gravel in a ratio of 2:2:1. We recommend adding a special plasticizer to the solution with each batch. It will add plasticity to the mass and perfectly protect the concrete from cracks during frost.
- Fill the reinforcing screed to a height of 10-12 cm (taking into account the height of the “brick+lattice” layer). It is better to pour the first layer of 7-8 cm and let it harden. After this, you can fill the solution to the remaining height.
- Allow the screed to harden. This will take 2-4 days, depending on weather conditions.

If you plan to install a ventilation system in the pit, then it is better to take care of it right away. In the case where it will pass under the foundation and then exit through the wall, it is necessary to dig a separate trench for the pipes. You can read more about the arrangement of ventilation in the next paragraph.
Ventilation arrangement
Over time, an unpleasant musty smell will appear in the pit. Unfortunately, this cannot be avoided, no matter how hard you try. Moreover, at the bottom of the pit there will always be stains from oil, fuel and other liquids that emit when evaporating harmful substances. It is better to do ventilation if groundwater flows near the garage, increasing the humidity of the inspection pit.
In any case, work on laying ventilation pipes must be carried out before starting the construction of walls and pouring concrete. You can make both a stand-alone version and combined with general ventilation garage. The pipes can be placed in formwork, or embedded in the wall.

The location of the pipes is determined by the size and shape of the garage. A pipe with a diameter of 100 mm is perfect for ventilation. But it is important to know that the supply pipe must be raised approximately 0.5 m above the ground, and then covered with a grill to prevent large objects from entering. The exhaust pipe is raised to 2-2.5 m, and subsequently a “fungus” is installed to protect the ventilation from moisture and debris. To check the efficiency of the system, hold a lit candle to the inlet. If the flame begins to suck in, or it goes out completely, then you did everything right.
Lighting arrangement
To make being inside the pit comfortable, it is better to immediately take care of its lighting. For some, a headlamp or other lighting fixture, but we would advise doing stationary system lighting. Electrical installation is a delicate matter, as it requires certain skills and knowledge. If you have never worked with electricity, then it is better to entrust this issue to a specialist.

To check the correctness of electrical installation work in the inspection pit, use the following indicators:
- Using a voltage of 220 V is unacceptable for constructing pits. In this case, a voltage of 36 V is used;
- all electrical fittings must be located outside the pit;
- the cable must be laid in a special corrugated metal sleeve;
- It is better to use low-voltage lamps (12 V or 36 V) as lighting elements. An installation of this kind is carried out in conjunction with a machine of the required rating, which must be located in a separate panel;
- It is better to recess the lighting fixtures into the wall, then they will not interfere with the work process;
- use waterproof sockets and switches.
You can also use some trick. By arranging lighting elements evenly, you will achieve more bright lighting. Moreover, as finishing material can be used tiles light shade, it perfectly reflects light, making the pit even brighter. It’s a good idea to use fluorescent lamps, which allow you to identify breakdowns faster and more accurately.
To better understand the issue of arranging a garage with an inspection hole, we advise you to look next video, which will help you do everything yourself:
Do-it-yourself inspection pit for a garage made of concrete
So we come to the last question related to the arrangement of a garage pit. If you have completed the work correctly at the preliminary stage: the floor is not cracked, the waterproofing is done correctly, the ventilation is functioning, the wiring is routed and protected, then you can begin building the walls of the pit. Both concrete and piece material can be used as a material. We would advise constructing a pit using concrete, as it is more reliable and durable.

To build a viewing hole at the final stage, you must carry out the following steps:

If you have mounted a metal corner around the perimeter, then it can be used as a template for the pit cover. Having made wooden shield, it can be placed on a metal base, thereby protecting the car from accidentally driving into a hole. If you lay the corrugated pipe around the perimeter of the inspection hole, you will get an excellent wheel guard.
Now that our inspection hole is ready, we can begin finishing surfaces. We recommend equipping the pit with tiles. Be sure to prime the surface before laying tiles. Don’t forget to also carefully unstitch the seams, then the inspection hole will serve you for decades.
DIY inspection hole in the garage, photo


TO
any motorist knows how necessary it is sometimes inspection hole in the garage! It happens that there is a nonsense breakdown, it’s a piece of cake to fix, but try and get there. Or changing the oil is a five-minute task, but you have to drag yourself to the service station and pay an amount that is completely incommensurate with the work. It’s worth, perhaps, shedding a little sweat, working a few weekends and getting rid of such difficulties forever. You will learn how to make a viewing hole in the garage with your own hands here.
Content
1.
2.
3.
4.
5.
6.
7.
Video version of the article
Let's start work. Marking the inspection hole
As for everyone, even the most simple structures, we begin the construction of our pit with markings, that is, with determining the outlines and dimensions of the future pit. This is necessary, especially since we will be constructing a pit in an already built, or even operating one. Which, you see, complicates our task, if only because of the cramped working conditions.
We will mark the pit based on the fact that the soil forming the walls of the pit will have a certain slope, while the dimensions of the inspection hole must be maintained within limits that make the work convenient.
This is on the one hand. On the other hand, when parking, the driver should not break out in cold sweat for fear that the car will fail. To ensure against slipping, we will take certain steps, but more on that later.
Based on all the mentioned requirements, we determine the width of the pit “cleanly” (that is, according to the width of the working space) at 70 cm. This is enough for comfortable work, and even for a tiny “Daewoo Matiz” (128 cm track) there will be room for maneuver of about 20 centimeters (between the pit and the wheel). And for Zhiguli cars, with their track of 132 cm, the width can be made even larger. Five to ten centimeters, but that’s not bad either.
We determine the length based on personal concepts about ease of work, as well as the size of the garage, but making it less than two meters is hardly justified.
On the floor of the garage we draw (or mark with pegs) a rectangle of our pit, then we add the thickness of the walls on all four sides and, guided by the stability of the soil, we give an approximate margin for the slope of the earthen walls. For dense loams this value is approximately 20-30 cm.
We determine the depth from the requirements of ergonomics, and in relation specifically to our loved one. It is clear that bending over or standing on tiptoes will not work much. Therefore, we calculate our hole in such a way that there is a distance of 25-30 cm from the top of the head to the bottom of the car.


