Kids grow up so fast! Today your baby is looking at books with dinosaurs, and tomorrow he will wake up and suddenly like stories about polar explorers. The older the child gets, the more “artifacts” demonstrating his interests appear in the children's room. We offer a selection of interesting and inexpensive ideas that will sound in unison with the child’s hobbies and help make the atmosphere in the nursery a little more magical, with a touch of adventure and fantasy. And of course, many of the projects from the selection can and should be done with children!
Order comes first
Our blog is about order, and that means we must talk about it first of all, even in an article with such an abstract topic. Moreover, I know a way to organize the order in the nursery beautifully and interestingly: use curly or multi-colored stickers-markings . They can be used to mark everything from a chest of drawers with clothes to containers with toys or stationery.
For kids who cannot read, shaped stickers in the form of clothing items are ideal. They are stylish and funny - a real decoration for a child's room. (By the way, many dads will also appreciate this decor - how much time you will save your husbands in case they themselves have to pack the child for the street :)
For older children, multi-colored stickers or “slate” stickers are suitable, on which, like on a chalkboard, you can draw with a special white marker. Attach them to cabinets and chests of drawers, containers, boxes, toy boxes, label what is stored in them, and cleaning up after games or a big wash will become quick and fun.

Fairy lights
A garland is a decoration that will create a holiday in any room. To make a garland, use any available materials - paper, cardboard, scraps of fabric, yarn and ribbons.

Garlands with ribbons make excellent decorations for Indian games. And thematic garlands with stars or ships will appeal to future travelers.

An electric garland can be supplemented with decor made from cardboard and plywood, shaped using wire, or using any available means. And then the New Year's accessory will become an all-season decoration.

Suspended structures - mobiles
In fact, this is a type of garland - they look different, but no less impressive. The mobile can be made from a hoop, an embroidery hoop, using any suitable frame, from which decorated threads, ribbons, or anything else you decide to hang on it (even LEGO bricks) will hang like streams of rain.

Exhibition of children's drawings
It is very important for any child that adults appreciate his creativity. I see this in my children, who from the very beginning early years, holding out their drawings, they look into my face - do I like it? Making simple devices for an exhibition of children's drawings is a 5-minute task. But the effect of them is stunning, both for the child’s self-esteem and for his personal space.
Use rails, string, clothes and curtain pins, bag clips or empty frames.

Vinyl stickers
Vinyl stickers - popular and inexpensive way decorate the walls in the children's room. Now you can choose a plot to suit every taste. And a person can transfer a sticker to a surface even without an art education. In addition to walls, you can decorate doors and furniture. And there are stickers that glow in the dark. Imagine a room in which, after turning off the lights in the evening, the stars and planets light up on the ceiling - magical!

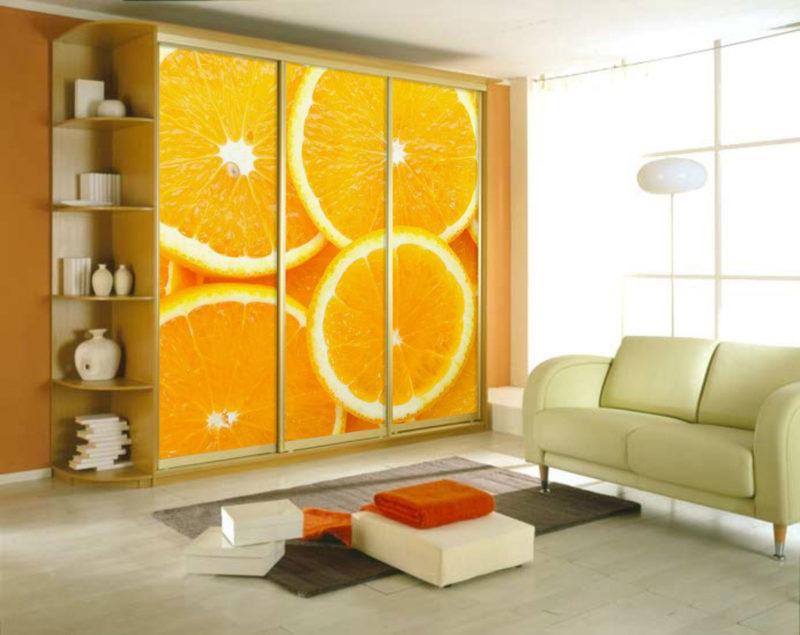
Drawings on the walls
A method of decorating a nursery, which, of course, will require more money and time. But looking at examples of children's rooms with wonderful drawings on the walls, you can find inspiration for Painting works. Moreover, now minimalism, plain walls and drawings with a simple plot are in fashion, which many of us can reproduce.

A wall where you can draw with crayons
Finishing the topic of mocking walls, I’ll mention a feature that has been at the peak of popularity for several years now: walls on which you can draw with crayons, like on a slate board. It's not that difficult to get one. You can order special vinyl stickers with a coating adapted for crayons. Can you buy paint for slate boards. Add paint to it, which creates a magnetic layer - then, in addition to crayons, you can use magnets on the wall.

"Elegant" furniture
About expensive bedspreads, pillows, tablecloths, etc. there will be no talk here. But there is a way to turn the most ordinary bed of a little princess into a marshmallow cloud, and desk a growing football fan - into the goal. See for yourself.

Shelves for your favorite toys
There are a million and one ways to organize the storage of toys, books, and stationery in a nursery. But I chose one - captivating with its simplicity and lightning-fast execution. Only for the most beloved toys that make your heart happy - it’s worth taking one look. All you need is a string or ribbon, a stick or a narrow strip.

Decorative elements made from recycled materials
Recycling items, especially packaging, is a great way to demonstrate your environmental responsibility. Packaging of products: juices, milk, canned food, carbonated drinks and household chemicals can gain new life in the nursery, bringing comfort and organization into it. (By the way, in the lower right photo - homemade model solar system, which used to be wall clock. My eldest daughter and I made it after the watch was hopelessly broken)

Unusual uses for ordinary things
A children's room is a place where fantasy lives. Don't limit it!
Use magnetic knife racks to help your son keep his model car collection organized.
The same machines can become original handles for a chest of drawers or cabinets.
Buttons can be useful not only on clothes.
And the cupcake pan will command the stationery.

Which interesting solutions Do you have any children's room decor? Welcome to the discussion of this topic in our communities
An excellent option for implementation unusual ideas and creating unique and bright design your child's room is to paint pictures on the walls in the children's room. True, to implement it yourself you will need certain knowledge and skills.
Wall drawings will decorate any interior design and, depending on the theme, can be used to decorate the walls of a child’s room of any age.
You can create them yourself, or you can turn to professionals for help. This activity is really fun. You can convey boundless love for your child with the help of such drawings.
Very often we do not know how to draw and therefore we are shy. And in vain. Children perceive the world differently. And what in our opinion seems tasteless and unattractive, the child will absolutely love it.
It is worth remembering that a child's needs change with age. When creating a particular nursery interior, you should focus on the child’s age and what he likes to do.
The baby must learn to concentrate and gain new knowledge about the world around him. Therefore, in the design of a newborn’s room, you should choose images of flowers, toys and animals as wall decorations.
When the child gets a little older, you can choose landscapes. When choosing drawings, you should focus on the baby’s preferences. Often, in pictures that seem absolutely innocent to us, a child sees something scary. If you see that your child doesn’t like the drawings, you should refuse them.
 Drawings on the wall are a great option for decorating a child's room, but they should not scare your children
The baby begins to walk and make his own changes to the interior design. To avoid unwanted masterpieces appearing on expensive wallpaper visual arts, it’s worth foreseeing everything in advance. It is better to highlight a special area on the wall where the young artist can create his creations. To do this, you need to prepare a section of the wall (level it, prime it) and cover it with white paint (preferably a matte texture). You can also limit it with a frame. From time to time, you can simply wash away the drawings and make room for new ones.
It is important that the child sees photographs of relatives from an early age. This way he will feel protected and involved in the life of a large family.
It’s good to decorate the walls with appliqués, embroidery, and your own drawings. The room will become very cozy and really comfortable. Children will feel that their parents truly love and care about them.

Choosing a picture for the wall
To decorate the walls in the nursery, it is good to take ready-made scenes. There is absolutely no need to invent something. Today there are a lot of sites on the Internet that contain a whole sea of different ideas and designs. Anyone can cope with them.
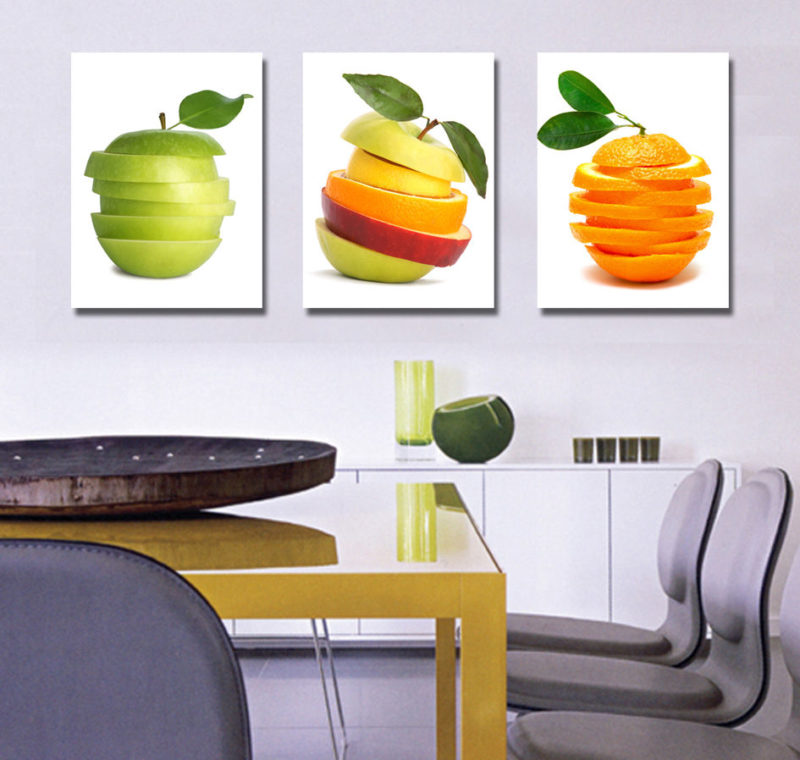
You can, for example, create bright triptychs. They will take their rightful place on the walls of the nursery. You can also enliven the design with three-dimensional letters that make up your baby’s name. This design looks really original.
 Together with your child, you can create a triptych painting that will take pride of place on the wall in the nursery.
 You should choose a drawing very carefully. It is necessary that the wall fits into overall design and the interior of the room and stylistically approached it. Can be depicted ladybugs or your favorite cartoon characters. Perfect solution– image of birch trees and funny animals.
It should be remembered that children do not like contrast and monochrome. They can cause fear. It is necessary that the characters be colorful and always kind.
Stencils for drawing

Many of us, unfortunately, do not know how to draw, so to create drawings on the wall, you can turn to professionals for help. True, such pleasure will be quite expensive.
An ideal solution for creating drawings on the wall with your own hands and significant savings family budget are stencils. You can make them yourself or purchase them in a store.
For self-creation For stencils, you need to take a sheet and cut out the necessary shapes and elements from it. One of the main advantages of their use is the possibility of repeated use. You can apply almost any design to the walls with your own hands as quickly as possible. In this case, it does not matter at all whether the walls are painted or wallpaper is pasted on them.
Using the stencil is very simple. You just need to apply paint through the holes in the thick cardboard. You may not know how to draw at all, but still paint magnificent pictures on the wall. You just need to choose the right stencil painting. You will not only create bright drawings in the children's room, but also hide any defects on the walls.
Preparing the walls and painting
If you decide to decorate the walls in the nursery in an unusual way, then DIY drawings are ideal for this. It is important to follow all the technology. The work is being carried out in stages.

- First you need to prepare the wall. This is the easiest way to do it. Old wallpaper and plaster are removed from the surface. After this, you need to re-plaster the walls.
- Then you should select the materials that you will need for drawing. Traditionally this involves paint and a brush. To create wall images, designers recommend using waterproof acrylic paints. It is easy to apply and rinses off quite easily.
- Then the background is applied. To create a single harmonious picture of the room, the background should be the same color as the rest of the walls. An excellent solution is to paint the wall in pastel colors.
- Next, using a regular pencil, draw the outline of the drawing. If necessary, the drawing can be corrected. You should draw in stages. If you like what you depicted, you can continue to create. If you are not happy with something, you should erase it and draw again.
- Finally, the entire wall is painted. For large elements, use a wide brush, and for small ones, use a thin brush. On at this stage there is no need for haste at all. It is important to do all the work carefully so that the paint does not spread or accidentally go beyond the contours.
 Drawing a picture on a wall is a very painstaking job that needs to be done measuredly and carefully.
 By creating a wall drawing with your own hands, you will feel like a real master. Agree that this is really nice. All you have to do is stock up on your imagination and you can start creating.
If the child is already old enough, you can involve him at this stage. This is useful not only from the point of view of helping parents, but also from a psychological point of view. Let the child feel important.
Decorating walls in a nursery using drawings and images has been used for quite a long time. They allow you to create a unique design for a children's room. If one of the walls is decorated with paintings, this will create maximum comfort. At the same time, the interior of the children's room will take on a completely different sound. The baby will be as comfortable as possible in such a room. It will also show your love for your children. It is likely that no one else will have such an interior.
 Drawing luminescent paints will delight your child
 It's so nice to create something unique. Each wall painting is exclusive. She is unique and this is her charm.
Decorate the interior with paintings made with my own hands became popular. Placing them on the walls of your apartment will add comfort, individuality and breathe a piece of your soul into the room.
Where to start drawing
First, you need to decide what you want to see as a result. You shouldn’t imitate other people’s ideas, it’s better to find your own. Think about what is missing in your home, feel the mood of the room in which it will hang. Any, at first glance not even real, fantasies have their place. Abstract images will add irresistibility to the interior, and posters in black and white will fit perfectly into modern design.
Having determined the style of work, you can begin to create a masterpiece.

Fabrication
Before applying the drawing, it is necessary to prepare the canvas. To do this, you will need cardboard and the fabric itself on which the image will be. A square or rectangle is cut out of cardboard, the size of the intended work. Fabric is cut out from this blank with an allowance of 5 cm. Then, the fabric is glued to the cardboard, and it should be stretched well. The corners are cut and carefully glued so that the fabric does not unravel.
You can use a simpler version of the base - cardboard painted with a roller with white acrylic paint. It must dry thoroughly before painting is applied to it. This will be the background of the picture.

Drawing
Before applying the drawing to the canvas, you should make a sketch on plain paper. It is cut out, applied to the canvas and outlined with a simple pencil. The outline of the drawing must be outlined with black paint.
Now you can begin to design the planned picture. There can be different methods:
- paint - the most common, the drawing is painted multi-colored paints;
- cereal, coffee, cloth - the elements are placed in the picture and secured with glue.

Paint selection
You can use any paint: acrylic, watercolor, oil. The main thing is to combine correctly color shades colors, then the picture will look impressive.

Stencils
A stencil is an ideal device for creating an image using paint or a can of spray paint. You can also apply a design using a stencil using the graffiti technique, which is at the peak of popularity today. The best foundation For this picture there will be cardboard or plywood, which is painted in a contrasting color. Such ornaments look original on a gold or silver background.
The use of herbarium elements instead of a stencil or openwork napkins looks impressive.

Photo printing
Modern and stylish interior can be created if you use paintings ordered from a printing workshop. Such workshops produce high-quality prints on any surface.
Family photographs in covers or frames fit perfectly into any interior; they can be color or black and white, placed in a chaotic order or in one plane. It is possible to arrange the photos as modular elements, which creates the impression of a single image.
Textile
Masterpieces in the patchwork style can be easily achieved using scraps of fabric, braid, and ribbon. Such paintings are made using the appliqué principle. The basis is textiles, dense in quality and not flashy in design (polka dots, stripes). The elements of the picture, on the contrary, are cut out of bright fabric. Using different colors scraps, you can get an original picture. And if you place it under glass, it will look stylish and impressive.
The combination of fabrics of different textures in one picture looks great. And from materials that hold their shape (felt, corduroy, flannel), you can cut out elements of the design: a house, an animal, fruit.
These products are ideal for the kitchen or children's room. And a silk painting will be a decoration for the hall.

Modular pictures
Modular - these are several paintings with a similar plot or one drawing divided into separate elements that can be different sizes. Currently, they are popular as they fit perfectly into the interior of any room. You can make them yourself and arrange them at your discretion.
You should start by choosing a picture: landscape, abstract image or photo. Blanks can be printed on paper or canvas in a photo salon, and then cut into separate parts. The paper version is glued to plywood or chipboard, and the fabric version is attached to back side frame using a stapler. It is good to work on a fabric base using the batik technique.

If you create a drawing yourself, then it is better to do it right away on individual elements. To make such a picture you will need:
- colored acrylic paint or waterproof marker - when drawing an image on paper;
- hacksaw;
- ruler;
- a simple pencil;
- foam sponge;
- sandpaper;
- tassels;
- polystyrene foam sheet (1 cm thick).
You should start working by dividing a sheet of polystyrene foam into the intended number of parts. To do this, you need to measure it with a ruler and cut it into modules with a hacksaw. the right size. Then sand the edges.
Now, all the parts are put together into a single canvas and the process of applying the image can begin. First, the background of the picture is made, the sponge is wetted in the paint of the intended shade. When the paint has dried, you can begin the drawing itself using brushes with paint, a marker, and applique.
Creating a three-dimensional painting for the living room
Look impressive in the living room three-dimensional paintings, they can be made to suit any room design. Options are available: leather, paper, and even coffee and pasta. The following technique is perfect for making such paintings:
- decoupage - decorating objects;
- quilling - creating a design from curled paper.
A picture made of textiles or foam rubber will look creative in the living room; it is easy to make an original multi-layered image from this material. The picture frame should be taken simple and decorated according to the interior of the room.

Most easy way- where plain paper is taken as a basis, onto which elements (butterflies, animals, flowers) made of various materials are glued.
If the hall is large, then a plaster image - a bas-relief - will fit perfectly. It is done directly on the wall and goes well with the overall interior. However, making such a picture is quite difficult. Skills in drawing and working with plaster are required. General recommendation There is no instruction on how to make a bas-relief; some craftsmen create it directly on the wall, others separately make elements from plaster, which they then fit into the overall image. If you have no experience, it is better to use a stencil.

Master class: Paintings for the interior
Unusual and modern solution- decorate the interior with a 3D painting. They are fun to make and look impressive. Eat different ways make similar products.
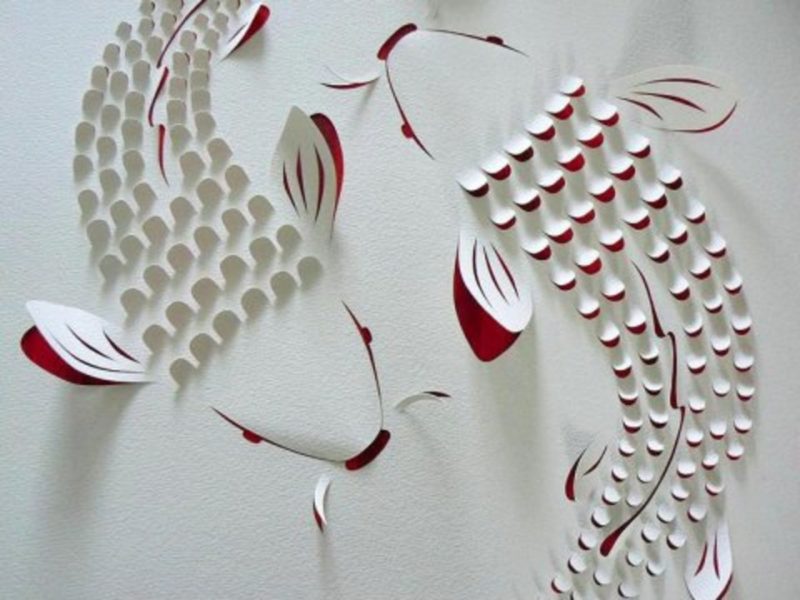
3d paper paintings
One of the easy ways is paper applique. To work you need:
- knife, scissors;
- pencils;
- not thick cardboard or paper white;
- PVA glue;
- frame with large sides, a candy box will do.
Step-by-step actions, using the image of a butterfly as an example:
- A rectangle the size of a frame is cut out of paper.
- A butterfly is drawn or printed on a printer and cut out.
- The resulting butterfly model is placed on the prepared white paper and traced with a pencil.
- The most difficult thing is to cut out the wings of the butterfly without touching the body.
- The wings bend towards the top and towards the middle, thereby adding volume.
- The blank with the butterfly is glued onto colored cardboard, which will be visible through the folded wings of the butterfly.
- At the end, the picture is placed in a frame and fixed with glue or a stapler.
This method can add volume to any drawing.

3d leather paintings
To create a 3D picture you don’t need expensive leather, pieces from old boots, bags, gloves, raincoats will do, but it is important that it is natural. To obtain the desired color, you can use acrylic paint.
The technology for creating paintings from leather is similar to the technology from paper. Leather is a material that can be easily manipulated and whole bouquets of ornaments can be created from it. The tools at hand are the same as when working with paper. Operating principle:
- a sketch is made on paper;
- transferred to the skin and cut out;
- so that the leather elements become rounded and voluminous, they must be held over a candle;
- the base of the picture is made of fabric;
- leather pattern elements are placed on it and secured with glue.
You can use buttons, dried plants, and beads as additional decoration.

Multilayer 3d paper painting
Multilayer 3D paper paintings look beautiful; they are not difficult to make. You should prepare:
- deep frame;
- cardboard;
- album sheets - for copies;
- Printer;
- glue;
- acrylic paint;
- scissors,
- acrylic lacquer;
- laminate backing.
Having chosen a drawing, we get to work. It’s good if the picture consists of several elements that can be cut out. You must make at least 10 copies on landscape sheets. If you use an inkjet printer, then you need to apply varnish to the pictures, otherwise the image will bleed; when using a laser printer, you can do without varnish.

The next stage is to cut out a base from cardboard, the size corresponding to the frame, and glue one drawing to it. The remaining images are cut out, but in different ways. Several copies (let's say a flower) are cut out completely: flower, leaves, stem. Others are just the flower and the leaves and just the flower.
Now the base for the laminate parts is cut out, and the elements are glued onto it. Then, these blanks are glued to a common base. The sides of the substrates should be painted in a color that matches the image so that they do not stand out.
The final stage is coating the painting with several layers of varnish.

DIY paintings for the kitchen from scrap materials
In the kitchen, homemade paintings look out of place. They add even more warmth and comfort. Eat different variants their production and any items that can be found at home are suitable here: buttons, seeds, cereals, coffee.

Pictures from cereals and seeds
This type of interior decoration is increasingly popular, it is environmentally friendly and inexpensive. These paintings look especially good in the kitchen rustic style. Making a picture from cereals is not difficult. You will need several types of cereals, glue, cardboard and thick material.
First prepare the base. To do this, the shape of the future painting is cut out of cardboard, and then the fabric is made from it, with an allowance of a few centimeters for folding. The fabric is glued to the cardboard.
The intended design is applied to the resulting canvas. Now you need to lay out the grain or cereal; if necessary, it can be painted in the desired color. After completing the drawing, you should glue all the elements to the canvas. This can be done using regular glue, but more convenient with a silicone gun.

Crafts from cutlery for the kitchen
Spoons and forks made of metal coated with enamel are sewn onto the prepared base. This still life will fit perfectly into the interior of any kitchen.
If you take plastic forks and spoons, you can create a more original picture. Plastic items They easily stick to any surface and are easy to paint.
Fits perfectly into the kitchen french style decoration with cupronickel silverware.
A canvas with glued porcelain dishes will look aristocratic.
You can arrange objects arbitrarily or following a specific idea.

Paintings from buttons and plates
Buttons can be used not only for their intended purpose, but also to create original paintings. They can be glued or sewn. It’s easy to make different patterns, animal shapes, and flowers from buttons. Or you can use them as a background for an image; they are sewn onto fabric and all kinds of plates and saucers are hung on top. If necessary, paint with acrylic paint.

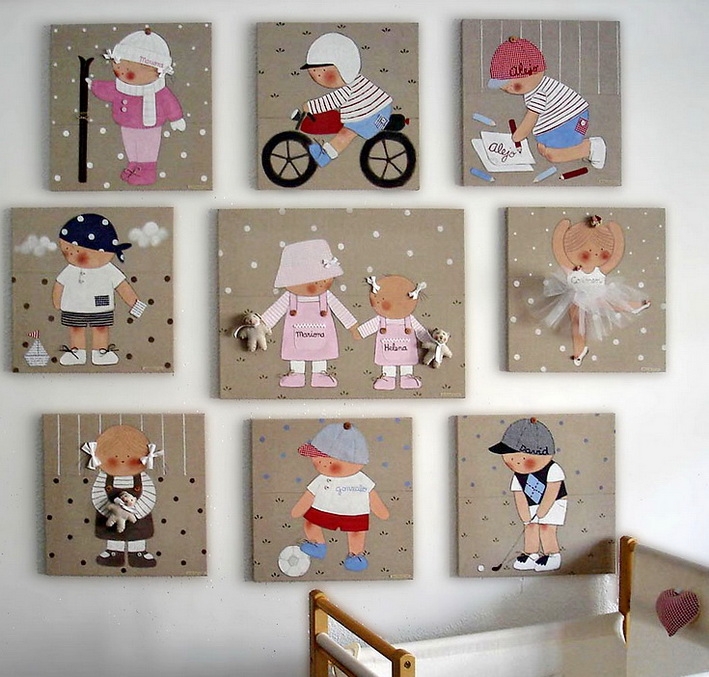
DIY paintings for the nursery
Do-it-yourself works will wonderfully decorate a child’s room, and they don’t have to be very complicated. When choosing a painting, you should take into account the design of the room, its color, the gender and age of the child, and his hobbies. Anything will do: a hand-drawn picture, an applique, a panel, a photo, maybe big picture or a modular option, the main thing is that it fits into the overall interior. Children's works framed will look original.
An excellent solution is a fabric version based on foam. To do this, you will need: a piece of foam plastic, shreds, pencil, glue, carbon paper, a sharp object to press the drawing.
The polystyrene foam is cut out to the required size, and the design is transferred onto it using carbon paper. The picture is pressed out with a sharp tool. The part on which the fabric will be placed is coated with glue, and the fabric is applied to it. It is pressed into the previously pressed outline, the excess fabric is cut off with scissors, and the threads of the shred are hidden inside using a ripper. Using this technique, it is easy to create different fairy-tale pictures.
DIY paintings - photos
There are many ways to create paintings; you can use any materials and objects for this. It all depends on your imagination and creativity. The photo shows possible ideas.
There is nothing better for adding comfort to your home than things made with your own hands, because your love and warmth are invested in them. Don’t be afraid to experiment and then you will create a unique picture that will decorate your home.
Quick navigation through the article
Painting walls in a children's room is a great way to “animate” a child’s personal space and make it more interesting. Wall drawings can be either really complex or very simple in execution. It is better to entrust large-scale works to a professional, but images that are not too large, detailed and multi-colored can be drawn with your own hands. The main thing here is to choose the appropriate design, materials and follow some rules of technology.
For those who are in the process of searching for ideas or tips on how to paint the walls of a nursery with their own hands, we have prepared a selection of inspiring photo examples and a small master class.
Ideas for beginners
If drawing is not your thing, then here are some options for painting a children's room you might like:
- A drawing that can be drawn using a ready-made or homemade stencil. Using a stencil, you can carefully draw a sketch or apply an image to the wall by painting the stencil cutouts.
This method is very simple, but you can come up with so many things with it different ideas, both for boys' and girls' rooms. Here are a few of them.


Decorating a wall using stencil technology involves the following steps:
Step 1. Mark the wall with a pencil and mark out the stencil locations using a construction or laser level.
Step 2. Secure the stencil with masking tape or glue the finished template if it is self-adhesive.
- How to make a stencil: find it on the Internet and print the picture, transfer its contours to lavsan film or thick paper and cut out the corresponding holes with a stationery knife.

Step 3. First apply one layer of paint and let it dry, then the second. You can apply the paint tightly at once, but the drawing will be more accurate if you work in stages. If you are painting with a brush, apply the paint in a circular motion. Periodically, excess paint should be wiped off with a foam sponge. If desired, the resulting drawing can be complicated - add volume to it or draw details.
Step 4. Give our drawing 24 hours to dry. As soon as the paint has dried, we coat the picture with a protective varnish, which will make it moisture resistant.

- Simple freehand drawing
A graphic or low-color, small and not too detailed design can be drawn by hand. We’ll tell you how to do this with your own hands below in the master class. In the meantime, we suggest you look at the following photos of painted walls in the interiors of children's boys and girls - maybe you and the owner of the room will like some ideas.


Ideas for lovers
It’s great if you have some drawing skills, then you can draw with your own hands not only cute characters and animals, but also a whole plot, for example, as in this photo selection of interiors with painted walls.


It is especially worth highlighting the theme of trees, which is fertile for creativity - they are not difficult to draw, but you can come up with so many interesting details! For example, these could be birds or fairies sitting on branches, beautiful leaves or flowers, squirrels or butterflies.


Ideas for the pros
If you have conceived the design of a wall on a grandiose scale, which only a real artist can implement, or you yourself are such a professional, then we bring to your attention examples of more complex works.
Here is a photo of artistic painting in the interiors of girls’ children’s rooms.


Photos of wall paintings in the interiors of boys' rooms


Master class on painting walls in a children's room with your own hands
Stage 1. Preparation - choose a design, buy paints, prepare the wall
So, first you need to choose a wall to paint, come up with a drawing or composition, taking into account the arrangement of furniture, sockets, lamps, etc., and also based on, of course, the desires of the child, your drawing skills and color design interior It’s better to think through several painting options at once and draw several sketches. The picture you and the owner of the room like should be printed in color, then you will understand what colors of paint you need to buy.
Shopping list:
- For painting walls in a children's room, acrylic paints are best suited. water based, and to fix and protect the design - matte varnish, also water-based.
- You also need to buy and prepare: synthetic brushes, roller, palette, masking tape, pencil, ruler, laser or construction level, as well as a stepladder if necessary.
At this stage it is important to ensure that the wall is dry and clean.
- To make drawing easier, the colors were bright and the drawing lasted longer, before you start painting, the wall can be treated with an acrylic primer.
Stage 2. Transfer the sketch to the wall
Now it's time to draw a sketch of the future picture on the wall. This stage is not very difficult, but important. This can be done by hand, using stencils (purchased or homemade) or using a projector as shown in the photo below.

Here is another way to transfer a sketch to the wall: on whatman paper, a piece of wallpaper or craft paper, draw a sketch with a pencil or chalk, then place cardboard or carpet under it and, using a pin or copy wheel, draw all the contours of the drawing. Next, glue the paper to the wall and draw your sketch with a pencil so that all its lines remain on the “canvas”.
Stage 3. Color and paint
- First, practice using loose strokes on paper. This should be done relaxed, holding the brush at a certain angle.
- Long lines, like the stem of a flower, need to be applied in one smooth and sweeping motion.
- To make the line thicker, you just need to apply a little more pressure on the brush.
- To draw round and rounded details, just apply gentle pressure and twist on the brush, and then paint over the resulting outline.
- It is more correct to paint “from the general to the specific.”
Once all the local spots are painted over, you can start drawing the details. And one more piece of advice - don’t be afraid to make a mistake, because most mistakes can be corrected, and even wall painting self made does not require such perfect lines from the artist.

Stage 4. Cover the drawing with varnish
Hurray, almost ready. Give the paint a couple of hours to dry (sometimes it takes longer depending on what kind of paint you used) and cover the entire composition with matte varnish so that you can wipe the walls in the future damp cloth, and the paint did not fade from sunlight.
In this video you can watch a short story about painting a children's room in the program “Housing Issue”.
Do you love wall art as much as we do? We decided to devote this post not just to drawings on the walls, but to painting the walls of a children’s room. After all, the environment has a great influence on inner world little man. And painted walls can turn a child's room into a completely special world! As wall decor, you can use patterns, flowers, and even entire paintings with an independent plot. Thanks to this, the child’s imagination develops, ready to cross any boundaries. How does your imagination awaken when you look at these paintings? Now imagine how they will bewitch your children!
For your inspiration - photos of drawings on the walls of a children's room. Turn your child's room into a submarine, a castle, a forest, or populate it with kind animals. The baby will be delighted!
Drawing on the wall in a children's room: submarine
Drawing on the wall in a children's room: forest

Drawing for the wall in the children's room: magic tree

Drawing on the wall in the children's room: butterfly and flower

Bright plants

Undersea world

Drawing on the wall in a children's room based on cartoons

Wallpaper stickers for the children's room: bubbles


Stickers for children's room


