With proper arrangement of space, a garage can serve not only for parking a car, but also as a workshop for its maintenance. In addition, a properly planned space will easily accommodate the required tools and provide storage technical fluids and wheels in the off-season. The functionality of the room will allow you to expand, which can be made from scrap materials or purchased at specialized stores with subsequent modification to suit your needs.
Considering the fact that the number of things in the garage will increase over time, it is worth rationally using the walls, floor, basement(if available) equipping them with the maximum number of shelves, hooks, and racks. For skilled people they define workplace, equip it according to your needs.
Storage of large items
All items occupying garage space are conventionally divided according to several characteristics: large and small, required constantly or used once or twice a year. Depending on this, before starting to arrange the space, they work out a list of large things that are not often used, which include:
- winter, summer wheels;
- bicycles;
- skis.

The list may be longer, perhaps the garage owner likes to do mechanics, then in his arsenal there will definitely be long pipes (plastic and metal) of different sections, bars and boards. For compact, organized storage of large items, homemade or purchased garage devices are used, for example:
- Acquire wall holders for bicycles that allow you to store them in a vertical position, which provides significant space savings;
- For sets of tires, special shelves are installed on which each wheel lies separately. They are placed in any convenient place, for example, under the ceiling, along a wall, or in a corner space, or hung from the ceiling or wall on an appropriate support, having previously been cleaned of dirt and packed in special cases. This method of storing tires is only suitable for sets on rims.
Considering cases where tires are stored without rims, a metal rack is welded on which the tires stand vertically in one row. Place the device under the ceiling or on the floor, securing it securely; - With the help homemade fastenings, provide a compact arrangement of skis, ski poles and other sports equipment.
Attention! It is necessary to provide in advance a place in the upper third of the wall for storing a removable trunk.
In addition, craftsmen make various hanging ceiling structures, located parallel to the floor, for placing long objects, such as pipe scraps or beams.
Devices for small things

For many craftsmen, the number of different-sized screws, nuts, bolts, and washers is measured in a bunch of boxes and buckets, in which it is extremely difficult to find the right part. To solve the problem, we have come up with tools for the garage that allow you to organize small things and ensure quick finding the required part, For example:
- special portable boxes with compartments. Convenient option, allowing not only to store, but also to transport the required parts if necessary. It should be noted that the cost of the boxes is relatively high, so the ideas proposed below will help reduce costs;
- craftsmen sort small nuts and other parts into jars with screw-on lids, while the lids themselves are securely attached to hanging shelves. All that remains is to screw the jar into the lid and the parts will always be in sight and at hand.
If you have the financial means, purchase compact storage systems for hardware, nuts and other parts of different sizes and different fastening capabilities.
Tool storage
Working tools are divided into large-sized and small-sized, respectively homemade devices for the garage will be different. In most cases, owners prefer to store cutting machines, hammer drills, and other large tools using their “original” drawers. Therefore for them convenient location Make a rack along the wall from scrap materials, taking into account the total load on the shelves (for homemade designs weight should not exceed 150 kg).
Attention! The stores offer a wide variety of shelving models made of both wood and metal that can withstand loads of up to 500 kg or more. At a relatively low cost, it is convenient to purchase a ready-made shelving unit for your garage. right size, securing it to the wall.
For small tools such as keys, screwdrivers, pliers and others, organize space depending on their number:
- the sets are stored in purchased boxes, placed on a rack;
- for single items, either cabinets are set up in which each tool is fixed in a corresponding niche, or a perforated surface is prepared (as in a store) mounted on the wall and a specific place is determined for each of the tools.
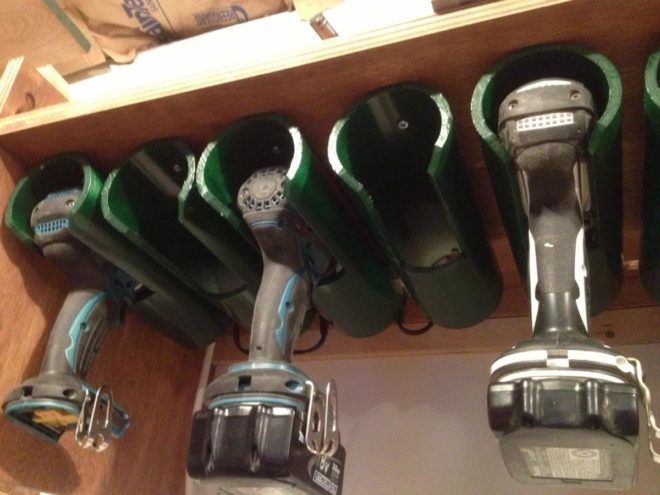
Some craftsmen place their instruments using designs from plastic pipes, in which holes of the appropriate diameter are made.
Homemade machines for garage work
For a comfortable stay repair work provide space for a workbench (it can be folded to save space). To begin with, they work out a drawing of the table, considering the presence of retractable shelves, then make it from boards or metal sheets, equipped with a vice and a sharpening machine.
In some cases, craftsmen cannot do without homemade machines and other devices made independently and improving the quality of the manufactured item.
Press from improvised tools

One of the most popular DIY garage gadgets is. To create it you will need hydraulic jack, metal surface, which will serve as the basis for the moving part of the press, springs and profile pipes or a channel to create a frame. Next:
- create a frame by welding channels and reinforcing the structure with transverse stiffeners; transverse corners are also welded downwards for stability;
- the movable platform is attached to the upper frame with springs, and a jack is installed.
The press forces are regulated by a jack.
Depending on the needs of the garage owner, other useful homemade machines, for example, drilling, made on the basis of a drill, secured with clamps and moving along a rack using a gear, or cutting, or turning.
In addition to the devices listed above, you should take care of the location of work clothes, provide for the presence of a fire extinguisher or sand (based on fire regulations safety), consider ventilation and lighting systems.
Thus, with a little ingenuity and thriftiness, you can make accessories for the garage with your own hands, thereby ensuring compact storage of things and freeing up enough space for minor car repairs and work related to the maintenance of certain home appliances.
As they say, there is never too much space in the garage. Men who spend a lot of time in the garage will agree that in some cases every minute and every square centimeter of free space counts. This is why a garage handyman needs competent organization workspace. Various people help out and help here in every possible way. devices for storing building materials and work equipment, machine parts and other things necessary for work. To ensure that your electronic, garden and garage gadgets are always in their place, use the following devices:
- stands;
- shelves;
- retractable panels;
- racks;
- organizers for tools.
For clarity, we also offer homemade products for the garage and home handyman do-it-yourself YouTube video will reveal all the nuances of organizing your workspace and suggest fresh ideas.
DIY crafts at home with your own hands
Man has been making homemade crafts since prehistoric times. Actually, all industrial processes are improved once artisanal or home-made developments craftsmen. Sometimes we don’t even think about the fact that we pay for things that we can do with our own hands. DIY homemade schemes are easy to find online, and the materials can be purchased at a hardware store or found at home.
For example, from cardboard box and a piece of fabric You can make a convenient portable organizer for towels and other textiles.
The topic of storing all sorts of little things is inexhaustible, fortunately, as is the number of ideas. Good ideas for decor You can also draw from ordinary things - let them be buttons or empty tin cans.  Cool shelves are made from ordinary drawers. How do you like this idea?
As you have already understood, if you have detailed instructions, it is not so difficult to make homemade products with your own hands at home. The video will help you understand all the nuances of this enjoyable activity. Useful tips, interesting ideas- Everyone should watch it.
DIY crafts for the garden and garden with your own hands
At the dacha there is usually some free time for creativity and arrangement of the surrounding space. That's why It's worth having a few on hand fresh ideas
to implement them on your own summer cottage. Country homemade products at home, with your own hands, they can be ingeniously simple. From scrap materials you can make unexpected and extremely useful things for home use. 
Ordinary pebbles turn into fairy-tale animals.From an old teapot It makes a wonderful flower pot.
Used tires– it has already become a classic in the world garden figures. Stylish lamps for country interior – do it yourself from an ordinary jar and candles (don’t forget about safety precautions).
- a great idea for a small cottage.  Do-it-yourself homemade products for the garden and garden are often made by yourself, without unnecessary time and financial costs. Perhaps you had no idea how useful it is for household will turn out to be plastic bottles. Plastic bottles that have gone out of use can serve as the basis for an incredible decorative flower bed.
  Cool “blooming” pillars will significantly decorate your garden space.
Do-it-yourself garden furniture, successful homemade products: photos and drawings
In the previous sections, we told you about homemade products that will become indispensable for the household and home life. However, we should not forget about rest, before which, nevertheless, you will have to work a little. Cozy armchairs, various tables and benches, swings and hammocks- all this country and garden bliss can settle on your site. We invite you to familiarize yourself with photo instructions and manufacturing drawings. garden furniture. We have selected the best options for you.
Preface
Some motorists consider the garage a second home. Electrical wiring in the garage is important for comfort; it’s not difficult to do it yourself. We'll tell you how to install wiring and alarm systems and make all the necessary furnishings: shelving, shelves, workbench and hand press.
A garage press is assembled from scrap materials. No complex parts are needed; it is made practically from scrap metal scraps. We will need:
- Two sections of channel, 80 cm long each, with shelf dimensions of 50x30 cm.
- Piece profile pipe with a diameter of 40 or 60 mm, a length of 2.5 meters.
- Iron plate 8 mm thick, dimensions 250x250 cm.
- Two corners, one of which is 300 mm long, with a section of 50x50 mm, the second is 250 mm long, with a section of 25x25 mm.
- The hydraulic jack is the main mechanism of the press.
- Two springs and bolts of different diameters for fastening. They are selected locally.
The base on which the press is located can be any plane, as long as it is strong and solid. Usually the press is installed on a workbench.
Homemade press on a workbench
First we make the side racks on which the entire mechanism rests. To do this, we take two sections of channel. From the bottom, for emphasis on each, corners are attached with the letter T. You can immediately make fastening points in them for subsequent installation on the base by drilling holes in four places on each edge. Then, using the same principle, a corner is attached to the upper part of the channel, and the pressing part of the press - a metal plate - is attached to it.
Now on the bottom of the support channels you need to make fastenings for the springs that return the press mechanism back. To do this, two holes are drilled and a bolt is screwed in from the inside. Then, using the same principle, the two upper fasteners are prepared on the underside of the pressure sheet.
Now all that remains is to make a stand for the improvised press. To do this, two profile pipes are cut, the length of which is slightly longer than the side supports from the channel. Connect them in such a way that they tightly grip the vertical posts of the press, but do not clamp them. A jack is installed under them, and holes are drilled in place for its fastening.

Improvised press on a stand
The homemade press is ready. For smooth movement, the side channel is lubricated with grease or oil. When the need arises to use it, the mechanism is installed on prepared mounts and the frame is tightened with bolts.
It’s easy to build an alarm system in the garage with your own hands; you don’t need any fancy “devices” for this. All that is needed is an old push-button telephone, a sealed contact, a spring switch, or better yet, a breaker and wires.

Do-it-yourself telephone alarm for the garage
The alarm is assembled as follows:
- On your phone, you need to set up a one-click call and enter your number.
- Then carefully disassemble it to connect the alarm wires.
- If the “hang up” and “call” functions on the device are controlled by one key, then the first wire is soldered to it, and the second to the speed dial digit.
- If these functions operate separately, then the third wire from the alarm breaker goes to the key.
- If the button is used with two contacts, then they are soldered onto the call and dial function button.

Assembling a homemade garage alarm from a telephone
When making such homemade products, keep in mind that the breaker button will play a major role. It must be installed on the edge garage doors between their opening and closing parts. At the same time, it should be positioned so that rain and snow do not fall on it. And the phone needs to be hidden in an inaccessible place, for example, in the far corner of the rack you built. To do this, you need to solder long wires to the contacts in advance. When closing the garage, the breaker button is pressed by the garage door leaf, and at this time the alarm is in standby mode. When the gate is broken or opened, the contact opens and the circuit signal is sent to the telephone, which will dial the entered number.
Remember that DIY projects like garage alarms require a certain amount of secrecy. You don’t need to tell everyone what a craftsman you are.
It is simply impossible without such structures as racks with shelves. You can put all the little things, spare parts, tools on them and attach them homemade press in disassembled form. To ensure that such homemade products fit into the garage space, first determine the location for their installation. They are usually constructed on one side of a wall or at the end of a room. The width must be calculated so that there is free access to the car and the open doors do not touch the pillars.
To install shelving you will need:
- block with a cross section of 50x50 mm,
- sheets of chipboard or OSB for the construction of shelves,
- iron corners and nails.
The base of the rack must be strong, because the considerable weight of the laid out tools presses on the shelves. Carry out all the calculations in advance and only then start working.

The basis of a homemade tool rack
The block is attached to the ceiling first. To do this you will need self-tapping screws plastic stoppers. Using a hammer drill, holes are drilled along a pre-marked line in increments of 20–30 cm. Plugs are installed in them and the block is attached to them with self-tapping screws. Then the plumb line determines the installation location of the lower bar. Both the top and bottom bars should be on the same horizontal line to keep the shelving level and strong.
Now you need to install the vertical posts. For better stability of a rack with shelves, they need to be fastened every 40–50 cm. They are fixed with nails, which are driven in using the “oblique hammering” method or using iron corners. We measure the distance from the top bar to the bottom and prepare according to the size vertical elements shelving frame.
Now you need to install horizontal lintels to support the shelves, but first you need to mark the places for their attachment. For this you will need a tape measure. From the floor, mark the distance to install the first row of shelves on the rack on each vertically installed block. Then measure the distance between each stand. We cut the bars to these sizes. Now they need to be secured. We insert one between the posts and secure it with screws from the end, two on each side. This way we install all the frame elements. Then, from the installed bars, the second row of shelves on the rack is marked with a tape measure. They are installed in the same way.

Installation of frame elements of a homemade rack
Before installation, it would be better to calculate in advance the number of shelves on the racks and assemble the frame according to the drawn-up drawing or diagram.
Having collected outer frame, all that remains is to fix the bars on the wall to install the shelves. A line is marked on the wall, at the level of each row of cross beams on the frame. Then the horizontal position is checked with a building level and the timber is attached along the entire length of the structure according to the markings.
All that remains is to make the shelves for the rack and install them. We measure the distance from the wall to the edge of the frame and from one vertical stand to another. We cut according to the dimensions obtained chipboard sheet, install it in place and fix it on top with self-tapping screws for reliability. Likewise we make all the shelves.

Shelves usually don’t have doors; you can hang a dark fabric curtain along the entire length. That's all, the place to store the necessary things is ready. All that remains is to simulate homemade workbench and the garage will be stocked.
It is impossible to make homemade items in the garage without having a workbench at your disposal. First, its support is assembled from corners or a profile pipe. It is better to connect these parts by welding. But if this is not possible, then bolted fastening is allowed. But for this you will have to additionally mark the joints and drill holes. The convenient height of the finished workbench is 90 cm from the floor. This will make it more convenient to carry out work at the workbench. But for some it is better to repair while sitting, in which case the height of the workbench will be different. The dimensions and dimensions for each garage are different. And it’s better to decide on them before assembly.
Having assembled the base, we move on to making the tabletop for the workbench. Recommended thickness is 7–7.5 cm. Can be made from a single sheet of multilayer plywood 100 mm thick. If this is not possible, we will do it differently. Let's glue together a table top from several sheets of regular plywood. The standard thickness is 1 cm and in this case 7 pieces will be enough. Having decided in advance on the size of the workbench (its upper part, where the table top will be attached), we saw off the plywood along it. You can use PVA glue for connection, but better moment or BF. It must be applied to each sheet separately and after waiting for 3-5 minutes, connect all the sheets.

Making a workbench top from plywood
After this, the glued sheets must be laid on a flat place and pressed down on top with a heavy load; everything should remain in this state for 24 hours. In order not to cut each sheet of plywood to size, you can first glue them together, and then cut out the tabletop for the workbench from the prepared material.
Now you need to cut off an iron sheet for the top covering of the working surface of the workbench, on which all work will be carried out (metal 4–6 mm thick is required). For accuracy, it is better to place it on plywood and trace the outline with an awl or nail. Then cut the sheet with a jigsaw equipped with a metal file. The tabletop must be secured with bolts, having previously drilled holes in it and on the workbench. After assembling the workbench, you can make small shelves and cabinets with doors in its lower part. Any plywood or pieces of chipboard left over after making the racks will be suitable for this.

Iron sheet for workbench top cover
A variety of homemade products make the life and work process of a car enthusiast much easier. There is no need to look in the corners to see where everything is, all the details are in their place. A simple-to-assemble alarm system will reliably protect the garage from burglary or car theft.
An ideal garage should organically combine the functions of a reliable shelter for a car and a well-equipped place for performing various repairs and other work. There are a number useful recommendations By interior design garage, while most necessary equipment you can make it yourself without spending money on buying them.
Work on the interior arrangement of a garage involves the use of many different useful devices. Read the suggested instructions and your garage will become the most convenient and comfortable.

Usually in the garage you have to store not only the car, but also many tools and other accessories. For convenient placement All this needs to be done is to equip the garage with racks, shelves, hooks and other similar devices.
The best option is a spacious rack. You can do it yourself. Fill in the remaining free space convenient shelves. There is nothing complicated in making them either. More detailed instructions you will receive next.

Get to grips with your tools. Arrange them according to frequency of use. The items you use most often should be stored in the drawers closest to the workbench. Store heavy equipment on the lower shelves of the rack; allocate space near the ceiling for spare tires - you will need them least often.
Secure the brackets
These devices will help you conveniently store replacement tires. Place the brackets closer to the ceiling, so the wheels will not take up useful space. For tires, buy large bags, or better yet, special covers to protect them from dust.

He's a workbench. The structure can be easily assembled with your own hands from boards and bars. You can attach a vice and other tools needed in the garage to the table. It is more convenient when the workbench is installed next to shelves and racks.
Organize your lighting system wisely
You will need several lamps: above the place where the car hood is usually located, above the desktop, in others important places garage. Ideally, the lighting system should be organized so that you can turn on all the lamps at the same time and each of them separately. An ordinary double switch will help you do this.
Install an outlet near your garage door and above your workbench.

Designate a place to store your work uniform. One shelf or at least a basic hook will be enough. Also provide a place to store work shoes and personal protective equipment.
Security Issues
Substances such as gasoline, oil, etc. are stored in the garage. To store them, you need to allocate a separate cabinet or at least a shelf not far from the gate. Place a box of sand nearby and hang a fire extinguisher on the wall.

Each tool in the garage must have its own place, otherwise there will simply be no order in the room. For organization convenient storage pack your things homemade rack. Ready-made models are quite expensive, and do not always meet the needs of a particular person. Therefore, it is much more profitable and rational to make a rack “for yourself” right away.
Assemble the rack in such a way that it can withstand a load of at least 150 kg. In this case, the load on each individual section should not exceed 500 kg. The rack can be assembled from wood or metal. The design can be straight or angular.
As for wood, preference should be given to the most durable species such as oak, hornbeam, beech, etc. Everything before assembly wooden elements structures are treated with antiseptic impregnation. Thanks to this treatment, the wood will be more resistant to moisture and various bacteria and will last much longer.
If possible, plan and sand all frame elements with high quality.
Make shelves from plywood or chipboard. DVL and OSB boards are also suitable. The main thing is that the plate has a thickness of at least 4 mm. The higher the expected load on the shelves, the thicker they should be.

To give the shelves a more presentable appearance, it is recommended to cover them with decorative film or paint them. Also, such processing will allow you to better get rid of contaminants in the future.
The simplest rack is made in several steps. Complete each of them in sequence. Various sizes will be given below. You can stick to them or change the dimensions at your discretion.
First step. Take a 9 cm wide board and cut it into several pieces of different lengths: 30 cm, 27.5 cm and 18 cm. From these pieces you will make spacers.
Second step. Take a board 19 cm wide and cut it into required quantity pieces 36 cm long. From these pieces you will make shelves for your rack.
Third step. Mark on the board that serves as the base the places for attaching the spacers. It is recommended to install spacers at a distance of 2.5 cm from each edge of the base. Glue the top spacer, then nail it to it top shelf with pre-fixed spacer. Do similar manipulations with the remaining spacers and shelves. The bottom brace is attached last.
Fourth step. Turn the rack over and tighten the spacers to the base of the structure using screws.
Fifth step. Handle everything thoroughly wooden surfaces sandpaper and apply a double coat of oil varnish. If you wish, you can cover the shelves with decorative film or decorate them with other material at your discretion.
Sixth step. Attach the shelving unit to the wall using anchor screws. Place fasteners under the lower and upper shelves.

Using this scheme, you can assemble a rack from the required number of sections. To strengthen the structure, place between sections wooden blocks. This will help distribute loads evenly throughout the system.
If there is no space to install a full-fledged rack or, on the contrary, you have installed racks and there is little unoccupied space left, be sure to make several convenient and simple shelves for storing various accessories.
First step. Determine where to place the shelves. Accordingly, set the required quantity and optimal sizes products.
Second step. Prepare the required number of boards and fasteners in accordance with the plan drawn up at the previous stage.

Third step. Mark on the walls where the future shelves will be attached.
Fourth step. Armed with a hammer drill, prepare holes in the walls in accordance with the markings and screw dowels into them. It is best to use dowels with hooks - they will provide more reliable fixation shelves
Fifth step. Attach eye hangers to the board. When choosing a distance, refer to the markings on the wall. Use self-tapping screws to attach metal hangers. If you don't have them, you can get by with ordinary nails.


Metal shelves

Metal shelves for garage

Metal shelves
Sixth step. Fix the finished shelves in their intended places.
Remember: it is better to make several short shelves than one long one, which will break under the weight of the objects placed on it.
If you wish, you can do decorative finishing shelves, for example, cover them with film or paint them. Make sure the shelves hang level. A tool called a level will help you control this moment.

To make working in the garage as comfortable and productive as possible, assemble and install a workbench in a convenient place. You can use it to repair both car parts and other household items. A homemade workbench has a big advantage over finished model factory production - you can make a table of the size that you need.
Workbench assembly kit
- Boards.
- Bars.
- Fasteners.
- Plane.
- Ties.
- Tool for wood processing.
- Wood glue.
- Sandpaper.
- Drying oil.
First step. Think it over optimal design workbench. The main elements of such a product are the underframe and the tabletop. The design also includes one or more clamping devices.


Second step. Assemble the tabletop. The best option– a tabletop made of 20 boards measuring 200x10x5 cm. Prepare grooves for stops measuring 2.5x2.5 cm in the 5th and 16th boards. Place the grooves in 25 cm increments.
To join the boards, use glue and metal ties. Before gluing, the surfaces of the boards must be planed.

Third step. Plan the dry tabletop thoroughly. You should get a smooth, flat surface. Over time, the wood will shrink. You need not to miss this moment and tighten the nuts on the ties in a timely manner.
Fourth step. Make the legs. To do this, use high-quality blocks measuring 80x10x10 cm. Make grooves for the brackets in the front supports. The brackets will later be connected to the longitudinal beam. This type of beam is commonly used in the construction of window frames.

Fifth step. Assemble the base of the table from two frames and fasten it to the supports. Assemble the frames from 10x5 cm boards. Use a tenon joint. The frames are directly cut into the table legs to a depth of 2.5 cm and bolted to them. Attach to bottom frame plywood sheet. A sheet 1 cm thick will be enough.

Sixth step. Attach the side and back support walls to the table. To make walls, use chipboards or plywood 1 cm thick. Build a convenient cabinet with a hinged door on the left of the table.

Seventh step. Connect the workbench top to the top frame using bolts. It is recommended to prepare the holes for the bolts in advance - this will make connections faster and easier. Tighten the bolts so that their heads are recessed into the wood.
Eighth step. Make a miter box. This device will help you in the future to cut workpieces at the required angles. The miter box is assembled from wooden strips 2 cm thick. Attach the finished miter box to the table using stoppers.
Ninth step. Treat your homemade workbench with drying oil and varnish. Give paint coating dry and you can start using the table. If necessary, install a vice on it or, for example, circular saw. At this point, focus on your needs.

Video - DIY garage accessories
Video from the channel “TEXaS TV”. Topic: gadgets and more for the garage. At one time, when the master was just starting to repair cars, money for good tool and there wasn't. Complex and expensive designs had to be made by myself. The author of the channel decided to prepare a review of homemade devices.
Watch the YouTube channel video “Hands from Shoulders”. Excellent devices for the garage and cottage.
If you have some old vacuum cleaner, it can be returned to service again, remake it, for example, a blower. With its help, you can quickly clean dust from some equipment or restore order on the street. You will need rubber seals, a motor and part of the housing. We redesign the button, leg, handles and get a compact and convenient device. To focus the flow in this case, the fire extinguisher socket. There are probably plenty more alternative options.
This summer we plan to build a similar dryer at our dacha. It can be used not only for fish, but also for meat, apples, and mushrooms. Cool option. There is a thermostat that maintains the required temperature in the chamber. Air intake from 150 ventilation pipe. It has a built-in heater consisting of two incandescent lamps. On top there is a filter from mosquito net. Fan from a server rack. The outlets are directed to the street.
An interesting design of a milling copier. Movement along shafts with a diameter of 20 mm is carried out using linear bearings.
If you build something from foam blocks, then you have probably felt the beauty of lifting them to the floors. It's still a pleasure. Weight more than 30 kilograms. Simple design gripping together with a winch or electric hoist will make work easier.
An improved version of the vice for welding work. Additional instructions were added to the device, which made it possible to connect parts in 3 planes at once.
At the beginning of May, the busy season begins for summer residents, including potato growers. If you have a walk-behind tractor, then it makes sense to think about automating the harvesting process. Moreover, we have a whole summer to prepare. This digger is of a screening type, but there is no sound in it as such. This greatly simplifies the process of making the device. Instead, the rods on the ploughshare were extended. The soil with potatoes is picked up by a ploughshare and served on a table made of twigs. The latter vibrates, the soil wakes up through the cracks, and the root crops on the other side fall to the ground. All that remains is to pick it up and put it in a container.
In a private house garden shredder – useful thing. There is no need to think about where to put the cut branches. Secondly, your garden will repay for such fertilizer excellent harvest. The knives are mounted on disks 16 mm thick. Cutting elements made from springs. Hammers for chopping branches to the required size.


