Dried leaves, flowers and herbs can be used to create unique paintings- both exquisitely complex and completely simple, which even small children can do. There are several techniques for making paintings, and perhaps you yourself will come up with something new. |
Collect and dry beautiful plants and enjoy creativity with your children, develop imagination, neatness and a sense of beauty.
Collect leaves, flowers and herbs for future paintings it is possible from spring to autumn.
Dry They are better in old heavy reference books or magazines. Thick plant stems do not dry well, so it is recommended to cut them in half lengthwise. Leave the plant in the book for 10-14 days.
Glue take it thick enough so that drops do not form.
 If according to your intention colorful but transparent petals
must be superimposed on a dark background and retain their original color, then first you need stick them on thin white paper
, cut along the contour, and then include it in the composition.
If according to your intention colorful but transparent petals
must be superimposed on a dark background and retain their original color, then first you need stick them on thin white paper
, cut along the contour, and then include it in the composition.
So, on a fine autumn day you went out to the park or forest and collected a large collection of beautiful bright leaves and plants.
Applications can be made as from freshly picked leaves and dried. If you want to preserve the leaves, two drying methods can be recommended.
The first, well-known, method - putting leaves between the pages of an old unnecessary book. It is better to lay each leaf on both sides with a paper napkin.
The second method is express drying of leaves using an iron. Just remember that the leaves are not sterile, so it’s better to iron them on a surface that you don’t mind throwing away later, for example, on large sheets paper. You also need to place a sheet of newsprint or a paper napkin on top of the sheet before ironing. And now more details.
 Powder drying
This method of drying flowers and leaves is not quick or easy. It will require bulk substances with hygroscopic properties: sifted river sand, semolina or corn grits, salt or crushed chalk.
Have powder drying and its advantage: it completely preserves the shape and vibrant color of plants or inflorescences.
Heat the sand in a frying pan so that no moisture remains and let it cool. Pour 2 cm of sand into cardboard box and place flowers on it.
Gently sprinkle sand on top until the plants are completely covered.
After two to three weeks, you need to make holes in the bottom of the box so that the sand can spill out.
Shake the dried flowers slightly to remove any remaining sand.
These flowers can be used for volumetric paintings or making floral arrangements.
Drying fast-withering plants
There are also plants that wither faster than they can dry (hydrangea, bulbous plants, heather, chicory). They require air drying and immersion of the stems in water.
Cut the lower part of the stem at an angle of 45 degrees and place it in a vessel with water to a height of 7.5 cm.

Drying plants using a hot method (express drying)
Hot drying, that is, iron drying ideal option when to dry the leaves for the herbarium for tomorrow. Also, hot drying can preserve the original color of cornflowers.
Wipe the leaves with a damp cloth or cotton pad to remove dirt and dust. There is no need to wet or rub too much so as not to damage the fragile surface.
Cover ironing board clean paper and place the leaves on it.
If you use newspapers, be careful, as printing ink can print on both the leaves and the surface of the ironing board.
Cover the top with another sheet of paper.
Switch the iron to the lowest temperature and check that there is no water in it. If your iron does not have too high power, then you can set the temperature closer to average, but not the maximum, because it is too hot iron will ruin the leaves.
Iron the leaves several times, then remove the paper and turn them over to the other side. Cover with paper again and iron.
Repeat the procedure until the leaves are completely dry.
Drying plants for garlands and crafts
Leaves and flowers that you want to use not for herbariums and paintings, but to create garlands or other crafts, need to be dried without a press.
To dry, place the plants on paper and straighten them carefully.
Tie the flowers in bunches and hang them with the inflorescences down. The room should have good air circulation and relative dryness
 Drying plants and leaves under pressure
Drying leaves under a press is the most famous and simplest method.
Leaves and flowers are simply transferred with sheets of paper or paper towels on both sides and placed under a press, or in books and magazines.
The paper must be changed every day to remove absorbed moisture.
Flowers and leaves will be ready to use after a week.
If the workpieces have become too brittle, dip them in a solution of water and PVA glue (4 parts water to 1 part glue), and then dry.
Leaves dried and processed in this way are ideal exhibits for a herbarium.
Drying plants on a wire rack
Some plants can be dried horizontally on a wire rack (for example, ivy). Some are best not turned upside down (physalis).

Drying flowers in the oven
Single large flowers whose petals are rich in liquid, such as roses or tulips, can be dried in the oven at low temperature.
Watch the process carefully: the flowers should not turn brown.
Before you start work, cover the table with oilcloth so as not to stain it with glue. Prepare the base - a sheet of cardboard, collected or dried leaves, scissors, glue (preferably PVA), tweezers.
First you need come up with a future picture . Then arrange it on a separate sheet of paper. And only then start gluing the individual leaf parts to the base. It is best to apply the glue in droplets along the edges. If you apply glue to the entire surface of the sheet, it may warp when drying the application.
Need a finished picture put under a press for one or two days. Don't forget to do it for her frame!
Types of applications
Overlay applique.
Try to start by coming up with pictures that do not require cutting out any details from the leaves, but are created by overlaying the leaves. You can come up with a lot of such pictures: butterflies, mushrooms, chickens and other birds... The missing elements can be drawn in with a felt-tip pen or made from other natural materials.
Having gotten the hang of simple pictures, children can begin to come up with multi-tiered images. In this technique, leaves are glued on top of each other in layers. The application will turn out bright and cheerful if the leaves are different in color.

Silhouette applique.
In this type of appliqué, excess parts of the leaf are cut off so that the result is exactly what the little artist intended.

Modular application (mosaic).
Using this technique, a picture is created by gluing many leaves of the same or similar shape and size (or, for example, maple seeds). This way you can make the scales of a fish, the tail of a cockerel or a firebird.

Symmetrical applique.
It is used to create individual images or entire paintings with a symmetrical structure, as well as to obtain two completely identical images (for example, reflection in water). To do this, you need to select similar leaves to get an image with its “reflection” or symmetrical in itself (“Butterfly”, “Dragonfly”, “Landscape with a lake”, “Boat on the river”).

Ribbon applique.
A type of symmetrical appliqué. Its difference is that it allows you to get not one or two, but many identical images - ornaments. You get a whole “round dance” of trees, flowers, mushrooms, butterflies, etc.


This year, my daughter and I very thoroughly, like squirrels, stocked up on autumn leaves, and all kinds of nuts, acorns, and pine cones. The older the child gets, the more interesting it is to make crafts from all this material - the daughter does more and more herself, and often we just do something nearby, the mother does hers, the child does hers. It is very pleasant to spend time like this. I already mentioned on FB that we made stamps out of fall leaves and apples - we were so into it! And this fall we did it for the first time “waxy” leaves - leaves preserved in stearin and wax. I had never tried this before and simply dried the leaves - on outdoors, in sand, or soaked in glycerin. I love floristry very much and am quite good at it. Now we've mastered it new technology which we are both delighted with. It is not at all complicated and gives a very effective result. Now not all the leaves have fallen off yet and you can also try to make wax autumn leaves, which retain their shape and color for a long time.

I traditionally don’t take photographs of a detailed masterclass, but I can describe everything in words. Let there be just a lot of photos of the result.
So we need:
1.Fresh autumn leaves (ideally - maple leaves with petioles);
2. Natural wax or stearin candles (I have the most ordinary white IKEA candles, you can use transparent candles or special kits for making candles. The final result depends on the type of wax - here everything can be found out experimentally.);
3. Baking paper or foil; (we will put leaves on it to dry);
4. The saucepan and container for the water bath are preferably wide, so that your largest leaves can easily fit in;
5. A wooden board or dish, tray, baking sheet, where the finished leaves will be temporarily stored and dried;
6.Stove, kitchen, free time and positive mood.
The process itself is as follows:
1. Melt the wax or stearin in a water bath. (Amount so that you can freely dip the leaf, approximately 1.5-2 cm from the bottom of the container.) As soon as the wax has melted, reduce the heat to a minimum to maintain heat.
2. Spread baking paper or foil near the stove - the leaves will dry on it so that they do not stick to the surface. The distance from the stove to the foil should be minimal; ideally, cover the edge of the stove with foil, otherwise you will have to spend a long time and tediously scraping off drops of wax or paraffin.
3. Take the leaf by the petiole with your hands and quickly dip it into stearin (wax). Make sure that it is completely submerged, but do not cook it in water for a long time; 6-10 seconds will be enough. Take it out and let the beads of wax drip directly over the pan. To do this, first hold it for 6 seconds with the tips down, then, if it is tight, turn it a little to completely cut off all the drops and so that no accumulated wax remains on the tips. Then quickly place the sheet face up on foil or baking paper. The sheet dries quickly - in about half a minute. Afterwards, you can immediately transfer it to the same baking sheet or dish where the leaves will finally dry out or wait their turn for use in crafts. But after a minute or two the leaves can already be used for work. Foil or baking paper must be periodically cleaned of wax drops, or a new one must be placed so that the drops do not stick to the leaves. When you put the sheet to dry, a small drop may remain on the tip and go beyond its aisles - after drying, this drop can be easily removed manually with a knife or fingers, but so as not to damage the entire coating of the sheet.
If a child participates in the process, then he must be at least 4.5-5 years old, and then he can dip the leaves into the wax himself, but only with a long petiole and after a thorough explanation by the mother of how hot the wax is. As soon as the child is tired, let him become a spectator. But in general, although this activity is interesting and fascinating, it is not for kids. My daughter made 6 leaves and then helped sort the finished leaves.
As a result of processing, the leaves become very beautiful: they retain their shape and color. It is impossible to make them absolutely even, since nothing can be placed on top when drying. So the natural curve will be preserved. But such a rich shade cannot be achieved by simple drying. White stearin causes the leaves to shine slightly, as if covered in frost or as if they were candied, and yellow maple leaves become brighter, more saturated. It is not so easy to work with white stearin - when it hardens, it can show flaws in the work - accumulations of white on the hollows of the leaves. You need to very carefully remove stearin from the leaf - practicing to make precise movements. For stearin, you need to choose smooth leaves without dents. Variegated leaves with white spots are also good in stearin. Stearin can break off from the leaves if children's fingers pick at it. But he doesn’t get down on his own. The leaves turn out to be quite fragile - as if they were glass or frozen, but durable. It’s a pity that the photos don’t convey the delightful sensations that arise when you hold this “wax” sheet in your hand and rustle it! After paraffin we tried natural wax. With it, the leaves do not become hard, but remain soft and acquire almost matte look. Of course, you shouldn’t bend them - the coating will lose beautiful view. All red leaves are very good under wax - for example Maiden's grapes. But the yellow maple leaves are not as impressive as in stearin, and they curl slightly. In general: depending on what you dip the leaves in, you get very different results. Since you don’t know what exactly will happen, you feel a little like a sorceress.
We put some of the finished leaves in a beautiful dish to decorate the dining room, so we could sort through them and admire them. And the other part made decorations for the windows: they tied the leaves with a thin black thread and attached them above window frame. These leaves have not lost their leaves for two weeks now. appearance. Our garlands are good both in cloudy weather and in sunny weather. In the sun, of course, they shine incomparably - like stained glass. And they rustle slightly from the breeze... But in general, from such “wax” leaves you can make anything - a bouquet, a volumetric applique, an autumn tree, a mobile, a garland - it all depends on our imagination. And the technology itself is magnificent. My daughter and I are very pleased and will continue to experiment with it next year.

Material prepared for work.

Water bath. Irgi leaves are drying nearby. Only I can dip such tiny leaves in wax - it is dangerous for a child to do this. Nearby lies a knife, with which I remove droplets of wax from the foil.

This photo and one below: - leaves in stearin.


This photo and the one below: leaves in natural pure wax.


We liked the paraffin treatment better - that’s why we made more of these leaves.

Leaves in stearin. The most spectacular and beautiful. Although many people also like waxy ones, which feel like soft, thin skin to the touch.
Those in stearin are as if candied, or in frost. They feel hard and fragile to the touch.

I made a wreath for the wall from leaves treated with stearin. These are the leaves of the serviceberry.


For contrast, this is how maple leaves dry at home without any treatment. My daughter was impressed.
True, we really like this bouquet: it is stylish and beautiful. In general, every dried maple leaf, when curled, becomes like a sculpture.

This is our composition on the window. Here you can see exactly how the leaves were tied - with a black thread behind the petiole.


Our composition is made from leaves treated with stearin. It is good both in cloudy weather and in sunny weather.


It's on another window - in the nursery.


The shadows of the leaves on the window are especially beautiful with the curtains drawn. They also sometimes “walk” around the room depending on the time of day.


The child is delighted with our “eternal” magical leaves.

Golden autumn is in full swing, the beauty in the parks is indescribable. Our whole family really loves to walk through the autumn forest, rustle the leaves, lifting whole “pillars” with our feet, arrange fireworks from them, and on the way home, collect the most beautiful ones and put them in a vase at home... Eh, but all this beauty is warm at home so short-lived. A couple of days pass and the leaves dry out, wither and begin to curl up, but I really wanted to preserve the bright colors of autumn and admire them in winter!
And now the means have been found! Welcome to the cat to find out all the “magic”, as well as fun ideas for what leaves can be used for!
Saving leaves
The simplest and known method Preserving leaves means drying under a press. But this method is suitable if you want to make a herbarium. Simply storing it in a vase or somehow decorating a room with dried leaves does not work very well, because the leaves become too brittle. Therefore, if we want to decorate a room using leaves, then it is better to choose another method of “preservation”.
In order to “extend the life” of fallen leaves, it is best to collect “wet” (recently fallen), undamaged leaves
Method 1 – soak in glycerin

To do this, we need a baking sheet (or a deep tray), a board (which will completely fit into the tray or baking sheet, in fact, glycerin itself (a lot)
Glycerin is the best remedy to maintain plasticity.
We make a solution - 2 parts water and 1 part glycerin. We need enough solution to drown our leaves in it. The solution is poured into a tray or baking sheet, leaves are placed in it in one layer, and covered with a board on top so that the leaves are completely recessed. We leave it like this for 2-3 days, and then check it. If the leaves have become plastic, you can dry them, but if they still feel a little brittle and “dry” to the touch, then it is better to leave them for a couple more days.
These ready-made leaves are perfect for decorating a room - wreaths, garlands or just a bouquet.
You can also preserve small twigs in a glycerin solution.

How to do it:
1. Cut off small branches with leaves and immediately immerse the stems in a container with warm water. Let them sit there for about 2 hours, away from direct sunlight.
2. Make a solution of 1 part glycerin with 2 parts water (you can add a few drops of dishwashing liquid) and bring it to a boil. Then reduce the heat and simmer it over low heat for 5-10 minutes.
3. Allow the solution to cool completely.
4. Remove the branches from the container with water, and break their ends with a hammer so that a larger surface can absorb the solution.
5. Place the branches in a solution with glycerin. Keep away from direct sunlight and other heat sources until small drops of dew appear on the leaves. This means that the leaves have absorbed everything they can.
6. Remove the twigs and dry the leaves.
7. Hang the branches with their leaves down to dry.
Method 2 – wax paper

You will need wax paper (for baking), 2 towels, iron
We cut a piece of wax paper and lay our leaves on it in one layer so that there is space between them. Cover the top with the same sheet of wax paper. It turned out to be such a “sandwich”. Now he rips the top with a towel (a kitchen towel, not thick) and carefully, so as not to displace the leaves, iron it. NO STEAM! It is also better to put a thin towel on the surface on which we iron so as not to stain anything with wax. The pieces of wax paper should completely stick together. After cooling, we cut out our leaves, leaving small edges so that the paper remains “sealed”. The leaves are completely intact!
Method 3 – wax procedures

pic
We take paraffin wax (we used regular candles) and melt it over low heat. ATTENTION – we melt in a container that you don’t mind, it’s impossible to wash off completely hardened wax (we’ve had a special bowl for these procedures for a couple of years now).
Where the leaves will dry later, we lay wax paper (again, it’s better to lay it under kitchen towel) (or you can hang the leaves on a rope to dry).
We take the leaf by the stem and carefully immerse it several times in the melted wax.
And now a few fun ideas what can you do with leaves
Funny herbarium


pic
A figured hole punch is always useful

pic
Shall we play?

pic
Let's paint
pic

Drawing with prints


pic
This way you can make cards as a gift.

pic
And if you take craft paper (brown) and decorate it with many prints, then the issue of gift wrapping will be solved!
Can you make prints on fabric?

pic

pic
Using pencils


The beauty of autumn foliage is fragile and short-lived. Today it pleases us with its special aroma and rainbow colors, and after a few days only a handful of dry wind remains from the yellow-purple petals. However, if desired, the tender leaves can be saved for later use for various decorative purposes.
Let's try to figure out how to do this.
You will need:
- leaves,
- glycerol,
- paper towels,
- several large heavy books,
- wax paper,
- iron,
- newspapers.
1. Select leaves, giving preference to whole, flat, relatively fresh and undamaged specimens. Please note that dry and tightly curled leaves do not absorb glycerin well, which we will use as a kind of preservative, which means they are not suitable for long-term storage.
2. In a wide flat container, dilute glycerin in water (ratio 1:2). Dip the leaves into the solution so that they fit freely and are completely covered with liquid. It will take several days for the leaves to absorb the glycerin. If the process goes correctly, then after some time the leaves will be saturated with moisturizing liquid, becoming elastic and soft.
3. Place the soaked leaves on paper towels and leave to dry for 1-3 hours.
4. When the leaves are dry, they should be placed under a press to remove any remaining moisture. You can use an iron or heavy books for this. If you want to dry the leaves using an iron, they should be laid out between newspaper pages and carefully smoothed out, placing the device on low temperature. The iron allows you to quickly prepare the leaves for further manipulation.
If you decide to use a book press, then the leaves should be placed on wax paper so that they are closed on both sides, and placed between the volumes, leaving in this form for several days.
How to use?
Glycerine leaves can be used for a variety of decorative purposes. They retain their shape and color for a long time, so they are suitable for all kinds of autumn-themed fakes.
Collages for children's creativity. Creating funny collages with the image of an animal and flora – exciting activity, which will appeal to creative kids.
You can turn ordinary leaves into strange animals in literally a matter of minutes. All you need for these fakes is stationery glue, scissors, landscape paper and a little inspiration.
Collages can be supplemented with small handwritten touches that will help to play up the foliage elements in an interesting way.
Crowns and bracelets. You can make a crown from glycerin leaves for the autumn festival, which is held annually in kindergartens and schools. A spectacular headdress is assembled like a wreath or made using a cardboard base and double-sided tape.
Using the same principle, you can make an autumn bracelet that will perfectly complement a themed costume.
Another decoration option involves creating crowns with images of forest animals, which are perfect for fairy-tale performances.
You can also make original masks from leaves by simply coloring them with a black and white marker.
Bouquets. As a rule, autumn bouquets- these are simple compositions of multi-colored leaves that decorate table settings or home interior.
However, there are more complex floral techniques that make it possible to make imitation flower buds from leaves. Such bouquets are especially expressive and are suitable for decorating special ceremonies: autumn weddings and anniversaries.
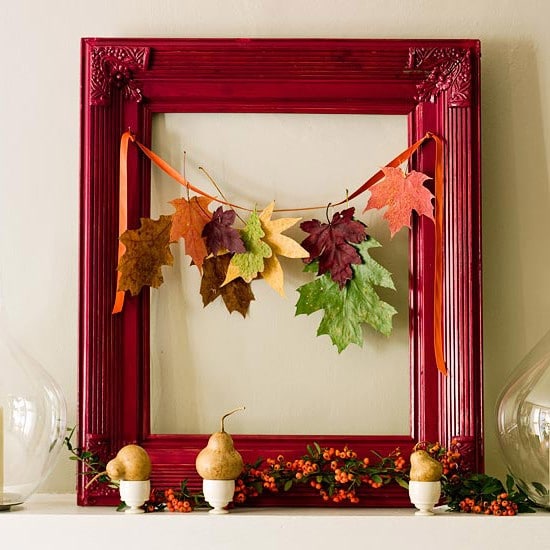
Garlands. By stringing the leaves on a thin thread, you will get a bright garland that will bring joy into your home. autumn mood.
Looking for more sophisticated solutions? Apply glue to the leaves with a brush, generously sprinkle them with shiny glitter and secure satin ribbons at the base, which will help strengthen the garland in the right place.
Stencils. Leaves can be used as stencils to apply interesting drawing onto fabric, paper or glass. There are two ways to make an autumn image. In the first case, the leaves are simply laid out on the surface, then paint is applied on top. When the coating is completely dry, the leaves should be carefully removed - unpainted areas will remain in their place.
Another method involves applying paint to the sheet itself, which is then used as a stencil. For such a print, you can use absolutely any paint (gouache, watercolor, acrylic, fabric paints), and the sheet itself should be painted on the side where the veins are located. It is better to press the stencil with a roller, but you can do without it by simply pressing the sheet with your hand.
In this way you can decorate clothes, home textiles, dishes and other household items.
www.znaikak.ru
How to preserve an autumn bouquet of leaves: saoros
We brought branches of red holly oak from the forest (in the botanical garden they call it Canadian oak) and they are so good. The leaves are large, as if carved, and shimmer in all shades of red. I wanted to admire this wealth of nature longer. And I remembered how they preserved the leaves in childhood. They put them in books, like a herbarium between sheets of paper. It won’t work because there are branches. They ironed the leaves, but they straightened out unnaturally. They also sprayed them with hairspray, probably already completely dry. Although now there are regular varnishes in cans. For now, I put it in a vase and sprinkled it with water. I found a way to treat it with glycerin on the Internet. In fact, I have a cautious relationship with chemistry and it is unlikely that I will glycerinate. But, suddenly, it will come in handy." There is a more labor-intensive, but also much more effective way plant conservation. To do this, you need to dilute glycerin with water in a 2:1 ratio and soak the leaves in it for several days. The time is selected individually for each sheet "(approx. - for fresh ones up to a week)" - it will become transparent-lace, and the color should intensify and consolidate. Remove the leaf from the solution and let it dry thoroughly. Do it differently with flower buds - pour the same solution into a jar and put the flowers in there upside down, secure the stems to the neck and let them soak in glycerin." Link"DECORATING THE HOUSE WITH DRY FLOWERSDried flowers. Preservation with glycerin. Drying in a standing position.
Stage 1. Cut and prepare the material. Evergreens can be cut for preservation at any time of the year, deciduous plants - in mid-summer.
Step 2. Place the plants in an aqueous glycerin solution. Thoroughly mix one part glycerin with two parts boiling water, immerse the plants in the solution to a depth of 7.5 cm. Keep the container in a cool, shaded place.
Step 3. Remove the glycerinized plants. Inspect the plants every week - upper leaves on long branches, wipe occasionally with a cloth soaked in aqueous solution glycerin. Remove the plants when all the leaves change color. The process takes from 1 to 8 weeks depending on the type of plant; if necessary, a solution is added to the vessel. Ready plants blot with a paper towel. Before use, hang the plants for several days with their heads down.Plants suitable for preservation in a standing position:Beech, camellia, rose, cotoneaster, holly, rosemary, hydrangea, cherry laurel, ferns, rowan, pear, oleaster, boxwood, oak, magnolia, broom , willow, rhododendron, eucalyptus." Link. Link
saoros.livejournal.com
In autumn, the leaves on the trees are so beautiful that you want to preserve this beauty longer. The maple leaves are especially beautiful, vinegar tree, apricot, peach (from my observations).
A bouquet can be made simply from leaves, both with and without twigs, you can include dried flowers, bunches of berries in the bouquet, making up beautiful composition. Look at the examples of bouquets in the photos below and you will find inspiration for creating your own beautiful and unique bouquet.
You can make flowers from leaves. The photo below shows the process of making roses in step-by-step pictures. As a result, you can get an extraordinary bouquet of autumn roses.
Autumn is on the threshold, while the leaves on the trees are green, only here and there on the birch tree are they visible yellow leaves, but this is a quick process, in a few days everything will be in a different form. Let's prepare for the golden autumn and plan to collect a bouquet from bright autumn fallen leaves. On the Internet you can see a master class on making roses from maple leaves, author Natalya Yakubova, teacher primary school. This is such a beautiful bouquet of roses made from maple leaves:
To make a bouquet of roses made from autumn leaves please you for a long time, you need to lubricate the leaves with sunflower oil or ready roses grease with oil.
can be coated with varnish or spray paint:
Happy beautiful autumn!
You can make a luxurious bouquet of roses from autumn foliage. We collect leaves. You can take the leaves different colors, sizes, but they must be clean and slightly damp. If the foliage is very dry, then it will not be possible to twist the leaf into a bud.
Wipe the leaves with a cloth, if necessary. Dry it a little if the foliage is wet. We begin to make the middle of the flower. Take a piece of paper and fold it in half - do not squeeze it.
We twist it into a soft tube. We hold it with our fingers and begin to wrap it with the second leaf. By the way, the sheet may be a different shade.
We do this for as many leaves as we want to get petals. We hold the bud with our fingers so that it does not fall apart. We do this, for example, five buds. We connect them together, holding them by the petioles - we collect a bouquet. Roses can be wrapped in green leaves). Cover with varnish.
info-4all.ru
Autumn bouquets and some secrets of their making and preservation
Autumn bouquets are amazing compositions that can combine all the gifts of autumn: flowers, leaves, branches, berries, vegetables and fruits. This bouquet will decorate any interior, giving it warm and rich colors and shades of autumn. And to make these bouquets pleasing to the eye longer, there are several secrets that you can use to extend the life of your autumn bouquet until the onset of winter.
The leaves collected for the bouquet can be greased with sunflower oil, adding a couple of drops to it essential oil, for example an orange. This way you can save your bouquet for more for a long time, and its aroma will improve your mood.
Professional florists use glycerin instead of oil
In a mixture of glycerin with hot water(3:1,) place the leaves or twigs from which you are going to make a bouquet, this way they will not dry out, but will remain soft. Although this method has a drawback - the color of the leaves can change unpredictably.

There is a special flower varnish that florists use to treat cut flowers. You can go to flower shop and ask for help.
Some people advise covering the bouquet with regular hairspray.
And such stunning bouquets can be secured with melted wax by dipping leaves or twigs into it.
After this treatment they will not lose their color and can last for a whole year.
You can also sprinkle your bouquets with sparkles, paint them with gold paint, decorate them with colored ribbons, decorative fruits, cereals, anything that will give them a special autumn feel and set a new note in your interior.

Waxing autumn leaves

In addition to the usual autumn bouquets, the house can be decorated with Japanese ikebana
To make your ikebana beautiful and harmonious, when composing the composition, follow certain rules.


prazdnichnymir.ru
How to create and preserve a bouquet of autumn leaves?
1- Auto and motorcycle
- Motorsport
- Car insurance
- Cars
- Service, Maintenance, Tuning
- Service, care and repair
- Choosing a car, motorcycle
- Traffic police, Training, Rights
- Registration of auto-moto transactions
- Other Auto Themes
- LEISURE AND ENTERTAINMENT
- Arts and entertainment
- Concerts, Exhibitions, Performances
- Cinema
- Painting, Graphics
- Other arts
- News and society
- Social life and show business
- Policy
- Society
- Society, Politics, Media
- Houseplants
- Leisure, Entertainment
- Games without a computer
- Magic
- Mysticism, Esoterics
- Fortune telling
- Horoscopes
- Other predictions
- Other entertainment
- Video processing
- Photo processing and printing
- Other photo-video
- Photography, Videography
- Hobby
- Other
- Military service
- Gold Fund
- Clubs, Discos
- Real estate, Mortgage
- Other unknown
- Religion, Faith
- Tips, Ideas
- Gift ideas
- goods and services
- Other manufactured goods
- Other services
- Uncategorized
- Business
- Finance
- health and medicine
- Health
- Pregnancy, Childbirth
- Diseases, Medicines
- Doctors, Clinics, Insurance
- Children's health
- Healthy lifestyle
- Beauty and Health
- Food and cooking
- First courses
- Second courses
- Cooking in...
- Cooking for children
- Desserts, Sweets, Baking
- Appetizers and Salads
- Canning
- On a quick fix
- Drinks
- Purchasing and selecting products
- Other culinary
- Celebration, Holiday
- Dating, love, relationships
- Friendship
- Acquaintance
- Love
- Relationship
- Other relationships
- Others social topics
- Breakups
- Wedding, Marriage, Marriage
- Computers and Internet
- Computers
- Web design
- Iron
- Internet
- Advertising
- Appetizers and Salads
- Other projects
- Computers, Communication
- Beeline
- Mobile communications
- Mobile devices
- Online shopping
- Software
- Cooking in...
- Cooking for children
- Desserts, Sweets, Baking
- Appetizers and Salads
- Canning
- education
- Homework
- Schools
- Architecture, Sculpture
- business and finance
- Macroeconomics
- Accounting, Audit, Taxes
- Universities, Colleges
- Education abroad
- Humanities
- Natural sciences
- Literature
- Publications and writing articles
- Psychology
- Philosophy, the unknown
- Philosophy
- Linguistics
- Additional education
- Self-improvement
- Music
- science and technology
- Technologies
- Selection, purchase of equipment
- Technique
- Other education
- Science, Technology, Languages
- Administrative law
- Criminal law
- Civil law
- Financial law
- Housing law
- Constitutional law
- Right social security
- Labor law
- Other legal issues
- travel and tourism
- Independent holiday
- Trips
- Around the world
- Permanent residence, Real estate
- Other things about cities and countries
- Wildlife
- Maps, Transport, GPS
- Climate, Weather, Time Zones
- Restaurants, Cafes, Bars
- Holidays abroad
- Hunting and Fishing
- Documents
woprosi.ru
How to save and use maple leaves?
The shape of a maple leaf is easily recognizable. It can be seen on the Canadian flag, and indeed, there are hardly people in Russia who cannot imagine it. Maples are very beautiful in autumn: their leaves acquire beautiful color, they smell somehow special. Children and adults collect them into beautiful yellow-orange bouquets, which, perhaps, can be called symbols of golden autumn.
But maple leaves do not last very long in this form. How to extend their life? And what else can you do with them? In fact, there are a lot of options. First of all, you need to choose correct leaves: they should be fairly fresh, the process of rotting should not yet begin in them. Having collected a sufficient amount, you can think about how to preserve them. The most popular way is to iron them through sheets of newspaper. This will help remove from the leaves excess moisture and prevent rotting. But this measure may somewhat spoil their beautiful color. Another well-known method is to put maple leaves in a book for a while; it will not harm it if you line the herbarium blanks with newspaper. But you will have to wait a couple of months for the results to be good.
So what can you do with dried leaves? Firstly, the same bouquet, which will last much longer, especially if you cover it special composition, which is used by florists.  Secondly, they can be used for applications, herbariums and similar crafts. Some even make beautiful roses out of them by rolling in a special way several leaves around each other. Such flowers can be coated with paint and made into wonderful Christmas tree decorations, especially since handmade is now very much appreciated, especially if it is such an exclusive item.
In addition to the decorative function, maple leaves can serve as medicine, they are quite widely used in folk recipes. Thus, it is believed that they have wound-healing, antimicrobial, anti-inflammatory properties, and  can also serve as an antiemetic, diuretic, and antipyretic. There is even an opinion that the maple leaf has an analgesic effect. However, it is better not to use such drugs without consulting a doctor, since only a professional can choose the right medications for the patient.
By the way, not all maples have the same leaf shape, but there are about 160 species in this genus. The number of their lobes varies; they can be round or more  elongated. But almost all nations in one way or another revere these trees; they have a place in the famous Japanese gardens, maple leaves inspire poets and composers to create poems and songs.
In addition, it is valuable wood and an excellent honey plant. In Canada, of which it is a symbol, maple syrup has long been made from it and added to desserts. This is how great the significance of this tree is for a person. Regardless of how useful and practical the maple is, it is simply beautiful, and its leaves can long remind romantic people of warm autumn days and people who were nearby.
fb.ru
4 Best Ways to Keep Leaves in Perfect Condition
You just want to catch the bright colors of autumn and hold on to them longer. Leaves are simply a miracle of shades that are worth decorating your apartment as part of color therapy. 🙂 But how often, after bringing home some beautiful leaf, we notice that it quickly loses color and shape, and it is useless to use it in decoration.

Today the most successful ways, get water, soda, books :))
Water and bouquets

The easiest way to preserve leaves longer is to pick them directly from the branches. Not to say that the autumn leaves on the branches hold on very tightly, but still this is a great chance to preserve the bouquet in its original form. Before placing the arrangement in a vase, trim the branches with a sharp knife and lightly split them. You can add a few tablespoons of glycerin or a teaspoon of sugar and an aspirin tablet to the water. Periodically sprinkling the leaves with water from a spray bottle will help the bouquet retain its fresh charm.
Skeletonization and decoration


A skeleton in decoration is a somewhat strange combination, unless we are talking about leaves and flowers. This technique allows you to make things so delicate that you can’t believe they are of natural origin.
You need to prepare a soda solution (about 3 tablespoons per 1 liter of water) and carefully place the leaves in the solution. Boil them over low heat for an hour to two, until the leaves darken, periodically adding baking soda. Then we lay the leaves on paper and hit them with the bristles of a toothbrush. The pulp of the leaf crumbles and a cute skeleton remains. 😉 Then the sheet needs to be dried, you can paint it or leave the resulting natural shades.
Some florists prefer the dry skeletonization method: you can peel the pulp from the leaf without first soaking it. In this case, it is better to use a natural bristle brush, and the stiffer the bristles, the better.
To prevent the sheet from being too brittle after cleaning, you can spray it with hairspray.
Acrylic varnish and garlands


Simple and stylish garlands greatly decorate the veranda and the house, but only if the leaves remain in their original form, without losing their shape and color. Special floral sprays or acrylic varnish, which is also sold in spray - in construction stores.
Leaves sprinkled with this varnish look shiny and fresh, are protected from damage and do not fade. The varnish is intended for wooden furniture, plastic, glass, but it will also protect leaves perfectly :)
You can also use a special floral varnish for the leaves to make the flowers shine. Another remedy is the usual one vegetable oil, which can be applied to the leaves with a silicone brush.
Drying in a book and vertical decoration


For that type of decor where smooth and clear lines are needed, the leaves can be dried using the old proven method. Place them between the pages of the book, and then move them to a new page every day. The moisture from the leaves will be completely absorbed in about a week; to strengthen it, you should dip them in a solution of water and PVA glue 4:1 and dry well. And then you can use the leaves in their original form, or paint them.
Pictures made from leaves sandwiched between two glasses look very stylish, and this decor lasts for a very long time, the colors do not fade.
How many flowers should there be in a bouquet?
The beauty of autumn foliage is fragile and short-lived. Today it pleases us with its special aroma and rainbow colors, and after a few days only a handful of dry wind remains from the yellow-purple petals. However, if desired, the tender leaves can be saved for later use for various decorative purposes.
Let's try to figure out how to do this.
You will need:
- leaves,
- glycerol,
- paper towels,
- several large heavy books,
- wax paper,
- iron,
- newspapers.

1. Select leaves, giving preference to whole, flat, relatively fresh and undamaged specimens. Please note that dry and tightly curled leaves do not absorb glycerin well, which we will use as a kind of preservative, which means they are not suitable for long-term storage.

2. In a wide flat container, dilute glycerin in water (ratio 1:2). Dip the leaves into the solution so that they fit freely and are completely covered with liquid. It will take several days for the leaves to absorb the glycerin. If the process goes correctly, then after some time the leaves will be saturated with moisturizing liquid, becoming elastic and soft.

3. Place the soaked leaves on paper towels and leave to dry for 1-3 hours.
4. When the leaves are dry, they should be placed under a press to remove any remaining moisture. You can use an iron or heavy books for this. If you want to dry the leaves with an iron, they should be laid out between newspaper pages and gently smoothed out, setting the device to low temperature. The iron allows you to quickly prepare the leaves for further manipulation.

If you decide to use a book press, then the leaves should be placed on wax paper so that they are closed on both sides, and placed between the volumes, leaving in this form for several days.

How to use?
Glycerine leaves can be used for a variety of decorative purposes. They retain their shape and color for a long time, so they are suitable for all kinds of autumn-themed fakes.
Collages for children's creativity.
Creating funny collages depicting the animal and plant world is a fun activity that creative kids will love.

You can turn ordinary leaves into strange animals in literally a matter of minutes. All you need for these fakes is stationery glue, scissors, landscape paper and a little inspiration.


Collages can be supplemented with small handwritten touches that will help to play up the foliage elements in an interesting way.

Crowns and bracelets.
You can make a crown from glycerin leaves for the autumn festival, which is held annually in kindergartens and schools. A spectacular headdress is assembled like a wreath or made using a cardboard base and double-sided tape.

.jpg)
.jpg)

Using the same principle, you can make an autumn bracelet that will perfectly complement a themed costume.

Another decoration option involves creating crowns with images of forest animals, which are perfect for fairy-tale performances.

You can also make original masks from leaves by simply coloring them with a black and white marker.

Bouquets.
As a rule, autumn bouquets are simple compositions of multi-colored leaves that decorate table settings or home interiors.

However, there are more complex floral techniques that make it possible to make imitation flower buds from leaves. Such bouquets are especially expressive and are suitable for decorating special ceremonies: and anniversaries.


Garlands.
By stringing leaves on a thin thread, you will get a bright garland that will bring autumn mood into your home.
.jpg)
Looking for more sophisticated solutions? Apply glue to the leaves with a brush, generously sprinkle them with shiny glitter and secure satin ribbons at the base, which will help strengthen the garland in the right place.

Stencils.
Leaves can be used as stencils, allowing you to apply an interesting design to fabric, paper or glass. There are two ways to make an autumn image. In the first case, the leaves are simply laid out on the surface, then paint is applied on top. When the coating is completely dry, the leaves should be carefully removed - unpainted areas will remain in their place.

Another method involves applying paint to the sheet itself, which is then used as a stencil. For such a print, you can use absolutely any paint (gouache, watercolor, acrylic, fabric paints), and the sheet itself should be painted on the side where the veins are located. It is better to press the stencil with a roller, but you can do without it by simply pressing the sheet with your hand.
.jpg)
In this way you can decorate clothes, home textiles, dishes and other household items.