The most important device in household electrical networks, undeniably, is a switch. Whatever room a person finds himself in (living room or bathroom, garage or basement, office or workshop), the first thing he will do is turn on the lights in the rooms using the switches. In this article we suggest you familiarize yourself in detail with how to install light switch. Moreover, it will be absolutely easy to do it yourself, don’t waste cash and time to invite an electrician. Having basic knowledge of physics and electrical engineering, you can handle it on your own.
Device
Before installing the switch, let's look at how this one works. switching device. Let's do this using the simplest example single-key switch Sveta.

switch operating mechanism
The most important part of this device is the operating mechanism. It is a metal frame on which a drive is attached, which directly turns the device on and off. Essentially, this drive is a moving contact that connects two fixed contacts of the switch.
One fixed contact is incoming, a wire from the power supply is connected to it, the second is outgoing, and the wire connects it to the lamp. The correct position of these two fixed contacts is open, in which case the switch is considered to be off, the circuit between the power supply and the lamp is not closed, and the lamp does not light. As soon as the switch drive is affected, the movable contact takes a position in which it closes a circuit between two fixed contacts, voltage is supplied from the power source to the light bulb and it lights up.
 For safety reasons, the entire contact part is placed in some kind of dielectric (it can be plastic or porcelain).
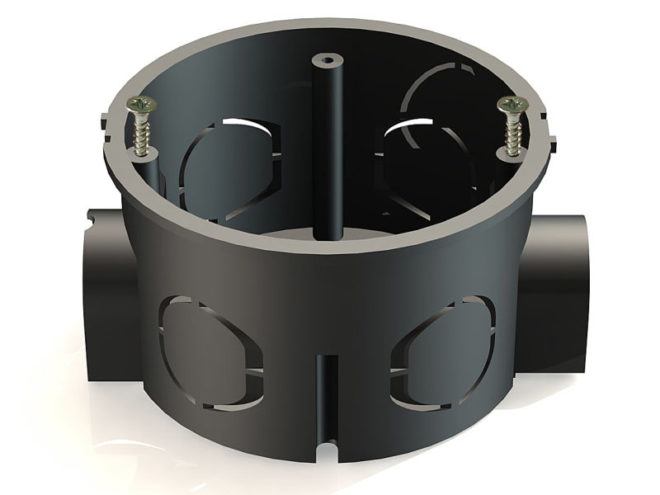
The switch is installed in wall holes, but before this, special socket boxes must be installed in the holes made in the wall. And the working mechanism of the switches is already fixed in them. Their reliable fixation is ensured by sliding legs located on the sides of the working part.
Another design component of switches is protective elements. As a rule, they are made of plastic. The first of these elements is a key; it is attached to the drive of the working part and directly controls the switching device. The second element is a protective frame; it covers the working part and prevents a person from touching the live contacts of the switch. The frame is secured with screws or plastic latches.
Materials and tools
Before installing the light switch, stock up necessary materials and tools. If you are going to do everything yourself, then you will need not only electrical installation tools, but also construction tools.

First you need to punch a hole in the wall. Suitable for this purpose:
- Bulgarian. With its help you can make a square hole in the wall, but that's okay. After inserting the socket box, cover the remaining space around it with a solution of alabaster or plaster.
- Hammer with special crown on concrete. I would like to say right away that with the help of such a tool you can make a wonderful, even hole in walls made of cinder block, brick, foam concrete, plaster, or aerated concrete. If the wall is concrete, then first the future hole is marked with such a crown. Then install the drill on the hammer drill and drill many small holes close to each other along the intended contour. Next, alternate between a drill and a chisel, knocking out the inside of the intended hole. There is an option to purchase a diamond-coated crown; it will cope with concrete wall myself, but this is a very expensive pleasure.
- A regular drill with a special wood bit or a screwdriver will help you make a neat hole in plasterboard walls.

To secure the socket box in the hole you will need:
- container for mixing the solution;
- plaster (alabaster);
- water;
- spatula.
To install the switching device itself, you will need:
- Plastic or propylene socket box.
- Single key switch.
- Indicator screwdriver.
- Knife for stripping wire cores.
- Two-core wire (cross section 2.5 mm2).
- Insulating tape.
- Flathead and Phillips screwdrivers.
Also, a wire must be laid in grooves to the installation site of the switch. To make these furrows, you will need a chisel with a hammer or a power tool (grinder, wall chaser).
Installation of a socket box
Installation of switches begins with the installation of socket boxes (otherwise known as mounting boxes). This is perhaps the simplest part in the whole process; no special construction skills are needed here, everything is done easily and simply with your own hands.

In concrete, brick, stone or block walls, the mounting box is installed on gypsum mortar (in extreme cases, on plaster). Gypsum mortar smear the hole inside, quickly install the socket box and cover the remaining empty spaces. The plaster hardens in a matter of minutes.
The main thing is not to forget that by this moment the wires should already be connected to the socket box!
When the walls are out plasterboard sheets, then the installation process is simplified. You just need to purchase a special socket box with mounting claws, insert it into the hole and tighten it with screws.
Good video instructions for installing socket boxes:
and for drilling holes for them:
Step by step instructions
Before you begin the process of installing a switch with your own hands, I would like to remind you of one very important rule.
Switches always and everywhere operate only for phase interruption. They should not break the zero. Therefore, when switching wires to switch contacts, it is so important to accurately determine the phase conductor. If you confuse zero and phase, the switching device will not stop working. But the lamp socket will always be energized. When replacing a burnt-out light bulb, there is a risk of electric shock to a person.

So, the mounting box is installed in the wall, two wire strands are inserted into it. You can begin direct installation of the switching device:
- The first step is to determine phase wire. Take an indicator screwdriver and touch both wires one by one. If the indicator window on the screwdriver lights up, it means that this wire is a phase; you can carefully mark it with insulating tape.
- Now turn off the circuit breaker that supplies voltage to the room or the common one to the apartment. Again, using an indicator screwdriver at the work site, check that there is no voltage. Touch it to the newly discovered and designated phase wire; the screwdriver should not glow.
- Take the switch in your hands, using a flat-head screwdriver on the left or right, lightly pry the key and remove it.
- Unscrew the two screws that secure the protective frame and remove it.
- There are two contact screws at the top of the operating mechanism. On many models they are marked. For example, the numbers “1” and “3”, or the English letter “L” and an arrow pointing down, respectively, these symbols indicate incoming and outgoing contacts. Unscrew these screws.
- Strip the wires inserted into the socket box from 1 cm of insulation. Insert the phase wire into the hole in the incoming contact, and the second core into the hole in the outgoing one. Tighten the screws and check that the wires are well secured. If there is any loosening, be sure to tighten it tighter, because poor contact will lead to burning and further damage to the switch. But there is no need to overdo it here, so as not to break the screws.
- Right there on the working part there are two more spacer screws. Unscrew them, place the working mechanism in installation box, carefully align horizontally and secure in this position by tightening the spacer screws. Check your work, try to slightly shake the working part. If it is securely fixed in the socket box, install a protective frame on top, screwing it with two screws.
- Attach a key to the drive of the working mechanism and check how it works installed switch. To do this, enable introductory machine. Press the switch key, the light bulb in the lighting fixture should light up. When you press the key back, the light should go out.
IN modern models Instead of screw switches, plug-in contacts are often used; they have proven themselves quite well. The wire must be inserted into the contact hole; it must fit tightly and rest against it. If you try to pull the wire back, then with a certain force it should not be pulled out, this means that the contact is good. Just don’t use all the strength you have! And so that if necessary, you can pull the wiring out of the contact hole, there are special levers there.
For more information about installing the switch, watch this video:
The essence of installing a two- or three-key switch is the same, the only difference will be in the connection diagram itself. And if you figure out how to properly install a regular switch with your own hands, then you can probably handle more complex switching devices.
DIY apartment renovation
Installing a switch with your own hands in an apartment is not such a big problem that calling and paying for the expensive services of a professional electrician. You can find out how to correctly install a switch, be it a two-key switch, by reading this review.
If you need a simple replacement of a broken device, then installing the switch yourself will take a short amount of time. If the problem of how to mount the device arose when laying a new circuit, then it will take much more time. Under such conditions, you must first decide on the type of wiring and at what level the device will be installed.
At what level should switches be installed?
The level of installation of the switch above the floor is dictated only by ease of use, and is absolutely not subject to the requirements for power or other characteristics of the circuit lighting fixtures. For a long time, the switches were installed somewhere at the level of human eyes (a resident of average height), but recently a position somewhere at a height of one meter from the floor level has become popular, so that you could press a key without raising your hand high.
Similarly, the location relative to doors and windows is not of fundamental importance, the main thing is that it is convenient to use the device.
Built-in and external switches
Now let's get back to wiring types. The wiring can be either open or closed, that is, it either runs along the surface of the wall structure (usually in special cable channel), or covered with layers finishing material. In this regard, switches are also built-in and external. The former are placed in a box (glass) walled into the wall, and the latter are placed on the surface of the wall.
First, let's look at how to install a switch on the device hidden wiring, due to the fact that this is a more labor-intensive option.

Installing a built-in switch yourself
Attention! All subsequent work must be carried out in a completely de-energized room!
When installing hidden wiring, it begins with installing the box. The bolts are unscrewed from it (it is better to use boxes with fastening bolts, and not under the legs, the so-called “euro”) and the plug covering the holes for the wire is carefully removed. In ordinary glasses for a switch there are usually five such holes, four on the sides and one on the back wall, which one you will use depends on the location of the electrical cable.
The next stage is installing the box. At the beginning of this process, you need to insert the box into the excavated niche and check that it fits freely in it. Then, you need to dilute a small amount of alibastra with water, so that a putty of a certain consistency is formed, approximately like medium-thick sour cream. Using a narrow spatula, we place part of this putty in our niche, also lightly spread it on the glass itself and carefully place the box in the niche, so that its edges are flush with the outer plane of the wall.
For a tighter fastening, add alabaster mixture to the outer voids to better fix the glass. But don’t overdo it, don’t immediately fill all the remaining gaps between the wall and the box, now the main thing is just to fix the glass in the right position and in the right place.
You need to act quickly, but also not to fuss, since the mixture of building gypsum (alibaster) hardens quite quickly. And don’t try to necessarily work out the entire composition that you mixed; the principle “so that the good stuff doesn’t go to waste” doesn’t apply here.
When installing, be sure to ensure that construction plaster does not fill the broken window for the wire to pass into the box. If this does happen, carefully remove the excess alabaster before it completely hardens (adding approximately the same amount of regular finishing putty to the alabaster helps to slow down the process of strengthening).
While we wait for the alibastra to harden, we strip the wire, that is, we remove the insulation from the ends no larger than 5 - 7 millimeters in size. Insert the cable into the mounting holes of the box. The free part of the wire should not exceed 10 centimeters - an end that is too long will not allow the switch to fit into the box, and an end that is too short will create inconvenience in operation.
Now you still need to mix a little gypsum putty and carefully fill all the remaining gaps between the frame and the wall structure. Let's leave our glass for now and return temporarily to the switch.
Before installing the device, or dismantling the old one, it must be disassembled. This is not difficult to do; usually, to disassemble you need to remove a key or several keys, if you have a double or triple switch, carefully lift it with the end of a screwdriver, and then remove the lock holding the upper frame. After removing the frame, the device is disassembled using a screwdriver; this is not at all difficult to do.
We bring the cable to the switch for fastening; to do this, unscrew the terminal screws, insert the cleaned ends of the cable and re-tighten the fastening screws.
The device is held in the box by spreading special claws (levers), or by using screws, and more often, to be sure, by both methods at the same time. Having installed the switch in the glass, pay attention to the location of the contacts (It is accepted that when turned on, the keys must turn upward, and when turned off, vice versa, downward) and secure it with screws.
Then, tightening the screws, we move the spacer legs apart, securely securing the device. If you plan to wallpaper the walls in the future, then close the mounted switch outer cover and there is no point in installing the keys; it is better to do this after finishing all the finishing work.

How to install a switch
DIY installation of a surface-mounted switch
In general, in the same way, and even easier (since there is no need to mount the box), you can mount overhead devices yourself. Actually, switch installation comes down to wall marking of places for fasteners, drilling using and inserting dowels, and fixing the switch on the wall structure.
Other types of switches, the same device with a rheostat, a device with backlight, etc. are installed in almost the same way; if there is a difference, it is not big. And devices that are triggered by a loud sound (by clapping hands) or by voice control are always additionally equipped with detailed instructions and a connection diagram.
In conclusion, I would like to add that mandatory requirement to all types of light switches - the phase cable must always pass through it, and never the neutral cable, so that when the device is turned off, replacement or installation of lighting devices can be done safely.
We hope that this article was able to answer the question - how to install a switch with your own hands? Good luck with your renovation!
Household switch is an electrical two-position switching device designed for manually supplying electric current to a chandelier or lamp.
Rules for connecting switches
Before you begin repairing, replacing a faulty one, or installing a new switch, it is useful to familiarize yourself with the rules for connecting it to the electrical wiring.
The PUE rules require breaking the circuit of the phase wire only, and not the neutral wire. If the neutral wire is opened with a switch, the operational safety of the electrical wiring is reduced.
Switch connection diagram
When the neutral wire is disconnected from the load by a switch, the electrical wiring to the chandelier and the wires in the chandelier remain under phase voltage. If the phase wire opens, as in the diagram above, then most of the electrical wiring is de-energized.

When the switch is correctly connected when it is in the “off” position, it virtually eliminates the risk of electric shock to a person in the event of any malfunction of the chandelier or errors when replacing a light bulb in a lamp, for example, accidental contact with live parts of the electric cartridge.
Water leakage from the upper floor will not lead to short circuit and failure of electrical wiring, although wet walls are good guide current, but the wires, due correct connection switch is not energized.
Below is the wiring diagram for connecting the switch in the chandelier wiring diagram. The phase wire from the meter is connected to the machine and then goes to the switch.

And one more requirement of the PUE rules, when connecting the switch the phase wire must be connected to the bottom contact of the switch.
When connecting a multi-key switch without a socket, assuming any of possible errors, nothing bad will happen. So you can act boldly.
If all the wires are connected together, both lamps will burn constantly. If you mess up the wires and don't turn on one lamp, you won't be able to turn on the second one.
Although this option may be useful to eliminate the possibility of forgetting to turn off the lights in the auxiliary room. If the light is turned off in the hallway, it will automatically turn off, for example, in the pantry or toilet.
Installing a hidden socket and switch on the wall
Accepted wires for connecting wall and ceiling lamps And electrical outlets hide in the wall. When I made a sconce for the hallway, I had to connect the lamp using an external wire with a plug and a switch on the wire itself. The wire was hidden behind the mirror, but the switch and plug remained in plain sight, and in addition one of the socket positions was occupied.

How to fix a loose switch or socket
Switches and sockets for indoor wiring installed in metal electrical boxes will become loose over time. Tightening the mounting screws provides short-term fixation. The claws at the ends are sharp and the contact area with the walls of the electrical box is small, so they do not hold well. The design does not allow the screws to be tightened any further; the claws bend and hold the switch even worse.

To ensure reliable and long-term fixation of the switches, it is necessary to glue pieces of leather or thick cardboard with a thickness of at least 2 mm to the entire depth of the box on the sides inside the electrical box at the places where the expanding fixing tabs rest. Take a strip, spread it with glue and insert it all the way into the bottom of the box. The excess is cut off with a knife.

Then, when tightening the screws, the teeth of the tabs will dig into the stickers and will no longer slide. All this work can be done without dismantling the switch.

How to secure an electrical box
switch or socket in the wall
More difficult case when the box itself becomes loose. You need to disconnect the wires from the switch or socket and dismantle them, remove the box, widen the hole and, using cement, alabaster or their equivalent, reinstall the electrical box. Wait until the solution hardens and install the switch or socket in place.
There is a simpler solution. It is enough to dismantle the switch or socket, drill a couple of holes for the dowel in the bottom of the box without removing it with a simple drill. Then drill into the wall in these places. Insert the dowels and screw the screws into them.

If the diameter of the screw heads is less than the diameter of the holes in electrical box, then you should put washers on the screws. The switch or socket is installed in place.
This article is about how to install a light switch. Generally speaking, light switches are used to control electrical lighting in residential and commercial buildings. In most of these cases, the light switches are mounted on the wall at a specific location in the room, the height at which they are mounted or the shape of the switches varies depending on the desire.
Light switch - has many types: single and multiple, internal and external. The light switch must be installed by a person experienced in electrical work.
To install the switch, you must do the following...
How to install a light switch
The first thing you need to do is turn off the breaker. Some people believe that it is safe to turn off only the meter on which you install the breaker, but we strongly recommend that you keep the main power supply switch turned off.
Turn off the machine
Then, use a voltage tester on each wire to make sure there is no electricity and everything is safe. We emphasize that it is better to check this several times before touching the electrical wires.

Switch connection wiring
The next step of the project is to remove any paint, residue or dirt from the box using pliers. Make sure that the area under the switch is free of debris and excess materials. This operation is important, especially if you are dealing with a newly built house or a repainted room.
However, even if you are replacing the old switch, you need to make sure that the new electric light switch will be installed and aligned properly.
After you have purchased the light switch, you must open it using a screwdriver. This operation is important because you will connect electrical wires with the inside of the switch.
The next step of the project, after we have opened the light switch, we need to start connecting the switch. Use pliers to cut off excess wires approximately 6 inches from the wall.

This length should be enough to connect the switch, and it should be more convenient to operate. Remember that you should not leave long wires; in the future they may not fit into the switch box.
Once we've made sure the wires are cut to the proper length, we continue to the next step. Use pliers to remove approximately 2.5 cm of wire insulation. Remember, to avoid touching the exposed wire in the future, do not chamfer more than the specified length.

How to connect a light switch
Use pliers to bend the end of the wires into an L shape (depending on the connection to the switch terminals).
Do not forget about the correct connection of the wires. It is customary to use the following wire colors:
- white or brown - phase;
- blue or black - zero;
- yellow, green, yellow-green - grounding;

AND general rule: the lightest wire is the phase (white, white-brown, brown).
Using a screwdriver, firmly tighten the screws holding the wires in the switch.

After you have finished connecting the light switch , It’s better to double-check that all the wires are in place and securely fastened. On at this stage you should get the following picture:

Once you have connected all the wires to the switch and checked that they are secure, carefully place the wires into the breaker box. Insert the switch there and if everything falls into place, secure it with screws.

To align the light switch, you can use laser level, but you can use a stationary level. This will only make the process a little more difficult, especially for beginners. After you have leveled the switch, finally tighten the screws.

The next step after installing the light switch in the box is to install the switch buttons. It is enough to press the button and press a little so that it fits into its grooves.

This operation is not difficult, and in addition, it represents one of the final steps of the process.

If you have finished connecting and installing the switch, go to the switch and turn on the general light.
The last step is to turn on the lights using the newly installed light switch to see if the hard work paid off. If the light comes on without interference, it means you did everything right.

In the picture you can see how to correctly connect an electric light switch: single-key, double-key, and so on.

Thanks for reading our article about , how to connect and install a light switch, we recommend that you read our other articles.
In this article we will look at the issue in detail. There's no need to rack your brains
Who to contact with this problem, where to find an electrician. There is no need to waste time searching and spending money on calling, all this is done easily and simply. You just need to follow detailed instructions given in this article and question how to install a light switch, will be solved without any difficulties or puzzles.
So, we have a new one-key switch and the desire to install it.
The installation site still looks a little sad, an empty socket box and two wires sticking out of it, but that’s only until we installed a new switch.
Preparing the circuit breaker for installation
First of all, before carrying out all work, it is necessary to determine the wire with the incoming phase using a voltage indicator (pointer). To do this, we alternately bring it first to one wire, then to the other. Mark the one you need using insulating tape.

Now, we turn off the electricity, check that it is not on the wires, use it, and only after that we get to work.
There are a huge variety of switch types. They differ: by manufacturer, by price category, quality of workmanship, various methods of connecting wires to contact terminals, and so on.
Let's consider two main installation options. In the first case, we will install a switch in a cheap price category of up to 80 rubles.
We prepare the switch for installation, and at the same time we will find out how the switch works.

Using a flat-head screwdriver, remove the switch key, slide it on the left or right side and disconnect it from the body.

We unscrew the two screws located diagonally on the protective frame and disconnect it from the mechanism.


There are four screws on the mechanism, two of the bottom ones are contact screws, they are designed to connect wires to the mechanism. The other two drive a spacer mechanism, which is designed to reliable fixation mechanism in the socket box.

Contact screws.


Left and right spacer screws.


We unscrew the contact screws; on the upper end side you will see how the pressure plates move.

One of the contacts is incoming, the phase comes to it, the other is outgoing, the phase goes from it to the lamp. Each contact has two holes for connecting wires. We figured out how the switch works, let's move on to the next stage.
Switch connection
We strip the wires and remove required quantity insulation, approximately 1 cm.

On inexpensive single-key switches, as a rule, the designation of contacts, incoming and outgoing, is not indicated, but just in case, look at back wall mechanism, designations can be as follows:
- numbers 1 and 3 - here there is 1 contact of the incoming phase, 3 of the outgoing phase
- letter L and number 1 - here L is the contact of the incoming phase, 1 of the outgoing phase
- letter L and arrow - here L is the contact of the incoming phase, the arrow is the outgoing phase
This is the most common designation.
Let's return to our switch. We insert the stripped wire into the hole, make sure that it is between the pressure plates, and tighten the contact screw. We check how well the wire is fixed. It should not swing or wobble; if this occurs, tighten the contact screw. A poorly drawn contact will burn out and subsequently lead to failure of the switch.
Don’t overdo it; on inexpensive switches, the screws and threads are not very reliable and are very easy to break.

The bare core of the wire should protrude 1-2 mm from the contact.

Insert and tighten the second wire.

Unscrew the screws of the spacer mechanism, insert the switch into the socket box, align it horizontally and fix it. We tighten the spacer screws and check the reliability of the mechanism in the socket box.

We install the protective frame, tighten the diagonal screws, securing it to the mechanism.

Set the key. Before installation, we look at the alignment of the pins and grooves of the moving part of the mechanism and the key.

This completes the connection of the switch.

Let's now consider the second installation option.
How to connect a light switch, option two
This option includes switches with an expensive price category of over 100 rubles apiece.
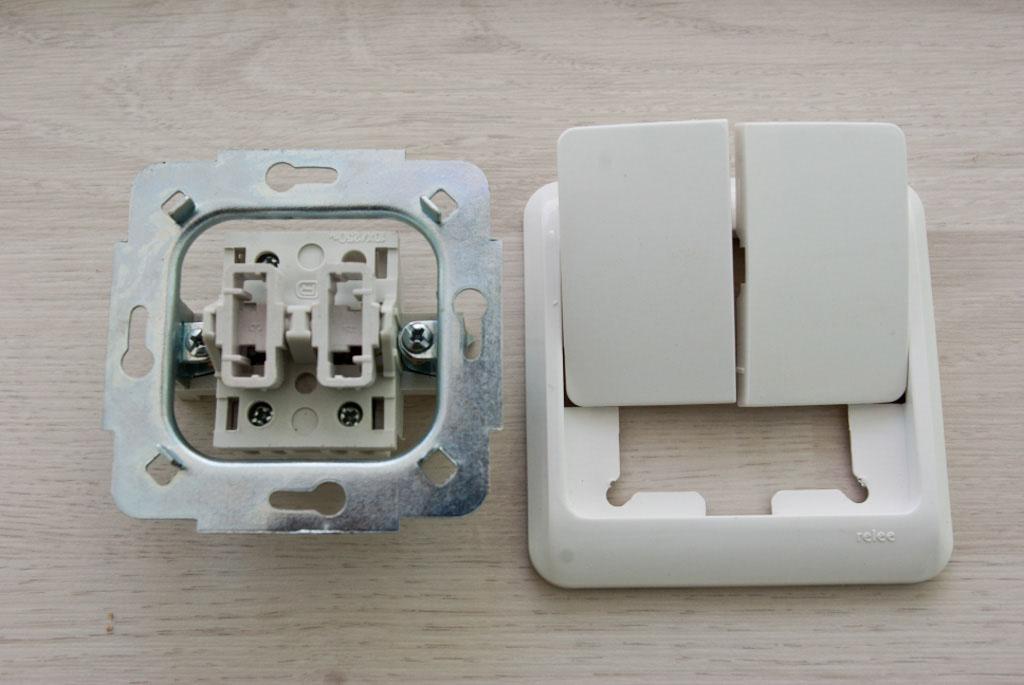
We prepare the switch for installation. During the process, we look at its device.
These switches are usually not sold as a complete set. The mechanism and key are together, but the frame is separate. This is done to be able to apply creativity in the design of the switch, for example, a white key, a black frame, and so on at your discretion.
The switch key can be removed very easily by hand. We're filming.

Screws for spacer feet are located on the left and right.


Turn over the switch. The first thing that catches your eye is the complete absence of screw terminals and clamps. This category of switches has plug-in contacts, which have proven themselves quite well in lighting.

Let's take a closer look. Switches of this class always have symbols.
In this case:
- L - contact for incoming phase wire
- down arrow - outgoing wire contact
Each contact has two contact plug holes.

We strip the wires and remove 1 cm of insulation.


We insert the wires one at a time into the contact.

The wire should fit tightly and rest. In this case, it is allowed for the wire insulation to stick out from the contact by 2-3 mm. We check how the contact is clamped, try to pull the wire back, if with a certain force (not with all the force) it does not pull out, the contact is good. We continue connecting the switch.

Let's move on to the next wire.

If there is a need to pull the wire out of the plug-in clamp and adjust the length of the stripped core, press the lever specially provided for this purpose.

We press and the wire is free again.

After connecting the wires, we proceed to installing the mechanism in the socket box.

If your mechanism is installed into the existing socket box without any difficulties and is securely fixed there, then all you have to do is put on the frame and install the key. But as a rule, in most cases the mechanism is not fixed in the socket box, the spacer legs do not reach the edges of the socket box, it is too large. TO How to connect the light switch if such a situation arises? Let's figure it out.The fact is that before there were other standards and the switch mechanisms were more massive. Now switches have become more compact, the mechanisms no longer take up so much space in the socket box, and the installation of the switch in the socket box itself has undergone some changes.Under new ones, modern switches socket boxes corresponding to them are made.

They are now made not from iron, as before, but from special non-flammable plastic.
When purchasing a new switch, you must definitely purchase a socket box for it; they generally have a standard diameter of 67 mm.
So, in this article, we examined in detail two connections of a switch with one key, having analyzed two different examples installations, and now we can rightfully consider this topic closed.
To carry out work on installing the switch, we used:
Material
- single-key switch - 1 pc.
- socket box - 1 pc. (needed in some cases)
- plaster or alabaster - 200 grams (required in some cases)
Tool
- voltage indicator
- pliers
- wire cutters
- Phillips screwdriver
- flat screwdriver
By installing the switch ourselves, we saved:
- - 200 rubles
- dismantling the old socket box - 100 rubles
- installation of a socket box indoor installation(brick wall, hole drilling, installation) - 200 rubles
- installation of a single-key indoor switch - 150 rubles
TOTAL: 650 rubles


