The essence of food preparation is the treatment with chemicals during the sublimation of wood under conditions of lack of oxygen. The colloquial name is smoking. Happens:
- Hot. Food is exposed to smoke with a temperature of 70-150°C. The process is characterized by accelerated preparation of products (40-180 minutes). Stored at room temperature for no more than 1-3 days.
- Cold. Treatment is carried out with smoke cooled to 20-30°C. Preparation time ranges from several hours to several days. The product acquires a subtle smoky aroma and exquisite taste. The shelf life reaches several weeks.
- Mixed. Flue gas temperature 40-80°C. Processing within 4-10 hours. Shelf life 3-7 days.
After heat treatment, products acquire a number of properties:
- soaked in aromatic substances that give food a unique aroma and taste;
- acquire a long shelf life due to the preservative properties of flue gases (bacteriostatic effect).
The tastiest and longest-stored products are those that have been processed in a homemade cold-smoked smokehouse.
From simple to complex
A cold-smoked smokehouse, made with your own hands, can represent the simplest structures assembled from improvised means. Or show devices folk art, which can compete with industrial models.
The most important difference from other types of smoke exposure is the temperature of the gases. Homemade smokehouse must include a device that reduces the thermal component. Scheme of cold and hot smoking:
It can be seen that the design of cold smoke generation includes an elongated channel (chimney). Moving through the pipe, gases lose part of their thermal energy. Accordingly, the temperature decreases. This effect is included in most homemade cold smoked smokehouses.

It can be seen that the cold smoked smokehouse, made by hand, includes three main components:
- smoke source (smoke generator);
- smoke channel (chimney);
- container for food.
In a hurry
How to make a cold smoked smokehouse with limited materials:
- on a hike;
- an outing into nature (forest, river, lake);
- at the camp site;
- garden plot, etc.
One option is simple smokehouse cold smoked based on rods and polyethylene film. It is not difficult to build such a structure. The main thing is to ensure a decrease in the temperature of the gases from the coals.
The design is based on the principle of a tent, wigwam, tent.

The power frame is made of poles. thrown on top polyethylene film. Fish (meat, chicken, game) is fastened with twines. The heat source is coal obtained from a previously built fire. Smoke - damp brushwood and branches with green foliage (but not grass).
The coals may be in a bucket or fireplace. The latter is performed in the ground in the form of a hole with an embankment. The advantages are obvious:
- there is no need for special building material. The only imported item is plastic film;
- extreme simplicity of design;
- speed of installation;
- the ability to visually observe the processing process.
The disadvantage is constant monitoring of the outbreak. Open flames are not allowed, otherwise the entire structure will burn; the process can turn from cold to hot. The need to provide coals and green branches during the entire cooking time. However, there is always a person in the company who happily devotes himself to the process of making a smokehouse for cold smoking with his own hands.
A more complicated option is to make a chimney. This is possible if there is a slope. The length of the ditch will be 1.5-2 meters. Depth 30-50 cm. The trench is covered with branches with foliage, spruce branches of pine or spruce. The earth is thrown on top and covered with film. The advantage is the freeing up of time due to the reduction in constant monitoring.
This cold smoking design is very convenient for cooking fish caught in the nearest body of water. Cooking time is reduced, but not at the expense of taste and quality. The finished product can be stored for several days.
More complex designs will require imported dimensional parts. It will already be home smokehouse.
Stationary samples of smokehouses
Making a cold smoked smokehouse with your own hands near your home is an opportunity to diversify the diet of your household, treat your guests to a delicious delicacy, and prepare food for future use. Having your own farmstead with poultry and keeping beef cattle means creating a mini-workshop for processing and further selling a variety of smoked meats on the collective farm market.
The design of the future smokehouse depends on the tasks set - how to make a smokehouse of a certain size for food processing. This can be a simple device assembled from ready-made components and parts. Or more complex unit using electricity, an electronic control unit. In any case, you will need the following skills:
- take measurements;
- draw up or read drawings;
- own metalworking tools and welding equipment;
- Knowledge of electrical engineering will be required.
Material at hand
The design is implemented according to the diagram shown in the figure:

The most accessible parts are a 200-liter steel barrel, the body of an old refrigerator, an iron cabinet for tools or clothes. For the chimney, metal pipes with an internal diameter of at least 100 mm are used:
- sewer;
- pressure conduit;
- ventilation duct made of tin;
- flexible corrugated pipe for a chimney from a fireplace or stove.
A fireplace located in a small pit is suitable as a smoke generator. The top is closed with a lid. What's more difficult is the application. metal furnace with separate chambers. One serves as a source of heat, the other contains sawdust to produce smoke.
Important points during design and installation:
- The cold smokehouse must be located at a distance from wood or other flammable materials;
- take into account the wind rose; the air flow should not clog the fire in the hearth or direct smoke towards residential or outbuildings with pets;
- it is necessary to ensure the slope of the chimney to create draft;
- Protect the location of the chimney and stove to avoid burns by curious children or adults.
The length of the pipe or trench under the chimney is 2-5 meters. This size determines the cooling intensity and draft. In winter or autumn-spring, problems with lowering the flue gas temperature will not arise due to the significant difference between environment and heat flow.
More difficult in hot weather. Let us remind you that the effect of cold smoking appears at 20-30°C. Warming up the air to 30-35°C can completely drown out the draft. Flue gases will not acquire the required thermal background.
Making a smokehouse with your own hands for cold smoking begins with preliminary design, blanks of initial units and parts. Next comes the determination of the location on the site. The connection of components and parts is made based on local conditions - by welding, soldering, threaded fasteners or caulking.
Examples of products created by thought craftsmen, are presented:


Construction products for smoking
Smokehouse device own plot may represent a stationary outbuilding made of metal, brick or wood. Hence, a home cold smoked smokehouse, assembled with your own hands, should be located in a place where smoke will not reach the home and annoy pets.
Examples of folk art:


In addition to solidity and solid volumes, the difference between the designs and simple devices, the presence of a chronometer that counts the time from loading to unloading finished product. A more advanced version is equipped with an electronic control unit:
- time is counted down;
- a sound signal is given indicating the end of the process;
- temperature control is carried out inside the product;
- carried out general analysis gas formation.
A self-built unit is an opportunity to realize your entrepreneurial spirit:

But for this it is necessary to solve a number of problems. The main ones are cooling the flue gases in hot weather and creating a constant flow inside the smokehouse.
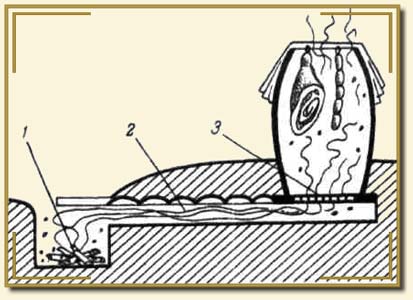
The idea of reducing temperature is shown in the figure:

From the figure it can be seen that the design resembles moonshine still. But it is not the “primary fluid” that is cooled, but the flue gas. In practice, the scheme is implemented in several ways.
- Cooling with water. To do this, the pipe (or part) is immersed in a bath filled with liquid from a well or borehole.
- Air cooling. Flue gas partially mixed with air from the compressor (the temperature decreases during expansion).
In any case, forced ventilation will be required. The diagram is presented:

In practice, this is connecting an aquarium pump or a fan from kitchen hood, or ventilation for the bathroom:

You can make a smokehouse with your own hands based on industrial designs. But for this you will need knowledge of welding:


This design will be able to implement the principle of hot and cold smoking:

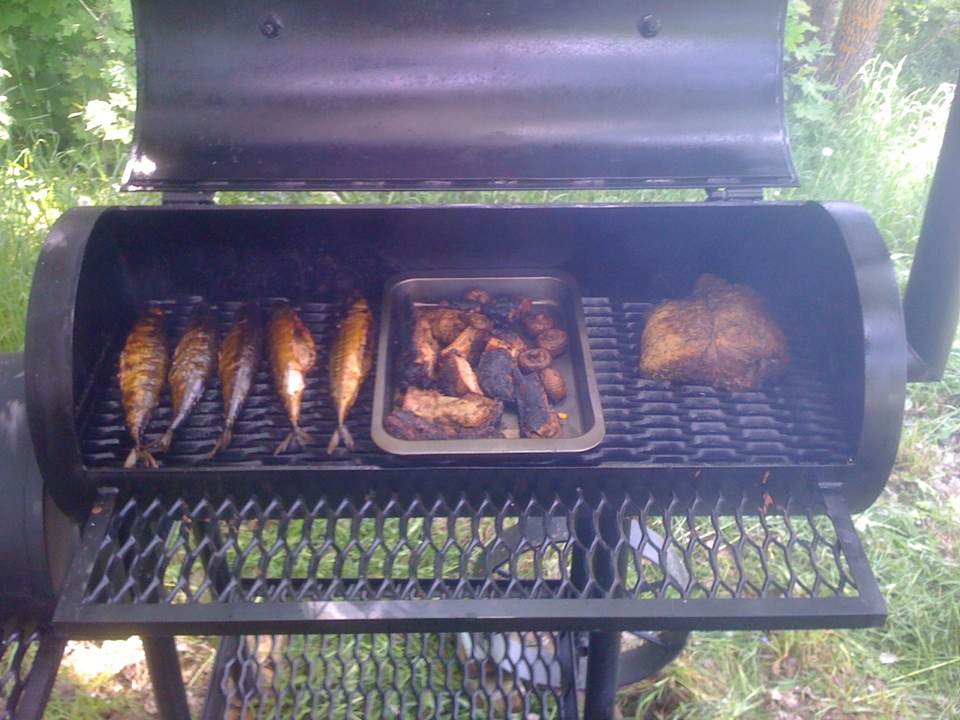
An additional (or main) function is cooking meat: kebabs, steaks, chicken, etc.
Food preparation
Unlike hot smoking, food products subjected to cold smoke processing must first be prepared:
- pickle;
- marinate;
- keep in a closed container with fragrant seasonings.
After salting, the semi-finished product must be cleaned of salt, washed thoroughly in cold water. It is possible that such an operation will be needed to remove excess marinade (initially a lot of vinegar was added).
The salting-marination operation has the function of bacteriological treatment. When exposed to salt, the outer flesh dehydrates. Bacteria in such an environment stop developing. But meat cannot be kept in brine. Otherwise, it will lose a lot of moisture and become tough.
Complex products - sausages, as well as fish, longer than 30-40 cm should be secured with twine based on natural materials (hemp, flax). This method will allow the sausage products to retain their shape. The fish will not fall apart.
A cold smoked smokehouse, designed with your own hands, is a source of pride for the master. A properly prepared product will bring double pleasure.
There are many options for expressing your creative thoughts. Even simple designs can successfully give food an unforgettable subtle taste.
One has only to look at the image of smoked delicacies, and the desire to eat it all immediately appears, which is quite natural for a person. Has your appetite also increased? What to do now? The first reaction is to go to the supermarket and buy everything your heart desires (and your wallet allows). But, alas, store-bought products are only called smoked because they are processed with liquid smoke. Opinions differ about the benefits of such nutrition, but if you have a small plot of land, you can set up your own production. In this article we will tell you how a cold smoked smokehouse can be made with your own hands from various materials.
Working principle of a cold smokehouse
Since we are talking about cold smoking, it is important to realize that it is not heat treatment product, but it is saturated with smoke, so smoking should occur at a temperature of 30 – 50˚C. It is necessary to ensure that the fumigation and heating are uniform - only in this case the smoked meats will turn out appetizing (meaning appearance) and delicious.
Many people have heard the expression “light smoke”, but did not understand what they were talking about, or thought that it meant light smoke, but in our case we are talking about smoke that does not contain carbon monoxide. It is quite possible to achieve this by making the chimney in such a way that this gas (along with other substances harmful to human health) precipitates before reaching the smoking chamber. After mixing with air and passing a long way through the pipeline, the output is smoke that is suitable in composition for proper smoking. Once in the smoking chamber, the smoke must linger in it for some time and nourish the food, otherwise it will be of little use.
Another important factor is proper preparation products. If anyone thinks that it is enough to place meat or fish in the chamber, and then light the oven and wait a little, then we will hasten to disappoint you. The procedure will be as follows:
- We will need a saturated salt solution, popularly called brine. It’s not difficult to prepare: salt is poured into a container and stirred until it stops dissolving. Salt is about 38–40 g per 1 liter of water. We don't need the salt that remains at the bottom - you can use it at your discretion.
- Now let's start salting the food. Small fish will need to be kept in the solution for 3 days. More big fish or young pork - up to 4 days. Tougher beef meat (as well as wild boar or bear meat) must be salted for 5 days.
- After the salting process, we begin to soak the meat. The duration of soaking can be up to 24 hours, but here again it is necessary to take into account the type and volume of the product being prepared for smoking. For example, it will take about 6 hours to soak a medium-sized fish, while a pork ham will take 2 times longer to soak. But this time is approximate, and in order not to soak the meat more than necessary, it needs to be checked. The method is very simple: press the soaked product with your finger, and as soon as it begins to be easily pressed into the pulp, the soaking process must be stopped immediately.
- Now the product needs to be dried. To do this, you need to let the water drain from the meat, and if you don’t have time to wait, you can wipe all the preparations with a waffle towel. It is better not to use paper towels for this purpose.
- Products should be placed in a ventilated cage (or box) and protected from flies by wrapping them in fine mesh gauze. It is important to remember that there will be no heat treatment of the product, and a smokehouse for maggots is like a steam room for a person - in general, this nasty thing is not destroyed during the processing process.
- It will take several days for the meat to dry out. Many people know very well what dried fish is (especially with beer), so it will not be difficult to determine when the product becomes suitable for further processing.
- Now all the workpieces are hung on hangers inside the smoking chamber. Products are ready for smoking.
What kind of firewood can you use?

Not all firewood can be used. Firewood from the following trees is best suited:
- plum;
- cherry (without bark);
- pear;
- apple;
- dogwood;
- apricot.
If you need to give smoked meats a tart taste, then the following are suitable:
- nut;
For smoking fish caught in heavily polluted waters, it is recommended to use the following wood:
- willow;
- broom;
If there is no firewood from fruit trees or if the smokehouse is made in camp conditions, the following trees can be used:
- linden;
- poplar;
- alder;
- aspen.
Trees coniferous species and those that are affected by fungus are unsuitable for smoking. In addition, since the pores of the fungus are easily carried by the wind, all trees located within a radius of 50 m around the infected tree automatically become unusable.
Stationary smokehouse
Very good news is the fact that special costs is not expected, but if in the household of a zealous owner there are necessary materials, then you just need to make an effort.

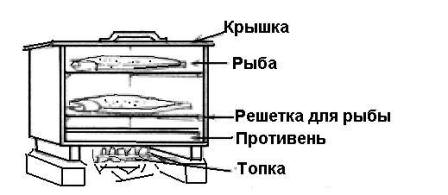
The diagram shows the structure of a classic smokehouse, where:
- Smoke generator (furnace).
- Chimney channel.
- Smokehouse.
Now let's start manufacturing, using ready-made drawings or developing your own diagram according to our recommendations.

|
To build such a brick smokehouse, we will use a small plot of land with a length of 4 m. It is very good if it is possible to install the smokehouse on a small slope, since in this case it will be easier to install the chimney at the desired angle. |
| |
So, the site has been selected (in our case on a slope), and now we can begin earthworks. Let's start with the fact that to create a chimney you will need a pipe with a total length of about 3 m and Ø150-200 mm. If there is one, what is its length? If it’s 2.9 m, then it’s okay. It’s just that the distance between the pits needs to be made in such a way that the edge of the pipe does not reach the brickwork, but ends up inside it. Simply put, make the distance between the holes 25–30 centimeters less than the length of the existing pipe. The stove should be at the bottom, so a foundation pit is made under it in such a way that its width will be 50 cm, length 70 cm, and depth - a couple of spade bayonets. |

|
On a higher part of the slope (it’s good if the difference in the location of the pipe is at least 50 cm), dig a 60x60 cm hole to make a foundation for the smokehouse. Depth – a couple of bayonets below the pipe location. (It may be less - it all depends on the type and density of the soil that was dug up, but there is no need to make a foundation on black soil). By the way, we will still need clay, so it needs to be placed separately from the ground. |

|
After digging the hole, we’ll check how the pipe fits and whether we made a mistake with its length. If everything is in order, then you can continue working. |

|
Now let's fill the dug holes with concrete. Under the smokehouse - level with the pipe (or slightly lower). And for the firebox - 10 cm below the pipe level. |

|
After the concrete has set, we will begin making the firebox. Having mixed a low-fat clay solution, we lay it on the foundation. On top, along the entire length of the firebox, we will lay refractory bricks, laying them flat on the clay mortar so that the base is under the pipe. This pillow will be the base of the firebox, so we will build the firebox on it, as shown in the photo. Some people prefer to use for masonry cement-sand mortar but it's not best option, since with high heating the connection between the bricks will be broken. |

|
Having laid out the walls, we will ensure good heat transfer from the pipe to the ground by sprinkling it with clay. By the way, if there is no suitable pipe, then the chimney can be made of red brick. |

|
It’s good if you have a cast-iron door in advance, then the size of the firebox is adjusted to it. After installing the door, we will cover the oven. We had a slab of a suitable size, but if we don’t have one, we can lay reinforcement and make a cover from fire bricks. |

|
Now let's start making a pipe-shaped base for the smokehouse. Its size is 50x50 cm, and we will do the masonry with simple red bricks on cement-sand mortar. |

|
Such a structure should work out. The height of the base is made slightly above ground level. |

|
Let's do a test fire - everything works great! |

|
Now let's start making a smokehouse, the dimensions of which will be 60x60 cm. |

|
To make the frame, we will use 4x4 cm bars. We will nail the first layer of boards onto the finished frame in a vertical position. We will install a metal chimney on the roof. In this case, the tree does not need protection from fire, since the smoke temperature is very low. |

|
Since we planned that the products will be hung, we will need to attach boards with cut grooves for metal rods on the sides. |

|
The second layer will be a lining made of coniferous wood; we nail it in a horizontal position. The same applies to the door. Such a device will help minimize smoke loss. |

|
Also, in the previous photo you saw a pin sticking out of the door - this is part of the thermometer. Its dial is located outside, so you can control the smoking process. |

|
The time has come to put everything together, for which you need to secure the smokehouse cabinet to the brick well. We remember that the base was made 50x50 cm, and the cabinet 60x60 cm. This was done specifically so that water would not get inside the base. To fasten it we will use metal dowels, fastening it through the lower bar to brick base. There is an alternative option - attach metal corners to the base, and a cabinet to them. All existing cracks are covered with solution. |

|
To complete the work, all that remains is to open up the wood protective agent and cover the roof with corrugated sheets or metal tiles. All that remains is to carry out the tests. |

|
Cases are different, so it is better to play it safe by placing a metal grate on the base - even if some product falls off the hook, it will not fall to the bottom, and its smoking will continue on this protective device. |

|
We have already talked about what kind of wood can be used for smoking. Do not ignore the advice of people who have been preparing food this way for many years. We light the stove. |

|
The smoke comes out well, so you can close the door, remembering to control the temperature inside the smokehouse. |

|
Don't forget to check the firebox and add firewood. |

|
And now, the smoking process is completed - the products are ready for consumption. |

|
The space around the smokehouse can be improved by making a path. |
Video: simple smokehouse in the ground
Video: design for cold smoking
Smokehouse from a barrel
Of course, you can use any barrel for our design, instead of a wooden smoking chamber, but this would not simplify the design much. You can make a smokehouse from a barrel more compact, even portable, only in this case you will have to make a smoke generator.
Making a simple smoke generator working with a compressor
The described structure will be assembled from what is on the farm, but if the necessary details are not in stock, you can buy them inexpensively.

|
To assemble the smoke generator, we used 4 pineapple cans and a piece of copper pipe. We also purchased 2 quarter-inch clamps with nuts and 4 metal clamps to fit the cans. |

|
In the bottom jar we will make one hole for the drive. |

|
The second hole of a smaller diameter will serve as an igniter. |

|
The third hole is made to fit the small diameter copper tube opposite the first hole. A little later we will look at how this design can be improved. If you choose the second option, then this hole (and the copper tube itself) will not be needed. |

|
One of the bends will be inside the jar, reaching its edge. |

|
Using a grinder, we cut out a groove 4 cm long and about 8 mm wide, as shown in the photo. |

|
The copper tube should not fit tightly into the fitting. |

|
And it shouldn't be short. |

|
Having secured the first bracket, screw the second one to it and insert the tube. |

|
To prevent the groove from becoming clogged with sawdust, we will install a metal shield made of thick metal (can be made of a pipe) on top. This protection should be above the squeegee, so its fixation can be ensured by screwing support bolts to the can in the right places. |

|
|

|
The generator itself will consist of three cans, and we will cut the fourth into strips, wrap them around the joints of the cans and secure them with clamps. |

|
If such a need arises, the tube can always be extended, but we recommend using a coupling rather than a nut for the connection. |

|
For our design we will use an aquarium compressor with adjustable air supply. |

|
Now let's pour wood chips inside. |

|
Turn on the compressor and set fire to the wood chips. |

|
By adjusting the seating depth of the copper tube, we make adjustments to ensure that there is as much smoke as possible. |

|
Now let's look at how this model can be improved, since this modification will help reduce the temperature of the smoke. |

|
You can also make sure that the ash spills out of the generator and does not accumulate in it. In this design there will be no inner tube - the squeegee is screwed to the edge of the can, and to prevent sawdust from getting into it, we will make a petal from tin from the inside, making many small holes in it. |

|
At the bottom of the jar we will screw a screw cap from a glass jar with two bolts, and then we will drill a lot of holes. |

|
It will be enough to insert the jar, turning it slightly, and the sealed ash container is ready. |

|
As we have already warned, in this design there will be no copper tube; air will be supplied through an external exhaust. |

|
To do this, we use a purchased (or used) fitting to bleed air from the brake system (preferably from a domestic car, since it is cheap). To do this, you need to drill a hole in the drive, and, having selected a suitable tap, cut the thread. There is a side hole at the top of the valve; if it is small, it needs to be drilled out to Ø2 mm. After screwing it in, the hole should be directed towards the smokehouse. |

|
This fitting is specially made so that a rubber tube can be pulled over it while bleeding the brakes, so there will be no problems connecting the hose from the compressor. |

|
Now you can add wood chips and set it on fire. |

|
Tests have shown that the system operates smoothly, delivering required quantity smoke. |
Smoking process
And now, the generator is assembled, all that remains is to connect it to a barrel (or other container), and you can smoke food.

|
The fish is soaked and ready for smoking. In order for the salting and soaking process to occur evenly, the products must be completely immersed in liquid. In our case, we achieved this by crushing the fish with a plate. |

|
The gas generator is connected to our small barrel (or large pan) and is ready to start. |

|
Although cold smoking produces little fat, it is still better to place a suitable container at the bottom to collect it. In order to be able to hang food, we drilled 4 holes in our container and inserted thin fittings into them. |

|
If it is cool outside, then the container can be slightly heated with an electric stove so that the temperature inside the smokehouse becomes acceptable. |

|
A thermometer installed in the container will help control the smoking process by adjusting the temperature inside it. |

|
The fish was put on old skewers from which the plastic handles had been removed. |

|
Now let's pour wood chips into our gas generator. |

|
Cover with a lid, turn on the compressor and set fire to the wood chips. |

|
Thick smoke appeared from under the leaky lid. |

|
Through the window intended for ignition, you can clearly see that there is good heat in the gas generator. |

|
Now all you have to do is wait, periodically adding wood chips and monitoring the temperature inside the container. |

|
Smoking is completed and the fish is now ready to eat. |
Depending on the volume of products that you plan to smoke regularly, select a suitable container - a saucepan or a 100-200 liter barrel.
Smoke generator operating without a compressor
The design of this smoke generator will only work in conjunction with a smoking chamber equipped with an exhaust pipe.

|
As a smoking chamber we will use an ordinary chainsaw packaging box, carefully wrapped with tape. |

|
We will fix a frame of bars inside, and stretch rows of wire onto it so that we can hang the fish. |

|
This is what a gas generator looks like. |

|
Wood chips are loaded into it and set on fire. |

|
Instead of a lid, we use a trimmed disc from a grinder, and close the hole in it with a metal ball, which will also act as a weight. To prevent smoke from entering the room through such a cover, the edge of the pipe must be cut very evenly. |

|
To check whether there are wood chips and smoke in the gas generator, just remove the ball and look inside. |

|
Well, if you move the lid, you can see that there is plenty of smoke. |

|
|

|
The idea turned out to be empty, since due to the thick smoke inside the box it is impossible to see anything, even with a flashlight. |

|
A pipe from a vacuum cleaner was used as a chimney. |

|
The chimney turned out to be long and curved, but this did not affect the operation of the gas generator. |

|
The second end of the pipe is inserted into the furnace. |

|
It is necessary to check that all oven doors are tightly closed and there is no air leakage, otherwise the gas generator will not work. |

|
The draft is ensured by the fact that the stove chimney rises significantly above the room. |

|
Upon completion of the smoking process, the tape is cut and the box doors are opened. |

|
Minimum costs, and we have delicious food. |
Video: cold smoked smokehouse from a barrel
Smokehouse from the refrigerator
If available old refrigerator with a whole body, then it can also be used by connecting a smoke generator to it or providing smoke from a homemade stove.

|
An old household liquefied gas cylinder was used to make the firebox. |

|
An old refrigerator was also found. We turned it upside down, removed the compressor and got to work. |

|
In the day refrigeration chamber it is necessary to make a hole to connect the chimney pipe. To do this, we outlined a circle of the required diameter and drilled many holes along the line with a Ø4 mm drill. |

|
Then we will make a hole in the inner lining. |

|
If the draft is weak (and this can also happen because the chamber is leaky), you can insert a fan into the bottom, which will draw smoke from the firebox, feeding it into the smokehouse. |

|
In order to be able to regulate the traction force and the temperature inside the chamber, you can connect the fan through a voltage regulator. |

|
In the upper part (in the photo it is below) we will drill many holes so that smoke can escape through them. |

|
We will also make a hole outside for mounting the exhaust pipe. |

|
Let's secure the pipe. |

|
This is how the smokehouse turned out. Now you need to install the structure higher and connect it to the firebox. |

|
The length of the pipe was considerable. |

|
Now let's add firewood and light the firebox. |

|
The smoke flows well, so you can start smoking. |

|
After hanging the food, set up a tray or bowl into which the fat will drain. We close the door and wait for the allotted time. |
Video: cold smoking in the refrigerator using a smoke generator
Video: cold smoking in a smokehouse from the refrigerator
Smokehouse from a gas cylinder
First of all, let's talk about safety precautions, since cutting a gas cylinder without first preparing it is very dangerous. Watch a training video on this topic.
Video: how to safely cut a gas cylinder

|
As already mentioned, the cylinder must be prepared properly. |

|
Now you can start applying markings. |

|
It is convenient to mark round parts using a metal meter. |

|
Now you can start cutting out the hatch in the cylinder using a grinder. |

|
It is advisable not to go beyond the markings, but in this case you will have to pry the cut out part with a crowbar to remove it. |

|
This is what should happen. As you can see in the photo, the cut was made close to welding seams– where the metal is thinner. |

|
A “sole” is welded at the bottom of the cylinder, thanks to which it becomes stable. Since we don't need it, we'll cut off this part. |

|
As a smoke generator we will use a receiver from truck. There are no explosive vapors in it, so you can cut out the door without preparation. |

|
On the same side where the door is cut, we cut holes on both cylinders, the radius of which should be as close as possible to the diameter of the other cylinder. |

|
We check how tightly they fit together and adjust if necessary. |

|
Now all seams need to be thoroughly welded. |

|
The hinges are welded. |

|
The doors should open without jamming, and when closing, fit tightly into the opening. By the way, you can weld a stopper from the inside if the door falls inward. |

|
At the end of the receiver we will make a hole for the damper. |
| |
It will be small, as it will be needed to regulate the air flow inside the smoke generator. |

|
Then we take a larger piece of metal and make a damper from it, securing it in the upper part with a bolt and nut. There is no need to tighten the fasteners, since the damper will need to be moved from time to time, changing its position, so screw the locknut over the first nut. |

|
The damper should move to the side with some effort. As you can see, a plastic handle is screwed to it, but practice shows that it also gets very hot, so you can weld a piece of rod. |

|
Let's start making a chimney by welding it at an angle from two pipes. As for the angle, it does not need to be 90˚ - it must be turned out. |

|
Let's mark the cylinder by outlining the pipe with a scriber or marker. |

|
Drilling such a hole is very tedious and expensive, so it is better to do it with a cutter. If there is none, then many people cut a hole with an electrode, setting the welding machine to maximum current. |

|
Once the pipe is inserted, its position must be adjusted and then welded. |

|
It is very convenient if the lids have handles on a wooden base, since you won’t get burned when touching them. |

|
Legs and a table were welded to the smokehouse, on which it would be possible to place dishes with products prepared for smoking. Inside we will install a grill from an old refrigerator, bending it to the size of the cylinder. |

|
All that remains is to charge the smoke generator, place the food on the grid, and you can smoke. At the same time, it is important to monitor the smoke generator - firewood or chips should smolder and not burn. |
The considered methods of smoking products allow you to prepare high-quality food that is not harmful to the body. We do not claim that smoked meats are beneficial for the human body. However, products prepared in some ways are such that experts in this matter will not even touch them. Watch a video on this topic.
Video: how to make a smokehouse incorrectly
Surely everyone would like to try dishes prepared in a smokehouse. The taste of fish, meat, lard, and cheese is significantly superior to the products sold on store shelves. Owners of country houses strive to build a smokehouse with their own hands for cold and hot smoking. After all, then smoked products are guaranteed to be natural, tasty and healthy.
How to make a smokehouse with your own hands from a barrel?
Smokehouses of any design always consist of two main chambers. The first is intended for storing firewood and special shavings to generate a large amount of smoke. The second chamber is used to load products that the owner wants to smoke. If the chambers are located one above the other, the products will undergo a hot smoking process, since the smoke will not have time to cool. The design of a cold smoked smokehouse is slightly different and cooled smoke enters the second chamber.
The easiest way to build a cold and hot smoked smokehouse is from a metal barrel. The final cost of the design will be low, but the quality of the products prepared in it will be as high as when using professional devices.
The easiest way to build a cold and hot smoked smokehouse is from a metal barrel
When making a cold smoked smokehouse, the container for storing products is installed at a distance of 3-5 m from the wood combustion chamber. Passing through a chimney with a diameter of about 100 mm, the smoke cools down. The food chamber is closed with a wooden, perforated lid. Such a device will trap smoke, but at the same time moist fumes will evaporate.
A hot smoked smokehouse is designed differently. It consists of one metal barrel and a wood combustion chamber. Smoldering sawdust from deciduous wood in the lower chamber will abundantly emit thick smoke, which, when hot, will enter the upper chamber. The products are placed on the grill and the cooking process will be in full swing.
When laying sawdust or wood shavings, it is important to use only well-dried material. Rotten and moldy sawdust is unsuitable. It is worth giving preference to firewood from fruit trees, since it is this aroma that will give the smoked product piquancy and a special, delicate taste.
How to make a smokehouse with your own hands: preparatory work

Mobile smokehouse
When starting to make your own smokehouse from a metal barrel, it is recommended to purchase and prepare everything you need in advance. Will need a professional construction power tools, namely:
- Bulgarian;
- welding machine;
- drill with a set of drills;
- jigsaw
Materials worth purchasing include the following:
- Barrel. This may be a used container, but if it contained hazardous chemicals or odorous mixtures, it is unsuitable. The container must be clean, without paint inside. If it is sealed on top, then the lid must be cut off. Metal legs are welded to the bottom.
- Grate for placing food on it in the upper chamber.
- Sheet of iron. The sheet thickness should be about 5 mm. Sheet iron will be used to make the smoking chamber.
- Metal corners, door hinges, chimney pipe - all this important elements smoking apparatus.
How to make a smokehouse with your own hands: manufacturing stages

Hot smoked smokehouse
If you have prepared all the necessary equipment and materials, you can start making a smokehouse with your own hands. Experts recommend following this sequence of actions, namely:
- making a firebox. A fire will be lit in this compartment. At the first stage, a hole for the door is cut with a grinder the right size. Hinges are welded to the cut out element, and then the assembled part is mounted back;
- making drainage holes that will serve as a blower. Through these longitudinal holes, ash and other combustion waste can be removed;
- installing the smokehouse bottom is the next step. For this purpose, prepared sheet iron is used. It is welded over the firebox. The bottom is intentionally made of thick metal to last longer. This detail contributes to the uniform distribution of heat in the smokehouse and for placing fruit tree shavings on it;
- the chimney is made from metal pipe about 10 mm in diameter. This element is welded to the combustion part of the smokehouse to form draft;
- constructing a tray to collect fat dripping from food is the next step. This part can be made from a lid that has been removed from a barrel. The diameter of the tray is intentionally made smaller so as not to interfere with the rise of hot smoke to the products in the smoking chamber, the size of which is about 15 cm;
- installation of a grate for storing products;
- making a lid from wood is the final step. Preference should be given deciduous trees tree. Holes are made in the lid through which steam will escape.
In a smokehouse, food is cooked quite quickly. So fish dishes take about half an hour. First, you should distribute the shavings or sawdust at the bottom of the smokehouse and light the fire. During combustion, smoke from the wood is vented out through chimney. Sawdust from fruit trees when exposed to fire begins to emit a pleasant, aromatic odor.
Video about making a smokehouse with your own hands:
Have you decided to build a smokehouse with your own hands for cold and hot smoking? This is a good idea that does not require large capital investments. The smokehouse from a barrel is assembled within one day and even one person without assistants can cope with the task. The result in the form of delicious and aromatic smoked products will delight the master’s family and friends.
Many of us like smoked lard, meat and fish. But such products are often offered of dubious quality or at seriously inflated prices. The only alternative to buying smoked meats is independent production, for which we need a smokehouse in the country.
Today we will give you many ideas for building an inexpensive smokehouse in your country house with your own hands. Now you won’t have to rack your brains for a long time, look for materials and hire craftsmen for the construction; just use our ideas and turn them into reality.
Which smokehouse to choose
In fact, there are many interesting options. We will consider some of them now, but don’t blame us, because their list will not include electric smokehouses or those made to order from forging or expensive stone... today we have a slightly different topic, which is aimed at the process of constructing a structure yourself, without special investments.
We invite you to pay attention to several interesting, but at the same time simple options. Each of us can do any of them, and what’s most positive is that the work can be completed in just a few days, and that’s the maximum. Also waiting for you original version smoking even if there is no smokehouse at the dacha, but preparing a delicacy is very necessary.

When choosing a smokehouse for your dacha, be sure to take into account its characteristics and features, especially pay attention to cold and hot smoking. When choosing an installation location, determine the prevailing winds, because smoke clouds in the yard or in country house you definitely don't need it.
Smokehouse on a slope
A smokehouse on a slope, a hill, near a ravine or a small ravine, and even near the drainage of a summer cottage - all this is a single building that will be very convenient for smoking a variety of products.
Such a smokehouse can be made from a wide variety of building materials, but many choose wood, since some types of wood can add a special aroma to the product. Moreover, there will be no worries about drying out or fires, since in this way we organize cold smoking with a very low temperature of the incoming smoke.
We invite you to carefully study the option we propose in the picture and immediately figure out what’s what.

As you can see, the organization of such a structure is very simple, and therefore it will not be difficult to build it. The only thing mandatory requirement– location, because the smokehouse must be installed on a certain slope.
So, first of all we need to build a chimney. You can dig a mine for it in different ways, but we choose the simplest and most reliable one. Firstly, we will need to dig a ditch 30 cm wide and 50-60 cm deep. It is possible deeper, but it is very painful, because digging a narrow and deep ditch is quite difficult. The length of the ditch should be at least one and a half meters from the place where the smokehouse is installed. Next, we place a pipe with a diameter of about 15-20 cm in the ditch, and run it from the fire to the entrance to the smokehouse. In some cases, the chimney is concreted, asbestos-cement pipes are laid, or the shaft is made of wood, but we believe that the most practical thing would be to lay the pipe, weld it, or simply fasten it at the bend and take it out into the structure. Fast, very reliable and durable.

Having finished the shaft, we move on to the construction of the firebox. This is not difficult, because to install it you will need to weld a metal box or lay it out of brick. In general, we will need to build a cube of 40x40x40 cm, which we attach to the pipe on one side and install a valve on it to create traction on the other.
The design of the smoking chamber is the simplest, because we just need to install a chamber made of wood above the chimney and try to make it quite airtight. Next, arrange everything for hanging or laying products for smoking (hooks and grates), install a smoke valve and a special door or removable panel for loading and removing products. By and large, that’s all!!! You can search good recipe and try smoking meat or fish.

Stationary smokehouse
Not to say that a stationary structure will take more time, but the costs will increase slightly, since it will be a more aesthetically pleasing building.
We will build it on simple foundation, made of brick, the facades of which in the future can be decorated decoratively. We will make a chimney from an asbestos-cement pipe or a metal pipe, and we will build a firebox at some distance from the smoking chamber.

The principle of operation is the same as in the previous case, but for such a smokehouse in the country you do not need to look for a special place; you can equip it exactly where it is convenient for you.
The work begins with laying the foundation for the smoking chamber. It is advisable to fill it not with tape, but with a general layer, at the same time creating a platform, and not just a foundation for the walls. It will be enough to make a sand and gravel cushion and pour the foundation to a depth of 30-40 cm, reinforced with wire, metal rods and pieces of reinforcement that will no longer be useful in the country.
During the construction of the foundation, or rather, the hole under it, it will be necessary to immediately make a branch - a trench under the chimney, and dig it at a distance of at least 1.2-1.5 m from the smoking chamber.
On the firebox side in the foundation, it will be necessary to immediately make a shaft for the chimney. This could be a pipe buried in the ground, or a brick box that will require a trench.
While the foundation is settling, you can work on the chimney and firebox. To do this, we lay a pipe or build a brick shaft, as we said, stretch the chimney to the required distance from the chamber and begin to build the firebox. This can be a metal box that will be hermetically connected to the chimney, or a box made of fire bricks with a special valve.
When this work is completed and the foundation is stable, you can begin brickwork walls of the smoking chamber. The masonry can be to suit any taste, for example, half a brick, with ledges for the internal organization of shelves and external decor. But the most important thing is to install transverse metal rods during laying to hang products on hooks.

Such a structure must be equipped with a special lid, which can be a wooden frame with stretched burlap, which will need to be moistened during smoking.
In addition, it can also be a barbecue with a smokehouse for the dacha, because on top of the brick box (smoking chamber), you can always install a decorative metal barbecue (removable).
The design can always be simplified as much as possible if, for example, you do not pour a foundation and build a chamber out of brick, but choose concrete pillars and an old one as an alternative for these two structural elements metal barrel.
If you want to move away from simplicity and move on to more expensive structures, then in the following figure you can see how to build a smokehouse in your country house thoroughly, beautifully and practically. This is a large volume, and, accordingly, a huge supply of products for smoking.

In fact, the principle of operation does not change in any way, only the durability of the building and its quality change, because now this is a real free-standing building that will help not only seriously set the table for any occasion, but also make money. Here you can independently regulate whether you need cold or hot smoking, for example, by simply organizing two fireboxes next to the smoking chamber and using them alternately.
The simplest smokehouse for hot smoking
Faster, more flavorful, but also more harmful... but if you cook high-quality products using the hot method original recipes, perhaps it will be possible to avoid high level harmfulness of the product. In general, we are making a smokehouse for which we do not need any major work.

So, you already see what a similar installation for smoking fish and meat looks like - a standard smokehouse that can be purchased at any specialty store. But since we agreed not to enrich entrepreneurs, but to do everything ourselves, we begin the review.
A smokehouse for a summer house starts from the place where we install it. It is advisable to choose a place away from the house so as not to get a lot of different odors into the interior. The site must be selected on a small hill, and also equipped metal sheet, on which the fire will burn. On both sides of our unique brazier we make a base for installation - we lay brick or concrete pillars. On top of them we install a metal box with shelves and a tray, a special lid or a side latch. Through this lid we can put food inside and take it out when ready. The tray is necessary for sawdust, which, when heated by a fire through a metal box, will emit a specific aromatic smoke and smoke meat and fish.
In principle, nothing else is required; the installation for smoking at home is ready. Oh, yes, just put the food in and light a fire under the smoking chamber.

A similar smokehouse, if it is made in small size, can become a companion on any trip to nature. Just imagine fishing and smoking fish at the same time on the river bank...
How to smoke without a smokehouse
Everyone understands how to smoke in a smokehouse, but how to do it in the field or if you are planning a dinner with treats, but the required structure is not at the dacha or at a picnic? We have several original answers to these questions and we really hope that you will not only like them, but also find them useful in life.
You will have to forget for a while about how to smoke properly in a smokehouse, because in this case the rules of the game change a little.
Free smokehouse at the dacha
We invite you to consider an option that we recently saw ourselves. It will require a minimum of effort from you, because something like this can be built in a few hours. Here is an example standard option for cold smoking, where the role of the smoking chamber is played by an old refrigerator. But, in view of the fact that plastic and other fillings in the refrigerator can give fish and meat not only an unpleasant aftertaste, but also some toxic substances, we suggest considering the option only as an example, and, say, replacing the refrigerator with a solid one wooden box or a barrel.


Quick smokehouse on the grill
Our minds are full of ideas, and that's why the following example for fast production we have some smoked meats new design- smokehouse on the grill. Yes, we haven’t seen this before either, but now we know exactly how to quickly smoke fish, lard or poultry before guests arrive. You just need to take a piece of pipe or an old metal barrel, place it on its side on the grill, install a grate inside, put the products for smoking, pour sawdust on the bottom (for smoking), close the barrel or pipe for maximum tightness and light a fire in the grill.
Smoking in the field
Have you gone out into nature, for a picnic, hunting or fishing, but there is no smokehouse nearby for your catch or game? It doesn’t matter, because you can always organize smoking outdoors without spending a penny. To do this, you will need stones or logs to create something similar to a firebox, put firewood there and burn a large amount of coals. Next, cover the whole thing with branches (preferably fresh ones so that they don’t ignite), green grass (you can sprinkle with herbs and spices), and place food on top. Now, all that remains is to sprinkle sawdust on the coals and turn over the food, which will simmer in the hot, aromatic smoke.

But there is another cool way - smoking fresh air, which is used by many hunters. This method makes it possible not only to smoke, but also to dry almost any product to increase its shelf life.
You will need to create a small room between nearby trees. You can make it using blankets, tarpaulins, or even thickly paved branches with foliage. Inside the room you will need to light a fire and do everything according to the recipe - coals, a little moisture, sawdust, maximum tightness. The smoking process can take several days, but if you are on a long vacation, time will not be a problem for you... just watch the heat and add sawdust to produce smoke, turn the product over or remove the smoked meats and hang them new product.
Smokehouse in the country (video)
We believe that today we have completely dealt with the issue of organizing a smokehouse on summer cottage with your own hands or even not in nature, where there are no conditions. We will be very glad if this topic is useful to you and you use it.
At the dacha, a smokehouse can be made from household items. You need bricks, a supply of iron, and you need to provide the structure with a water seal made from a hose. Such a building will fit in a small area.
Creating a small smokehouse with your own hands has some subtleties, which we will talk about in our review of smokehouses.
Suitable for cooking fish and meat, it is not difficult to make, and it will take little time to build. A gradual slope is required, with a slope of approximately 35 degrees. Dig a hole 200 cm deep. initial stage the fire is lit, the smoke goes along a closed path into the smoking chamber, which can be a barrel in the form of a compartment.
This is what a simple cold smoked smokehouse looks like
Since the chimney from the chamber to the smokehouse is not in a vertical position, toxic parts of the smoke will be lost in the ground, and condensed water will also remain there. It can also be done on a hike.
It's more difficult to make. The drawing shows the vertical position of the structure, thanks to this the smoking process will go better, so for the smoke it is necessary to make additional output. If you make a lid with a water seal, there will be the necessary pressure so that the products are smoked evenly. The amount of smoke will have to be controlled.
This is what a hot smoked smokehouse looks like
It is better to place food above the tray, otherwise the food will become bitter. For permanent conversion, you need to make gaps in the lid. It is advisable to protect the brick with special fire-resistant clay. This version of the smokehouse is suitable only for summer cottage conditions. For smoking to take place you need a large amount of smoke, so a smoke generator is necessary.
It’s easy to make a smoke generator yourself:
- We take an iron can as a basis;
- We make a hole in the lower part;
- To avoid air being drawn in from above, we make a lid;
- A PC fan will do to seal the smoke;
- We do the work by welding, ignite the wood chips and start the fan.
This is what a ready-made smoke generator for a smokehouse looks like:
The smoke generator has characteristic feature: the cooler drags smoke, but does not push it away! The smoke generator is placed directly to the compartment, because ignition occurs in a separate compartment from which the smoke generator will have to expel smoke.
It is possible to combine a hot smokehouse with a stove (here the price for electric sauna heaters is very low), but for this you need complex design, so we will not describe this in the text.
What materials are needed to create a smokehouse?
You can make smokehouses yourself only of small dimensions. You will need sheets of iron, you need to weld them along the lines. Most projects require brick. In fact, it turns out to be a brick building with a large capacity. Brick chimney will quickly become saturated with the taste of various dishes, this will be reflected in other products. Therefore, brick is needed only for the rigidity of the structure.
Good welding and stainless steel sheets - ideal option to create.
Semi-hot smoker from scratch
If you have a stove with a special hood, cut tin can and place it on low heat, add wood chips. To prevent grease from staining the stove, place a tray; food can be hung on the hood. The smoke will reach the food already cooled to the desired temperature. You won't be able to cook a lot of food this way. If you don’t have a stove, you can use an electric stove instead.
You can use a refrigerator as a basis; the dimensions of the refrigerator make it possible to make a smokehouse for large volumes of food in a summer cottage. We take out all the mechanisms and tear off the facing insulation.
The entire space in the refrigerator will serve as a smoking chamber. The sliver should lie at the bottom on a special platform; place the area for fat a little higher.
In the place where the engine was located, you can install a smoke generator. At the bottom of the refrigerator do big hole, put a tube in it, the tubes need to be combined with the exit from the stove, where the wood chips burn.
Small stainless steel smokehouse
From the name it is clear that this smokehouse requires stainless steel, specifically three grill grates and a couple of rods. The rods must be bent to U-shape, then on each you need to weld three pairs of rings at the same distance from each other.
We attach 4 short beams of 2-3 centimeters to the gratings by welding, which will then need to be inserted into the newly welded rings. The design should be rigid, that is, it should not “walk” under the mass of products. Outside, dig a fireplace with a chimney and that’s it, you can smoke! Such a smokehouse can be made on gas oven, then you won’t have to worry about the strength of the fire, and just wait for the food to cook.
Why do you need a water seal?
It is used to divert smoke into the water, thereby preventing smoke from spreading throughout the room. A hole is made in the compartment lid, which is then combined with a water source. It is also used to create pressure in the chamber if you need to cook a lot of food at once.
How to make a smokehouse-grill?
It is necessary to make the smoking tank in such a way as to create a path for the smoke. The chamber must have a place where the fat will drain, the main thing is that it drains outside the grill, otherwise the fat can spoil the cooking.
Description of the smokehouse:
- The grill is better if it is wide - it will be easier to remove the coals for smoke.
- On top of the grill we place the tank on a brick stand so that there is access to oxygen. Any tank will do, as long as it is spacious.
- Spacers are made from wire inside the tank to hang food.
- To ensure uniform smoking, you can install a water seal, it is made near the tank, and the compartment is covered with a lid.
A smoke generator is not needed here. This option is only suitable outdoors.
Cold smoked smokehouse in almost any conditions
- No need for iron and no need to make a separate oven.
- Take three to four meters of greenhouse film.
- We drive stakes into the soil a couple of meters high to make a square.
- We connect the stakes standing diagonally with rods.
- We place the products on the rods, then stretch the film.
- We lay out half a bucket of coals on the ground, place bricks to delimit it, hide it with grass - the smoke generator is done.
- Cover the entire structure with film until completely cooked.
Need to: Welding machine, a grinding machine, thin reinforcement and several sheets of iron.
- We cook the iron so that we get a box of four sides.
- We make the bottom, weld the seams well.
- We use the remaining iron to create a lid so that it is larger in size than the sides of the box.
- We make a tray inside and a row of rods for hanging food.
- We place the finished work on bricks and light a fire under it.
So anyone can make a smokehouse. What kind of smokehouse to make - everyone decides for himself, the main thing is to comply with all execution technologies!
We offer several videos from experienced specialists who will tell you how to make a smokehouse with your own hands


