It is not uncommon for situations when, when installing a shorter tire on a chainsaw, you have to change and. This information will tell you how to shorten the chain on a chainsaw so that the part completely exhausts its service life. In another option, it is possible to fit a long chain to a shorter standard guide bar.
For repairs, unstretched chains with a relatively short lifespan are used, which have received partial damage when they break or the cutting links get into metal inclusions contained in the wood.

Experts advise minimal losses quality to rivet and repair a damaged chain, using the technical potential of the service workshop.
Despite assurances from manufacturers about problems and difficulties self-repair, a significant part of users prefer to learn techniques for restoring the functionality of saw sets on their own.
The reason for this phenomenon:
- the owner lives at a great distance from service and maintenance points;
- high cost of repair services provided;
- lack of necessary equipment.
Compensating for natural chain wear by shortening is neither advisable nor safe. Operating a saw set with a stretched chain is inevitably accompanied by:
- forced wear of the tire and drive sprocket;
- increased load on the engine;
- increased risk of injury from sawing work of various levels of complexity.
External and internal factors of accelerated wear
The reason why the chain on a chainsaw is stretching intensively may be wrong choice chain oil or replacement of the recommended material with an oil substitute, malfunction of the lubrication system or inaccurate adjustment of the variable displacement oil pump.
Filling the lubrication system with material of substandard density and viscosity negatively affects the lubrication and cooling efficiency of working surfaces, and the performance of the pump supplying chain oil to the saw set.
Refilling summer oil can create many problems when operating a chainsaw at low air temperatures of -10°C. As a result of an oversight, the oil pump drive may break down, reducing its performance to the level of oil starvation.
Possible causes of spontaneous saw chain breakage

If the chain on a chainsaw breaks, it is necessary to find out the cause of the malfunction and determine the feasibility of repairing the damaged part or installing a new one.
Typical causes of saw chain breakage are unfavorable external factors:
- excessive tension;
- wear of the guide bar or discrepancy between the shanks and the width of the working groove;
- operation of the saw set with large constant loads;
- overheating of the headset due to lack of lubrication;
- the chain does not match the type of tire and the configuration of the drive sprocket crown.
Features of home renovation
Many experienced users prefer to repair chains themselves. The success of the work performed is determined by the presence of special skills and tools, knowledge design features models for various purposes.
In particular, dismantling and assembling wear-resistant analogues does not create difficulties. The carbide composition is applied only to cutting edges saw links. As for connecting elements and rivets, standard metal is used for their production.
With greater or lesser success, you can rivet a chainsaw chain at home, and if you have the right tool, even in the field. It should be kept in mind that during subsequent use of a self-repaired headset, special care should be taken. At the first opportunity, it is advisable to have the connection repaired in a hospital.
Post-repair restrictions
The problem is that the repaired a quick fix the part contains one or more “weak links”. In this state, the operating time of the headset under heavy loads is significantly limited, and increased demands are placed on the full operation of the lubrication system.
It is possible to use the restored chain in operating mode, provided that the repair was performed by an experienced riveter who has a riveting machine and other special equipment at his disposal.
The initial stage of repair and restoration work

All known methods Shortening the saw chain requires criteria for the rejection of damaged cutting and connecting links, and a technology-defined sequence of work operations. The cutting and connecting links are mounted with factory rivets, which in all respects comply with current standards.
The use of homemade components is not recommended in any case. Special rivets for chains are extremely rare on sale, so in most cases the problem is solved by installing the necessary details removed from the dismantled chain section.
Sequence of dismantling and subsequent assembly
At home, it is easier to disconnect the chain by cutting off the heads, after which the shortened rivets are easily knocked out with a thin steel rod. The task is simplified by the presence of a release clamp suitable for the pitch of the chain. The rivets removed by such a device can be used without restrictions.
You can independently connect the ends of a shortened chain in a bench vice. Rivets threaded into chain elements with reverse side are flared around the circumference with light blows of a medium hammer. The finished connection should not have any play, and a tight fit is not allowed.
During assembly different types saw chains, it is necessary to observe the dimensional intervals between the cutting links prescribed by the design.
Range of saw chain repair machines
Special machine for riveting chainsaws is included in the list of working equipment of specialized workshops. The offered range includes several budget and branded imported models costing from 2000 to 5500 rubles.
Riveting machines are characterized by increased capabilities and a comfortable level of work brands Calm, Husqvarna and Champion.
The cost of universal Shtil NG-7 riveting machines is about 18,000 rubles. Technically advanced devices provide high quality riveted connections, saving working time and material resources.
The cost of a special one varies from 2000 to 6000 rubles
Repair standards and restrictions

Grinders stuck by welding or heated with an abrasive wheel, connecting elements chains are less wear-resistant, which significantly affects their reliability.
- A tight connection of adjacent links is accompanied by additional loads on the engine and kinematics of the chainsaw.
- The lack of a smooth movement of the chain makes it difficult for the headset to enter the cut; the possibility of kickbacks and other traumatic moments cannot be ruled out.
- “Over-tightened” and loose connections of a repaired chain are more susceptible to breaks when there is a sudden change in load.
The simplest machine in design for repairing chainsaw chains justifies its cost by being able to completely rivet a damaged chain in a short period of working time and restore its performance to a level of up to 90%.
Chainsaw chains made in China They are essentially copies of European models, so the above repair recommendations are valid for the entire Chinese chain range.
Criteria for self-selection of saw chain
In everyday life, the quality of removable saw equipment from leading European brands is highly valued. Guide bars and chains from the Stihl and Husqvarna brands enjoy unofficial status as reference products.
When purchasing a product, you must make sure that the model meets the design standards of the chainsaw in terms of length, pitch and shank thickness. The entire chain range is divided into five size groups with intervals from 1/4 to ¾ inches.
Products with a smaller pitch are equipped with small-cube models of budget-class chainsaws, chains with an increased pitch and thicker shanks - characteristic feature sets of powerful and productive professional chainsaws.
How to eliminate the risks of purchasing a low-quality fake

When purchasing a branded chain on the market, the risks of purchasing a counterfeit Chinese chain cannot be excluded. Task independent choice is complicated by the lack of a reliable way to distinguish a high-quality branded original from a fake, which in terms of working life is an order of magnitude inferior to branded products.
With greater confidence, you can identify Shtilevsky chains by their silver packaging, bright orange logo and the presence of a wear indicator. Cheaper Chinese counterparts are decorated more modestly, in gray boxes with yellow trademark.
Without fear, you can buy saw chains of high quality and durability in company stores and licensed sales offices of intermediary companies.
Pro recommendations for preparing a new chain for use
Practice has proven the effectiveness of stabilizing the internal structure of the saw chain metal. Sufficiently long heating of the product in an oil bath at a constant temperature of 60-70°C eliminates internal stress and promotes recovery crystal lattice metal
Optimal time heating of the tool steel from which the cutting links are made can vary over 7-10 days or more.
Nuances of long-term storage
If the chainsaw is not going to be used for a long time, it is recommended to remove the bar and chain, thoroughly clean it and treat it with any neutral preservative. The above fully applies to spare headsets.
Regardless of the type of packaging, it is advisable to store dismantled parts in dry rooms with a stable temperature. Subject to these conditions, the formation of condensation moisture and the appearance of pitting corrosion are excluded.
The condition of the chainsaw chain must correspond technical requirements its operation. Any defect, be it sagging of the chain or deterioration in the quality of the cut, often occurs due to its stretching.
From an operator safety point of view further exploitation chainsaws are not permitted. At the most unexpected moment, the slack chain can break and cause injury to him. It is necessary to replace it with another spare chain, or to shorten it in a workshop or workplace.
Is it always necessary to repair the chain?
A sagging chainsaw chain is not always a reason to repair it. You must first make sure that it is definitely not subject to tension (adjustment).
Here are some typical cases:
- Chain stretches.
- The new existing circuit does not match the short bus.
Find out how to make a router from a drill with your own hands:
Chain stretching due to prolonged operation is a typical case. During operation, the metal of the chain heats up, and the links gradually stretch due to the expansion of the metal in volume. That is, the chain is stretched every time, which can sometimes be eliminated by partially reducing the cutting time. However, this is not an option when she has to work intensively throughout her entire shift. industrial conditions or when preparing firewood for the winter.
Another circumstance that does not allow the saw to be used normally even with a new chain is the discrepancy in length. This can only happen when purchased by inattentive users, or is caused by the current lack of the required chain. Which, in principle, is not so dangerous, since you can always find a way out by shortening it manually. At the same time, the strength of the connection of the chain links will remain at a fairly high level.

Adjustment of chain tension is usually done manually using the saw tension bolt located in the area of the dog teeth.
Using a straight screwdriver mounted on the bar and drive chain, after closing the side cover, begin to gradually tighten.
You should not tighten the chainsaw chain all the way, as you risk stretching the links again soon. Usually, a small reserve of chain stretch is left, which can be checked by hand. It should be slightly retractable from the tire by about a millimeter.
If there is a need to shorten
 Often, when working in the forest or on a remote construction site, you will not be able to find a replacement for a stretched chain.
Having taken into account all the advice, and having made sure that it is necessary to shorten the chain, it is important to know the sequence of actions and possible ways replacements.
There are not many of them and they depend on how many links need to be removed and under what conditions the repair will be carried out.
Each link (the cutter and the links connecting them) has two such rivets. If nearby “native” connecting links are damaged, you can use elements from any other similar circuit of any equipment, even automotive equipment. You just need to file the profile, especially at the bottom, where it has a small groove.

The easiest way is to take a long chain, in which several segments can be removed without problems. This way, at least, it becomes possible to use family links. They can be removed using a hacksaw, but it is better to use sandpaper.
Initially, you need to grind off unnecessary rivets, and then cut off the excess area. To do this, you need to pry it with a knife and knock out the rivets from the unnecessary links using a homemade knockout.
When connecting a new chain, you have to make homemade riveting of the links. The rivets themselves can be bought at the store, but if you don’t have them, use steel wire, or better yet, a short bolt with a flat head. Riveting is done on a rigid base (metal workbench or vice). Alternately threading through the elements of future rivets, use a hammer to flare them from the reverse side.
Selection of chain taking into account stretching
 There are no special solutions in this regard. You just need to remember about the complex wear and tear on the equipment of the chainsaw itself. You should either change it entirely during prolonged operation, or take care to extend the service life of its main part, that is, the tire and sprocket.
The operation of the chainsaw will last longer only if it is additionally equipped with several chains. Professionals especially do not neglect this circumstance and purchase an additional bar and (or) several chains along with the saw.
Things to remember: By alternately changing the chains in time and turning the tire over, you can delay the wear of the cutting equipment as much as possible, which means you are less likely to resort to shortening the chainsaw chain.
From this video You will learn how to shorten the chain on a chainsaw:
The chain is the main part of the bicycle transmission unit. Passing through the teeth of the sprockets, the chain transmits torque to the rear wheel. This explains why the bike is moving. The dynamic loads on the unit are quite large, so during operation the chain mechanism wears out. In this article we will look at how to remove a chain from a bicycle and how to put it back.
 The working life of the singlespeed chain mechanism is designed for the entire “life” of the bike. The bicycle chain runs smoothly without deviating. The situation is somewhat more complicated with bicycles designed for several speeds. The load on the chain mechanism here is greater relative to parallel gears, since the bicycle chain is located at an angle relative to the bicycle frame. If compared with parallel transmission, the impact on the links is several times greater. To avoid damage to the entire transmission mechanism, the chain must be replaced in a timely manner.
Don't think that you can't remove a chain from a single-speed bike. It is removed for cleaning or repair.
When should you remove the chain from your bike?
 Let's figure out how to find out that the chain assembly of a multi-speed bicycle is faulty. You can estimate the mileage of a two-wheeler, but other factors also influence the serviceability of the bicycle chain.
- Correct selection of gears;
- Quality of roads;
- Driving speed.
 The appearance of suspicious sounds (provided that the lubrication is in order) and difficulties with shifting gears are the first signs of a malfunction of the chain assembly. The simplest way assessment of the serviceability of the links is as follows:
- Bend the bicycle chain away from the largest sprocket;
- If it moves freely from 3 or more teeth, then the bicycle chain must be replaced. Two prongs are a kind of warning. You can still drive it for a while, but it will have to be removed soon.
This same method works for single speed bikes.
An informative method is to measure the length of the bicycle chain.
- 30.5 cm – best value length;
- 30.6-30.8 cm – average degree of wear, high maintainability;
- More than 30.8 cm - links and sprockets are heavily worn. The entire transmission is damaged.
To correctly measure elongation, the chain must be completely removed from the bike.
Types of bicycle chains
Let's consider 2 main types of bicycle chains:
- Keyhole;
- Solid.
 Its peculiarity is that it has a special clamping fixture. Taking one off the stars, as well as putting it back on, is not difficult. To do this, you just need to disconnect the lock.
You can determine the location of the split link using visual inspection. If the links are clean, finding the connector is easy. As a rule, the manufacturer's mark is stamped on the connector.
Solid
It is impossible to completely remove such a bicycle chain. If you remove it completely from the sprockets, it just hangs on the frame. Of course, compared to the option equipped with a lock, the solid design is less convenient. However, there are also advantages. The lock may become loose and the connecting pin may get lost. The links disengage. There are no such problems with a solid chain. If it breaks, then this is purely a quality cost.
 It's not difficult. Follow the algorithm.
- Pry up the clamp with a screwdriver or a knitting needle. It is important not to break the clamp, since it will not be possible to connect everything back without it;
- Unhook the link.
Now you can freely remove the bicycle chain and perform the necessary manipulations on it: shorten it, clean it, or, if it is hopelessly damaged, throw it away.
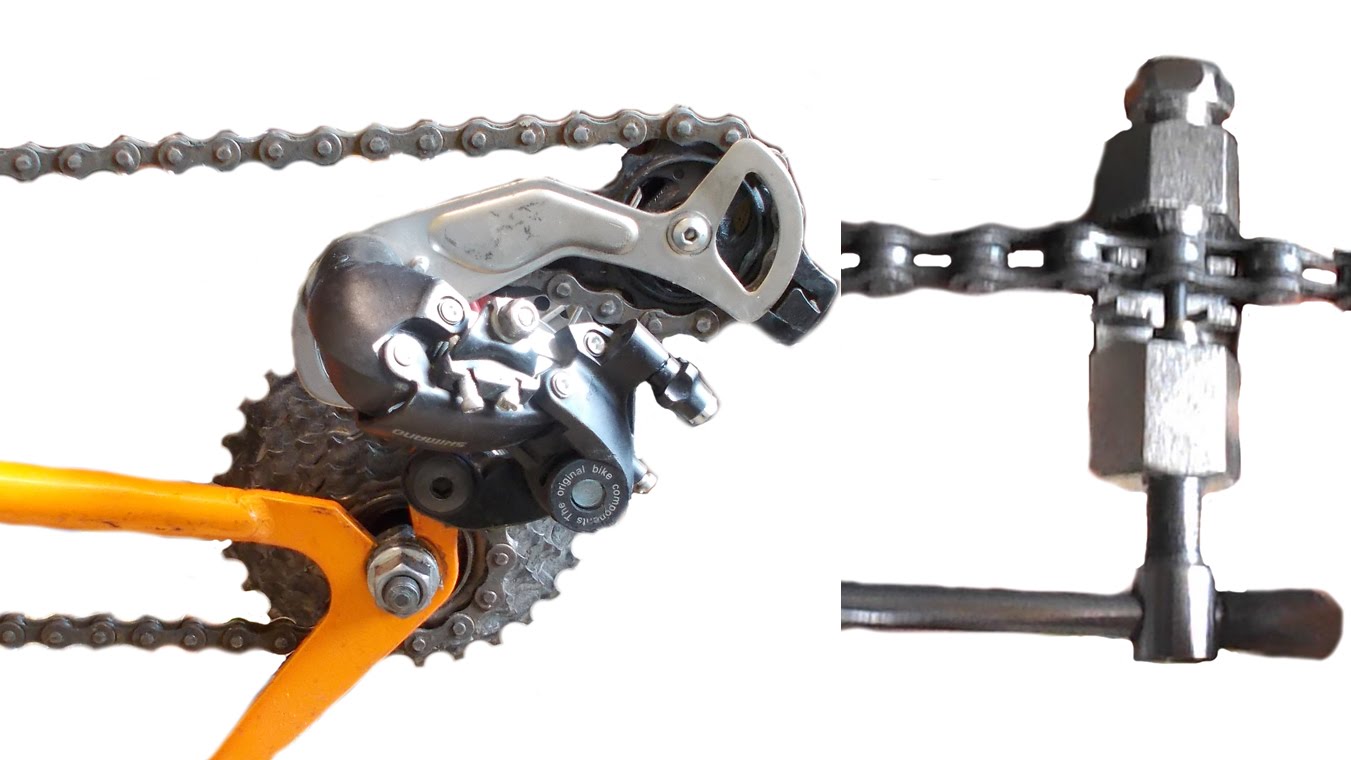
To disconnect a solid structure, you will need a special tool called a squeezer. Using this device will allow you to remove the link without damaging it. The algorithm is as follows.
- Select the link to be disassembled;
- Place the bicycle chain in position for pressing out and pressing in the link axle, or pin;
- Tighten the screw and pull the axle towards you.
There is no need to completely pull out the pin, as it will not be easy to insert it back into place. Manipulations with the squeeze slightly loosen the axis. To re-release, select another link. Press the axle in in reverse order.
- Connect adjacent links to each other;
- Press the pin in using the screw.
Repairing a bicycle chain
 The most common defect in a bicycle chain is its sagging due to an increase in length. Of course, you can remove a stretched bicycle chain and replace it with a new one, but you can also try to restore it. Due to the loosening of the axles, the bicycle chain expands in the transverse and longitudinal directions. It is impossible to eliminate the transverse expansion, but perhaps something will work out with the longitudinal one.
The extra links must be removed in such a way that the bicycle chain passes freely, without unnecessary tension, over the large sprocket. When shortening, also use a squeeze. It is important here not to overdo it by pulling out extra links.
It helps to install so-called stabilizers on a bicycle, which prevent the chain from flying off the sprocket when riding. Of course, installing a damper as a temporary measure is a good solution, but we must not forget about replacing the bicycle chain.
 Installing a bicycle chain on a single-pillar is quite simple:
- Hang the bike chain on both sprockets;
- Snap the lock (alternatively, press in the pin).
With a fast bike you will have to tinker a little longer.
After using a bicycle for a long time without maintenance, the chain often begins to sag. How to shorten a bicycle chain at home? What is required to determine the correct length? We will look for answers to these and other questions in the presented material.
What factors affect the elongation of a bicycle chain?
A number of factors lead to wear of the axles, the so-called pins, of a bicycle chain. Firstly, deposits in the form of old oil accumulate between structural elements, onto which dust and small contaminants stick. Additionally, stretching can put undue stress on the chain when cycling up steep inclines. Another reason is the end of the chain’s service life, the destruction of its elements as a result of impacts and metal corrosion. To avoid discomfort while operating the bike, you need to understand
How to determine the optimal length?

Before you figure out whether it is possible to shorten the chain on a bicycle with my own hands, you need to find out how long it should be for comfortable movement. To understand this issue, it is enough to throw the chain onto the largest sprockets in both the rear and front chassis of the bike. Next, you need to open one of the links. Finally, tighten the chain as much as possible. It is enough to add a couple of centimeters to the resulting length so that the chain is not subject to excessive stress while driving.
Preparation for dismantling
To make it easier to work with the chain, it is worth cleaning it first. The simplest way is to wipe it with a regular piece of material soaked in kerosene. You can also use a special remover, in particular AB-80 or WD-40 liquid.
Tools
How to shorten the chain on a speed bike or mountain bike? There are several tools you can use to separate the links. First of all, you should pay attention to the special squeeze. The latter is a simple device that resembles a manual stand with a rod that applies pressure to the axes (pins) of the links. You can buy such a tool at any point that sells sports equipment. Its purchase will cost from 500 to 1000 rubles.
If it is not possible to buy a squeeze, then you will have to use improvised means. We are talking here about a hammer and a metal rod, which will serve as a punch for removing the axes of the links. You will also need a couple of nuts that will fit under the chain links.
How to shorten a bicycle chain using a wringer?

To get the job done by resorting to exploitation special tool, you need to perform the following sequence of actions:
- Place the squeezer in a position where its rod is centered on the axis of the chain link.
- Perform rotational movements with the tool until the axle is almost completely out of the link.
- Disconnect the circuit and, if necessary, perform similar operations with its remaining sections.
- Remove unnecessary links and connect the structure.
Having figured out how to shorten a chain on a bicycle, you need to figure out how to connect it. A narrow half-link must be inserted between the cheeks of a wide one. The axle should then fit completely into the hub hole. Next, it is necessary to evaluate the mobility of the links. If it is insufficient at the joint, the hinge can be developed using pliers.
How to shorten a chain on a bicycle without squeezing?

Absence specialized tool, designed to separate chain links, is not a critical point. As mentioned above, an alternative to squeezing can be a metal pin, nail, etc. Also here you will need a hammer, with which the axles will be knocked out of the links.
With this approach to business, the main thing is to be careful. After all, inaccurate, too strong blows can lead to deformation of the link plates. To prevent this from happening, regular nuts must be placed under the chain elements in advance.
Those who are trying to shorten a bicycle chain for the first time without using a special squeezer are recommended to practice beforehand. For these purposes, it is worth using an old chain or separate, unnecessary links. This kind of work requires some skill. Therefore, before influencing a working chain with a hammer and a punch, you need to perform the above steps several times and evaluate the result of your own work.
In conclusion
So we figured out how to shorten a bicycle chain. As you can see, you can cope with such a task not only with the help of a special squeeze. To get the job done, sometimes it is enough to use available tools that can be found in every home.
Reading time: 7 minutes. Published 06/14/2019
The chain is considered consumables for a chainsaw. More often than other elements, it fails and begins to sag, especially with frequent use. During intensive work, the metal links begin to heat up, which leads to stretching of the saw set and a decrease in tension. To avoid scheduled replacement, the chain can be shortened at home. The procedure is simple to implement, but you need to know how to properly remove the rivets and put all the components back together.
Why does the chain on a chainsaw stretch?
The chain on any chainsaw stretches over time, this applies not only to budget models, but also famous brands, such as “Calm”. The following reasons contribute to this process:
- Poor adjustment of the oil pump. Leads to improper oil supply, increasing the heating of the metal during sawing.
- Forest felling and construction in unfavorable, extreme conditions. Particles of dust, dirt or sand fall on the links of the headset and act as an abrasive material. Gradually wipe the joints.
- Using used or low-quality oil containing metal particles.
- Install a new headset without adjusting the adjustment bolts after each use.
- Reduction of natural tension after long and intense work.
Chain stretch – normal process for saw set. It can be controlled using the oil recommended by the manufacturer and following the operating instructions for the tool. If you do not pay attention to tension, it can lead to tool breakage, reduced productivity and dangerous injuries during operation.
Important! Oil must be selected taking into account technical characteristics model of your saw. The instructions always indicate which mixture should be used.
What to do when the chain is stretched?
The headset should be tamed when the force of the adjusting bolt is not enough to fully tension the blade. The second common situation is the need to replace the tire installation with a shorter length. In total, you can remove no more than 2 links, but if you want to expand the headset, additional parts can be purchased at a specialized store. It is important that the parts of the blade match in thickness, shape and pitch of the cutting teeth.
Use of special equipment
Rivet punch
Figure 1 – Rivet punches for chainsawsThis is a mechanical device similar to a conventional press. The package includes an anvil, grooves for fastening the saw set with different steps teeth For convenience, there are replaceable tips for extruding rivets. The tool is intended only for separating links.
Riveting and rolling machine
 Figure 2 – Riveting and rolling machine
 Used together with a punch for riveting and rolling saw chains with different pitches. The cutting depth of the headset can vary from 1.1 to 2 mm. The package includes rotating inserts, anvils marked A or B (the difference in the pitch of the links).
Mechanism of operation - saw chain with a new link and fresh rivets, they are attached to the guides. After this, the area is pressed with a roller to the built-in anvil, and the engine is started. As it rotates, it presses and crushes the rivet. During the process, you need to slowly tighten the adjusting screw. The advantage of a riveting-rolling machine is that the quality and strength of the rivets do not differ from factory ones and can withstand heavy loads.
Important! It is not advisable to purchase machines for a home workshop. They have high cost and are intended only for working with a chainsaw headset.
Do-it-yourself chain shortening
You can shorten the chainsaw chain with your own hands using simple tools. This method is less reliable, but easy to use and does not require special skills in working with riveting equipment. Disadvantage - you cannot control the strength and quality of crushing of rivets. This can cause the tool to break under heavy loads.
What tools will you need for repairs at home?
The work can be done using the most available tools. Depending on your skills and abilities, you may be required to:
- vice;
- Bulgarian;
- hammer;
- chisel;
- needle file;
- beard;
- pliers or passages.
Some craftsmen also use an electric welding machine. It is not recommended to use it, since the seams after welding quickly become unusable under the influence of vibration during intensive operation of the chainsaw. This method is only suitable for gear chains that transmit force to the drive sprocket.
Removing rivets
To separate the links, physical force is required, since high-quality steel is used to manufacture the headset. Before starting work, secure the chain firmly in a vice to avoid injury during removal. Grind off the protruding part with a needle or file. The rivet itself can be removed with your own hands in the following ways:
- Continue sanding until the bridge shows through. Attach the beard and gouge out the metal with a hammer.
- Grind down the rivets with a grinder. The disadvantage of this method is that you can damage the chain itself. The work must be carried out carefully, periodically wetting the area with water.
- After holding the chain in a vice by the guides, cut off the rivets with a chisel.
If it is necessary to increase the number of links or remove one of them, then it is necessary to remove at least two rivets (left and right). When using a grinder, the metal can heat up, so after grinding you need to wait until it cools down or work with protective gloves.
Connection of links
You can purchase a new link for any chainsaw model in any specialized store, remove it from the old headset. The use of donor spare parts is not recommended, as this reduces the quality cutting blade. Installation technology:
- Install the link with new rivets on the chain. Place open side up on an anvil.
- Place the top plate on the rivets and tap with a hammer several times to ensure a tight connection.
- Place the bit on the rivet and give 1-2 strong blows with a hammer. Achieve pronounced thickening and flattening of the metal. Repeat the operation on both sides of the link.
After work, you should check that the chain is movable and that all its elements move freely in different directions. This avoids jamming during the sawing process.
Important! The headset cannot be installed on a chainsaw if the links cannot move freely. After repair or change in length, check each element.
How to properly put on and tension a chain?
Before starting work, you should wear gloves to avoid cuts from sharp teeth. You can only tighten a cold chain - after cooling, it can burst from overvoltage, damaging the mechanism. Take off protective cover from the chainsaw, carefully place it on the bar.
Depending on the configuration of the tool model, tension is applied manually or using a special regulator. In the first case, you need to loosen the bolts on the bus, and after installing the chain, apply tension using a slotted screwdriver. If there is an adjusting bolt, turn it all the way until there is sufficient blade tension. After work, check for sagging; be sure to tighten it after the first use.
Repair errors and their consequences
The quality of work on shortening or increasing the size of the chain on a chainsaw depends on compliance technological process. Main mistakes:
- the new element of the headset does not match in pitch, thickness or size of the teeth;
- installing an element in the wrong direction;
- the chain does not match the length of the bar;
- The rivet is installed loosely or crookedly.
Violation of the operating pattern can lead not only to tool failure, but also to dangerous injuries. You should carefully check each element of the headset before you start cutting wood.
Prevention methods
To avoid loosening the tension of the saw set and breaking it, you need to use links made of high-quality metal. Check the presence of lubrication on the chain before starting work, and systematically tighten the adjusting bolt. Read more about. With planned maintenance monitor the condition of the drive sprocket, which sometimes causes breakdowns.
You can shorten or replace a chainsaw chain link at home. There is no need to purchase expensive equipment for working with rivets. The procedure can be carried out using simple plumbing tools. The length of the headset and its tension directly affects work performance and the risk of injury. Before starting the saw, check the tension of the blade and, if necessary, tighten the adjusting bolt.


