At country houses and personal plots The problem of disposing of organic waste often arises - leaves, weeds, peelings, sawdust and other things. Unlike inorganic waste (glass, plastic, etc.), all this can be used to produce clean, environmentally friendly fertilizer - compost. It is obtained as a result of the biological process of decomposition under the influence of the vital activity of microorganisms. Adding compost to any soil improves its quality characteristics. Clay soils acquire a lighter, crumbly structure, while sandy soils retain moisture better. Let's look at how you can make a compost pit and prepare compost correctly.
The following organic wastes are suitable for raw materials, which are divided into two large groups.
Brown waste
These include those that release carbon.
Green waste
 Waste that releases nitrogen is considered green.
- berries, vegetables and fruits unsuitable for food and processing;
- drunken tea and coffee cake;
- stubs and cleaning;
- scraps of wool;
- leftover soups, cereals;
- eggshell;
- waste products of herbivores.
When adding a large amount of freshly cut grass, the compost preparation time will increase significantly. To speed up the process, lightly cover small layers of grass with soil.
What should you not put?
Not all organic matter is suitable for fertilization.

The following cannot be placed in a compost bin:
- fresh pet excrement;
- loach, wheatgrass;
- bones;
- leaves and other parts of plants affected by diseases, especially powdery mildew;
- plants treated with any chemicals;
- weeds whose seeds have ripened;
- inorganic non-degradable waste (rubber, metal, glass, synthetic materials);
- tops of potatoes and tomatoes;
- fats, meat, dairy products;
- fresh and boiled eggs (except shells).
Potato and tomato tops, even healthy-looking ones, can be carriers of late blight. Subsequently, such fertilizer can infect all plants. In addition, this raw material takes a very long time to dispose of; the process will take about 5 years.
Everything that is not suitable for a compost pit should be thrown into a cesspool or removed from the site as garbage.
Requirements for placement
A place on the site is chosen, as a rule, out of sight and one that you don’t mind - where nothing grows due to dense shade or infertility of the soil, somewhere behind outbuildings, if there are any, in the backyard.
There are other important points.
- You need to understand that rotting raw materials will not emit the most pleasant smell, so you should think about moving away from the resting place and about the neighbors. It would be good to know the compass rose so as not to place the pile on the leeward side.
- Consideration should be given to ensuring free access to the pit, since raw materials will be added and taken constantly throughout the season.
- It is advisable to choose a site on flat surface, and not in a hole, it is possible with a slight slope to eliminate stagnation of water, which interferes with the flow of oxygen, and therefore extends the process over time.
- Compost pile, although called a pit, must be above ground level. In this case, it will warm up better, it will be more convenient to loosen, water and generally maintain it. Optimal parameters- 50 cm deep, 1 m fence above the ground. Higher walls will make it difficult to loosen and use compost.
- Avoid proximity to a source of drinking water (must be more than 25 m).
- The place should be in the shade or partial shade - sunlight slows down and dries out the raw materials.
- Do not place the structure under trees, they may get sick and die. Neighborhood with conifers and other evergreen crops is especially not recommended. Best neighbors there will be alder and birch.
Do not cover the bottom of the pit with film, slate or other material that does not allow moisture to pass through! It must penetrate from the soil unhindered (depthing will facilitate this), otherwise everything will dry out. The bottom should remain earthen.
Design features
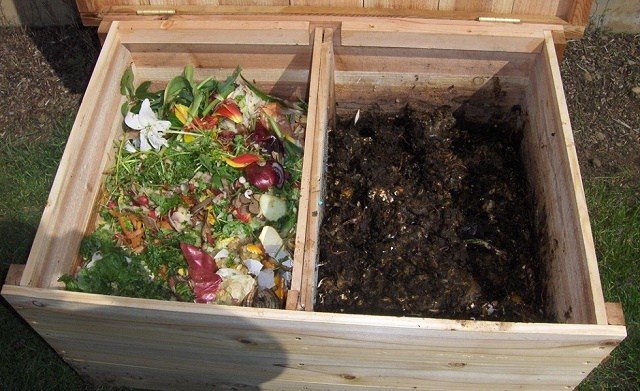
The ideal dimensions of a structure are usually indicated by the parameters 1.5m x 2m, but ultimately they are determined based on the amount of raw materials that can be accumulated in 2 years. This is how long the process of preparing the finished substrate will take. Therefore, the ideal pit should be twice as large and two-section, designed to last two cycles. The first compartment will contain ready-made waste, the other will contain fresh waste over the next two years.
It is important to know that a small pit will not warm up well as a result of rotting, and this temperature may not be enough to kill all pathogenic microflora and harmful spores. Experts determine the required temperature of 60C and the above-mentioned optimal dimensions.
The structure must have a removable lid on top.
Design options
You can arrange a compost pit in different ways; let’s look at several common options.
Regular pit
The simplest construction that does not require additional costs and materials. A shallow hole is made, no more than half a meter deep, into which everything is folded according to the usual principle. The contents are covered with black polyethylene on top. To make it easier to remove for adding waste or using, it is rolled on both sides onto a long handle, which also serves as a load. After each new laying, it is recommended to cover the waste with grass.

The option is simple, but it is difficult to call it effective and convenient. There will be difficulties with mixing, and such a pile will not be able to warm up sufficiently, which means that it will take a longer time for it to rot.
Two-section composter
The material for production can be boards, old slate, metal sheets, corrugated sheets, walls from plastic containers, brick, etc. Optimal sizes depending on the size of the plot - 1.5-2 m wide and 2-3 m long. Make a deepening of 0.5-0.8 m. To secure the structure in the corners (stepping back the required distance from the hole), pipe sections or metal rods are dug in large diameter, capable of supporting the weight of the compost heap. Wooden pillars they are not suitable for this purpose, since the process of decay will invariably affect them, and the structure will not last long due to the load.

Install the walls, not forgetting the ventilation holes. A partition is installed in the middle, dividing the structure into two equal-sized compartments. Ready humus will be stored in one of them, and “young” waste will be stored in the second. It is better to make the lid hinged, on hinges, so that it does not move and tightly covers the contents.
It is advisable to treat the supporting sections of metal pipes with an anti-corrosion bioprotective compound, and all wooden parts- protective impregnation, and then cover with two layers of acrylic paint.
The bottom, as already mentioned, cannot be covered with waterproof material, but straw, sawdust or tree bark are perfect for this - they will provide the necessary air exchange and allow excess moisture to escape quietly.
If desired, you can make three sections. In the first there will be a ready-made substrate, in the second there will be a fully laid ripening one, and the third will be intended for laying new raw materials.

Single section composter
More simple and sufficient compact version. You will have to take the finished product from below, for which you need to make a hole in one of the walls (or better yet, on different sides), from which the ripe fertilizer will be selected. There should be a distance of at least 30-40 cm between the wall of the box and the ground. In this case, there is no need to mix the substrate.

Concrete box
A structure that will be completed literally once and for all. Neat and reliable. To do this, you need to dig a trench of the required perimeter with a depth of 70-80 cm and make formwork. Pour concrete into it, remove the formwork and remove the soil from the box to the required depth. Can be used as a cover wooden shield or film pressed with a metal mesh.

Ready made plastic container
The modern market offers ready-made composter structures made of plastic. They have different size(within 400 -1000l), the necessary ventilation holes (make sure of this!) and a lid.

Their cost depends on the size, design and region and usually ranges from 2 to 10 thousand rubles.
Do not make compost pits that are too large; their contents will overheat, which is also undesirable, since this will lead to the death of the necessary microorganisms.
How to properly fill a compost bin?
Before laying the raw materials, clear the bottom of the pit from the turf and dig it well to a depth of 30 cm. This will provide conditions for the active life of worms and the penetration of beneficial microorganisms, which will provide indispensable assistance in the waste processing process. In addition, excess water will drain well into the loose soil.

We begin laying, alternating layers of wet and dry, brown and green raw materials. Their optimal ratio should be approximately the following: 3 parts brown waste to 1 part green waste, and there should be 5 times more wet raw materials than dry ones. Anything large should be broken or chopped.
Moisten (not too much) and close with a lid.
The raw materials should not be compacted too much, but excessive looseness is also undesirable. Everything should be in moderation, especially humidity.
Storing compost is not everything. Proper further actions will help speed up the decay process and make the fertilizer more nutritious. Please adhere to the following guidelines.


The following additives help speed up cooking.
- Rotted horse manure.
- Some types of plants (valerian, chamomile, dandelions, yarrow).
- Specially produced activating preparations, for example, Baikal EM-1, Compostin and Compostar.
- Stale (dried) bird droppings.
- Legume stems.
- Bone and dolomite meal.
- Superphosphate and complex mineral fertilizers.
As the contents rot, the temperature inside rises, and light steam may even rise from the heap. This is normal and indicates that everything is going well.
Spare no effort and time for this simple structure. This will solve the problem of recycling a considerable part of organic waste, and will provide the most valuable fertilizer, the quality and environmental friendliness of which you will be absolutely sure of.
» Medicines
Annual use of growing area different cultures greatly depletes the soil. To restore its fertility, it is necessary to periodically apply fertilizers. One of the most accessible types of food, which has a rich composition of nutrients, is compost. This fertilizer can be made at the dacha with your own hands.
Compost is one of the types of organic fertilizers that can be prepared independently using various household and vegetable waste. A high-quality composition containing minerals and valuable trace elements is equivalent to humus. The nutrient mixture reaches readiness as a result of decomposition organic matter under the influence of heat and moisture. A compost heap is identified with a living biological reactor. The process of converting waste into a valuable nutritious product occurs thanks to intensively developing microorganisms.
Preparing compost is not a labor-intensive process, but the technology still has some features. Only the right composition can restore the vitality of the soil, increase its fertility and improve its structure. Recipes and preparation methods organic fertilizer great multitude. Every experienced gardener has its own exclusive secrets, which consist in the use of various additives, the combination of certain components, etc.
For those who did not take care of setting up a compost pit in advance, bagged humus is offered. But before purchasing, you should collect information about the manufacturer, otherwise you may get a neutral or negative result after fertilizing the land.
 Natural compost is rotten organic waste
 What is it made from?
No matter how tempting the offers to purchase ready-made compost may be, you can only fully trust a product you prepare yourself. To obtain organic fertilizer you can use:
- waste and peeling of vegetables/fruits;
- eggshells(only from eggs that have not undergone heat treatment);
- tea leaves, coffee grounds;
- mown grass;
- dry leaves;
- peat;
- domestic animal manure, bird droppings;
- thin branches, stems;
- paper, natural fabrics, feathers (raw materials in crushed form);
- straw, shavings, seed husks.
All or part of the ingredients are filled into a box or pit in a certain order. To start the fermentation process, it is necessary to create a favorable temperature regime and high humidity.
 Compost is prepared from the remains of fruits, vegetables, eggs, straw and other things.
 The following ingredients should not be placed in a composter or pit:
- vegetable waste and fruits that have passed heat treatment (there are practically no useful microelements in them, the composition will turn out to be non-nutritious);
- weeds(all types of weeds contain poisonous or toxic substances that pose a danger to the soil and cultivated crops);
- plants affected by any diseases or pests(compost with such a component will provoke the spread of the disease on the soil and plants);
- synthetic material(it is not subject to the process of decomposition and rotting);
- citrus waste (essential oils inhibit decomposition processes; a large number of crusts can increase the acidity of the soil).
According to popular rumor, you can add dog and cat feces to compost, as well as used toilet filler. Experts do not recommend using this type waste, since animal waste products may contain worms that are dangerous to human health. Being in a warm and humid environment, they survive well, and then successfully colonize raspberries, strawberries and other fruits.
Advantages and disadvantages
To appreciate the full benefits of using compost, you need to consider its effect on the soil environment and plants.
- Compost contains a large amount of valuable minerals and trace elements in the correct proportion. When it enters the soil, a rapid metabolic process occurs, as a result of which the deficiency of missing substances is instantly compensated.
- Organic matter, when combined with soil, forms a single structure. After heavy watering or rain, micronutrients remain on the surface, unlike mineral fertilizers, which settle into deeper layers of the soil.
- Compost allows moisture and air to pass through well, which allows it to improve the soil structure in the upper layers. This is important for the normal development of the root system.
- The fertilizer contains a large amount of humus, which increases the fertility of the land.
- It is almost impossible to overfeed plants with organic matter. All components are of natural origin. They undergo natural decay processes without contaminating the soil with various toxins.
- Compost from organic fertilizers is the most accessible a way to enrich the soil with useful substances.
 Real compost has virtually no downsides and mixes completely with the soil.
 Compost has virtually no disadvantages. However, it is worth noting that when arranging a compost heap or pit, you need to choose a place away from the recreation area and home, since the process of rotting is accompanied by the release of an unpleasant odor. In addition, this object attracts flies, ants and other insects. Arranging a special box equipped with doors will help to avoid problems with such a neighborhood. Insulating a compost heap in this way also has aesthetic value; the corner of the site will not look dull.
How to make a compost bin with your own hands
To organize a place for collecting organic waste in order to obtain fertilizer, it is recommended to use a compost box. Making a storage unit is not difficult at all, following simple rules.
Requirements for construction on site
In order for the manufactured container to meet all requirements, it is worth considering important points when assembling it:
- the side walls must have holes to ensure air circulation (2 cm gaps can be left between the boards);
- there is no such element as the bottom in the box;
- the presence of a lid will limit the flow of water during heavy rains (excess moisture will provoke the development of fungus);
- the lower part of the box should be opening to ensure the intake of fertilizer (the composition ripens faster from below).
Materials for making organic fertilizer
To make a compost bin, bars and boards are selected. You can also use wooden shields. Instead of wooden lid often use a frame, upholstered plastic film or polycarbonate. Fixation of individual elements of the container is carried out with hardware and hinges (unlocking fragments).
Optimal box dimensions: height – 1 m, width – 1.2 m.
Manufacturing instructions
- Clear the area under the compost bin from plant debris and remove the turf layer. Mark according to the drawing.
- Dig holes 35-50 cm deep in the corners to install supports.
- Install the supports in the holes, level them vertically and fill them with gravel to half the depth. The part remaining to the soil surface is filled with cement.
- 1-2 days after the cement has hardened, fill the cement fill with earth.
- Connect the supports at the top and bottom with bars (on 4 sides).
- Cover the frame with boards around the perimeter, leaving 2 cm gaps for air access. The board needs to be attached to hinges on one or both sides at the bottom so that it can open to collect fertilizer.
- The top should be equipped with an unlockable lid made from several boards without gaps.

How to make a compost heap
As an option, prepare a compost heap in one of the secluded corners of the site. A heap does not mean a random dump of garbage, but a systematic collection of organic waste. It is better to choose a place in the shade; in the sun the components will dry out. A shady shelter provides the necessary humidity, which has a beneficial effect on the decay process. Worms, wood lice and other microorganisms also contribute to decomposition.
The right materials

Such products are made on the basis natural ingredients, they will not be able to cause harm to either the soil or plants. For example, the drug Embiko Compost (Gringo) ensures the ripening of fertilizer in just 6-8 weeks.
How to determine when compost is ready
Ready compost can be identified by its characteristic dark color composition. It should be crumbly, moist, and not smelly. The ripened fertilizer has the smell of forest soil.
By following the rules for making compost, you can regularly replenish your supplies. nutritional mixture for the garden with your own hands, without spending additional money on ready-made fertilizers.
Every summer resident and owner of a private household, who has been growing vegetables in his own garden for many years, knows that the land tends to be depleted, and the yield and quality of garden products are reduced. Naturally, limited area plot of land does not make it possible to carry out full crop rotation, leaving some part of it unused for a year or two: in this case, the soil is, as they say, “fallow” and has the opportunity to restore its fertile potential. We have to solve the issue by fertilizing the soil, and this is where many people have all sorts of problems.
All (or almost all) issues related to soil improvement can be solved with the help of such a wonderful substance as compost.

This is a very effective natural fertilizer that can be produced under natural conditions without any financial costs from literally nothing, or rather, from garbage that is usually burned or thrown away.

You just need to make a little effort to create optimal production conditions - make compost pit. Next we will tell you how.
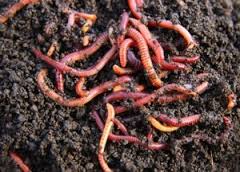
If we talk in simple language, then compost is the result of the process of decomposition of organic waste with the help of microorganisms and the mandatory access of oxygen under conditions of sufficient humidity and biological heat. Earthworms and dung worms play a major role in the formation of high-quality compost.

Let’s immediately make a reservation that the process of compost formation (ripening) is quite long and, without the use of special auxiliary compounds, lasts from one and a half to two years. In rare cases, when the best natural conditions are created, it is possible to obtain good compost within a year, however this process does not tolerate haste, especially since proper organization process, in the future it will be possible to receive a portion of fertilizer almost annually.
 Multilayer structure of compost mass. Below is a drainage layer of large branches, at the top is a fresh layer of household waste.
 So, we mentioned that regular garbage and organic waste are used to create compost. This is true, and setting up a compost pit will allow you to solve two pressing issues at once - to dispose of most household waste and to obtain a high-quality soil improver.

You will throw into the compost bin:
- fallen leaves;
- cut grass;
- dry branches from trees and shrubs, roots, wood waste;
- withered tops from the garden;
- potato (beet, carrot, etc.) peelings, banana peels, apple peels, etc. cores, half-eaten salads, tea leaves, coffee grounds and other waste from the kitchen and dining table;
- paper and cardboard waste.

At the same time, you must remember that everything placed in the compost pit must be shredded (especially wood, paper, cardboard), and not contain paint and varnish coatings or any fats.

You should not place items such as meat, bones, animal intestines, cabbage leaves and dairy products (they rot and create a very bad smell), vegetable stems affected by late blight and other diseases, as well as weeds in compost - it is still better to burn them to there were no problems in the future. Many experts do not recommend throwing pet excrement into a compost pit, since it may contain eggs of helminths (worms), which, although they should die from the heat generated inside the compost mass (from 40 o C to 70 o C), no one will give such a guarantee, so it's better to be careful. Naturally, plastic, rubber, metal and items made of synthetic materials will not decompose in compost; they will remain garbage and then end up in your garden.
Making a compost pit with your own hands

For our purposes, it makes sense to talk about three types of compost pits that you can build yourself, and also get acquainted with some production samples from a large assortment available for sale in specialty stores and “gardening” departments of hypermarkets.
You can make it yourself:
- the pit itself, the “working” part of which is below ground level;
- completely external structure, in general outline representing a box or enclosed space;
- a less common “universal” type that combines the previous two in its design.
In fact, making a compost pit with your own hands is not at all difficult; next we will look at the available designs and you will see for yourself.
Compost pit location
Before you start arranging a compost pit on your garden or summer cottage, you should pay attention to some of the nuances of its correct location.

Taking into account the peculiarities of the waste composting process, the pit should be located at a distance from sources of drinking water - springs, wells, wells. Optimal distance- 25 meters: further is possible (if the territory allows), closer is not advisable.
An important point: if the terrain on your site is uneven, with slopes, always choose the location of the compost pit below the level of the well, preferably at the lowest point of the site. This is done so that during rains (snow melting) decomposition products do not fall into the source along with water flows. You can determine the lowest point by following the direction of the streams during heavy rain.

Another problem is unpleasant odors, which may well be coming from the compost pit. This should be taken into account so as not to spoil relations with neighbors and your own mood. Therefore, find out in advance the predominant direction of the wind, which should become your assistant in this matter.
Usually the compost pit is located somewhere away from view - behind outbuildings, at the end of the garden, etc. However, you can still arrange some suitable fencing such as a screen with climbing plants. In addition to its decorative function, such a fence must provide the pit with two extremely important conditions:
- protect from the sun, providing reliable shade;
- do not interfere with the free flow of wind.

Well, now, actually, about the pit itself.
The first option can be considered the oldest, which gave its name to all other designs. This is the hole in pure form, no more than 1 meter deep, 3 meters long and approximately 1.5 meters wide. Such calculations are determined by practical expediency: it will be more difficult to fill a larger volume, and the resulting compost is quite enough for a garden of 8-10 acres.

However, everything is not so simple: the formation of compost is an aerobic process, requiring free access of air to the entire mass, which dense soil cannot provide. To solve this problem, you should line the inside of the pit walls with wooden boards at a certain distance (about 20 cm) from the earthen walls. To do this, posts are dug in the corners of the pit, to which the boards are nailed. The boards themselves do not fit tightly to each other; a distance of 4-5 cm is left between them. Such measures are necessary for better ventilation of the compost mass, as well as for earthworms to access it.
 A drainage layer of pieces of wood and branches is placed at the bottom of the pit for better ventilation.
 Now you need to build a wooden shield and block the hole exactly in the middle, dividing it into two equal parts. One will contain waste, and the other is needed for periodic transfer (several times a season) of the mass in order to better saturate it with oxygen.


Some people prefer to line the walls of the compost pit with bricks (as in the photo above), cinder blocks, or concrete. Such “thoroughness” is completely useless for the reasons stated above.
Compost bin design

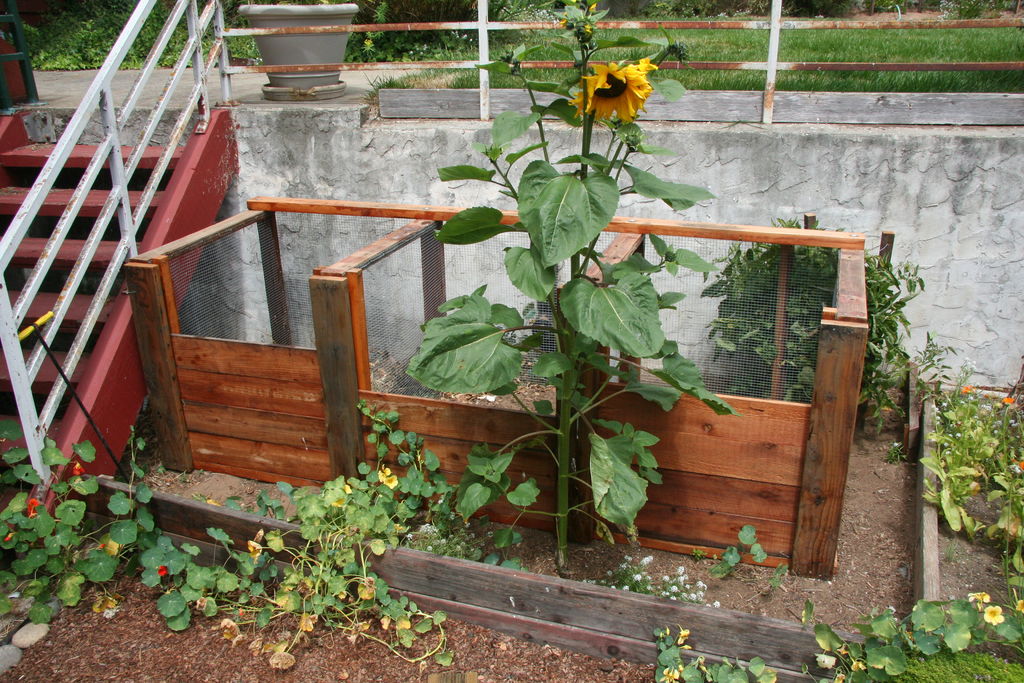
The above-ground structure is considered more popular - the so-called. compost bin.
 Its construction does not require special skills and calculations: the main thing is to provide a certain volume for the waste mass in which they can be located and gradually melt into a nutrient substrate, as well as a sufficient amount of air supply.
 Compost bin made from wooden pallets
 The compost bin can be made either portable or stationary by digging into the ground at the corners columns of the required height (1 m above the ground surface) made of thick wooden beam or metal pipe. These posts are then sheathed with narrow ones (10-12 cm) wooden planks maintaining an interval of 1-2 cm, sufficient to ensure drainage functions.

Good so-called “Finnish” type of compost bin, the main part of which is a cube with a side of 1 m. These dimensions are designed to ensure that the mass overheats, and not its drying out (with a smaller volume) or burning out from excess internal heat in a significantly larger volume.

Construction on top gable roof, one slope of which serves to place waste in a box and is a hinged lid with a convenient handle. In the lower part of one of the surfaces, you need to place a door 30-40 cm high on the same hinges, through which it will be convenient to remove the finished (mature) compost, located in the lower conventional third of the mass (mature, ripening compost and fresh waste on top).


One wall of the box, facing the yard, can be made blank. As with the pit, the box can be built into two compartments, but this is not so important here.

As you know, demand creates supply, and therefore various manufacturers offer to purchase ready-made compost bins - composters made from high-strength plastic or metal (sometimes wood), having modern design and designed to create the maximum favorable conditions for composting mass.


Composters vary greatly in their cost, manufacturability (some models are equipped with temperature sensors and electromechanical mass rippers), size and design features, which can be either one-piece or collapsible.


In the presented photos you can see some samples, but it is better to choose in consultation with the seller.


Compost care
Having acquired your own compost pit(or a box), you will have to take care of the mass that is gradually turning into fertilizer. This is not difficult, all care consists of periodically moistening the mass and ventilating it.

It is convenient to moisten using a garden watering can, wetting but not flooding the mass with water. Aerate the ripening compost using a garden fork, piercing and turning the mass in several places to the maximum depth or transferring it from compartment to compartment.

For better ripening and quality of future compost, you can add a small amount of rotted (two-year-old) manure to the mass.
You can significantly speed up the ripening of compost using commercially available special compound preparations: in some cases, the result is obtained in just one month, although the consistency of the compost will be different, and it will have to ripen in the soil, which, according to many experts, is even good for plants.

At the dacha there is always a lot of waste that can be easily turned into fertilizer. All that is required is a compost heap or a DIY compost pit, into which you need to regularly collect plants and organic waste. After two seasons they will rot and turn into compost, suitable for fertilizing all garden plants and garden. Detailed instructions How to properly build a compost pit and heap can be found in the article below.
Benefits of using compost in your summer cottage
Although creating compost is time-consuming, the effort is always worth it. The benefits of making compost in a DIY compost bin are as follows:
- Environmental friendliness. Compost is a natural fertilizer for plants.
- Improving soil quality. Thanks to the use of compost clay soils become looser and allow more air to pass through. If there is a lot of sand in the summer cottage, thanks to compost it will retain more moisture, which will increase its fertility.
- No need to pay money. Compost can be obtained free of charge from food waste and plants that grow in your summer cottage. But you will have to pay for manure and mineral fertilizers.
- The ability to profitably dispose of organic waste and keep the area clean. Grass, weeds and leaves will in any case grow on the summer cottage and to maintain cleanliness they must be taken somewhere or burned. If you throw them into a compost pit or on a compost heap - without extra effort useful compost is formed, and will be transformed into an attractive place for relaxation and growing vegetables.
How to make a compost pit and heap with your own hands?
First of all, it should be noted that a compost pit and a compost heap are not very good ideas for producing compost. If you create a waste pit directly in the soil, the compost will take a very long time to create, since the rotting process will slow down due to the presence of moisture and lack of ventilation. If you simply pour organic waste in the form of a heap, the decay process will proceed unevenly, and a lot of heat will escape into the atmosphere.
A proper compost pit or heap is a structure (box) made of wooden boards, buried 50 cm into the soil and raised 1 meter above the ground. Organic waste and garbage must be thrown inside such a box. summer cottage. Under the influence of heat, it will gradually begin to rot and after six months, nutritious compost will form from the garbage.
But before you make a compost pit, you need to remember a few rules:
- To enhance the rotting process, the compost bin must be built in a shaded area away from the house (it is worth remembering that rotting produces a very unpleasant odor). You should not organize a compost pit near trees - an excess of nutrients in the soil can cause their death.
- compost pit should be located at a distance of 25 meters from the well so that substances formed during the decay process do not fall into drinking water. But it can draw water from a well located in close proximity to the compost pit.
- You should not make a compost heap in an area where water collects. This will slow down the compost formation process.
- The ideal pit dimensions are 1.5 by 2 meters. If you make the pit small, the waste in it will not warm up, and the rotting process will proceed slowly. A very large hole will require a lot of waste.
- It is recommended to divide the compost pit into 2 sections. The first section can be used immediately after construction, and waste should only be thrown into the second section starting next year.
- You cannot lay polyethylene at the bottom of the pit. It is better to throw hay or small branches there.
- It is necessary to build a lid on top of the compost pit or cover it with a piece of roofing felt. Can be used for mulching.
- About twice a month, the contents of the pit must be mixed so that the rotting process occurs evenly.
You can use compost from a self-made compost pit in the new season. But for it to be as nutritious as possible, rotting must last at least 2 years.
What waste can be sent to the compost pit and compost heap?
A self-built compost pit is intended only for plant waste. You can drop there:
- leaves and thin branches that are raked from under the trees;
- wood sawdust, shavings and bark;
- cotton rags;
- cardboard and paper;
- plant roots;
- ash;
- cut grass;
- flower stems;
- all food waste of plant origin, including tea bags and eggshells;
- scraps of pet hair.
The compost heap should not contain animal products and animal feces, mineral fertilizers, or weeds on which seeds have already ripened. The compost should not contain plants with a long period of decay (this includes potato tops and tomatoes). Also, you should not throw bushes of plants affected by diseases into the compost pit - it is better to dry them and burn them directly in the beds.


