Performance qualities of laminate and wide choice color solutions, textures and patterns, the relative ease of installation make us think about its possible use for wall decoration. Of course, first of all, this is flooring, popular and in demand, and is not used very often as a wall hanging. However, laminate can add interesting and fresh “notes” to the design of a room precisely when it is not used for its intended purpose. Which laminate to choose for installation on the wall and what are the specifics of such installation?

Arguments for
At first glance, the idea of decorating a wall or niche with laminate looks unexpected. However, if you look at it, there are strong arguments in favor of such a decision:
- Beautiful appearance. Some models of this coating are difficult to distinguish from natural wood valuable species.
- Wear resistance, strength and long service life. The top protective layer perfectly protects the laminate from external influences.
- Antistatic.
- Simple installation that literally anyone can do.
- Easy care of laminate flooring during use.
- Affordable price for a material with such characteristics and appearance.
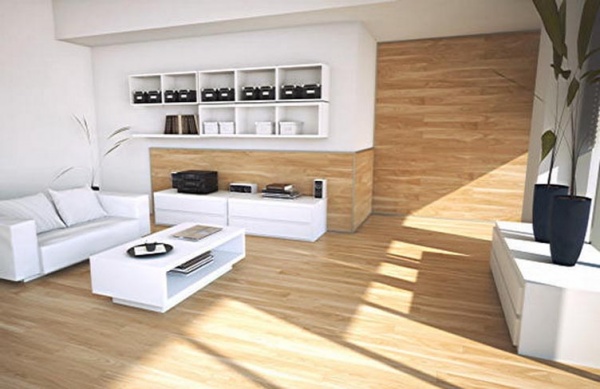
This coating has all the qualities to become part of the original and stylish design rooms, even if not in a very familiar “role”. Laminate on the floor and on the wall, matched in one color scheme, will help to visually expand the room.
Choosing a laminate for wall decoration
Important! To decorate walls, you should choose a low-class coating (21-23) - it will experience virtually no stress. This way you can save a decent amount. It is important for you to choose a material that matches the color and pattern of your design ideas. However, it is quite difficult to buy low-class laminate; stores try not to keep it in stock.
The choice of panel connection option (adhesive or locking) depends on the class of the laminate. Covering classes 21-23 are not available with a Click-lock; laminate of this class has only an adhesive connection. Laminate with an adhesive connection is mounted on a leveled surface, and the adhesive is applied in a zigzag pattern to the back side of the panel. Then glue is applied to the end of the panel and the next one is laid. Excess glue is removed immediately damp cloth, which is moistened in a weak solution of vinegar. A block is placed under the bottom panel as a stop so that the structure does not start to slide down.
Laminate flooring with Lock and Click locks is attached to the wall using liquid nails and clamps. Clamps are galvanized staples; they vary in size and shape. One type of clamp has teeth that are driven into the end of the panel and fixed with self-tapping screws or nails to the sheathing or wall, the other has a flat protrusion that fits into the groove of the panel. Clamps are specially designed for fastening lining, laminate and other similar coverings to walls, providing a very reliable fastening.


Advice from experts. The locking connection of panels with Lock and Click locks does not need to be coated with glue. But experts strongly advise using gel for laminate flooring - the gel will help maintain the elasticity of the joint.
Where and how will we use it?
Let's start with rooms where laminate flooring should not be laid on the walls. This is a kitchen, a bathroom, an uninsulated balcony, a basement in a country house. Changes in humidity and temperature will negatively affect the material, and it will quickly lose its appearance.
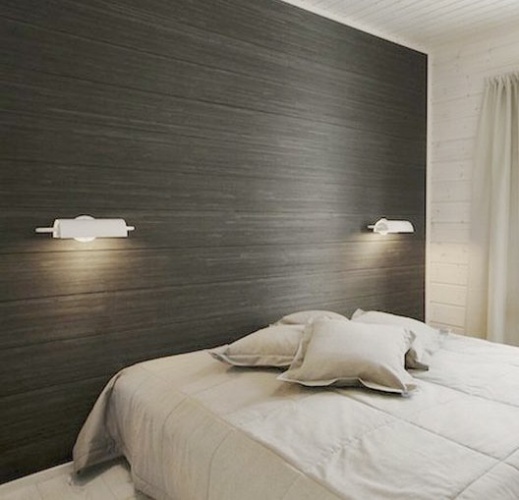
Traditionally, laminate is used to decorate walls in the hallway to the height of the panel. They decorate part of the wall above the head of the bed in the bedroom with this coating; they make it from laminate decorative panels behind the TV in the living room, niches are being trimmed. The difference in shades of material in the same color scheme on the floor and on the wall creates an interesting effect.


Features of the installation process
Laminate is intended for laying on the floor, and the technology for installing it on walls, taking into account all the features of this material, has not yet been fully developed. Only recently have some manufacturers begun to produce special frames for attaching this coating to the wall.
One group of specialists refers to extensive practical experience and in videos posted on the Internet demonstrates fastening with liquid nails, clamps, and even self-tapping screws and nails. Some manufacturers (for example, Egger) show in video instructions that the first panel from the bottom is fastened with self-tapping screws at the bottom, and nails are hammered in the upper part (this is how the lining is attached).

Another group of specialists claims, and claims with good reason, that the coating cannot be fixed rigidly, which is why it is called a “floating floor.” A twisted screw or a hammered nail is not very compatible with the concept of a “floating floor”.
The truth, as usual, is somewhere in the middle. There is no point in refusing to use laminate as a material for decorating walls based on the theoretically correct judgments of the second group of specialists. But these judgments cannot be completely ignored either.
Important! During installation, try to avoid rigid fixation of the panels. How to do this? For example, the top panel in the structure is rigidly fixed to a metal sheathing using clamps. Next, the panels are secured with clamps with a flat protrusion, but the clamps themselves are not screwed to the vertical rail. Fixation is carried out only on panels of the 6-7th row, which gives some mobility to this part of the structure.
With the adhesive method of fastening, the wall surface must be dry and very smooth. You cannot attach the material to drywall that is simply glued to the wall - the entire structure will collapse under the weight. It should be remembered that laminate is a fairly heavy material.

For fastening to the sheathing, the pitch of the bars should not exceed 600 mm. For vertical installation of laminate, the sheathing bars are positioned horizontally, and for horizontal installation, the bars are mounted vertically.

A distance of about 10 mm should be left between the laminate structure on the wall and the walls in the room. The same distance should be between the structure and the floor. To maintain this distance, plastic wedges are used.
When laying laminate on a wall horizontally, it is necessary to maintain a checkerboard pattern or offset the next row by one third of the panel. Everything is the same as when laying it on the floor. With one long vertical seam, the load on the fastener increases. It is more convenient to start installation from the left corner of the wall and move to the right. However, it is more convenient for “right-handers” to work this way; it is more convenient for “left-handers” to start from the right corner.

Conclusion
You should avoid using laminate to decorate walls in rooms with large changes in humidity and temperature.
Search original solutions leads to the use of finishing materials for other purposes. A striking example This approach involves finishing the wall surfaces with laminate. But this does not mean that it can be done any way you like. Be sure to take into account all the subtleties and nuances, only then the result will be positive.

Coating features
Finishing walls with laminate is unacceptable for kitchens, because under the influence of excess moisture and temperature fluctuations it will swell and warp. There is no way to avoid such influences; there is no protection against them. The same reasons do not allow us to recommend this coating for cellars, basements, and closets. But in the hallways, where deviations from normal room conditions rare and insignificant, such finishing is quite acceptable.


Sheathing a balcony with laminate is not the best good idea. No matter how hard you try to equip the room, changing conditions from season to season will definitely affect the coating.
The strip of a click product can be adjusted accurately only with the help of a tool; no amount of effort is enough to do it manually. Most often, a boss is applied and then hit with a hammer, so the blows are evenly distributed in force.
You can also lay laminate on the wall using a rule (hook), erroneously called a clamp by some craftsmen. The indentation along the outer border is created by spacer wedges, and it is advisable to have a double set of such tools in case they fail. It is most reliable to cover a wall with laminate using lathing; this will help achieve high strength, enhance sound insulation and thermal insulation. But please note that the design will inevitably be limited. The adhesive method only helps to form an original design.


Laminate flooring is very durable (it lasts so long that you won’t see any wear and tear and will rather just want to change your surroundings). At the same time, the coating is completely safe and can be disposed of in the simplest way. Decorating walls with laminate is significantly more economical than using wood, and even lining or MDF, but is not inferior to them in external elegance. There are a lot of textures and colors mastered by technologists, and they will fit into any interior. Quite a lot important factor – easy care. Only occasionally will you need to rub the wall with polish.


What to do if the walls are uneven?
First of all, you need to carefully check whether they are really uneven. Take a lath, the size of which is equal to the height of the wall without taking into account the baseboard. Important: before starting the test measurement, the plaster layer and trims should be removed so that they do not distort the result. The rail is moved vertically, the slightest bulges and dips are marked with a pencil. Protruding parts must be scraped off or knocked down with a chisel.
The holes are filled with putty and rubbed over. Such simple methods will allow you to strengthen even the most uneven and chaotic wall. Assessing how smooth the control rail itself is is also not particularly difficult. Attach it to the wall and trace the outline with a pencil, turn it 180 degrees and attach the ends of the strip to the end points of the line. If both lines completely coincide, you can safely use this tool in your work. But the slightest deflection or bend indicates that you need a different rail (which, of course, is checked in the same way).


How and with what to fasten?
The adhesive laminate must be attached to smooth surfaces. Liquid nails or construction silicone are used to hold it in place. The wrong side of the panel is covered with glue in the form of a zigzag, after laying the strip, coat the end with the same glue, and proceed to the next chain. If adhesive liquid appears at the boundaries of blocks and lines, it is immediately removed with a soft cloth made of natural fabric soaked in culinary acetic acid.
Laminate that is installed with glue cannot be fixed to the sheathing; it has too small a strip of contact with the support.


The tongue and groove type of laminate is equipped with a lock of the same name. This coating can be laid out without smearing the tongue with adhesives. Therefore, the borders of individual boards will not be stained with adhesive. If you don’t want to glue at all, you can nail the product to the surface in the manner of a regular lining. It is attached to a wood lattice using furniture nails or gluers (the second option is also suitable for an iron base).
For wall laying, you can also use click format laminate - this is an improved version of tongue and groove covering. The cut of the ridge is pear-shaped, as is the structure of the channels. The connecting structures push the ridge lobe of the lock into the niche, having first tilted the block. Then they twist the product towards the base and at the same time press lightly, due to which the lock closes. The click type of laminate is good for its high hardness.


Click coated gluers are not compatible. If you use them, you will not be able to latch the lock. But it is quite possible to glue the block onto a wooden sheathing yourself.
Methods
You can attach the laminate to the walls either with glue and liquid nails (but you will need to thoroughly level the base and prime it), or using slatted lathing (but it will take up some of the space, so it is not recommended in small rooms). If you decide to nail the covering to the entire wall or to its top part, work starts from the ceiling to the floor; Decoration of the lower half of the walls is carried out from the floor upward. To ensure that the planks are firmly fixed, check their correct installation using a building level. When there are locks in the panels, they should be glued like this: first coat the surface with glue, then connect them into a lock, and only then attach them to the wall.
If you think that glue alone is not enough, additional reinforcement of the structure with nails or staples is acceptable. tongue and groove board secured to the sheathing with clamps at the top and bottom.


Additional items
The choice of items to strengthen and hold the structure is extremely important. The most common clamps seem to be produced in wide range, and if you purchase the wrong product, you will devalue all your work. The thicker the panel that needs to be held, the larger the diameter of the tongue should be. Compared to other types of mechanical fasteners, clamps have the advantage of having a low risk of panels splitting. They are great even in rooms with significant humidity. A bracket with a jagged protrusion is driven into the board and held in place with self-tapping screws; a bracket with a flat protrusion will help press the protruding part of the click lock against the wall or sheathing.
When choosing liquid nails, be sure to check their area of application. They are both universal and intended for interior works. Very dense laminate cannot be attached to walls, so there is no point in using liquid nails to hold heavy objects. Acrylic composition cannot be used at subzero temperatures.


Covering the end of the laminate on the wall is not so easy, but this task can be solved. According to experts, profiles in the shape of the letter P, which are made from a variety of materials, will help - there are aluminum, plastic, and even wood. As an option, you can purchase a flexible rubber threshold. All these blocks can be attached using the same liquid nails or glue-sealant. Sometimes they also offer edge tapes, but any method should not disturb color harmony canvases.
A separate topic is guides for wall mounting of laminate; the step between them should not be more than 0.6 meters.


How to lay it?
Laminate flooring swells as it becomes wetter. And therefore, no matter what installation method you choose, be sure to leave a gap of 1.5-2 centimeters from the corner along the entire perimeter. Spacer wedges on the walls can help with this, but there is room for improvement. best solution. Completely flat boards or slats of the required thickness are placed below, which are wrapped in thin plastic film. And on the sides you can safely use wedges, where they will not be squeezed out by the weight of the sheathing.


Laying the canvases should begin from the far left corners, it is carried out as the clock progresses. Left-handers will be more comfortable working on the right against the clock. Installation of laminate flooring is allowed both vertically (from left to right) and horizontally, with the second method being preferable. Solid strips, contrary to imaginary evidence, are by no means simpler or cheaper. Joints running along the same line must be covered with plinths attached to mounting nails.
The technology involves drilling mounting holes directly through panel joints. And even in the case when the wall is lined with continuous strips along its length, you will have to install skirting boards every 170 centimeters or even more often. Continuous panels support each other only in one direction, and if there is no additional reinforcement, the cladding can fold.
No matter how well you try to install the covering, no matter how high-quality nails, gluers and glue you use, these holding elements may no longer perform their function. Excessive proximity will create increased mechanical stress.

It is best to lay the laminate using the comb method: cut exactly in the middle as many strips as would fit on half of the horizontal rows. When ten lines can be laid in height, five strips are required to cut. Installation proceeds alternately: a solid part, then cut, again a whole block. This solution will make the load on the fasteners as uniform as possible.
In some cases, it will be more interesting to lay out the laminate in a diagonal way; then they take two different colors. But if you do not have solid experience in working with such coating or special training, it is not recommended to take on diagonal laying. It is much easier to lay the covering vertically on the glue: you will, of course, have to clean and level the wall, but you will not have to pay for the sheathing elements. You can limit yourself to panels of only two types (long and complementary).


To install laminate flooring yourself, be sure to buy an electric jigsaw; it will help you cut the panels as accurately as possible, and in the future it will be useful for other work. You will also need consumable files, a hammer for tamping, a short (up to 40 cm) ruler and square, a tape measure, limiting wedges, a block for tamping, a corner cutter, a saw, a drill and a hammer drill. To laminate a wall that was previously wallpapered or painted, remove the coating using a spatula or a hammer drill with an attachment. The final removal of irregularities is achieved with sandpaper.
Having decided to create a backlit wall, immediately lay all the cables, draw up a diagram with their placement and output (connection) points so as not to get confused in the future.


Important nuances
Laminate flooring is not only beautiful and aesthetically pleasing, it allows you to seal cracks on balconies and loggias. With proper selection, the coating will last you at least a decade and a half.
Always take into account the possible mechanical stress and the risk of abrasion. If you have to frequently clean the walls or have cats in the house, too thin plasterboard coverings will be unacceptable.
Fitting and trimming will inevitably increase the consumption of material, therefore the resulting overall figures for the need for it can be safely increased by 10%, then the necessary reserve will be created. As already mentioned, the indentation along the perimeter should be 1.5-2 cm, it is set on the sides with spacer wedges, and at the bottom with a special board or plank. Always use a boss for tamping; if you hit it directly with a hammer without it, you can create crooked cracks. Using a rule (hook), you can attach the last row in the corners; to do this, knock with a hammer or hand on the surface of the “flag”.


When creating the sheathing, it is recommended to use slats of 3 centimeters, the distance between the screws should not exceed 40 millimeters. The slats themselves should go at an angle of 90 degrees relative to the panels, so first outline what and how exactly will be installed.
The exact distance separating the edge of the laminate from the wall border is determined individually, taking into account a number of nuances. If you cannot find this distance, you should seek help from professionals.
When using coating, it is enough to never deviate from these rules in order to avoid many serious problems.

Design options
Having laid out the bottom strip 0.6-0.8 meters long from additional panels, then the corridor wall can be sheathed with the main panels up to the ceiling. The horizontally facing connection is closed onto the plinth. Vertically directed joints at a certain interval are fastened with parts of the same product, and it is launched further along the laminate-covered top. This creates the romance of the Middle Ages, appropriate both in the bedroom and in the living room. Fluorescent lamps can replace torches.
Contents of the article:
Laminate is essentially fiberboard wrapped in a durable wrapper. The material has a layered structure and protective coating, which is a decorative wear-resistant film. Thanks to their excellent characteristics and original appearance, laminated boards have found application for wall decoration, although previously they were used only as flooring.
Characteristics and types of laminate
Laminated decorative plate consists of four glued layers:
- Bottom layer. It is stabilizing and serves to protect the slab from deformation. In addition, it increases the rigidity of the product, and in some models a special backing is glued to the bottom layer for additional sound insulation of the material.
- Slab base. This is a load-bearing layer that is made from wood fibers and has a high density. It carries out the main functions of a laminated board. The supporting layer has moisture-resistant impregnation and a special lock designed for fastening products to each other.
- Decorative layer of the slab. This is paper with a pattern of some texture: tiles, stone, wood and other materials.
- Top layer. This is an acrylic or melamine resin that protects the product from impact loads or abrasion. The class of the material depends on the thickness and strength of this layer. Recently, its coating has also become decorative: in accordance with the design, a texture is applied to the top layer, enhancing the imitation of natural materials.
Laminated boards are divided into four main classes:
- For home use products of classes 21-23 are used.
- For the same use, but with increased load or for commercial purposes, but with low load - class 32 (AC3).
- For commercial use with heavy loads - class 33 (AC5-AC6).
- For industrial or sports use - class 34, the most durable of all the above.
According to the method of fastening products to each other, laminate is divided into three types:
- Adhesive. Its peculiarity is that the connection of the plates to each other and their fastening to the wall is carried out only with the help of glue. Laying the material is simple, but its dismantling is quite complicated, especially if you want to keep the slabs intact.
- Sheet pile. It is distinguished by the presence in its design of special locks, which, when installing the slabs, form tongue-and-groove connections between each other. Such panels are attached to the base with clamps or small nails, which are driven into the grooves of the lock.
- Click. It has a special fastening that looks like a tongue-and-groove one, but is much more convenient. When installing on a wall, the panels are fastened to each other at an angle of about 20 degrees. In this case, the grooves of the locks are joined, and the entire structure snaps onto them. This coating requires lathing.
Advantages and disadvantages of laminated boards

Not so long ago, MDF panels were very popular when decorating walls. But compared to the price of laminated boards, their cost is much higher, although these materials look equally stylish and respectable.
Besides its cost, laminated coating has a number of other advantages:
- Durability is an important factor that is relevant provided that the cladding is properly used and cared for.
- Wide choice color shades and textures - it provides ample opportunities for designers to realize their ideas when decorating interiors.
- The ease of installation of laminate on walls allows you to carry out the entire range of work yourself.
- Practicality of the material. Laminated panels withstand wet cleaning quite well, do not accumulate a lot of dust, and do not absorb odors.
- The slabs are not resistant to excess moisture. When the base gets wet, they may swell and become cracked. Therefore, their use is highly undesirable for cladding the walls of kitchens and bathrooms.
- The material does not tolerate temperature changes in the air. In the cold, the cladding can crack, and in the heat, it can burn out or swell. Hence the conclusion: you should not use laminated panels on an open area or balcony.
- Another disadvantage of such boards is the presence of melamine resin in top layer their coverings. Some experts claim that it has negative impact to your health. Listening to their opinion, the use of laminated cladding in bedrooms and children's rooms should be limited.
Features of choosing laminate for walls

When purchasing it, many circumstances should be taken into account. The main one is: the laminate chosen for installation on walls must have a formaldehyde emission rating of Super E class. In this case, the environmental safety of the material will be at a sufficient level.
If there are animals in the house that can scratch the walls with their claws, you should not purchase expensive cladding.
When choosing laminated adhesive boards, it is important to know that the walls must be absolutely flat, otherwise the panels will not stay on them. If there is no desire, time or opportunity to level walls that have significant differences, you can make lathing and buy the appropriate material for it.
The color of the walls after installing the panels should match the interior details. For small rooms, light cladding is suitable, but too bright patterns are inappropriate in them.
The choice of type of laminated boards affects the method of their installation and vice versa. This should be taken into account based on your financial capabilities and availability of time. For example, leveling and covering walls with slabs can be more time-consuming and labor-intensive than the same cladding over lathing.
Preparation for installation of laminated panels on walls

Before fixing the laminate to the wall, you should stock up necessary tools. The composition of the kit may be different, it depends on the method of installation of the laminated boards. But in any case, you will need a pencil, tape measure, hammer, square and electric jigsaw.
With the adhesive method of fastening slabs special tools will not be required. In other installation options, for example, a mallet will not be superfluous. In order for the panels to fit tightly, they will have to be padded with something. A hammer is not suitable for this purpose, since blows with it can damage the slab and cause cracks in it. A rubber mallet gently impacts the material, keeping its surface in its original form.
In addition, you will need a special hook with which you can easily pull up the slabs for installation in the corners. To ensure a gap around the perimeter of the room between the cladding and the floor, it is necessary to acquire spacer wedges.
Laminated panels are sensitive to high humidity, therefore, the gap from the floor and corners of the room to the ends of the slabs should be approximately 2 cm. A wooden strip should be placed on the floor, and wedges should be placed only on the sides of the panel, since it is not lightweight. When using the adhesive installation method, it is advisable to wrap the rail plastic film. It will protect the slab from gluing to the support.
In the process of preparing for covering walls with laminate, you should calculate required quantity panels. When calculating, you need to multiply the height and length of the wall, and then add 10% to the resulting number, taking into account the adjustment of the material to the required dimensions.
Technology for attaching laminate to walls

There are two fundamentally different ways attaching laminate to walls. The first involves fastening the material with glue or liquid nails. With this method you can carry out without any problems color design cladding and combine its texture. However, the walls need high-quality preparation, after which their surface should be perfectly flat.
The second method is to install the slabs on a sheathing, which is made of wooden slats and fixed to the walls. The advantage of this type of fastening is the possibility of creating a soundproofing layer under the panels. However, many often refuse this installation method, since it involves some reduction in the volume of the room.
The arrangement of laminated panels on the walls can be horizontal, vertical and diagonal. To choose any option, you need to take into account some factors, including interior features, complexity of installation work and personal preferences. When installing the slabs, do not forget to leave the necessary gaps, which were mentioned above. They are covered from below with plinths, which provide additional fastening for the panels.
To increase the strength of the cladding, the slabs are often fastened with a “comb”. Its essence is as follows. You need to take a certain number of slabs and cut half of them in half lengthwise. First, a whole strip is attached, then two halves are mounted to it, then the whole strip is installed again, and so on. The process is repeated until all work is completed. This fastening evenly distributes the load on the fasteners in pairs of halves of the slabs and creates an interesting pattern on the walls.
The horizontal arrangement of the slabs is also interesting. It is especially good when using two colors at the same time, which gives the cladding a special beauty.
Attaching the laminated cladding should begin on the left side of the wall, opposite to the entrance, and move to the right during the process. This organization of labor will ensure convenient joining of panels. There is an exception: if the performer is left-handed, you can start work on the other side of the wall.
The step-by-step cladding process looks like this:
- Surface preparation. The adhesive option for installing slabs involves preliminary cleaning of the walls from the old coating and their leveling plaster mortar or gypsum putty. Other options require the manufacture of sheathing.
- To work on the frame you will need wooden slats or a galvanized metal profile. The width of these elements should be 20-40 mm. They are fastened to the wall using dowels and self-tapping screws, the fastening step is no more than 40 cm. Installation of the sheathing elements should be carried out in a perpendicular direction relative to the future placement of the laminated boards. At horizontal mounting laminate on the wall, profiles or sheathing slats must be placed perpendicular to the floor. Installation control is carried out at the building level.
- Selecting the starting point for installation. If you plan to completely cover the entire wall or only its upper part, fastening the slabs should start from the ceiling from top to bottom. When planning to cover the lower part of the wall, work begins from below. It is necessary to immediately measure 2 cm gaps from the ceiling to the panels, as well as from each corner to the slabs.
- Installation of tongue-and-groove slabs with fastening to the sheathing must be done using clamps, which should fix the panel from below and from above. To cover the walls with high-quality laminate, it can be additionally glued.
- When installing adhesive panels, apply glue to their back side, and then press the material tightly against the wall. You need to hold the stove in this position for about a minute, and then you can continue further work. The fastening of the remaining plates is carried out in the same way.
How to attach laminate flooring to walls - watch the video:
Laminate flooring is inexpensive, looks quite beautiful, almost like parquet, and laying this flooring is easy even for beginners. This practicality of laminate prompted designers and craftsmen to the idea that it would be nice to finish not only the floors, but also the walls with laminate.
The practice paid off, and today the walls living rooms and offices lined with this finishing material, are quite common and even popular solutions.
Advantages of laminate wall finishing and some limitations
There are several advantages of finishing walls with laminate, which is why this flooring, in general, initially became widely used for wall finishing.

Here are some:
- Excellent wood look, variety of textures and colors;
- Relatively low price and durability;
- The coating retains its unchanged appearance for many years, practically does not get dirty, and is easy to clean;
- Good fire resistance and tolerance to elevated temperatures;
- Lightness and high speed installation

Of course, laminate also has disadvantages that somewhat limit its scope of application. This is primarily its susceptibility to deformation under the influence of temperature and humidity changes.

Therefore, for example, it is better not to think about decorating the walls in the bathroom and kitchen with laminate.
Choosing a laminate for wall decoration
The most important characteristic of laminate is abrasion resistance. It is determined by the coating class, the lowest of which is 21, the highest is 34.

The first one lasts a little more than 2 years and is only suitable for rooms with low load on the floor covering.

However, we must not forget that we will use laminate for wall cladding, so there will be practically no load on it.

Thus, even the most inexpensive laminate will look like new on the wall for many years.

This means that when choosing a laminate for wall decoration, you can not pay attention to its class, but concentrate on such parameters as cost, texture, color, etc.

There are many colors of laminate flooring. These are not only classic “wood” colors - oak, walnut, pear, cherry, etc., but also modern “metallic”, avant-garde white or black, etc.
Methods for installing laminate on the wall
To cover walls with laminate, you can use the adhesive or frame method. The first, that is, in which the planks are glued to the base, can be used with any type of fastening, be it adhesive or locking.
Laminate with an adhesive type of fastening can be found quite rarely today, but if you chose it for arranging the walls, then it should be glued to the base with a special glue for laminate.

If the laminate is interlocking, then “liquid nails” can be used for gluing to the base, and for additional fixation, fasteners used when installing MDF panels. It should also be taken into account that high-quality finishing of walls with laminate using the adhesive method without visible seams is possible only on a high-quality and almost perfectly flat base. This can be a carefully plastered wall or sheets of plasterboard, plywood, etc.
Method 1 - attaching the laminate with glue
- We install a stop under the first line of planks on the floor so that they do not slide under their own weight.
- We start laying the laminate from the bottom, the first row is laid level, with the groove up.
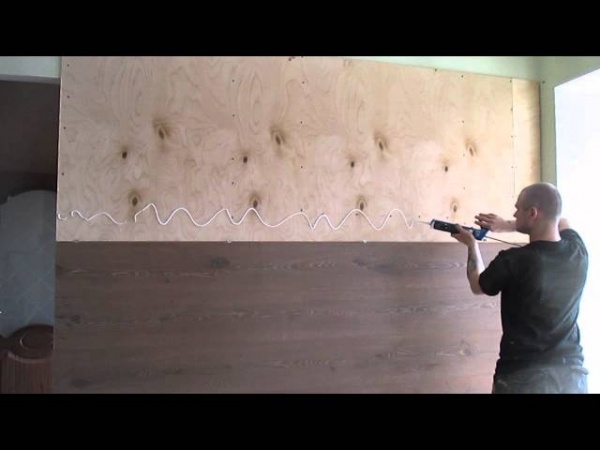
- Glue is applied to the base before installation.
- In order to guarantee the reliability of the connection, the grooves of the locking connection at several points must be attached to the base with a clamp - fasteners for, etc. (to do this, the lock on the bar must be cleaned with a knife at the attachment point).
- Before laying the next row, the joints (grooves) must be treated with a special water-repellent gel for laminate flooring.
- We lay the next row in a checkerboard pattern so that the vertical joints on adjacent rows do not coincide.
- It is better to use wooden slats 44x74 mm or 40x40 mm as the sheathing material;
- In the first rail we drill holes to attach it to the base in increments of approximately 30 cm;
- We apply the rail to the wall, align it strictly vertically and mark the places in the wall where you will need to make holes for dowels to attach the rail (the rail must be raised from the floor by at least 10 mm);
- We drill holes in the wall and attach the first vertical batten; we do the same with the rest - we mount them at such a distance that the edges of the plank are held by the slats, while there should be one or two more slats between the boards.
- We fasten the bottom strip of the laminate with the groove upwards using self-tapping screws with a countersunk head, while trying to make this fastening as low as possible so that it can later be covered with a plinth.
- The upper part of the board to the batten in the area of the lock connection is nailed to wooden slats. To ensure that the complex profile of the lock does not interfere with completely recessing the nail head into the laminate board, you can use a metal rod, core, etc. when driving, or you can use the same clamper, having previously cleaned the lock in this place. Remember that if the head of a screw or nail protrudes even slightly in the joint, then the joints when laying the laminate will have large gaps.
- The next rows of laminate are laid in a checkerboard pattern, observing the installation features of the planks with a locking connection.

Before carrying out this work it is necessary to dismantle door frames, they are subsequently put in place on top of the finish. You should start laying the laminate from the lower left corner.
Method 2 - laying laminate on the sheathing
This installation method is considered the most reliable and practical. In this case, you should choose a laminate with long and preferably wide slats, then the labor intensity of the work will be even less. Besides, this method does not provide for installation pre-leveling walls

Installing the sheathing:
Thus, the laminate strip should be attached to the sheathing at least at three points.

We install the laminate on the sheathing:
Possibilities of covering walls with laminate in residential premises. What to pay attention to when choosing a material and how to perform installation correctly.
How to use laminate to decorate an apartment
An unusual solution for wall decoration can be laminate cladding. This material is suitable not only for flooring, but also for vertical surfaces apartments. It is practical and comparatively inexpensive way make the room original.
Features of laminate wall finishing
Cover one of the walls or a fragment of a wall. In some interiors, cladding the lower part of the walls will be relevant. Laminate decoration is suitable for interiors in the following styles: loft, country, English style.
The arrangement of the lamellas can be horizontal, vertical, diagonal. They can be the same color or consist of different collections.

You can choose interesting combinations and arrangements of lamellas yourself, using images from magazines or websites dedicated to interior design.
Advantages of laminate
 Main advantages:
- it is easy to install;
- has a smooth coating that is easy to wash and clean from dust;
- there are collections with moisture-resistant coating, they can be used to decorate walls in the kitchen;
- large selection of textures, colors and patterns;
- affordable cost - the thinnest lamellas are used for walls;
- You can hide the unevenness of the wall.
Disadvantages of use
Flaws:
- additional costs - installation cannot be done independently without having the appropriate experience;
- at low temperatures the material will be deformed, so it cannot be used in country houses that are not heated in winter;
- When installing lamellas on the lathing, you need to decorate the thickness from the wall to the edge of the laminate.
Types of laminate that are suitable for finishing indoor walls
 The material differs in the type of outer surface, it can be:
- glossy;
- matte;
- with imitation tiles, can be glossy or matte;
- with a decorative layer of natural wood;
- with a textured surface.
Laminate also differs in strength classes:
- class 33 is the most durable and is more suitable for flooring in public spaces with a large number of visitors;
- class 32 and 31 are also durable and do not deform during prolonged contact with water;
- class 23, 22, suitable for residential premises;
- class 21 is only suitable for wall cladding: living room, bedroom, corridor.
The manufacturer usually indicates the material class on the packaging, and you can also check it with your sales consultant.
Laminate is produced in thicknesses from 6 to 12 mm, it differs in the type of connections:
- tongue and groove lock - consists of a groove on one side and a special tenon on the other side;
- Click lock is a simpler type of connection. Here the tenon is shaped like a hook; it is inserted into the groove at an angle and then straightened, causing a click to occur. This connection allows you to make the laminate collapsible.
Laminate wall finishing: mounting methods
 The main types of material installation on the wall:
- on a lathing made of wooden slats;
- for glue or liquid nails;
- using clamps.
The choice of type of fastening depends on the purpose of the room and the condition of the walls. It is better to use the frame in a spacious room, as in the corridor or small kitchen it will take up a lot of space.
Before installing the material, it is necessary to prepare the surface. If the plaster is crumbling or the wall is uneven, the base should be leveled. Small defects can be corrected yourself. These may be cracks or small depressions. If the wall defects are significant, then it is better to level it with drywall.
Is it possible to glue
For gluing to the wall, it is better to use a thin laminate. The wall must be flat, without differences in height.
Which glue to choose
 There are several types of glue:
- With weathering - after applying glue to the lamella, it must be pressed against the wall and then removed. The surface should be weathered for 5 to 10 minutes. Then the lamella is glued to the wall.
- No chapping. At first glance, this option saves time, but after gluing two rows, you should let the glue set. Otherwise, the entire finish may shift under the weight of the upper rows.
Using a wooden frame will help save money and time on leveling the surface. The slats are attached to the wall perpendicular to the direction of the laminate, and a frame is made along the edges. They are attached in increments equal to half the lamella. This will ensure ease of installation.
Fastening with clamps: installation options
For convenient fastening of the laminate to wooden frame you can use clamps. These are metal clips that securely hold the panels and provide slight movement of the slats. The clamps come in different sizes and are coated to prevent rust. Therefore, they can be used even in rooms with high humidity.
Methods of fastening clamps
They are attached to wooden sheathing or sheathing with a sheet of fiberboard or plywood using:
- special staples; a construction stapler is used for this. When pressed, the staple should completely enter the surface; if this does not happen, you need to drive the staple with a hammer;
- nails;
- self-tapping screws
First, the clamp is installed, and then its horizontalness is checked using a level.
Selecting a cladding option, depending on the wall and room dimensions
 Vertical installation of lamellas is much easier. This option will do for low rooms and can visually increase the height of the room. For small room Narrow panels are suitable. For wide wall It is better to choose lamellas of large width.
How to attach laminate flooring to a plasterboard wall
Laminate is usually attached to such a surface using glue. Drywall must first be primed. For this option, the thinnest laminate is used. Since if there is a lot of weight, the wall surface may collapse.
How to cover uneven walls with laminate
Laminate can also be used on uneven walls, but for this you need to use a wooden sheathing.
The sheathing must be installed strictly horizontally and vertically; if gaps form between the timber and the wall, then special spacers made of thin wood must be installed.
How to glue adhesive laminate with your own hands: step-by-step instructions
 Glue the laminate in the following sequence:
- level the wall with plaster or plywood;
- glue the lamellas from bottom to top in several rows, depending on the glue;
- After installation and drying of the glue, install the baseboard and decorative strips.
Surface preparation
It is necessary to apply a primer to the wall to ensure adhesion of the surface to the adhesive. After drying, begin installing the slats. You can also install a sheathing of beams and screw a sheet of plywood.
Preparing wood sheathing
After purchasing the slats, they should not be immediately attached to the wall; they should lie in the room. During this time, the wood may dry out a little, this will help avoid deformation when attaching the laminate.
How to secure without lathing
Without lathing, the slats can be glued to a leveled wall. The second option: a sheet of plywood is attached to the sheathing, and lamellas are glued onto it.
Sticking
Glue is applied to the first panel in wavy lines and pressed against the wall, aligning along the intended line. Then they tap it with a special wooden hammer.
How to mount horizontally: how to stick
 A small gap should be provided between the floor covering and the wall laminate. To do this, you need to draw a horizontal line on the surface of the wall at a distance of no more than 2 cm from the floor. After gluing the lamellas, the gap is covered with a plinth.
How to lay it out vertically
For vertical installation, you must first draw a vertical line on the wall, and lay the lamellas along it from bottom to top. After installing the first vertical row, install the next one, leveling each element using a level.
Facing: how to do it
They start tiling from the floor, usually from the left corner. After installing the first row, proceed to the next ones. After installing two horizontal layers, the work must be left, as the glue must set.
How to make and fix tongue-and-groove laminate on the wall yourself: installation technology
 Tongue and groove laminate has a special locking connection. You do not need to use glue to install it.
List of tools
- mallet;
- glue;
- level;
- construction corner;
- hacksaw;
- hammer drill.
How to make a frame for covering
For lathing, slats with a width of 20 to 40 mm are used. Their placement must be marked on the wall using a pencil and level. The pitch of the slats is approximately equal to half the width of the lamella. It is necessary to make a frame of slats around the perimeter.
How to attach the sheathing: fasteners
The slats are attached using self-tapping screws in increments of about 30 cm. The slats must be smooth and dry. The rail can be installed by drilling through it and into the wall. It can also be attached using steel angle with holes for self-tapping screws. First, the corner is attached to the wall, and then the rail on the side is screwed to the corner.
How to lay soundproofing sheathing
 Sound insulation is installed between the beams of the sheathing. It should fit snugly against the beams; mineral wool is usually used.
How to lay laminate: how to install
It can be attached to surfaces in several ways:
- gluing each lamella separately;
- using clamps;
- small nails that are nailed onto the plank; this option is reminiscent of installing lining.
First, the lamellas are covered with glue, then inserted into the lock and pressed to the surface. After this, gently tap with a mallet.
How to set interior corners
When forming internal corner you need to remember that laminate when high humidity it swells, so you need to step back at least 1 cm from each wall. You can decorate the resulting space using a special corner.
How to decorate the edge: how to close it
 The outer corner can be decorated using plastic corner, which can be purchased at a hardware store. It can be made of MDF to match the color of the laminate.
How to lay corners
The corner must cover the joining seam and have a hidden fastening method. It consists of a strip and a decorative outer element. In the center of the seam, fastenings for the strip are made. Drill holes and install screws. Then the outer part is installed on top.
How to finish the surface
You can hide the sides using decorative strip, edge tape. Tongue and groove laminate can be installed horizontally, vertically, or at an angle. In the latter option there will be a lot of waste, this must be taken into account when purchasing material.
 The outer corner made of laminate is usually decorated with a corner. Also, some manufacturers produce a special profile with which you can make the corner more accurate.
Thicker slats are easier to install, but the thinnest slats are used for wall cladding.
For ease of installation, it is advisable to trim and lay the slats on the floor. If floor space does not allow, then you can lay out two or three rows on the floor, gradually transferring the parts to the wall.
Laminate can be used not only for floors, but also for walls. Here you can combine different shades and use thin lamellas of tongue-and-groove or click laminate.
Useful video


