A presentation is a great way to make your report more understandable and interesting to the public. Nowadays, presentations are created mainly in PowerPoint, which is included in the Microsoft office suite. In this article you can familiarize yourself with a small step by step instructions on creating presentations in Microsoft PowerPoint. The article will be relevant for PowerPoint 2007, 2010, 2013 and 2016.
Step 1. Launch PowerPoint.
To start creating a presentation, simply launch PowerPoint. This can be done using a shortcut on the desktop.
If you don't have a PowerPoint shortcut on your desktop, you can launch the program by searching in the Start menu. To do this, open the Start menu and search for “PowerPoint.”
Step No. 2. Choose the design of the future presentation.
Once PowerPoint is launched, you can immediately begin creating your presentation. The best place to start is with the design, to do this go to the “Design” tab. On this tab you will see a large list ready-made designs presentations. Select one of the available options.

To the right of the list of ready-made designs, there are buttons for “Colors”, “Fonts”, “Effects” and “Background Styles”. Using these buttons you can adjust the selected design to your requirements. You can change the color and font of the text, the background color of the presentation, and add additional effects.

If ready-made designs are not enough for you, then you can search the Internet for other templates for PowerPoint presentations.
Step No. 3. Creating slides.
After choosing a design, you can start creating slides for your future presentation. This is done using the “Create Slide” button, which is located on the “Home” tab. Click the down arrow below the New Slide button to open a menu with available slides.
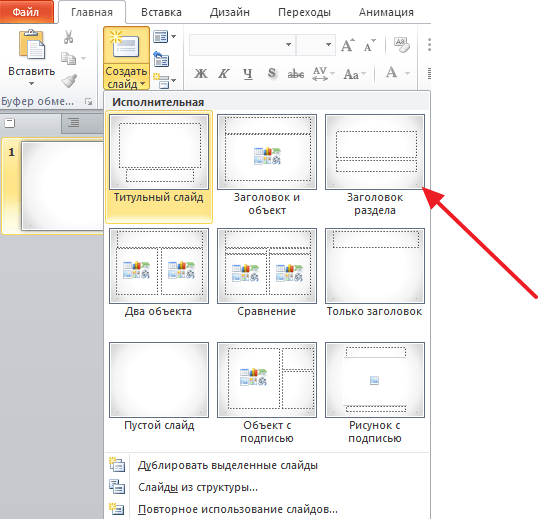
In the menu that opens, you will see several types of slides. These are the Title Slide, Title and Object Slide, Section Title Slide, Two Objects Slide, etc. Select the type of slide that suits you and click on it with the mouse. For example, we will create a Title and Object slide. This will create a new slide with a title at the top of the slide and an empty space at the bottom.
Step No. 4. Filling out the created slides.
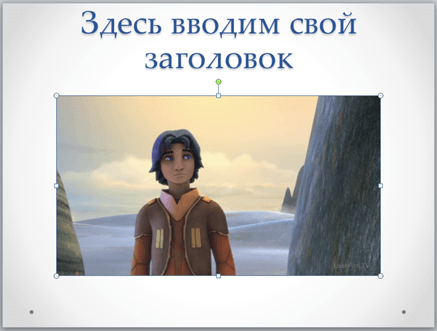
Once you've created your slide, you can fill it with information. To begin with, you can change the title of the slide; to do this, double-click on the inscription “Slide title” and enter another text.
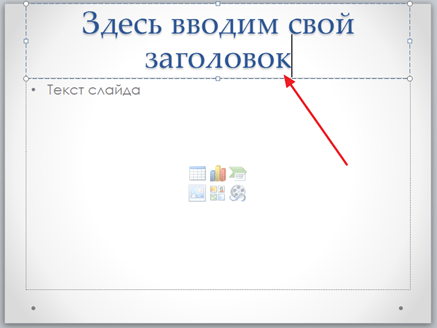
Once the title has been entered, you can fill in the blank field below the title. If there should be text under the title, then simply click on the empty field and enter the desired text.
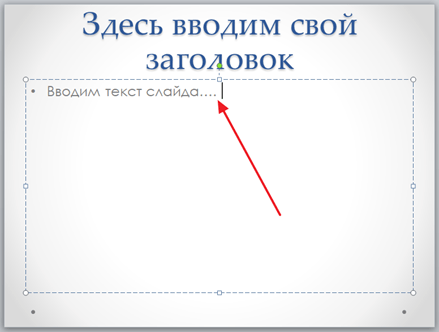
If there should be some other information under the title, for example, a video or picture, then for this you need to use the buttons that are located in the middle of this field. There are six buttons available to insert tables, charts, SmartArt graphics, photos, pictures from the PowerPoint library, and videos.

When creating presentations in PowerPoint, photographs are most often inserted, so we will consider this option. In order to insert a photo from a file, you need to click on the button with the image of the photo. After this, a window for selecting a photo will appear. Select the desired photo and click on the “Insert” button.
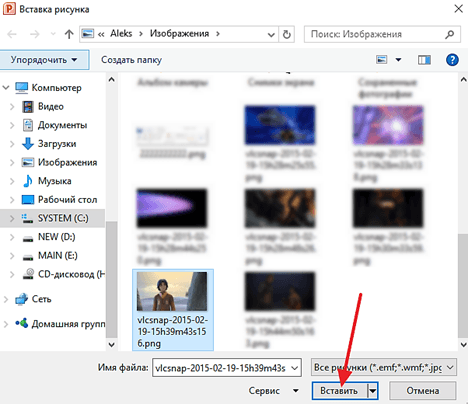
The photo you selected will then appear under the slide title.
This way you have created a PowerPoint presentation from one slide. To add another slide, return to the “Home” tab, click on the “Create Slide” button again and add another slide to the presentation. After this, you can fill out another slide with information. Repeat this procedure until the presentation is ready.
Step #5: Preview your presentation.
In order to evaluate the created presentation, go to the “Slide Show” tab and click on the “From the Beginning” button there. After this, the presentation will open in full screen, and you can see how it will look in its finished form.

You can also click on the “From Current Slide” button. In this case, playback of the presentation will not start from the beginning, but from the frame where you stopped when working with the presentation.
Step No. 6. Saving the presentation.
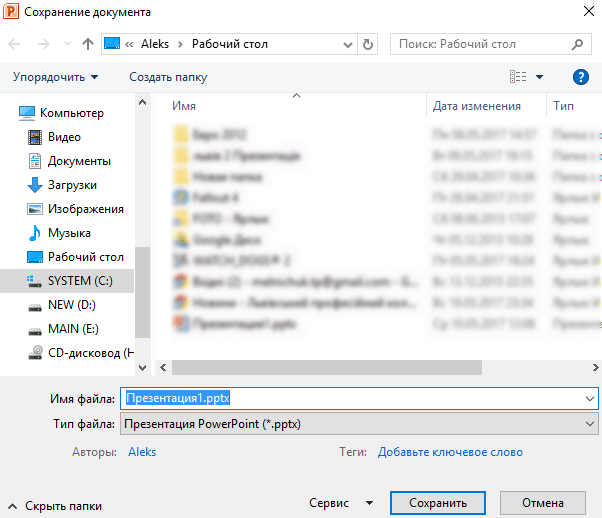
After the presentation is created, it needs to be saved. To do this, open the “File” menu and select the “Save As” option.
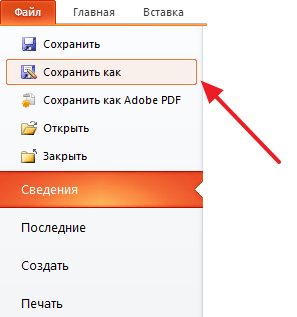
As a result, a window will open to save the file. In this window you need to select a folder and click on the “Save” button. This will give you a PowerPoint presentation file in PPTX format, which you can then open and continue creating your presentation.
If your presentation is already ready for display, then you need to additionally save it in a different format. To do this, you need to use the “File – Save As” menu in the same way, but before saving, change the format to “PowerPoint Demonstration”.

After saving this way, you will receive a file in PPSX format. The advantage of this format is that the presentation begins to play immediately after opening it, and the PowerPoint interface does not even appear. However, files in PPSX format cannot be edited, so the presentation must be saved in both PPTX and PPSX formats.
The main purpose of a computer presentation is to accompany the speaker’s speech. Done correctly, it draws attention to the speaker and helps make his speech brighter and more convincing. The main points, photographs, graphs, tables, and videos are placed on the slides. To create a presentation, you only need the PowerPoint (PP) program, which is part of the Microsoft Office package, which is installed on most computers.
Whether the presentation will be simple or complex with various special effects - it all depends on the desire of the author. The main thing is to perform it in such a way that the audience likes it. Prepare required material for slides. It is advisable to write the text yourself, based on your own experience. This will make your presentation unique. Photos and pictures from your personal archive or found on the Internet must be of excellent quality and correspond to the topic of the report. Draw graphs in MS Excel or manually. No matter how beautiful the presentation is, it does not replace the speaker and should not distract from his speech. Focus on the audience, make a plan, calculate the time. Launch the PP program. Next, use one of possible options: create a blank slide or choose a ready-made presentation template. There are many ready-made templates on the Internet; they will decorate your work; choose one that suits the topic of your report. Many people prefer to start with a blank slide and design it to their liking. Add slide pages as you work: “Home – Create slide.” They can be deleted (“Delete”) or rearranged by dragging with the mouse. The first slide is the title slide, it contains a title and a subtitle. For the following pages, apply the desired layout (layout) using the Layout menu. This will allow you to place text in two columns, add a picture, a diagram. While the slides are white, they don't look very interesting. Make them brighter. To do this, there is a section in the menu “Design - Themes”. Click on the selected topic, the appearance of the slide will change. You can apply the selected theme to the entire presentation or just to individual selected slides. In the left “Slides” tab, select them, right-click on the selected topic, and select the “Apply to selected slides” command. Using the “Colors” button in the top menu, select a color scheme if you are not satisfied with the standard one. Experiment with the “Effects”, “Background Styles” menus, and transform the finished theme to your liking. If you don’t like the ready-made themes, create your own. Under Background Styles, open Background Format. Insert a wallpaper from a file on disk. Use no more than 3-4 colors when designing a slide. The background and font colors should be contrasting and not merge. The PP program contains many various instruments for working with fonts: size, color, style - similar to MS Word. In the “Font” group, select the desired parameters. When choosing, follow the rule: the text that carries the main semantic load is highlighted in a large size - 22-28, color, style, special effects. For subheadings that emphasize main idea, a smaller font is recommended – 20-24. Main text, captions for diagrams, figures – 18-22. When designing your slides, stick to the same style: the size and color of the headings are the same, color scheme texts up to 3-4 colors. The number of lines is no more than 6, approximately 6-7 words per line for better visual perception. If you doubt the combination of background and text colors, then stick to black font and white background. The text should be easy to read even from a distance. The presentation will impress the audience if you place pictures, collages, photos, diagrams on the slides. Go to the “Insert” menu, select an object to insert: a picture from a disk or a picture from the library, a diagram, shapes. Avoid text wrapping around the image. A presentation with musical accompaniment. From the Insert menu, select Sound from File from the list.
The presentation consists of a lecture by a speaker accompanied by a slide show. Presentations successfully combine the impressions of textual content and visual images. As a result, the effect increases sharply compared to if listeners perceived only speech information.
The ability of a presentation to attract the attention of listeners makes this type of conference an effective tool in marketing, education, and design. You can easily imagine how much better the lecture material will be perceived if students not only listen to the monotonous voice of the teacher, but also see in front of them an exciting show on the topic of the lesson.
Presentations are often used to present the contractor's vision of the project during the competitive selection process. It is clear that it is a high-quality presentation that allows you to get a profitable client.
Presentation software
There are various software with which even people with little knowledge of the art of design and directing can create effective presentations. Creating a presentation using such a program can be compared to assembling certain objects in a construction set from ready-made parts.
The user does not need to draw anything himself, but only select and arrange suitable objects. This compilation is additionally processed with special effects and the result is a professional-level product.
The best programs for working on creating presentations include the following:
- Libre Office Impress
- Serif Draw Plus
- Adobe Presentation
- Presentations in Flash format
Apart from Libre Office, all other programs are paid and are quite expensive. large sums money. However, the capabilities of these commercial applications are an order of magnitude higher than freely distributed software. Free programs are best used for initial training.
When a designer has to make presentations to make money, it quickly becomes clear how free programs not intended and inconvenient for professional work.
The procedure and features of creating a presentation
It should be remembered that the slide show serves to enhance the impression, attract attention and facilitate the understanding of the verbal information presented by the lecturer.
Therefore, first the text is written, and based on the structure of the text, a presentation script is developed. The text is segmented into meaningful pieces and the optimal format of visual accompaniment is selected for each episode.
- Photo.
- Graph or diagram.
- Infographics.
- Animation.
- Video.
After developing the main base - a lecture plus visuals, it is advisable to test the initial version and see clearly what special effects and transitions can be added and where. And is it necessary to do this?
You should not overload the visuals with special effects, otherwise listeners will turn into spectators and will enjoy the beauty of the animation, while the presenter’s text will fade into the background. The thing is that textual information is the main content, and visual accompaniment is an intensifying background. A side dish should not be turned into a main dish.
Particular attention should be paid to including text fragments in slides and animations. People came to the presentation to listen to the lecturer, and not to read sheets of text on the screen - this can be done at home on a computer, via the Internet.
The text on the slides serves only to highlight key points in the story. After finalization of the text-visual series, audio is added. Strictly dosed and only where it is really necessary.
Using Templates
Creating presentations based on ready-made templates not only greatly simplifies the workflow, but also simplifies the perception of the program by viewers. The point is that people also perceive the world in the format of familiar patterns and more often pay attention to things that are constantly present in their everyday world.
If some non-standard images appear on the screen, listeners simply will not be able to understand what is being said. Anything unusual requires significant effort to understand. And most people try to just ignore too much new information so as not to overload the brain.
All of the programs listed above include ready-made templates for presentations on literally any topic. And new options are constantly appearing.
The presentation developer will not need to manually adjust each element and adjust it to the logic of the narrative development. Having chosen a suitable template, all that remains is to fill out the ready-made slides with your thematic images, videos and the product is ready to use.
Step-by-step instructions for creating a presentation in Microsoft PowerPoint
Let's figure out how to create a presentation on your computer using Microsoft PowerPoint.
Step one. Open Microsoft PowerPoint and select a presentation theme.

Step two. I chose the first topic that came up - “Ion (conference room)”. You must fill out the title page. It is also the first slide of your presentation. We click the mouse in the text input area and write the name of our presentation. If the title is long and the text does not fit, the font can be reduced. As a result, we get " front page", first slide.

Step three. Add a new slide. To do this, click the “Create Slide” button located at the top left and select the slide format that we need. I chose the “Comparison” format because... I want to compare last year’s indicators and current ones. Enter the slide title again. It should briefly describe the topic of the slide. Next, fill in what we will compare. In my case, there are 2 columns with headings and a data entry field. In this field, you can select the required data format from the available options: table, chart, SmartArt graphic, drawing, image from the Internet, video. I insert a table and fill in the indicators. This results in the following slide:

Step four. Add another slide. Graphic information looks good in a presentation. And PowerPoint has great capabilities for adding graphic data. Press the button pointed to by the arrow in the picture:
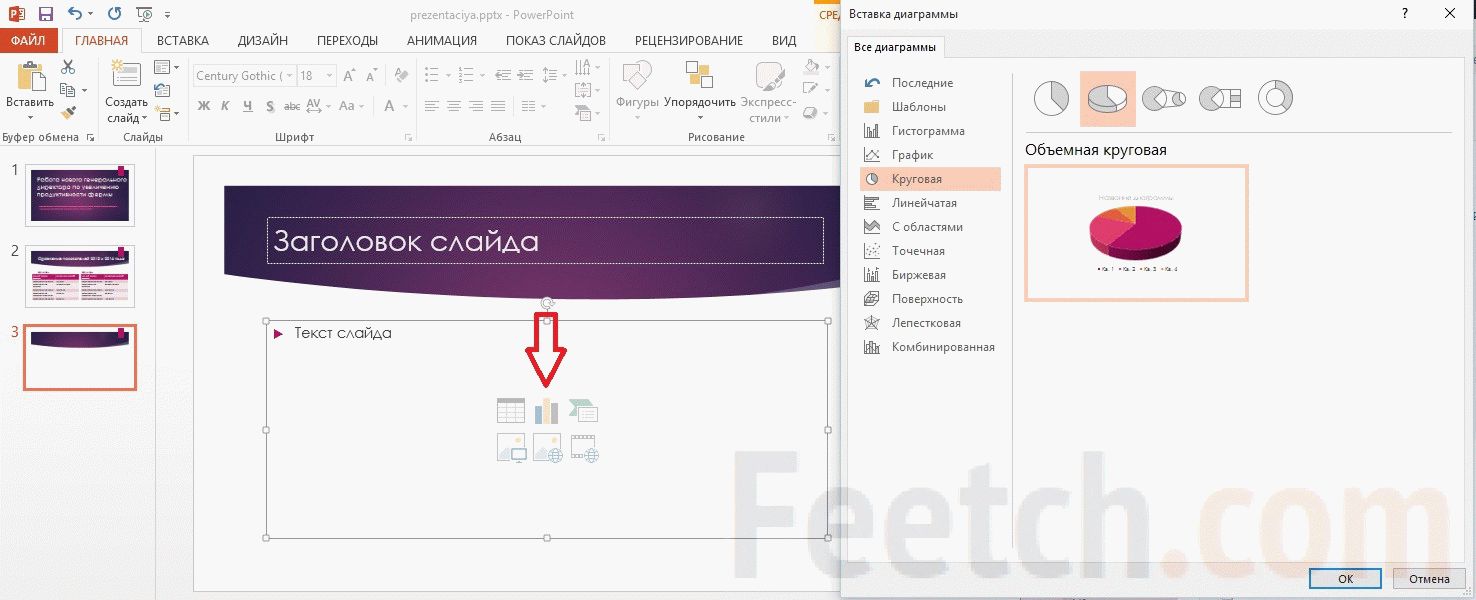
And insert a three-dimensional pie chart into the third slide. A table appears into which you can enter data. Next, select the chart style and fill in the title. We've got the third slide.

Step five. We add a few more slides with all the information that you want to convey to the audience and then make a final slide with information about the speaker and the text “Thank you for your attention.” The presentation is ready.
06/02/2017 14:19
In line special tools PowerPoint is used for creating presentations. Part of the Microsoft Office suite, Microsoft's software helps both experienced and untrained users create, view, and deliver beautiful presentations. The extensive functionality of the software allows you to visualize your material in a high-quality and varied manner, presenting it to listeners in the form of a bright, effective and memorable show.
By mastering Microsoft's presentation and slide show software, you'll master the art of visualization. Any idea presented with such accompaniment will be better understood by the listeners. Using a presentation, you can teach schoolchildren and students, demonstrate engineering and design projects, films, music videos and photographs, give presentations to an audience, and even stage a theatrical performance. PowerPoint allows you to create a presentation of any complexity: from a simple one (with pictures, tables, etc.) to a complex one, replete with animated special effects. It all depends on the audience, the goal, your imagination and how successful you are in mastering the functionality of the program.
How to make a PowerPoint presentation or ten steps towards your goal
Step 1. Come up with a concept.
First, the text part of the speech is worked out, and then it is accompanied by visualization elements. A presentation cannot replace a report; it is additional: it helps to convey information to the listener and presents it visually. That is why you must first decide on the concept of the report, and only after that think through the plot, script, and structure of the presentation show.To develop the right concept, answer the following questions::
- What goal do you want to achieve with this presentation?
- Who will listen to the speech (audience characteristics)?
- What visual elements are you planning to use in your presentation?
- What is the duration of the performance?
Step 2. Start of the project.
Launch PowerPoint and use the appropriate function to create a new slide show (like a page in a Word document). Click on the option in the navigation bar and decide on the layout. It can serve as a layout for an individual slide or for a presentation as a whole.
Useful tips:
- A large amount of information is difficult to perceive, it distracts a person and does not allow him to concentrate. Ideally, one slide will contain one block with text, video, photographs, tables and other elements.
Step 3. Templates to help.
For those who are creating a presentation for the first time, it is possible to use predefined templates, which greatly simplifies the matter. And only when PowerPoint is mastered inside and out, you can create custom samples that will meet your specific requirements and tasks.Since we are creating our first presentation for now, we choose a template that is already preinstalled in the program. To open the menu, click the Office Button and choose New. The “Templates” group and the “Empty and Last” command will appear in a new window. By double clicking on the “New Presentation” button we create a project.

You can also use the “Installed templates” command. By clicking on it, you can choose the type of template from a classic or modern photo album, advertising booklet, quiz, widescreen presentation. The choice of one template or another is determined by the form of the presentation.
Step 4. Customize the appearance.
This step is important and necessary. Open the Design tab and from there go to Themes. Decide on the topic of the document and select the one you need. Appearance slides can also be changed. Open the “Slides” tab, decide on a theme and apply it to one or more slides by clicking on the appropriate command.
The program's pre-installed themes are suitable for all presentations. And to make the selected theme unique, there are separate buttons with which you can select the background, color, and animation effects.
Experienced PowerPoint users don't use built-in themes; they create their own. To do this, you need to use your own photographs and images.
- The text must stand out against the background, otherwise it will be difficult to read.
- The more color solutions, especially variegated shades, the more difficult the text is perceived. The main thing here, as in clothes, is not to overdo it with colors and make them compatible.
- Three or four combined shades ideally concentrate the attention of the audience and increase the perception of information.
Step 5. Correct font.
When working with a presentation, just like in Word documents, you can change fonts by choosing the type, color, and size. In a word, if you are familiar with Microsoft Office programs, then you will learn to work in PowerPoint.
To select a graphic design of letters and symbols, open the “Home” tab and decide on the font, its color and size. Then fill in the “Title” and “Text” fields for the slide you are creating.
- The text located on the slide should be divided into two parts. There are main words and auxiliary words that complement the main idea of the message. And accordingly, an important part of the text should be especially highlighted. This can be done using an unusual font, size, color and, of course, special effects. You can also make it go first main information, and then additional. In a word, in order to convey the main idea of the slide, it is necessary to correctly place the accents.
- Solid text (same color, font size) is not acceptable. Divide the information into meaningful blocks and use a different font size for each. Headings, subheadings, comments to images, and main text should be visually highlighted.
- It is important to design the text so that it stands out and visually attracts attention. Underline key words, write in italics or bold, special attention Pay attention to the headings - they should catch your eye.
- Do not write more than six lines on a slide, otherwise there can be no talk about the effectiveness of information perception.
- Preferably choose one font for the entire presentation.
- Don't use fonts that are difficult to read. The interlocutor should read the line instantly, and not decipher exotic “squiggles”.
- A large amount of text information on one slide is difficult to understand. 10 succinct words are better than a “sheet” of text.
Step 6. More visibility!
If the subject of the presentation allows and is necessary for better visual perception, use a variety of elements. This could be an image, diagram, clip, collage, diagram, table - anything that serves as visual evidence of your information. To place any element on a slide show, use the Insert tab or familiar commands.
Useful tips:
- It's best if you don't use images wrapped around text. The text is absorbed more effectively if it accompanies a graphic element located on a separate page (in this case, a slide).
- All graphic material used in the presentation must be of high quality. Do not insert small images. A stretched photo will ruin the entire presentation.
Step 7. Sound accompaniment.
Music and soundtrack are an attribute of a win-win presentation. Click Insert, open Media Clips, and select Sound. A window with a list of commands will open, select “Sound from file”. Another window will open in which you need to specify the folder with your music and select the file type. Decide on the method of playing the audio track (by click or in automatic mode). If you select the former, the Audio Tools tab will appear. Go to Sound Options and configure playback commands.
Useful tips:
- Do not play loud music and sound: the audience should hear your speech
- As you understand, hard rock cannot accompany your performance. Choose calm music.
Step 8. Effects.
Their use decorates the presentation, makes it diverse, adds emotionality and semantic load. Animation effects can be applied to any graphic element or object, if, of course, they are appropriate. The animation is configured on the corresponding tab. In order to add an effect for graphics, objects, text, click on it and configure the animation by clicking on the appropriate item. Added effects can be changed.
Useful tips:
- An abundance of special effects will not diversify the presentation, but, on the contrary, will harm it. The audience is distracted by attention-grabbing animation and misses the textual content.
- Animation inserts should be used minimally and carry a semantic load.
- Effects are appropriate for highlighting facts, figures, keywords, and in conclusion.
Step 9. Slide transition effects.
When one slide in a presentation is replaced by another using animation effects, it attracts attention. PowerPoint has many preset transition types - blinds, checkers, rectangles, vertical and horizontal merges.To apply the same transition type to each slide in your presentation, go to the Animations tab. Click first on your thumbnail and then on “Go to next slide.” Here you can select the desired effect.

The slide transition effects you choose can be customized. If you want to change the speed, click on “Go to next slide” and select the appropriate button. By clicking on it, set the values you need. You can also change the order of slide transition effects. To do this, you need to go to the appropriate group and make settings: slides can change by click or automatically.
An audio track is also added to the slide changing effects. Click the Animation tab and then Go to Next Slide. Select the Transition Sound button. If the sound is in the list, click on it. If you need to add a sound not from the list, click on the “Other sound” command. Find the file on your computer and add it using the "OK" button.
- Frequent sound when changing slides is unacceptable.
- Do not use automatic slide changing.
- Be sure to indicate in the test where the slides change.
- The person who deals with organizational issues should also have a text with these tips.
Step 10. The presentation is ready!
Each slide is ready and you can now look at the entire presentation. Click "Slide Show" and start watching. If you don't like something in your work, you can always correct it. To return to the slides, click the Escape key. Be sure to save the modified and viewed slide.- When a presentation is visually appealing through colorful objects, graphic elements and vibrant animation, that's a good thing. But the skill of the speaker in this matter is still the main thing.
Conclusion
By learning how to work in PowerPoint step by step, you will be able to create vivid, memorable presentations and skillfully present them to different audiences. The Microsoft Office program will surprise you with its every new slide show. functionality. And you will have the feeling that this instrument is impossible to fully master. But each new presentation will be better and better, which means you have learned all its lessons with flying colors.To download a program to your computer for creating, viewing, displaying slide shows and presentations, use the official source - website.
In this article we will try to cover the topic of creating the right presentation on a computer that can interest and convince listeners. Today our daily life It’s hard to imagine without computer technology. In business, such technologies play a special role, for example, it is not enough to just talk or write about your idea or business plan.
Colleagues, management and business partners want to see future project with my own eyes. To visualize business ideas, photographs, graphs, drawings, diagrams, clips, three-dimensional models, etc. are used. Agree that such a visual demonstration is much more informative than “dry” printed text. This technique is especially important for those who perceive information better visually, and such people, according to scientists, are about 30%, i.e. every third. This method of demonstration is called “presentation” and is widely used in various fields: design, marketing, economics, pedagogy, engineering, etc.
Presentations are indispensable in learning processes, for demonstrating ideas and results, and for comparative analysis.

You can create a presentation on your PC using the PowerPointe program. With the help of which 95% of presentations are prepared. It is part of the standard Office suite. Microsoft Office PowerPoint is an easy-to-use, reliable and informative program for implementing a variety of presentation projects that meet the highest requirements.
Using PowerPoint you can create effective tool to accompany an oral or written presentation. The program allows you to create graphics, diagrams, photos, and contains various special effects, allowing you to create a memorable, bright project.
Taking the time to learn the basics of PowerPoint is a worthwhile investment in self-development and education, since everyone has to give presentations, speeches, and demonstrations sooner or later.
Creating a presentation using PowerPoint (standard Microsoft program)
You can find the Power Point program on your computer using Windows search.
The most important rule is the presentation is not a replacement for your report or speech, but only complements it, illustrating your words and allowing you to focus on the main points. That is why you first need to carefully think through the plan for your speech and only then make the presentation.
Step 1. Take into account all the details of the presentation!
The most important questions to ask yourself before putting together a presentation are:
- What is the main purpose of my presentation?
- What features will my listeners/viewers have?
- What is the duration, content and dynamism?
Step 2. Let's start creating!
Creating a presentation begins with launching the program. Next, using the “create slide” option, which is located in the right corner of the panel at the top, select a slide layout. This layout not only applies to the entire presentation project, but can also be customized for each slide.

Important! Try not to place several blocks of different types of information (photos, text or diagrams) on one slide at once. This distracts potential viewers, dissipates attention, which ultimately leads to a decrease in the perception of your performance.
Step 3: Use the template!
PowerPoint uses a presentation template for all new presentations you create. To use it, you need to click “File” and after opening the menu, select the “create” command. A window will appear where the “templates” will be displayed. Here you need to select “new presentation” (by clicking the mouse twice).

You can also select templates for your presentation using the “installed templates” command, which gives access to “classic” and “modern” album, “advertising booklet”, “quiz” and “wide screen presentation”.
Step 4. Select a template theme!
In order for the presentation to have the desired look, you need to go to the “design” tab, go to “themes” and select the document you like. To change the visual appearance of your slides, you need to find the "slides" tab, highlight the slides you want, and click on the theme you want to use for the selected slides.

The themes available in PowerPoint are universal for presentations various types. You can change the color, style, add effects using the corresponding buttons: “effects”, “background styles”, etc.

You can also create topics for presentations yourself, using your own photographs, drawings and solutions.
Important! Please note that the text must be in contrast to the background, otherwise it will be difficult to read. You shouldn’t make your slides too bright or overload them with color, because... this harms the perception of visual images. Optimal solution- use no more than 3-5 colors on one slide that harmonize well with each other, improving perception.
Step 5. Choosing font size and color?
Microsoft's PowerPoint presentation software allows you to change the type, size, and color of the font used for text elements. Working with presentation texts is as easy as working with documents in Office Word.

To write text, you just need to place the cursor in the desired place, for example in the “heading” or “text” field and start typing. To select the required font, you need to go to the “font” group, where you select its parameters: size, color, type.
Important!
- Classify the text into main and additional. It is better to highlight the main one in some way so that it brings maximum information to the listeners. You can highlight the main text by size, color or special effect, as well as the order in which it appears on the screen. Additional text serves to explain the main text; it is better to apply more “calm” effects to it: smaller font size, less saturated color, etc.
- Don't forget about the concept of "readability"! The text should be readable and easy to understand. To do this, it must have a clear structure, which is emphasized by the font size. For example, for the heading you can use a font size of 22-30, for subheadings - 20-24. For captions under tables, explanations, footnotes - 8-10. Body text usually reads well at a font size of 14-20.
- Highlight the title, subheadings, and main points in bold or underlined font. By preparing comments, explanations, footnotes, additional information— italics.
- Don't forget about the "principle of six": 6 words per line, 6 lines per slide.
- Don't use different fonts on the same slide! Better yet, use the same font for all slides of your presentation project.
- Do not use complex, unclear, or bulky fonts. Best options for presentation are Times New Roman, Bookman Old Style, Verdana, Calibri, i.e. those fonts that are most often used to create printed materials.
- Do not overload the slide with test material; remember that a presentation is not a replacement for your speech!
Step 6. Better to see it a hundred times!
To make your speech more interesting and well-reasoned, you need to use graphs, diagrams, drawings, infograms, collages and photos in your PowerPoint presentation. To place these elements, you need to go to “illustrations” and click on the group. You can also insert a photo or drawing into a presentation using the traditional “copy” and “paste” commands.

Important!
- Minimize the “picture surrounded by text” technique, because This combination is extremely difficult to perceive. It is better to place the picture on a separate slide, adding text information to it below. In this case, the image will look solid and not overloaded.
- Photos and drawings used must be high quality and the required size. Please note that when stretched, images lose their sharpness, which can ruin the effect of the entire presentation.
Step 7: Insert Musical Accompaniment!
For some presentations, it is appropriate and even desirable to use audio. How to insert music or sound? This is not difficult to do: you need to go to the “multimedia clips” tab and stop at the “sound” item. A list of commands will appear in which you need to select “sound from file”. A standard dialog box will appear where you will need to specify the folder from which sound or music will be inserted. The type of audio file is also indicated. After this, we indicate the method of playing the sound. It can be automatic or by command - a mouse click. To select, go to the “sound options” menu and specify the required settings.

Important!
- Watch the sound volume! Your speech must be heard. Ideal option— take into account the acoustic features of the room where your performance will take place.
- Choose calm, neutral music. It is better to give preference to instrumental or classical music that will not irritate or distract listeners from your performance. Avoid rhythmic, intrusive melodies, although there are situations when just such a musical background is appropriate.
Step 8. Show and interest!
The introduction of animation effects that can be added to one or several slides will help diversify your presentation. You can add animation if you select the tab with the appropriate name and go to the “animation” group, and then open the “animation settings” menu. After this, you should click on the object (text, diagram, graphic or photo) to which you want to add an animation effect using the “add effect” button. You then need to follow the steps to insert animation effects, and the effects will appear in the Animation Setup list in the order in which they will appear in the presentation. You can change the speed, order and direction of effects in “change effect”.

Important!
- Don't overload your presentation with irrelevant special effects. A large number of moving objects, extraneous sounds, animations irritate listeners and distract from your presentation. It is better to limit yourself to 1-2 special effects that will emphasize the significance of the information presented.
- You should not use animation effects “just like that” or “for beauty.” They must carry a meaning that is understandable to the audience.
Using animated special effects is good to highlight key points presentations, draw conclusions, summarize. Best effect has animation based on text selection different colors. On the contrary, moving letters are perceived worse by listeners.
Step 9. Interesting slide transition!
Transitions from slide to slide make the presentation more cohesive and of higher quality. To add transitions, you need to select the “transitions” tab, where you click on the slide thumbnail. Here you can select your favorite effect for changing slides.

The slide changing speed is set in the “transition to next slide” group using the “transition speed” button, where the optimal speed is selected. Also in the “slide change” group, the change order is set: automatically or manually by clicking. The change of slides can be accompanied by a sound effect. To do this, click on the “animation” tab and select the “transition to next slide” group. There, you will see a “transition sound” button, by clicking which you will be able to select a sound file to accompany the process of changing slides.
Important!
- Don't make the slide transition sound too intrusive or loud.
- Take advantage of the click-to-slide transition feature. Sometimes this is convenient - the presentation completely corresponds to your speech, does not “run” forward and does not lag behind.
- In the text of your speech, be sure to note the moment when you need to change the slide.
- If the slide show is being led by technical staff, make a copy of the talk with notes for them.
Step 10. Let's get acquainted with what happened!
The presentation has been created! To see what you got, you need to click the “show slides” button. If during viewing you decide that one or more slides require adjustments, you can do this by pressing “Esc“. After making changes, you should save the latest version.
Important! Remember that a presentation is a tool that illustrates your speech, but does not replace it. Overloading the presentation bright colors, music, sound effects, and animation can ruin even the most thoughtful and interesting speech, distracting listeners from it.
Conclusion
Now you can easily make your own presentation using PowerPoint. After completing all 10 steps, you will learn the basics of creating a presentation, but every time you take on new project, remember that you have many more features to discover in this program from Microsoft.
We invite you to watch a short video tutorial on how to create a presentation in PowerPoint.


