Pleated blinds look gentle and airy, in addition, they perfectly cover the room from the rays of the scorching sun. Vertical blinds made from strips of fabric will help create a fashionable and unusual interior. Make original curtain you can do it in just a couple of hours, step-by-step photo instructions They will help you make your own blinds from wallpaper, fabric and even thread.
If there is a roll of wallpaper left in the house after renovation, try making paper blinds with your own hands from this wallpaper. Such blinds are functional, beautiful, affordable, but require delicate care.
Paper blinds
Paper blinds are easy to make and do not require large financial costs. For homemade version curtains you will need:
- wallpaper;
- one or two cords (slightly longer than the height of the window);
- awl;
- ruler 50 cm;
- pencil;
- scissors.
The width of the wallpaper can be 55 cm or 1 m, depending on the size of the window. For a wide window, you can make a pair of 55 cm products.
The most budget-friendly way to close a window from sunlight– pleated blinds
- First, measure the height of the window and add 30 cm to this value. Measure the desired length on the wallpaper and cut it.
- From the inside out, draw the wallpaper into equal transverse stripes (2-3 cm wide). Make bends along the lines to create an “accordion”.
- Now use an awl to make two holes along the left and right edges of the workpiece or one in the center. Thread a string through the holes to adjust the height of the blinds. The lower end of the cord can be decorated with a tassel or large bead; tie a knot at the end of the upper cord.
- Attach the upper part of the paper sheet to the window using double-sided tape.
- To get rounded blinds, glue Velcro at the bottom of the product along the edges (on the right and left sides), and then connect both halves. Homemade blinds from wallpaper are ready.
Advice. These blinds are perfect for paper wallpaper medium density. With vinyl wallpaper you will have to put in more effort, as they are more difficult to bend.

You can even adjust the height using clothespins
For paper blinds, a sheet is suitable thick paper a quarter longer window opening
Detailed video lesson from a handmade master
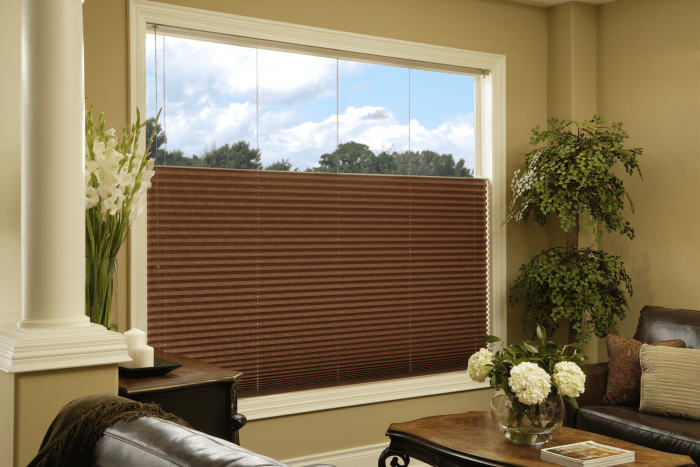
We sew fabric blinds
Fabric blinds will require more effort and time to manufacture than paper blinds. But they will be more durable and practical. To prevent the curtain from shrinking in size after the first wash, the fabric should be washed before cutting.
Please note! There are several ways to attach blinds. The first option is that the product is mounted in the window opening directly next to the window itself. This option is convenient if you have a large window sill. If you sew a curtain on each window sash, you can ventilate the room even when the blinds are lowered. The second method of fastening is outside the window opening, in this case the curtain is sewn wider than the opening by 5-10 cm on each side.

Installation options for horizontal blinds
You can secure the fabric version with Velcro on wooden beam or loops on the finished cornice. The weighting strip is needed so that the product holds its shape well and the fabric is evenly distributed over the entire width of the window.

Fabric blinds can be used independently or together with curtains. They are washable and fit fairly well to the window.
Install fabric blinds Can be used on any window - plastic or wooden. Choose a dense or translucent material depending on the degree of shading you want to achieve. A special curtain fabric or linen is ideal - they are durable and easy to use.
Horizontal fabric blinds
To make such curtains you will need curtain fabric or ribbons - satin or synthetic. Ideal option– dense fabric that holds its shape well, does not fade, does not turn yellow in the sun, with antibacterial and dirt-repellent impregnation.

An original solution, but difficult to implement
Important! Each lamella should be no wider than 10 cm, otherwise the finished product will look too rough. The width of each plank should be the same. When calculating the required amount of fabric, keep in mind that each lamella will need double width and seam allowances of 2 cm.
Step by step order actions
- We cut out the slats.
- Fold each one right side inward and sew on three sides.
- Turn it inside out and iron it.
- We process the unstitched edge (top) with braid and fasten it on both sides, retreating a couple of centimeters to the eyelets.
- We lay the finished strips of fabric tightly one against the other on a long braid.
- Each strip on top must be basted to the braid and stitched.
- We attach the finished product to the cornice.
- We tie threads to the bottom loops of each row and thread them through the rest.
- We bring both threads in one direction and pass them through the ring that was previously driven into the cornice.
- We tie the threads and fasten them to the side of the window opening.
Advice! To make the blinds look neater, attach weights to the bottom bar.
- determine the length finished product;
- we calculate required quantity and the width of the lamellas;
- we buy a guide made of plastic or aluminum with rotating and moving sliders;
- prepare thin wooden panels;
- We buy durable cord, rings and threaded hooks.
Important! When calculating the width of the lamellas, take into account the size of the window opening - the smaller it is, the narrower the strips of fabric should be.
Making blinds
- We cut out the lamellas, not forgetting that the pattern should be twice as wide as the lamellas plus allowances).
- Fold the fabric with the right side inward and stitch on three sides.
- Turn the lamella right side out and iron.
- We process the fourth side.
- Using adhesive tape on top and bottom of each strip.
- We attach a small threaded hook in the center of the upper edge of the panel.
- In the middle of each top panel we make a hole for the cord of the rotating mechanism.
- We hang the slats on the guides.
- We screw the threaded hooks on both sides at the level of the holes for the cord.
- We pull the cord through all the holes and hooks.
- We fix the cord in the holes with thin chains or matches, having previously lubricated them with glue.
- We tie the ends of the cord in the form of a loop hanging down about 20-30cm.
- At the bottom we fasten the slats together with a cord.
- So that the blinds can be moved, we attach a thin rod on hinges.

Sewing curtains using old blinds
Materials: worn out horizontal blinds, textile the right size, liquid nails, sewing machine, scissors.

Remove all connection elements, bottom stops and slats from old blinds. The central threads must be left
- Cut out the rectangle for the curtains along the base, not forgetting the seam allowances. Make markings on the wrong side and glue the crossbars onto the new fabric.
- Fold the edges of the fabric twice, iron them and sew them on the sewing machine.
- Pass the warp threads through the holes in the crossbars.
- Attach the fabric to the base, e.g. liquid nails.
- Thread the thread through the holes and secure with a knot. Hide the hanging ends of the threads on the wrong side.
On top bar glue a piece of fabric.
Exclusive blinds for a unique interior
- Rope slats are hung on the cornice of vertical blinds. They are not connected by the bottom chain.

- Non-standard solution– blinds made of newspaper tubes. Newspaper sheets are rolled into thin tubes using a knitting needle and a screwdriver, painted in the desired color, covered acrylic varnish and dried. At the final stage, the tubes are connected into one sheet with twine and hung from the cornice.

A curtain made of newspaper tubes resembles bamboo blinds
- Hold roller blinds in the open state it is possible using a belt with a button.

Homemade Roman blinds
The operating principle of Roman blinds and sails is very similar: a piece of fabric is raised and lowered using a rope and special device. However, a Roman blind can be sewn without a special curtain rod and accessories. It can be safely used for a room of any style and direction, the main thing is to choose the right fabric.


Combine Roman shades with tulle curtains or draped curtains. Using a cord, the fabric is gathered into horizontal folds; it can be fixed at any level.

Roman blinds can be combined with curtains of the same color
Rimka without a special cornice
To make a “rim” you will need:
- thick fabric;
- wooden block for a cornice (2.5 cm thick, 5 cm wide and a length equal to the width of the curtain);
- Velcro;
- finishing braid;
- slats;
- small nails;
- plastic rings of small diameter (1-2 cm);
- weighting material with a diameter of 5 mm or a wooden block;
- three cords (the length of each is calculated as 2 curtain lengths plus 1 curtain width);
- cord fasteners (hooks).
Advice. Instead of plastic rings, you can use metal nuts of the same diameter. A wire with a diameter of 3-5 mm is suitable as a weighting agent.

Work order:
- Measure the window. The width of the product should be 6 cm greater than the width of the window (allowances of 3 cm on each side). The length of the canvas is equal to the height of the window plus 12 cm of allowance (2 cm seam along the top edge and a double hem of the fabric 5 cm wide along the bottom edge).
- Attach the wooden cornice strip with screws to the window opening. Using a staple gun or small nails, attach one piece of Velcro tape to the strip. The second part of the Velcro tape needs to be sewn to the top of the panel.

To secure the curtain rod, you will need screws with rounded tips.
- Divide the window height by the desired number of folds to get the distance between folds.

Table for determining the number of folds
- Place the fabric on the table or floor with the wrong side facing up. Using chalk, mark the fold lines for the folds, the fold lines for the fabric for the weighting, and the places where the rings will be sewn.
Advice. If the window is wide and it is not possible to sew a curtain from one panel, sew two pieces of fabric.
- Apply finishing canvas along the fold lines, and then stitch it so that slats can be laid inside.
- Pass the cord through the rings from bottom to top, bring it out through the rings on the top cornice and through the side hook.
- Pull the cords together to create a beautiful drape.

The finishing border is sewn from the wrong side at the place of future folds

Each ring is fixed with several stitches and secured with a knot.

Next to the place where the weight will be inserted, you also need to sew a row of rings
Advice. To avoid wasting time sewing on rings, you can buy ready-made ribbon with rings.
Roman blind with mechanism
Using a chain-tape mechanism, the fabric is assembled into horizontal folds. If you purchase such a device, you can sew the curtain yourself. This option may be suitable if it is difficult to choose the right color and texture from the entire range of blinds.


To make a Roman blind, you need a special mechanism, which can be ordered at custom sizes windows

Cornice and control mechanism
Rim made from scrap materials
Manufacturing of roller blinds
Roller blinds are very similar to Roman blinds. But they are assembled by winding them around a rod or using a rope mechanism.

Mechanism for lowering and raising roller blinds
You will need: two canvases of the same size, ribbons for garters (the length of each is two curtain lengths plus 25 cm), 2 nylon cords (the length of the first is three lengths of the fabric, the length of the second is three curtain lengths plus its width), as well as two slats, screws, wooden cornice, furniture stapler.
- Sew two pieces of fabric together to make a bag. Then they turn it inside out and smooth out the seams.
- The weighting material is placed in the open cut and stitched.
- The upper part of the canvas is processed and nailed to a wooden cornice with a stapler.
- Garter ribbons, which will hold the curtain in the folded position, are attached to the cornice with a stapler.

The fabric completely covers the cornice

How to finish the edges of curtains
You can trim the edge of a thin fabric item using adhesive tape. Hem to the desired length, iron the fold, place adhesive tape between the layers of fabric, and iron. For heavy fabric, use adhesive tape folded 2-3 times. This method is fast, but not as reliable as the edging method.

Finishing the edge with adhesive tape
Edging method
Use ready-made braid with finished edges. Instead of braid, you can cut a strip of fabric, bend it in half, and fold the edges inward and press it. The edge of the curtain is placed between two parts of the edging tape, basted and stitched.

Roman blind with wide border
Hemming method
The edges of the panels can simply be hemmed on a sewing machine. The seam on the front side will not be visible if the edges of the product are hemmed with a hidden seam.

In the absence sewing machine edges can be finished by hand
Choose wallpaper for blinds, taking into account color design rooms. If making blinds with your own hands from fabric is an impossible task, and the paper version is not suitable for you, order curtains from trusted manufacturers.
The situation with blinds and curtains is somewhat similar to that in botany. There, none of the greatest luminaries has yet been able to really explain the difference between dicotyledonous and monocotyledonous flowering plants. Although a child will immediately say: “This is a rose, and this is a lily. This is a birch, and this is a palm tree.” Botanists, however, are not to blame, they are serious scientists, and not slang “nerds,” it’s just that the plant world is incredibly diverse. Well, we are not “nerds” either, the heat has hit, and we need blinds for the windows. First - simple ones a quick fix from scraps lying around on the farm, and then, perhaps, more substantial permanent ones. How to do both yourself is explained in this article.
Note: The emphasis in the word “blinds” is on the last “i”. The word is neuter, does not decline. Therefore, “blinds”, “blinds”, etc. - illiterate. In RuNet you can also come across “blinds”; apparently, by analogy with trouser legs and trouser legs. However, the element of stacked blinds is called a lamella, which translated into Russian means something long, thin, and flat.
In blinds technology, a set of rotating slats in a frame for regulating light, liquid and gas flows. But in order to properly make blinds at home with your own hands, you need, of course, to understand how the blinds on apartment windows differ from those of a car radiator, a water-jet propulsion system of a boat, etc. We will assume that household solar blinds are designed to regulate natural light in rooms, and that is how we will understand them. That is, simply put, the curtain is against peeking, and the blinds are against the blinding sun. And let’s also take into account that the awning is not a blind. True, then we will have many types of blinds without slats without them, but what can you do? Ask botanists if there are precise and unambiguous characteristics that distinguish monocots from dicots. And the world of blinds is also rich and diverse.
History and types
Lattice sun screens were invented by the Arawak Indians who lived in the West Indies, on the islands of the Caribbean. The first Europeans to see their blinds were the Spanish conquistadors. They liked the arrangement, but they killed every single one of the Arawaks - because they had less gold and spices than the hidalgos, fooled by greed, wanted to find, and the Arawaks themselves, in the Indian way, preferred death to slavery. However, the history of the conquest, crusades etc. and so it is known.

The first historical type of blinds is colonial, pos. 1 in Fig. These are simply shutters with angled wooden slats. In the tropics, where it is summer all year round and the sun is high, they are still in use today, because... simple, reliable and cheap. In a temperate climate somewhere in the middle of the 18th century. Based on Indian ones, Venetian blinds appeared: internal long sides the slats were hinged in the frame, and the outer ones were connected with a cord. By pulling it, the inclination of the slats could be changed according to the time of year and the weather. At the same time, the French name for this device, jalousie, “jealousy,” took root. The coquettes of that time, closing the blinds, brought the fans hanging out under the windows to white heat; especially if a man’s face flashed in the window before.
Note: within one climate zone(Who carries blinds with them?) You can abandon the rotating mechanism, making the blinds reliable in the Arawak way. How - see below.
The development of the “Venetian” principle is now horizontal blinds, pos. 2 and 3. The first samples, in which all the lamellas could be collected into a tight package and lifted up, appeared on sale in 1841. The bad thing about them, firstly, is the price, up to 5000 rubles. and more for good model for 1 window. Secondly, steel lamellas, especially the lower ones, are easy to bend to the point of breaking, but cannot be restored to their original state. Replacing the slats costs about 1/5 of the cost of new blinds. And the good thing, in addition to being suitable for any climate, is the ability to install rigid horizontal blinds on plastic windows, without damaging them or the walls at all, see below for more on this.
Note: Horizontal slats made of Faux material do not break or bend; it is something like MDF with strengthening impregnation. But the price of wooden blinds is much higher than that of metal blinds of the same size. In addition, so that the lamellas do not quickly wear out against each other, the so-called cord drive has to be introduced. ladders, see fig. on the right, which do not add elegance to wooden blinds.

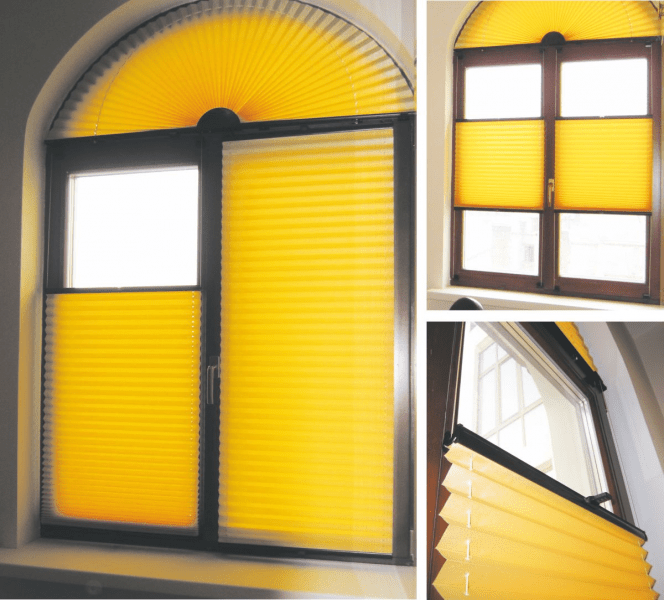
People only thought of vertical blinds in 1960. They are no cheaper than horizontal ones, but, firstly, their slats are fabric and do not break. Secondly, the slats can be removed individually for cleaning and replacement. Thirdly, vertical blinds not only regulate light sweat, but also allow you to optimally distribute it throughout the room, which, if used skillfully, saves electricity. And the somewhat “office” look of “vertical blinds” (which, by the way, is no more “office” than horizontal blinds) easily fits into everyday life design techniques, pos. 4, 5. If the windows in the room are arched or otherwise “wrong”, then there is no alternative to vertical blinds, see next. rice.

The Achilles heel of blinds with separate slats is the mechanism. Firstly, it is quite complicated, see for example. rice. below. Anyone who uses such blinds knows that even the world’s best brands can’t do without breakdowns. Secondly, the mechanism has components, for example. ball chain, which is impossible to make yourself; Buying parts at retail will cost more than turnkey blinds. Therefore, further in the “do-it-yourself” framework, we will limit ourselves to methods of attaching ready-made blinds to windows without drilling and installing them indoors.

In ancient times there was no robotic production, but the need for blinds was no less than today. IN different parts ecumene people got out of the situation in their own way. In the East, for example, they came up with pleated blinds, or pleated blinds, pos. 6. in fig. at the beginning. Actually, this is already a curtain, but in order to get around the nitpicking of pedants, we can assume that these blinds have 1 lamella, which rotates along with window frame. For the rich, pleated blinds were made from selected silk; the poor made do with palm leaves (in India) or rice paper (China, Japan). A significant fact: modern wallpaper paper is even better than rice paper, so it’s quite possible to make wallpaper blinds with your own hands from trash. One lamella, very attractive in appearance, will take no time more than an hour, but will last at least all summer, see below.
Silk arrived in ancient Europe, but at such a price that not every archon or senator could afford curtains made from it. The Greeks and Romans saved themselves from the heat by building houses from marble, which they had in abundance, and protected themselves from excess light with Roman or Romanesque curtains, pos. 7. Although it would be more correct to call them Persian, because in Europe they appeared after the campaigns of Alexander the Great.
Structurally, Roman blinds are real blinds with connected horizontal slats. Their mechanism is elementary simple and quite accessible for making with your own hands, without expensive purchased parts. However, so that Roman blinds do not constantly jam and warp, the fabric from which they are sewn must be sufficiently dense and rigid; the Persians used brocade. Therefore, next we will briefly touch on Roman curtains - they are certainly not openwork.

Looking ahead a little, take a look at pos. 10. This is also an oriental invention - bamboo curtains. Apart from the slats (which are also non-rotating), they have little in common with blinds, both structurally and functionally. But according to the principle of bamboo curtains, they make, firstly, roller blinds, pos. 8. These are factory products, for self-made not readily available, but indispensable for attics with sloping windows, see fig. left. The mechanism of roller blinds is much simpler, more reliable, cheaper and lighter than that of blinds with separate slats, and can be mounted on a plastic window independently, simply and without tools, see fig. right.

Analogs of roller blinds with a roll of fabric at the bottom - roller blinds, pos. 9 – it’s not much more difficult to make with your own hands than paper blinds, so we’ll deal with them further. As for the blinds, pos. 11, then all that remains of the blinds is the function of adjusting light transmission. The design of blinds-scenes, presumably, explanations for pos. 11 is not required, so we’ll be done with them.
Making blinds
Before you take on any self-made blinds, you need to correctly measure the window opening for them, because... majority homemade designs cannot be altered. A diagram of window measurements under the blinds is shown in the figure:

As for purchased blinds, the measurements of the openings for them, as a rule, are included in the installation price, and this is included in the selling price. If this service does not reach you, then further, in the section on installing blinds with your own hands, there will be instructions for measurements for individual types; In general, their exact diagrams are given in the company specifications.
Paper
Blinds from paper wallpaper are the easiest and fastest to make. Wallpaper is used because wallpaper paper is strong enough, rigid, resistant and at the same time transmits a little light, i.e. When the blinds are fully lowered, the room will have soft, diffused lighting. By choosing the color of the blank, the blinds can be made quite aesthetic, and paper wallpaper is inexpensive. Step-by-step instructions for making “wallpaper” blinds are shown in the figure:


The process, as we see, is simple, and if there are pieces of wallpaper left in the closet from the renovation, all the expenses will only be on tape and a couple of small pieces of fittings. In addition, you can watch a master class on making homemade paper curtains in the video below. Regular tape is enough to last the blinds all summer.
Video: DIY paper blinds
The first disadvantage of pleated blinds made from wallpaper is obvious: to assemble them, you need to stretch high up. The second may affect when the blinds are removed - the tape leaves marks on the paint. You can remove them with a cotton swab slightly moistened with vodka, cologne or 70% medical alcohol (alcohol “for injections” in a bottle with a blue stopper), but if the window frames are inexpensive, the sticky layer of tape can eat into the paint so that it can no longer be used. you will bring it together.
The paper blinds of the design shown in the following are free from this drawback. rice.:

Making them more difficult: you need to accurately glue many pipes onto a mandrel. By the way, a pair of identical beer cans, placed at intervals so that the tapering parts stick out from the ends of the pipe, are suitable for it. Arranged similar curtains according to the Roman type (see below), so you need to punch 3 holes under the cord: 2 10-15 cm from the edge and 1 exactly in the middle. Weight ( wooden slats) is placed in the lower pipe and secured with a couple of drops of glue. Its length is the same 10-15 cm less than the width of the canvas; the ends of the weighting material should fit between the outer cords. You can generally make a weighting material from 2 identical pieces laid between the cords. 3 holes are drilled in the top beam for the cords, and the beam is secured into the window opening, placing bosses under its edges so that the cords move freely. The timber is covered at intervals with a piece of the same wallpaper. The design turns out to be quite complex, but it will last for many years, especially if the wallpaper is non-woven.

Another “design” of paper blinds is shown in Fig. right. New settlers of the first Khrushchev buildings remember these people well; back then they were made from newspapers. However, using the same method, without cutting the sheet all the way through, you can quickly make quite decent paper blinds for your dacha from wallpaper or paper with a pattern. They are to some extent automatic: a breeze blew, the stripes (30-70 mm) swayed. The shading remains, but this primitive curtain does not interfere with ventilation.
Roman blinds
The design of Roman blinds is shown in Fig. Pockets, as a rule, are not sewn separately, but are formed from layers of panel fabric. They sew either on one side, like the picture on the right, or on both sides, sewing the free edge of the pocket to the panel. In the first case, less fabric is used (each stitch requires an allowance of 1-1.5 cm), but the fabric wears out faster on the folds.


Roman blinds function reliably if, in addition to sufficient density and rigidity of the fabric, the batten inserts are also rigid, and the bottom panel is weighted with a load of about 1-1.5 kg. Therefore, the armor is made from strips of plywood or hard plastic 2.5-3 mm thick and 30-40 mm wide, and the weighting material is made from strips of plywood 4-6 mm thick and 100-150 mm wide. The top beam (the fabric wraps around it) with a cross-section of approximately 40x40 mm. All edges of the inserts, weighting material and beams must be rounded and sanded, otherwise the fabric on them will quickly fray. The pattern for the pattern of Roman blinds is shown in Fig. right.
For more information on making Roman blinds yourself, see the video below:
Video: how to make a Roman blind with your own hands
Note: lightweight waterproof and waterproof translucent Roman blinds are made from a special synthetic fabric, the so-called. calender raincoat fabric. But in the hottest sunshine, in a room with such curtains, to be honest, it’s too stuffy.
Roller blinds

Roller blinds made of fabric are much simpler and more economical, which in this case can be any fabric, incl. light translucent. The principle of cutting the panel of homemade roller blinds is shown in Fig. They also require an upper fastening beam, but it can be round, approximately 40-50 mm in diameter. The lower weighting material is the same. The holes for the cord are framed with eyelets for curtains, and the cord itself can be as thin as desired, as long as it does not break. “For beauty”, you can use a ribbon instead of a cord, and so that it is not visible at all, you can use a fishing line. In addition, roller blinds can be hung/removed at any time using the top hinges. General aesthetics – 3+, but for summer cottage, probably the best option.

As already mentioned, roller blinds were originally made from bamboo. If you have bamboo slats at your disposal, nothing prevents you from making bamboo blinds with your own hands. Process elementary: bamboos on flat surface tied with any sufficiently strong cord in increments of 30-50 cm, see fig. Attach bamboo blinds to a block in the window opening. 3 holes are drilled in the beam for cords for assembling and unfolding the canvas: some ends of the cords are tightly attached to the beam, and the other, traction ones, are surrounded by a loop covering the canvas at the bottom and passed through the holes.
Colonial Improved
Now let's see how to make simple, cheap and reliable colonial-type horizontal blinds with fixed slats for mid-latitudes with your own hands. First, their grille is assembled in a hinged and/or folding frame, like a window shutter. Then, 3-4 mm thick plywood, twice impregnated with a water-polymer emulsion and painted, will be used on the lamellas. The second impregnation is done after the first has completely dried. In extreme cases, say, for a summer cottage, the slats can be made from cardboard processed in the same way, but then the shutters and blinds also need blind sashes that can be closed for the winter.

The layout of the slats of “moderate colonial” blinds is shown in Fig. right. Proportions and angles are given for Middle Strip RF; the dashed line shows additional slats of unshaded windows facing due south. In general, it is advisable to maintain the following ratios:
- South windows: h = W.
- South-east and south-west windows: h = 1.5W.
- East and west windows: h = H = 2W.
If you haven’t forgotten school trigonometry, then you can more accurately calculate both W, h, and the installation angle of the lamellas β. It is necessary that on the winter solstice on December 21, when the altitude of the Sun at noon is α = φ – 22 degrees, the shadow from the overlying lamella does not reach the inner edge of the underlying one, and on the summer solstice on June 22 it should reach half its width on the western/eastern windows, by 2/3 in the southwest and southeast, and by 3/4 in the south. Then in winter the blinds will practically not shade the room, in the summer in the morning it will be illuminated by direct rays (which is very beneficial for health), and as the sun rises, the direct light will be replaced by diffused light. In the afternoon, the pattern of lighting changes will be reversed.
Note: 22 degrees with some, in this case completely insignificant, addition is the angle of inclination of the Earth’s rotation axis.
We install blinds

All that remains is to figure out how to install the purchased blinds yourself. The first thing you want in this case is to do without plumbing and construction work. Why distort the window frame and/or its opening? Especially if the windows are new plastic, and their slopes have just been refinished. Are there ways to install blinds yourself without drilling? Yes, there is such a possibility, see fig. Installation on brackets that cling to the window frame is more expensive. Fastening with special adhesive tape is no less reliable (up to 5 years of warranty), but it may leave indelible marks on the frame.
In general, it is better to mount them on brackets, but then you need to keep in mind that there are 2 main systems for attaching blinds to plastic windows - HOLIS and MAGNUM, see fig.:

HOLIS is simpler and cheaper, but MAGNUM allows the use of cornice correctors, and the reliability and durability of the blinds significantly depends on its precise adjustment, especially horizontally along. You can learn more about attaching blinds without drilling from the video:
Video: installing blinds on windows without drilling or screws
If you are going to install oak blinds using self-tapping screws in dowels, keep in mind that it is best to attach their cornice to the ceiling. Firstly, there is some savings on a pair of brackets and the work of installing them, see fig.


Secondly, fastening to the window slope is much less reliable: there is a thick layer of not very durable cement mortar no reinforcement and even weaker finish. In order to reliably drive the dowel into the main wall, the slope will have to be drilled to such a depth that the labor intensity of installation will be much higher. more fastening to the ceiling. Branded vertical blinds, for example, according to the specifications on them, are attached only to the ceiling, see fig. right.
And one last thing
At the beginning of the article, awnings were already mentioned as sun protection devices for windows. By the way, they have a lot of advantages over blinds: they do not interfere with ventilation at all, provide better shade, protect against splashes in the rain, do not require frequent adjustment, and are much more reliable. Unlike adjustable blinds with separate slats, awnings are technologically much simpler. It is quite possible to make a good adjustable awning with your own hands, having mastered simple working skills, especially in our time, when there are propylene pipes and synthetic fabrics of monstrous durability and strength. However, several times more materials will be spent on an awning than on blinds for the same window. This is probably why manufacturers are not keen on awnings: their competitiveness is low. However, the owner of a private household who is considering ways to shade windows or awnings should keep in mind: cases when a disadvantage in mass production turns out to be an advantage when making it yourself are by no means rare. Materials for awnings may well turn out to be cheaper than turnkey blinds.
When arranging a home, every housewife tries to give the interior something stylish and special: something that will not only decorate her home, but also emphasize her refined taste. One of the ways to express your individuality is curtains, which reflect a touch of homely beauty and comfort in the interior. In this case, pleated curtains, which you can make from paper with your own hands, will look best on the windows. They can become the highlight of the entire interior.
What are pleated paper curtains?
Pleated draperies are made from paper or fabric, and according to the arrangement of the stripes they can be vertical or horizontal. You can choose the appropriate material for the job yourself. But paper curtains are original solutions for those who prefer frequent design changes and do not plan to spend too much on expensive fabric.
In addition to its low cost, curtain paper has the following advantages:
- style. Today, many blanks for the interior are sold with different embossings, designs and applications.
- Different densities. This indicator allows you to make pleated curtains light-proof for a nursery or bedroom and light for the kitchen.
- Versatility. You can cut a variety of shapes from paper - horizontal or vertical, various non-standard curtains.
- Availability. In order to create a pleated pattern with your own hands, you can even use wallpaper.
How to make pleated curtains from paper with your own hands?
In order to make curtains, you will need:
- glue;
- paper the width of the window and approximately 1.5-2 times its length (height);
- two wooden planks exactly the same width;
- threads (it is advisable to use thick nylon or silk);
- gypsy needle or awl.
Pleated curtains are made at home, following the instructions.
- We take two identical wooden planks along the width of the window opening.
- Fold the paper and iron it into small folds the width of the bar.
- Glue the top edge of the paper to the strip using glue, press it and let it dry. For high-quality fixation, it is better to use double-sided tape.
- We make even holes along the edge of the paper using a needle or awl, after which we stretch the threads, securing them to the top bar. If your curtain is very wide, you can stretch the threads through 40-50 cm of the fabric. For high-quality fastening, you will have to make holes in the wooden planks themselves, fixing the threads on top with knots and gluing them.
- Accurately calculate the height of the straightened blinds and the window. Cut the paper according to the required parameters.
- Glue the paper to the bar at the bottom, and then secure the threads there.
- We are waiting for the structure to dry, and your pleated paper curtains are ready.
As you can see, making pleated curtains with your own hands is not difficult and does not involve significant costs.
How to properly attach pleated curtains?
It’s worth saying right away that pleated curtains can be attached in different ways. One of the most budget-friendly options is to buy adhesive hooks. As soon as you pass the threads through two wooden planks, you need to fix their knots, and then make a loop. Attach the hooks to the window and then hang the curtain. You can also decorate the loops with tassels, beads and other decorative elements.
Another type of fastening is special plastic structures attached to window frame using self-tapping screws. Thanks to the peculiarity of the shape, you can pass the fixing threads through the structure, fixing the paper curtain as tightly as possible.What is the best way to attach pleated curtains to a window?
Such structures can be fixed both above the window and in the frame of each window, since the curtains are quite light. Frame mounting provides more freedom in opening windows, but an open window may allow sunlight to enter the room.
Mounting above the window can be done to the ceiling or wall. Connection to the ceiling will be preferable as it creates a holistic impression of the interior of the room. Mounting it on a frame will not allow you to use the window sill or grow flowers on it, since with the curtains closed they will be sorely lacking in light.
There are several methods of fastening, and each person chooses them based on their own convenience. An economical way to attach a paper curtain to a window is to buy self-adhesive hooks. The threads are passed through the lower and upper wooden planks, then they are fixed into a loop. The hooks are attached to the window, and then the curtain is hung on them. Loops that remain visible can be decorated with thread tassels, ribbons, beads or any other way you like.
Another method of attaching pleated paper curtains involves using ready-made plastic construction, which must be secured to the window frame using self-tapping screws. The threads are passed through this design and secured as stated in the instructions.
Do-it-yourself pleated paper curtains are a source of pride for the apartment owner, since such a simple solution does not occur to everyone. The disadvantage of the design is that these curtains cannot be used in inclined window openings. Therefore, they are not suitable for decorating attics and attics.Among the many advantages of decorating a window with pleated paper curtains, it is worth especially noting the unlimited color scheme, ease of manufacture, environmental friendliness, availability, stylish appearance and versatility, as they are suitable for any interior. In addition, when attaching such blinds you do not have to drill into the frame. This is a real find for rented apartment, windows non-standard shape, as well as for those who like to change the design frequently. Considering that they are attached directly to the window opening, the window sill remains open, which is very convenient in the kitchen and nursery. They are also indispensable in glass loggia, because they allow you to refine the space while saving money. Pleats look beautiful both solo and in combination with traditional curtains or tulle.
The disadvantages of this design are that it cannot be washed, and if the paper becomes wrinkled during use, it will be impossible to restore its original shape. However, this disadvantage is compensated by the low cost of the product. Whatman paper is also suitable for the role of blinds, which can be painted in any color if desired or images can be created on it.
Materials for work:
1. Wallpaper;
2. Thin satin ribbon;
3. Drawstring;
4. End switch;
5. Hole puncher or drill;
6. Double-sided tape;
7. Ruler, pencil, scissors. 
Sequence of manufacturing pleated blinds
The main thing in the manufacture of blinds mounted on window sash– correctly calculate the size of the canvas. In order not only to shade the room from the sun, but also to hide the interior from prying eyes, the pleated panels should be approximately 2 cm wider than the glass on each side. The length of the wallpaper should be one and a half times the height of the window. 
Having cut off the required volume of fabric, we proceed to the most important part - folding the accordion. The width of the so-called slats should not exceed 4 cm, otherwise the curtains will not look aesthetically pleasing. Using a pencil on the wrong side, mark the places of future folds. 
Using a ruler, make folds. 
Using a hole punch, awl or drill, make a hole exactly in the middle of the workpiece. 
We stretch a satin ribbon through it and tie a knot on top. Instead, you can use a silk cord, but the advantage of the ribbon is that it is easier to match the color of the wallpaper. 
At the bottom we insert a drawstring that will adjust the height of the pleated. 
Now you need to connect the edges of the bottom fold. This can be done using glue, magnets or double-sided tape. Apply glue without reaching the middle, and then connect both ends, forming a peacock tail. For better adhesion, we put paper clips or simple paper clips on the fold and hold it until the glue dries. 
A wooden end cap is used as a weighting material. 
We glue double-sided tape over the entire width to the top edge. 
We remove the protective layer from the double-sided tape, glue the top fold to the frame and adjust the height of the curtain, moving the drawstring to the desired level. 
DIY wallpaper pleated blinds are ready!
You may like:
- HOW TO COMBINE WALLPAPERS BEAUTIFULLY: A SELECTION OF THE BEST...
- I sewed curtains for the kitchen, and now I can’t stop...
- THE MANY FACES OF A WINDOW SILL OR HOW IT CAN BE USED...
- GORGEOUS BATHROOM DESIGN 4 SQUARE. M. PHOTOS OF THE BEST...
- Chic kitchen design 11 sq.m. with examples and...
- SHE TOOK A PIECE OF YARN AND WRAPED IT AROUND THREE FINGERS OF HER HAND!…
Blind-type curtains have gained a large number of adherents in the market. They are actively purchased and are still in demand. One of the varieties of such curtains are pleated blinds. These are beautiful curtains, distinguished by originality and at the same time simplicity.
They look quite beautiful and are available in a large assortment. Let's learn more about them, consider the advantages and disadvantages, features and types.
A little history of the creation of pleated blinds
If you turn to a French translator, the literal translation of pleated is rendered as jealousy. Facts about the origin of window products can be called contradictory. One version says that pleated blinds were invented by the husbands of beauties from Venice. At first, husbands tried to hide their chosen ones from prying eyes behind thick and constantly drawn curtains. As a result, from not enough sun, they began to fade. So the craftsmen came up with blinds that, although they let the sun’s rays through, hid what was happening in the room. The events took place in the 17th century. And because the events took place in Venice, they were often called Venetian.

Other people say that the origins of the creation of products are in the East. Pleated blinds were invented by the Arabs, and in Europe they saw the light of day because of the Spaniards, who brought them here. After which the idea of curtains was picked up by aristocrats from England and France.
The first models were made of wood and had no adjustment. The slats were simply at a certain angle. Gradually, fashion picked them up, and blinds replaced ordinary shutters. They have been used in Russia since the 90s, although they could be bought in stores before. There was simply little demand for pleated blinds.
Modern pleated blinds:
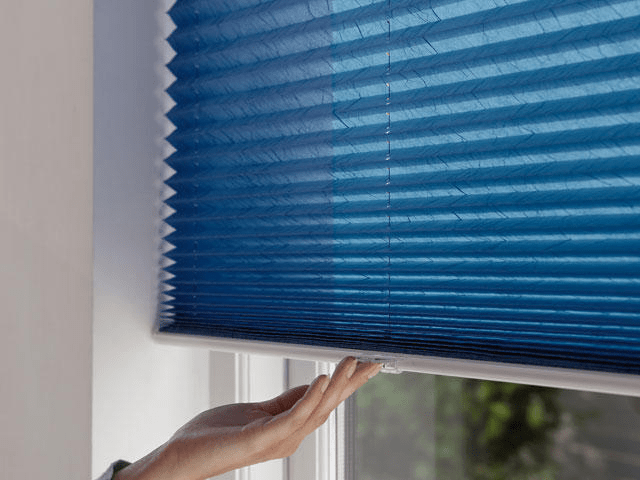
Advantages of pleated blinds
The design of the products is quite simple. They are made from corrugated material that has different densities, texture, pattern and color. Pleated fabric or paper has a number of positive aspects:
Types of pleated blinds
Before purchasing such designs for yourself, you need to familiarize yourself with the variations. If a designer is involved in the design, then the work is simplified. And as for independent choice, then you need to think about it.
Let's consider these types:
Making pleats with your own hands
Mentioned above is the fact that you can make blinds for windows yourself. You don’t need to be a master to do this, and you’ll spend very little time and money. Now we will look at a master class that will help you make pleated curtains with your own hands.
In your work you cannot do without:
- stationery knife;
- roulette;
- pencil;
- hole punch;
- double-sided tape;
- a piece of wallpaper or other paper;
- tape and retainer.

When you have prepared everything you need, you can get to work. Here is the creation sequence:
- Use a tape measure to measure the size of the window.
- Select the material type. Most often they use paper wallpaper, which already has a good appearance.
- Use a utility knife to cut the wallpaper according to size. Just keep in mind that you need to add 40 cm to the height of the window, because the paper will need to be bent. For example, if the window size is 1x1.2 m, you need a piece measuring 1x1.6 m.
- On the wrong side, make a mark with a pencil, every 3 or 4 cm. It will indicate the fold lines.
- Start folding the sheet like an accordion so that the folds at the top and bottom can bend inward.
- Use a hole punch to make through holes in pleated blinds (you can use a drill). There will be three of them: along the edges and in the center.
- All that remains is to stretch the tape or rope through the holes and secure everything with clamps or tape.


