I always loved biology, but I never had a microscope, and so I decided to get one in order to admire the microcosm with the younger generation, and perhaps photograph the main chip of the 3DO console in the meantime.
It didn’t take long to choose the optical device itself; the choice fell on the Altami 104 microscope, this is a domestic microscope, my model with 2000x magnification (optics doesn’t provide more, no matter what they write there - it’s digital bullshit). Its price is very low, it cost me 12,800 rubles (May 2015). I don’t know how the imported analogs compare to it, but I’m happy as an elephant =) I doubt that it’s possible to make the device any better for the money. I ordered from the manufacturer, because it’s faster and cheaper and probably more reliable: http://www.altami.ru.
Microscope Altami 104
For those who also have not found how to adjust the light field of the microscope, I suggest: remove the eyepiece (if you were in a hurry to attach it), set the aperture to minimum and adjust the capacitor with the adjusting bolts so that the spot is in the center, then do not touch these screws again.

Spot by which to adjust
Of course, looking through a microscope (especially a monocular one) is difficult and you want to display everything directly on the monitor. However, the camera for the microscope is comparable to the price of the microscope itself. And I decided not to take it yet, but to try to make it myself. Which I will now tell you about in all details =)
In addition to the microscope, you will need a webcam, preferably with a good matrix, I used a Logitech C270 (at one time I bought several for 700 rubles, a special camera for a microscope with the same resolution costs 9000 rubles). It is very convenient because the focus of this camera is adjusted mechanically, although this is probably also possible in others - I just haven’t taken it apart, I don’t know.

Logitech C270 webcam
You will also need a screwdriver, a plug from plastic bottle, a couple of small screws (five millimeters long), and it is also advisable to have a glue gun on hand (Glue Gun), a couple of zip ties and a drill similar to those used by dentists =) So let's get started!
First of all, you need to reduce the weight of the camera, so you need to remove the mounting part of the camera. We pull out the decorative end caps from the rotating mechanism and unscrew the screw, then we squeeze out the shaft and the camera becomes like a feather.
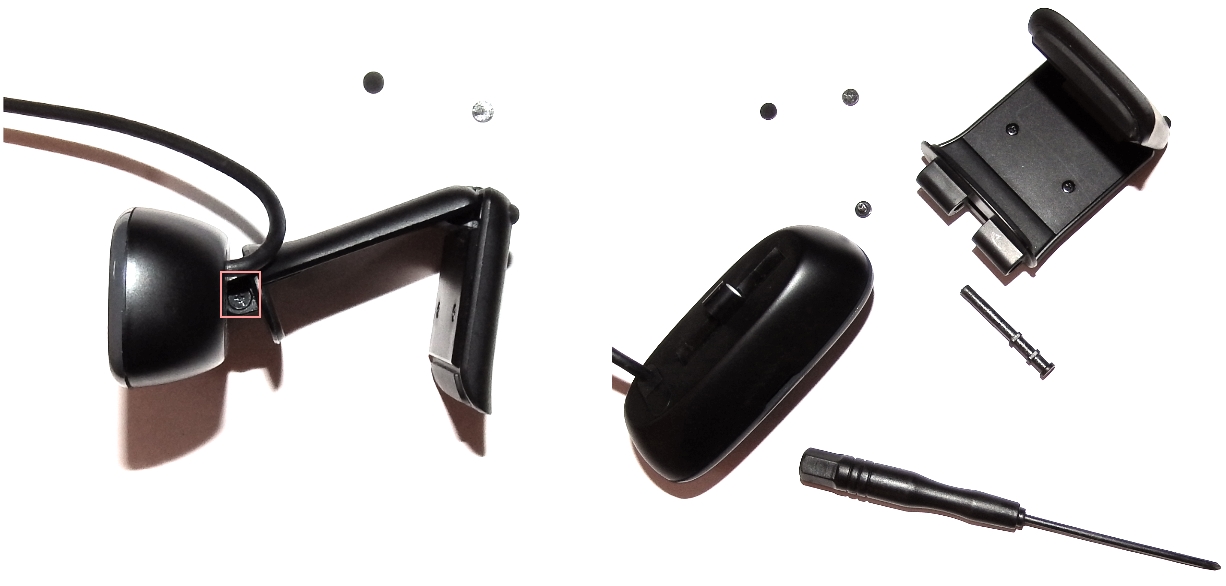
Disassembly of the fastening mechanism
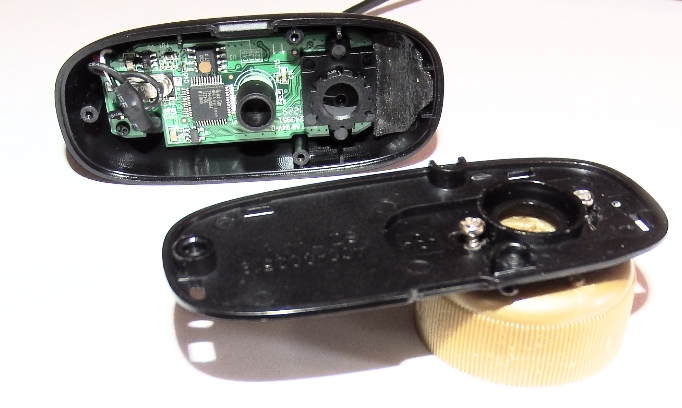
Next, you need to remove the front panel of the camera to get to the focus adjustment. To do this, you need to pull off the decorative panel, and then unscrew a couple of screws and remove the main one plastic panel, behind which there is a simple filling.

Opening the camera
Now we need an attachment for the eyepiece, and its role will be played by an ordinary cap from a plastic bottle! It fits perfectly in diameter and has a stop inside so that it does not press close to the optics - you can’t think of anything better, you just need to cut the thread and drill a hole with a radius of 3 plus or minus millimeters. For this I used a drill with a flexible connection, and used a small drill as an attachment. If you don't have this on your farm, take regular knife and carefully cut the thread and make a hole with a regular drill, or whatever way you pick it. The pieces of plastic can be scorched with fire to prevent them from dangling, then you need to level the top of the cork, for example with a stone.

Preparing the cork
Place the finished plug on the eyepiece and lean the camera with the main panel on, if necessary, adjust the focus (slowly, little by little, as accurately as possible). Also, cover the LED in the camera, for example, with electrical tape, so that it does not shine where it is not needed.
Next, you need to screw the main panel of the camera to the cork, for this I used screws, you can probably put it on with glue, but you need to accurately align the camera, so it’s preferable to use screws, first set one, maybe not the first time. Try it on, perhaps adjust it relative to the first screw and only then fix it with the second one. If the inclination is not optimal, insert spacers from pieces of plastic or something you have on hand. Then perform a general fitting.
Attaching the panel to the plug
Now all that remains is to record the result; for this you can use glue gun. Here I recommend gluing a tie or another flexible piece of plastic as clamps, this is necessary in order to fix the eyepiece so that your image does not rotate, following the webcam wire, you can even have several of these ties, or whatever you think of. Spread glue around it and let it harden.

Ready digital attachment
Now let's install all this on the microscope eyepiece, tighten the clamp to the eyepiece tube with a tie and enjoy the microcosm! The whole process takes no more than an hour; it took me longer to write the article.

Microscope assembly
In general, I must say that a special attachment is preferable, since it does not try to adapt to the lighting, which, under some microscope operating parameters, leads to auto-adjusting bounce in the image; perhaps this is adjusted in web cameras, I have not figured it out yet. And everything is calibrated exactly on the factory attachments, without any screws. But nevertheless, for amateurs, the result is very good, although the preparation was done hastily on old glass with dirty hands - that’s why there is so much garbage in the picture =)
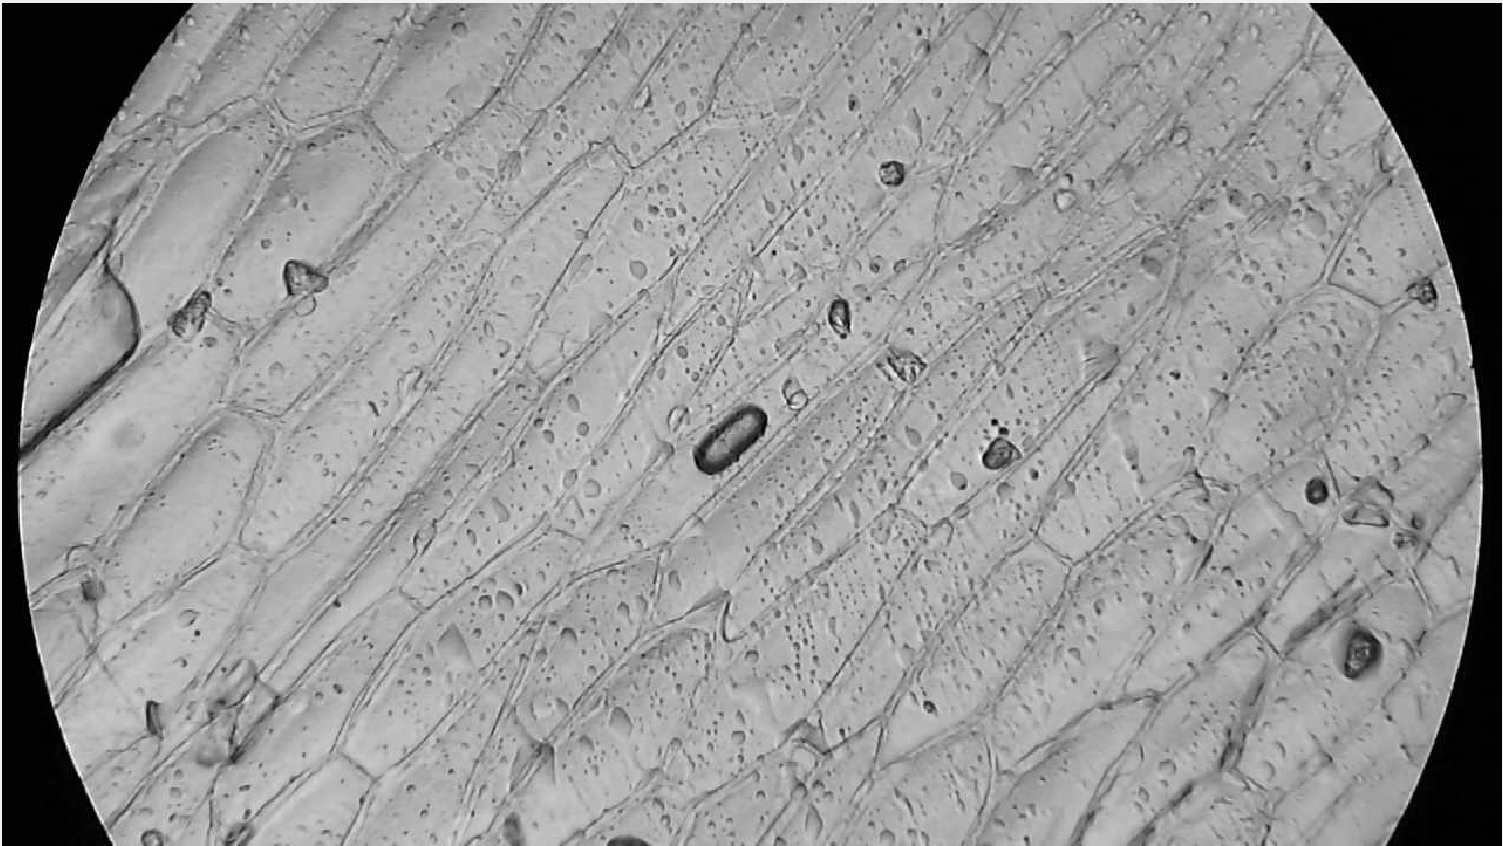
Some kind of bacteria on onion cells
As a Windows 7 user, an unpleasant surprise awaited me after XP - in 7 they removed webcams from “my computer”, i.e. There are no standard tools to look at the result, so I had to program it =) Unpack it to any place and run the executable.
It has long been known that simple trinkets made by a parent with his own hands for his child are valued much higher by him than clever purchased gifts. At the same time, the authority of the elder in the eyes of the youngster increases noticeably. We present one of these man-made “little things” to the reader’s attention here. We will talk about a simple optical device from the “breed” of microscopes. The ability to magnify the latter far exceeds the capabilities of the strongest magnifying glass; a microscope will allow a child to see a lot of interesting things, examining, for example, insects and plants, and will help an adult, if necessary, evaluate the quality of sharpening of a cutting tool.
Homemade microscope from optics from an old camera
The homemade microscope uses two ready-made optical units- standard lenses: from a small-format camera (such as FED, Zenit) to an eight-millimeter film camera. It is quite possible to obtain film optics, since thousands of amateur film cameras have become dead weight after the mass distribution of electronic video equipment.
So, how can you make a microscope from a camera?
For our microscope, we took a “Zonnar” lens (from a German camera) with a focal length of 10 mm, which was assigned the role of the microscope eyepiece. The Industar-50 lens from the old FED was suitable as a homemade lens. You also needed an extension ring No. 4 with an M39x1 connecting thread (the longest), used for macro photography. If you use a Zenit lens, you will need ring No. 3 with an M42x1 thread. Photo and cinema lenses are combined into a single optical whole using a rigid, light-proof tube. The extension ring will serve as a link between the lens, tube and stand. To pair a miniature cinema lens with the rear end of the tube, the upper conical part (along with the neck) of a suitable plastic bottle of drinks or perfumes is suitable.
Our assembled optical device is shown in the figure. The stand is made of thin boards or multilayer plywood 6...10 mm thick. An aluminum strip up to 50 mm wide and 1...1.5 mm thick is suitable for the bracket. You can make a bracket from a pair of PCB plates, connecting them to each other and to the stand with aluminum corners. It is advisable to give the bracket a shape that provides the optical unit with a convenient tilt for “work.” The tube, glued from cardboard, is fixed to the body of the extension ring with glue. The length of the tube depends on the size and shape of the neck of the plastic bottle (in this case, the neck should be cut so that its cylindrical part is at least 20 mm long, which will ensure the alignment of the optical units when docking). In the neck of the neck we will attach a film lens, for example, from a simple “Sports” film camera (of any modification).
Focusing of the optical system on the object of observation is carried out using a remote ring of the photo lens. It is better to make the tube composite (from separate sections that fit into each other with slight friction), which will expand the focusing range. Internal surfaces It is advisable to coat the tube and neck with matte black paint. If you equip the device with a table for supporting a glass slide and a mirror, it will be possible to examine objects in transmitted light.
A microscope is a rather complex optical instrument that can be used to observe objects that are invisible or difficult to see with the naked eye. It allows curious people to penetrate the secrets of the “microcosm”. You can try to make a microscope yourself. There are quite a few designs of homemade microscopes, and in this article we will look at one of them.
One of the most successful designs was proposed by L. Pomerantsev. To make a microscope, you need to purchase two identical lenses of +10 diopters each, preferably with a diameter of about 20 millimeters, from a pharmacy or optical store. One lens is needed for the microscope eyepiece, the other for the objective. But first, let's understand the units of measurement of lenses.
What is lens diopter
Diopter is a unit of optical power (refraction) of a lens, the reciprocal of the focal length. One diopter corresponds to a focal length of 1 meter, two diopters - 0.5 meters, etc. To determine the number of diopters, you need to divide 1 meter by focal length of a given lens in meters. Conversely, the focal length can be determined by dividing 1 meter by the number of diopters. The focal length of a +10 diopter lens is 0.1 meters or 10 centimeters. The plus sign indicates a converging lens, and the minus sign indicates a diverging lens.
How to make a homemade microscope
Ten centimeters long according to the diameter of the lenses. Then cut it in half to make two tubes five centimeters long. Insert lenses into them.
At one end of each tube, glue a cardboard ring or a ring glued from a narrow strip of paper with a hole ten millimeters in diameter. Place the lens on the inside of this ring and press it with a cardboard cylinder coated with glue. The inside of the tube and cylinder should be painted with black ink. (This must be done in advance)
Insert both tubes into the tube - the third tube is 20 centimeters long and has such a diameter that the eyepiece and lens tubes fit tightly into it, but can move. The inside of the tube should also be painted black.
Draw two concentric circles: one with a radius of 10 centimeters, the other with a radius of 6 centimeters. Cut out the resulting circle and cut it into two parts along the diameter. Make a microscope body from these semicircles C-shape. The semicircles are connected with three wooden blocks, each 3 centimeters thick.
The upper and lower blocks should be 6 centimeters long and 4 centimeters wide. They protrude 2 centimeters beyond the inner edge of the plywood semicircles. Attach the tube with tubes and the adjusting screw to the top block. For the tube, cut a groove in the block, and drill for the adjusting screw through hole and hollow out a square recess.

A – tube with lenses; B – tube; B – microscope body; G – connecting blocks; D – adjusting screw; E – stage; F – diaphragm; Z – mirror; And - a stand.
The adjusting screw is a wooden rod onto which a cylinder cut from a pencil eraser or wound insulating tape is tightly seated. It is best to use a small piece of suitable rubber tubing for this purpose.
The screw is assembled like this. Cut the block in half lengthwise. We thread the screw rod into the hole in one half, place a rubber cylinder on it, then thread the other end into the hole in the second half of the block and glue both halves together. The rubber cylinder should fit in the square recess and rotate freely in it. We glue the block with the screw to the plywood semicircles, making cutouts at their ends for the screw core. At the ends of the rod we attach handles - halves of a spool of thread.
Now attach it to the block using a bracket bent from tin. First, make cutouts in the bracket for the screw and nail it or screw it to the block with screws.
The rubber cylinder of the adjusting screw should be pressed tightly against the tube; when the screw rotates, the tube will move slowly and smoothly up and down.
The microscope can be made without an adjusting screw. In this case, it is enough to glue the tube to the top block, and point the device at the object only by moving the tubes with lenses in the tube.
Nail or glue an object table on top of the bottom block - with a hole about 10 millimeters in diameter in the middle. On the sides of the hole, nail two curved strips of tin - clamps that will hold the glass with the drug in question.
Attach a diaphragm to the bottom of the object table - a wooden or plywood circle, in which four holes are drilled around the circumference different diameters: for example 10, 7, 5 and 2 millimeters. Secure the diaphragm with a nail so that it can be rotated and so that its holes coincide with the hole in the stage. Using the diaphragm, the illumination of the preparation is changed and the thickness of the light beam is adjusted.
The dimensions of the object stage can be, for example, 50x40 millimeters, the diaphragm size is 30 millimeters. But these sizes can either be increased or decreased.
Below the object table, attach a mirror measuring 50x40 or 40x40 millimeters to the same block. The mirror is glued to the board, two nails without heads (gramophone needles) are hammered into it on the sides. Using these nails, the board is inserted into the hole of a tin bracket screwed to the block with a screw. Thanks to this fastening, the mirror can be rotated and installed at different angles on the hole in the object table.
Use the third connecting block to attach the microscope body to the stand. It can be cut from a thick board of any size. It is important that the microscope rests firmly on it and does not wobble. Cut a straight spike from the bottom of the block, and hollow out a nest for it in the stand. Lubricate the spike with glue and insert it into the socket.
The microscope is adjusted by turning the mirror, moving the tube and tubes with lenses in the tube with a screw, magnifying the image 100 times or more.
All of us dreamed of having a microscope as a child. I confess that I was one of these dreamers. The microscope is very useful thing and will always come in handy, especially if you are a radio amateur, because you can study micro-details with it mobile phone and computer. And then one day I was given an old pair of binoculars that had been sitting idle on a shelf for several years. Therefore, it was decided to collect something useful from it. There are lenses - so you can make a good microscope from them. To do this, you just need to disassemble and remove the two lenses that are on it. See the photos below. The black tube is 15 centimeters long and it needs to be covered from the inside with aluminum foil, and we do this to obtain maximum illumination inside the tube since our microscope does not have a backlight like in the factory models. The pipe in this case is plastic, but you can also use a piece water pipe with a diameter of 0.5 inches.
We attach the lenses to the pipe using moment glue and silicone, if you have metal pipe I highly recommend using cold welding. The microscope is ready, now you can look at things that are too small for the ordinary human eye.


I compared the manufactured microscope with an ordinary magnifying glass, the result is that the magnifying glass magnifies it 5 times, and the microscope about 20 times, you can calmly look into the eyes of an ant or look at mollusks that are hiding under the leaves of trees.
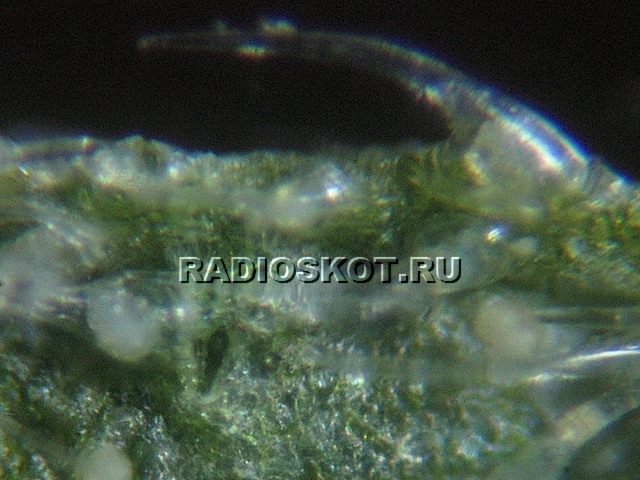

For a microscope, you can make a stand for more professional use and it is better to have several glasses on hand with dimensions of matchbox, glass is very convenient to use for viewing leaves, insects and various liquids. The stand can be made as follows - take a CD disk and an aluminum wire with a diameter of 3 mm. We twist one end of the wire into a hoop, into which the microscope should freely enter and exit. We also twist the second end in this way and attach it to the center of the disk using silicone, so if we look through a microscope we will see the disk!

It is at this place of the disk that you need to glue a blank sheet of paper with superglue so that the multi-colored rays of the disk do not interfere with viewing, and on the paper you can use glue to firmly glue the moment rectangular piece glass Thus, we have created an almost semi-professional microscope from binoculars, which is indispensable in many matters. Create a device and study everything you can. Good luck - AKA.
Discuss the article MICROSCOPE FROM BINOCULARS
The high level of miniaturization of electronics has led to the need to use special magnifying tools and devices used when working with very small elements.
These include such a common product as a USB microscope for soldering electronic parts and a number of other similar devices.
Some experts believe that a USB device is optimal for making a household microscope with your own hands, with the help of which it is possible to provide the required focal length.
However, to implement this project it will be necessary to carry out certain preparatory work, which greatly simplifies the assembly of the device.
As a basis for a homemade microscope for soldering miniature parts and microcircuits, you can take the most primitive and cheapest network camera like “A4Tech”, the only requirement for which is that it has a working pixel matrix.
If desired, receive high quality images, it is recommended to use higher quality products.
In order to assemble a microscope from a webcam for soldering small electronic products, you should also worry about purchasing a number of other elements that ensure the required efficiency of working with the device.
This primarily concerns the illumination elements of the field of view, as well as a number of other components taken from old disassembled mechanisms.
A homemade microscope is assembled based on a pixel matrix that is part of the optics of an old USB camera. Instead of the built-in holder it contains, you should use a machined lathe a bronze bushing adjusted to the dimensions of the third-party optics used.

The corresponding part from any toy sight can be used as a new optical element of the microscope for soldering.
To receive good review areas for desoldering and soldering parts, you will need a set of lighting elements, which can be used as used LEDs. It is most convenient to remove them from any unnecessary LED backlight strip (from the remains of a broken matrix of an old laptop, for example).
Finalization of details
An electron microscope can begin to be assembled only after thoroughly checking and finalizing all previously selected parts. The following important points should be taken into account:
- to mount the optics in the base of the bronze bushing, you need to drill two holes with a diameter of approximately 1.5 millimeters, and then cut a thread into them for an M2 screw;
- then bolts corresponding to the installation diameter are screwed into the finished holes, after which small beads are glued to their ends (with their help it will be much easier to control the position of the optical lens of the microscope);
- then you will need to organize the illumination of the viewing field of the soldering, for which previously prepared LEDs from the old matrix are taken.
Adjusting the position of the lens will allow you to arbitrarily change (decrease or increase) the focal length of the system when working with a microscope, improving soldering conditions.
To power the lighting system, two wires are provided from the USB cable that connects the webcam to the computer. One is red, going to the “+5 Volt” terminal, and the other is black (it is connected to the “-5 Volt” terminal).

Before assembling the microscope for soldering, you will need to make a base of a suitable size. It is useful for wiring LEDs. For this, a piece of foil fiberglass, cut in the shape of a ring with pads for soldering LEDs, is suitable.
Assembling the device
Quenching resistors with a nominal value of about 150 Ohms are placed in the breaks in the switching circuits of each of the lighting diodes.
To connect the supply wire, a mating part, made in the form of a mini-connector, is mounted on the ring.
The function of a moving mechanism that allows you to adjust the sharpness of the image can be performed by an old and unnecessary floppy disk reader.
You should take one shaft from the motor in the drive and then reinstall it on the moving part.
To make it more convenient to rotate such a shaft, a wheel from an old “mouse” is put on its end, located closer to the inside of the engine.
After final assembly The design should result in a mechanism that ensures the required smoothness and accuracy of movement of the optical part of the microscope. Its full stroke is approximately 17 millimeters, which is quite enough to sharpen the system under various soldering conditions.

At the next stage of assembling the microscope, a base (worktable) of suitable dimensions is cut out of plastic or wood, on which a metal rod selected in length and diameter is mounted. And only after that the bracket with the previously assembled optical mechanism is fixed on the stand.

Alternative
 If you don’t want to bother with assembling a microscope with your own hands, then you can buy a completely ready-made soldering device.
Pay attention to the distance between the lens and the stage. Optimally, it should be almost 2 cm, and a tripod with a reliable holder will help you change this distance. Zooming lenses may be required to inspect the entire board.
Advanced models of microscopes for soldering are equipped with an interface, which significantly relieves eye strain. Thanks to a digital camera, the microscope can be connected to a computer, record a picture of the microcircuit before and after soldering, and study defects in detail.
An alternative to a digital microscope is also special glasses or a magnifying glass, although a magnifying glass is not very convenient to work with.
For soldering and repairing circuits, you can use conventional optical microscopes or stereo. But such devices are quite expensive and do not always provide the desired viewing angle. In any case, digital microscopes will become more common and their prices will drop over time.


