The advantages of drywall as structural material truly impossible to overestimate. It would seem that this is an unremarkable material with no decorative properties. And, nevertheless, with its help you can create an interesting and even exclusive interior - such as, for example, in the photo above.
For those who prefer to do everything in their home with their own hands, nothing is impossible. And we will try to help visitors to our site understand not only the basics of working with drywall, but we will also offer some excellent design examples for wooden house.
Wall cladding and insulation
To claim that creating a masterpiece from drywall is easy and simple is to say a lie. Of course, this requires certain knowledge, skills, as well as creativity, without which it is difficult to come up with something interesting. Since the walls of a wooden house will be sheathed, it is worth thinking about how to combine plasterboard sheathing with load-bearing structures.
So:
- If construction wood of normal quality was used, the fragments left without veneer are sanded and tinted. It looks very beautiful on the walls, and especially on the ceiling. In the title picture you can see a great example of this design.

- If your intentions do not include making zoning and decorative structures from plasterboard, but just need to make sheathing with insulation, you can always do it yourself. But before starting practical work, you need to stock up on some theoretical knowledge.
Our instructions are designed to help you figure out what's what, but let's start with the simplest option. And this is sheathing with insulation.
Multi-layer structure
Plasterboard sheets can be mounted both on glue and on a frame (see Plasterboard cladding: frame sheathing and adhesive alignment). The first option for cladding a wooden house is definitely not suitable - especially if you need to provide insulation. This means that the ceilings and walls will have to be sheathed.
- In addition to gypsum board sheets, you will need the materials from which this very sheathing is mounted. These can be bars or aluminum profiles, or both at once. This depends on the curvature of the walls, the insulation option, and the size thermal insulation material.

- First of all, you must clearly understand what the general structure of the structure is. Then it will be easier for you to figure out what and how much you need to purchase, and calculate what the price of the issue will be. The bars are a material that is ideal for installation on wooden walls, but if uncalibrated wood is used in their construction, there will be too many irregularities on the surface that are difficult to level out with the help of pads.
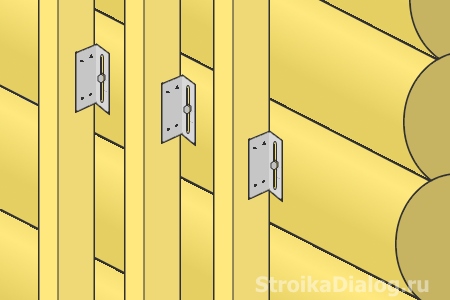
In such a situation, it is better to take a metal profile. It is attached to the wall using direct hangers and allows you to bring walls of any curvature into a single plane.
In principle, bars can also be attached to hangers, but this is not very practiced among professionals. More often, timber is still used for cladding straight sections, but semicircular walls in wooden house basically it doesn't happen.
Material selection criteria
So, we present in the form of a table the types of materials that will be needed for sheathing with insulation:
| Type of material | Dimensions |
| Each manufacturer has its own size range. The sheet size can be either 2000*600 mm or 3000*1200 mm. But in most cases, a standard size is used, which is standard not only for domestic, but also for imported material: 2500 * 1200 mm.
|
| The cross-sectional size of the timber used to install the frame is selected depending on the thickness of the heat-insulating material. The pitch between the belts also depends on the size of the insulation, only in this case, its width plays a role. The cross-section of the bars can be: 30*40 mm; 40*40 mm or 40*50 mm.
|
| Since the walls of a wooden house are not airtight, such as brickwork, then, first of all, you have to create a barrier to moisture and drafts. For this purpose, a rolled material called a hydro-windproofing membrane is used.
|
| After the windproofing is installed, the edges of the canvases, laid with a slight overlap, are glued with special waterproofing tape, which you see in the photo above. |
| During the installation of the sheathing, in those places where it adjoins perpendicular walls or partitions, sealing tape must be placed under the bars. This will also serve as a barrier to drafts.
|
| As insulation for walls, you can use both rolled and slab materials. We gave an example of one of the options that has a foil coating. This layer eliminates the need to install a vapor barrier film on top of the insulation. When laying the material into the structure, it should be facing the inside of the room with foil. |


Not counting nails and screws, this is a complete set consumables required directly for plating. But if you take into account that the surface of the drywall will still have to be prepared for finishing, you will also need a primer (see Why a primer is needed: technological nuances of finishing work), putty, and sickle tape, which will be discussed in more detail below.
With their help, the places of fastenings and joints between sheets are sealed, or, if necessary, the surface is puttied over the entire area.
List of tools
The set of tools you need for the job will depend on the degree of complexity plasterboard structures. In any case, a roughing and edging plane is needed to cut and smooth the edges; drywall knife; wide and narrow spatulas. To cut holes, for example, for a socket, you need a special hacksaw or a round attachment for a drill, which is called a “crown.”

If you want to independently plan the space of your home using plasterboard partitions, make some interesting niche or install a suspended ceiling, then to work with metal profiles you will also need special tools: metal scissors and a cutter. Along with general construction tools, it’s also a good idea to have a circular saw.
Features of installation of gypsum boards
For installation plasterboard sheets should begin after the installation of the substructure is completely completed. Since the first sheathing is intended for installation of insulation and is carried out in accordance with its overall dimensions, then the distance between the elements of the counter-lattice is made such that it is convenient to attach the gypsum board.
So:
- You should decide in advance how the sheet will be positioned during installation, because its length is twice the width. Experts often prefer to do this so that long side laid according to the height of the wall, because the size of the sheet is often enough to cover it from floor to ceiling. As a last resort, small strips are mounted along the top.

- Elements of the first and second sheathing are usually mounted perpendicular to each other. In this case, the bars under the insulation are placed horizontally, and the slats on which the drywall will rest are installed vertically. The spacer sheathing is attached not to the bars that hold the insulation, but to the base base, using long 4.8*130 mm self-tapping screws, which you see below.
- The step between the slats should be no more than 60 cm, which allows the sheet to be secured across the width in at least three places. The length of the fastening is made more often - every 22-25 cm along each support belt. Where cutting fragments have to be inserted, transverse belts are also installed so that fastenings can be made along the entire perimeter.

- It must be borne in mind that in order to avoid the appearance of cracks on the lined surface, the fastening of adjacent sheets is carried out with a slight offset. Also, when making fastenings, it is very important not to overdo it when screwing in the self-tapping screw.
This must be done without force, so that its head does not go deep into the thickness of the sheet, thereby tearing the cardboard shell. If everything happened exactly like this, you should unscrew the fasteners and, stepping back a couple of centimeters, make a new fastening.
Preparing the coated surface for finishing
Properly covering the walls with plasterboard is only half the battle. We still need to prepare its surface for further finishing, and, of course, come up with an acceptable design option.
The first step will be to seal the joints of the sheets and the points of their attachment to the sheathing. To do this, you need a putty mixture specifically designed for gypsum boards.
- As for the reinforcing tape, both the appearance of the cladding and the strength of the seam depend on its quality. Many craftsmen do not favor fiberglass tape, and claim that the paper version is much more reliable. If anything, it shapes better internal corners. For protection external corners a regular plaster profile made of aluminum with perforation is used.

- When the work uses putty from the same manufacturer as the drywall, this ensures maximum adhesion of the materials and you can do without priming the seams. Note that the opinions of experts on this matter are divided. Many of them believe that priming is necessary in any case.
- A solid sheet in most cases has already prepared edges. To ensure the same preparation when cutting it into separate fragments, use special tool. First, a roughing plane is used, which levels and smoothes the end of the gypsum board, and then a chamfer with an inclination of 45 degrees is cut with an edge plane.

- The beveled walls of the groove formed between the two ends of the gypsum board provide space for filling with putty and allow you to create a seam of the proper thickness (see Puttying drywall joints - how to do this). Otherwise, it will turn out thin and very fragile. After putting the mixture into the recesses between the sheets, remove the excess with a spatula, and then, without waiting for the putty to set, glue the seam with sickle, pressing it well into the seam.
- The heads of the screws also need to be sealed, and if the working blade of the spatula clings to the screw, then it is not screwed in properly. For ease of work and elimination of such defects, craftsmen use a spatula with a screwdriver on the handle - it is very convenient and saves time. Second, more thin layer putty mixture, is not applied immediately, but after several hours. More often - the next day.
- But what to do after it dries depends on the type of finishing that you will do next. If it's a pasting roll materials, putty seams can simply be cleaned and sanded, and the surface of the drywall can be treated with a primer.

- In any case, if the wallpaper is dense, with relief or large drawing, the joints of the plasterboard sheets underneath will not be highlighted. You just need to take a pigmented primer for the wallpaper, which will disguise the colored surface of the plasterboard. In this regard, we consider it necessary to draw your attention to one very important nuance.
If after some time you need to remove the annoying wallpaper, then it will come off along with the cardboard shell of the sheet. So, if you don’t want to redo the sheathing later, it’s better to immediately putty the entire surface of the drywall. This will make it possible to update the interior as often as you like.

There is nothing to say about preparation for painting. To decorative finishing It turned out to be of high quality, the surface of the walls and ceilings should be perfectly smooth.
Watch video master classes from professionals and learn to do everything yourself. If you really want, the interior of your home will turn out no worse than the option in the picture above as a sample.
Drywall - universal building material For interior decoration, leveling walls, forming partitions and complex structures decorative in nature. It can be used in houses made of any materials - stone, concrete, wood. Finishing a wooden house with plasterboard is an inexpensive and optimal solution for arranging living space in any style and shape.
The essence of drywall
There are many materials based on gypsum: plasters, sheet products, blocks for assembling walls and partitions. It is sometimes difficult to find differences between them, but gypsum board (plasterboard sheet) is a separate type sheet material, which cannot be confused with anything.
GKL is a “sandwich” of 2 sheets of cardboard, between which a pressed gypsum sheet 0.65...1.25 cm thick is enclosed. The mineral itself is light and porous, and therefore has a number of unique properties:
- The small mass of the sheet distinguishes it favorably from other finishing materials in terms of the same volume and thickness;
- High porosity favors heat retention indoors (this is especially true when covering external walls on the room side);
- Drywall absorbs sound, again due to its high porosity;
- The plaster itself does not burn, so it can be hidden under sheets electrical wiring, as well as other communications;
- Sheets can be cut into any shape without special equipment;
- Low cost GCR is one of the main factors why the material is often chosen for finishing walls and ceilings.
The only thing to remember is that plaster and cardboard are afraid high humidity, water getting on their surface is generally unacceptable.
All these qualities make drywall a popular material for interior work, especially among owners of private wooden cottages, where walls made of timber or logs need leveling cladding.
Drywall in a wooden house: what can be sheathed
As already mentioned, gypsum board sheets are a universal leveling and finishing material. It is suitable for use on surfaces that are not subject to mechanical stress, since gypsum is very fragile. Plasterboard in a wooden house can be covered with:
- Ceiling;
- Walls;
- Partitions.
From sheets and a frame for them you can create:
- Cabinets and niches;
- Bar counters;
- Arched openings;
- Multi-tiered ceilings and other structures.
All of the above types of structures and products can be created independently, using a single technique for working with this combined material. Let's look at the process using the example of wall and ceiling cladding.
Methods of fastening sheets
Covering walls with plasterboard in a wooden house and finishing other structures can be done in two ways:
- 1) Frame method;
- 2) Frameless.
If we are talking about creating partitions, multi-tiered and suspended ceilings, shelving, you can’t do without a frame.
The frameless method of attaching plasterboard sheets is simple: a sheet of plasterboard is attached to the wall using glue. This installation method is used to level the surface for finishing and facing work (for wallpapering, laying tiles). Gluing is only possible on a relatively flat base. This method is not suitable for finishing on logs.
We will consider the frame method of installing drywall in detail, since it is the same for creating any structures from gypsum plasterboard.
Metal or wooden frame
Finishing walls with plasterboard in a wooden house begins with aligning the frame to the leveled surface. There are 2 types of it:
- Metal;
- Wooden.
Wooden houses can shrink significantly; timber or logs constantly exchange air and release moisture. These are uncomfortable conditions for metal, which lead to corrosion and deformation. In addition, installation steel frame- the process is labor-intensive and requires the inclusion of a large number of additional parts, which will not be easy for a professional to deal with. Experts very rarely install metal frames in wooden houses due to their low efficiency and high labor intensity of work.
For the construction of a frame in a wooden house, a small cross-section of softwood timber is ideal. From it you can assemble a strong frame for a partition, wall and or ceiling.
How to build a frame for plasterboard sheathing
In the case of a wooden house, you can go in different ways:
1) If the cladding is carried out in a house that was built several years ago and has settled sufficiently in height, you can mount a fixed frame of slats. To work you will need:
- 75×25 mm slats for guides for gypsum board joints;
- 50×25 slats for sheet guides;
- Self-tapping screws;
- Metal corners for fastening slats;
- Screwdriver;
- Ruler, pencil and stationery knife for marking and cutting gypsum boards.
Horizontal slats are attached along the lower edge and under the ceiling. In this case, the lower one lies on the finished floor, the upper one does not reach the ceiling 1-2 cm. The placement of vertical guides begins from the corner. The distance between the main slats along the central axes should be equal to the width of the sheet. Internal slats are set in increments of 400 mm, i.e. 2 auxiliary slats for 1 sheet with a width of 1205 mm.
The slats are fastened to the wall using self-tapping screws or nails. The installation of each guide must be accompanied by checking verticality with a level or plumb line. The main and auxiliary elements can be attached to the horizontal floor and ceiling rails either with metal corners or with self-tapping screws, directing them to the support point at an angle of 45°.
It is important to check not only the strict verticality of the guides, but also the evenness of the plane to which the drywall will be attached. For control, it is optimal to use a long, flat rod or a building rule.
2) The movable frame is suitable for installation in a newly built house, in which the rigid frame given above is deformed when the structure shrinks. You will need the same set of tools, only as a moving element you need to purchase crab attachments and PAZ 2 strips. The plank is attached to the wall motionlessly; a crab pre-installed on it with a rail can move along it within 6 cm when shrinking. They tell you more about installation masters in the video. The work algorithm also applies to wooden frames.
3) One more interesting way installation of a movable frame without complex devices. Fastening is carried out not to the wall, but to the ceiling. To do this, nylon plugs are inserted into the places marked on it. They will protect metal and wood from negative effects on each other. Holes are drilled in the ceiling beam at the attachment point, into which a long bolt and washer are threaded. It turns out, upper part the frame is not firmly fixed, but suspended. Thus, we leave the structure the opportunity to maintain its integrity and not change its position when the main wall shrinks and the ceiling lowers.
The guide rails are screwed into the ceiling and floor beams and to the walls along their length.
Fastening drywall

The frame is exposed, now we’ll figure out how to properly cover the walls with plasterboard in a wooden house with your own hands.
The standard width of a gypsum board sheet is 1205 mm. This size should be used as a guide when attaching sheets to slats.
The sheet is fixed to the guides using self-tapping screws. Alignment begins from the corner bars, orienting the drywall to the middle of the main vertical bar. Screw the sheet onto the screws with a screwdriver. It is important to insert the fastener to the required depth: the head must fit into the plane of the sheet, but the paper must remain intact. Otherwise, the product becomes vulnerable to external influences, and the fastening loses strength.
The pitch between the screws should be 30 cm.
Completion of work and preparation for finishing
When the sheets are attached to the frame, you can immediately begin sealing the seams. For this you will need:
- Gypsum mixture;
- Spatulas;
- Reinforcing polymer mesh;
- For external corners - metal perforated corners.

The solution is diluted according to the instructions in a small amount. Remember: the plaster sets within 20 minutes!
Use a spatula to seal all recessed screws, leveling the surface of the sheet using a crisscross movement of the spatula with the solution.
The joints of the sheets are filled with a gypsum mixture, on top of which a polymer reinforcing sickle tape is pressed. It is designed to strengthen the joint and protect against spillage, chipping and cracking of the mortar after hardening. Apply more on top of the layer with tape. gypsum mixture to mask surface unevenness.
Plasterboard covering in a wooden house is now complete. Using the same principle, you can create a frame for a shelving unit, cover a shaped opening, or create a multi-tiered structure. Setting up the frame only at first glance seems difficult; once they get to work, even an inexperienced novice builder will quickly get involved and be able to independently assemble the frame for plasterboard sheathing in a wooden house.
Many people consider drywall and wood to be incompatible materials, preferring to leave timber walls without finishing at all. However, over time, the natural beauty of the timber is lost: the wood darkens over the years, and cracks may appear in it. If the time has come to update the interior, plasterboard in a house made of timber can be the most profitable solution, opening up rich design possibilities.

Options for using plasterboard sheets in a wooden house
Sheathing a house made of timber with plasterboard will be beneficial for several reasons: it is environmentally friendly safe material will make the walls completely smooth and neat, which opens the way for any other finishing. Often log houses are finished with clapboard or block house, but these materials are more expensive, and finishing work turn out to be more labor intensive. In addition, plasterboard is a non-flammable finishing material, so, unlike lining, it increases fire safety Houses.
This material does not interfere with natural air exchange, so it does not reduce the environmental friendliness of a wooden house. There are many options for using it in the interior:
- Wall cladding. It will not only allow you to hide the timber wall, which has lost its original beauty. Behind plasterboard sheets you can hide any communication paths and make the interior more neat.
- Construction of partitions. It's simple and convenient option redevelopment of the premises. Partitions in a regular five-wall log house can be arranged in different ways, which will expand the design possibilities and allow residents to make the space as comfortable as possible.
- Ceiling trim. For this, the lightest and thinnest plasterboard sheets are used. They help create multi-level designer ceiling, hiding all the unevenness of the base surface, as well as wires or other communication paths.
- This material is used for finishing window slopes. You can purchase moisture-resistant plasterboard sheets (GKL), which will be reliably protected from mold.
If sheathed timber house plasterboard, you can use any wall decoration options: wallpaper, panels, tiles and much more. This is an opportunity to completely renew and transform the interior, without it becoming less beautiful and environmentally friendly.
How to sheathe the walls of a wooden house
One of the advantages of gypsum boards is the quite affordable price not only for the sheets themselves, but also for all the materials necessary for their fastening. You will need to purchase a metal profile and self-tapping screws; for work you will need a level, a plumb line and a screwdriver. It is not recommended to use nails to fasten the profile: the thread will provide a stronger connection, and the frame will not become loose over time.
How to cover a log house with plasterboard? Wall covering begins with installation metal frame from profile. In some cases, wooden beams are used instead of metal - this further increases the environmental friendliness of the building.
A wooden frame can be assembled from ordinary slats; it will make it easy to hide all communications behind the sheets. A good option for creating a frame is slats with a section of 50x50 mm.
How to cover a timber house with plasterboard? The sequence of actions is as follows:
- Marking the walls. It is done using a tape measure or a long ruler and a level: you need to draw vertical and horizontal lines. A line is drawn on the ceiling parallel to the wall, then a vertical frame diagram is built using a level.
- Fastening the frame to the walls. Important nuance, which is important specifically for a wooden house: the frame cannot be tightly attached to the wall. As temperature and humidity rise and fall, wood will expand and contract, so the material needs to be left with a few millimeters of space.
- Installation of horizontal frame slats that act as spacers. When constructing partitions from this material, the frame is additionally lined with insulation to improve their sound insulation qualities.
- The gypsum boards are attached to the frame using self-tapping screws and a screwdriver. Typically, self-tapping screws are placed at a distance of approximately 15 cm from each other, this ensures sufficient strength of the fastenings. The screw caps must be completely recessed into the material, this will avoid problems during finishing.
- The joints are glued with a special reinforcing tape. This is a special tape for drywall joints that prevents cracks. If their width exceeds 3 mm, the cracks are sealed with putty, and the tape is applied only after it has completely dried.
In addition, they need to be treated with antiseptics and fire retardants to reduce the risk of rotting and fire damage. As a result, the work on installing the frame will take much longer.
Metal does not cause such troubles; with proper experience, the frame can be completely assembled in 1 day. Metal profile stronger and more durable, so the gypsum boards will be securely fastened.
Is it possible to use the frameless method in a wooden house?
There is also a frameless method of sheathing with plasterboard, in which the sheets are immediately attached to the surface using a special adhesive. This allows you to preserve the usable area of the room as much as possible, but in this case it will not be possible to hide the wires behind the sheets.
Sealing gypsum board joints with serpyanka is also necessary when frameless method installation of drywall.
Installation of gypsum boards without a frame is used only on flat walls: it can be concrete or brick with high quality masonry Walls made of timber are never completely flat, so thin sheet impossible to securely attach with glue. Besides, adhesive compositions reduce the environmental friendliness of the house, so it is more convenient to use the conventional frame method.
Cured plaster is hard and brittle. In gypsum plasterboard it is reinforced with cardboard located outside. The smooth surface of the sheet is ideal for quick and cost-effective wall leveling. Drywall has recently begun to be used in a wooden house. Previously, it was believed that flexible wood and durable gypsum were incompatible. Thanks to the metal profile and suspension systems Now plasterboard is widely used by builders and those who like to do their own repairs.
Lathing walls for installation with plasterboard
The metal profile allows you to sheathe the inside of a wooden house with plasterboard

Do-it-yourself wall lathing
Considering the ability of gypsum to absorb moisture even from the air, it is possible to sheathe walls from the inside with plasterboard only in houses with heating and year-round accommodation. Otherwise, after 3–4 winters, repairs will have to be done again and mold will be dealt with.
Wood is an ideal building material for a home. It retains heat well, absorbs noise, and purifies the air. The difficulty of finishing lies in the ability of wood to constantly change its size - to breathe. This must be taken into account when installing drywall in a wooden house. GKL are attached only to the sheathing. Even on walls made of laminated timber, plasterboard is not glued directly to the surface.
You can sheathe the inside of the ceiling and walls with plasterboard if they are level and do not shrink. This is a masonry of:
- aerated concrete;
- foam concrete;
- bricks;
- cinder block.
Artificial stone must have straight corners no chips. The surface should be flat, the seams thin, without excess mortar.
Immediately after completion of construction, it is impossible to sheathe the inside of a wooden house with plasterboard. It must settle and shrink. For brick buildings, a year is enough. Wood requires more time. Small deformations will occur constantly. It is enough to cover the stone and plaster with a primer so that it does not crumble, then sheathe it. The tree goes through several stages of treatment with antipyrines and antifungal compounds.
Sheathing the outside of a house with plasterboard is not cost-effective. Special moisture-resistant sheets are required. They are much more expensive than regular ones. The facade of the house is being processed special compounds, protecting wood from moisture, mold, insects and fire. Finally, the entire facade must be puttyed and primed and painted.
First we cover the ceiling with plasterboard using hangers

Covering the ceiling with plasterboard
Leveling for plasterboard finishing begins with the ceiling of the house. It must be sheathed so that there is a gap between the sheets and the walls. The metal profile frame is mounted on the floor beams. The sequence of work is standard.
- Make markings along the entire ceiling.
- Fix the PP guide profile around the perimeter. It cannot be fixed rigidly to the ceiling. You need to use hangers. If the house was built more than 5 years ago and there are no living spaces upstairs, you can get by with black wood screws and do not tighten them tightly, leaving a gap under the cap. The hole in the profile must be larger so that the bolt shaft can move. Best option– use of special spring plates.
- The strips on which the sheets will be attached are inserted into the guides. They are fixed to the ceiling using hangers or perforated strips.
- Wires are laid inside and communications are carried out, installation locations for lamps are marked, and fastenings are made for them.
- All that remains is to sheathe the ceiling. The holes for the lamps should be 2-3 mm larger. The same gap is around the entire perimeter of the ceiling and between the sheets of drywall. The sheets are attached to the profile with self-tapping screws.
Attention! With a frame made of wooden slats 50x50 timber and spring brackets should be used. A screw is screwed into the hole in the center of the arc, and the edges are fixed to the ceiling.
Sealing of seams and puttying is done after all surfaces inside the room and even the house have been covered.
Plasterboard covering of log walls inside the house

Lathing on wooden walls
Sanded and varnished or waxed wood has its own unique pattern. It goes well with most modern styles. Some harmoniously complement, others emphasize with their contrast smooth lines and forms. Sheathing a house from the inside should be done in several cases:
- there is no opportunity to regularly care for the tree;
- the wood darkened over time and lost its attractive appearance;
- wall insulation;
- additional sound insulation;
- the need to hide communications;
- you need a solid, level base for tiles and other finishes.
There may be other reasons for covering the inside of a wooden house with plasterboard. This mainly concerns interior design and changing the environment. GCR is used to make partitions in houses during redevelopment.
When making sheathing for drywall in a wooden house, you should follow several rules:
- it is necessary to clearly maintain the horizontal and vertical position of the frame and cladding elements;
- When screwing the hangers, you should leave a gap;
- the distance between the vertical posts of the structure is equal to half the width of the plasterboard sheet - 60 cm;
- the length of the profile is fixed to the wall at a distance of no more than 50 cm;
- when joining sheets along the length, horizontal crossbars from the profile are placed at the joints;
- for wood, coated, black self-tapping screws are used;
- A gap of 2 - 3 mm should be left between the sheets.
Advice! Do not use nails. They do not stick well to the tree and soon begin to fall out. Screw connection much stronger.
Mounted around the perimeter of the room starting profile, and vertical posts are inserted into it. The sheet is screwed along the edges and the center at a distance of 15 - 20 cm. The screw heads are recessed. They are hidden when leveling with putty.
After attaching the sheathing, the corners of the sheets should be slightly cut off. They can fluff up and protrude beyond the plane. It is advisable to immediately coat the entire wall with primer. Then a reinforcing painting mesh is glued to the joints and the gaps are smoothed with putty. The bolt heads are puttied crosswise with a narrow spatula.
Under the wallpaper, it is enough to clean out the uneven areas and cover everything with primer again. Painting requires more smooth surface. The entire wall is treated with finishing putty, sanded and, if necessary, several layers are applied.
The tiles are heavy. A base is made of a thick waterproof sheet of plasterboard under it. After sealing the joints, prime them twice with the compound deep penetration. Then the adhesive solution is applied and the tiles are laid. The starting profile for the first row does not touch the floor and is attached to the wall.
Lathing made of wooden beams for the internal lining of a house with plasterboard

Wooden sheathing
Sheathing the inside of a house with plasterboard can also be done using wooden sheathing. You should choose for racks and a transverse beam of 50x50 mm. Use a 70 mm wide strip as a starting one. The screws are installed with washers and are not tightened.
Flaw wooden frame in complex wood preparation. It is necessary to treat with fire retardants and impregnate with antistatic agents. The service life of such cladding is much shorter than metal cladding and soon the inside of the house will have to be clad again. Even well-dried wood can behave during processing. The beams should be carefully checked for curvature.
Frameless plasterboard cladding inside the house

We cover the walls with plasterboard without sheathing
A frameless method of installing plasterboard sheets inside a house is possible on stable smooth surfaces. It's mostly plaster. The masonry must have unevenness within 5 mm. If the wall does not need to be aligned vertically, then the house can be sheathed from the inside with plasterboard without sheathing.
The surface of the walls of the house must be cleaned of dust and other contaminants. Coat with 2 layers of deep penetration primer. The starting profile is installed below. It serves as a support and helps to align the sheets horizontally. The glue is applied with a notched trowel. The advantage of this installation method:
- sheathing is done faster;
- saved usable area premises around the entire perimeter;
- finishing costs are significantly lower.
Disadvantages include the inability to hide communications under the casing and make internal insulation Houses.
Wooden houses are becoming increasingly popular due to their aesthetic appearance and an environmentally friendly indoor microclimate. However, wood is characterized by constant changes in size, first during the shrinking process, and then due to regular absorption of moisture and drying. These properties of wood cause some difficulties when choosing a finishing method. interior walls Houses. Among the many options, plasterboard deserves attention, in particular, finishing walls with plasterboard in a wooden house.
Features of finishing the walls of a wooden house
The properties and advantages of plasterboard are known to everyone; they make it possible to easily and quickly finish brick and concrete walls. As for a house made of wood, in this case there are a number of features that do not have to be encountered when finishing surfaces made of other materials. This also applies to the use of drywall in a wooden house.
Wood processing
The tree is characterized by poor resistance to moisture and various aggressive factors, and is easily damaged by insects and fire. If you cover untreated walls, the presence of mold and bugs will only be known when the walls are destroyed. From this it follows:
- Before covering the walls of a wooden house with plasterboard, cracks and cracks must be caulked to prevent the appearance of bugs and moisture accumulation
- Wooden walls need to be treated with antiseptic compounds and fire retardants
- The insulation laid under the drywall must be covered with a vapor barrier material, which will become an obstacle to the path of wet steam to the wood
Data-lazy-type="image" data-src="https://remontcap.ru/wp-content/uploads/2017/10/antiseptik-dlya-sten..jpg 730w, https://remontcap.ru/ wp-content/uploads/2017/10/antiseptik-dlya-sten-300x225..jpg 174w, https://remontcap.ru/wp-content/uploads/2017/10/antiseptik-dlya-sten-70x53.jpg 70w "sizes="(max-width: 730px) 100vw, 730px"> 
Creating a sliding frame
The first time after construction, houses made of logs are characterized by natural shrinkage, which occurs for the following reason: when drying, the tree loses moisture, which leads to a decrease in size. The timber used to build houses bends when it dries, making the walls of the house uneven. After drying, wood also tends to change size, as it constantly absorbs moisture and dries out.
All these nuances lead to the fact that rigid fastening of wall sheathing with plasterboard in a wooden house can cause deformation or destruction finishing material. Therefore, facing internal surfaces premises should be carried out on a floating frame for plasterboard in a wooden house and remain immovable in relation to the base.
Jpg" alt=" finishing walls with plasterboard in a wooden house" width="650" height="329" srcset="" data-srcset="https://remontcap.ru/wp-content/uploads/2017/10/tvh51qMiwG..jpg 300w" sizes="(max-width: 650px) 100vw, 650px">!} 
Wiring
Covering wooden walls with plasterboard with your own hands involves masking various communications, including electrical wires. However, the slightest damage to the electrical wiring from an incorrectly screwed screw or short circuit may cause a fire. Consequently, all communications, especially fire hazardous ones, must be hidden in special cable ducts or metal sleeves.
Methods for covering walls with plasterboard in a wooden house
How to attach drywall to a wooden wall when finishing indoor walls? You can do this in two ways:
- By frame technology
- Frameless method
Each option for solving the question of how to level walls with plasterboard in a wooden house has its own advantages and disadvantages, as well as installation rules and features.
Frame technology for finishing walls with plasterboard
In most cases, plasterboard sheets used for cladding walls in a wooden house are attached to a frame. Lathing for plasterboard in a wooden house can be made of wooden blocks or metal profiles.
Installation of a metal frame
Plasterboard covering inside a wooden house using frame technology in most cases involves the use of a metal frame. Moreover, for wooden walls it is recommended to install a sliding frame. To create it you need to prepare the following tools and materials:
- Guides and wall profiles
- Self-tapping screws and dowel-nails
- Screwdriver and drill with attachments
- Two types of fastenings – sliding and “crabs”
Do-it-yourself installation of a frame for interior finishing of a wooden house with plasterboard is carried out in the following order:
- Horizontal guidelines are drawn on the wall for installing guide profiles, 10-15 cm away from the floor and ceiling;
- Mark the places where it is planned to mount the vertical posts;
- Fixed horizontal profiles along the bottom and top lines;
- Then, according to the corresponding marks, set sliding fastenings For vertical racks and with the help of crabs they mount them;
- Next, horizontal jumpers are attached using self-tapping screws, installing them between the vertical supports.
Read also:
data-lazy-type="image" data-src="https://remontcap.ru/wp-content/uploads/2017/10/mjv4aqa25.jpg" alt=" finishing walls with plasterboard in a wooden house" width="800" height="451" srcset="" data-srcset="https://remontcap.ru/wp-content/uploads/2017/10/mjv4aqa25..jpg 300w" sizes="(max-width: 800px) 100vw, 800px">!}

Creating a wooden sheathing
Very often the question “how to sheathe the inside of a wooden house with plasterboard” is solved with the help of lathing made of wooden slats. This allows you to disguise some communications or additionally insulate the walls.
To work, you should prepare the following:
- Wood slats
- Dowel-nails or self-tapping screws
- Screwdriver or drill
- File
The manufacture of a frame for attaching drywall to a wooden wall is carried out according to the following scheme:
- Markings of future fastenings for slats are made on the walls along the perimeter and vertically. In this case, it is important to correctly calculate the distance between the slats, the main thing is that the gypsum board joint is located exactly on the slats;
- According to the completed markings, attach the vertical slats to the wall using dowels;
- At the next stage of creating a wooden frame for finishing with plasterboard timber house between vertical elements install horizontal slats, and it is better to place them at different heights;
- Plasterboard sheets are directly attached to the finished mesh. The fasteners should be located at a distance of about 15 cm.
Frameless method of finishing walls with plasterboard
Do-it-yourself interior plasterboard cladding in a wooden house can be done directly on the walls using mounting adhesive. This technology allows you to quickly cover walls indoors. However, it is worth remembering that the gypsum board fastening must be carried out perfectly smooth walls, which is not always possible in a wooden house.
In general, drywall is attached to wooden walls without a frame as follows:
- First, prepare the surface for work. To do this, the walls are cleaned of the existing old coating, dirt and dust are removed with a soft brush;
- The prepared base is covered with a layer of deep penetration primer;
- If there are slight deviations from the vertical on the plane, then you can use strips of plasterboard sheets, which are glued in problem areas;
- Now you can start mixing the adhesive solution. Pour water into the container according to the instructions on the glue package and add the dry mixture. Then, using a mixer or a drill with an attachment, thoroughly knead the solution;
- The plasterboard sheet is laid on special substrates or bars so that the material can be lifted without much difficulty;
- Next, piles of adhesive solution are applied along the perimeter of the sheet and diagonally. In this case, glue is applied along the edges in increments of up to 25 cm, diagonally - up to 35 cm;
- The prepared sheet is lifted and applied to the wall. It is very important to create a gap between the plasterboard panel and the floor, for which bars no more than 2 cm thick are placed under the lower edge;
- Lightly tapping the slab to level it vertically. It is best to use a building level up to 2 meters long;
- All sheets are installed in the same way.
The most popular frameless technology is when covering a log house with plasterboard.
Finishing the inside of a house with plasterboard allows you to simultaneously solve many problems. The main thing is to choose the right method of fastening the sheathing, taking into account the characteristics of the wooden house.


