Floors covered with laminate are considered one of the most practical, cheap, beautiful and easy to install. And this is true - you can cope with the task of laying them yourself, without even resorting to the help of specialists. The main thing is to have the desire and allocate time for work. But how to lay laminate? Let's look at this question in practice.
Laminate – finishing flooring, although considered easy to install and maintain, is quite delicate. It is demanding in terms of operating conditions and the installation process. If you neglect some of the features and rules for working with it, the coating will not last long.


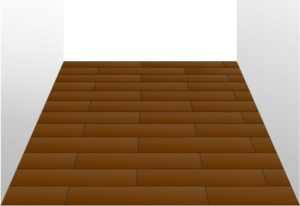
The photo shows the process of laying laminate flooring.
Therefore, before starting work, it is worth ensuring the following conditions in the room:
- temperature range – 15-30 degrees above zero;
- air humidity – about 40-70%;
- level, cleared of debris and dried base;
- the room must be dry. If the humidity is high, you will have to buy more expensive moisture-resistant material;
- heaters and others heating devices cannot be turned on while working with laminate;
- It is recommended to close windows to avoid drafts.

Attention! Laminate flooring cannot be installed on sagging floors or cracked screeds. Otherwise, the material will not last long. The locks connecting the covering elements will break when the material flexes, which will ultimately damage the integrity of the base.

It is also important to remember that laminate flooring can be laid only 2 days after the material was delivered to the work site. It needs this time to “get used” to the new operating conditions - the laminate will absorb the necessary humidity, adapt to the temperature, so that during operation it will not change its dimensions excessively. It reacts sharply to changes in room conditions - the effect of thermal expansion may appear.

It is necessary to leave the purchased laminate in the room where you plan to install the floor. This is necessary for acclimatization. This process takes about 48 hours

When choosing laminate, you should focus not only on color, but also on the quality of the material. It is not worth purchasing low-quality products that are too thin or not suitable for operating conditions. Such a coating will serve too little and will quickly lose appearance. Packages with laminate must be sealed, and before installation it is important to inspect all boards for damage or chips. Damaged installation elements cannot be used.

Prices for Tarkett laminate
Tarquette laminate
The process of laying the material may differ depending on what type of lamellas are used. For example, there are three installation methods, each of which uses a different type of material: laminate with joints Click or Lock, as well as the type of coating that is installed using glue.


Installation of laminate flooring with a click lock
When using the adhesive method, the laminate is glued to the rough base using special compounds. The technology is similar to laying parquet. Glue can also be applied to the joints between individual planks, which are then tightly joined to each other. But this method is now practically not used, with the exception of the design of premises with very high traffic or with high humidity air. It will not be possible to disassemble the laminate if necessary.
Installation of cover with type locks Lock involves the connection of individual planks shock method. That is, during operation, the tenon on one side of the lamella is driven into a groove on the other lamella. This coating is already losing popularity due to its disadvantages - labor-intensive work and complex parsing if necessary.

Important! If material with this type of lock is used, the work should be done carefully - control the impact force and use a special rubber or wooden block, placing it at the point of impact.

Nowadays, laminate with joints is most often used for laying this type of flooring. Click. Here the joining occurs due to a tongue and groove, but of a special shape in which the elements are securely joined and connected to each other without the use of impact technology. The panels are joined at a certain angle, after which the lamella is lowered to the floor - at this moment the snapping occurs. This connection allows, if necessary, to easily disassemble the trim and re-install it.


Methods for arranging lamellas
Laminate flooring can be laid in different patterns, according to patterns. Here you can choose any option you like, the main thing is to follow the drawing. There are several most popular layout options. The material consumption will also depend on the choice of method.
Table. Laminate layout options.
| Layout option | Description |
|---|---|
| This is the most economical option, since the amount of trimmings and waste here will be minimal. The first row is laid first, and the remaining trim from the last plank can be used to start the second. The main thing is that they are at least 30 cm long. The amount of waste in this case usually does not exceed 5% of the material. |
| If you look at a laminate laid in this way, the joints will form a special pattern, reminiscent chessboard. In this case, the new row always begins with such a cutting length that the panel is shifted to the side by 1/2 from the previously laid one. The amount of waste in this case increases to 15%. |
| Reminds me classic version installation, only performed at an angle of 45 degrees relative to the walls of the room. It looks impressive, but the amount of waste becomes even greater - more than 15%. |


![]()
To avoid possible errors When creating a drawing, it is better to design the entire work in advance by sketching out a layout diagram on a piece of paper. And take into account that the minimum displacement of the joints should be 20 cm relative to the lamellas laid in the previously installed row.

Important! Regardless of what kind of laminate is laid and according to what pattern, there should always be a compensation gap of about 1.5 cm between it and the wall. Otherwise, the material will be deformed. The area of 1 m2 of laminate under the influence of humidity and temperature can increase by approximately 1.5 mm.
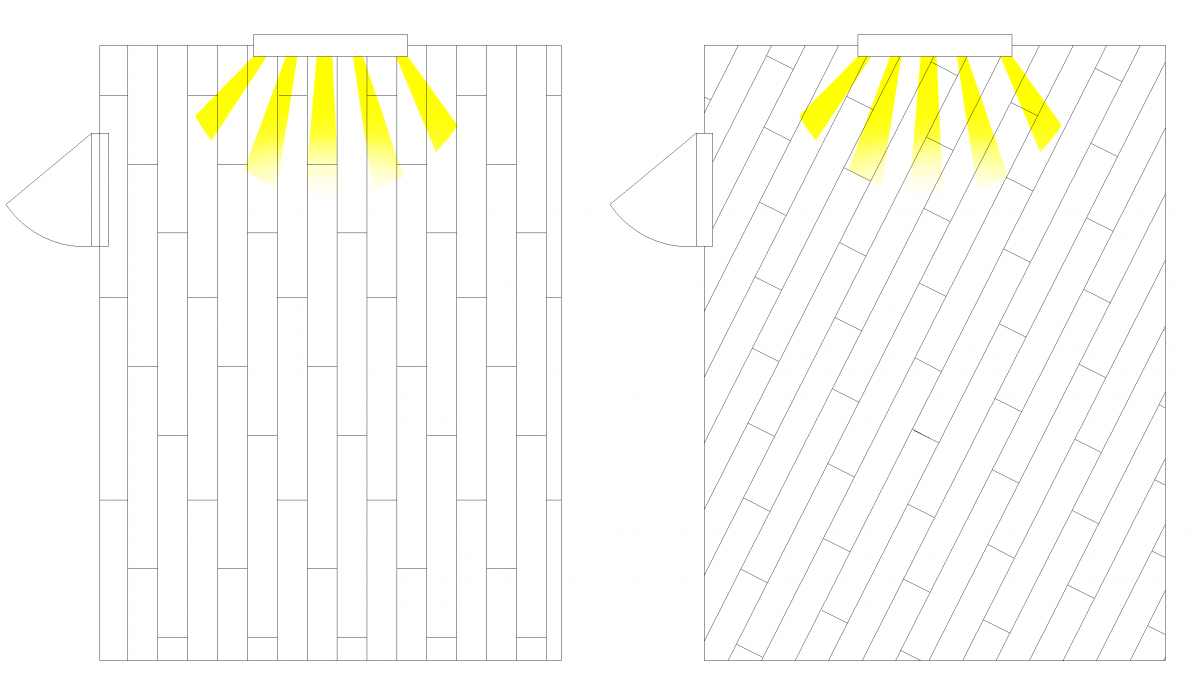
When installing laminate flooring, it is important to consider light sources so that the gaps between the planks are less noticeable. That is, they are laid so that they are located perpendicular to the light source (for example, a window).

Also, pre-planning the installation will ensure that the planks in the last row will have sufficient width (100 mm). If it turns out that they will be smaller, then it is better to narrow the first row a little.
Laminate manufacturers emphasize in their advertising campaigns that the installation of this popular floor covering has become so simple that anyone can handle it. Who has no experience working with laminate at all. You need to read the instructions, look promotional video company, and as a result of your labors, a room with a new floor will quickly be transformed, and an admiring family will extol your construction achievements. Despite the fact that before installing the flooring, your success in this field was not much different from the ability of one of the characters of the English writer Jerome K. Jerome Uncle Podger to hang pictures.
Indeed, the improvement of panel interlocking systems has greatly simplified the installation process. If laying laminate flooring with a Lock lock requires certain experience and skills, then the next generation of locks - Click - does not impose such requirements. And the market already sells laminate flooring with 5g and Megalock locks, and even with aluminum locks. Soon everything will be like in Russian fairy tales, when all you need to do is bring the packages into the room where the installation will take place and hold the flooring without opening the boxes for a couple of days. To adapt to the temperature and humidity in the room. And then you open the packages, and the panels themselves are laid “at the behest of the pike.” However, the devil, as we know, is in the details.
Laying laminate
The work of installing the flooring has become much easier. The same cannot be said about preparing the base before laying. The base must be level, stable and dry. The difference in height is permissible within 2 mm per 2 m. In some cases, a waterproofing device is required before laying the substrate and the laminate itself.
Laying the substrate
Substrates differ in the material from which they are made, characteristics and cost:
Manufacturers claim that the substrate is able to level the base under the laminate. This is an exaggeration. The substrate must provide heat and sound insulation. The underlay can compensate for minimal unevenness in a leveled old wooden floor or plywood base, but no more.
Important! The substrate is laid end-to-end, the joints are fixed with tape. This way it will not move when laying the laminate.

Choosing a installation method
We determine the method of laying the covering: diagonally, perpendicular or parallel to the light (along or across the room). Diagonal mounting is most often used in narrow rooms- this is one way to visually expand them.


It is usually customary to lay laminate flooring perpendicular to the light source ( long side along the stream of light) - in the room this is a window. In daylight, the joints between the panels are less noticeable.

However, when laying the coating on wooden floor It is imperative to focus on the direction of the floorboards. On such a floor, the laminate is laid perpendicular to the floor boards to reduce possible deflection. If the old wooden floor is covered with plywood on top, the flooring should be laid in the traditional way - perpendicular to the window.
In small narrow rooms without natural light(corridors, hallways) laminate is laid crosswise in order to visually expand the room.

Laying laminate flooring with different types of locks
For installation work you will need:


First, plastic wedges are installed to maintain a 10 mm gap between the laminate and the wall. The first row is laid horizontally from the corner of the room in the direction from left to right. The ridge of the panels of the first row is directed towards the wall. The panels are connected at their ends. The last panel in the row is cut with a jigsaw or hacksaw and laid in a row. You can start the next row with the remaining piece of the panel (provided that its length is more than 300 mm). It is important that the seams in adjacent rows do not match.
Advice. To give panel offsets a more accurate appearance, a technique such as “offset by a third of the board” is used. One third is cut off from the new panel, after which it is laid.

The first and second rows are joined. When using panels with a Lock-lock, you will need to hammer them with a mallet (through a die) to fix the ridge in the groove of the adjacent panel.

Click system panels are laid at an angle of 45° until they click into place. This coating can be disassembled if necessary.

The panels of the last row will most likely need to be cut to size. Remember that the cutting line will be covered by the baseboard, so small unevenness in the cut area is not a problem. After laying the laminate on the wooden floor is completed, the wedges are removed and the baseboard is installed. First, see how much you need to trim the panels of the last row. The flooring will not look very good if the width of the panels of the first and last rows is very different. In this case, it is better to trim the panels of both the first and last rows.
Laminate is high quality flooring that has an extremely beautiful and stylish appearance, as well as unique characteristics.
Well, not everyone knows how to lay it themselves. If you decide put it in your home or apartment laminate, then we will give you advice on how to do it correctly.
How to lay laminate flooring correctly (preparation)
So, if you have decided on the class and color of the laminate, then you can start. Let's start with counting how much laminate flooring is required to lay a particular room.
By the way, the room should be with moderate humidity, and in no case should it be a bathroom, because laminate is afraid of strong moisture, because of which it quickly becomes unusable.

Typically, one pack of laminate contains 10 boards. This The pack is designed for an area of 2 square meters. m, but only if you lay the laminated boards parallel or perpendicular to the window.
If you want to lay the laminate at an angle relative to the window, then in this case it is necessary reserve of 15%, and when laying perpendicular to the window, make a margin of approximately 7% .

However, you should know that it is better to buy material with a reserve in any case, since all measurements with subsequent cuts are unlikely to be done perfectly, especially if you are new to this business.
Laminate flooring can be laid at any angle. But: if the floor is laid perpendicular to the window, then the seams will be less noticeable. This method is the most popular.
If parallel, then the seams will be “emphasized” thanks to the falling shadow, and a visualization of a wide room will be created. Well, well laminate laid correctly at an angle, will optically increase the area of the entire room.

Before starting work, you must prepare the surface, on which we will lay the laminate. The main condition in this matter is flat floor. In principle, it doesn’t matter what is on your floor now: an old wooden floor, laminate or just “bare” cement.
In order to find out if your floor is level, just take a building level and walk around the room, measuring the level of slope. If the floor level in the room is acceptable, then you can safely install laminate flooring.

For minor unevenness you can use cement mortar. In the lowlands you need to raise the level. Places that are too high should be removed. On an area of 2 sq. m level difference should not exceed 2 mm.
Well, if the level of the old floor requires drastic changes, then it is necessary to make a screed. Screed is ideal option for leveling the floor. In addition to the screed, you can also lay out the floor plywood.
After purchasing the laminate, it is better to unpack it and let it sit for at least two days. adaptation in the room where it will spread.

Sometimes it happens difference in color shades on laminated boards. In this case, it is necessary to package the boards so that the differences after installation are as little noticeable as possible.
How to lay laminate

Before starting work, the floor should clean and vacuum thoroughly, so that debris does not get into the locks of the laminate flooring (it is small debris that often causes squeaking).
Recommended first layer lay out plastic film 200 microns thick. This type of flooring protects the laminate from water formations underneath. We lay down the polyethylene so that there is a surplus of about 20 cm, which can be trimmed after all the work is completed. For convenience, we fasten the entire flooring with tape.

Our next layer should be from EPPS(extruded polystyrene foam). This substrate is used for depreciation, and also as heat and sound insulator. This material must be laid end-to-end, to avoid thickening. We also secure the joints with tape.

All layers: polyethylene, EPS and laminate criss-cross.
If instead we have concrete base plywood or wood, then you don’t need to put anything under the laminate.

Now let's prepare necessary tools:
- Jigsaw
- Hammer
- Wooden plank
- Roulette
- Pencil.
How to lay laminate flooring

During laying laminate flooring it will be necessary to shift the end joints to obtain a brick-like masonry. It is necessary to move the joints no less than 30 cm, and if allowed by the manufacturer, then no less than 20 cm. Such masonry helps strengthen the entire future structure and does not allow the laminate to “walk.”

You need to know in advance what size it will be last row of laminate, which will most likely be cut. This cut should not be less than 5 cm. If the cut is less than 5 cm, then you will need to reduce the first row.
The best option would be if the first and last boards match in size.
How to lay laminate flooring yourself

You can start laying laminate flooring with any sides of the room.
The boards must be fastened by snapping them into a special lock, as shown in the figure. The main thing in this matter is don't confuse Which side should the laminate boards fit into the puzzles on? On one side, the boards have hollow holes, and on the other, extensions that should fit into the holes.

Thus, we lay the laminate over the entire area of the room with our own hands. To make sure the boards fit snugly, they hit with a hammer, having installed wooden plank, hitting it.

For knocking last board a special bar is required (as shown in the figure and video below).

The plank must not be applied to the board lock, otherwise it can be broken. The wooden plank should be applied to the top end laminated boards. Along the edges of the entire room should be placed small supports about 1 cm thick so that the laminate has room to “stretch” due to temperature changes.
You can dock like this single laminated boards, and in advance bonded row, but in this case you will need a partner, because the stitched row of laminate may be too long.
Obstacles when laying laminate flooring

While laying laminate You will encounter obstacles such as pipes, door frames, transitions to another type of floor, etc. We will provide some universal tips on how to get around the obstacles that arise so that you can choose the most suitable suitable option specifically for your gender.
Laminate is an excellent floor covering that has become widespread in our country quite recently. Due to its appearance and ease of operation , laminate has become the main competitor other coverings: parquet, linoleum, ceramic tiles. In order to correctly lay laminate flooring, you need to familiarize yourself with the theoretical part, as well as have some skills in carrying out repair work.
When choosing this coating, everyone is guided not only by its appearance, but also by considerations of practicality. When planning the use of laminate, it is necessary to take into account its advantages and disadvantages.
Advantages of the material
The main advantages of this flooring include:

All this characterizes laminate as universal coating. It is necessary to take into account both the pros and cons of the material. This will help avoid the need to re-floor the floors after 2-3 years.
The negative aspects of the coating are as follows:

Very often, the choice of coating is made solely on aesthetic principles. The spectacular floor, which is in the same concept with the walls and interior, pleases the eye. But when choosing this material, it is necessary to take into account its compliance operating conditions. Which laminate to choose for a kitchen or bathroom, and how long it will retain its appearance - its classification will indicate this.
It is very important to determine the operating conditions of the flooring in advance. Depending on this, the material of one class or another is selected. The class indicates strength characteristics and is always displayed on the label. There are 3 classes of laminate:
- household (grades 21-23);
- commercial (31−33rd class);
- industrial (41−43rd grade).
 The household class is quite suitable for a bedroom or office. If you need to decide which laminate to choose for your kitchen or bathroom, experts recommend choosing material from class 31 and above . Commercial laminate Suitable for hallways where the floor is subject to rapid abrasion. Industrial class is not used for flooring in an apartment.
The laminate is selected according to the desired color scheme, texture, pattern. Accounted for performance characteristics. Moreover huge selection, which stores offer today, purchase required material is not difficult. Make sure that the lamellas from different packs have the same shade.
You should not start working immediately after purchasing the coating. The laminate must be removed from its packaging and left in the same room where the repair will be carried out for 2-3 days.
Installation laminated coating is not particularly difficult. No qualifications or sophisticated equipment are required. It is enough to know the basic rules and some subtleties in order to lay laminate flooring with high quality with your own hands, without resorting to the help of specialists.
Preparatory stage
Even before purchasing the material, it makes sense to assess the condition of the surface on which the new floor will be laid. If necessary, carry out restoration or renovation work. In some cases, the subfloor will have to be completely replaced. Do not neglect this stage. The surface must be flat and horizontal. Level difference of more than 2 mm per 1 linear meter unacceptable. Any unevenness, potholes, or cracks can lead to deformation and even breakage of the finished coating. The laminate will creak, and joint discrepancies may appear.

Minor surface imperfections can be hidden under OSB sheets. This will give finished floor additional thermal and sound insulation.
 Place on the prepared surface waterproofing layer. It is especially relevant for “wet places” in the apartment - kitchen, bathroom, toilet. Film is best suited for this. waterproofing material
, but you can also lay regular polyethylene. It is spread overlapping with an allowance of up to 15 cm and with an overlap on the walls of up to 20 cm. The canvases are fastened together with adhesive tape.
Place on the prepared surface waterproofing layer. It is especially relevant for “wet places” in the apartment - kitchen, bathroom, toilet. Film is best suited for this. waterproofing material
, but you can also lay regular polyethylene. It is spread overlapping with an allowance of up to 15 cm and with an overlap on the walls of up to 20 cm. The canvases are fastened together with adhesive tape.
A substrate is laid on the waterproofing layer. The substrate serves as an excellent shock absorber. It dampens sounds well and extends the life of the laminated coating. The backing is made of foamed polyethylene or polystyrene. Often use natural cork backing. This is an ideal, although the most expensive option. Laying is carried out exclusively end-to-end, it is necessary to ensure that there are no overlaps or gaps. The strips are attached to each other with tape or adhesive tape. If the material has a foil layer, then when laying it should be on top.
Tool preparation
The necessary tools must be prepared in advance so as not to stop during the work process. In the process of laying laminate you will need:
- Wooden wedges are spacers 10-12 mm thick to maintain the gap between the laminate being laid and the wall. Under the influence of humidity and temperature, the assembled floor can “walk”. Gap will prevent its deformation. The number of wedges depends on the area of the room. They are set at intervals of 40−60 cm.
- Hacksaw or jigsaw. If there are pipes in the room, without electric jigsaw can't get by. Cutting complex holes by hand is difficult and time-consuming.
- Tape measure, ruler, square.
- Pencil.
- Wooden or rubber mallet. You can also use a regular metal one, but then you will need to use a wooden spacer.
- A small pry bar or a special lever with a protruding arm. Such a lever can be purchased at a store, or you can make it yourself from a metal strip. This tool will make your work much easier hard to reach places and along the walls.
It is quite possible that an additional trip to the store in order to purchase necessary tool, won't be needed.
Laminate flooring is usually laid in long joints along the direction of natural light, that is, from the window. In this case with panel pokes are almost invisible, as the light glides along them. They usually start work from the far corner, in rows, from left to right. There are also transverse and diagonal laying laminate It is used, as a rule, in designer renovations to emphasize the structure of the surface of the floor covering or to play up the shape of the room.
The lamellas are laid out among themselves in various ways:
- Diagonally - the rows are shifted by the width of the board.
- “Brick wall” - the rows are shifted by ½ the length of the lamella.
- “Deck” laying - the rows are shifted by 1/3 of the length of the lamella.
 Laminate manufacturers recommend the latter installation method. It is this that ensures sufficient strength of the locking connection.
It is worth calculating the number of rows in advance and taking into account that the last row should not be narrower than 10 cm. Otherwise, you need narrow the first row. If there are pipes in the room, then the layout must be thought out in such a way that the joints of the lamellas are located in their locations. The laminate should not interfere with the opening and closing of doors. If necessary, door leaf can be trimmed.
Regardless of the type of lock, the tenon is cut off from all panels of the first row. After installation, the row is wedged away from the wall.
There are two types of locking connections for laminated panels - “Lock” and “Click”. The remaining types are modifications of one of them.
 Installation of slats with “Lock” locks. The lock connection has a tongue and groove in the same plane. Fixation occurs thanks to special protrusions and grooves. The side and end sides are connected by tapping with a hammer until the connection is complete. If you use a metal hammer without a cover, you can damage the lock tenon. After wedging the first row from the wall, the second row is assembled. Each lamella is attached separately to the adjacent lamella and the previous row. In this case, the first and last lamella of the row are trimmed taking into account the displacement of the transverse seam. When installing the last row adjacent to the wall, you cannot do without a pry bar or a curved lever.
Installation of lamellas with “Click” locks. The groove and tenon of the lock connection are in different planes. You can connect one lamella to another only at an angle. The lock snaps into place when the panels are rotated in one plane. The assembly process is much simpler than with the “Lock” lock. We inserted the tenon into the groove at an angle, then tilted the inserted panel until it clicked. The peculiarity of laying laminate with this type of lock is that the entire row is installed first, and then it is attached to the previous row. This laminate does not require tapping. The joints are almost invisible.
Panels with a “Lock” lock are gradually giving way to panels with a “Click” lock. Knowing how to properly install laminate flooring with a modern lock can significantly reduce installation time. In addition, disassembling a laminate with a “Click” lock is much easier, while the slats retain their integrity and can be used again.
Completion of installation work
After complete installation of the laminated surface, you can remove wedges from the walls and lay the baseboard. It should be remembered that the plinth is attached to the wall, not to the floor. Places where the assembled surface adjoins other coatings (for example, tiles in work area in the kitchen) are closed decorative overlays. The floor is ready and does not require additional curing or drying time. Can be entered furniture and start decorating.
Laminate is a beautiful and practical coating, which also significantly saves effort, time and money during repairs. The main thing is to understand how to lay laminate flooring correctly and follow some rules and recommendations.
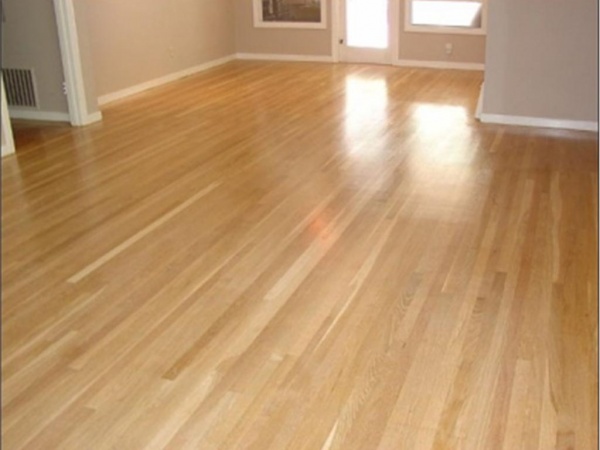
One of the most common and popular floor coverings is laminate, an example of which can be seen in the photo. In addition, its installation is quite simple work, which you can handle on your own. Property owners often think about how to install laminate flooring with their own hands, because in this case, repairs will cost much less than if you turn to specialists for help.
Preparing the concrete base
Before laying the laminate, the surface must be leveled. If you carefully examine the panels, you will see that there are locks along the perimeter of the slats. With their help, they are folded into a solid coating located on the same plane. If you do not follow this recommendation, the locks will become loose, the cracks will increase, and if there is a significant deviation from the norm, the floor will be damaged.
Because of this feature of the laminate, certain requirements are imposed on the base. Although SNiP does not contain special instructions for this material, its manufacturers advise not to exceed the maximum permissible height difference on the base surface, which can be no more than 2 millimeters per 2 square meters.
For this reason, after removing the outdated floor covering, the surface must be checked for unevenness, using a rule of 2 meters in length. It is applied to the floor in different places and directions, thereby revealing the presence of depressions and bumps.

After completing the arrangement of the screed, be sure to wait for it to dry completely. This process may take several weeks depending on the height of the layer, the temperature and humidity in the room and the composition of the mixture. It is not recommended to make additional efforts to dry the floor, since the concrete will crack when it dries quickly.

For this reason, you need to let the screed dry on its own, even if it takes a long time. Experts even advise specially covering the concrete with polyethylene so that the moisture does not evaporate so quickly, and, accordingly, the base becomes more reliable and durable, without microcracks, which can subsequently increase.
To check the dryness of the screed, lay a piece of polyethylene film measuring 1x1 meter on the floor. If by morning no traces of moisture have appeared on its surface, then it has completely dried, and you can begin laying the laminate.
Wooden floors

How to do the job:
- Sheet plywood is placed on the floor surface in the direction of installation and trimming is done. The joints of the products are shifted in relation to one another according to the principle of brick laying;
- the sheets are numbered and the joining points are marked with a marker, or a pencil;
- along the marked lines are made from wooden slats lathing. The components of the structure must be leveled horizontally. You can adjust the slats in height using glue-impregnated plywood pads (read also: " ");
- plywood sheets fixed to the slats according to the assigned numbers. Screws are screwed in at a distance of 15-20 centimeters from each other, embedding the head;
- The plywood surface is treated after installation grinder so that it becomes perfectly even.
If desired, the joints of the sheets are treated with a special wood putty or a mixture of fine sawdust and PVA glue. After this, the preparation of the base is completed, and you can begin laying the planks.

As for whether you can lay laminate flooring in an apartment yourself on an outdated floor covering, this is only allowed if the surface is flat. Plank new material It is permissible not only for laminate, but also for linoleum or parquet. The exception is carpet.
Laminate installation
Installation is often left to specialists. Yes, this allows you to get good result, but the cost of the service is quite high. At the same time, this work is not so complicated that it cannot be handled independently.

Instructions on how to lay laminate flooring yourself:
- Before laying the laminate, check the floor slabs or the previous floor covering for horizontalness and height differences.
- If there are uneven bases, a screed is installed or the floor is leveled using plywood, sanding or another method.
- A PVC membrane or a special polyethylene film is laid on the prepared dry base. This layer will serve as waterproofing and protect the neighbors below from flooding. The film is laid in such a way that it covers the walls by 5 centimeters.
- The waterproofing sheets are placed with an overlap of 30 centimeters, and the joints are connected with plumbing tape.
- Lay the substrate. It is advisable to use the material recommended by the laminate manufacturer. But it is also permissible to use polystyrene foam, balsa wood or a special combined substrate 3 millimeters thick.
- Then you should find out the width of the room, subtract 20 millimeters and divide the resulting value by the width of one panel. If the remainder is less than 5 centimeters, then both rows located near the walls are cut off. The first one is about half, and the second one is according to the free space.
- Now let's talk about how to quickly lay laminate flooring. Installation begins from the far corner of the room. The first panel is placed in a corner, the gap with the wall is controlled with wedges 10 millimeters thick. The next lamella is inserted into the end until the lock is activated. Thus, a complete line is assembled along the wall, and the second row is made, starting with a panel cut in half, directing it with a cut towards the wall (more details: "").
- Then they insert the side lock, take the next board and again place it sideways at a slight distance from the end of the previous element. Next, knock the panel with a hammer through a block of wood and snap the end lock into place.
- If the laminate has a “Click” system, then the first and second rows are assembled at the end, and then placed completely in the side lock and snapped into place.
- When the last panel in a row has the “Lock” system, a clamp is used to tamp the part.
- In this way, the entire floor covering is collected. In those places where the pipes pass, holes are cut in the panels to size. Then they saw off part of the lamella so that the cutting line divides them in half. The places where the pipe entrance is located are covered with cuffs made of wood or plastic.

This is what the instructions look like on how to lay laminate flooring in an apartment yourself. After installation is completed, you can use the room. Laminate is enough reliable coverage, which retains an attractive appearance for a long time. The decorative layer of the products is sufficiently covered strong protection, which preserves the material from mechanical and other types of damage.
But it is still recommended to handle laminate with care. Most often, the coating is damaged by pieces of furniture, heels, and sharp objects. To prevent the slats from being damaged, it is recommended to glue rubber or felt pads on them to the legs of tables and chairs, which will protect them from the appearance of marks and dents.
All you need to install laminate flooring in an apartment is time and patience. The work is not difficult, you can handle it yourself without spending a lot of money on the services of specialists. You just need to carefully level the base - this will take a lot of time, but if not done this work, the floor covering will not be as reliable and durable. And then, according to the instructions, lay the laminate itself.


