How to process the edges of canvas
Before starting work, it is worth sweeping the edges of the canvas. This can be done either manually or using sewing machine or overlocker. You can coat the edges of the canvas with transparent Moment glue, at a distance of two cells from the edge. After washing the finished work, the glue does not dissolve and the embroidery keeps its shape. You can also coat the edges of the canvas with colorless nail polish or enamel.
You can finish the edges of the canvas manually using a blanket stitch.

Embroidery technology
If you have to embroider big picture, then it can be very difficult to correlate the crosses on the canvas and on the diagram. The diagram is usually marked with 10 by 10 squares. The same can be done on canvas by drawing such squares with colored thread in large stitches or by tracing the fabric with a water marker (these lines are then erased with a damp cloth and no traces remain). As you sew the fabric, the thread can be pulled out, only carefully so as not to damage the sewn area. Or the threads can be removed after finishing the embroidery. It will be easier if you use silk threads for marking - they stretch out more easily.
Often, embroidery uses two or more threads together. If you separate the threads before inserting them into the needle (even if they are threads of the same color), the crosses will be straighter.
In complex patterns, it is convenient to start by making crosses of the color most often found in this part of the work, or, if there is none, crosses whose icon is easiest to find.
If you are going to embroider on a colored canvas, then for convenience you can place a light fabric on your lap or on the table (if a stationary hoop is used for embroidery). Then the holes will be better visible. Now there is a special lamp on sale that fits on your lap and illuminates your work from below.
When purchasing a dark base for embroidery, you need to make sure that the holes into which the needle is inserted are clearly visible.
You can also use special magnifying glasses to relieve eye strain, which are sold in sewing stores.
When embroidering in the evening, you need to set yourself additional source light, for example table lamp. In this case, the additional light should be located below eye level so that it illuminates the fabric and does not blind the eyes.
To prevent the colored canvas from showing through through light threads, it is better to embroider floss in larger number folds than on white canvas.
If, while working with a dark base, your eyes still get tired, you need to stop embroidering and make compresses with warm, freshly brewed black tea and exercises for your eyes. For example, you can sit by the window, relax, and alternately look into the distance and then at the window glass for 5 seconds. This exercise should be done for several minutes.
If you are at work complex circuit with several colors of thread, where literally each cross is a different color, you can save a lot of time by threading the threads into the needles at once and “parking” them at the edge of the embroidery. Then it will be possible to embroider this part of the work without constantly being distracted by threading.
A good embroidery needle can be seen by the shine of the metal; it bends poorly and is more elastic in the hands; straight; the tip of the needle does not cling to the fabric when it is passed along it at an angle; when examined, the eye has strict outlines, without notches, and seems to be recessed into the body of the needle. With such needles, the thread does not break when embroidering, and the needle itself does not break.
There are several types of needles for needlework. They differ in both numbers (that is, size) and shape. For embroidery, short needles (up to 3 cm) are used, for hand sewing - needles of medium length (3 - 4 cm); long needles are used if it is necessary to cover long distances: for bead embroidery, darning, basting.
Embroidery needles usually have a long eye to make it easier to insert multiple layers of floss. The thickness of needles with an oval eye, as a rule, increases from the sharp end to the blunt end. This allows you to place several threads at once. Needles with a round eye have the same thickness along their entire length. This is important when embroidering, for example, French knots, when it is important that the needle does not make the knot looser when passing through it.
Define desired number needles can be used as follows. If the needle is too thick for the selected fabric, it will widen the distances between the threads. If the needle is too thin, then to pass the needle and thread
force is required through the fabric. In this case, the thread will pass, but the additional force to which the eye will be subjected will lead to faster wear of the needle.
Correspondence of canvas, needle size and number of threads: canvas 11 (11 cells per inch = 2.54 cm) - needle 24 - number of floss threads 3. Canvas 14 or 16 - needle 24 - 26 - threads 2. Canvas 18 or 22 - needle 26 - threads for 18 1-2, for 22-1.
It is not advisable to use needles with an easy-to-thread eye in embroidery, because when threaded, the thread quickly deteriorates and wears out, and the teeth on the eye of the needle often catch the fabric, leaving “hooks.”
The embroidery (long) eyelet is suitable for embroidery with wool or floss in several folds. A needle with a blunt point is useful for cross stitch and stitching work.
The thimble is selected according to the size of the middle finger right hand. It should not fit loosely or too tightly on your finger.
When choosing scissors, you should be guided by the following considerations: they should cut well, close without effort, their tips should converge at one point, be comfortable for the hands, and pleasant to look at.
Small round hoops are good to use when embroidering using satin stitch and other techniques. large diameter- in the techniques of stitching, counted satin stitch, and sometimes in the technique of cross stitch.
Round hoops are good for one-handed embroiderers. Professional embroiderers use both hands, and then they need rectangular ones with support on the floor or table. To begin with, it is enough to have a round hoop with a diameter of 7-9 cm, 15-17 cm, 30 cm and rectangular 30 by 40 cm.

Embroidery looks good on both natural (linen, calico, cambric, voile, silk, wool) and synthetic fabrics (chiffon, voile, spandex, gabardine, etc.) The choice depends on the purpose finished product and embroidery design. Most often, a plain fabric is used, but if necessary, to achieve the right artistic image, it is possible to use fabrics with different printed, printed or structural patterns.
For cross stitch, use a tapestry needle. Such needles have a rounded end, which does not pierce, but pushes apart the fibers of the fabric, as well as a large eye, compared to sewing needles. The proportionality is this: the larger the needle number, the smaller it is. The needle should be large enough to move the thread through the fabric with minimal effort. This reduces friction, wear and tear on the fabric and floss. The choice of needle thickness is also influenced by the thickness of the threads, as well as the number of fibers.
Cross stitch should start from the center. To do this, the fabric is folded four times and the center is determined in this way.
When cross stitching, all stitches should be made in the same direction. They can be in the opposite direction only in one case - to achieve some visual effect.
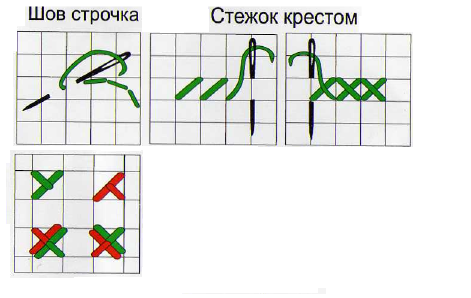
Stitches. There is the traditional method, in which each cross is sewn separately, and the Danish method, in which half of the cross is sewn first and the entire line is sewn, and the crosses are completed as they come back. Traditional method Mostly single crosses are embroidered.

Before embroidering, you can run the thread over a damp sponge. This will make the thread flatter and smoother and fit better.
After the embroidery is ready, it must be washed in shampoo (preferably a little warm water so that the colors do not fade). Then gently squeeze, wrap in a soft towel and dry. It is better to lay it out on a flat surface that absorbs moisture so that the fabric does not lose its shape.
For ironing You need to put a soft backing (towel) on the ironing board so that the crosses do not lose their shape when ironing. The embroideries are rather not ironed, but rather steamed from the reverse side. You must be especially careful if the embroidery contains metal threads. You need to make sure that the embroidery dries completely, because even a small amount of moisture can warp the paper or cardboard, and the finished work will not look as good as it could.
After the embroidery has completely dried, you can begin to stretch it onto the base of the frame. Thick cardboard of the appropriate size is used as a base. inside frames. The base is wrapped in embroidery so that the design is exactly in the center. The free edges of the canvas are folded inside out, then the opposite folded ends are pulled together by stitching. Embroideries decorated in mats look very impressive.
Wash better in warm water with the addition of soft detergent, which does not contain bleaching agents.
Embroidery inserted into a postcard will look more impressive if you insert a piece of soft fabric, for example, thin padding polyester, cut under the hole, underneath it.
The simplest and quick way registration: glue the work to a piece of thick cardboard cut to fit the frame. However, the glue can damage the fabric, and in addition, the work will become almost inseparable from the base, so that in the future it will be very difficult to re-arrange it if necessary or wash it.
More convenient way: cutting out the cardboard base the right size, place the embroidery on it, fold the edges over reverse side and secure them with transparent tape for paper (it is better to use something that can be easily removed). After this, “darn” the hole with ordinary sewing threads.
Embroideries look better in frames without glass: the structure is better visible. However, the likelihood of contamination of the work (dust or touch) increases.
A passe-partout—a frame of fabric embroidery—can completely change the look of a painting, emphasizing certain tones. An oval mat is very suitable for small works with a simple background: the work will be visually larger. Double matting can make embroidery very impressive. To do this, choose two or even three colors present in the embroidery and select a mat to match. Typically, more saturated tones are left for the top layer, and softer ones for the inner layer. If the embroidery has unusual shape- this can be emphasized by cutting out the passe-partout along the same contour.
Colored embroidery will become bright again if, before ironing, dip the front side of the product in water with vinegar added and place it on a clean cloth.
You need to embroider with metallic threads in a special way, otherwise all the threads tend to separate one by one, twist, and generally interfere with embroidery in every possible way, especially when metallic thread is paired with regular thread. In addition, such threads break and fray at the eye. To avoid these troubles, you need to take a rather short metal thread. The ends of the threads can be slightly varnished to prevent them from delaminating. You will have to embroider with them a little slower than with regular ones, and be careful - adjust the finished crosses with a needle where necessary. And when you need to make the free end shorter, “tighten” it, don’t just pull with a needle, be sure to hold the thread with your hand.
When embroidering with metallic and regular thread at the same time, you need to take a metallic thread longer than regular thread, since the metallic thread is consumed faster than regular thread, and besides, the frayed ends of the metallic thread can be trimmed.
“This is impossible,” said Reason.
“This is recklessness,” noted experience.
“Try...” whispered Dream.
The large Soviet encyclopedia about embroidery says this: Embroidery is a widespread type of decorative and applied art in which the pattern and image are made by hand (with a needle, sometimes crocheted) or by means of an embroidery machine on various fabrics, leather, felt and other materials, linen, cotton, wool, silk (usually colored) threads, as well as hair, beads, pearls, precious stones, glitter, coins, etc. For sewn appliques (a type of embroidery, often with a raised seam), fabrics, fur, felt, and leather are used. Embroidery is used to decorate clothing, household items, and to create independent decorative panels. The types of seams are infinitely varied: for “blind” embroidery, that is, on a whole fabric, a cross, satin stitch, set, painting, vestibule, etc. are typical; for “stitching”, that is, embroidery on fabric with threads pre-cut or pulled out in certain sections of it, hemstitching, “weaving”, flooring, guipure, etc. Used both individually and in various combinations with each other, they allow you to create embroideries from very flat to convex, from the lightest contour or openwork mesh (“lace”) to “carpet”, tightly covering the entire surface of the product. Drawings with geometric shapes are done primarily by counted embroidery (by counting the threads of the fabric), and a curved design is done by “free” embroidery (along a pre-applied contour). The main expressive means of embroidery as an art form: identifying the aesthetic properties of the material (the iridescent shine of silk, the even shimmer of linen, the shine of gold, sparkles, stones, the fluffiness and dullness of wool, etc.); using the properties of the lines and color spots of the embroidery pattern to additionally influence the rhythmically clear or whimsically free play of seams; effects extracted from the combination of a pattern and image with a background (fabric or other base) that is similar or contrasting to the embroidery in texture and color….

It's simply a miracle - with the help of a needle and various threads, a simple fabric is transformed into a work of art. The art of embroidery has a long history. In ancient times, when people lived separately, each nation, and sometimes even a small village, had its own characteristics in embroidery and other types folk art. Modern embroidery can be used to decorate children's and women's clothing, as well as household items: curtains for windows, napkins, pillowcases for sofa cushions, rugs and panels, towels, aprons, bags, souvenirs, etc. is one of the oldest types of needlework, which many women and men around the world are passionate about. And this is not surprising, because all you need for embroidery is patience, patience and more patience.
Embroidery is an ancient and most widespread type of decorative and applied art. It has a centuries-old history.
The process of development of embroidery can be traced from images in art monuments of ancient civilizations of Asia, Europe, America, from literary sources, as well as from surviving examples of embroidery from different times and peoples.
History of embroidery.
History of embroidery
Embroidery is a well-known and widespread handicraft art of decorating all kinds of fabrics and materials with a wide variety of patterns, from the coarsest and densest, such as cloth, canvas, leather, tree bark, to the finest fabrics - cambric, muslin, gauze, tulle, etc.
Embroidery is a widespread type of decorative and applied art in which a pattern and image are made manually (with a needle, sometimes crocheted) or using an embroidery machine on various fabrics, leather, felt and other materials using linen, cotton, wool, silk (usually colored) threads, as well as hair, beads, pearls, precious stones, sequins, coins, etc. For sewn appliques (a type of embroidery, often with a relief seam), fabrics, fur, felt, and leather are used. Embroidery is used to decorate clothing, household items, and to create independent decorative panels.
The types of seams are endlessly varied:
for “dead” embroidery, that is, on a whole fabric, a cross, satin stitch, set, painting, vestibule, etc. are typical;
for “stitching”, that is, embroidery on fabric with threads pre-cut or pulled out in individual sections,
hemstitch, “weave”, flooring, guipure, etc.
Used both individually and in various combinations with each other, they allow you to create embroideries from completely flat to convex, from the lightest contour or openwork mesh (“lace”) to “carpet”, tightly covering the entire surface of the product. Drawings with geometric shapes are done primarily by counted embroidery (by counting the threads of the fabric), and a curved design is done by “free” embroidery (along a pre-applied contour). The main expressive means of embroidery as an art form:
identifying the aesthetic properties of the material (the iridescent shine of silk, the even shimmer of linen, the shine of gold, sparkles, stones, the fluffiness and dullness of wool, etc.);
using the properties of the lines and color spots of the embroidery pattern to additionally influence the rhythmically clear or whimsically free play of seams;
effects extracted from the combination of a pattern and image with a background (fabric or other base) that is similar or contrasting to the embroidery in texture and color….
Cross stitch
From history
Our favorite cross stitch, like other types of needlework, has its own history. There is no exact information about where and when embroidery appeared in general, and when cross-stitch became a separate type of needlework. Almost no original embroideries dating back to the 12th century remain. But images of clothing and interior items indicate that embroidery appeared much earlier. In different countries, the patterns differed in style and colors used. The embroidery reflected the national color and own vision of the beauty of each people.
IN Western Europe Counted embroidery became especially popular in the 16th century. At that time it consisted mainly of biblical stories and texts combining various techniques execution. By the end of the 18th century, the classic cross stitch clearly began to predominate on embroidery patterns. And the themes of embroidery have become more diverse. In the East, embroidery was traditionally used to decorate household utensils - carpets, capes, pack bags. Distinctive feature Oriental embroidery is the variety of colors used and the complexity of the ornament. The Great Silk Road contributed to the spread of embroidery throughout Europe. In Russia, embroidery has always been very symbolic. Some patterns were born in ancient times and bear the imprint of pagan symbolism. Archaeological finds indicate that embroidery was being done in Rus' back in the 10th century. Gradually, embroidery becomes more and more widespread in decorating costumes and household items.
Since the 18th century, it has entered the lives of all segments of the population. Embroidery was divided into folk and urban. Urban embroidery did not have strong traditions, as it was constantly changing under the influence of fashion coming from the West. And folk cross stitch was associated with ancient customs and rituals of the Russian peasantry. Each cross stitch had its own purpose. Cross stitch on shirts was located at the points of contact between the human body and the outside world (i.e. on the collar, sleeves, hem) and played the role of a talisman. The cross-stitching of towels reflects people's ideas associated with the cult of fertility and the cult of ancestors. First of all, this concerns the ornament of folk sewing, in which ancient symbols were preserved until the 2nd quarter of the 20th century. The main pattern of folk cross stitch is ornament and stylized images of animals and birds. Each pattern was embroidered in a specific color, which also had a symbolic meaning.
Different regions of Russia had their own characteristics and techniques of cross stitching. But each craftswoman, using those ornaments that were characteristic of her region, tried to make them individual and unique. There are several types of cross stitch, among which the most common is a one-sided simple full cross, which gives crosses on the front side of the product, and vertical or horizontal stitches on the back side. Each cross is made with 2 intersecting diagonal stitches, with the lower stitches being placed from left to right (from the lower left corner of the square to the upper right), and the upper stitches from right to left (from the lower right corner of the square to the upper left). Only if you follow this rule, the embroidery will turn out neat.
Tools and materials
To perform embroidery, you need to prepare fabric and threads, a set of needles, a hoop, and scissors. Various view embroidery also requires different materials: matte or shiny threads, silk, twisted or soft. It all depends on the material, the pattern, and the genre of embroidery. And finally, to embroider a wonderful picture with a cross, you, of course, will need patience and perseverance.
Canvas
Canvas- this is a mesh cotton, linen or mixed fabric, as well as bases made of other materials. Embroidery on canvas is possible in any technique, be it a counted cross, an uncounted cross, satin stitch, tapestry stitch, carpet technique, for making pillows, carpets, embroidered paintings, handbags, boxes and much more.
There are several types of canvas: uniform and uneven weave, plastic canvas, overlay canvas for embroidery on clothes, Stramin.
The most convenient canvas for counted cross stitch Aida
, consisting of 100% cotton. Its fabric is a base of tightly woven 4x4 threads, forming clear squares. Crosses on such fabric without special effort They turn out smooth and beautiful.
Canva Aida happens with different numbers weaving threads. Aida with 8 and 11 threads per inch (that’s 32 and 43 cells per 10 cm, respectively) is convenient for children and beginning embroiderers, since its squares are large and easy to count.
- Aida 14 canvas is a canvas with 14 threads per inch (55 squares per 10 cm) and is considered one of the most popular and convenient fabrics for cross stitch.
- Aida canvas 16 and 18 - respectively, with 16 and 18 threads per inch (63 and 70 cells per 10 cm, respectively) allows for a clearer transfer of details, but requires increased attention and accuracy.
- Aida 20 canvas is a canvas with 20 threads per inch (79 squares per 10 cm) suitable for minor works, performed with tapestry stitch.
Even Weave Canvas
does not have clearly marked squares for stitches, so it is more difficult to embroider on it. However, embroidery on such a canvas looks better, since the part of the canvas free from embroidery remains a homogeneous canvas without holes or cells. Embroider on such a canvas through 2 threads, counting them horizontally and vertically.
Uneven weave canvas
consists of flax or mixtures of flax with other materials. The threads of such canvas are of uneven thickness, which distinguishes them from canvas of uniform weave.
Plastic canvas
used for embroidery and making various products that must keep their shape very well (corners for a computer, Christmas tree decorations, boxes, etc.).
Overlay canvas used for embroidery on fabric that does not have a constant number of threads per unit length, or the weave is too small to count. It is used for embroidering on clothes, bed linen, bags and other items. This canvas is divided according to the method of removal after completion of work into water-soluble and removable, that is, pulled out.
Stramin Usually used for embroidering pillows and rugs with counted cross stitch, in tapestry technique or in carpet technique. The German company Zweigart & Sawitzki produces a particularly hard cotton stretcher, Magic Canvas. Its rigidity (threads do not fluff even on cutting lines) and bright colors allow you to use it for small souvenirs with partial embroidery: Christmas decorations, glasses cases and mobile phones, decorative elements.
Needles
Special needles are used for embroidery; they are divided into sharp and blunt, single-sided and double-sided, and also have differences in thickness.
Sharp needles used for embroidery on thick fabric.
Blunt needles used in cross stitch and other types of embroidery where the fabric has a special open structure. The blunt end of the needle allows you to more accurately hit the right places without the risk of splitting the fabric or the finished cross.
All needles have a large eye for easy threading of two or more threads.
Double sided needles convenient to use when you use a frame for work that does not need to be supported by hands. In this case, one hand is under the embroidery, the other is above it, the needle does not have to be turned over, and the hand does not have to be moved from one front side to the other side. This significantly saves time and makes work easier.
Also, needles vary in size, each of which is best suited to canvas with a certain weaving density.
The needle should pass freely through the fabric without leaving visible holes.
Hoop
During work, the fabric should be well stretched, which makes embroidery easier and faster, and the work more even and accurate. For this you should use special embroidery hoop
.
The simplest and most common are round plastic hoops with a plastic screw, available in various sizes. Their use is quite simple: place the fabric on the smaller hoop, pull it lightly, place a second hoop with a screw on top and lightly tighten the screw, then pull the fabric again and tighten the screw completely. During the embroidery process, the tension of the fabric weakens slightly, so you need to periodically tighten it. If the design does not fit entirely into the hoop, then they are moved during operation.
Floss
Most often, two types of embroidery threads are used in work: floss And wool.
The first ones are made from 100% cotton.
Floss– these are strong and bright threads, modern methods dyeing allows you to achieve an incredible richness of shades, thanks to which a dozen tones of the same color can be used when embroidering.
The works are more realistic, and the color transitions are smoother and more invisible.
Sometimes viscose is added to cotton thread - this floss is more difficult to work with, it slips more, but it has a bright shine, which looks very advantageous in combination with regular floss.
More varieties - metallized thread for embroidery, thread glowing in the dark, And unevenly colored thread. When working, it is customary to combine threads of the first and second types for convenience with a simple floss of a suitable shade.
A non-uniformly colored thread can be like various colors, and convey shades of the same color. These types of threads allow you to add expressiveness to your work, combined with regular floss.
Other embroidery threads, woolen, are not as shiny as floss, and are more capricious in work.
But paintings embroidered with wool turn out to be more contrasting and bright; wool is indispensable when embroidering pillows.
The main thing to remember when working with such a thread is that it should not be very long, otherwise the wool will fray.
Scissors
Everything is simple here. The tool you need is important and useful. They should always be at hand. Sharp blades and small size- Very important parameters. This is easy to understand during the embroidery process, since neatly trimmed ends of the floss are the key to neat work overall. There are, of course, heron scissors with gold-plated handles, but ordinary ones with blunt ends are quite suitable for us. It is also good to stock up on small scissors - they are convenient for picking up and cutting incorrectly made stitches.
Basics of embroidery
Performing a single cross
The cross stitch is formed by two diagonal stitches, which are performed in the same sequence throughout the entire work. First, a diagonal stitch is placed from left to right (bottom), and then a diagonal stitch from right to left (top). In the picture on the left, a circle marks one square of Aida fabric.
Embroidering a small area
Complete the first row from left to right Complete the second row from right to left
Continue in this manner until the desired area is filled, then use the top diagonal stitches to cover the last row completed from right to left. Continue in this manner until all rows are covered with top diagonal stitches.
Types of embroidery
Alphabet made with a cross
Chenille embroidery
Cross stitch
Half-cross stitch (English) (tapestry sewing)
Satin embroidery
Richelieu embroidery (lace embroidery)
Ribbon embroidery
Silk embroidery
Gold embroidery (gold threads)
Beadwork
Isothread
Oryol list
Application
Dictionary of embroidery terms.
Adventure (jargon, used on the Internet)
A game played on the Internet in communities and forums. Rules of the game: on the forum or in the community, after a certain period of time (for example, once every 3 weeks), parts of one scheme are posted. Participants embroider this piece and post the result. The essence of the game is that the participants do not fully know what the resulting embroidery will be.
Openwork embroidery (cutwork)
A type of embroidery in which the main lines of the pattern are covered with a satin roller, after which the fabric around the pattern is cut out. Embroidery arose during the Renaissance, in the 14th century, in Italy. Products made with openwork embroidery along a free contour, in which individual elements of the pattern were connected by jumpers (brides), were the privilege of the nobility. Cardinal Richelieu especially loved this type of embroidery, after whom it got its name. Currently, all types of openwork embroidery along a free contour with jumpers are called “richelieu”.
Assisi (from Italian assisi)
An embroidery technique in which the background is sewn together and the pattern is created from the unfilled areas. This technique owes its name to the town of Assisi in Italy, where Saint Francis was born, who, according to legend, brought a sample of Arabic embroidery from Crusades, on the basis of which Italian craftswomen developed their own unique style of embroidery - Assisi
Baguette
A smooth or profiled strip designed for making frames for embroidered paintings, etc.
Biscornu (from the French biscornu - curved), “crooked”
An embroidered or beaded miniature three-dimensional product made from two squares of canvas, rotated 90 degrees relative to each other and sewn along the perimeter and in the center. Usually used as an accessory (pincushion, pendant, pendant).
Blackwork (from the English blackwork - black embroidery)
Counted embroidery done with threads of the same color on a contrasting base. In black embroidery, the “back needle” stitch is most often used, as well as the Holbein stitch – “double basting”. Sometimes the style of black embroidery itself is called Holbein.
Backstitch (from the English backstitch - seam “back needle”)
The seam is used to mark borders in embroidery, edging.
Vladimir seam
One-sided decorative stitch, a type of satin stitch. The outline of this seam is not sewn. Usually embroidered in red in combination with others - black, blue. The stitches are located on the same contour line at a short distance: they seem to sink, which gives the embroidery a peculiar beauty.
Cross stitch
An embroidery technique that uses two crossing diagonal stitches. The order of the seams is to make the bottom stitch from the bottom left corner to the top right corner, and the top stitch from the bottom right corner to the top left corner. For a row of crosses of the same color, first perform the bottom row in one direction (half cross), then the top row in the reverse order (full cross). All top stitches should face the same direction. If crosses of the same color are located close to each other (no more than 3 cm), then the working thread is not cut off, but broaches are made from the wrong side, i.e., from one cross to another, the thread is fastened (threaded) under the stitches.
Ribbon embroidery
A type of embroidery in which thin pieces of silk or artificial ribbon are used instead of Gamma floss threads. Special stitches and the very texture of the materials allow you to create three-dimensional shapes. Most often, floral motifs are used in ribbon embroidery.
Surface
Embroidery with straight or oblique stitches, completely or partially filling the pattern along the free contour transferred to the fabric. Any fabric can be used for embroidery smooth surface- thin and dense, cotton, silk, with any weave of threads. The surface can be one-sided or double-sided, flat (without flooring) and high, or convex (on flooring), slotted, precise or counted, and free or drawn. The satin stitch is done on the hoop tightly stretched fabric, otherwise the drawing will be pulled down.
Smooth surface fastened
A type of satin stitch that is used to quickly fill large areas with one color.
Surface with flooring
Double-sided satin stitch, which is made on a pre-laid flooring from threads thicker than working ones, to give volume and convexity to the embroidery. Stems, flowers and leaves are embroidered using satin stitch with flooring.
Satin roller
A series of parallel stitches tightly adjacent to each other. It can be straight or inclined. To make the seam even, the stitches need to be laid evenly, not too loose and not too tight.
Tapestry (from French gobelin)
A lint-free wall rug, hand-woven with cross-weave threads. Tapestries are woven from colored silk and/or wool threads in separate pieces, which are then sewn together. Today, not only carpets and fabrics are called tapestries, but also large embroidered paintings.
Tapestry stitch
A stitch that is usually used to embroider large works - paintings, carpets. The stitch is very simple and looks like a regular half cross. But in the stitch technique there is fundamental differences, which allows paintings embroidered with tapestry stitch not to warp.
Holbein
Double basting stitch. It is very often used in the blackwork embroidery technique, which is sometimes called Holbein. Cuffs and lace made using this technique can be seen in the portraits of the artist Hans Holbein the Younger, after whom the seam got its name.
Embroidery needle
Embroidery needles are divided into two types: sharp and blunt. For embroidery on thick fabric, the first type of needle is used. For embroidery on canvas or fabric of uniform weave, in which there is no need to pierce holes, needles with a blunt end are used. To make it convenient to thread the floss, embroidery needles are made with a long eye. The diameter of the needle should correspond to the thickness of the holes in the canvas.
Canvas
Mesh see-through cotton, less often linen, fabric made from twisted yarn, bleached or tinted, heavily finished. Produced using plain or leno weave. Used as a base or stencil for embroidery.
Gimp (from French cannetille)
A thin metal (usually gold or silver) thread in the form of a helical spiral. In modern elegant fabrics, flat split threads made of aluminum foil, such as Lurex, are most often used.
Floss color card
A table in which floss threads are presented by name, color picture and specific number. There are summary tables of floss, which summarize the numbers assigned to each color by different manufacturers.
[b]Count (from the English count - number)
The numbers after the name of the canvas indicate the number of “squares” or threads per inch (2.54 cm). To understand how many “squares” or threads there will be in 10 cm, you need to divide the canvas number by 2.54 and multiply by 10. The larger the canvas number, the smaller the cells, and the denser the material itself.
Carpet crochet embroidery technique
Embroidery on vinyl canvas, which is performed with a special crochet hook. With its help, pieces of wool or acrylic yarn are pulled through the weave of the canvas and tied into knots.
Longstitch (from the English longstitch - long stitch)
Individual stitches and embroidery techniques also bear this name. Long stitch is a stitch that is used along with backstitch to design embroidery and outline contours. The longstitch technique is a type of counted stitch. It is performed on canvas or fabric of uniform weave along the applied contour of the design. Inside the outline, the fabric is evenly filled with long stitches in a vertical or horizontal direction.
Melange
A thread in which the color flows smoothly from one to another. When dyeing a thread, only one color is used, but its intensity varies along the entire length, from light to dark.
Hemstitch
Through patterned stitching on fabric, made by pulling out transverse threads. It is made with threads to match the fabric along the threads and allows you to get delightful openwork paths of different widths and shapes.
Metallic
Metallized threads for embroidery and needlework give embroidery special beauty and expressiveness.
Floss (from French moulinet)
They appeared thanks to the DMC company, which late XIX century patented new look cotton, non-fading embroidery threads, giving them the name floss. Later, other companies began to call embroidery threads by this very term.
Countless cross
The technique of embroidering along contours previously applied to the fabric.
Pasma
Bunch of six strands of floss
Passepartout (French: passe-partout)
A piece of cardboard or paper with a quadrangular, oval or round hole, a type of frame into which embroidery is inserted.
Loop stitch
The buttonhole stitches are based on a simple chain stitch. It can be done with various variations thick or thin thread. All seams in this group consist of loops secured with short stitches. They are used both for embroidering contours and for filling the inside of the pattern. When filling the internal space, rows of chains are embroidered in the same direction.
Printed cross
Embroidery technique based on a design completely printed with crosses on the fabric.
Flat surface
A type of double-sided satin stitch in which the stitches fit tightly together.
Half cross
An embroidery technique that is used as an independent stitch to fill the background, to create space in a painting, to indicate the shadow of an object.
Welted surface
Through embroidery, which is characterized by holes of various shapes and sizes pierced or cut into the fabric, trimmed with satin roller or buttonhole stitch.
Hoop
A craft tool in the form of a frame or stand on which embroidery fabric is stretched taut.
Stramin
The largest (27 squares per 10 cm), mesh, rigid canvas which is used for embroidering tapestries, carpets, pillows, etc.
Embroidery pattern
An image divided into colored or symbolic squares, according to which embroidery is performed. Typically, embroidery kits include a color or black and white pattern; a pattern with backstitch is printed separately. Sometimes the diagram can be applied directly to the canvas. Patterns are included in embroidery kits and can also be sold separately.
counting cross
Embroidery on canvas or fabric of uniform weave without a printed pattern.
Shadow surface
A type of smooth surface. It is performed in an oblique or straight stitch with or without “laying” with threads of the same color, but several tones (2-3, from light to dark). In a single-color shadow satin stitch, the color effect is created by the different directions of the stitches and the different reflections of light from the embroidered surface. For shadow satin stitch, it is better to use shiny silk threads or floss. The thread tension is not tight, the upper thread is weaker than the lower thread, so that no traces of the lower thread are visible on the front side of the product.
Removable canvas (overlay canvas)
A canvas with which you can transfer cross-stitch patterns to fabric not intended for such embroidery, for example, a blouse, shirt, curtains, tablecloths, decorate children's clothes or your favorite jeans. The removed canvas is applied to the fabric, and upon completion of the embroidery, the threads of the canvas are pulled out or dissolved.
French knot
The stitch used to embroider finished work small details. For example, you can embroider the middle of flowers with knots, thereby creating the effect of stamens. The size of the knot depends on the number of turns of thread or ribbon around the needle.
1. 2. 3.
Hardanger
Hardanger embroidery technique (named after a fjord in northern Norway) – modern version ancient Scandinavian stitch embroidery technique. The history of this type of embroidery is still unclear. But it is likely that Hardanger embroidery was created as an imitation of lace, which was popular in the 1600s and 1700s in Europe. Also Hardanger is a fabric for embroidery. see Hardanger
Seam "forward needle"
The seam is made with stitches of different lengths from right to left. The length of the stitches, frequency and distance between them depend on the purpose of the seam.
Aida
The most common type of canvas, which was invented by the famous company Zweigart at the beginning of the twentieth century. Thanks to its special 4 by 4 weave technique, this fabric forms neat squares, which is very convenient for cross stitch. Typically, Aida canvas is marked with numbers: 8, 11, 14, 16, 18, 20. These numbers (counts) indicate the number of cells per 1 inch (2.54 cm).
Davosa 18
100% cotton canvas with 18 threads per inch or 71 cells per 10 cm. This soft fabric high quality with a special weave - the intersecting threads are not rigidly woven together. The needle passes effortlessly through the spaces between the threads. It is most often used for embroidering tablecloths, napkins, and runners.
Evenweave (from the English weave - weave of threads in fabric, even - homogeneous, uniform)
Even weave fabrics are used as the basis for embroidery. These include Linda (100% cotton), Lugana (52% cotton and 48% viscose). Unlike Aida Gamma K04 canvas, evenly woven fabrics do not have clearly defined “squares,” which makes it more difficult to embroider on them; you have to count the threads while working. But the embroidery result is much better, since the part of the work not filled with crosses is a uniform canvas, without visible squares and holes. On fabric of uniform weave, a cross is usually embroidered through 2 threads (for one cross, 2 threads are counted horizontally and 2 vertically), in this case the number of crosses will be half the number of threads. For example, for Linda 27 canvas the number of crosses in 10 cm will be 53.
Hardanger
Cotton fabric, dense to the touch, with a weave of 2x2 threads, density 87 cells per 10 cm. The threads do not intertwine with each other, so there are no clearly defined squares, so cross-stitching is not very convenient, it is recommended to use it for embroidery with counted satin stitch, blackwork technique, and etc.
Linda 27
100% cotton canvas with 27 threads per inch. Lightweight fabric with uniform weave of threads. It is used for sewing clothes, bed linen, tablecloths, napkins, as its edges are easy to process and it drapes well. But unlike the Aida canvas, where the square cannot be divided, Linda allows you to make two narrow crosses in the horizontal or vertical direction instead of one cross.
Lugana 25
Cotton blend fabric (52% cotton and 48% rayon) 25 threads per inch. One of the most popular fabrics from Zweigart. Elegant fabric for tablecloths, pillows and other decorative items. Great for cross stitch.
Round Robin (concept from the Internet)
A game for craft lovers. Most often it is carried out in communities and forums. Game principle:
* A team of participants is assembled (from 2 people)
* Each participant marks sections of the canvas for future embroidery according to the number of players, chooses a theme and does the first embroidery.
* Then all participants pass their canvas to another participant (in a circle, the embroidery should return to its owner).
History of embroidery
Materials and tools.
Embroidery materials and tools
In embroidery, a beautiful combination of colors is important. Grayish, green, yellow and red tones are used more often, blue and purple are used less often. Usually used as the main one white, as well as gray, sand, greenish and black. The materials for embroidery are linen, cotton, woolen fabrics with clearly visible threads, as well as fabrics made of silk and artificial fiber.
For linen fabrics, bleached, semi-rough or unbleached plain weave fabric is used.
Linen matting is also suitable for embroidery (for curtains, wall hangings and tablecloths). This fabric is used to make clothing.
From cotton fabrics for embroidery, you can use matting and others.
For embroidery with colored threads suitable material is an artificial and natural silk fabric with clearly visible threads.
You can also use white and colored plain weave wool fabric.
Clothes made of fine woolen fabric can be decorated with colored threads (for example, children's clothing, ties, decorative scarves, sleeveless vests or clothing details).
Coarse wool fabric can be used to make large decorative items (for example, tablecloths, shelf curtains, pillows, etc.).
For embroidery you will need the following tools: needle, thimble, scissors, measuring tape, hoop, tracing paper, colored copy paper, thread.
When embroidering without a hoop, the fabric should be pulled over three fingers of the left hand, holding it with the thumb and little finger.
While sewing, hold the needle with the thumb and forefinger of your right hand, while the eye of the needle should rest against the thimble placed on the middle finger.
The needle should be selected in accordance with the thickness of the threads and fabric, but always with a large eye.
Threads are taken depending on the type of embroidery - cotton, floss, wool, silk, etc.
As a silk thread, you can use threads from silk ribbons: from a ribbon no more than 70 cm long (the length of the working thread), cut off the side edge, and then separate the number of threads required for embroidery.
In order for the embroidery to be perfect, it is necessary to make an accurate translation of the design. Basically, the design is transferred to the front side of the fabric. There are several ways to transfer a design onto fabric.
The first method: first you need to transfer the drawing onto tracing paper, having first compiled the individual details of the drawing into a pattern. Place colored copy paper between the fabric and the tracing paper so that the colored side is on the fabric. Trace the contours of the motif with a sharpened pencil. When adding the following parts of the drawing, you must strictly follow the joining lines. Do not stick pins into fabric or carbon paper as this will cause stains.
The second way to transfer a design onto fabric: place the fabric on the design and carefully trace all the contours with a finely sharpened soft pencil, carefully and without pressure, otherwise the threads of the fabric may separate. Secure the thread with several stitches in the place that will then be covered with embroidery.
Third method: separate one thread from the skein (2 or 3 if necessary), fold the ends together and thread it through a needle. Before starting to work, make a small stitch on the fabric and pull the thread until a small tip remains in the form of a loop, which was formed when the thread was folded in half. Thread a needle with a working thread into this loop and tighten it.
When finishing the embroidery, secure the thread on the wrong side (in the place where the embroidery is located) with several stitches using a seam.
After finishing the embroidery, you should very carefully iron it from the wrong side through a damp cloth, placing it on a soft surface (for example, a blanket).
Types of seams with instructions... http://gallery.ru/watch?a=Uh2-e05B
Embroidery lessons T.A. Tereshkovich Useful tips needlewomen.
Schemes.

Project idea.
Embroidered paintings are one of those interior decor elements that will never go out of style. Our grandmothers and great-grandmothers decorated their homes with embroidered paintings and panels. However, beautiful embroidered still lifes, landscapes, portraits and icons can transform and decorate the most modern interior. Paintings self made– it is always unique and original, they attract attention and make a lasting impression on guests.
Embroidered paintings are also valuable because they convey not only external beauty, but also much more - warmth skillful hands, love, positive warm energy. Therefore, an interior that contains embroidered paintings becomes so warm and homely.
Pictures can be embroidered various materials: colored threads (cross stitch, satin stitch, etc.), satin and silk ribbons, beads. Today the most popular are three-dimensional paintings, embroidered with ribbons, as well as cross stitch.
Thanks to modern technologies, you can develop an individual embroidery pattern for literally any image or photograph you like. A wide selection of threads, ribbons and embroidery fabrics themselves make the process of creating paintings even more interesting, and the result much more beautiful.
With embroidered paintings you can decorate any room in the apartment - the kitchen, living room, bedroom and even the nursery. The main thing is that the picture (both the frame and the drawing) fit harmoniously into the style of the interior, both in color and theme. For suitable for kitchens embroidered still life painting with delicious fruits and beautiful vases. For the living room, you can embroider someone’s portrait or a picturesque landscape in colors that suit the color scheme rooms. In the children's room there is also a place for a bright and colorful embroidered picture depicting fairy-tale characters or funny animals.
You need to hang embroidered paintings at approximately eye level so that you can appreciate the beauty of this handmade work. If there are a lot of embroidered paintings in the house, then the larger ones should be placed a little higher on the wall, and the small ones lower.
Cross stitch technology.
Fabrics and threads for embroidery are chosen depending on the purpose of the future product, the nature of the pattern and the method of its implementation.
Cross stitch is used to embroider on fabrics on which the warp threads are clearly visible. One cross stitch should completely fill one small square of fabric. Therefore, cross stitch is used on fabrics woven on a square basis, that is, on fabrics where the warp and weft threads are located at right angles to each other and where these threads are of the same thickness. It is best to use fabrics like linen as fabric for counted embroidery.
For embroidery, linen and cotton mercerized threads and floss are used different colors. The floss has a strong color, shine and the necessary strength. Also suitable are wool, staple, silk, synthetic threads (cashmilon, lavsan, nylon), iris, cotton and wool garus. The skein of floss is opened and cut in the place where the knot is located. The skein consists of 14 skeins, each of which has 6 thin threads.
Accurate and reliable fastening of the thread is the basis of embroidery. This is the beauty of the underside and the durability of embroidery. Poorly secured thread ends will come out during the first wash. There are simple (even somewhere banal) requirements for this important aspect embroidery:
Þ no knots;
Þ try not to hide the ends of dark threads under stitches made with light threads. Sometimes, however, this requirement cannot be fulfilled, for example, a single dark stitch of an eye on a light-colored face, and then you need to look carefully so that the hidden tip does not show through on the front side;
Þ when finishing embroidery with thread, secure it with at least 4-5 stitches on the wrong side;
Þ cut the already secured end of the thread close to the fabric, otherwise by the end of the work your wrong side will look like terry towel.
If you are embroidering with an even number of threads, then try to secure the thread at the beginning of the embroidery using the “loop” method.
The desire for beautiful and even crosses, as well as for a beautiful reverse side, can only inspire respect. Of course, the very understanding of straight crosses does not come immediately, but when putting your soul into embroidery, you should not forget about technique. It will be easier to achieve perfect crosses if you follow some rules:
Þ do not use too long a thread;
Þ carefully ensure that the top stitches are always directed in the same direction (“/” – bottom stitch, “\” – top stitch);
Þ When embroidering, the thread twists, and this significantly worsens appearance crosses. Let the needle hang freely for a few seconds and the thread will unwind on its own;
Þ When embroidering with any number of threads except one, you need to ensure that the threads lie evenly, without twisting among themselves.
Simple cross stitch embroidery.
For convenience, it is best to stretch the work onto a special frame for embroidery - a hoop.
In order for the embroidery to be more visual, all the top stitches should lie in one direction (in the same direction), for this you need to immediately get used to performing the bottom cross stitch from the top left side to the bottom right. A stitch of crosses is embroidered in two steps: first we embroider a stitch of lower stitches in the right quantity, then finish the crosses with the top stitches.
Many works are embroidered for a long time, and as a result the embroidery becomes dirty. Therefore, at the end of the work, the embroidery should be washed in lukewarm water with the addition of vinegar (to avoid shedding, and the threads will return their original shine). For washing you should use gentle washing powders(preferably liquid) or baby soap. The embroidery is under no circumstances twisted, gently wrung out through a towel and hung to dry, but not until completely dry, but until slightly noticeable moisture is present. After washing, it is better to iron the work. Embroidered work is ironed from the inside out through damp gauze.
Embroider for someone great job in a couple of months is normal, but someone can embroider it for a year or longer. Embroidery should bring joy. Moreover, the source can be completely different stages: the choice of a project, the beginning, the process, the end, or admiring the result. It is possible that it will be done for you - this is only a technical process and satisfaction will come only after visiting a framing workshop. Then the speed has higher value than for a person who enjoys the leisurely process of embroidery.

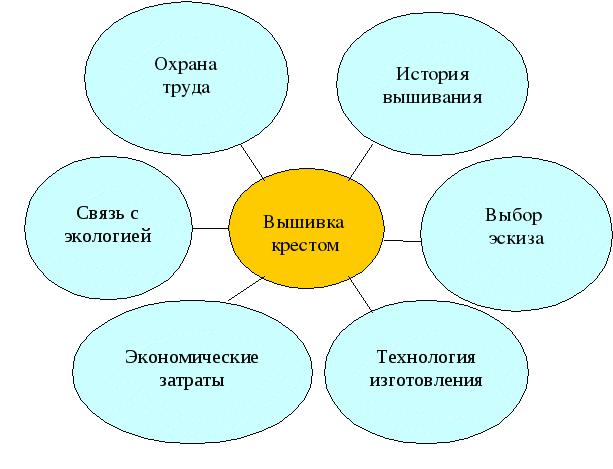
CREATIVE PROJECT
"EMBROIDERY
CROSS"
Completed by: Sumina Svetlana
8a grade student
Checked by: Usoltseva L.S.
technology teacher
Kupino 2015
Content:
1. Relevance
2. Project goals. Selection and justification of the problem
3. Possible options and their assessment
4. Drawing up a work plan
5. Useful tips
6. Main part.
Selection of materials
Little tricks
Model selection
Selection of tools, devices
7. Safety and sanitary rules
hygienic requirements
8. Execution technology
9. Economic justification
10. Connection with ecology
11. Self-esteem
1.Relevance
Embroidery is the oldest and most widespread type of decorative and applied art. Excavations of ancient burials and settlements, testimonies of chroniclers and travelers suggest that the art of embroidery was familiar to people of the distant past. Since ancient times, embroidery has decorated human clothing and household items. But we will never be able to find out who and when first thought of conveying the beauty of the surrounding world, their experiences and sensations with a patterned motif. Science is unable to accurately determine the time of the emergence of this art due to the fragility of the fabric and threads.
Embroidery was always done exclusively by women. For mothers and housewives, this was the most accessible type of applied art, which combined aesthetic needs, thirst creative activity for the benefit of family and home.
Having originated in ancient times, the art of decorative embroidery has been preserved for many centuries in the decoration of homes, clothing and various items everyday life.
One of the first embroidery schools was opened in Kyiv, in the St. Andrew's Monastery, by the sister of Vladimir Monomakh, where young girls learned the art of embroidery with silk, gold and silver threads. Over the centuries, the hands of craftswomen have created lush floral patterns on the clothes of nobles, wealthy strata of the urban and rural population, and in the design of religious decoration. Embroidery in folk life was more modest.
Until the end In the 18th century, embroidery was an amateur activity, a home craft. With the emergence of handicrafts and various types of crafts in the country, embroidery became a profession for many craftswomen. The development of embroidery has led to the formation in many regions of the country of separate centers of embroidery art with unique artistic features of patterns, colors, execution techniques, shapes and compositional solutions. In the 19th – early 20th centuries, embroidery was widely used to decorate folk costumes in all corners of our country.
Nowadays, this type of decorative and applied art continues to develop on the basis of ancient embroidery and is gaining increasing popularity. Modern embroidery is distinguished by its strict compositional design, simple color scheme, meets the requirements of the style of room decoration and the cut of clothing. Embroidered products enliven the room and are decorative element, which fights against standardization. Embroidery on clothing adds uniqueness to the most ordinary style, made from widely available fabrics of mass production and tailoring. A girl who knows how to embroider can look original among her peers by showing her imagination and reflecting her style and taste in the design of her clothes. The main thing is that the embroidery blends harmoniously with the fabric, model and is age appropriate.
2. Project goal:
Improving your capabilities in the field project activities. Development and execution creative project
Selection and justification of the problem
I chose this topic for my creative project because I believe that cross stitch is the most popular and widespread in our time. It is easy to perform on any fabric, counting a certain number of threads.
Cross-stitched paintings look very beautiful, original, and they fit very nicely into your home interior. Cross stitch allows you to express your individuality.
3. Possible options and their assessment
¤ Sewing the product – this technology very interesting, but requires enormous skill and material costs
¤ Knitting is a common type of needlework that requires great skill and patience.
¤ Embroidery – this type Since ancient times, handicrafts have been famous for craftswomen; they do not require a large investment of money; I master them perfectly. I choose cross stitch
Drawing up a work plan
5. Useful tips
To prepare the workplace
To make embroidery comfortable and not cause fatigue, you need to properly organize your workplace and follow certain labor rules.
¤ The table with fixtures and tools should be positioned so that the light falls on the work from the left side. It is necessary to monitor the position of the body, do not slouch or bow your head low. The body should be tilted forward during operation. The distance between the eyes and the work should not exceed 25-30 cm. Sometimes, for this purpose, the hoop is installed higher, placing a board, book, etc. under it. The chair is moved towards the table so that you can lean on its back.
¤ There must be order in the workplace. Before starting and after finishing work, you should wash your hands so that the thread and canvas remain clean, and no small particles of thread remain on your hands.
¤ Great value has the correct positioning of hands during work: left hand should be at the bottom, the right one is on top of the hoop.
Caring for finished items
¤ Embroidered work must be washed, well ironed while wet on the reverse side
¤ You can wash the product in lukewarm water with the addition of vinegar when rinsing; it is better to avoid sharp, rubbing movements, do not wring out, but simply wrap the washed work in a dry terry towel
¤ Iron the painting on a soft mat so that it is embossed. It is best to iron the painting from the middle to the edges to avoid creases and shifts on the base fabric. After ironing, the work should dry in the unfolded position.
¤ After the work is finally ready, it must be inserted into the frame. To do this, you need to stock up on plywood or thick cardboard the size of the embroidered picture, use a thick thread and a thick needle to pull the edges from the wrong side, first horizontally, then vertically, trying to pull the design as tightly as possible onto the cardboard or plywood, and then insert your work into the frame.
6. Main part.
Selection of materials
Success when doing any embroidery largely depends on the right choice fabrics and threads: thick threads are used to embroider on rough fabric; thin ones are used for more delicate work.
Dress patterns are also used for cross stitching. fabrics, the surface of which is easily divided into squares thanks to the linen weave of the threads or suitable coloring.
Threads for embroidery are chosen in accordance with the thickness of the fabric, the nature of the pattern and the technique of embroidery. They can be cotton, silk, wool, synthetic, but they meet the same requirement - to be strong and not fade when washed. The most common and suitable thread for any type of embroidery technique is floss. They are made from the best varieties cotton They come in different colors and shades and come in one or six folds. Floss acquires its shine as a result of special processing - mercerization. For embroidery on canvas, cloth and other coarse fabrics, thick paper or woolen threads and iris are used. Using bobbin threads No. 10...80, various stitches and openwork embroideries are performed. The length of the embroidery thread should not exceed 50 cm.
Little tricks
¤ If you embroider with artificial silk and synthetic threads, they fluff up and give the embroidery a velvety look.
¤ To prevent fabric threads from fraying during work, the edges of the product are overcast
¤ If your eyes are sore after tiring work, place a solution soaked in cold water tampons, then replace them with tampons soaked in warm water. Repeat this procedure several times
¤ Do you want to thread a thick thread into a needle, but you just can’t do it? If you hold the thread and needle over paper of a contrasting color, things will go smoothly. You can also soap the end of the thread and twist it into a rope
Model selection
I chose cross stitch as the theme for my project. This type of needlework does not require much effort from me, but on the contrary, has a positive effect on nervous system, and, therefore, for all health. I have a great advantage over others in that no one else will have an embroidered picture like mine, and I also benefit financially. When I embroider, I not only express and realize my ideas, but also gain experience in cross stitch. Before starting work, I choose a sketch at my discretion. I thought about it and decided to embroider two paintings, the painting “Cat” and “Flowers”, they will be a decoration home interior my grandmother.
Selection of tools, devices, equipment
For embroidery you need fabric, thread and a simple set of tools and accessories: needles, scissors, thimble, ruler or measuring tape, hoop, piercing, cutter.
To ensure good embroidery quality, use hoop. Their main purpose is to keep the fabric taut and protect the embroidered pattern from pulling (deformation). The hoops are round, oval and rectangular. The hoop consists of two hoops (20 to 25 cm in diameter) that fit into each other. To better secure the fabric in the hoop, the smaller hoop is tightly wrapped in thin fabric. The fabric prepared for embroidery is placed on a smaller hoop, a larger one is put on top and the material is pulled tightly on all sides. If you need to embroider on a small piece of fabric, then sew another fabric to it, then stretch it evenly so that the threads do not warp. If the design is large and does not fit within the hoop, it is embroidered in parts.
To embroider you need to have a kit needle: thick – for embroidering on thick fabrics with iris and woolen threads; medium thickness and thin - for embroidery with floss and bobbin threads. It is better to take short needles with a long eye so that the thread can be pulled through freely. Beginners should use needles large sizes. In the future, larger needles. Subsequently, needles are selected in accordance with the fabrics and threads (on thin fabrics they embroider with thin threads and needles).
In work (embroidery) they use ordinary household scissors and small, with curved sharp ends and sharpened blades.
Thimble when embroidering, it makes it easier and faster to push the needle through the fabric, and protects your finger from being pricked by the eye of the needle, especially when embroidering on rough fabrics. They put it on the middle finger of the right hand and select it so that it sits tightly, does not wobble (is not spacious), but does not squeeze the finger. Thimbles come in metal and plastic. It is recommended to give preference to metal.
Centimeter tape or ruler used to determine the location of embroidery and to mark the grid.
By using punctures – a bone or plastic stick with a pointed end – you can perform openwork embroidery. It is convenient to use the piercing for making holes in fabric.
If you cannot use carbon paper to transfer the drawing, use cutter .
It is better to store embroidery accessories in a separate box or basket so that everything is at hand. Thrift allows you to use them longer.
7. Safety regulations and sanitary and hygienic requirements
1 Safety precautions at work
with tools and accessories
From the first embroidery lessons, you need to accustom yourself to following safety rules while working:
¤ Use tools carefully;
¤ Do not stick a needle into clothing during work or leave it at the workplace;
¤ The needle should always be with thread; if it is lost, you should immediately look for it;
¤ Do not bite the thread with your teeth, but cut it with scissors;
¤ Pass scissors to each other only with the rings first;
¤ Do not put thread, fabric, or needles in your mouth;
¤ Sew with a thimble to avoid pricking your finger;
¤ Know the number of needles taken for work. At the end of the work, check for their presence. Be sure to find the lost needle;
¤ Do not sew with a rusty needle: it does not penetrate the fabric well, leaves stains and may break.
¤ Wet heat treatment of products should be carried out on ironing board or a specially equipped table with a working iron.
2 Correct posture while working
is as follows:
¤ The legs must rest firmly with the entire sole on the floor, since in a different position of the legs the blood circulation is disrupted;
¤ The body must be kept straight or slightly tilted forward;
¤ Tilt your head slightly forward;
¤ You cannot lean your chest on the table;
¤ Arms should be bent at the elbows and no more than 10 cm behind the body;
¤ When working, do not place your elbows on the table;
¤ The distance from the eyes to the product should be on average 30 cm;
¤ During work, you should periodically change the position of the body
3 Organization of the workplace
when performing manual work
¤ A workplace is usually called a section of a room or office intended for performing certain work and equipped in accordance with this work.
¤ For operations performed manually, a work table is required on which tools and devices are located. At the workplace there should be only workpieces, tools and devices that are necessary to perform this work. All work is performed on the table; the workpiece must be held in front of you.
¤ Has a great influence on the well-being of workers and the quality of their work. correct landing. Incorrect body position of a worker causes premature fatigue and decreased performance. It also contributes to the appearance of stoop, curvature of the spine, the development of myopia, and so on.
8. Product technology
1 Technology for cross stitching “Cat” paintings
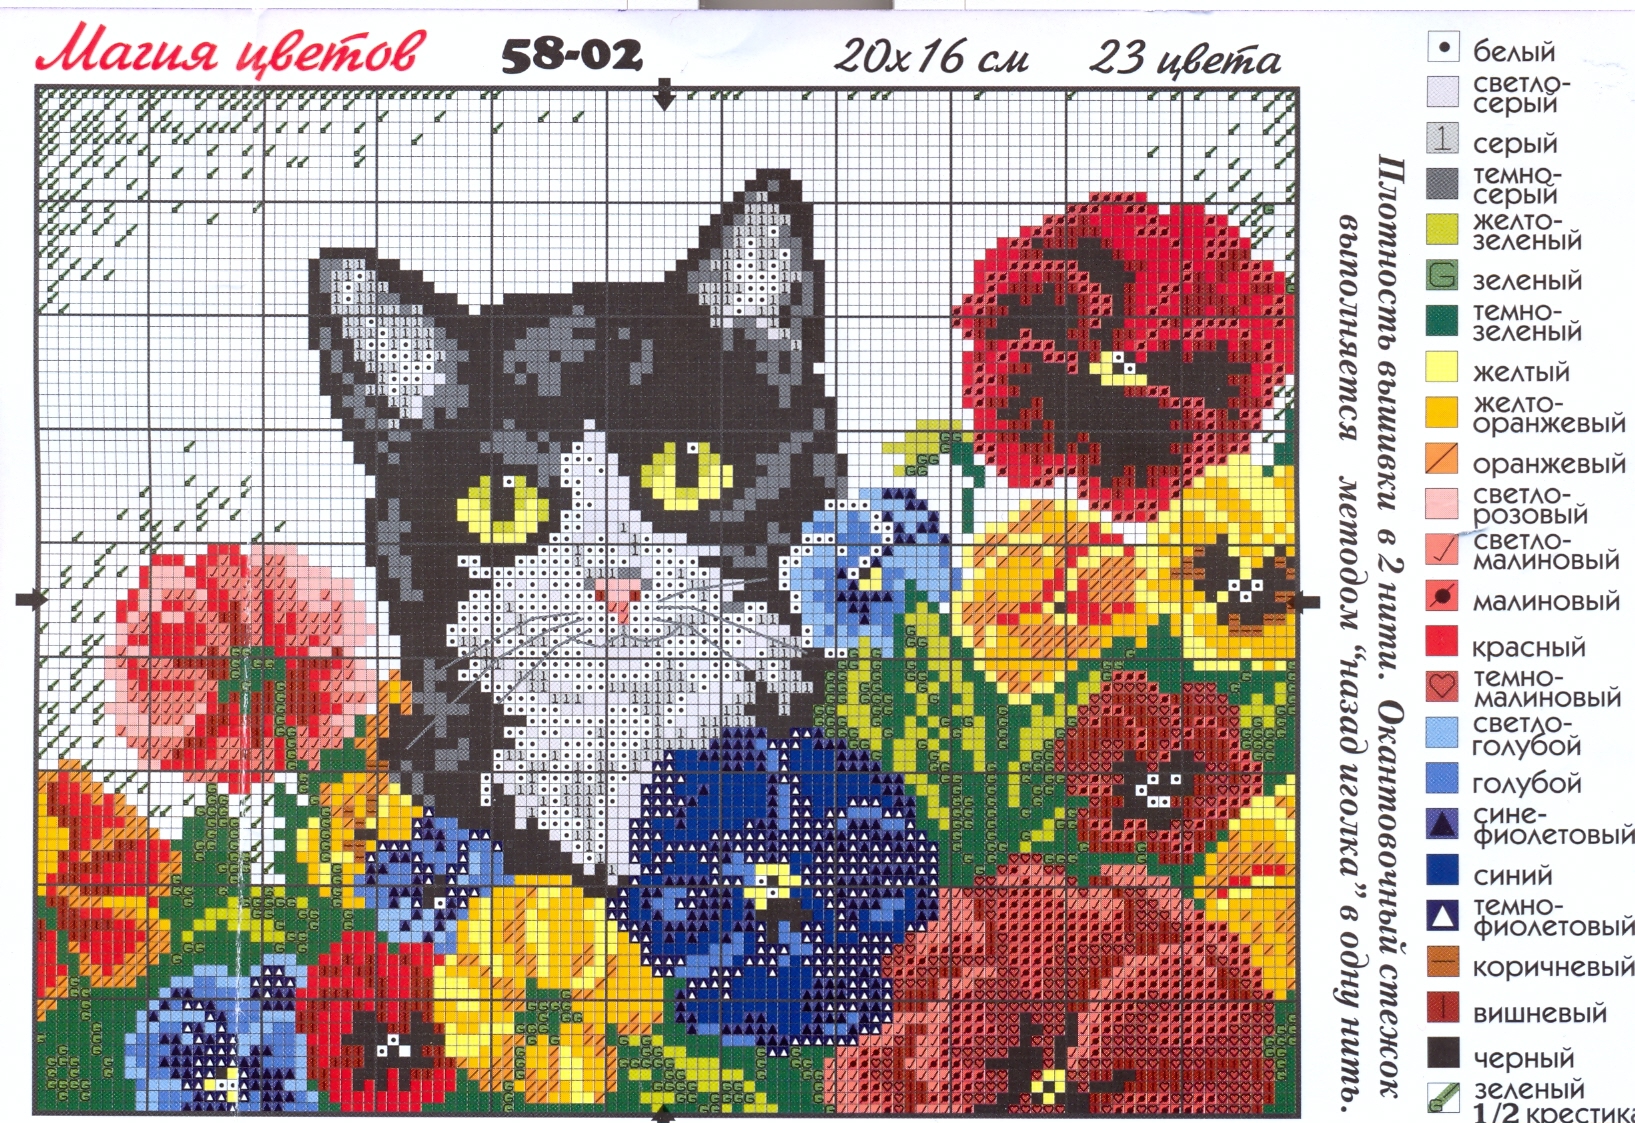
To make this product we will need a palette of colors of floss threads, canvas, an embroidery needle, a hoop, scissors, I found a diagram of the painting on the website of craftswomen.
2 Making a cross seam
This seam is made with two diagonally crossed stitches. Find the location of the embroidery, determine the size of the cross by the number of threads. Fasten the working thread in the left corner of the square and begin embroidering. Count 3...4 threads along the length and width of the fabric and make an oblique stitch. The working thread with the needle goes along the wrong side, a certain number of threads is counted, the needle is inserted into the left corner of the square, making an oblique stitch from top to bottom. If you need to embroider a row of solid “crosses” horizontally, then the oblique stitches are performed first in one direction, and then overlap them with a second row of oblique stitches in the opposite direction. When embroidering with a cross, the stitches should be at the same distance from each other. Embroidery on the reverse side has the form of vertical or horizontal stitches. The working thread is secured without a knot on the front side under the part in 
 embroidery
3 Securing the working thread
To secure the thread at the beginning of embroidery: starting from the first cross, leave about 2 cm of thread from the wrong side. With the next 4-5 stitches, grab this thread, and cut off the rest with scissors so that there is no tail left.
TO 
when the thread runs out, you can fasten it by passing along the wrong side of the embroidery under a row of already existing 4-5 stitches, then the tail will practically not be visible.
4 Description of work
You need to start embroidery from the center. To find the center on the fabric, you need to fold the material in half along and across the warp thread and press lightly with your fingers.
It is better to start with large areas of the same color. Then it is easier to calculate where to embroider small areas.
The shorter the thread, the less it curls when embroidering. Therefore, the length of the thread should not exceed half a meter. Smaller thread helps produce better quality embroidery.
After a few stitches, it is advisable to let the needle hang freely so that the twisted thread can return to its normal state.
It is better not to tie knots to secure the thread, as they may later appear on the front side of the embroidery during ironing.
Scheme "Kitties"
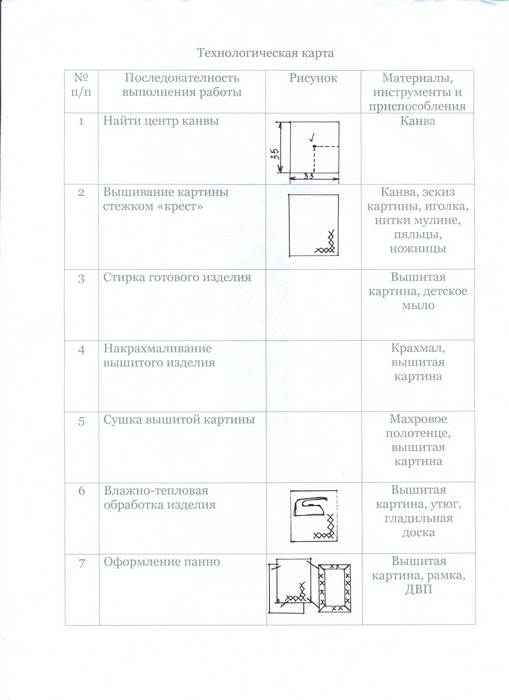
5. Route technological map embroidery paintings
№ p/p
Operation
Materials
Equipment
Choosing a painting scheme
sketch
Some elements from various magazines
Selecting a canvas
canvas
Selection of threads
floss threads
Washing the finished product
embroidered picture
baby soap
Wet heat treatment
embroidered picture
iron, ironing board
Panel design
frame, fiberboard
9. Economic justification
I chose cross stitch as the theme for my project. This type of needlework does not require much effort from me, but on the contrary has a positive effect on the nervous system and overall health. I also benefit financially. When I embroider, I not only express and realize my ideas, but also gain experience in embroidery. Before starting work, I chose the drawings and floss threads for them at my discretion. Remains of thread can be used in the manufacture of panel paintings.
Before starting work, I determine the cost of the product being completed. The production of this painting requires the following material costs:
Name of materials
Quantity
Price
Sum
Fabric canvas
Floss threads
104
Total:
104
I had needles, hoops, scissors at home, and skeins of floss thread remained from the previous work.
Since our family very often cross-stitches, we order floss threads "Gamma" through the online store, one of the leading manufacturers of sewing accessories in Russia. The floss threads from this manufacturer are different high quality and durable color, they do not fade even after washing and do not fade in the sun. They are made from 100% cotton using European equipment, which guarantees their strength and reliability.
The canvas fabric was also purchased from us in advance.
10. Connection with ecology
In our modern age, natural threads are rare, mostly synthetic, but for my work I chose floss threads. These threads are an environmentally friendly product and do not pollute the atmosphere. They do not change color when washed.
11. Self-esteem
I give my assessment on the following points:
Have I done everything?
Did my project succeed?
Am I satisfied with my product?
Do I want to fix something in it?
Having answered all these questions, I will evaluate my own work.
Embroidery! 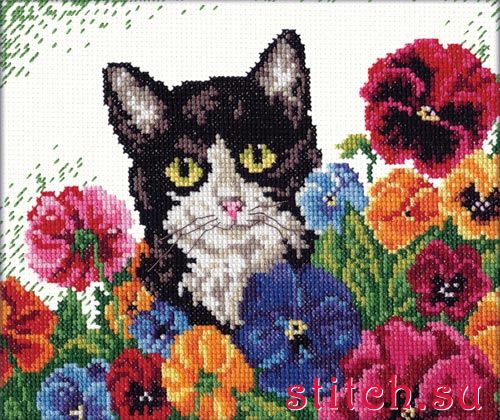
All the colors of the rainbow play in my hands.
Hoops, threads, needles and my imagination
doing their job!
Embroidery is the future!
National color always, everywhere and
everywhere.
There is an art workshop.
COME!
LOOK!
CHOOSE!
Embroidery of linen, suits, coats!
13. Literature used
Aleshina, L.A. Painting with needle and thread
Children's encyclopedia
Dorozhkina, T.N. Handicraft technique
Litvinets E.N. Learn to embroider
M oiseenko, Yu.E., Bichukova, E.V., Bichukova T.V. To a young embroiderer
Anyone who has ever created something with their own hands knows that overwhelming feeling of pride when you hold the finished result of your work in your hands.
Among the variety of types of needlework, cross stitch is becoming increasingly popular. It will be very useful for beginning needlewomen to master the basics of this skill.
Cross stitch is easy to learn and very beautiful - the design is spectacular, textured and, most importantly, cross stitch for beginners does not require any special skills. A needle and a simple cross pattern allow you to create real works of art - bright and unusual.
If you have certain abilities and experience, you can later reproduce even photographs on fabric with colored threads, not to mention simply decorating canvases. One of the simple cross stitch patterns can be found in our article.
Experienced embroiderers advise starting to get acquainted with this type of needlework using ready-made kits. The best of them are considered to be those that use a small-format pattern, the diagram of which is easy to read, and the base fabric has average density weaving threads. Even if these are small cross stitches, they will allow you to understand the basics of art, master stitch technology and understand changing threads according to a pattern.
This embroidery technique consists of close-fitting diagonal stitches located on top of each other. The main secret of a beautiful result is that when working on a drawing, you need to make sure that the bottom thread always goes in one direction, and the top thread in the other. Following this sequence will give your creation accuracy and a certain charm.
When doing this kind of embroidery, it is very important to follow the thread movement pattern and needlework technique. If on the front side you get a classic cross pattern in each square of the canvas, then on the back you should get even vertical stripes. This effect is possible if, during operation, the needle is constantly vertical in relation to the canvas. Following these simple tricks will allow even a beginner to get amazingly beautiful work.
When you gain experience, you will be able to do such unimaginable things as However, the first step of any pioneer in this type of needlework is cross-stitching a napkin. A small amount of work and a bright final result allow you to get true pleasure, available only to embroiderers. To and in further work were always “at the top of their game”, it is necessary to remember a number of nuances regarding materials for embroidery.
What is needed for cross stitch?
Material that is easy for even a beginner to work on is called countable. This means that the texture of the fabric has a clearly defined thread pattern, which are located strictly perpendicular to each other. The most popular among needlewomen is Aida, on which the squares are clearly traced. The material marking number decreases as the number of diagonal stitches per ten square centimeters increases. That is, the largest pattern will be obtained on Aida 11 fabric, and the smallest - on Aida 18.
Regular canvas is also suitable for beginners, but it will differ from professional fabric in being more soft. Lugana, Linda, Murano and similar fabrics are recommended to be mastered with a certain skill, since the weave here is denser. But the result is completely different - refined and more sophisticated. Cross stitch for beginners does not require any special preparation if you work with a ready-made kit. Otherwise, you will have to independently select threads and needles for embroidery.
Regular floss is suitable for this work, but it is advisable to wash it before starting to design the pattern, since if the quality of the dye is low, your beauty may fade and the picture will lose all its charm.
When selecting a needle, you must adhere to the following rules:
- the needle should be blunt, with a rounded end;
- The eye of a needle for needlework should be large so that the threads do not become deformed when pulled;
- all needle parameters should be average: not thin, not long, not short.
This needle will be easy to use even for the most inexperienced craftswoman.
What techniques do beginners need to know?
Of course, cross stitch requires a lot of work, but once you master the technology it becomes a truly exciting pastime. When you start your creativity, do not tie a knot on the thread - it is better to leave the tip as a line and carefully weave it into the work from the inside out. When the thread becomes short, bring it to the wrong side and thread it under several stitches. As for the stitches themselves, there are several varieties of them, which helps make the work brighter and more impressive.
Lighter cross stitch is done with whole elements, when the entire pattern is created only by changing the color of the thread. But even for beginners, cross stitch can turn out to be especially interesting if you use all the basic and additional elements in your work.
They are divided by variety:
- single incomplete cross ¾;
- double incomplete cross ¾;
- a stitch called “back needle”;
- half cross;
- double-sided cross;
| If a full cross consists of four rays, then a half-cross has only three rays, and first a full diagonal is made, and then a half stitch. With a double incomplete cross, the entire pattern is made with two colors of thread, each of which forms a single ¾ cross. If you If you are interested in cross-stitching a napkin, then you may have to master the “back needle” stitch, when the needle, after reaching the front side, makes only one stitch back in any direction of the pattern and comes out again at a distance equal to one stitch from the starting point. | |
| Beautiful and light cross stitch is obtained by using a double-sided technique, the peculiarity of which is that an identical pattern is obtained on both the front and back sides. The execution of this seam includes 4 stages, with the last stitch running at an incorrect angle, but this is not noticeable in the overall volume of the fabric. | |
| More complex cross stitch for beginners involves the alternating cross technique, which is also performed in four stages: first all the lower diagonals, and then the upper stitches. | |
| Remarkably beautiful patterns are obtained when embroidery is carried out using a Chinese or marked cross, and the reverse side of the latter is often used to decorate the ornament. | |
| Beautiful embroidery Cross work requires a lot, including the use of additional elements, such as a half-cross. As the name suggests, this is only half of the embroidered element. When you master all these simple elements, you can try your hand at more complex techniques. |
Once you start embroidering, it's hard to stop. The reason is that this type of needlework is captivating in its simplicity of execution. And combined with the most beautiful results, you want to create more and more, achieving perfection in this art.


