Electrically heated floors are easy to install in a private house or city apartment yourself. It is enough to understand the technology of their installation and take into account the advice of specialists.
Features of warm electric floors - pros and cons
Electric floor heating involves the use of a special cable, which is laid according to a certain pattern on the floor base and then connected to the household electricity supply network. The design of such a system does not require installing pipes and connecting them to heating. This distinguishes electrically heated designs from common water ones. The electric heating systems we are interested in have the following advantages:
- 1. Possibility of installation at any time of the year in any room.
- 2. Regulation of the system using modern electronics, which automatically turns off the heated floor in the event of an emergency.
- 3. Guaranteed heat supply to the desired areas of the room.
- 4. Possibility of installation in non-residential premises (garages, balconies, etc.).
Electric underfloor heating can be used as an additional and main heating system. But only subject to proper installation in accordance with the requirements for working with electrical installations.
The disadvantage of electric floors is the need for constant monitoring of their functioning. This problem is solved by connecting electronic devices that automatically regulate the operation of the heated floor. If such devices are not installed, the comfort and safety of using electrical heating system decreases. In addition, the type of heating under consideration requires relatively large financial costs for the purchase of the required equipment, its proper installation and subsequent maintenance (it should be performed regularly) during operation.
Many consumers refuse to use heated floors, worrying about high consumption electricity. One thing can be said here. Electricity bills, of course, will be quite high. But it is quite possible to reduce costs (and significantly) by installing the already mentioned auto control systems. Save on electronic devices no need. The costs for them will pay off quickly.
Installation cable – which one to choose?
Warm electric floors can be installed using two different types of cables:
- resistive;
- self-regulating.
Products of the first type have a core with high electrical resistance. When current passes through it, it is converted into thermal energy used to heat the room. The specified core must be included in insulating material, which reduces the risk of electric shock. Additionally, a metal braid is placed on the insulation, which plays the role of protective screen and a grounding element.
Single-core resistive cables are the easiest way to install an electric heating system. They should be installed over the entire area of the floor base and connected to electricity at both ends of the wire used. Essentially, this means that the cable installation must be done in a loop. Single-core systems are quite reliable in operation. But when they are used, an electromagnetic field is formed in the wire. The metal braid smoothes out this process. Unfortunately, it cannot completely exclude the possibility of a field appearing. Therefore, it is undesirable to use such systems in residential premises.
If you want to have an absolutely safe heated floor at your disposal, it is better to opt for two-core cables. They have an additional conductive core. It is located between the heating wires. When using such cables there is a risk of electromagnetic field comes down to zero.
Resistive wires with one or two cores must be terminated in concrete screed floor as carefully as possible. Otherwise, the cables may overheat and damage the entire heating system.

Self-regulating wires will provide protection against overheating and breakage
Problems with overheating and breakdown heated floors does not occur if self-regulating wires are used. They can be used for installation under tiles and any other finishing coatings. In a self-regulating cable, the main element is a special matrix of polymer material. It guarantees the operability of the system as a whole when its individual sections overheat. Due to this, the durability of electric heating increases 5–6 times. True, the cost of self-regulating wires is much higher than the price of resistive cables.
Calculation of system power - we’ll do it ourselves
The power characteristics of the heating cable are easily calculated. It's done like this. You need to multiply the floor area (measured in sq. m.) by the value of the installed power (in watts). The last value depends on the type of flooring. If the cable is installed for a floor under tiles, and the system will be used as an additional heating source, the recommended value of the installed power is 130–150 W/sq. m. In cases where electric heating for tiles is planned as the main one, this value is 180–200 W/sq. m.

The desired power affects the wire laying pitch
Power values for other types of coatings are given below:
- granite slabs – 210–220 (additional system) and 260–300 (main);
- porcelain stoneware – 160–170 and 200–220, respectively;
- parquet board, carpet, laminate – 120–150;
- linoleum – 130–150.
Under decorative coverings made of linoleum, laminated and parquet boards, carpet cable is installed exclusively to create an additional (auxiliary) heating system. As the main heat source, the heating cable can perform its functions exclusively under tile materials.
Also, installation of an electrical cable (single- or two-core) requires calculation of the wire laying pitch. There are no problems here at all. It is necessary to divide the area of the room that will be heated by the length of the cable. Important point! The area of the room is understood as that part of the surface of the room that is not filled with furniture. There is no need to heat the floors under sofas and massive cabinets.
We install electric heating using understandable technology
When all calculations have been completed and the cable has been purchased the right quantity, installation can begin electrical system heating The do-it-yourself work plan will be as follows:
- 1. Select a small area on the wall in the room (distance from the floor - 0.5–1 m). Make a recess at the designated location for installation distribution box. You will put a thermostat in it. It is necessary to control the operation of the heated floor.
- 2. Connect the grounding and power wires to the box.
- 3. Make a small groove in the wall surface. You will run the wires along it to the connection point between the thermostat and the heating cable.
- 4. Clean the floor base, install a small thickness (about 20 mm) thermal insulation layer on it (it is advisable to use foil materials).
- 5. Place on the floor in increments of 0.5–1 m mounting tape, fix it with screws or self-tapping screws.
- 6. Lay the cable on the tape according to the planned pattern (loop, parallel lines).
- 7. Place a corrugated tube between the heating wires and place a temperature sensor in it. Note: the end of the tube should be plugged. Then concrete mortar will not get clogged into it and will not damage the sensor.
- 8. Bring the ends of the temperature indicator and the heating cable to the installation site of the thermostat, connect them to the control device using special couplings. The latter are sold together with an electrical cable.
All elements of the electrically heated floor are installed. Now you can pour the concrete-sand mixture screed. Its thickness is 3–5 mm. After the screed has hardened, you can connect the system to the power supply and then lay the finishing coating.

Advice. It is better to entrust the connection of a heated floor to an electrical panel to a professional if you do not have sufficient knowledge in the field of electrical installation to perform such an operation yourself.
Increasingly, heated floors cover all the floors in an apartment and house, and from an additional heating system, floor heating goes into the main, and sometimes the only heating system. In this article I will consider in detail the types and properties of floor heating in an apartment and house.
Hello dear readers! Warm floors in the bathroom, toilet, and kitchen are no longer some kind of luxury. This is rather the minimum necessary for comfort. Increasingly, heated floors cover all the floors in an apartment and house, and from an additional heating system, floor heating goes into the main, and sometimes the only heating system.
About heating the room
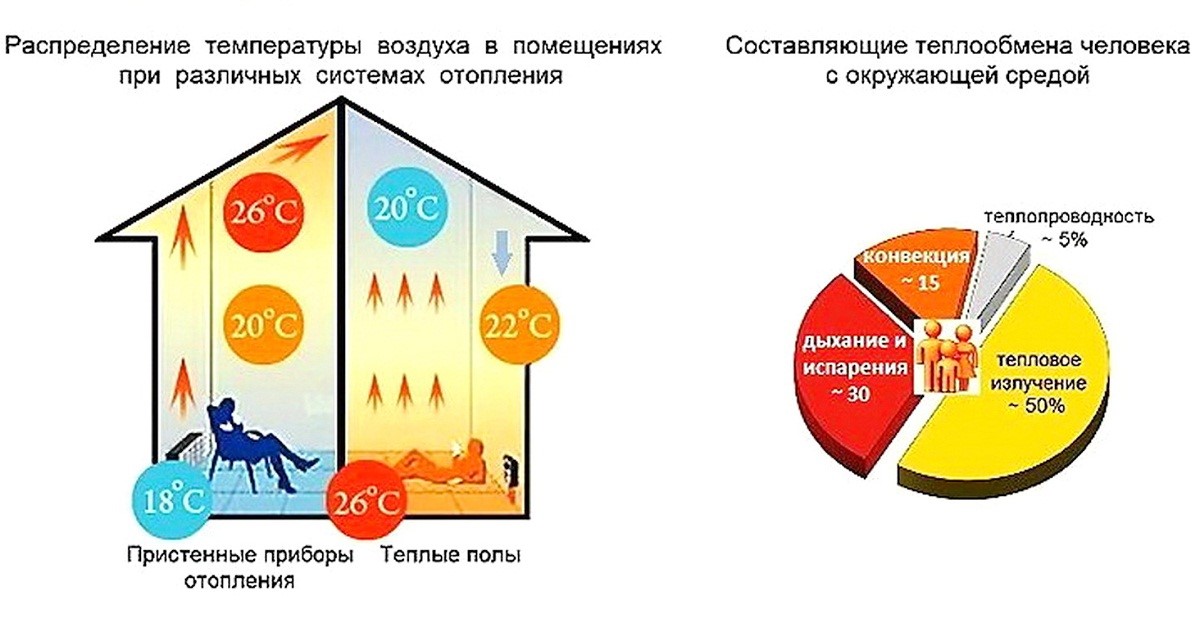
The classic home heating system is radiators or convectors installed under the windows of the room. Windows serve natural ventilation premises and cold air, penetrating through the windows into the room from the street, they are heated by heating radiators and, as a result of natural convection, moves from a warm place in the room to a cold one. We don’t see these air flows, but they are there and pass upward from the heating devices near the window, then, gradually cooling, along the ceiling to the opposite wall and return along the floor to the heating device.
Note: No heating system for a house or apartment will be ineffective if standard methods of retaining heat in a house or apartment are not followed: plastic windows, insulate the walls of the house, use external insulation technologies, that is, take all measures to preserve heat in the room.
With such a heating system, the heating of the room occurs unevenly. The warmest place is near the radiator, the coldest is in the opposite corner. To heat the room evenly, we use a variety of portable heating devices, dragging them from place to place. But anyway, the warmest place in the room remains near the ceiling, and the coldest near the floor.
About floor heating
The room heating pattern changes when using floor heating. Floor heating occurs evenly over the entire area of the room. Warm air rises evenly, creating an almost ideal difference in air temperature from floor to ceiling. When the temperature of the floor heating system is correctly set, a temperature of 24° C is created at foot level, and 20° C at head level. This is the most comfortable indoor temperature climate for a person.

How can you heat the floor?
General principle of floor heating
Any floor heating system consists of a heating element evenly distributed around the perimeter of the room and neatly hidden under the floor finish. But it's not that simple.
The heating electric cable of a warm floor must be insulated from direct contact with the base of the floor and the walls of the room. This insulation should prevent heat loss heating element and direct all of its heat to heat the floor, and not the neighboring rooms. This insulation is called thermal insulation and is integral element floor heating systems.

To increase the heat transfer of the heating element of a floor heating system, it must be enclosed in a layer with good heat transfer (screed) or placed in a kind of “sandwich”, where the bottom layer is a heat reflector and the top layer is a good heat conductor.
class="eliadunit">
- The first floor heating system is called concrete.
- The second floor heating system is called floor heating.
About floor heating elements
The heating element of a floor heating system can be water or electric.
Water heating element for floor heating
The water element heats the floor by circulating hot water through it. This floor heating system is called a water heated floor. The water heated floor circulation system must be independent of central heating. Also, it should not have plumbing penetrations into internal system water supply of an apartment or house. In other words, you cannot connect to a hot water pipe running indoors.

You can only connect to a separate water supply system.
Electric floor heating element

The electrical element of the floor heating system is a variety of electrical cables converting the energy of electric current into thermal energy. In other words, the electric current flowing through the heating element heats it, and it heats the floor of the room.
Depending on the type of electric heating element, electric floor heating is called cable or film. Cable floor heating is divided into resistive cable heating and thermal mats. Film heating is otherwise called Infrared heated floor.
But let's return to floor heating systems.
Concrete floor heating system

The principle of a concrete floor heating system is that the heating element is laid on a thermal insulation layer and filled with cement screed of various thicknesses. But although it is called concrete, instead of concrete, a cement-sand mortar or self-leveling floor is used.
Concrete water heated floor systems are used with a water heating element. An electric heated floor is heated by a resistive electric cable.

The floor heating system resembles a “sandwich”. The bottom of the flooring system is heat-reflecting surfaces, the top is special heat-conducting materials that separate the heating element from the floor finish.
In conclusion, I would like to note that all floor heating systems are called a “warm floor” system or, more simply, “warm floor”. Read more about each type of “warm floor”, the principles and features of their design in the following articles on the site.
That's all! Walk on the heated floor!
"is quickly gaining popularity. It is much more pleasant to walk on a warm surface without the fear of catching a cold. You can make such a system with your own hands. Let's talk about this.
There are three types of underfloor heating. Each type of design has its own disadvantages and advantages. Let's try to figure out which ones exactly.
The electrically heated system includes a temperature controller and electrical cable. The difficulty lies in making the tie after laying the wires. The procedure itself is simple. Other disadvantages include a sufficient amount of energy consumed from the network and radiation that “comes” from the cable.
Electrically heated floor
You can save money by installing the “” system. The design consists of a large number plastic pipes, which contain water. The advantages include: no radiation, no electricity consumption, low cost. Installing the system yourself is more difficult than in the first case. What you should be wary of is that the pipes may burst and the neighbors below will be flooded.
Infrared floor
Installation of a water floor
After carrying out the calculations and preparing the tools, you can begin. Consider a concrete system.
Floor installation is divided into several stages:
- Dividing the room into zones, approximately forty square meters;
- Laying insulation on a rough surface;
- Installation of pipe contours and laying of reinforcing mesh;
- Pressure testing works;
- Concrete screed;
- Laying the final floor covering.
Breakdown into zones
The maximum area of one plot is forty square meters. Aspect ratio – 1:2. This is necessary to avoid cracking of the screed.
Insulation coating
Thermal insulation material is laid on the cleaned and leveled surface. It is necessary to ensure that some of the heat does not escape from the room through cracks in the floor. Instead, it will rise towards the ceiling.

Laying thermal insulation for heated floors
The thickness of the thermal insulation layer should not be less than three centimeters, but the maximum thickness can reach up to fifteen. It all depends on the amount of heat lost and the design of the room.
The thickness of the thermal insulation layer should not be less than 3 cm.,
the maximum thickness can reach up to 15 cm.
It all depends on the amount of heat lost and the design of the room.
The damper tape is laid around the perimeter of the room. After that on the layer thermal insulation material polyethylene film is laid.
To protect the pipe from damage, it can be inserted into corrugated pipe. They can be laid in a spiral, snake or other way.
Pressure testing works
Crimping is necessary to detect mechanical damage. Carried out under pressure.
Concreting
The penultimate stage is pouring the concrete screed. Only carried out when accuracy has been verified preliminary work and all shortcomings, if any, were corrected. When concreting, the system must be under a pressure of 4 bar.
The thickness of the screed is up to 70 millimeters. Made from a mixture of sand and concrete or other components.
Laying the final coating
The last stage is laying the finished floor. This is done immediately after the screed has dried. For these purposes, you can use any material, taking into account taste preferences: parquet, and so on.
If you do not have experience in carrying out this type of work, you will have to call specialists. During installation, you can carefully observe the process in order to subsequently put the acquired knowledge into practice.
During construction or renovation, specialists are increasingly abandoning the classic heating scheme in favor of an innovative floor heating system. Heated floors - modern, comfortable, effective way make your home warm and comfortable at any time of the year, without disturbing the style of the interior. This technology is widely used in residential, office and industrial settings.
Conventional heating includes radiators that heat the air only near the window. In this case, as a result of convection, the warm flow rises from heating devices, gradually cools and falls down, returning along the floor to the radiator. With this heating scheme, the heat distribution is uneven, the warmest place is near the ceiling, and the coldest place is at the bottom.
A warm floor consists of a base, a heating element distributed throughout the room, auxiliary elements (sensors, thermostats, couplings) and decorative covering. The floor is heated evenly throughout the room to the same temperature.
Advantages of a “warm” floor:
- large heat transfer area;
- no convection;
- reduction of humidity;
- possibility of regulation in separate rooms;
- environmental friendliness;
- safety (subject to compliance with installation techniques).
Note: Underfloor heating can be the sole or auxiliary heating system.
Disadvantages of "warm floor":
- clear requirements for finishing;
- high cost of the system and installation;
- the need to dismantle the top covering during repairs.

Classification of heating elements
Depending on the heating element, heated floors are divided into several types, each of which has its own installation features.
Table 1. Types of heated floors
| Properties | Water heated floor | Cable heated floor | |
|---|---|---|---|
| Heating element type | Hot water pipes | IR film, IR rods | Cable |
| Installation time | From 4-5 days | 1 day | 1 day |
| Application | Floor | Floor, ceiling, walls. | Floor |
| Repair | Only defective segments can be repaired; the rest of the system works | If a single section is damaged, the entire system fails. | |
| Maintenance | Required | Not required | Not required |
| Zoning | Impossible | Maybe | Maybe |
| Installation cost | High installation costs, low operating costs | High equipment costs, low operating costs | Relatively inexpensive installation, high energy costs |
| Possibility of use in multi-storey buildings | No | Yes | Yes |
| Service life | Up to 50 years | Up to 15 years | Up to 25 years |
Prices for heated floors Warmstad
Warmstad floor heating
Electric heated floors: detailed characteristics
The most common system today is electric floor heating. A variety of cables that convert current energy into heat are a heating element. Installation of thermal insulation, grounding, and installation of thermostats of varying complexity are required. Automatic sensors are able to turn on the power to the system when the temperature drops, and the thermostat maintains the surface given parameters. A compact control and adjustment system saves space; connections are made for each room separately.

Note: system installation electric heating does not require approval if the total power consumption does not exceed 15 kW.
Advantages of electric heated floors:
- This best option for an apartment (the risks of causing inconvenience to neighbors are minimized; installation does not need to be coordinated);
- heat up quickly when turned on;
- the ability to maintain a constant temperature;
- safety;
- compactness of control devices;
- ease of control;
- long service life.
The main disadvantage of such a system is the high cost of electricity, even with high-quality insulation premises operating costs will be significant.
Cable type electric heated floor
To install heated floors, resistive or self-regulating types of cable are used. They are used in rooms with complex layouts, since they can be laid in any configuration.

When choosing the type of cable, the heat transfer power, as well as the area and volume of the room, are taken into account.
In a single-core resistive cable, heat is generated by one conductive core. It heats up quickly and has a constant heat transfer along its length; overheating is possible at separate areas. Such a cable is connected to electricity from both sides, i.e. When installing, you need to lay it out in a loop so that the beginning and end meet in one place, or lay another supply wire. This is the most cheap option, but it emits strong electromagnetic radiation.
A two-core resistive cable consists of two cores; one or both are used to generate heat (then the other will be a conductive element). It has two layers of insulation, which eliminates short circuit. A two-core cable is more convenient to use; power is supplied only from one end, and a sealed coupling is installed on the other. It has a higher degree of electromagnetic protection.

Resistive cables are distinguished by their simplicity of design, low price, increased power and stable characteristics over the entire service life. But they are sold in pieces of a certain length, they cannot be cut in any way, so if one section breaks, you have to replace the entire section.

Self-regulating heating cable has a different operating principle and structure. It changes heating power when the surrounding temperature changes, ensuring uniform heating of the entire floor surface at minimum costs electricity. The design of such a cable is more complicated: in addition to the current-carrying cores, it contains a polymer semiconductor matrix, which is a heating element and allows you to regulate the temperature. In the event of a breakdown, only a section of the cable can be replaced. This heating element has reliable protection, safe and durable. Possessing significant heating power, the self-regulating cable is economical; when laying, it can be cut into sections of any length. The disadvantage is the high price.
Electrical cable systems are widely used in combination with any decorative coating.
Heating resistive mats
The heating mat is a fiberglass mesh base with a two-core cable attached to it. They simplify and speed up the installation of heated floors, since the cable along them is already fixed at a certain pitch. Porcelain stoneware or ceramic tiles are ideally combined with this system as a decorative floor, without the need for additional screed, and the heating element is mounted in a layer of tile adhesive. This is a reliable, durable and safe technology for creating heated floors.

It is very convenient to use mats in certain areas - in the kitchen, in the bathroom, in the hallway where you take off your shoes. Although they are also used as the only source of heating for the entire room. It is necessary to carefully consider the selection of the power of the mats, high-quality cable and regulators. In order not to waste electricity, you need to choose mats so that at the lowest power they heat the room to the desired temperature.
When choosing quality materials, correct installation and operation, this type of “warm floor” is durable and reliable.

Warm floor infrared operating principle
Infrared flooring is universal and suitable for any type of housing.
It differs in the way energy is transferred; heat transfer occurs through the action of electric current on carbon elements, which creates infrared radiation that heats the floor.

Two types of infrared elements are used:
- film;
- rod-shaped
Film - a thin polymer film, inside of which copper conductive busbars are located and graphite paste is sealed. The thickness of this film is less than 5 mm. The heating intensity is controlled using a regulator.
The great advantage of infrared film is its simple installation. No screed is required, but a layer of heat-reflecting substrate must be laid underneath.

Infrared heated floors are efficient, economical and reliable. The film is characterized by high heat transfer with low energy consumption.

The disadvantage of IR film is that it is afraid of overheating (200°C and above), so it is not placed under heavy household appliances and furniture.
Rod infrared mats are tubes filled with a carbon composition, which are connected in parallel to two current-carrying busbars in polymer insulation.

Each rod functions independently, and if one or more of them breaks, the system will still work. Carbon rods self-regulate as temperature changes external environment the amount of heat generated changes. The system must include a thermostat and a floor temperature sensor; if they are not installed, the heating elements will operate constantly at the same power, and this is not economically profitable.

Advantages of rod infrared mats:
- ease of installation;
- efficiency (electricity costs are up to 60% less compared to cable systems);
- versatility of use;
- the ability to combine with any decorative coating;
- environmental friendliness and fire safety;
- the room warms up quickly and evenly.
The disadvantages are the high price and short service life - up to 10 years.
Calculation of electric heated floor
It is necessary to determine the optimal power of a heated floor in order to ensure a comfortable temperature in the room with minimal electricity costs.
Let's use the formula:
P= S floor xP 0
where P is the power of the heated floor, W; S floor – usable area of the room, m²; P 0 – specific power, W/m².
The usable area of the room is the area free of furniture and heavy objects, on which a heated floor is laid.
We take the specific power according to the reference table depending on the room; these data are used if the heated floor is additional heating. For main heating, the power is 160 - 180 W/m².
Table 2. Power density
Let's look at an example. Given: living room on the 2nd floor, area 25 m², furniture occupies 4.2 m². You need to find the power of the heated floor, provided that it additional source heating
S floor = 25 - 4.2 = 20.8 m²
According to the table we take P 0 = 120 W/m².
P = 20.8x120 = 2496 W
You can also use an online calculator to determine the power of a heated floor.
We consider the technology for laying electric heated floors in our
How to make an infrared heated floor
Step 1. To perform the installation correctly, you need to draw a floor plan of the room, mark the areas where the furniture will be located, and calculate the area where the IR film will be laid. At the same time, you need to know that if the IR system is the only source heating in the room, then the film should occupy 80% of the area, if additional - 40–50%.

On usable area it is necessary to place the sections in such a way that they fill the entire room as much as possible, but do not intersect. An indentation of 15–20 cm is made from each wall. It is optimal to arrange the strips in length (no more than 8 m) in order to minimize the number of connection points; a transverse arrangement is also allowed.
Step 2. When choosing materials, take into account that the power of the film is selected depending on the decorative floor covering, room and type of heating system.
Table 3. Thermal film power
For saunas and industrial use, a film with a power of more than 220 W/m² is intended.
It is optimal to choose a film with a thickness of 0.3 mm; it is durable and resistant to deformation. For small room It is advisable to purchase material 50 cm wide.
A set of warm infrared floors includes: thermostat, temperature sensors, connecting clips, cables, IR film.
Step 3. The next step is to install the thermostat. The diagram shows the installation location of the thermostat, connecting contacts and sensors. It is placed at a height of 15–20 cm.

To lay the cable, drill a vertical hole in the wall to the point where the thermostat is attached. Electricity is supplied from the nearest outlet; it is better to place the wiring in a plastic corrugated pipe.
Note: To reduce the length of the wire used, it is recommended to place the thermostat on the wall perpendicular to the direction of laying the strips.

Step 4. The carbon film is mounted on a perfectly flat, cleaned base. The floor must be thoroughly cleaned of dirt and dust, and the horizontal surface must be checked. The permissible height difference is no more than 3 mm. If necessary, fill the cracks and pour a thin concrete screed or leveling mixture.

Step 5. Laying waterproofing will protect the system from moisture coming from below. For this they use plastic film no thinner than 50 microns, the joints are connected with sealing adhesive tape.

Step 6. Izolon, Penofol, cork backing, foil coating. The layer thickness should be 3–5 mm. The substrate is placed over the entire area close to the walls, the joints are secured with masking or aluminum tape.

Step 7 Cutting the film into strips the right size. IR film can only be cut in places designated by the manufacturer; the material cannot be cut at an angle.

Step 8 We lay out the strips according to the plan, retreating 10–20 cm from the walls. In this case, the copper busbars are placed at the bottom. The distance between the canvases is 1–2 cm, secured with hot glue or double-sided tape.

Step 9 To connect the cable to the film, special clamps are used. One side of the clamp is placed between the film and the copper strip, and the other on the busbar.

The wires are inserted into the already installed clamp and processed with pliers. The wires to the terminals are mounted in parallel, i.e. the left only with the left, and the right with the right. The connections are insulated and crimped tightly.
Step 10 The wires connecting the heated floor to the network and the thermostat are laid to the wall and hidden in the baseboard.
A groove is made in the thermal insulation, sections of wire protruding above the film are placed there, and secured with tape.

Step 11 The contact points of the electrical wires and the cutting line of the copper bus are insulated with vinyl - with mastic tape on both sides.

Step 12 The temperature sensor is attached to the graphite strip on aluminum tape, as close as possible to the thermostat, but at a distance of at least 50 cm from the wall.

Step 13 The temperature sensor is insulated and connected by wire to the thermostat.

All connections are insulated with special overlays
Video - Instructions for installing infrared heated floors
Water heated floor
Water floor heating is a system of bendable tubes through which circulates hot water, supplied from gas or

Water heating is prohibited from being used in apartments above the first floor, provided that in the basement or ground floor no living quarters. Therefore, it is used in private houses with individual water supply, and in apartment buildings, if the system was originally provided for by the project. The law prohibits unauthorized connection to central heating and hot water supply.

At concrete method pipes are laid under a screed with a thickness of at least 3 mm; decorative flooring can be done no earlier than after 28 days.

If you need to reduce the load on the floors, or the height of the room is limited, use a floor laying system. The pipes are placed on polystyrene foam mats, and a screed is poured on top.

In houses with wooden floors, pipes are laid in wooden grooves.

Despite the complexity of installation, the water floor system is cost-effective and durable. The main disadvantage is the possibility of leakage and difficulty in repair. It is not recommended to use a warm water floor as the main heating in the house.
Video - Installation instructions for hot water
Choosing a heated floor finish
It depends on the purpose of the room, the type of heated floor, budget and personal preferences of the owner. What should you pay attention to?
First of all, not every type of coating is compatible with one or another type of heated floor. For example, parquet is not recommended for use with a cable system due to the risk of overheating and fire.
Ceramic tiles and porcelain tiles are a universal option for any heated floor. It is resistant to impact high temperatures, moisture and dirt. Tile - environmentally friendly material, which does not emit harmful substances even when exposed to high temperatures. It has high thermal conductivity, which means it heats up quickly. For heated floors, it is advisable to choose tiles of small thickness.

When choosing laminate as finishing coating its features must be taken into account. Laminate can be used if the heating elements of the system are distributed evenly over the entire area of the room, and their heating temperature does not exceed 27–30°C.

When purchasing, choose laminate class 32 and higher, optimal thickness boards 8–10 mm.
There should be symbols on the packaging indicating that this material can be combined with warm floors. Low formaldehyde content is designated E0 and E1.
Linoleum and vinyl covering have good elasticity and moisture resistance. With heated floors, thin linoleum without insulation on a smooth base is used. So that it does not change its properties, optimal temperature heating should be no more than 27°C. When choosing this material, it is important to pay attention to the markings.

Using cork in combination with a heated floor is ineffective due to its low thermal conductivity, but if necessary, use a glue-free cork coating.
When choosing carpet for heated floors, preference is given to natural materials, because synthetics release when heated harmful substances. Operating temperature heated floor systems when using carpet are designed 3-5 degrees more. The length of the pile affects the thermal conductivity of the carpet, best choice There will be a thin short-pile carpet made of wool or felt.
When purchasing a decorative floor covering, ask the seller for a certificate for this material, which will indicate its detailed characteristics and conditions of use.
A properly selected heated floor can be used with any floor covering. A large number of options for underfloor heating systems, modern materials allow them to be installed indoors for various purposes and operating conditions. It is important to maintain the power of the heating system and not exceed the permissible operating temperature of the finish coating.
To ensure that the temperature in the room remains uniform in all areas, you can install heated floors. This method of maintaining heat compares favorably with the effect of radiator heating. Therefore, owners of houses and apartments are faced with the problem of choosing a safe heated floor.
Depending on the technologies used, the following are distinguished:
- water;
- electrical;
- infrared (film) heated floors.
1. Using water as a thermal fluid is the most economical solution. It is not difficult to install a water floor under the tiles with your own hands: to do this, pipes laid around the perimeter are connected to the hot water supply system. The option is in demand in suburban construction, and by existing standards implementation in conditions apartment building impossible.

2. Electric is a good alternative. warm design, heating in which occurs using a conductor - cable. According to reviews, electric heated floors still allow you to save energy, for example, when they are systematically used in dachas. Modern automation makes the technology safe to use. To find out how electric heated floors are installed, just study the recommendations of their manufacturers.

3. Installation of film-type devices is easy and quick and does not require professional skills. For laying under tiles, it is convenient to use the material in thin mats.

Popular manufacturers
- A worthy example of infrared heated floors is the products of the Korean company CALEO, which are installed under almost any type of coating - parquet, laminate and others.
- The Russian company Teplolux produces IR heated film and mother-type floors and electrical cables with one or two cores.
- Warm systems from the French brand Nexans are used all over the world. The technology of couplingless connection of the heating element with a copper conductor, developed on its basis, ensures reliability and durability.
Consumers can buy heating mats and floors, as well as a heating cable, guided when choosing the information given below:
| Manufacturer | Model | Description | Approximate price, rubles |
| Teplolux | MH 1-155 | Thin warm mat MH 1-155 belongs to a series of designs with a single-core MINI cable mounted on a carbon mesh. It has a power of 155 W and a heating area of 1 m2. MN 4.2-640 – 640 W, per 4.2 m2. Both models do not require a significant increase in thickness during installation. | 3 500 |
| MN 4.2-640 | 6 000 | ||
| CALEO | LINE 130-1 | Heated film floors from the LINE series are ideal for dry installation without the use of tile adhesive. LINE 130-1 has a power of 130 W, suitable for an area of 1 m2. The power of the second LINE model – 130-4 – is four times higher; for space up to 4 m2. | 1 500 |
| LINE 130-4 | 5 000 | ||
| Nexans | TXLP/1R-17 | Heating cables TXLP/1R-17 and TXLP/2R-17 (single and two-core) with a linear power of 17 W per meter are used in combination with a thermostat. Length varies from 17.6 to 194 m. | from 5,000 for 17.6 m |
| TXLP/2R-17 | from 5,500 for 17.6 m |
Before installing heated floors in wooden house, you need to decide on their type and installation technology. An important condition successful implementation is good insulation and alignment. The evenness of the surface will be ensured by the self-leveling coating. Floor installation diagram ceramic tiles for warm self-leveling floors involves eliminating voids between the floor and the tiles.

The price range for heated floors from the listed manufacturers varies widely. Thus, the cost of water and heated infrared floors directly depends on the size of the sections, and therefore the power and heating area.
- Film devices from the CALEO company of the GRID series with anti-spark technology: RUB 1,400 – 28,000.
- The price of the universal two-core Teplolux floor ranges from 2,500 to 20,000 rubles. Products approaching the most expensive category are cables with a length of 150 m and a power of 3 kW or more. Please note that the company guarantee for this type is 25 years.


