Starting any business, we do not immediately take everything into our own hands, but study the initial bases. Drawing is no exception. The desire to paint beautiful portraits and landscapes must be strengthened by the practice of drawing ordinary things. Sometimes you need to draw a regular circle a hundred times, then to be able to manipulate it in all directions. Today we will study and practice perspective, and for example, we will learn how to draw a fence. Perspective is a concept in drawing that distorts the image relative to the viewer. The concept is the simplest and, at the same time, the most complex. You should start with simple objects, like squares, circles. Even an ordinary chair or ball will serve well. Why is this needed? As you have noticed from the previous lessons, often before we create an object, we draw the corresponding geometric shape and fit it there. This skill will allow you to accurately depict complex structures.
It is interesting that the perspective changes not only the dimension, but also attributes such as color, contrast. The effect of presence and fullness is created, this will only make the drawing more realistic.
Tips for Building Perspective:
- Always remember that in any type of perspective objects converge at one or more points, this can distort their size and make them look irregular shape. It may seem so only at the beginning, in the end everything will look natural.
- You cannot create a drawing so that some objects have one type of perspective, while others are directed to a different point. Unless you decide to make some surreal compositions.
- Practice on regular geometric shapes!
Let's move on to practice.
How to draw a fence with a pencil step by step
Step one. First we define the horizon line, then it will serve as a reference point for the perspective. We define this point and draw fence lines to it. As you can see, its size will decrease and converge at one point. Behind the horizon line we draw clouds and several houses. Step two. When everything is built correctly, just carefully outline the fence and other objects. environment. With short lines draw grass on the ground. Step three. At this stage, let's draw everything that we have behind the horizon line. This is a continuation of the fence that goes to the houses, on the left side we will draw a piece of the road. Step four. Now just sketch the trees in the background and shade the fence, making it more lively and rich. Everything big starts small. Leave comments and wishes, do not forget to share ideas and plots for lessons. You can do this on a special page - here.
To make it easier for you to find interesting drawing lessons, I recommend.
The decoration and design of homestead fences has long gone beyond regular painting or installing a fence. Now this is an occasion to show your originality and worldview by decorating the fence with drawings, decorations from stucco, forging and other materials. Make it exclusive original design fences personal plot You can either do it yourself or with the help of professionals. The main thing in this business is the desire to express one's individuality without holding back the rampage of fantasy.
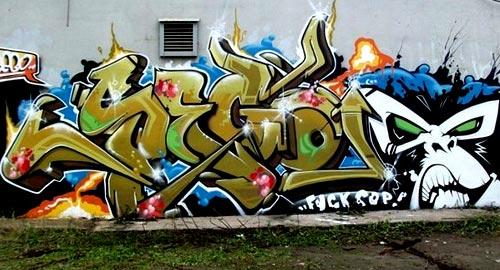
drawing on the fence using the graffiti technique
Airbrush drawings in the design of fences for summer cottages, price, photo
Airbrushing and graffiti are relatively new methods of decorating homestead fences. With their help, original and realistic images are made on the outer or inner side of fences, entry and garage doors. The art of airbrushing originated from graffiti, which is dominated by more straightforward and rough drawings.
The fence is painted using a special apparatus - airbrush. This device, using the pressure generated by compressed air in cylinders, effectively sprays paints, reaching a complete coverage of any surface.

An airbrushed drawing looks spectacular and realistic than a work drawn with a roller or brushes. Thanks to spraying, subtle gradations of retouching and shades are achieved.
Despite quite high cost artistic services, a spectacular and colorful pattern on the fence will please the eyes of the owners of the fence and ordinary passers-by for a long time. airbrush price fences starts from 35 thousand rubles and depends on the complexity of the selected pattern.
Do-it-yourself drawings on the fence for giving, photo and video ideas
For implementation independent work for the design of the fence, you will need the following tools and materials:
- A sketch of a drawing applied to the surface of the fence with color markings.
- A stencil prepared independently or purchased in a store.
- Masking tape or adhesive tape to attach the stencil to the surface of the fence.
- Construction plumb and level, for the correct and even marking of the future pattern on the fence.
- Sanding paper, brush or grinder to clean the surface of the fence.
- Materials for cleaning and protecting fences from atmospheric influences: a primer for concrete fences, an antiseptic and drying oil for wooden fences, a solvent and a primer for metal fences.
- Acrylic, oil or nitro paint, you can also use markers for tagging.
- Roller, brushes or spray gun to perform work on the design of drawings on the fence of the cottage.
Instructions for the design of metal fences, photo
Fences with a metal surface are the perfect easel for painting. Before starting work, it is required to prepare the surface of the fence. Stages of work on the design of metal fences with your own hands:

- Cleaning of rust and dirt from the surface of the fence with a metal brush or grinder.
- Treatment of the cottage fence with a degreasing compound for metal surfaces to ensure high adhesion.
- Application of a primer for metal surfaces.
- Drawing a picture or pattern on a surface. It is advisable before that to decide on the sketch and its color markup.
- Fixing the result with a colorless varnish, for the durability of the picture.
Paint for painting a metal fence can be any: acrylic, oil, nitro paint. Painting tools can be brushes, roller, spray gun, airbrush.
Drawings on wooden surfaces, video tutorial
Before drawing a pattern on a wooden surface, preparatory work should be carried out. Stages of working with a wooden surface:
- Cleaning the fence from burrs with a grinder.
- Treatment of wood with an antiseptic.
- Impregnation of the surface with drying oil.
- Drawing a pattern or pattern on the fence.
- Fixing the durability of the pattern with a colorless varnish.
It is advisable to use oil paint for wooden fences, since nitro paint will last on the surface for the whole season, acrylic paint - two or three seasons, but at the same time it will lose its color and properties. Coloring tools can be anything. Since the wooden surface quickly absorbs the paint, it will need to be applied in several layers.
Making a slate fence
On slate, if it is not wavy, it is easy and convenient to apply drawings. But before applying the pattern, the slate surface should be prepared - sanded and coated with a primer, and after the pattern - apply a transparent varnish.

The wavy surface of slate is easiest to paint with a spray gun, brushes and an airbrush. Paint is better to prefer acrylic or specialized for slate.
Modern fencing technologies
To decorate the courtyard and the inside of the fence, you can use an art sticker designed to decorate surfaces. This fresco has increased strength and is designed for outdoor use.

Bright 3D stickers for outdoor use have the following properties:
- resistance to moisture, frost and sudden changes in temperature;
- do not fade and do not fade;
- resistance to mechanical stress;
Tips for properly gluing the pattern to the fence:
- Pre-clean the surface from dust. Degrease metal and concrete barrier with a solvent or coat with a primer.
- Protective film with inside Stickers are removed as they stick to avoid the formation of bubbles and creases.
- Pierce the formed air bubbles with a needle and gently smooth out with your hand.
- For additional durability and durability of the pattern, apply varnish on it in several layers.
Gallery of photo ideas for decorating a summer cottage fence


In recent years, the design on the fence of the cottage has become increasingly popular. The most popular is the direction associated with applying a beautiful pattern to the fence. Most people think that only real artists can paint a fence. In principle, only they can paint a beautiful picture.
Realistic drawing on a concrete fence
However, a simple drawing is quite accessible to draw and an ordinary person. The most important thing is to have on hand the right materials and turn on your imagination.
To draw a picture on the fence with your own hands, several methods have been developed. In this matter, the ability of a person to draw is put in the first place.
Aerography
The beginning of this direction, when an inscription is made on the fence, was the drawing technique, called "graffiti". This method has found particular popularity in car tuning. To draw a picture, a special airbrush is used. It is also called an air brush.
In fact, this is an ordinary spray can, which has interchangeable nozzles to spray paint.
Due to the compressed air under great pressure, the paint is sprayed evenly. In this way, you can draw a picture on each surface with your own hands.

An example of an airbrush drawing on a fence
For such an airbrush, any unevenness on the fence of the cottage will not become an obstacle. The fact is that when staining in this way, it is possible to adjust the saturation of the shades by the force of pressure on the atomizer.
Airbrush paintings always have volume and look quite realistic. However, for a person who does not have the ability to draw, such a technique will not be available. It is best to use the services of professionals.
Stencil application
If you do not need to draw a piece of art on the fence with your own hands, you can use more affordable technology. The drawing can be drawn on the fence of the cottage, using a stencil. It is made of cardboard, on which the desired image is cut out. Absolutely everyone can make a stencil with their own hands. But if you wish, you can purchase a ready-made stencil in specialized store for artists.

Painting a fence with a stencil
To attach the stencil to the fence, use the most ordinary adhesive tape, masking tape is also suitable. During operation, for greater reliability, it is better to hold the stencil with your hand.
Drawing can be applied with a variety of tools:
- brush;
- roller;
- sponge.
For painting the fence, water-repellent paints are used.
Sketch for drawing
To draw an image from an already made drawing, a sketch is first made. A drawing of the fence is made on a small scale, a color picture is drawn on the image with a drawing of all the details. For such a picture, you can choose any topic. It can be various geometric shapes or a beautiful landscape.
Tagging
This is the latest trend in last years in the arsenal of artists. A special vandalizer is used to apply the image.
This is how the drawing on the fence looks like done by the tagging method
This is a multi-colored marker designed for reusable use, with a nib up to 10 centimeters wide.
Paints that can be applied to the drawing
For, most suitable:
- Acrylic water-repellent paints;
- Oil enamels;
- Alkyd paints.
Metal fences are beautifully painted with anti-corrosion paints. brick fences are covered with acrylic or silicone paint. Any paint must be water-repellent. After applying the drawing, so that it pleases the eyes for many years, it is advisable to make a coating acrylic varnish.
How to paint corrugated board
When, then the plot of the picture can be almost anything. Can do beautiful fence from corrugated board, decorating a reproduction of any picture on its surface.

Original drawing on a corrugated fence
Thanks to the huge number of shades, you can create a unique fence with your own hands that will not lose its beauty for many years and will be unique and original. The result is a work of art that harmonizes perfectly with the overall landscape. To make the fence more beautiful, it needs to be painted. bright colors with rich colors. However, the industry produces corrugated board already in color. He can be:
- red;
- green;
- blue
- brown;
- grey;
- burgundy.
Therefore, it is possible to choose steel sheets that do not require painting. To achieve true harmony, it is desirable to select the shade of corrugated board according to color scheme building. Eg, brick house having green roof, looks very bad when it has a blue fence. But a fence painted in rainbow colors will be attractive and unique.  You can draw any pattern on a fence made of corrugated board:
- flowers;
- portraits;
- ornaments;
- animals.
You can draw pictures on each section or selectively, on several of them. Since, for the convenience of work, it is necessary to make cardboard stencils that are glued to the fence with double tape. When graffiti is done with spray cans, it turns out very fashionable,. Each section should have a different pattern. Such a fence always attracts attention, it will become a regional landmark, to which people come specially to admire.  On the corrugated board, the drawings are perfectly preserved, the colors do not fade, they are not washed off.
metal fences
Sometimes covered with a pattern that imitates the structure of wood. The image can be almost anything. If you look at such a fence from afar, it is very difficult to distinguish it from an ordinary, wooden one. Only when you get closer, you can see that the fence is made of metal. If such a fence has beautiful pillars, it becomes attractive, looks very original. To protect the pattern on the metal, it is closed transparent film. Thus, the picture will remain bright for many years.
Starting any business, we do not immediately take everything into our own hands, but study the initial bases. Drawing is no exception. The desire to paint beautiful portraits and landscapes must be strengthened by the practice of drawing ordinary things. Sometimes you need to draw a regular circle a hundred times, then to be able to manipulate it in all directions. Today we will study and practice perspective, and for example, we will learn how to draw a fence. Perspective is a concept in drawing that distorts the image relative to the viewer. The concept is the simplest and, at the same time, the most complex. You should start with simple objects, like squares, circles. Even an ordinary chair or ball will serve well. Why is this needed? As you have noticed from the previous lessons, often before we create an object, we draw the corresponding geometric shape and fit it there. This skill will allow you to accurately depict complex structures.
It is interesting that the perspective changes not only the dimension, but also attributes such as color, contrast. The effect of presence and fullness is created, this will only make the drawing more realistic.
Tips for Building Perspective:
- Always remember that in any type of perspective objects converge at one or more points, this can distort their size and make them appear irregular in shape. It may seem so only at the beginning, in the end everything will look natural.
- You cannot create a drawing so that some objects have one type of perspective, while others are directed to a different point. Unless you decide to make some surreal compositions.
- Practice on regular geometric shapes!
Let's move on to practice.
How to draw a fence with a pencil step by step
Step one. First we define the horizon line, then it will serve as a reference point for the perspective. We define this point and draw fence lines to it. As you can see, its size will decrease and converge at one point. Behind the horizon line we draw clouds and several houses.
Step two. When everything is properly built, just carefully outline the fence and other environmental objects. With short lines draw grass on the ground.  Step three. At this stage, let's draw everything that we have behind the horizon line. This is a continuation of the fence that goes to the houses, on the left side we will draw a piece of the road.
  Step four. Now just sketch the trees in the background and shade the fence, making it more lively and saturated.
  Everything big starts small. Leave comments and wishes, do not forget to share ideas and plots for lessons. You can do this on a special page -
A completely new direction in design household plots- Drawing drawings on fences by airbrushing. Of course, everyone has seen beautifully painted cars on the streets of cities and towns. The same method is used to make original and realistic drawings in the country on the fence.
What is the essence of the technique and is it possible to perform such a design on your own. And also, what other modern design techniques can be applied to the fence in the country or in country house became exclusive and expressed the lifestyle and worldview of the owner of the house.
After all, according to the fence, as business card, the first impression is created about the inhabitants of the household.
The use of airbrushing in landscape design

Spray paint application with special device- airbrush, is called airbrushing. Which in translation literally means - an air brush. The device allows you to draw on the fence of any material, as the paint is sprayed with compressed air, under pressure. This method allows you to decorate materials that cannot be painted with a conventional brush or roller.
Airbrush drawings are extremely realistic and spectacular. The method allows you to perform the most subtle gradations of tone and retouching, which no other painting technique can achieve.

Of course, the price for such a design of fences is quite high. But this is justified by the exclusivity and beauty of the design. The technique is quite new and originates in the youth art of the streets - graffiti. But thanks to the work of professional artists, simple drawings turn into amazingly realistic and stylish paintings.
Advice. On your own, such drawings as in the photo are unlikely to be reproduced. Therefore, it is better to turn to professionals.
But there are other, simpler methods that allow you to make drawings on the fences with your own hands.
Applying drawings with a stencil

Not everyone has artistic talents, but with the help of a stencil, you can create bright and colorful compositions on fences from a variety of materials:
- from the inside they do not differ in a joyful palette of colors. Therefore, drawing a picture on the inside of such a fence will transform the yard at their summer cottage;
- Drawings of metal fences can also please the eye with bright and unusual decor;
- Painting on is not difficult even for an amateur.
Stenciling will become an exciting activity not only for adults, but also for children. In addition, such a painting develops fine motor skills, which is very important for children under twelve years old.
Materials needed for applying stencil paintings

In order to draw a picture with your own hands, you will need the following materials:
- Stencil, prepared independently or ready-made, purchased at a hardware store;
- Masking tape and adhesive tape;
- Level and plumb for smooth mounting of the stencil on the surface;
- Sandpaper or grinder for grouting surfaces;
- Solvent and drying oil. Necessary to remove paint residues, as well as to create the effect of a "blurred" image;
- Paints.
Advice. The choice of colors depends on the material from which the fence is made. But without fail, the paint must have water-repellent and, preferably, antiseptic properties.
Instructions for the use of paint should contain information about the properties of a particular paint.
Work sequence

In order for the decor not to disappear after the first rain, it is necessary to follow the sequence of work:
- First you need to prepare the surface of the fence. Degrease and sand wood surfaces to better adhesion surface paints.
Advice. If the drawing is done on concrete, then the surface is treated with a special primer deep penetration for painting.
It is necessary to wait until the surface treated with a primer is completely dry. This requires a minimum of twenty-four hours, as required by the instructions.

- The stencil is attached in level to the surface using masking tape or adhesive tape;
- The sequence of applying paints is indicated in the specification for the finished stencil;
- After applying paint of one color, it is better to wait for it to dry completely, and then paint with a different color;
- After applying all the colors, the stencil is removed, and the pattern is outlined along the contour.
Important. After the painting has dried, it must additionally be covered with a protective layer of transparent varnish.
Modern fence design technologies

To decorate the fence in a colorful and original way, you can use artistic stickers designed for decorating surfaces. It is only important to pay attention to the fact that the sticker must be designed for outdoor use. The variety of design options is amazing, you can always choose an interesting and stylish option decor.
For example, frescoes that imitate old painting on plaster look stylish and modern.
Bright and colorful stickers with pictures in a three-dimensional 3D image, the price of which is quite democratic, intended for outdoor use, have the following properties:
- Resistant to moisture;
- Do not fade in the sun and withstand sudden changes in temperature;
- Frost-resistant;
- Resistant to abrasion and mechanical stress.

A few tips on how to quickly and correctly glue such a pattern on the fence:
- The surface must be cleaned of dirt and dust;
- protective film from the inside it is necessary to remove as it is glued to avoid the appearance of bubbles and kinks;
- If, nevertheless, unwanted air bubbles have formed, then they can be easily pierced with a needle and smoothed out with the palm of your hand;
- In order to be sure of the stability and durability of the design, in addition, after gluing, the surface can be covered with a layer of transparent varnish in several layers.
Important. Work must be carried out in dry, warm weather. Preferably in the morning or evening to avoid direct sunlight on the finish.
Conclusion

As you can see, there are quite a few options for the original and unusual design of fences. The choice depends only on the taste preferences and material capabilities of the owners. In the presented video in this article you will find Additional information on this topic.
Decorating fences with pictures is a new direction in the design of fences. Despite their "youth", various painting technologies quickly became popular, because they allow creative owners to individualize country cottage area and any fenced area. Anyone can create an attractive pattern using our recommendations.
Airbrush drawings in fence design
An interesting option is to paint the fence using the airbrush method, i.e. by spraying paint from an airbrush. Airbrushing is applicable on fences made of different material, because the paint is easily distributed on the surface under pressure with a jet of compressed air. If there are bulges, curvature, depressions on the fence - this is not scary. A substance released from a can will mask any defect in a matter of minutes.

To turn the fence into a real masterpiece of art, you will need some materials and tools:
- A drawing of a pattern with color markings, if it will occupy a large surface.
- A stencil with an image you like (you can buy ready-made or make it yourself).
- Scotch tape or masking tape - useful for fixing the stencil.
- Level or plumb - will help to evenly set the workpiece on the fence.
- Sander - removes rust and gives the work surface smoothness.
If the drawing will be carried out on a metal sheet, an additional solvent and primer will be needed. For concrete fences - only a primer, for wooden fences - an antiseptic and drying oil. Materials will help remove old paint and protect the canvas from the influence of precipitation. They are also needed to achieve a blurry effect.
Thanks to airbrushing, the drawings are more realistic. With a can, it is easier to achieve gradation of shades and make the pattern more effective. Images made with a brush or roller look a little worse.
Do-it-yourself drawings on the fence for giving
There are many options for drawing a picture on a country fence. Airbrushing is considered the most modern of them, but in the old fashioned way, you can also use a stencil. Each method has its own working nuances, on which the final result depends. Let's learn how to use a stencil and start with simple drawings, because complex patterns in the absence of experience will not work.

Let's write all the work in the form of instructions:
- A suitable pattern is transferred to paper and cut out along the edging.
- Prepare a masking tape that will protect the picture from streaks.
- The workpiece is leveled and, after making sure that it is level, the stencil is fixed.
- The span material is cleaned sandpaper or grinder.
- The surface is painted along the lines indicated by the stencil.
- The workpiece is carefully removed after the paint has set a little, otherwise it will flow.
Floral ornament, birds, butterflies, flowers look very beautiful on the country fence. Some owners will like a picture with cartoon characters or stories from fairy tales. Also interesting are the options with seasonal landscapes and plots of village life.
In order for the lines of the image to lie exactly, and the end result to be perfect, it is necessary to use a stencil. At home, it can be cut out of linoleum or thick cardboard.
Instructions for the design of metal fences
An ideal easel for drawing on a fence is fences with metal spans. Before the beginning decorative works It is recommended to carefully prepare the surface to be painted.

Consider the whole process in stages:
- Cleaning the work surface (with a metal brush or grinder).
- Degreasing of iron sheet special composition, providing a high degree of adhesion, or adhesion of the metal to the coloring matter.
- Priming of metal areas.
- Drawing a pattern according to the created sketch and color markup.
- Covering the painting with a colorless varnish, which gives the drawing durability.
You can paint a metal fence with any paint - acrylic, oil or nitro. Any tool is suitable for work - an airbrush, a brush, an airbrush or a roller.
Drawings on wooden surfaces
When decorating wooden fence it is important to follow the same procedure as when making metal surface. But first, the wood should be cleaned with a grinder from burrs and coated with an antiseptic and drying oil. Next create a pattern acrylic paints. Nitro and oil paints do not use for drawing on a wooden fence, because they quickly peel off, warp and lose color. Lacquer coating surfaces painted with such substances do not make durable.


What designs are applied to wooden fences? Options can be both strict, in the form of geometric patterns, and cheerful, childish, bright and deliberately careless. It is convenient to apply the paint with a brush or roller, because the wood quickly absorbs the substance and does not drip.
If the picture is written with an airbrush, the drawing will have to be completely reproduced 2 or even 3 times. The reason is the same - the rapid absorption of paint. To consolidate the achieved result, the fence is covered with a colorless acrylic varnish.
Making a slate fence
Slate in the construction of fences is used flat and wavy. It is clear that it will be easier to draw on flat material, and you can apply the image in any way - with a roller, airbrush, brush or marker. To make the paint less intensively absorbed by asbestos cement, the surface of the fence is pre-sanded and primed. The finished drawing is additionally varnished with colorless acrylic.

It will be difficult to paint wavy slates with a marker and a roller. A high-quality drawing on a curved surface will be obtained if the master uses an airbrush or brushes. It is also very difficult to clean the corrugated slate, since the work is carried out manually or by careful use of a vibratory grinder.
Slate with a small wave is also difficult to draw. You can improve the quality of painted works by using brushes of different sizes.
The easiest way to paint wavy slate with an airbrush. The paint released from the sprayer will settle well on an inhomogeneous surface, which is characterized by many technological irregularities. Also, on a fence with spans of wave slate, it is easy to paint with paint brushes. They are excellent for images with blurry lines.
Modern fencing technologies
Unusually and colorfully decorate the fence will help special artistic stickers. When buying, the consumer should pay attention to whether the original purpose of the translation corresponds to outdoor use. There are usually a lot of variations of images on sale, so even the most fastidious buyer will find an interesting decor for themselves.


The bright stickers, which convey pictures in a fashionable 3D image, have several important properties that make them suitable for outdoor decoration.
Useful qualities for decorating a fence are:
- Resistant to fading and discoloration.
- The ability to withstand mechanical stress.
- Exposure of wet and frosty conditions, sudden changes in temperature.
How to stick the finished drawing on the fence correctly, our instructions will tell:
- Wipe the dust off the surface of the fence first.
- Degrease or treat the hedge with a primer.
- Carefully remove the film from the sticker as it adheres to the canvas. If you take off protective covering immediately, you will not be able to avoid creases and bubble areas on the canvas.
- Pierce the bubbles with a needle, if they still appear, and slowly smooth out the puncture site with your palm.
- Make the drawing durable by covering it with several layers of varnish.
Engage in the design of the fence with stickers only in warm, dry weather. Best time for finishing - morning and evening, when direct sunlight does not fall on the processed canvas.
Any business needs preparation and planning. Drawing is no exception and requires certain knowledge, skills and abilities. The article will discuss how to draw a fence correctly, as well as what tools and skills you need to have in order to bring the drawing to mind.
"Children's" style
First you need to decide what result you need, and then decide which fence to draw. The easiest way to depict it is in the form of three or four sticks sticking out of the ground, and two horizontal bars.
If the task is for a child to depict a small palisade, then there is nothing easier. After these steps, you can paint in any color, depict a house behind a fence and a blue sky.
in an adult way
It will be a little more difficult if there is a perspective in the drawing, and the work is more thought out. Perspective - criterion visual arts, which distorts the work relative to the viewing angle. They train to draw correctly, usually on geometric shapes or simple objects such as a chair, table or ball.
This is necessary in order to correctly depict complex objects: first, a sketch is made in the form of a heap of geometric shapes, then the excess is “cut off”. Only artists from great experience able to draw immediately without sketches.
Helpful Hints:
- In any perspective, the guide lines of the elements of the composition converge at one or more points. On initial stage everything can look awkward: an object is smaller or larger than another. But at the stage of completion everything acquires natural look. And this is logically explainable: a thing that is in the distance will always seem smaller.
- Each object cannot have a separate perspective. The only exception is for surrealist artists.
Stage 1
Having mastered the principles of building a composition with a perspective, you can no longer think about how to draw a fence. The horizon line is drawn with a pencil. No need to do this under the ruler - it will be unnatural.
The place is determined, which will be the finish of the perspective. Guide lines of the fence and other structures that are planned to be depicted should be brought to this point. The palisade itself will end exactly at the specified point. Two guides make it clear that the size of the fence posts decreases as you move away from the viewer.

Stage 2
After the schematic sketch is done, it's time to think about how to draw a beautiful fence next. They draw columns according to a well-thought-out plan: the farther, the less.
If you want to complement the composition, you can depict grass with small strokes.

Stage 3
It is required to draw a fence as a background element. That is, some part will run parallel to the horizon line to outline the household shown in the figure.
Of course, this can not be done. It all depends on the author's idea. You should examine the resulting drawing. When identifying empty places, it is recommended to finish something: be it a tree that complements the landscape, or part of the road. If only the law of symmetry was preserved and the composition was not overloaded with unnecessary details.

Stage 4
At the final stage, you should shade the sections of the fence, trees and other objects. Then you need to pay attention to the inner and outer shadows. This will make the drawing lively and colorful.
If the question arises of how to draw a fence with patterns, then you should pick up a sharply sharpened pencil and apply the desired pattern to the boards of the palisade. In order to correct individual segments, a nag (soft eraser) is used.
To give objects volume, glare is applied with a nag on those places where light falls from foreign objects (secondary lighting). This is usually the edge dark side any object. Draw a line with the tip of the eraser and enjoy the result.

Pencil choice
To understand how to draw a fence in stages, you need to not only be able to imagine, but also bring the work to its logical conclusion. To do this, you need to choose the right pencils.
There are soft, hard and hard-soft. When choosing, they are guided by the designation: 9H is considered the hardest, and 9B is considered extremely soft. There are also transitional markings (H, F, HB, B), which are considered hard-soft.
Improper use of a hard pencil will ruin the drawing due to damage to the paper, and soft ones often break when sharpened. But each artist selects tools for himself. Often in training videos you can find a model with the designation 4B.
Shadows
The key to a quality drawing is correctly applied shadows. They are thrown off by every object on which the light falls.
Accordingly, at the stage of developing a sketch, the artist must immediately determine the location of the light source. Usually this is the upper right or left corner.
To achieve realism, it is useful to know that the shadow must be proportionate to the subject. Strokes are best applied with a soft pencil and do it smoothly. If they are visible to the naked eye, you need to do shading. Usually a small piece of paper or even a finger is used for this. It is enough to make circular rubbing movements. In addition, in art shops you can buy a special pencil designed for such a thing.
Verdict
Drawing is a great art and a special gift. How to draw a fence, an elephant, a person, a sky, a tank or anything else? The answer is simple: first of all, there must be inspiration.
It is this that is the impetus for creative progress. A real artist is always interested in improving skills and bringing the work to the ideal. You can remember as much as you want popular expressions relating to the fine arts. One of them is "I'm an artist - that's how I see it." There is, of course, some truth in this. But most often it serves only as an excuse for sluggishness and an unsuccessful attempt to portray something.
For those who are just starting to master this difficult path, there are many video tutorials that help to comprehend the mysteries of fine art. Techniques, principles and laws of composition construction - everything is not as complicated as it seems.
It's easy to draw a beautiful fence. It is more difficult to depict people, animals and depict dynamic scenes. You need to go to this gradually, learn to work out the details, then apply general tones. This will require a sea of patience, an ocean of perseverance and an immense amount of ideas.
Good luck to everyone in your work!
Simple drawings with paints on the fences in the country
This unusual direction in decorating fences in personal plots - airbrush painting (as well as graffiti and tagging) - has appeared recently, but has become popular almost everywhere. Many people think that drawing something on a fence is a matter that only professionals can do, and this opinion is partly justified. But anyone can draw a simple floral pattern or a cartoon character.
Consider several modern fence design techniques that will bring a little exclusivity and a lot of positive to your site.
What is airbrushing?
Aerography is painting a surface by spraying paint with an airbrush(in translation - an air brush). Airbrushing is a universal method, since you can make drawings on fences from any material - after all, the paint is applied under pressure with a jet of compressed air (it is sold in special cans). Therefore, even the most complex surfaces(with bulges, hollows, bends and curves) the airbrush conquers in seconds.
Such a drawing always looks more realistic and spectacular than the work done with a brush or roller.
By airbrushing, you can get unusually fine gradations of retouching and shades. Although the latest painting tools are used quite often in the coloring of fences.
The cost of professional services for drawing pictures on the fence is considerable, but it is justified by the exclusive result and colorfulness of the picture. Airbrushing was born from graffiti, which looks more rough and straightforward. The same can be said about tagging - the inscriptions applied by the vandalizer predominate here - this is a special marker different color with a wide pen (up to 100 mm) reusable. Therefore, for a country fence, all methods are good, but with an airbrush you can get thinner and more elegant lines.
Self-drawing a picture on the fence
To start independent work on decorating your fence, you will need the following materials and tools:
- A sketch of the future drawing with markings by color, if the picture occupies a large area.
- Ready stencil with a future pattern. You can make your own or buy.
- Adhesive tape of any color or masking tape for attaching the stencil.
- Building level and plumb line - you will need to set up exactly and fix the stencil on the fence.
- Sander for cleaning rough or rusty surfaces (you can use sanding paper, but it will take much longer).
- Solvent and primer for metal fences, primer for concrete fences, antiseptic and drying oil for fences made of wood. These materials are needed to clean the surface from old paint, to protect it from weathering and to display the "blurred image" effect.
- Acrylic, oil or nitro paints.
Drawings on a metal fence
When working with a brush or roller, a positive result is more predictable, since you control the speed of applying the paint yourself. Yes, and you can also fix the oversight slowly. The same applies to the vandalizer (tagging marker). The airbrush releases a jet of paint under pressure, so you need to carefully monitor the direction of the jet, pressure and distance from the spray can to the surface to be painted - the blurring of the picture and its saturation depend on this. Therefore, it is better to practice on some surface before the main work.
Metal fence - perfect surface for fantasy paintings, abstract drawings, portraits, landscapes, urban or space paintings.
First you need to clean the surface of the fence from rust, paint over with a primer, and then apply the contours of the future painting, portrait, landscape or still life with a pencil or light marker. It is also recommended to make a drawing on paper before work and paint it with the final colors so that when applied to the fence you can control the color tones of the picture. Acrylic and nitro paints dry quickly, so you will also have to work at an accelerated pace. In order for the drawing to be preserved for many years, it should be covered with acrylic varnish.

Decorate a wooden fence
 When working on wood, the same rules and procedures are followed as on a metal surface. The only difference is that wooden fencing must first be deburred with a grinder, and then protected with a layer of antiseptic and drying oil. On wooden surface do not use nitro or oil paints- nitro paint will begin to peel off the very next season, oil paint will last two or three seasons, but during this time it will lose color and also warp, even if a protective layer of varnish is applied over it. Therefore, count only on the acrylic version.
For a wooden fence, children's cheerful drawings, deliberately inept and bright, will be ideal. In the absence of the talent of the artist, you can simply apply multi-colored geometric patterns. On such a fence, you can safely work with a brush or roller - the surface quickly absorbs paint, and there will be no streaks if you put thin layer. When working with an airbrush, you will have to apply 2-3 layers of the same pattern, all for the same reason - the surface absorbs paint quickly. For a 100% result, a wooden fence at the end of the work is recommended to be protected with acrylic colorless varnish.
Drawing on a slate fence
Asbestos cement slate is flat and wavy. It is very convenient to draw on a flat slate fence and you can do it in any way - with an airbrush, marker, brush or roller. So that the paint is not so actively absorbed into the asbestos cement, the surface should first be sanded and painted over with a primer. After applying the pattern, the surface must also be protected with a layer of acrylic colorless varnish.
 It will be problematic to draw on a wavy slate with a marker and a roller, so it is better to use brushes or an airbrush. You will have to clean the surface manually, so the work will be long and tedious. You can speed up the cleaning process by using vibratory grinder(these are used for polishing car bodies). A small wave slate fence is a big challenge for the artist, and here quality can only be achieved with the help of brushes of different sizes.
The surface of a wavy slate is most often heterogeneous, has many technological depressions, and on a slate with a large wave, an airbrush will come in handy (however, just like paint brushes). A blurry pattern will look great here, and it is also much easier to achieve this effect on an uneven surface.
Concrete option
A concrete fence with a bright and rich pattern is associated with a construction site or a railway station. Therefore, designers recommend painting such a fence in a single color. For a summer residence or a personal plot, shades of green will be successful. Against this background, all conceivable and inconceivable flower arrangements will be spectacular. If, nevertheless, the desire to make a drawing is very strong, you can use soft, pastel colors and patterns close to nature - landscapes, the sea, desert expanses or snow sketches. Usage white color for fragmentary coloring of the fence will make it more solemn and elegant.
The drawing technology depends on the surface - a shallow relief can be painted with an airbrush, marker, brush, roller, etc.
 An openwork fence is best painted only with a brush or a small airbrush. As in previous cases, the surface is cleaned and primed. If the paint is applied in several layers, then a protective layer of varnish is not needed.
To maintain the unity of the exterior, the fence and the roof of the house should be painted in similar colors. Prefabricated concrete embossed slabs will show you which colors to choose. Yes, imitation brickwork requires Brown, masonry should use shades natural stone. Bright colors and shades eventually get bored and annoying. Therefore, you should choose muted colors: burgundy, dark green, mustard or even asphalt colors.
Using a stencil
The practice of using stencils for coloring any fences has shown that this is - universal tool both for the artist and for the amateur. Ease of use, ease of application of paints (usually with a foam sponge or small roller) and the absence of the need to show imagination and artistic talents make the stencil very popular.
The stencil can be successfully used to hide defects concrete slabs or wooden fences. It is attached with tape or masking tape, the paint is applied along the edges with a sponge, and inside the picture - with a roller or airbrush.
The edges of the stencil, even if they are securely fastened, should always be held where the paint is applied. Themes and style performance may be used in a variety of ways. If the fence is painted within the city limits, then pop art and large portraits, geometric patterns will come in handy. You can draw a picture on a marine theme or depict night city, space, all kinds of abstractions. The picture may look like a finished composition or may be divided into several parts of different themes. For a country fence, you can use:
- Floral, vegetable and natural patterns and paintings.
- Images of animals, domesticated plants, vegetables, fruits and berries.

Modern drawing technologies
If the drawing on the fence has nothing to visually attach to, then it is better to paint the fence in neutral, pastel shades. These are beige, peach, blue or caramel colors. Remember the main law of any artistic composition - use no more than three primary colors plus their shades.
Innovation and automation make it possible to partially get rid of manual labor when painting. So, large areas of fences can be painted using pneumatic spray guns, having previously marked out the future picture or panorama by color. country fences it is better to paint (depending on the material) with a brush, roller or airbrush.
When applying inscriptions, strokes and graphic drawings on a plain surface, the tagging method is best suited - applying paint with a wide marker.
Any picture, drawing, inscription on the fence perform not only a decorative role, but also protect the surface from light mechanical and atmospheric influences. Therefore, even if the drawing is fragmentary, then it is necessary to cover the entire surface with a protective colorless varnish. work surface. It should also be cleaned and prepared. Preparation consists of two stages:
- Dry cleaning of the surface with a brush, trowel, grinder or vibrating flat grinder: dirt, burrs, rust and manufacturing defects must be removed.
- Wet cleaning - water. After that, the fence should dry well.
Need to paint the fence only in dry and preferably cool weather. Do not apply paint in the rain or immediately after it. IN hot weather you can’t paint either - the paint will not have time to diffuse deep into the surface and after a while it will begin to peel off.
;Simple drawings with paints on the fences in the country
This unusual direction in decorating fences in personal plots - airbrush painting (as well as graffiti and tagging) - has appeared recently, but has become popular almost everywhere. Many people think that drawing something on a fence is a matter that only professionals can do, and this opinion is partly justified. But anyone can draw a simple floral pattern or a cartoon character.
Consider several modern fence design techniques that will bring a little exclusivity and a lot of positive to your site.
What is airbrushing?
Aerography is painting a surface by spraying paint with an airbrush(in translation - an air brush). Airbrushing is a universal method, since you can make drawings on fences from any material - after all, the paint is applied under pressure with a jet of compressed air (it is sold in special cans). Therefore, even the most complex surfaces (with bulges, depressions, bends and curved lines) are conquered by the airbrush in seconds.
Such a drawing always looks more realistic and spectacular than the work done with a brush or roller.
By airbrushing, you can get unusually fine gradations of retouching and shades. Although the latest painting tools are used quite often in the coloring of fences.
The cost of professional services for drawing pictures on the fence is considerable, but it is justified by the exclusive result and colorfulness of the picture. Airbrushing was born from graffiti, which looks more rough and straightforward. The same can be said about tagging - inscriptions applied by a vandalizer predominate here - this is a special marker of different colors with a wide nib (up to 100 mm) reusable. Therefore, for a country fence, all methods are good, but with an airbrush you can get thinner and more elegant lines.
Self-drawing a picture on the fence
To start independent work on decorating your fence, you will need the following materials and tools:
- A sketch of the future drawing with markings by color, if the picture occupies a large area.
- Ready stencil with a future pattern. You can make your own or buy.
- Adhesive tape of any color or masking tape for attaching the stencil.
- Building level and plumb line - you will need to set up exactly and fix the stencil on the fence.
- Sander for cleaning rough or rusty surfaces (you can use sanding paper, but it will take much longer).
- Solvent and primer for metal fences, primer for concrete fences, antiseptic and drying oil for wooden fences. These materials are needed to clean the surface of old paint, protect it from atmospheric influences and to show the “blurred image” effect.
- Acrylic, oil or nitro paints.
Drawings on a metal fence
When working with a brush or roller, a positive result is more predictable, since you control the speed of applying the paint yourself. Yes, and you can also fix the oversight slowly. The same applies to the vandalizer (tagging marker). The airbrush releases a jet of paint under pressure, so you need to carefully monitor the direction of the jet, pressure and distance from the spray can to the surface to be painted - the blurring of the picture and its saturation depend on this. Therefore, it is better to practice on some surface before the main work.
A metal fence is an ideal surface for fantasy paintings, abstract drawings, portraits, landscapes, urban or space paintings.
First you need to clean the surface of the fence from rust, paint over with a primer, and then apply the contours of the future painting, portrait, landscape or still life with a pencil or light marker. It is also recommended to make a drawing on paper before work and paint it with the final colors so that when applied to the fence you can control the color tones of the picture. Acrylic and nitro paints dry quickly, so you will also have to work at an accelerated pace. In order for the drawing to be preserved for many years, it should be covered with acrylic varnish.
Decorate a wooden fence
 When working on wood, the same rules and procedures are followed as on a metal surface. The only difference is that the wooden fence must first be deburred with a grinder, and then protected with a layer of antiseptic and drying oil. On a wooden surface do not use nitro or oil paints- nitro paint will begin to peel off the very next season, oil paint will last two or three seasons, but during this time it will lose color and also warp, even if a protective layer of varnish is applied over it. Therefore, count only on the acrylic version.
For a wooden fence, children's cheerful drawings, deliberately inept and bright, will be ideal. In the absence of the talent of the artist, you can simply apply multi-colored geometric patterns. On such a fence, you can safely work with a brush or roller - the surface quickly absorbs paint, and there will be no streaks if you put a thin layer. When working with an airbrush, you will have to apply 2-3 layers of the same pattern, all for the same reason - the surface absorbs paint quickly. For a 100% result, a wooden fence at the end of the work is recommended to be protected with acrylic colorless varnish.
Drawing on a slate fence
Asbestos cement slate is flat and wavy. It is very convenient to draw on a flat slate fence and you can do it in any way - with an airbrush, marker, brush or roller. So that the paint is not so actively absorbed into the asbestos cement, the surface should first be sanded and painted over with a primer. After applying the pattern, the surface must also be protected with a layer of acrylic colorless varnish.
 It will be problematic to draw on a wavy slate with a marker and a roller, so it is better to use brushes or an airbrush. You will have to clean the surface manually, so the work will be long and tedious. You can speed up the cleaning process by using vibratory grinder(these are used for polishing car bodies). A small wave slate fence is a big challenge for the artist, and here quality can only be achieved with the help of brushes of different sizes.
The surface of wavy slate is most often heterogeneous, has many technological depressions, and on slate with a large wave, an airbrush will come in handy (however, just like paint brushes). A blurry pattern will look great here, and it is also much easier to achieve this effect on an uneven surface.
Concrete option
A concrete fence with a bright and rich pattern is associated with a construction site or a railway station. Therefore, designers recommend painting such a fence in a single color. For a summer residence or a personal plot, shades of green will be successful. Against this background, all conceivable and inconceivable flower arrangements will be spectacular. If, nevertheless, the desire to make a drawing is very strong, you can use soft, pastel colors and patterns close to nature - landscapes, the sea, desert expanses or snow sketches. The use of white for fragmentary coloring of the fence will make it more solemn and elegant.
The drawing technology depends on the surface - a shallow relief can be painted with an airbrush, marker, brush, roller, etc.
An openwork fence is best painted only with a brush or a small airbrush. As in previous cases, the surface is cleaned and primed. If the paint is applied in several layers, then a protective layer of varnish is not needed.
To maintain the unity of the exterior, the fence and the roof of the house should be painted in similar colors. Prefabricated concrete embossed slabs will show you which colors to choose. So, imitation brickwork requires brown, stonework should use shades of natural stone. Bright colors and shades get bored and annoying over time. Therefore, you should choose muted colors: burgundy, dark green, mustard or even asphalt colors.
Using a stencil
The practice of using stencils for coloring any fences has shown that this is a universal tool for both the artist and the amateur. Ease of use, ease of application of paints (usually with a foam sponge or small roller) and the absence of the need to show imagination and artistic talents make the stencil very popular.
The stencil can be successfully used to hide defects in concrete slabs or wooden fences. It is attached with adhesive tape or masking tape, the paint is applied along the edges with a sponge, and inside the picture - with a roller or airbrush.
The edges of the stencil, even if they are securely fastened, should always be held where the paint is applied. Themes and styles can be used in a variety of ways. If the fence is painted within the city limits, then pop art and large portraits, geometric patterns will come in handy. You can draw a picture on a marine theme or depict a night city, space, all kinds of abstractions. The picture may look like a finished composition or may be divided into several parts of different themes. For a country fence, you can use:
- Floral, vegetable and natural patterns and paintings.
- Images of animals, domesticated plants, vegetables, fruits and berries.
Modern drawing technologies
If the drawing on the fence has nothing to visually attach to, then it is better to paint the fence in neutral, pastel shades. These are beige, peach, blue or caramel colors. Remember the main law of any artistic composition - use no more than three primary colors plus their shades.
Innovation and automation make it possible to partially get rid of manual labor when painting. So, large areas of fences can be painted using pneumatic spray guns, having previously marked out the future picture or panorama by color. Country fences are best painted (depending on the material) with a brush, roller or airbrush.
When applying inscriptions, strokes and graphic drawings on a plain surface, the tagging method is best suited - applying paint with a wide marker.
Any picture, drawing, inscription on the fence perform not only a decorative role, but also protect the surface from light mechanical and atmospheric influences. Therefore, even if the pattern is fragmentary, then it is necessary to cover the entire work surface with a protective colorless varnish. It should also be cleaned and prepared. Preparation consists of two stages:
- Dry cleaning of the surface with a brush, trowel, grinder or vibrating flat grinder: dirt, burrs, rust and manufacturing defects must be removed.
- Wet cleaning with water. After that, the fence should dry well.
Need to paint the fence only in dry and preferably cool weather. Do not apply paint in the rain or immediately after it. It is also impossible to paint in hot weather - the paint will not have time to diffuse deep into the surface and after a while it will begin to peel off.
Primer application (for metal fences), antiseptic (for concrete and slate fences) and drying oil (for wooden fences) will ensure maximum adhesion and diffusion of paint into the material. Each protective layer is recommended to be applied at least 2 times. Of course, you are provided with an increased consumption of material, but you will get a durable, colorful and spectacular pattern.
On next video you can watch the slideshow from various options fence coloring pages:
We advise you to read
 What is "desu"? And how to understand anime? See what "desu" is in other dictionaries
 How many glasses of water a day should you drink - useful and dangerous doses
 Interpretation of sleep according to the best online dream books
 Meeting of the Coordinating Council in the Department of Education of the Kolomna City District