If the technology for installing wallpaper on walls is violated, after it dries, the surface loses its attractiveness and joints become visible. The method for correcting joints in wallpaper is determined by the reason for their appearance. How to fix joints on various types wallpaper, we will find out further.
Wallpaper joints - reasons for their appearance
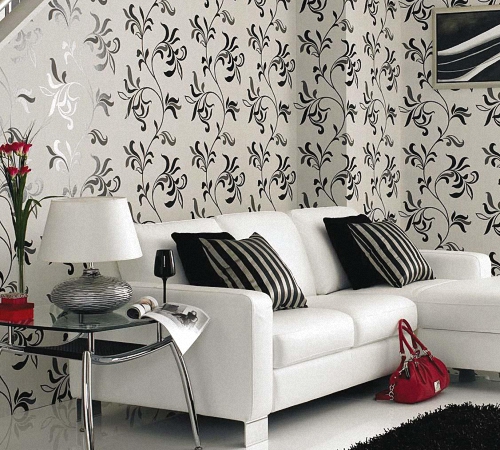
Wallpaper is perhaps the most popular type of wall decoration in residential premises. However, quite often there are situations when, after gluing the wallpaper, the joints between them become visible. When buying wallpaper, you should already think about the reasons for the occurrence of joints.

This factor is typical primarily for low-cost wallpaper. Although sometimes joints appear when gluing expensive non-woven wallpaper. By choosing wallpapers that have vertical stripes or a checkered structure, you can easily hide the joints, even if they are visible. Wallpapers with a glossy surface, vinyl, plain, textured or thin structure always have noticeable joints.
To seal certain joints between wallpaper, a special sealant is used, however, its use is relevant in the case of painting wallpaper. It is possible to further paint the sealant itself in the color of the wallpaper.
If the wallpaper is transported or stored incorrectly, its joints also become visible. When purchasing wallpaper, carefully inspect the roll for damage on the sides of the stripes. Crumpled, damaged ends immediately become visible at the joints. If you have already removed the packaging from the wallpaper, be sure to store it in a standing position.
If the ends dark wallpaper are unpainted, then to avoid the appearance of joints, color them with a dark pencil.
Most often, joints appear on paper wallpaper. This happens because the paper stretches under the influence of glue and decreases in size when it dries. Therefore, after applying the glue, immediately glue the wallpaper to the wall without waiting for it to swell. Otherwise, ruptures and uneven shrinkage cannot be avoided.

In order to achieve an ideal joint between the wallpapers, you should carefully prepare the wall for their installation. If there are unevenness on the walls, the appearance of joints cannot be avoided. Therefore, before gluing wallpaper to the wall, take care of puttying, sanding and applying a primer. Without a primer, the base for the wallpaper will contain a lot of dust, which will absorb the glue and will not hold the wallpaper on the wall surface. It is preferable to prime the walls 24 hours before wallpapering.
The process of applying wallpaper glue is another reason for the appearance of joints. If you apply glue in excess or in insufficient quantities, then the probability of joints appearing is almost one hundred percent. It will take longer for a thick layer of glue to set than for a thin layer, while the paper base will already be dry, and the glue underneath will still be wet. The glue, in this case, is not able to keep the wallpaper from decreasing in width. Thus, gaps form between the canvases, which impair the attractiveness of the finished coating.
After applying the canvas to the wall, using a rubber roller, you need to carefully roll the seams, only in this case will they be securely fixed to the surface.
Some wallpaper options imply the presence of joints, which are almost impossible to hide. These are wallpapers in the form of glossy and vinyl versions, as well as silk-screen printing. Buying expensive and collectible options will in no way protect you from the appearance of joints. Therefore, when choosing wallpaper, focus on wide canvases, and try to place the joints between them in places where furniture or other interior items are installed.

How to fix joints on wallpaper
There are several options for diverging joints on wallpaper. We invite you to familiarize yourself with them:
- the divergence of the joints in such a way that the gap in the wall becomes visible between them;
- ingress of adhesive onto the front side at the joint;
- twisting and lifting the edges of the joint strip;
- color difference between wallpaper joints;
- unevenness or uneven coloring of joints.
To correct these problems, various methods are used, which differ in labor intensity and material costs.
To fix wallpaper that has come apart at the joint, you should first examine the reason for its appearance. Width paper wallpaper, after applying glue to them, it increases by about half a centimeter. Once the wallpaper is applied to the wall and dries, it begins to regain its volume. Thus, a divergence of the joint is created.

Working with wallpaper on paper, non-woven and vinyl based, one should take into account the fact that these materials are prone to swelling. In order to avoid the appearance of joints, follow the technological recommendations for gluing wallpaper on the wall:
- the material should not become excessively wet when it hits the wall; after applying the glue, you do not need to wait a lot of time to install the wallpaper on the wall;
- do not allow excess glue on the surface of the wallpaper, narrowing often occurs roll materials during the drying process, therefore, the wall does not have time to dry before the wallpaper dries and joints and discrepancies appear;
- To fix the edges of the canvas, use a special glue that will securely hold the canvas on the wall surface, additionally fix the edge of the canvas with a rubber roller.
Several methods are used to remove joints between separated strips. The simplest, on the one hand, and the most costly, on the other hand, is painting wallpaper.
A less expensive method is to use tile grout to match the color of the wallpaper. For this purpose it is added specific color color scheme, and grout is applied to the joints. It is possible to use a regular marker or pencil to paint over the area where the joint appears.

It is possible to use the top part of the wallpaper connected with PVA glue. That is, if there are crumbs on the wallpaper, then they need to be carefully removed from the trim, then the crumbs are combined with glue and applied to the surface. This mixture is used for puttying joints.
Installing molding or special panels will not only get rid of joints, but also improve the attractiveness appearance wallpaper A simpler option is to install paper borders on the seams between the wallpaper. It is possible to re-glue the wallpaper where the joints diverge. To do this, you should soak the butt parts of the sheet using warm water. Next, apply glue to them and try to stretch and connect to each other, if there are small errors, this method will help you correctly match the wallpaper together.
Another problem that arises with wallpaper joints is the presence of glue on their surface. This occurs due to the application of a large amount of adhesive to the wall or wallpaper. Despite the transparency of the adhesive, it is still visible in daylight. In order to avoid such situations, it is recommended that you first study the instructions for wallpaper glue and apply it according to it.
To remove glue from the surface of the wallpaper, be sure to prepare a clean, preferably white, rag. While the glue is still wet, you can use it to get rid of it.

Sometimes a problem arises in the form of curling of the edges of the wallpaper at the joints. Most often, the wallpaper begins to peel off along with the wall decoration. The reason for this is the use of low-quality finishing materials. To remove this defect, it is enough to use wallpaper glue, with the help of which the curled edges are again fixed to the surface. To firmly fix the wallpaper on the wall, use a rubber roller.
Wallpapering the joint is a rather complex process, for which you must strictly adhere to the wallpapering technology.
If there is an uneven color or cut of the wallpaper, the aesthetic appeal of the coating is also lost. This occurs due to the mismatch of wallpaper rolls in color or tone. Try gluing the second canvas upside down in relation to the first. This method of reversing wallpaper installation will get rid of this problem.
To hide an uneven cut of wallpaper or uneven color, you need to resort to painting the joints. For these purposes they use special means in the form of markers and pencils. Try to choose a pencil color as close as possible to the wallpaper.
Various tapes, edgings, borders, etc. will help decorate the joints of wallpaper. Please note that each type of wallpaper differs in the manifestation of an individual reaction to one or another version of the wallpaper. For example, if you apply glue to paper wallpaper, it will stretch very quickly, but this will not happen with non-woven wallpaper. Before starting work, carefully study the instructions for the wallpaper, their features and installation technology. Only in this case will it be possible to get rid of problems with how to glue the joints of the wallpaper.

Instructions on how to glue the joints of vinyl wallpaper
Particular difficulties when gluing vinyl wallpaper arise when connecting them at the joints and in the corners. Particular care should be taken when processing wallpaper joints in corners.
At proper preparation walls, and especially if there are even corners, there are no problems with the appearance of uneven joints in these places. The main rule for obtaining high-quality corners is to cut through the joint. The canvases on both sides are installed on the wall with a slight overlap of three centimeters. Next, you should cut through this place and you will get a butt joint between the two panels. The joint is coated with glue and smoothed. In this case, it will still not be possible to avoid a slight shift in the pattern. Although sometimes it turns out to perfectly match the drawing.
In order to avoid the appearance of joints during the process of gluing vinyl wallpaper to the wall, it is necessary to install the sheets with an overlap. If vinyl wallpaper has a non-woven backing, an overlap of 20 mm is sufficient for a paper backing given value doubles. Next, just cut through the joint with a knife level and remove the excess.
After completing the wallpapering work, check the walls for defects in the form of air bubbles, diverging joints, or un-glued areas. Correct them if necessary. It is recommended to install furniture and other objects at the joints to hide them.
Vinyl wallpaper have a non-woven or paper base. Depending on this, the adhesive for fixing them to the wall is selected. Using glue for non-woven wallpaper will allow you to fix finyl wallpaper with a non-woven base. This adhesive option is applied to the wall. The wallpaper is on paper based, must be coated with glue before installation. In any case, before starting work, read the instructions for applying glue.

Non-woven wallpaper - joints, elimination features
The popularity of the widespread use of non-woven wallpaper is explained primarily by its fire safety, good heat and sound insulation characteristics and greater mechanical strength.
The process of gluing non-woven wallpaper is the same as gluing paper-based wallpaper. To do this, just follow these steps:
- prepare glue;
- cut the wallpaper into strips according to the height of the room;
- apply glue to the wall;
- install the strip on the wall and glue it;
- get rid of excess glue;
- trim unnecessary parts of wallpaper;
- glue the next strip.

Before starting work, you need to purchase a special glue for non-woven wallpaper and dilute it according to the instructions. Gluing the joints of non-woven wallpaper is not particularly difficult. Using a level, draw a line on the wall that will be the location for installing the first strip. At the same time, watch out for unevenness. Install the strip on the wall, previously coated with glue. In the same way, draw a second line and glue the strip. There are no particular problems with the divergence of joints in non-woven wallpaper, since they are not capable of stretching like paper wallpaper. A regular level will help to make the wallpaper joints even, with the help of which you can draw a line for the location of the strip.
Pay special attention to the corners; the wallpaper sheet should extend into the corner by 10-15 mm. The wall is coated with glue and the sheet is applied to it. Use a roller to flatten the sheet. The next sheet is glued with an overlap. When small folds form, they are cut to remove air and smoothed out.
If it is necessary to paste wallpaper on external corners, an overlap of 25 mm should be made. If the angle is perfectly flat, then it is enough to join the strips together. Otherwise, you should still resort to using overlap. Using a utility knife, cut through the joint and get rid of the excess.
Well, the rough preparation of the walls is finished and it’s time for the actual interesting stage– wallpapering. In order to admire a beautiful wall covering without visible joints, you need to make a lot of effort. It is not necessary to glue the wallpaper overlapping; there is another option. You can even do this yourself, without the help of professionals, if, of course, you know the technology. This article will tell you and teach you how to glue wallpaper end-to-end correctly, and you can clearly see the process itself in the videos included.
Tool preparation
If the procedure of wallpapering a room is performed for the first time, there is a suspicion that it will take a long time. In order not to be distracted during the process by searching for everything you need, it would be correct to prepare all the tools and materials in advance. First of all, of course, you will need the wallpaper itself and wallpaper glue. You will also need:
- Pencil;
- Tape measure, square, plumb line and long ruler;
- Bucket or basin for adhesive mass;
- Stationery sharp knife;
- Roller for smoothing seams;
- Wallpaper brush for applying glue or roller;
- Unnecessary rags for removing excess adhesive material.

It is important to note that the glue must be selected in accordance with the type of wallpaper. Each pack of dry adhesive powder indicates what wallpaper it is intended for. Also, when choosing, you can consult with the seller, who will help you choose the adhesive powder correctly.
Preparing wallpaper and walls
As a rule, people who carry out repairs on their own do not have the same skills as professionals, so before hanging wallpaper, you must definitely cut it into sheets of suitable length. Professionals, as a rule, glue canvases directly from the roll, without cutting them, regardless of whether they are end-to-end or overlapping. This preparation is especially important if the wallpaper has a pattern or relief that needs to be adjusted.
For correct cutting For panels with a pattern, you need to find a repeat pattern on the packaging, which determines the length through which the pattern is repeated. This indicator helps to use wallpaper more economically and correctly than with conventional measurement and calculation. You can make markings using a repeat in this way: for example, the value is 60 cm, and the height of the ceilings in the room being renovated is 2 m 80 cm. In this case, there will be 4 repeats per roll, which we multiply by its value, that is, by 60 cm The result is 240, this is not enough, since the panels are shorter than the ceiling height. We take 5 repeats and multiply by 60 cm, it comes out to 300 cm. This number is just right. It is necessary to cut all the rolls into equal parts of 300 cm. What remains does not need to be thrown away, it can be glued in small places, for example, under the windowsill or behind the radiator.

After the panels of the required length are prepared, it is necessary to mark the walls. This is also very important stage, the passage of which eliminates oblique gluing and allows you to do everything correctly. For marking, you will need a plumb line, with which vertical lines are measured and drawn along the entire surface of the walls at a distance equal to the width of the roll. You can do this starting from anywhere in the room, but not from the corner. This process is shown in the video.
Butt wallpapering technology
There are only two ways to hang wallpaper: overlap and butt. Only very thin paper wallpapers are glued with an overlap or processing is done in the corners. This method wastes a large amount of material, and, as a rule, overlapping fabrics stand out too much at the joints. Therefore, it is preferable to choose the second method.
To create a beautiful decorative wallpaper covering as a result, we follow this scheme:

To properly wallpaper walls butt-to-end, you need to take into account external factors. This is the air temperature in the room, which should be no more than 20 degrees. It is also necessary to close the windows and doors in the room so that drafts do not interfere with the drying of the glued canvases. Direct sunlight also does not have a very favorable effect on freshly hung wallpaper.
Corner processing
As soon as a straight wall is glued, the question always arises of how to design the corner. Typically, apartments do not have perfectly even corners, which is why the problem of bubbles arises. You can solve this; there are two ways to do this:

On next video You can see how this is done visually.
Every owner probably wants the renovation in his house or apartment to be, if not one of the best, then, in any case, not one of the worst, which is why a completely reasonable question arises: how to glue wallpaper end to end? In order for this to happen without interference, the base (wall or ceiling) must meet certain technical requirements.
These requirements and the gluing process itself will be discussed below, and in addition, as additional material, you can watch a thematic video in this article.
Requirements and technology
About surface parameters

- For quality work you need a flat surface, since vinyl wallpaper can be glued end to end (paper, acrylic, non-woven) only on a flat base, where the difference in plane does not exceed 1-2 mm per square meter. This means that the rough base on which the installation will be carried out needs to be pulled out level, which is what lighthouse profiles for plaster or putty are used for. In the same way, leveling the surface with plasterboard, which is created specifically for this purpose, serves this purpose.
- If you are making repairs in a new building, then do not hope that the walls there are perfectly smooth - in almost all cases (99% out of 100%) this is not the case - there will always be errors even in block houses. Even if you have one wall that is level, and the other has a slope or differences, then an accurate joining will not work, since the discrepancy between the sheets will increase depending on the slope of the base in geometric progression. Of course, the price of repairs when leveling the base increases, but its quality also increases in the same way.
Installation nuances. Docking
Note. We will not consider how to glue wallpaper into a joint, starting with surface preparation.
Let us roughly assume that , and all we have to do is glue the sheets correctly.

So, we are now looking at how to properly glue vinyl wallpaper at the joint (paper, acrylic, non-woven), and we need to start by marking the wall, for which we will need a long building level and a simple pencil.
Depending on the sheet width ( standard width 0.53 m and 1.06 m) we retreat from the corner so that the sheet is wrapped a few centimeters on the adjacent wall, that is, if it is 53 cm, then we retreat from the corner by approximately 45-47 cm, and if it is 106 cm, then 98-100 cm respectively.
At this distance under the level, draw a strict vertical line with a pencil, along which we will orient the edge of the sheet (you can step back 1 mm to make the line more noticeable).

Now you need to carefully press the edge of the sheet, since you can seal the joints on the wallpaper only if they adhere tightly to the base and a rubber roller will be the most effective tool for this.
If you have to work with patterns or a design, then after gluing the first strip you need to make an adjustment - to do this, unroll the roll to the height of the room and apply the sheet to the wall so that the pattern or design matches - this will make the transition unnoticeable. Leave a few centimeters of margin on the ceiling and floor sides, which you will cut off after gluing the strip to the main area.
If there is no pattern on the wallpaper, then the task is somewhat simplified - there is no need to adjust it to the pattern - just cut a strip of the required length with a margin of 5-10 cm and glue it to the surface, tightly connecting the edges. In such a situation, the price of the material will decrease somewhat, since when adjusting according to the pattern, a lot of waste is produced, which will never happen on.
Note. If you are gluing paper-based wallpaper, then the instructions require that you apply glue to both the wall and the sheet so that the paper gets wet.
If the substrate or the entire sheet consists of non-woven material, then it should not be smeared - it is enough to apply glue only to the wall.

But there are situations when you have to work with uneven surfaces, and in the top picture you see a schematic illustration of how to hang wallpaper without joints, that is, the joint as such will still remain, but you will not be able to adjust the edges on an uneven plane.
But here we should immediately make a reservation that this method is applicable only for plain wallpaper (without a pattern), which is designed for painting or simply has one color or a vertical pattern that is not on the edge of the sheet. If you use this method for stripes with a pattern, then after installation you will get something tacky, where all the irregularities will be obvious.

One of the most popular types of room decoration is wallpapering. But in order for the result to please you, you need to know how to glue wallpaper correctly. There are a sufficient number of nuances that affect the quality of the finish.
Preparatory stage
First, everything in the room that can be removed is removed, including door frames and baseboards, if possible. They also remove sockets and switches, closing the boxes with wires with plugs - plastic or wooden.
Turn off electrical outlets
When working with electricity, we de-energize the room and do not turn it on until we are finished. It is advisable to carry out all work, including wallpapering, with the power turned off. The work is “wet”, and water or glue can get on the wires and short out. If the wiring is done according to all the rules and there are protective circuit breakers, this is not a big deal. They'll just turn off the power and that's it.
If the wiring is still done in the old way, it can be dangerous. The worst part is that in this case there is often no way to turn off the power in a separate room. Only in the entire apartment or, at best, in half of it. Then the solution is to remove the power wires from the sockets and switches (with the power off, of course) and carefully insulate the ends, then hiding them under plugs. Then you will have to unwind them and put them back in place, but it will be safe.
Lighting during work is temporary - extension cords are pulled from other rooms and portable lamps are turned on. Once you have dealt with electricity, you can move on.
Sealing irregularities
Here you will first have to assess the condition of the walls. First you need to remove all the nails and screws, remove chips and repair cracks. Then examine the results. If the walls are more or less even, there are only small defects, you can get by with occasional leveling. Only cracks, dents and chips are repaired. They can be covered with finishing putty. Just before leveling, completely clean the wall of dust and pieces of wallpaper, and then cover it with a primer (with a wall roller and a brush in the corners).
If the wall has been “treated” with a hammer drill, you cannot do without full putty of the entire wall. Mostly used today gypsum putty. First, apply a layer of primary or starting. It has a coarser grain and the layer can be up to 3-5 mm. This composition is used to level out the main unevenness, trying to achieve flat surface. After drying, they pass through a special mesh, removing any unevenness or sagging that may exist.
After being used finishing putty. It is very flexible and can be applied thin layer- up to 1-2 mm. After this, the wall becomes smooth (after the irregularities have been smoothed out with a mesh, only with a smaller mesh).
Primer of walls
The second layer of primer is applied after puttying. It forms a film on the surface that reduces the absorption of the glue and also improves adhesion. For wallpapering, you can use a thinner wallpaper glue as a primer. Each pack has a table indicating the amount of water for gluing and priming. We dilute the glue in the required proportion, wait for it to be ready (also on the package) and cover the walls with the composition. The priming technique is the same: first go over the corners with a brush, then with a roller on smooth surfaces.
In the video, for some reason, the use of primary putty is called plaster, but otherwise the sequence of actions is presented correctly.
Rules for gluing
When wallpapering there are several rules that must be followed. The technique varies depending on the type of wallpaper, as does the glue, which is necessary for a quality result. the difference is mainly in when and where to apply the glue. You don't have to guess. Everything is on the insert, which is included on each roll of wallpaper. There it is graphically depicted, and in some it is written, which part should be coated with glue: only the wall or only the wallpaper, or maybe both at once.

But some things remain the same. For example, applying a starting strip.
Where to start
In reality, the starting location is not that important. It is important that the first strip is glued strictly vertically. Therefore, the choice is yours.
If the room has a perfectly designed corner: smooth and exactly vertical, you can start from there. You can start from a door with a perfectly aligned jamb. If there is nothing like that, draw a guideline for yourself. Take a building level, mark a point on the wall and draw an exact vertical line through it. Inexpensive household-grade building levels, which we usually use for repairs, sometimes give a significant error. And since it is important for us to stick the first strip strictly vertically, check the accuracy of the line using a plumb line. He never lies, pointing straight down. If everything is fine, you will align the edge of the strip along this line.
If you still haven’t decided where to start gluing wallpaper and this is your first experience in this area, start with the wall that is least visible. For example, the one along which there is a closet. The first couple of pages will be difficult for you, but then you will better understand what’s what and there will be fewer flaws.
How to glue wallpaper on a wall
If glue, at the request of the manufacturers, is applied to the cut fragment, the smeared strip is folded so that the coated side is inside. To do this, fold the edges towards the middle, then fold them several more times. The folds are not pressed. Let them remain round. This is necessary so that all layers are saturated and the canvas fits well on the wall and also sticks without bubbles.

If you need to apply glue to the wall, coat an area slightly larger than the width of the wallpaper. The area under the ceiling, in the corner and near the floor is coated with a brush. Then the rules are general.
Take the cut strip and climb up the stepladder. Place the top edge a few centimeters on the ceiling, then align one of the edges along the drawn “start” line. Since wallpaper today is glued end-to-end, it doesn’t matter which edge.
Strictly attaching the side edge to the line, moving from this line to the other edge, glue the wallpaper in the ceiling area. Then, gradually moving down, you go down a little lower.
Extra centimeters on the ceiling are cut off. It is more convenient to do this with a paper knife and a large spatula. Press the paper well against the corner by running your hand. Then apply a spatula. Run a knife blade along its edge.

Trimming under the ceiling and near the baseboard
When gluing the canvases, movements are made from the center of the strip to the side and slightly downward, expelling the trapped air to the edges. Previously, this was done with a rag, but it works better and faster with a roller with an elastic nozzle (it is usually yellow). There are practically no bubbles when working with it. But if the wallpaper is structural, with an embossed pattern, you can crumple it with a roller. Then take a wallpaper brush. It is wide and flat, with hard pile.

Wallpaper brush for quick pasting
Having reached the place where the strip is not yet glued, unroll the rest tightly and proceed according to the same pattern. First, you expose the edge, then use a roller or rag to expel the air, achieving a flat surface.
The second strip is glued in exactly the same way, with the only difference being that the canvas already on the wall will serve as a guide for gluing the edge. That’s why it’s important to glue it evenly, otherwise everyone else will also be mowed.
Secrets of pasting corners
The most difficult part to glue wallpaper correctly is in the corners. But this is only until you know the secret. You can try to do it simply at first. Wrap one of the parts onto the adjacent wall by 1-2 cm, and cut the second at the corner.

It’s not difficult to do, this method looks good. But on some wallpapers this stripe is very visible. For such a case, there is another way. Glue the canvases on both sides of the corner so that they wrap at least a little on the other side (2-3 cm is enough). Press well so that they fit exactly. to the walls and corner.

Then you take special cutter or a large spatula. Press it in the corner, cut the wallpaper along its edge with a sharp knife. It is necessary to cut both sheets at the same time, so considerable effort may be required. To ensure a continuous cut, do not tear off the knife. Having stopped, move the spatula, which you rest against the blade and then continue the cut.
Having cut everything off, remove both cut strips and join the remaining strips in the corner. If the wallpaper was pressed well before trimming, the match is perfect, without any discrepancies.

How to glue wallpaper on outside corners? Almost in the same ways. In the first case, one of the strips is wrapped around the corner by one or two centimeters (for thicker wallpapers, 2 cm is better, for thin ones, 1 cm is enough). The second strip is glued strictly along the corner. If this overlap is visible (usually on non-woven wallpaper), you will need to cut along the entire strip. In this case, we wrap more and cut vertically using the same spatula and knife. We remove the cut and glue the joint.
Meter-long wallpaper in the corners is glued in the same way as narrower ones. It happens that a narrow strip is needed in a corner, and the rest is cut off. If the wallpaper is without a pattern, it can be used somewhere, at least in another corner. With patterned canvases, sometimes it is also possible to attach them somewhere, but this is more difficult to do. That’s why they take patterned ones with a decent supply: just for such cases.
How to glue vinyl wallpaper on paper, how to remove imperfect corners in this video.
How to glue wallpaper near doors and windows
If the doors or window are flush with the plane of the wall, problems usually do not arise. Wallpaper is cut along the door frame or along the edge of the trim. The canvas is cut at an angle of about 45° to the corner of the casing or frame. The cut parts are wrapped along the opening, bent and then cut off with scissors or a knife. It’s smoother and faster using a knife and spatula.

How to glue near the door
The option that causes more difficulties is when it is necessary to cover the slope of a door or window. When using paper wallpaper, the principle is again simple: glue the strip onto the slope, extending it 1 cm onto the wall. We glue a piece on top exactly along the cut of the window opening.

But this method will not work with wallpaper on non-woven fabric: the “overlap” is too visible. In this case, the strip is cut along the window opening with a small margin. Another fragment is glued on top with an overlap, cutting them exactly along the cut of the window opening. The glued piece is wrapped inside, onto the slope. Then they join as before.
It's difficult to explain in words. It’s more accessible in video. By the way, it also talks about wallpaper design arched openings there is a plot.
How to make joints invisible
Care must be taken to ensure that the joints of the canvases are invisible during gluing. You need to connect the canvases so that there is no gap between them, but also so that they do not overlap one another even by a millimeter. A perfect match must be achieved.

Because it's perfect smooth walls Unfortunately, we don’t see them very often; it turns out that the seam either creeps in a little or diverges. Your task is to move the canvas so that it becomes perfect and invisible. You can move the canvases with your hands - they can slightly stretch and contract. Due to this, you achieve the required match. If the resulting defect is too large and nothing can be achieved by shifting, the strip is peeled off to this place and, having corrected it as necessary, is glued again. Sometimes, if the seam is sticking out a little, rolling it with a special tapered roller can help.
With this technique, it turns out that first the edge is glued, which is joined, and then, from it, they begin to smooth out the rest of the surface of the canvas. If you have examined the seam and are satisfied with the result, take a clean rag and wipe it off any excess glue that may have come out during all these actions.
To learn how to glue meter-long vinyl wallpaper on a non-woven backing and how to make the joint invisible, watch the video.
Eliminating shortcomings
If there is a lack of experience, it may happen that bubbles appear on the walls after or during drying. You can remove them with simple steps. Take a large syringe, fill it with glue, pierce the bubble and inject some glue into it. Vinyl wallpaper, acrylic, paper - upper part however, it is unimportant. The actions vary depending on the basis. If the wallpaper is paper-based, wait five to seven minutes; if it is non-woven, act immediately.

How to remove bubbles from wallpaper
Seams come apart quite often. Wallpaper may peel along the thread or baseboard. There are two ways to glue them. Use a brush and the remaining glue or buy a special one for seams. It comes in a tube and is applied precisely. And again, the procedure depends on the base. After wetting the paper, wait a while, then glue it, making sure the edges match.

We continue the topic of wallpapering that I started in the article.
Apply glue (from the back side, of course) to the first panel with a roller or brush, carefully covering the edges. Be careful not to leave gaps. There is a special glue from the “Moment” series, pink color– uncoated areas are clearly visible. And when it dries, it becomes colorless. A little excess of glue is better than too little.
 The coated cloth is folded: fold the ends towards the middle with glue inward, and twist. Don't be afraid if it's not toilet paper, the “wallpaper” will not stick together. This is necessary so that the paper is saturated with glue and stretched - after ten minutes the panel can be unrolled and glued. If indicated in the instructions, then immediately before gluing each piece of wallpaper, coat the surface underneath with glue.
 Unfold the top edge of the panel and attach it to the wall. Align the edge of the paper with a plumb line. Unfold the bottom and glue it down. Air bubbles form under the paper. Kick them out from under the wallpaper rubber roller, a special spatula, or a dry cloth. The edge of the panel adjacent to the corner should extend 5-10 mm (at least) onto adjacent wall.

During any painting works– this also includes wallpapering – drafts must be completely excluded! Remember that the drying of dispersion (i.e. water-soluble) paints, wallpaper paste, etc. should not occur due to evaporation into the atmosphere, but due to the absorption of water into the surface that you have painted and pasted over! Even a minute draft, or just an open window is a guarantee that in some places the wallpaper will come away from the walls - you will be tortured to re-glue it later. By opening the window, you are ruining your own work with your own hands.
It is advisable to cover the entire room at once. Or at least, from corner to corner. Only professionals can leave a half-glued wall, come the next day, sip a Pepsi :), and complete their work.
Also, if you believe these sometimes stupid textbooks, you first need to completely cover the walls with paper (newspapers, for example). Nobody does this now! If you are a professional painter and carry out similar training - please let us know via feedback - we will know and perhaps make changes to the article. Thanks in advance. Today, instead of waste paper, you can use special paper tapes (approximately as for cash registers- sold in rolls in the same place where wallpaper is sold). A strip of paper is glued directly as you work with the wallpaper at the junction of the two panels.
After gluing each panel, carefully press the canvas into the corners at the top and bottom with a spatula. By the way, the baguette (fillets) must be glued before the wallpaper! If you are doing the repairs yourself from “A” to “Z”, also look at the article “Installation of baguettes”. But it is advisable to fix the baseboard after. First glue the last panel to one wall, then carefully push the corner with a spatula (be careful not to break the paper) or with a corner roller and glue the remainder extending onto the next wall.
Important! If you did the preparation yourself, or entrusted this task to not the most expensive craftsmen, do not use this advice. Check out the intricacies of wallpapering corners in the article “secrets of the craft.”
Having pasted the room around the perimeter, make a wallpaper joint in the last corner - from which you started gluing - in the same way. If the first panel has already dried, then first, 20-30 minutes before, wet the edge placed on the adjacent wall with water. However, it is best to join the wallpaper above a window or door, and stick a whole panel in the corner - the discrepancy between the patterns will be less noticeable.
When finished, trim off the top and bottom excess wallpaper “under a ruler” (you can use a long spatula) with a stationery or circular knife.
And more! If you really decide to hang wallpaper yourself, forget everything you read here - this official information- and follow the link. Good luck, friends!


