Stretch ceilings today are a popular technology for decorating a room. But despite the apparent simplicity of installation, there are points that need to be taken care of in advance. These include, for example, curtain rods, which require a special niche.
What is a hidden cornice, and why is it needed?
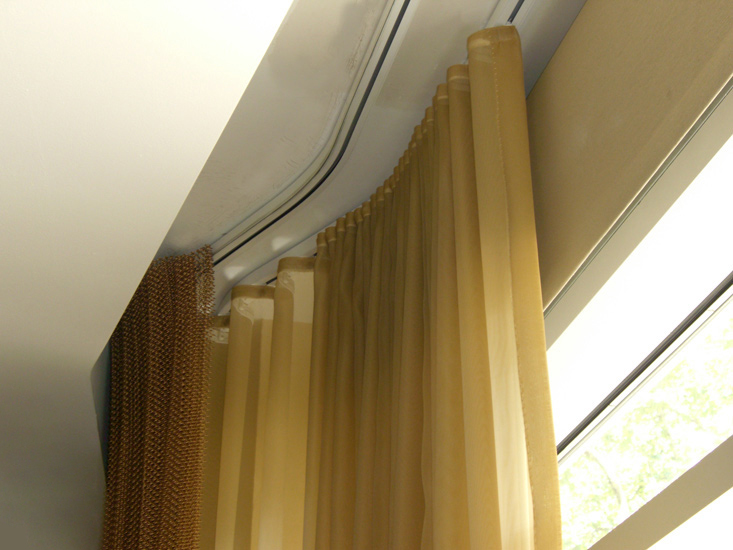
A hidden cornice is an element that is hidden from prying eyes. This option is used to maintain the harmony of the design. When using suspended ceilings, a hidden cornice is installed to prevent the film from breaking.
Attention! If the room has non-standard window sills, it is difficult to choose a cornice for them. A niche will help you get rid of worries and achieve attractiveness.
Another reason for using such a part is the arrangement modern design. In this case, people try to do everything as aesthetically as possible, avoiding flaws. A niche under the eaves is a great way to deal with this.

Depending on the interior style and requirements for operational characteristics cornices are made from various materials:
- Plastic. They are popular due to their low price and optimal strength for lightweight curtains.
- Aluminum. Light in weight and durable.
- Wooden. The models are massive and expensive. They look attractive and luxurious, so there is no point in hiding them.
- Steel. These options are used for fastening heavy curtains. Sometimes they are additionally decorated with plastic or wooden elements.
The modern market offers all these options in various design interpretations and a wide range color scheme. For hidden placement, it is better to choose steel options. They are reliable and durable, and will not be visible from the outside.
Advantages of hidden cornice placement
– best choice for everyone who cares about aesthetics and harmony in the interior. They differ from visible models in a number of advantages. The main one is the practicality of the product. Such a cornice will fit into a room with both high and low ceilings. low ceilings. The result will be an interesting frame, visual extension and increasing space.
Hidden installation of elements is a great way to aesthetically decorate the interior. Wiring or other engineering elements are installed in a niche, hiding them from surrounding views. In this case, there is no need to arrange additional boxes in which it was planned to hide the ceiling elements.

Often the hidden element acts as the main accent in the room. This happens in cases where you want to emphasize the lightness and grace of curtains, highlight window space, or simply decorate the room in an original way. Interesting combinations with lighting lead to the creation of unique textile compositions.
If you are planning to save money, a hidden element location is the best choice. In this case, give preference to a simple aluminum cornice, because it will not affect the appearance of the interior. You don’t have to select an element to match the furniture, door handles or decor style. You can focus on the attractiveness of the curtains.

Useful tips for choosing a design for suspended ceilings
If you decide to install a hidden cornice, mounting it in a niche, carefully approach the issues of choosing an element and subsequent operation. Focusing on the nuances will avoid problems in the future. First, consider the design of the niche. The first option is to entrust this to the designers who will prepare the project. Second possible option- Do everything yourself. In this case, it is recommended to take into account design features cornice, which is not so simple.

When choosing the width of the element, take into account the width of the window sill and heating devices located underneath it. Remember that the curtains should not touch the radiator. If you are attracted to floor textiles, move the niche 3-4 centimeters forward from the window sill, and the problem is solved.
If renovations are planned indoors small area, you will have the opportunity to visually expand it. In this case, the width of the cornice must exceed the width of the window sill. If desired, curtains can be hung along one of the walls. This will visually make the room more spacious and enjoy the aesthetic design.
During the selection process, do not lose sight of the functional elements of the cornice. These include runners and loops. Check their operation, make sure they are easy to operate and quiet.
How to create a niche on a suspended ceiling?
To create a niche on suspended ceiling, first decide on your preferred method. There are two popular options. The first involves the initial assembly of the frame, taking into account the creation of a niche. This method is complicated and only available to professionals.
This is explained by the fact that you will have to accurately calculate all the required elements. In this case, the perimeter of the niche is specified by profiles, which are subsequently covered with sheets of plasterboard. Holes are cut in the sheets themselves in accordance with the required parameters, forming a niche for the suspended ceiling. After this, attach the cornice to the base ceiling using dowels.

Another popular method of forming a niche is based on a metal frame. It retreats from one of the walls by 20-25 cm. After this, the frame is sewn up with plasterboard around the perimeter. The result is a finished niche that does not need to be cut out.
However, in this case, the niche needs finishing: painting, whitewashing or wallpapering. Keep in mind that before this the surface is carefully prepared - cleaned, primed, puttied. After this, the cornice is attached to the ceiling.
Attention! Plan your niche in advance, at the stage of developing the preferred design for the stretch ceiling. It can be located not only traditionally by the window, but also pass through the entire room, zoning and decorating the space.

Fastening the cornice itself - simple task for every person. There is no need to follow exact calculations here. A niche will transform your room, the design will become interesting and effective. When selecting elements, take into account all the described subtleties, this will guarantee long service life and aesthetics. The installation procedure is shown in the video.
At Ceiling niche for cornice. How to calculate dimensions
One of the ways to install curtain rods is to install them in a special ceiling niche. Most often, a niche is made from gypsum board, although I have come across niches made of wood, MDF/chipboard, and polyurethane. In general, the choice of material is solely the responsibility of the interior designer. I will talk about how to calculate the size of a niche so that the use of cornices and curtains is as comfortable as possible in everyday life.
So, we are essentially interested in two parameters: the height of the niche and the width (depth) of the niche.

Height calculation. The height of the niche should be such that the drapery tape (it is sewn along the top line of the curtains) is completely hidden in the niche. The height of the drapery tape depends on the height and weight of the curtains. This is a separate big topic, but in most cases it is approximately 70 - 100 mm. It is clear that if you make a niche exactly at the height of the drapery tape, then a person looking at the curtains from below will still see this very drapery tape. Therefore, we add another 50-100 mm.
In practice, the most common height is in the range of 100-250 mm.
Width calculation. The width of the niche should ensure the possibility of installing the necessary curtain rods and the free movement of curtains along the cornice. Cornices designed for installation in a niche:
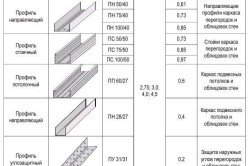
1. Aluminum profiles.


A modern, convenient and technological solution, a huge range of profiles, maximum consideration of all needs: for light curtains - thin miniature curtain rods, for heavy curtains - strong reinforced ones, you need to install them in a bay window - please, if you want to add an electric drive - no question. In general, the profile type is selected for a specific request. The number of profiles depends on the design of the future curtains: for each layer of curtains there is a separate profile.
![]()
The estimated distance between profiles is 50 mm. The width of the profiles is different, but for calculations you can start from 15 mm. For example, a curtain decorative curtain and a functional curtain will require three profiles, and the width of the niche, respectively, 3 profiles * 15 mm + 4 distances between profiles * 50 = 245 mm.
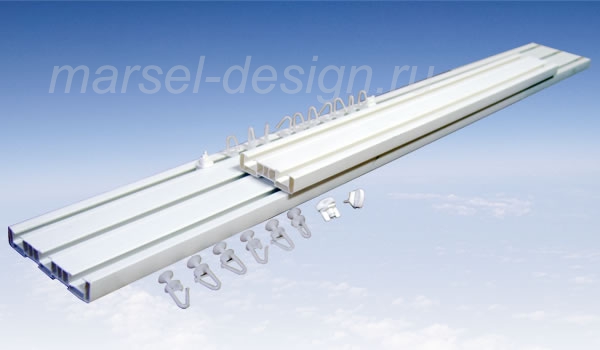
2. Plastic (or aluminum) ceiling rails for curtains. A cost-effective and quick-to-install solution. Here, calculating the width of the niche is even easier: tire width + 50 mm each to the outer and inner edges of the niche.
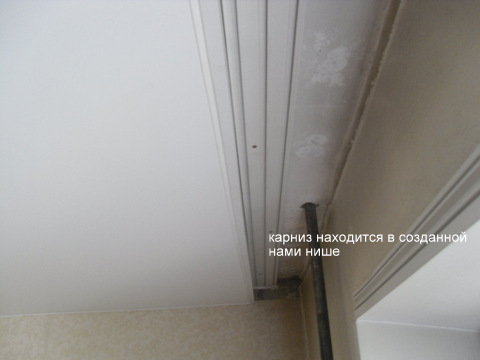
An important point is the removal of the window sill or heating radiators. In order for the curtain to have a clear vertical position, the distance from the wall to the cornice must be no less than the extension of the window sill. If this point is not taken into account, it turns out something like this

So, when calculating the size of a niche, you should take into account:
1. The overall height of the ceiling in the room, the dimensions of the room.
2. Removal of the heating radiator and/or window sill.
3. Curtain design.
4. Type and dimensions of the cornice.
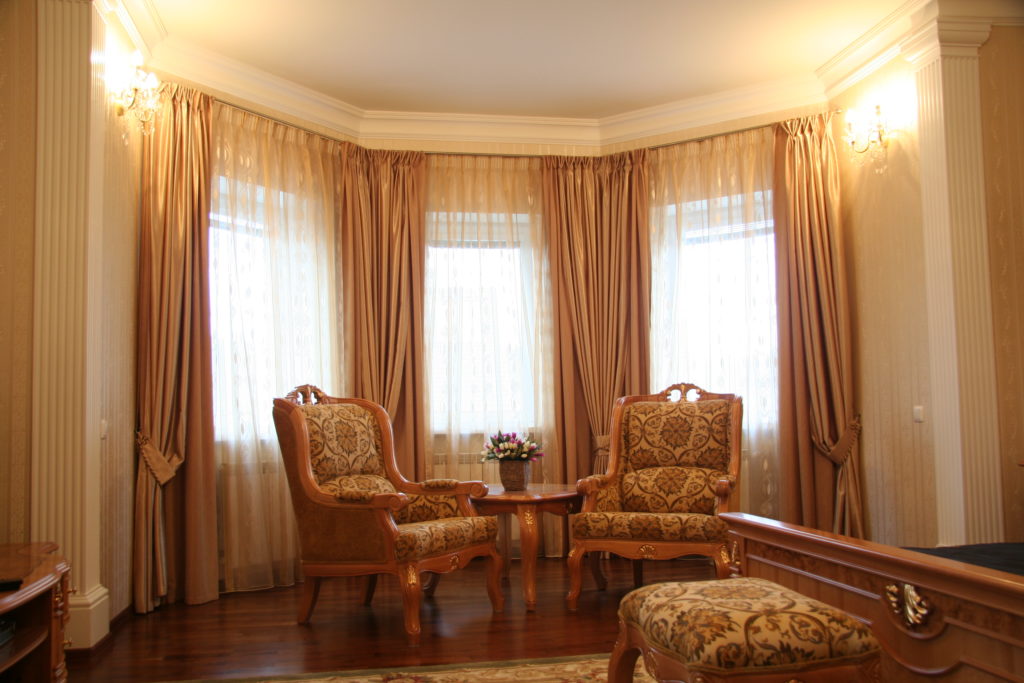
The cornice on which the curtains are attached does not always fit into the interior of the room. A plasterboard niche for curtains will help to disguise it. This design allows you to hide not only the cornice strip, but also the suspension system: hooks, clips, rings. This gives the impression of a curtain descending directly from the ceiling. What other functions does it perform? plasterboard niche? Is it possible to install it yourself?
What is a plasterboard niche?
A niche for curtains or tulle is a structure securely hidden in the ceiling (regular or suspended), designed to disguise the cornice. For its manufacture, sheets of plasterboard, beams or profiles and fasteners are required. The box can be shallow: in this design it is convenient to hide a string cornice for light curtains or tulle. A deep one allows you to disguise a multi-level or massive cornice for heavy curtains.
A niche for plasterboard curtains has the following advantages:
- neatly and elegantly complements the window opening in a room decorated in any style;
- helps create the illusion of a higher room (this is especially noticeable in the presence of glossy stretch ceilings that have a reflection effect);
- disguises a block with a mechanism on a cornice equipped with an electric drive, which rarely fits into the interior of the room;
- You can provide effective illumination of curtains by installing an LED strip inside the niche: the lighting will be beautiful and safe, since the fabric will not heat up.

Calculation of dimensions and preparation of materials
When determining the dimensions for arranging a niche, you need to take into account all the protruding parts located inside the room. Heating radiators have an effect if they are not located in a special recess, wide window sills, the presence of lambrequins, the number of rows of cornice. Measurements must be taken taking into account the fact that folded curtains form folds, which must be placed freely in the niche. Otherwise, difficulties will arise when moving the curtains, and they will begin to break.
As an example, let's calculate the dimensions of the box for a two-row cornice. If the heating radiator protrudes 15 cm from the wall, you need to measure 2 cm from it to the curtain (a little more is possible). We add the width of the cornice and another 2 cm necessary for free placement of the folds of the canvas. If, in addition to curtains, lambrequins are attached, their thickness must be added to the resulting figure.
Before starting work, the ceiling must be cleaned of the previous coating, giving special attention place for laying profiles. If the plaster peels off, it will need to be removed. Significant defects on the ceiling need to be puttied. A primer should be applied over the dried putty: it will protect the ceiling from dampness. Painting must be done after the construction of the structure is completed.
To install a plasterboard structure you will need:
- screwdriver;
- hammer drill (or electric drill);
- metal scissors;
- simple pencil;
- large stationery knife;
- narrow hacksaw;
- tape measure from 3 m;
- plasterboard sheets;
- aluminum profiles;
- dowels;
- self-tapping screws;
- self-adhesive tape;
- sandpaper.

How is installation done?
Drywall, unlike concrete, stone and brick, is a material from which any structure can be made by a person who does not have special skills. It is lightweight, easy to use and allows you to implement any design ideas. The easiest way is to make a niche in suspended ceiling, also made of plasterboard.
It is better to carry out the work at the stage of installing the ceiling itself. They include several stages.
- Determining dimensions, marking the ceiling. It is initially better to formalize all ideas in the form of drawings and sketches: then it will be easier to determine the amount of material required.
- Installation of frame profiles according to the completed markings.
- Attaching the niche frame to the ceiling using self-tapping screws.
- Finishing the resulting structure with plasterboard. It must be cut into sheets according to the size of the box. Drywall is fastened with self-tapping screws metal profiles frame.
- To mask the joints of drywall sheets, you need to glue reinforcing tape to them and putty the seams and corners. Ready design need to be painted (to match the ceiling or walls).
- Fixing the cornice and securing the curtains.
Installing a niche for curtains in a suspended ceiling is also possible, but it will be a little more complicated. The cornice must be hung before the ceiling itself is installed. Next, the base of the niche is mounted - wooden beam, which will be the support tension structure. The ceiling profile must be installed on the inside of the beam, while wooden element must be completely hidden.
If you install LED backlight inside the niche, connect it to a switch separate from the lighting of the entire room. This will allow you to adjust the atmosphere of the room depending on the time of day and your own desires.
A plasterboard niche looks more impressive if it is located along the entire wall. However, if the length of the cornice is equal to the window opening, you can save significantly by making a structure of the same size. A plasterboard niche can be decorated in an interesting way. For example, a box of the same shade as the wall looks beautiful. Try lining a niche with a mirror: this will visually raise the ceiling. In a room furnished in classic style, the cornice area can be decorated with molding - a decorative convex strip that will give the niche a spectacular and complete look.
When arranging a niche for a cornice, determining the correct dimensions is of paramount importance. Too much narrow design will lead to deformation of the curtains; too wide ones will take up extra space. If you install the niche correctly, you will get a beautiful and impressively decorated ceiling, and the curtains will become its elegant continuation.
- Preliminary preparation, measurements
- DIY cornice: features
- Practical installation recommendations
Curtains, curtains, drapes - all this is designed to decorate the window opening, emphasize the style of the interior, and adjust the degree of illumination in the room. There are many curtain rods on the market that can harmoniously fit into any room without burdening it in any way. However current trends in the design of residential and office premises dictate new ways of design window openings. Such a solution, how to make a cornice from plasterboard, can safely be considered an innovation. In such a niche you can easily hide both the cornice and the string.
A niche for curtains made of plasterboard will harmoniously fit into any interior without burdening it with unnecessary details.
Preliminary preparation, measurements
How to make a cornice with your own hands? This is a completely feasible task if you have the tools and minimal skills to work with it.
Required materials and tools:
Profiles used for installation of drywall.
- electric drill or hammer drill;
- screwdriver;
- self-tapping screws for fastening drywall and profiles;
- dowels;
- scissors for working with metal;
- tape measure and pencil;
- construction knife;
- aluminum profiles;
- plasterboard sheets;
- self-adhesive tape.
A niche, inside which the cornice will be fixed in the future, is very often made when installing a gypsum plasterboard ceiling. Structurally, it looks like the ceiling decoration plasterboard sheets does not reach the wall in which the window opening is located. However, this solution is not always suitable for apartments whose height is insignificant. Using plasterboard on the ceiling will further reduce the space. In such premises they build independent design cornice, which is a box located along the entire wall or even along the entire perimeter of the room.
Before starting work, it is necessary to carry out measurements and calculations of the required materials. Therefore, the width and depth of the niche for the cornice must be known. The width of the structure depends on what the curtains and curtains will be and how many rows they will be arranged in. If a 2-3-row design is assumed, then you need to imagine how it will be in harmony with the rest of the interior, so as not to weigh it down or clutter it up.
Measurements are made in the following order:

The profile is installed using dowels at 50 cm intervals.
- You need to use a plumb line to mark a line on the ceiling that corresponds to the line of the window sill or radiator, depending on what extreme point located further from the window;
- stepping back from the marked line into the room another 2-3 cm, draw another line, which will determine the location of the 1st row of curtains;
- apply the curtain fabric to the line closest to the wall and look at how close the curtain is to the window sill or radiator; if it is too close, you should retreat another 1-2 cm;
- stepping back another 1-2 cm from the outer border of the curtain, you get the desired width of the niche.
The depth of the niche may be small, but you should take into account the convenience of its installation, as well as possible fastening self-adhesive LED strip, which is used as illumination of a window opening and is glued in a niche.
Return to contents
DIY cornice: features
Before carrying out work on the installation of the cornice, it is necessary to clean the ceiling from the old coating and remove the peeling plaster in the places where the profiles are laid. If the ceiling has significant defects and cracks, they need to be puttied. After the putty has dried, the entire ceiling should be covered special composition(primer) that will protect the ceiling from moisture.

Installation of drywall to the profile is carried out using self-tapping screws, slightly deepening the caps
Installation of a plasterboard cornice is carried out in the following sequence:
- Along the line marked on the ceiling, after retreating a distance equal to the thickness of the drywall, screw the guide ceiling profile. To do this, holes are drilled with a drill in increments of no more than 50 cm and fasteners are made with dowels.
- At a distance equal to the width of the box, a second guide ceiling profile is attached in parallel. Fastening is carried out in the same way as before.
- From rack aluminum profile Using metal scissors, cut out pieces whose length is approximately 40 cm or more if desired. These pieces are screwed to the guide profiles with self-tapping screws for such fastening, using a screwdriver. The fastening step is at least 30 cm.
- At the free end of the screwed short sections, screw 2 more guides ceiling profiles on self-tapping screws.
- The ends of the last guide profiles should be fixed to the wall.
- Drywall sheets must be cut according to the size of the resulting niche. To do this, measure the required sections on a sheet of drywall, draw a line and make a cut. construction knife. After this, the sheet is placed on a flat horizontal surface, press, the sheet breaks along the cut line. After this has happened, the facing part of the sheet is cut with a knife, unless the sheet is completely broken.
- The resulting pieces of drywall are attached to the constructed frame with self-tapping screws using a screwdriver. Their installation begins with the inner wall. Hats should be slightly recessed.
If the design of the cornice provides for lighting, for which built-in lamps are used, then the wiring under them should be laid at the stage of installing the frame for the cornice. In order to protect electrical cable from moisture, minor mechanical damage during further repair work, it is placed in a special sleeve. It makes more sense to attach it to the ceiling with clips. When installing plasterboard sections, it is necessary to make slots into which the lamps will be placed in the future.
If self-adhesive tape is used as backlight led strip, then it is glued on after finishing the putty work. Using this particular type of lighting allows you to achieve soft illumination of the window opening, which will bring a romantic mood to the room.


