Takes ~4 minutes to read
A professional kitchen requires the presence of a hood. This complex design with an air duct system provides work area(near stoves, ovens, hobs) a favorable and healthy microclimate. Housewives also appreciated the benefits of exhaust systems. Therefore, hoods are increasingly becoming one of the main elements of home kitchen equipment. We previously looked at, and in this article we will tell you how to properly install a hood in the kitchen.

Save
Functions of exhaust devices in the kitchen, their difference from ventilation
The importance and necessity of using the equipment in question is confirmed by the tasks it solves:
- Contaminated air with particles of combustion products, fumes, smoke and odors is removed from the area adjacent to the stove.
- In place of exhausted air containing contaminants, an influx of comfortable, clean air is provided, which has lower humidity and temperature.
- Thanks to the operation of the hood, conditions are not created for the unwanted appearance and proliferation of harmful microorganisms.
- Significant or complete removal of air contaminated with grease, soot and dirt helps to keep it presentable for a long time. appearance kitchen furniture, interior items, household appliances, increases their durability.
- Favorable comfortable conditions are created not only for those working in the kitchen, but also for those in neighboring rooms and the premises of family members and guests of your home.

Save
Air exhaust, which is provided by exhaust systems, cannot be replaced by classical ventilation. The latter only creates conditions for air exchange in a limited space. Air saturated with combustion products and vapors is not removed. This problem is solved installed hood. Connecting special pipes with a ventilation shaft, it ensures the removal of contaminated air to the outside.
Important! The ventilation pipe connected to the exhaust pipe must have a cross-section that matches or exceeds the cross-section of the pipe itself (in the latter case, a transitional shaped element will be required for the connection). Compliance with this condition makes air removal more effective.
Types of kitchen exhaust devices, their important parameters
Installed kitchen hoods are represented by the following types:
- Hanging– budget, most common devices for mounting under a shelf.

Save
- Built-in– harmonizes well with kitchen furniture; the retractable panel makes them compact.

Save
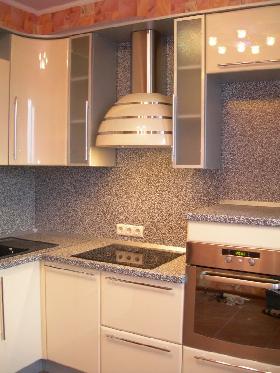
- Dome– universal fireplace type hoods with the ability to operate in flow and recirculation modes.

Save
- Island– used in large kitchens with a central stove.

Save
Before purchasing a hood, be sure to take linear dimensions (length x width) hob kitchen stove. For the product you are purchasing, these dimensions should be slightly larger or at least the same. With a smaller area, the efficiency of air removal will be reduced. This will immediately affect the general microclimate kitchen area and will cause some disappointment with the purchase. The next parameter - productivity - depends on the volume of the room (which can be easily calculated by multiplying the kitchen area by its height). Productivity (m 3 / h) should be 10 or more times the obtained volume value.
The hood should be installed 65-75 cm from the hob surface of electric and induction cookers. Above a gas stove, this distance increases by 10-15 cm. Reducing the height of the device will lead to inconvenience in working near the stove and can create a fire hazard due to overheating of the equipment.
Necessary tool
For installation of equipment and preparatory work you may need:
- hammer drill or drill with impact function;
- screwdriver;
- electric jigsaw;
- building level;
- tape measure, ruler;
- hammer;
- set of screwdrivers.

Save
Correct installation of a purchased hood: how to install and secure
Let's look at the most common installation methods.
Included with the purchased hood is a diagram for installing the electrical appliance in the kitchen. Be sure to familiarize yourself with it before carrying out installation work.
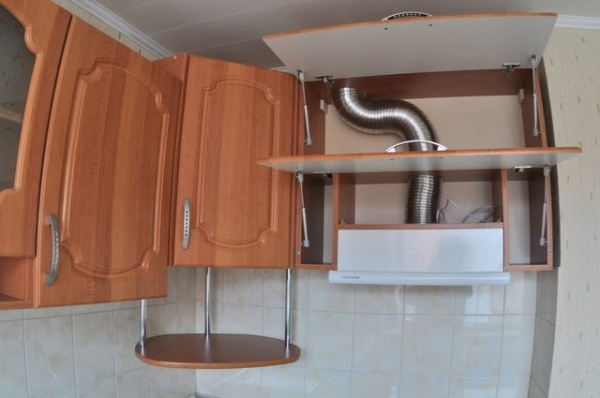
Installation in a cabinet

Save
The method involves permanently placing the electrical appliance in a hanging cabinet above the stove. If the installation of the hood coincides with general work When arranging a kitchen, it is logical to order a special cabinet with all the furniture according to an individual sketch. The main feature of the furniture unit is the absence of a bottom and a securely fastened, durable middle shelf, which will bear the entire load after attaching the body of the electrical appliance to it. The distance from the bottom of the cabinet to the shelf must correspond to the height of the purchased device. All shelves and the top cover are ordered to have holes of the required shape for the air duct. The dimensions are determined depending on the exhaust pipe used. Holes are not made for devices operating on the principle of recirculation (air purified by filters again enters the room).
If the furniture was installed earlier, you will have to mark and make the necessary cuts in the shelves and cabinet lids yourself using an electric jigsaw. Perfect accuracy is not required - after installation, possible flaws will be hidden.
Depending on the set of supplied fasteners, the hood is fixed to the shelf with self-tapping screws or a screw-nut connection through pre-drilled holes in the shelf. After hanging the cabinet on the wall, put on and secure the air duct pipe to the outlet pipe. It is advisable to provide an electrical outlet and place it in the cabinet itself. Sagging wires and other unaesthetic details will be hidden by a closed door.
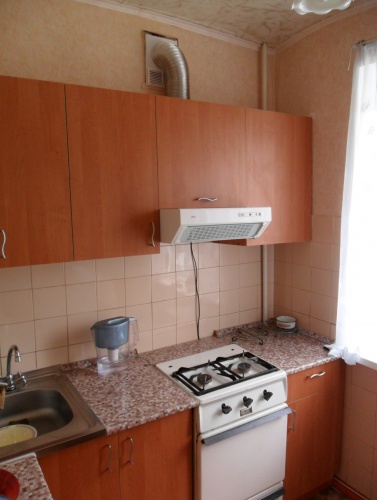
Under cabinet installation

Save
This method is very similar to the first option. Only the equipment is attached to the bottom of the cabinet. This type of fastening is used to reduce the distance from the hood to the stove for effective suction of contaminated air. Appliances are selected that will look easy in the kitchen interior. If you want to hide the front panel of the hood, install a decorative false panel made of material similar to the front of the cabinet door.
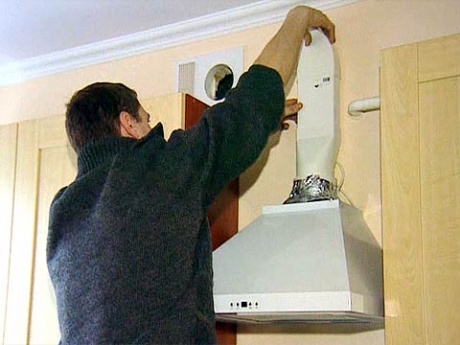
How to attach to the wall
Being above the stove, the furniture is exposed to high temperatures and steam. Because of this, its appearance may suffer and its service life will decrease. Therefore, a gap often forms between furniture elements above the stove. If there are no cabinets above the hob, the hood can be mounted on the wall. This is a simple and reliable method.

Save
First, the height of the electrical appliance is determined and a horizontal line is drawn along the level. Now the hood is applied to the wall at the required height and marks are made for drilling through the holes in its rear panel. After marking, drilling is done seats for dowels (minimum depth – 50 mm). Then the top screws are tightened and the hood is hung. If it is located without deviations and hangs securely, the lower screws are screwed through the holes in the panel.
If there are no places for fastening on the rear panel, the hood is installed on a specially made frame made from a corner. The frame itself is attached to the wall with self-tapping screws. If it is not possible to fasten it close to the wall (a pipe or other communications pass through this place, or a wall with sheathing), collet pins or long self-tapping screws (screws with a thread for a nut on the other side of the product) are used to fasten the frame.
Electrical installation features
Wiring for the installed equipment is planned and laid in advance.

Save
Depending on the method of connecting the hood to electrical network and complex kitchen design, the solution to the issue may be as follows:
- The standard electric cord for range hoods is quite short. Therefore, when connecting a plug to a socket, the latter must be provided and installed in advance. Wiring or an extension cord with a socket can be carefully laid behind furniture or covered with a PVC box.
- The connection via a machine (permanent) is made in a phase break.
- Grounding is always connected first.
The second and third points are mandatory.
Types of pipes used
Corrugated aluminum products consist of a base of metal rings covered with foil in several layers. The main advantages of corrugation: low cost, ease of installation, the ability to easily bend and avoid obstacles, the folded “accordion” extends to increase its length several times, the ability to withstand heating up to +250°C, can be easily extended using metal tape. Described in more detail in the publication.

Save
Useful information! If the corrugated pipe does not have maximum stretch, whenexhaustWhen the system is running, a characteristic noise occurs. Its cause is unevenness inner surface, creating additional resistance to the diverted air flow.

Save
Plastic elements of exhaust piping have the following advantages:
- The low weight does not burden the kitchen furniture, does not create difficulties for installation alone, and eliminates additional supports and fasteners.
- The assembled structure is characterized by high strength and tightness.
- Easy to assemble shaped and linear elements.
- Aesthetics of assembled structures.
- Good sound insulation.
- The material (PVC, polyurethane, polypropylene) is environmentally friendly and not subject to corrosion.
- Grease and dirt do not accumulate due to the smooth inner surface of the pipes. For the same reason, they are practically silent.
- Durability.
The most popular cross-section of pipes used is round. Plastic pipes can also be rectangular. They are easier to install close to the wall and have a more aesthetic appearance.
Air duct assembly features
The correct choice of exhaust device, calculations and selection of pipes, transition elements, connecting devices may not give the expected result. All the efforts of the previous stage are easily canceled out by elementary mistakes or negligence in the subsequent assembly and installation of the pipeline to the ventilation shaft. For correct and correct operation exhaust system, the following points should not be overlooked:
- Assembled from standard elements, the pipeline should be as close to a straight line as possible. Deflections and drops in its flat areas are not allowed. If you use a corrugated pipe, ensure that it stretches to its maximum.
- Be sure to use sealant to seal the joints of pipes with adapters, pipes and with each other.
- The bend radii of the pipeline must exceed the diameter of the corrugation itself. Violation of this condition leads to a decrease in pressure and efficiency of the entire system.
- The optimal pipeline is no longer than 3 m with a minimum number of turns and bends (the desired angle of rotation is obtuse).
- The use of special adapters helps keep the air duct intact when routed through a wall.
- Long corrugated pipes are fixed with clamps every 1-1.5 m. This helps eliminate their possible deflection and swinging during operation of the exhaust system.
- It is advisable to use a special frame at the junction of the laid pipe and the exhaust shaft. There is a valve (non-return) on it, a flange for securing the edge of the pipe, the rest of the area is occupied by a ventilation grille. Operating principle - when kitchen equipment not in use, nothing interferes with air circulation through the grille (valve is open); When you turn on the hood, the valve closes and the exhausted air with contaminants cannot get back into the kitchen.
- The entire system must be grounded to protect against static electricity.

Save
Remember! The performance of an operating exhaust system decreases by 10% for each bend of the air duct at an acute and right angle. In several such areas, the operation of the hood becomes ineffective and occurs with overloads. If it is impossible to change the route of the pipeline, it is necessary to increase the power of the installed equipment and the nominal cross-section of the pipe. here
Tension and suspension ceiling structures, which also help to hide the external elements of other utilities installed. If possible, the pipe is passed through a prepared niche in hanging furniture. False panels with decor help to close communications furniture facade or adjacent wall. They are usually mounted or installed on hanging units of kitchen furniture.
Save
Video
Correctly selected elements and components of the air exhaust system, their proper connection and installation make it possible to create an area in the kitchen in which cooking becomes a safe and enjoyable experience.

Installing a hood in the kitchen can be done in different ways, everything will depend on its type, and they are like this:
- Hanging, which are fixed under the cabinet located above the stove;
- Built-in - they are installed inside a hanging cabinet and thanks to this they fit perfectly into the overall interior of the room;
- Wall-mounted - installed on the wall above the stove;
- Corner hoods are those hoods that are installed in a corner;
- Island - they can be mounted anywhere in the room, hanging from the ceiling.
It is very important to understand one rule - installation kitchen hood it is only possible to be no lower than 70 cm above the stove, and if the stove is gas, then this distance should be no less than 80 cm. This is necessary for the hood to work effectively.
Hoods also differ in ventilation modes; there are flow-through ones, the principle of which is to extract dirty air. This method is the most effective and is called diversion.
The second type is circulation hoods, the air here is passed through carbon filters, after which what remains at the exit is clean air. Its installation is quite simple, but since it does not require ventilation, the efficiency of air purification is an order of magnitude lower compared to flow-through hoods.
It is quite important what the hood performance will be, measured in cubic meters. meters in 1 hour. When purchasing, be sure to consider how much noise the hood will create when the ventilation is on. Models that emit noise higher than 50 dB are not worth purchasing. Instead, it is better to buy hoods with 2 or even 1 fan; they will not make noise at all, and in addition, they are equipped with gaskets that absorb sound.
Before you figure out how to install a hood in the kitchen with your own hands, you need to remember about electrical safety. You need to connect the hood very carefully to the network, since the kitchen is a room where something can always get inside the housing (it can be fat, moisture accumulated inside), which can lead to bad consequences, namely an electric shock.
That is why the hood must be connected to the network using 3 wires - 1) phase; 2) land; 3) zero. As standard, the ground wire is painted yellow made of green stripes. Grounding is required before installation to ensure safe use.
If your room has Euro sockets or a ground loop, then there should be no problems. It may be that the equipment does not have a grounding connector, in which case it will not be difficult to make one yourself, you just need to screw the wire to the metal case.

But many people may not have a Euro socket and grounding in the kitchen. Then the question arises - how to make the connection? You can do this yourself, but the first thing you shouldn’t do is try to connect the neutral wire to pipes or batteries. The connection must be made to a solid neutral.
It is important to know that if wires are already connected to the grounding, do not even think about disconnecting them, because you may get an electric shock. You just need to tighten your wire on top of the ones that are already there. If they are not there, then you need to clean the pipe and secure the wire contact.
Ventilation in the kitchen
To properly connect a kitchen hood to ventilation, you must, of course, do the installation correctly:
- To install ventilation in the kitchen, the best option would be to install a box with a flapper valve. There should be 2 holes on it. When the valve is in a horizontal position, it means that it is closed, the air leaving through the window will provide excellent ventilation in the kitchen;
- When pressure appears during fan operation, the valve closes the first window and therefore ventilation passes through the hood. This scheme has a rather big advantage, which is that there will be no reverse draft, and natural ventilation will also remain, and this will happen even when the hood is turned off. You can adjust the valve using a thin spring.
Making a choice of air duct
Kitchen air ducts can be divided into the following:
- Corrugated aluminum duct - it is quite simple material and installing a hood with your own hands in the kitchen using it will not be difficult at all. All this is due to the fact that the material can easily be bent to any size, and it is also worth noting such a plus as the absence of vibration, which cannot be said about rigid boxes. But if you want the air duct to fit harmoniously into your room, then you will have to think through options for how to hide it, because its disadvantage is that it looks ugly;
- Another type of air ducts is PVC air ducts. First of all, it is worth noting their lightness, strength and noiselessness, this is achieved due to their smooth surface, which provides almost no air resistance.
Hood installation
Naturally, everyone wants to know how to properly install a kitchen hood, and first of all, it is worth noting that installation will depend on where the ventilation shaft is located. One of the most popular options is to install a hood in a built-in closet, which we will now consider.
If you want everything done well, then first you must have a cracker box. The housing can be made without any problems from a material such as aluminum or galvanized sheet. Also, as an option, you can buy a valve that opens like a butterfly, which is placed at ventilation shaft.

For greater convenience, place the housing above the stove on a wall cabinet, then seal all the cracks polyurethane foam so that there is no resonance.
Initially, you just need to try on the body of the firecracker on the cabinet and make markings for the hole. Next, you can remove the cabinet and use a jigsaw to make a hole. To make it neat, first drill a hole inside with a drill, and then use a jigsaw to cut out the shape that you need in the cabinet.
Also make holes in the internal shelves for the air duct, if they exist, of course, and in the upper wall you need to make a square hole so that there is 3-5 mm of reserve for the firecracker.
Connecting the air duct
We will divide the air duct connection into the following stages:
- To begin with, do the following - you need to insert the corrugation into the holes made in the top wall of the cabinet, bend it into a square shape, and then cut it so that there is a margin left, bend the corners outward;
- Next, you can begin attaching the corrugated cabinet to the wall, and be sure to treat all joints of the air duct with silicone so that power is not lost;
- The next step is to attach the box you made yourself to the cabinet; this is done to connect the corrugation to the ventilation shaft. If there are large gaps, then they will need to be sealed with foam;
- Now we can start fixing the hood in the cabinet. Self-tapping screws can be used for fastening;
- The corrugation with the help of a clamp must be fixed very securely; this connection does not need to be sealed with sealant, but for higher reliability this can be done;
- If you want to make a direct connection, then the air duct must be attached to the shaft, and in order to do this efficiently, you must use a special grille with a round hole;
- Are you planning to use PVC air ducts? Then everything will be simple here too - the pipes must be connected to the component corners and routed to the ventilation;
- If you need to install a hood in the kitchen of a private home with maximum quality, then be sure to know that when installing ventilation, try to bend the pipe as little as possible, because this is necessary for good air draft. After each bend, the power will be lost by about 10%.
We mount the hood on the wall without a cabinet
Not everyone associates the correct installation of hoods in the kitchen with wall cabinet, this is explained by the fact that many people simply do not want their cabinet to quickly become unsightly from excess moisture in the kitchen and polluted air. It also often happens that they want to install a larger hood, but a smaller hood can be placed inside the cabinet.
Therefore, in order to hang the hood on a wall without a cabinet, you first need to attach a U-shaped frame of corners with dowels to the wall, this same mount will support the body.
But it can often happen that using ordinary dowels the hood cannot be attached to the wall. Then the question arises, what to do in this case? This can happen, as a rule, to those who have a gas stove in the kitchen, in which case the pipe will interfere with normal fastening.
For such a case, long-sized self-tapping screws-studs are ideal; one side of them looks like a thread with a nut, and the other just like a self-tapping screw. They just need to be screwed into the wall, like dowels, and then the hood body is attached to them, slightly retreating from the wall.
At the last stage, all that remains is to carry out correct connection hoods to the network. This can be done by simply connecting it to an outlet or making a permanent connection using a fuse. It is very important to connect the grounding first, since when the fans are running it will remove possible voltage that may be on the case.
Now all you have to do is decorate the hood and enjoy a pleasant atmosphere in the kitchen, and most importantly, clean air.

It is also important to remember that it is simply necessary to clean the hood from steam a couple of times a year to prevent fire. As you can see, installing a hood in the kitchen with your own hands is not such a difficult task, the main thing is to just stick to necessary rules safety with electricity and you will succeed in the end.
Many people, when purchasing a new hood, are not sure whether they can install it themselves, preferring to turn to specialists. This work does not cause any difficulties; it is enough to have basic skills in handling a drill and understand electricity. Another important point – right choice models according to the room. The productivity of the equipment should be 10 times the volume of the kitchen. The design of the product may be different, but the installation principle is almost the same. Let's look at the step-by-step process of installing a hood over a stove and the main features that may arise during operation.
The hood is selected based on the area of the kitchen and the overall design
Features of installing kitchen hoods
Manufacturers produce different hoods, which differ in the method of attachment:
- built-in – installed in a cabinet in the form of a slider;
- flat is independent device, he does not need access to the ventilation shaft. Polluted air is forced through a filter system and released back into the room;
- corner - this model is chosen if the hob is placed in a corner. The exhaust system can be supply through an air duct or recirculation;
- domed, inclined, fireplace - occupy the entire space above the stove, attached to the wall surface;
- island - installed on the ceiling above the hob, they take up quite a lot of space.
When choosing, it is important to follow the standards for placement above a gas stove or hob.

The corner hood fits very organically into the kitchen design
How to safely install a hood in the kitchen
A range hood is an electrical appliance, so it is important to take care of safety during its operation.
- In any model, fat and moisture accumulate and a breakdown may occur, as a result of which current will pass through the body. In this case, there is a high risk of electric shock. Therefore, first of all, it is necessary to ground the device. Modern apartments equipped with a grounding circuit, you don’t need to do anything additional, just turn on the hood.
If there is no grounding, you must draw the circuit yourself. A 3-core wire with a cross-section of 2.5 mm² is suitable for this. It does not need to be carried outside or attached to radiators; it is enough to simply extend it to the electrical panel, where it is connected to a dead neutral. If wiring is already connected to it, you just need to secure your wire on top.
- When installing the hood, one more rule should be followed - the distance from the hob to the bottom border of the device must be within the limits specified by the manufacturer in the product data sheet.
- Another important parameter safety - the throughput of the ventilation shaft should be higher than that of the exhaust device. Otherwise, contaminated air masses will return to the kitchen or to neighbors through other openings in the ventilation duct.
- The installation of the hood must be reliable, the fastening is strong enough so that it does not fall onto a hot stove during cooking. You need to be especially careful if the installation is carried out on drywall. In this case, it is necessary to additionally strengthen the place using wooden blocks.

Installing a Grounded Outlet for Safety
Tools and materials needed for work
Before starting work, you need to prepare the following tools and materials:
- air duct, additional elements if necessary;
- hammer drill A drill with an impact function is also suitable; this will make the work a little more difficult if the walls are concrete;
- screwdriver;
- measuring tape or tape measure;
- level;
- hammer;
- fasteners;
- if necessary, a sheet of plasterboard, metal guides;
- primer, paint, brush, putty and tool for its application.
If an expensive tool is not available, it is not practical to purchase it for installing one hood. Many stores offer equipment rental for a short time. Installation will take no more than 2-3 hours, rental will not be expensive.
How to properly install an inclined or dome hood over a gas stove: main steps
The installation of inclined and dome hoods is practically the same; it should not cause any difficulties and it is quite possible to do it yourself, saving a certain amount of the family budget. Let's look at the entire installation process step by step.
Installation of a recirculating hood
This treatment system does not require connection to a ventilation shaft, so it simply needs to be mounted on the wall. This is a good solution for private houses or apartments in which the stove is installed far from the ventilation system.

The recirculating hood can be installed under upper furniture, if height allows
Check valve installation
First of all, install a firecracker in the ventilation system or a check valve. It is necessary to prevent the return of air into the room. It is not difficult to make it yourself; to do this, you can take a piece of tin and make a box, the diameter of which should be 3/4 of the cross-section of the air duct.
Next, you need to take a small sheet of aluminum 5 mm thick, cut out the damper and attach it to the box with a spring so that air flows push it out when leaving the room. When air flows back, the damper must be closed.
The spring can be made from wire 120 mm long, 5 mm wide and 0.3 mm thick. Its tension should close the forcedly open damper and return it to its original position.

Operating principle of a check valve
Hood installation
After installing the clapper, you should secure the hood to the wall. Manufacturers provide the availability of fasteners along with the equipment. It is necessary to carefully measure the distance, the placement standards are indicated in the product passport, check the horizontal position using a level and drill a hole with a drill or hammer drill. Then drive in the dowel and screw in the screws.

Mounting the hood to the wall using self-tapping screws
Duct installation
Easiest to install corrugated pipe. It can be stretched to the required parameters or cut with scissors. During operation, the hood does not produce additional noise and has excellent aerodynamics. The air duct must be connected with one side to the branch pipe, the other must enter the ventilation shaft.
A check valve must first be installed in the channel, the body of which must be attached to the wall. You can secure the duct connections using clamps. After which the entire structure must be covered with a plasterboard partition or a plastic box.
If the ventilation shaft is located at a distance from the hood, you can extend the air duct over a long distance. It must be remembered that with each turn of the corrugation, 10% is lost. bandwidth pipes. In addition, it does not look very aesthetically pleasing. Therefore, in this case, it is worth thinking about moving the hob closer to the ventilation hole.
When installing the duct, there must be a gap between the ceiling and the pipe. This must be done due to the fact that during operation of the hood there is a slight vibration of all elements, which can damage the ceiling.

Installation and connection of a plastic air duct
How to independently connect a kitchen hood to electricity
Before installing the hood, you should first check the length of the cord and the distance to the outlet. In this case, it is not advisable to use a carrier; it is better to immediately move the outlet, and you should not place it close to heating equipment or water. The most optimal place– pave hidden wiring above the lockers.
You can move the outlet yourself or invite a specialist. Then the place needs to be plastered and decorated after the repair.
Features of installing a built-in hood
A built-in hood in its technical parameters does not differ from an inclined or dome model. The main difference is in the design, for example, the casing in a tall product performs a decorative function. At correct installation the hood is almost invisible in the kitchen; only the control panel remains in sight. It is suitable for small rooms or kitchens decorated in country, classic or rustic style.
To install such a structure in a house, certain professional skills are required. To place it, you need a cabinet, which is installed at the required distance above the stove. Can be taken under exhaust equipment existing furniture or make a custom cabinet.
Let's look at the step-by-step process of installing a hood in already installed furniture.
- In the cabinet, remove the bottom and shelves. You can install additional fasteners for rigidity.
- You need to cut a hole in the top panel for subsequent installation of the air duct. It can be cut out with a jigsaw.
- Install the hood in the cabinet and secure it with self-tapping screws.
- Next, you should hang the cabinet with the hood in place.
- Install and secure the air duct.
- Connect and check the operation of the system.
A corrugated air duct in sight can ruin the design of any kitchen. It is recommended to hide it inside furniture or use a decorative model. Alternatively, install plastic construction, which visually looks much better.

The sequence of installing the hood in the cabinet
Hood installation height
Manufacturers indicate the dimensions in the technical notes for the product, since they directly depend on the power of the equipment. Optimal height Installation of the hood above the hob or stove should be in the range from 65 to 95 cm from the bottom edge of the model to the burners:
- for gas - from 75 cm to 90 cm;
- for electric – from 65 cm to 70 cm.
If you install the hood lower, individual elements may be damaged due to high temperature, steam and splashes.
It is possible to install a hood at a height of more than 90 cm only if the power of the equipment allows it.
How to choose an air duct for a kitchen hood
Air purification in the kitchen depends not only on the power and performance of the equipment, but also on the correctly selected air duct. The trading network offers the following elements:
- corrugated pipe made of round aluminum foil, the main advantage of which is low cost. The air duct bends well, so installation does not cause any difficulties. Additional elements for organizing air purification are not needed; you may only need clamps with which to secure the corrugation to the hood and ventilation grille.
Disadvantages include uninteresting appearance and vibration when the device is operating at high power;
- rigid plastic pipes - to install the ventilation duct, it is necessary to purchase transition parts: turns, connections. The elements are produced in round and rectangular sections. Finished design It has a presentable appearance and good sound insulation. The main advantage of rigid pipes is their small height, so they can be hidden even in a suspended ceiling.
When choosing an air channel, you should focus on the diameter of the outlet - the bell; in addition, it is important to correctly measure the distance to the ventilation shaft. For a corrugated pipe, the difference due to incorrect measurements will not affect the installation; for a rigid air duct, this can lead to the purchase of unnecessary parts.

A variety of elements of the plastic air duct allows you to perform complex piping
Conclusion
Installing a hood over a gas or electric stove will take 1-2 hours; the work is not difficult. Therefore, before turning to professionals, you should try to install it yourself. It is important to follow safety precautions and take into account all the features that we have described. And then its operation will reliably protect the room from unpleasant odors.

A slider hood installed in a cabinet does not clutter up the kitchen space
To ensure proper air circulation and create a comfortable microclimate in the kitchen, it is necessary to install an exhaust system. It prevents odors from the kitchen from penetrating into the rest of the rooms in the apartment, especially if the kitchen is combined with another room. In addition, exhaust ventilation in the kitchen prevents grease from settling on the furniture, dishes, and appliances surrounding the stove.
The need for a kitchen hood
Availability exhaust ventilation in the kitchen is justified by serious reasons:
- During cooking, a gas stove releases a large amount of harmful substances into the air that can harm the body: carbon monoxide, unburnt residues natural gas. In addition, gas leaks from equipment or pipelines are possible.
- When cooking with both electric and gas stoves, kitchen fumes are released when frying foods, as well as water vapor. The latter is not capable of causing great harm to the body, but disrupts the normal indoor microclimate. Kitchen fumes form harmful substances in the air that can settle not only on dishes, furniture and walls, but also inside a person’s lungs.
Having an effectively functioning exhaust system in the kitchen is necessary not only for reasons of cleanliness and hygiene, but also for the safety of human health.
Owners of kitchen gas equipment should pay especially close attention to the presence of good traction.

Types of hoods
Types of ventilation from kitchen hoods are divided into general and local. In the first case, air exchange is carried out throughout the room as a whole, including the food preparation area, hob, dining area. This is a less productive option that requires additional air flow through natural ventilation of the room. The second option is to install a kitchen hood directly above the hob.

Local exhaust, in turn, is divided into two types:
- Air filtering installation.
- Exhaust hood.
The filter passes polluted air through itself, leaving all the soot and fat particles inside. The umbrella draws in exhaust air and discharges it into the ventilation shaft. From the point of view of air purification efficiency, it is preferable to install ventilation equipment in the kitchen of the second type.

Rules for installing exhaust ventilation
Before installing a hood in the kitchen with your own hands, you should choose it correctly:
- It is necessary to determine the diameter of the fan. To do this, the outlet of the ventilation shaft is measured, the value is rounded down - this will be the required diameter.
- To install a kitchen hood, you need to calculate the fan performance. To do this, you need to calculate the volume of the room and subtract from it the volume occupied by the furniture. The resulting value must be multiplied by 6 and 12. You get two indicators of the lower and upper limits of the fan performance. These indicators will help you choose the right fan model.
- To prevent exhaust air from being drawn through the fan, it is necessary to select equipment with check valve.
- No less important characteristics equipment for the hood are: the presence of a mesh to prevent the entry of insects; removable front panel for easy cleaning; presence of a timer.

By selecting necessary equipment, you can start. It is recommended to follow some rules for installing a hood in the kitchen:
- It is necessary to ensure reliable grounding of the equipment. Therefore, installation of a hood in the kitchen is carried out by connecting to the electrical network with three wires: “phase”, “zero”, “ground” with wires in yellow insulation.
- To know how to properly make a hood, you need to have an idea of connecting to the power supply. This is especially true for those device wires that are not equipped with a plug. In this case, the connection is made through the terminal block. For convenience, the socket for the terminal block can be made hidden inside the hood body.
- The hood must be mounted above an electric stove at a height of at least 70 cm, and above a gas hob a distance of 80 cm must be maintained.
- Before installing a kitchen hood, the building's air ducts should be checked for blockages. If the draft is bad, you need to contact housing office specialists to clean the shaft.
- Before you ventilate your kitchen, it is important to choose the right duct. You can choose a round corrugated aluminum pipe or a rigid plastic pipe. In the first case, the advantage is lower cost and a simpler installation method, in the second - space saving during installation, a more aesthetic appearance and resistance to vibration.
Installing a hood in the kitchen
Installing a kitchen hood with your own hands depends on the type and location of the ventilation duct. Ventilation can be installed inside kitchen cabinet or make a separate model in the form of a fireplace mantle or inclined panel.
Installation diagram
It often disrupts the ventilation installed in the apartment. If you make another hole for air exhaust to install the hood, the quality of air exchange will not improve, since the cross-section of the ventilation shaft will not change after such manipulations.
In order not to impair air exchange, an additional box with a special valve should be installed. The principle of its operation is simple: when the fan is not working, the valve is open, and natural ventilation occurs. When the fan operates, the pressure generated closes the valve, thereby providing forced ventilation.
This hood installation scheme prevents the occurrence of reverse thrust and implementation natural ventilation when the exhaust equipment is turned off.

To properly connect the hood in the kitchen, it is necessary to correctly install the check valve: in the horizontal channel, the axis of the damper attachment must take a horizontal position, and the heavier section should be inclined downward. Without air pressure, the valve will be closed.
Fan Installation
A homemade kitchen hood can be made from a fan mounted into the wall. To do this you need:
- Mark a location on the wall to install the fan, then make a hole of the required diameter.
- A fan is inserted into the hole, and the free space between the wall and the equipment is filled with foam.
- WITH outside a grate is installed.
- After these manipulations, the fan can be connected to the power supply.
DIY kitchen hood
You can make a hood in the kitchen with your own hands, by building it into a cabinet or without it. Built-in ventilation looks organic with kitchen set. The stages of its installation are as follows:
- An aluminum or metal box with a check valve is made. For convenience, it can be purchased ready-made.
- A hole is marked on the top board of the cabinet in accordance with the lower clapper window. For final installation, you need to outline the sides of the firecracker.
- A hole is cut in the bottom of the cabinet along the edge of the bottom of the hood.
- Next, remove the cabinet shelves and cut out holes for the air duct with a jigsaw to mount the hood.
- A square hole is cut out on top of the cabinet board for the clapper window with an allowance of 3-5 mm at the edges.
- The corrugation is installed: a corrugation is threaded into the round holes, the upper end of which is formed by hand in the shape of a square and pushed into the upper hole.
- The cabinet with corrugation is installed in place.
- The kitchen hood is inserted into the cut-out hole in the cabinet with your own hands. All junctions of corrugations, “crackers” with holes must be processed silicone sealant, and then with polyurethane foam. A do-it-yourself kitchen hood is attached to the cabinet using self-tapping screws.
- A corrugation is put on the exhaust pipe and secured with a clamp. There is no need to seal this connection, as this will complicate disassembly for cleaning the ventilation, and will also create pressure drops in the area where the pipe passes into the corrugation.
When using not corrugated, but plastic pipes for air ducts, installation is carried out by connecting them with component corners and further wiring to the ventilation duct.
If installing a hood in the kitchen with your own hands is carried out in the form of installing a separate structure, a metal frame is made from a 20–25 mm angle according to the dimensions of the hob. It is attached to the wall under the hood socket. The air duct itself is installed under a plasterboard box. The firecracker is placed on the top edge of the box, just like on a cabinet.
To know how to make a hood in the kitchen yourself, you need to consider practical recommendations and advice from experts in this field. To summarize these recommendations, the following can be noted:
- Do-it-yourself ventilation in the kitchen should be not only exhaust, but also supply.
- When installing the air duct, it is necessary to avoid a large number of bends in order to ensure good draft.
- To ensure good traction, it is necessary to clear the building shaft of blockages.
- Installing a check valve will help prevent the supply of exhaust air.

A correctly selected one does not have a drive or spring, but it does have a damper with an offset axis relative to the center.
Installing a hood is a simple process, however, it requires compliance with many nuances. Therefore, it is better if it is handled by specialists with knowledge of the operating features of ventilation systems and extensive practical experience in connecting exhaust units. Such a pleasure will cost a lot, in the range of 4000-8000 rubles, depending on the amount of work and the type of hood. But you don’t have to worry about how to install a hood in the kitchen yourself, but enjoy the work done.
Self-installation is not always advisable for the following reasons:
- During operation of an electrical device, problems may occur;
- Errors may be made during installation. This is dangerous for the health of apartment residents and can cause damage to the hood;
- Warranties from the manufacturer cease to apply if the installation is carried out incorrectly, the installation diagram is violated, or it was carried out by specialists who do not have the necessary certificates to perform this type of work.
For anyone who does not have experience in installing electrical hoods, it is better to pay for the services of specialists rather than think about how to install a hood in the kitchen without negative consequences.
Which hood should you choose for your kitchen?
To choose the right hood for the kitchen, you need to know what parameters to pay attention to when purchasing it. Not only the appearance of the air purification device is important, but also the principle of its operation and features internal structure and much more. So, pay attention to the following parameters:
Hood type
Depending on the installation method, hoods can be built-in, flat, or fireplace. Flat models They are the simplest in design and easy to install. They are ideal for those who are used to saving family budget. Square work surface of such devices should be equal to the area of the hob surface of the stove.

Built-in hoods differ from the previous ones in that they require connection to the ventilation shaft via an air duct. But they can be almost completely hidden in a hanging cabinet, and this will undoubtedly appeal to those who pay special attention to kitchen design;
Fireplace hoods look good in spacious kitchens. They have high performance And stylish design. We will look at how to install a hood for this type of kitchen later.
Performance
The larger the kitchen area, the higher the performance of the hood should be. The number of motors installed inside the device body also plays a role. For a room of up to 10 square meters with a ceiling height of 2.3-2.5 meters, a model is suitable that can pass through from 280 to 350 in an hour cubic meters air. For kitchens from 14 square meters It’s better to buy a hood with two motors and a capacity of at least 400 cubic meters per hour. For the convenience of calculating the required productivity, it is better to use the formula V=S*H*10*1.3, where S and H are the area and height of the kitchen;
Dimensions
The dimensions of the hood must be combined with the dimensions of the kitchen stove and hanging cabinets. The working surface area of the device must be no less than the area hob, but it’s better if there is more. It is important that the air purification device does not protrude too far beyond the kitchen cabinet. How to install a kitchen hood so that it looks good in the interior, read in the “Installation” section;
Operating mode

Hoods operate in two modes – air exhaust and air recirculation. In the first case, all fumes from the room are discharged into the ventilation system of the house or directly outside; in the second case, the air is purified through filters, which sometimes need to be purchased separately, and returned back to the room. Majority modern devices support both modes. If your apartment does not have a separate ventilation window to the street and you cannot connect the hood to the existing ventilation system, then you should buy a model with a recirculation mode of operation;
Number of operating speeds
The more operating speeds a hood has, the more versatile it is, since it allows you to clean the air faster. Modern household devices are manufactured with up to four speeds.
Installation of various types of hoods

Installation of hoods, depending on their type, is carried out differently, so we suggest you familiarize yourself with how to install kitchen hoods.
This you need to know: In old houses, the installation of hoods was not provided for, since they do not have individual ventilation ducts. And if you connect an air purification device to a common channel, this will lead to their incorrect operation, which will provoke an emergency situation.
Owners of apartments in such buildings can solve the problem as follows:
- Buy a hood that operates in air recirculation mode (cleaning it through filters and returning it back to the room);
- Make a separate ventilation system (exit to the street). The work must be performed by a specialist.
If necessary, you can call a specialist who will check the condition ventilation duct and will tell you how to install a hood in the kitchen.
Devices and tools required for installation

To connect the hood you will need:
- Plastic or metal corrugation (if the device will be connected to a ventilation window);
- 2 clamps for attaching the ends of the corrugation to the flanges of the ventilation grille and hood;
- Ventilation grill;
- Hammer drill, screwdriver or screwdriver, possibly a wrench;
- Tape measure and pencil for marking;
- Construction level;
- Electric jigsaw or hacksaw for metal.
How to install a hood in the kitchen: steps
First, let's look at mounting a hanging hood. Such devices are the simplest in their design, have a low cost, operate without connection to the apartment’s ventilation system, and are installed in two ways: as a separate module and on the bottom of a hanging kitchen cabinet.

There are two ways to install a flat hood on a wall: using a metal frame or special screws. In the first and second cases, holes of a certain depth are drilled for self-tapping screws, after which the hood is attached to them or a frame.
There is another installation option - on the bottom of a hanging cabinet. To do this, you can use corners of a certain height, which are screwed to the bottom of the cabinet in the corners, after which the hood body is inserted into them. Or, if the hood has holes for fastening, it is better to install through them using self-tapping screws.
Installation of a built-in hood
Now let's talk about how to install a built-in kitchen hood. This is a little more difficult to do, because you have to deal with laying the air duct, connecting it to ventilation system and a hood, making holes in the hanging cabinet. Before starting installation work, you need to make sure that the air purification device is working properly by connecting it to the electrical network and checking all functions. Remove from hood protective film preferably after completion of the installation process.

How to install a hood in the kitchen - a step-by-step process:
- At the bottom of the cabinet, which is usually slightly recessed, using a pencil, mark the places for drilling holes. To do this, the distances between the fastening points on the hood are measured and transferred on the same scale to the bottom. Additionally, inlet and outlet openings for the air duct are outlined. Then using electric jigsaw and a perforator, cuts are made in the marked places;
- Before installing the hood in the cabinet, a flange with an anti-return valve is attached to its outlet.
- An air duct (purchased separately) is placed on top of the flange at one end. It can be either corrugated or plastic. The joints are first coated with sealant. For better fixation of the air duct, it is secured with a clamp, which is purchased separately. A corrugated hose is inserted into the hole under the air duct, after which, using the self-tapping screws supplied in the kit, the hood is connected to the bottom of the hanging cabinet. To reduce the noise of the device during operation, insulating material is laid between it and the cabinet;
- On vent leading to the street, a ventilation grille is attached. The second end of the air duct is connected to it; the joints are pre-coated with sealant. When laying a channel, you should remember that the fewer joints it has, the better. In this case, the hood noise will be less and the performance will be an order of magnitude higher.

Depending on the design of the built-in hood, the installation process may differ slightly.
After installing the hood, it should be connected to the electrical network. To do this, you need to mount a new socket, power it from the panel, and place it on the line circuit breaker to prevent electric shock to residents, after which the electrical appliance can be used. Now you know how to install a built-in kitchen hood.

Installation of decorative (T-shaped hood)
T-shaped hoods have a unique design and look chic in the kitchen interior. They have high performance and are ideal for installation in spacious rooms. Read about how to properly install a hood in this type of kitchen.
In addition to the hood, the delivery set includes the following items:
- Fasteners;
- A strip for attaching the casing to the wall;
- Transition flange with anti-return valve;
- Air duct of a certain length.
Any missing items must be purchased separately. The instructions for each model describe everything in detail. Before starting installation, you need to check the functionality of the hood. Remember that the height of the hood above the surface of an electric stove must be at least 47 centimeters, and above a gas stove - at least 65 cm.

How to properly install a kitchen hood - steps
The installation sequence of the T-shaped hood is as follows:
- Measure the distance from the bottom of the hood to the mounting holes on back wall devices;
- At a distance of 65 or 75 centimeters from the surface of the slab, draw a straight line using a pencil and level;
- Set aside from this line up the wall the distance measured from the bottom of the hood to the mounting holes;
- Measure the distance between the mounting holes horizontally and also make marks on the wall;
- When all the measurements are transferred to the wall, use a hammer drill and drill holes at least 4 centimeters deep and 1 centimeter in diameter along the marks;
- Take the screws (included), connect them to the dowels and insert them into drilled holes so that the threaded part faces outward;
- Place the adapter flange onto the hood outlet and secure it with self-tapping screws;
- Hang the body of the exhaust device on the ends of the screws protruding from the wall, attach the nuts, and tighten them tightly with a wrench.

If the hood operates in air recirculation mode, then it will not be necessary to connect it to the ventilation shaft. If you plan to connect the hood to ventilation, you will additionally have to install an air duct. This is done like this:
- Take the air duct included in the kit and place one end of it over the adapter flange, having previously coated the joints liquid sealant, and secure with a clamp, which is purchased separately. If the length of the existing air duct is not enough (does not reach the ventilation shaft), then you should buy another hose or select an adapter for the existing one;
- Second end of the duct in the same way it must be secured to the ventilation grille, which is previously placed on the hole in the wall intended for air outlet.
When the hood is installed and connected to the ventilation, all that remains is to make markings for the decorative casing. On the wall you need to mark the attachment points for the casing strip and drill holes with a diameter of 6 millimeters. Next, install two dowels in them and tightly fasten the strip to the wall, after which the inner part of the casing is placed in the outer one.

The next step is to install the outer part of the casing on the body of the air purification device using self-tapping screws. Raise its inner part until the mounting holes of the strip and casing are at the same level, and then connect them to each other.
Now you know how to install kitchen hoods different types, but for the reasons described above, we do not recommend doing this without proper experience. It’s better to entrust the work to specialists than to spend money on equipment repairs later.


