Doors in stores are sold in two versions: with an assembled frame, and separately door leaf and box timber. Buying an assembled product is not difficult, however, if for some reason you purchased an interior door in the form of a designer, then you will be faced with the task of assembling door frame interior door. This is a simple matter for someone who has installed more than one door. But for a beginner, the problem can be difficult to solve. This article may help you understand how to properly assemble a door frame with your own hands; the video shows step by step process works
What is a door
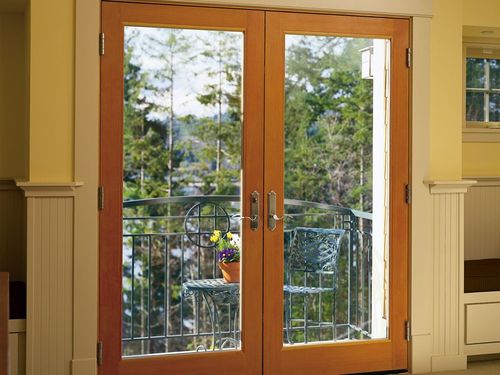
This term refers to a structure installed in doorway to close it. Depending on the type of door, the device for securing it may be different. Sliding and folding ones are mounted on guides. Carousels rotate around a central axis. Hinged doors rotate around an axis passing along one side of the door leaf. Now we will look at the device swing door, or rather, her boxes.
Door frame - part door block, fixed in the opening. Serves for hanging with door hinges sash and for closing the end of the wall in the opening. The most common thickness of box timber is 75–85 mm. If the wall thickness is greater, additional planks are used to cover it. Special longitudinal grooves can be selected in the box, into which the additional strip fits. A step is milled into the box beam - a quarter, having a depth equal to the thickness of the sash.
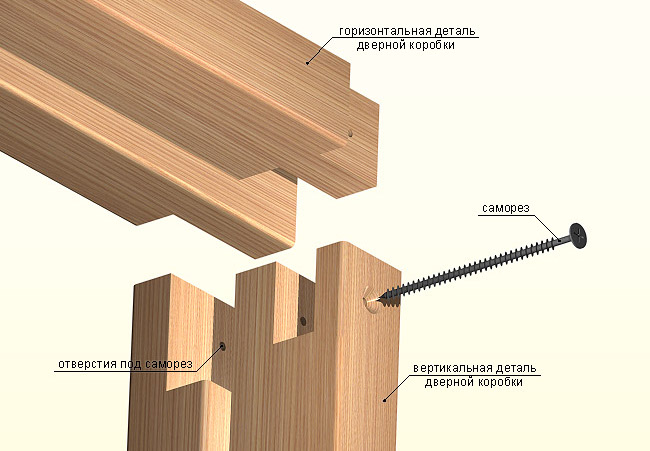
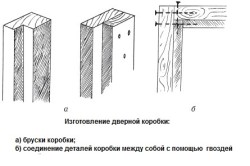
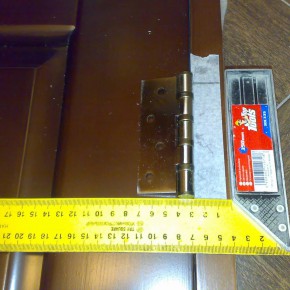
The material for making box timber is natural wood, MDF or chipboard. In the photo you see a schematic representation of the door block. To install the hinges, make a sample the size and thickness of the hinge sash. This is necessary so that the door leaf fits more tightly to the jambs. If the loop is not inserted, it will big gap. There are loops without insertion - a butterfly loop.


The door frame is a frame structure. The vertical posts are called jambs, the one on which the hinges are attached is called a hinge post. Upper horizontal jumper is called the lintel, and the lower one is called the threshold. Bottom part optional element. It is installed if they want to block the gap under the sash from drafts. You can also install a door with a threshold in a wet room. Then the side above the floor in the opening will keep spilled water from flowing into the corridor. Threshold-free structures are installed at the ready stage finishing. If you choose the option with a threshold, then the installation must be done before laying the floor covering so that the gap between the threshold and the floor is hidden in the thickness of the floor covering.
How the box is assembled
The entire process of assembling an interior door frame comes down to connecting individual elements: jambs, lintel and threshold into a structure that has a U-shaped (without threshold) or O-shaped appearance if we are assembling a door frame with a threshold. There are three types of connections:
- Spike connection. It is the most durable and labor-intensive. Doesn’t lend itself well to implementation “on the knee” with your own hands, without special tool and proper skill.
- Baguette connection. The parts are filed “on the miter” - at an angle of 45°. They are connected with studs or self-tapping screws. A lot of fuss to get little results. When made from laminated MDF, chips and sloppy seams are possible.
- At an angle of 90° with cutting off the protruding part of the quarter. This is the easiest way, reliable and effective.
Materials and tools
To complete the work of assembling the frame and installing the door, you will need a set of tools. Its composition depends on your capabilities and the method of joining the timber. What you will need to assemble the frame and install the door:
- roulette;
- hand saw or cutting miter and miter machine;
- miter box;
Used for sawing bars at various angles. It will be required if you have chosen the “must-joint” connection method and for installing platbands. If you have a cross-cutting machine in your arsenal, then you won’t need a miter box.
- pencil;
- chisel.
A chisel is needed to select a place for hinges and install a lock. Professional installers prefer to use a router. And super professional ones have a special loop milling cutter.
- drill;
- wood drill;
- perforator and drill.
If installation is required in the opening of concrete or brick walls.
- a container of polyurethane foam;
- acrylic on wood in a suitable tone;
- masking tape.
Let's start assembling
Having prepared all the necessary tools and accessories, you can assemble and install the door frame.
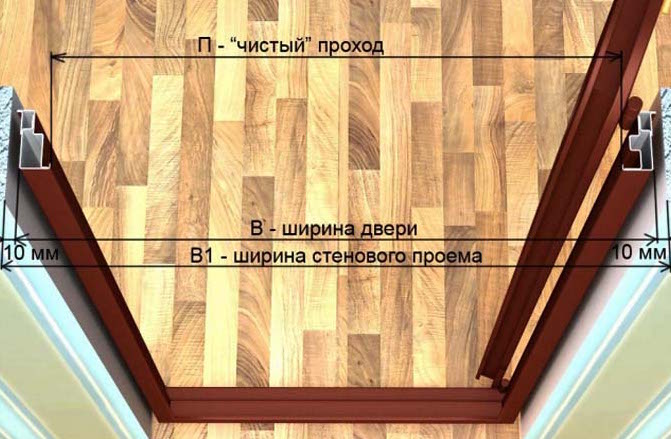
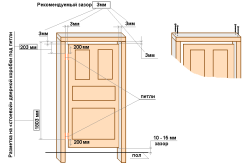
- We make markings. We mark the box beam. When marking, it is necessary to take into account allowances for freedom of opening. Between the frame parts and the door leaf we make allowances of 2-4 mm. The gap from the floor should be greater: 10 mm. Let's not forget to add on the connection. The size of this increase depends on which assembly method is chosen.
- We make parts. In order to prevent the formation of chips on the surface of the MDF, tightly stick masking tape onto the cut site, carefully repeating the relief of the timber. It is better to choose a hacksaw with fine teeth, then the cut will be cleaner.
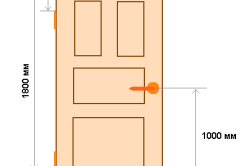
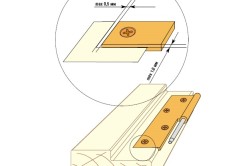
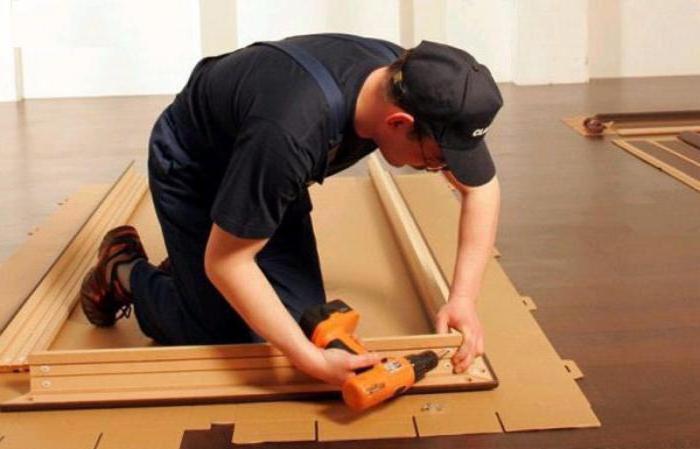
- Assembling the box. Depending on which assembly method is used, we connect the elements together. Place the assembled frame structure on flat surface and mark the location of the loops. As a rule, hinges are installed at a distance of 200 mm from the edges of the door leaf. According to the markings made, using a router, or, in the absence of a chisel, we make a recess for the hinge strip. If you are using a chisel, first cut the laminated MDF surface using a knife along the marking line.
The door frame prepared for installation just needs to be installed in place, hang the door, add the finishing touch in the form of platbands, and enjoy the result and the admiration of the female half of your family.
The door frame is mounted in the entrance opening of the wall and is part of door design, on which a sash is hung with the help of hinges, serving as an obstacle to entry into or exit from the room. The box is made of MDF, chipboard or wooden beam thickness 75-85mm. When the wall thickness is more than 85 mm, additional strips are used, which are installed in special grooves of the beams. The door frame has a cutout 1/4 deep equal to the thickness of the leaf.
To install hinges in the box, material is sampled in an amount equal to the thickness of the hinged sash. This is necessary for a tight fit of the door leaf to the frame jambs. installed without insertion.
The door frame is a frame structure. Its vertical components are called jambs, one of which is looped, the other is feigned. The hinge beam carries the main load of the door leaf. The horizontal upper box lintel is called the “lintel”, and the lower one is called the “threshold”. The threshold in the box is an optional element. It is installed when it is necessary to eliminate drafts by covering the gap under the door leaf. Doors with thresholds are often installed to keep spilled water from entering adjacent rooms. The gap between the floor and the threshold is hidden by the thickness of the floor covering. Therefore, the assembly of the door frame with the threshold is carried out before laying linoleum, laminate and other materials used for finishing the floor.
Types of connections of door frame elements
The entire procedure for manufacturing the frame structure of an interior door consists of connecting individual elements of the frame together into one product, which has the appearance of a closed or open contour, depending on the presence of a threshold. There are three types of connecting box beams:
Tools and materials
Accurate assembly of the door frame requires tools and auxiliary materials. You will need the following: 
- Tape measure, pencil, masking tape;
- Miter box - a device for cutting timber under different angles. Required for baguette connections and preparation of platbands.
- Hand saw, drill with wood drills, construction knife;
- Hammer – it is necessary for attaching the interior door frame to a brick or concrete wall;
- Chisel - will be needed to cut out places in the box for attaching hinges;
- Polyurethane foam - necessary to seal the space between the door frame and the opening.
- Acrylic paint for wooden surfaces.
Door frame assembly
Most home craftsmen choose simple diagram assembly, which involves joining the box elements at an angle of 90 degrees. To assemble the door frame for ease of work, it is recommended to lay out all the parts of the future structure in one horizontal level. This can be done on a cardboard floor, a couple of tables pushed together, or four stools. Correct assembly door frame implies the following order of work:
From all of the above, it is noticeable that assembling a door frame with your own hands is not particularly difficult. A positive work result can always be obtained by following the rules of the exact sequence of actions.
- Installation and tools for it: recommendations
- Stage three: hanging the canvas
Those who like to tinker and make repairs with their own hands may want to learn how to assemble and install interior doors. In fact, this process takes some time and requires effort. Therefore, at the very beginning, you should familiarize yourself with all the stages that you have to go through, and only then get to work.
First of all, they assemble the interior door, and only then do its installation. To ensure that the products are free of gaps and other defects, you need to follow these steps:
- prepare the premises;
- prepare the doorway;
- wander around consumables and tools;
- assemble the product taking into account its design features.
Stage one: preparatory work with the premises
When buying a new door, you should be prepared for the fact that the doorway may not match in size. Therefore, before going to the store, it is advisable to take the dimensions of the opening, and this also takes into account the fact that the new door will have its own jamb, which will have to be installed in place of the old one.
Next, pay attention to which room the doors are selected for: kitchen, bathroom, restroom, etc. Why is this so important? Because each room has its own communications, which should already be ready by the time of installation. The same applies to water supply or heating pipes. They are installed taking into account the required inclination, and it is better to entrust this matter to a professional.
Exclusive lovers should pay attention to the wiring. Now it has become fashionable to decorate interior doors with lighting. This means that all wires must be routed to the required points in advance.
How to prepare a doorway? It was stated above that special attention should be given this place. First of all, you should remove the old opening. At this stage, only the frame can be damaged; the walls of the opening themselves must remain intact. Many people try to save money by installing new door in the old jamb. As practice shows, this does not lead to anything good. At a minimum, the door may not fit into the frame, and at maximum, when closed, it may leave significant gaps or not close.
After dismantling the old frame, markings are made to indicate the location door handle, method of opening (inward or away from the room), etc.
We should not forget about stripping, which involves removing excess finishing, such as pieces of hanging cement, etc.
Return to contents

Regardless of the type of door being installed, installation has the main classical stages:
- Assembly and installation of the door frame.
- Hanging the door.
- Installation of additional parts.
- Fastening platbands.
As for the tools, they are as follows:
- drill;
- screwdriver;
- perforator;
- circular saw;
- hacksaw for wood;
- building level;
- hammer;
- measuring tape;
- nail puller;
- mallet;
- miter box;
- chisels;
- dowels, screws;
- tape, which is used for painting;
- polyurethane foam;
- wooden spacers and wedges.
A little advice from the experts: to control the evenness of the installation, it is best to have a plumb line on hand. If you use a rubber mallet, there is a possibility that marks will remain on the surface, so it should be immediately replaced with a wooden one.
To secure the frame, dowels are best suited. And when it comes to the hinges, it is better to entrust this task to yellow-passaged galvanized self-tapping screws. The standard fasteners included are not particularly reliable.
In order not to purchase wedges and spacers separately, you can make them yourself, and the entire preparation process must take place along with the installation of the door itself, since this is how you can choose the correct dimensions.
Return to contents
Stage two: assembly and installation of the door frame
First of all, the process of trimming the gaps is carried out, and it is necessary to take into account flooring. If interior doors are intended for residential premises, then the gaps are best made at 1 cm.
The order of assembling the box is as follows:
- The lintel beam is sawed down to fit the hinged beam, that is, two elements need to be fitted, then a line is marked, after which a neat cut is made and the end is chipped with a chisel.
- Next, the lintel and hinge beams are connected with self-tapping screws, and the connection angle should be 90°.
- After this, loops are attached to the hinge beam.
- Then the three loots are connected and the door is put on. The ceiling beam is adjusted at the end.
To secure the box, it is recommended to use pieces of cardboard or hardboard, but only so that they all have the same thickness. This will help ensure there are gaps between the edge of the door and the frame itself. They will be equal to 0.3-0.4 cm. But here you should control the wedges while tightening the screws so that they do not move freely.
To ensure that the door functions correctly, special attention is paid to fitting fittings.
To install the lock, you need to perform the following steps:
- The door fit is checked. To do this, the door leaf is inserted into the frame, after which the hinged edges are connected. The gaps are measured from the top and sides, which should be equal: from the floor - up to 4 mm, the rest - 2 mm. If they do not correspond to these dimensions, then the edges of the canvas are planed.
- Next comes nest placement. For this purpose, a line is drawn across the loop side, measuring 15 cm from the top. Then the loop is adjusted along the contour and the lower side of the element is marked. After this, the thicknesser is installed between the central and edge parts of the plate, and a line is drawn from the front side along the edge. Next, the two circuits are connected. As soon as the work with the main marking is completed, the location of the next loop is measured, while moving 22.5 cm from the bottom edge.
- Then the indentations are made using a chisel, bevel and mallet. Stepping back from the edge by 0.2 cm, the material is cut to a depth equal to the thickness of the plate. To ensure the process is correct, the chisel is held at an angle of 45°, and the blows are applied clearly and sharply. We should not forget about the evenness of the edges, for which purpose the chisel is placed vertically on the line and the chips are cleaned out.
- To hang an interior door, the hinge is placed in the upper socket, marking the future holes for the screws, after which the hinges are fixed. Next, the door leaf is mounted into the frame itself, wedged, and similar markings are made on the jamb. Then you should fix the hinges on the sash using screws.
- Work is underway to mark the location of the lock, spindle and lock hole. After this, holes are drilled at the prepared points. The lock is secured with screws. The last point in this step is to attach the receiving pad.
- Using a chisel, make recesses for the lock tongue and latch. To fix the door frame in the opening, wedges are used. Their fixation must be rigid. To prevent the loot from losing its shape during blowing polyurethane foam, spacers are installed.
The door frame purchased together with the door, with rare exceptions, is a set of blanks that you need to assemble yourself.
How to properly assemble a door frame
We have three beams, with a coating similar to the door leaf and made with a decent margin. Assembling a door frame is the process of sawing two sections at the junction, adjusting vertical racks in height and the connection itself.
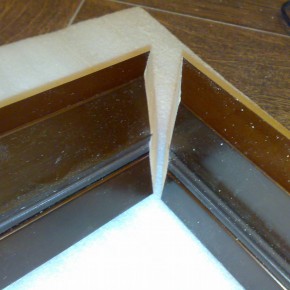
In this case, the connection of two vertical posts with a top ( top part boxes) can occur by sawing two joined parts at an angle of 45 degrees, or in a straight line, with the choice of a quarter. I would recommend cutting at 45 degrees only if you have a cross-cut saw or are good at performing this operation manually (experience and practice).
The quality of a 45-degree cut is influenced by a lot of factors - starting from the accuracy of the miter saw’s settings, the sharpness of the disc, the accuracy of installing the part in the machine and other little things that imperceptibly affect the final result. In addition, the connection itself after even a high-quality gash is not such a simple matter. It is quite difficult to drill and tighten screws when two parts strive to move away from the intended position.
![]()
Therefore, in case of doubt and lack of experience, I recommend docking at 90 degrees. What's the best way to do this?
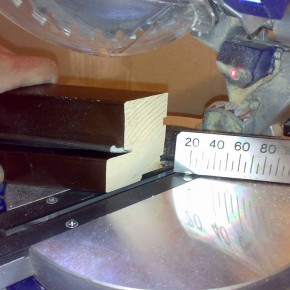
First of all, you need to measure the width of the door leaf. The fact that it was presented in the store as 600, 700, 800 or 900 mm does not mean at all that it is exactly that size. For example, the door I am installing has a width of 797 mm. Therefore, when assembling the box, we achieve a width of the structure equal to the result of your measurement plus 6 mm.
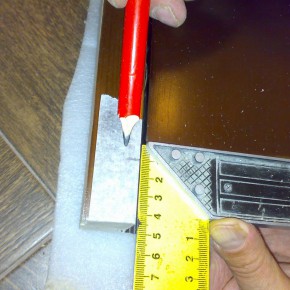
To connect two parts that have a “ledge” (narthex) in their profile, it is necessary to cut it off. This is done on top, while the side stand must be trimmed off. Having made the markings, we cut down the ledge to the required width with a fine-tooth hacksaw, not reaching a few millimeters to the base. Then we cut it down with a chisel and clean it until we get a smooth plane.
The door frame is assembled using self-tapping screws with a length of 51 mm. up to 75 mm. and in some cases - 100 mm. Self-tapping screws are tightened only with preliminary drilling. We use a drill with a diameter not exceeding 0.7 of the diameter of the self-tapping screw. The first assembly is carried out using two self-tapping screws in each connection so as to only “grab” it.
Place the box on the floor, laying protective material. Now we go to the doorway to take measurements of the floor area directly at the location where the door is installed. To do this, using a building level (exceeding the width of the opening), we place horizontal marks at a height of approximately 20 centimeters from the floor.
We measure the distance from the marks to the floor, on the left and right sides of the opening. If there is a difference, remember how many millimeters and on which side the value is greater. Together, carefully place the door leaf into the assembled frame.

Holding the door leaf and tapping on the top, we achieve the formation of a uniform gap of 2.5 - 3 mm on top of the door. Then we mark the length of the side posts.
At flat floors and the absence of carpets, the clearance under the door should be 8-10 mm. We make a mark on the stand that, based on the results of our measurements of the quality of the floor, will take the place of the smaller of the two values.
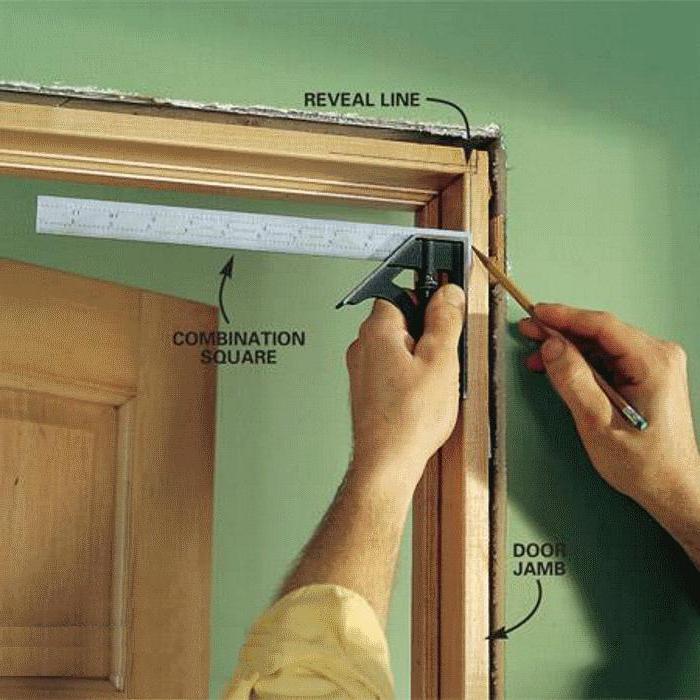
On the second stand - add the difference obtained during measurements. As a result, we will make markings and file the frame posts so that they stand clearly on the floor and there are no gaps under them. And one more marking - the place where the hinges are inserted into the box. We insert it into the made selections in the doors and, pressing the square, transfer the contours to the box.
And one more thing, before removing the door leaf and disassembling the frame to insert the hinges and saw off the height. Pay attention to the size of the gap to the left and right of the door leaf next to the top. Once you've disassembled the box, you can make adjustments before final assembly. When executing final assembly use 2-3 screws on each connection. After the guides have been installed on the floor and ceiling, and one rack has been attached to two opposite walls, you can...
When purchasing a new door, the buyer receives a far from finished structure for installation. It does not have places to install hinges, and the locks are not embedded. The buyer has an inevitable question - how to collect
You can use the services of professionals or install the structure yourself. To do this, you need to prepare tools and study the features of the technology.
Doors on the market are mainly sold complete with a frame, but sometimes they need to be matched to each other.
For the most part, new doors do not fit into old frames, either in size or style. In this regard, it is necessary to completely change the previous design.
Selection of door frame material
Nowadays, the market is dominated by products with an impressive appearance and a low price, for example, made from MDF - a composite of compressed fibers. 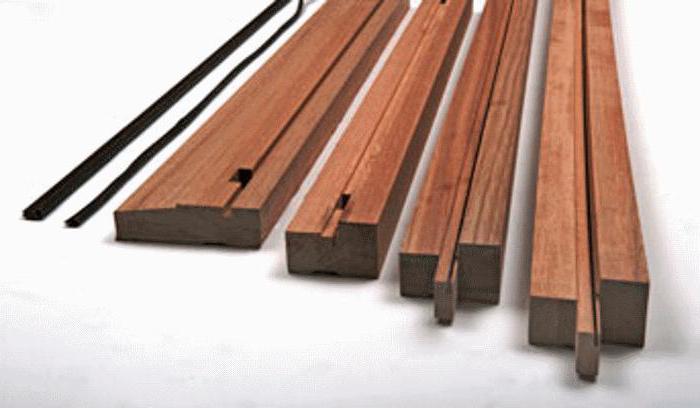
How to assemble a door frame from MDF so that it lasts no worse wooden structure? The new material has many advantages, but here it is important to dwell on the disadvantages. Despite its great strength, the box may become deformed if it is heavy. In addition, in a humid environment, MDF panels can peel off and also swell, leading to disruption of the geometry of the opening.
Despite the shortcomings, affordable cost, good mechanical properties and wide range MDF parts make them a priority even when completing premium doors.
Required Tools
Before assembling the door frame, you should first prepare the tools:
- hammer;
- set of chisels;
- roulette;
- square;
- or with fine teeth;
- plumb level;
- dowels, screws, hinges;
- miter box - a tool for making cuts at certain angles;
- screwdrivers.
The work is greatly facilitated if you have a power tool: a screwdriver, a jigsaw, an electric drill, a hammer drill, a router.
Preparing the doorway
It is important to choose the right door according to the width of the opening, so that later there will be less work by fit. Minimum clearance must be at least 15 mm on each side.
Before installation, check the evenness of the opening. It is measured in several places vertically and horizontally.
How to assemble the door frame of an interior door if the opening is too large? To do this, planks of the required width are packed around the perimeter or the space is filled with bricks. 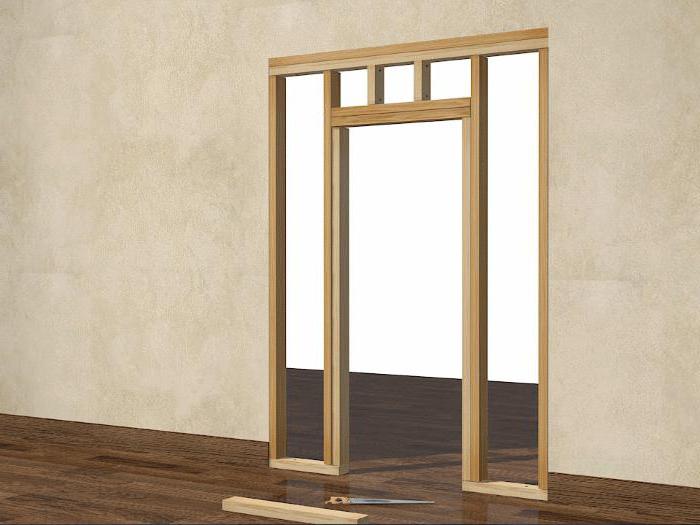
Other options are glazing the opening, making a frame from wood or metal and covering it with plasterboard.
Door frame components
The box is made of timber and consists of fragments:
- loop beam and porch;
- lintel (top beam);
- threshold.
Thus, in order to assemble a door frame (it is equipped with a threshold only for a heavy leaf, which is mainly used at the entrance to an apartment), it is necessary to correctly connect its component parts. 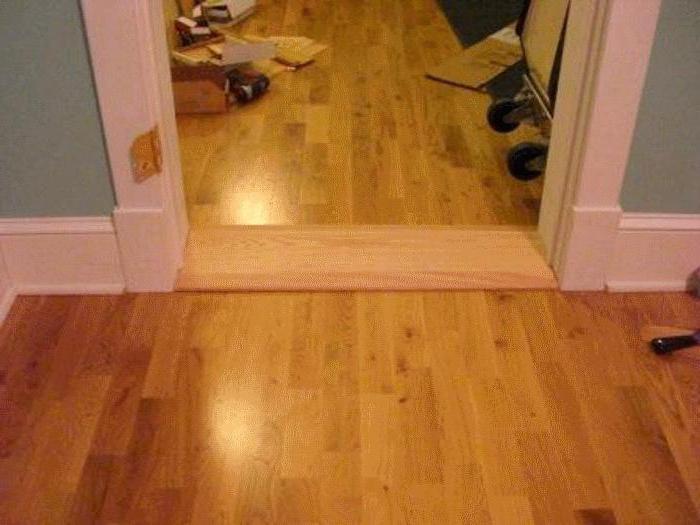
Thresholds are rarely installed for interior doors.
Door frame assembly methods
Assembly is carried out extremely carefully so as not to damage decorative coverings. Even one minor chip or scratch spoils appearance designs.
To install doors in frames, hinges are required. In interior designs, two are enough, and for the entrance, a third is often installed.
The main difficulty in assembling the box lies in the correct execution of cuts and connecting the horizontal beams with the vertical ones. Their profiled structure creates difficulties for beginners. The installer must fit all elements exactly to size. Before assembling the door frame, you should choose an installation technology. The beam is attached in several ways.
Tenon connection
The most durable and reliable, but at the same time the most complex is finger joint. To do this, grooves and ridges are made at the junction of the beams along their thickness. Here you also need the ability to use it. The connection is made without fasteners, but many craftsmen make additional reinforcement with galvanized nails.
It is not so important on which part to make a groove or tenon. In any case, a rigid connection is ensured.
A milling cutter is a tool for professionals and it is not practical to purchase it to install even several doors. When we assemble the door most in an accessible way is docking at an angle of 45 0 or 90 0.
Even a beginner can do the assembly at right angles if he performs all the operations correctly.
How to assemble an interior door frame with a joint 45 0
At the junction of the horizontal and vertical beams, cuts are made. Measurements are taken several times in advance so as not to make mistakes in the calculations. It is especially necessary to adjust the horizontal beam precisely in order to correctly select the gap of 3-4 mm and the width of the door. The racks can subsequently be sawed off from the bottom after assembling the box, since they are made with a margin of length. After cutting, the surfaces to be joined are leveled with a chisel.
The timber is usually fastened with self-tapping screws at an angle of 45 0 . To prevent the wood from splitting, holes are made under them with a drill, the diameter of which should be smaller than that of the self-tapping screw core. The drilling depth is made less than the length of the fastener so that the connection is reliable. One joint requires two screws on one side. You can add another one in the middle, on the other side of the corner.
How to assemble a door frame with a docking 90 0 yourself
The assembly method is best for beginners. First of all, the door leaf is measured for compliance rectangular shape. It is often observed that one of the sides is slightly different in size from the other. This deviation must be taken into account when sawing the racks. The cuts from the ends of the timber are also checked, which must be strictly at an angle of 90 0. Workpieces may arrive from the factory with an uneven cut.
The connection of the horizontal strip with the vertical ones is also made with self-tapping screws.
Checking the correct connections
The test is carried out by placing the box on a level horizontal surface and placing the door leaf on top of it. If it fits in with a small gap, then the assembly was done correctly.
The lower ends of the racks are filed down, as they should rest against the floor. The horizontality of the floor covering in the doorway is first checked. Deviations should be taken into account when sawing off the posts.
Important! The blanks are cut from the veneer side to prevent its peeling.
Installing hinges
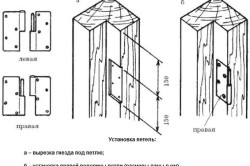
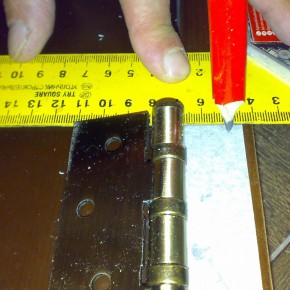
Before that, you need to choose the side where it will open. Depending on this, loops of a certain type are selected - right or left. The fabric for fastening the hinges is chosen to be more massive, without defects and cracks. The location of their installation is marked at a distance of 15-25 cm from the door end. The canopies are separated into a large part for the frame and a small part for the door leaf. Then the loop is applied to the end of the door and outlined with a pencil, and then with a knife. The markings on the box are done in the same way. In this case, the door leaf is placed against the frame and the marks for the hinges match.
The edges of the door leaf and hinges are aligned, avoiding distortions. The hinges should face the direction the door opens. When marking, it is unacceptable to confuse the top and bottom of the door. This determines how it will be installed after securing the hinges. If the door has glass, their location should also be taken into account.
Using a chisel and hammer, cut out a place for the hinges to a depth of 3-5 mm so that they fit flush with the wooden surface. Seating fittings are carried out with extreme care and precision. Then the loops are applied, the screws are marked and screwed in. The marks should coincide with the centers of the holes so as not to split the wood when screwing in the fasteners. To prevent the loops from tightening with self-tapping screws, the pencil marks are additionally marked with an awl.
By applying a ruler, the correct fit of the loop is checked. When protruding, the platform underneath it deepens, but not more than the required level. If the hinges are installed correctly, the doors should open 180 0. The load on the door should not exceed the specified value. Usually it is 50 kg.
Installing a frame in a doorway
The work does not end with the points describing how to properly assemble a door frame. It still needs to be installed so that the door opens and closes well. To do this, the box is carefully placed in the opening and temporarily secured with pieces of packaging cardboard or polystyrene foam. The level checks the verticality of the loop beam. Then wooden wedges are cut.
They are installed under the hinges. These parts are also clogged in the upper corners. To prevent the box from moving, two wedges are driven in from opposite sides with sharp parts overlapping each other. The positions of the sidewall and lintel are checked with a level, since displacements are possible during wedging. The box should be positioned flush with the room wall. The wedges should not protrude outward.
Questions of how to assemble and install the door frame, as well as hanging the door leaf, are resolved together, since everything is a single structure. 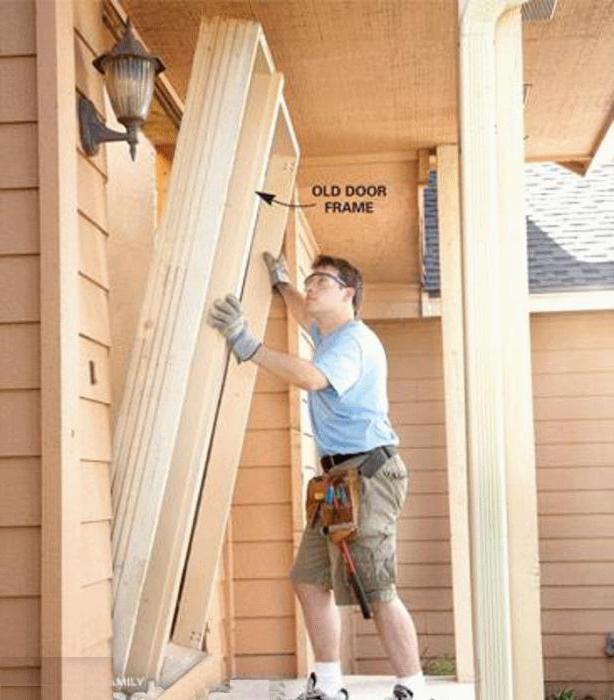
The door frame is attached to the wall with dowels at the hinge locations. Wedges are also located there to prevent deformation of the timber. The pretend side is not yet exposed.
To make the exposed elements of the box more stable, they need to be partially foamed. The surfaces are pre-cleaned and moistened with water, which increases the adhesion of the foam by an order of magnitude.
Hinges are attached to the door leaf, after which it is installed on the lining in the doorway. Then the door hinges are attached to the frame beam: first from above, then from below.
The door is closed and the porch is set using wedges. When all the gaps are set, you should foam the box around the entire perimeter. It is recommended to install spacers in it to prevent swelling of the parts.
Conclusion
Subject to availability necessary tools You can install the doors yourself. To do this, the most important thing is to figure out how to assemble the door frame. If you perform all installation operations correctly and consistently, everything will work out.


