The types of self-leveling polymer floors, their advantages and areas of application are described in.
Now it makes sense to learn about the technology of filling them, especially since it is quite unique and has many important nuances.
In addition, readers will probably be interested in reading reviews of similar floor coverings from people who have already experienced their daily use, as well as getting an idea of the approximate price level for such materials.
Pouring polymer floors involves several characteristic stages of work, carried out in a strictly defined sequence, in compliance with the technological requirements established by the system manufacturer.
It is clear that different types of coatings may have significant differences in the nuances of preparing the mixture and the timing of its use, the time intervals for drying each layer, the use of special additives, fillers or coloring pigments.
However, the approximate sequence of actions is the same for all types of self-leveling polymer floors.
As an example, we will consider the technology of pouring a two-component epoxy-based coating of the Elakor-ED system, which is widely used in industrial and private construction, includes all the necessary components for all stages, and has earned the most positive reviews from consumers.
Materials and tools for work
The amount of material is indicated based on filling 10 square meters. meters of floor with a thickness of 2.5 mm (this is the minimum acceptable layer for this system). So, high-quality pouring of a polymer epoxy floor will require:
- Two-component primer “Elakor-ED 2K/100” - 3 kg.
- Self-leveling floor "Elakor-ED" - 25 kg (7 kg for the base layer, and 18 for the main layer).
- Purified quartz sand, fraction 0.3 – 0.6 mm – 23-25 kg.
- Finishing polyurethane varnish "Elakor-PU - Lux" - 1.2 - 1.5 kg.
The necessary tools are prepared in advance: 
- Spatulas of different widths, from 200 to 600 mm.
- Sintepon rollers with a pile of 10-15 mm.
- Needle roller.
- Squeegee with adjustable gap.
- Drill with attachment for mixing construction mixtures. The drill must have speed control and reverse.
- If a large area is covered, you will need attachments for work shoes - paint shoes.
- A hard synthetic broom, a powerful vacuum cleaner (preferably an industrial one).
- Containers for mixing the component solution.
- Hand and face skin protection must be used.
Preparing the base
The pouring work begins with preparing the base. Polymer floors can be poured onto a concrete screed, wooden surface, old tile, but any type of surface requires careful inspection and appropriate preparation.
One of the most important requirements is the horizontality of the surface. Epoxy flooring has self-leveling properties. However, large differences in level will lead to a serious overconsumption of quite expensive material and a general increase in the cost of the coating.
A height difference of up to 1 mm per linear meter is considered acceptable. If it is larger, it makes sense to first eliminate it with a leveling screed.
- The concrete floor should not have unfixed cracks, deep potholes, or crumbling areas.
 Absorbed oil or other stains are unacceptable - they are hollowed out to clean concrete, followed by filling of potholes.
For repair work use polymer putties, which can be supplemented with quartz sand.
The residual moisture content of the cement base should not exceed 4%. If work is carried out on fresh concrete, the minimum curing period should be at least 4 weeks.
- When covering a wooden floor, pay special attention on the stability of the base - it should not “play”.
The tree must be cleaned of dirt, old paint, sanded and polished. Relative humidity of wood is allowed up to 10%.
- When laying on tiles, be sure to tap all the tiles to identify those that are loose.
They should be removed from the general masonry, and the resulting recesses should be sealed with putty.
Immediately before applying the primary primer layer (no more than 2 hours), the entire floor surface must be once again cleaned of debris and dust with a powerful vacuum cleaner.
Conditions for floor pouring work
The pouring technology requires compliance with certain operating conditions:
- The air temperature in the room and the surface of the base is within +5...+25 degrees.
- Air humidity – no higher than 80%.
- The optimal temperature of the components when mixing them is 15-20 degrees.
- To prepare the solution, you must choose a place that will eliminate the possibility of accidental splashes on the surface to be poured.
 The purpose of priming the floor is to clog the pores of the concrete, improve adhesion, and prevent peeling or swelling of the future coating.
In the case under consideration, the primer is a two-component composition; in other systems, a ready-made deep penetration primer is often used.
The required amount of component “B” is added to component “A” and thoroughly mixed, using both forward and reverse direction of rotation of the drill. Optimal speed is 500 rpm.
After obtaining a homogeneous mixture, wait for 2-3 minutes. to release air bubbles, and you can get to work.
- The soil is spread like a snake over the surface and evenly distributed with a synthetic padding roller.
If areas with increased absorbency are identified, they are immediately re-primed. You should get a uniform, smooth, glossy surface. The primary layer of soil will require from 18 hours to a day for polymerization.
- If required, at this stage you can seal small irregularities by mixing epoxy putty or even a small amount of the base composition of the self-leveling floor with 1-3 parts of quartz sand.
- After the primary layer, a second protective layer of soil is applied, which is immediately sprinkled with a small amount of sand.
A day later, preferably no more, they move on to the next stage.
Creating a Base Layer
The base, underlying layer will become a reliable basis for the finishing, front surface. It will completely seal all remaining pores, hide all unevenness and differences. It is also poured in two steps.
- First, a generous layer of epoxy primer is again applied to the surface, which is spread with a spatula so that no puddles form. Spread in excess on top of unhardened soil. quartz sand(approximately 1.5 kg per square meter).
- After 15-18 hours, excess sand is removed with a stiff brush, and the surface is dust-free.
- Prepare the basic composition for pouring the floor.
 There are some subtleties in its preparation - first, component “A” is mixed in the forward direction and reverse, and then, without stopping rotation, component “B” is poured in.
An absolutely homogeneous composition should be achieved.
After mixing, again 2-3 minutes for aeration - and the mixture is immediately put to work. Leaving it in the container for more than 10 minutes is contraindicated.
- The composition is poured onto the floor in even strips and distributed to the required thickness using a squeegee. In some hard to reach places you will have to use a spatula.
Average consumption is about 400-500 ml per square meter.
If you plan to decorate the floor with polymer inclusions (chips), then they are laid at this stage. It is better to carry out work wearing paint shoes on your feet and avoiding shuffling movements.
- After leveling the spilled mixture, it is given 15-20 hours to harden.
 This layer will become the “face” of the future floor, so great care is required when pouring it. In addition to its decorative function, this layer also bears the main mechanical load.
The composition is mixed in the same way as described above, but the amount of mixture per square meter will be greater - at least 1 liter per square meter at a surface temperature of about 20 degrees, or even 1.8 liters at 5 degrees.
With a smaller amount, the self-leveling effect may not be achieved. Preliminary leveling is also done using a squeegee.
Time is limited - the prepared epoxy mixture must be worked out in 30 - 45 minutes.
10-15 minutes after the composition is evenly distributed over the surface, but no later than half an hour, rolling with a needle roller occurs, which will free the layer from possible air bubbles.
Polymerization will last about a day, but the floor should be subjected to mechanical stress no earlier than after 4-6 days. During this period, the surface must be open, but protected from dust, dirt, and liquid.
A good addition would be to apply protective coating made of polyurethane transparent varnish. It is applied twice in a thin layer using a roller or brush. Its polymerization will take another day, and after 3 days the floor will be completely ready for full use.
After all layers have completely hardened, expansion joints are cut around the perimeter of the room and sealed with a special sealant.
How much does the material for polymer self-leveling floor cost?
For example, prices for several popular systems of polymer self-leveling floors of various types:
| System brand | Brief description | Consumption per sq. m (with a thickness of 2.5 mm) | Packing | Price (rub/kg) |
| "Elakor-ED" | 2.5 kg | comp. “A” - bucket 20 kg. comp. “B” – 4 kg canister | 225 | |
| "Elakor-PU" | polyurethane two-component composition | 2.5-3 kg | copm. “A” - bucket 18 kgcomp. “B” – 6 kg canister | 245 |
| "Elakor-ED Transparent floor" | epoxy two-component self-leveling floor | 2.1 (thickness up to 2 mm) | copm. “A” - bucket 20 kgcomp. “B” – 10 kg canister | 350 |
| Evropoll "Pro database EP" | transparent base two-component epoxy composition for the preparation of highly filled quartz mixture | — | comp. “A” - bucket 20 kg. comp. “B” - 5 kg canister | 200 |
| Duracon TR System-205 | Methyl methacrylate coating for medium and high loads, anti-slip effect | 3.3 (with a layer of 6-8 mm with saturation with quartz sand) | universal compound - containers of 180 kg. | 295 |
| -//- | -//- | -//- | Hardener Duracon catalyst, 25 kg canisters | 645 |
Polymer floors have gained considerable popularity due to their excellent technical specifications and wonderful performance qualities. This coating can be installed not only indoors industrial purposes, but also in private houses and apartments. Making polymer floors with your own hands is not very easy, but if you carefully follow all stages of the work, you will definitely get a high-quality smooth coating that will last for many years.
What base is suitable for pouring?

You can make a polymer floor covering with your own hands on almost any type of base. But each of them has its own device features:
- Wooden base. To fill on wooden floor, you will have to level it first. Usually an electric planer is used for this. If necessary, failed logs should be replaced, and all gaps between them should be treated with an adhesive composition;
- Concrete base. If there are significant unevenness on the surface, before pouring a clean floor, it is necessary to make a screed. At the same time, the reliability of the polymer coating on a concrete floor will always be higher than on a wooden base;
- Tile. If necessary, the polymer composition can even be poured onto tiles. It must be well secured, so before starting work, each of the tiles must be tapped. To ensure high adhesion of the polymer mixture to the tile, it is advisable to sand the base.
Preparing the wooden base

Of course, making a self-leveling coating yourself is quite problematic, since you will have to do a considerable amount of work preparing the base for pouring the polymer.
First you need to make sure that the warping is level. Check this using a regular level. Permissible deviation the value is considered to be 4 mm. To make polymer self-leveling floors on a wooden base with your own hands, you need to:
- Remove all skirting boards;
- Clean off the old coating: varnish, paint, adhesive. To do this, you can use a grinding machine. If you don't have one, use a regular spatula and wire brushes;
- It is imperative to take into account the humidity of the ceiling; it should not exceed 10%;
- Find and treat all defects: chips, dents, cracks and crevices. All existing flaws must be sanded with sandpaper;
- Clean the base from construction debris and dust;
- Then degrease the coating using cleaning powders;
- Next, treat the defects with special building compounds.
Preparing the concrete base

If you are going to install the coating on a concrete base, you will have to complete the following preparatory steps:
- Measure the humidity, it should not be higher than 4%;
- Then be sure to check the compressive strength of concrete, the indicator should be above 20 MPa;
- If the concrete base was recently poured, work on installing the polymer mixture can be carried out no earlier than after 25-28 days;
- Remove outdated floor coverings;
- Remove any contaminants from the surface: mastic, oil and glue stains, varnish and paint;
- Clear the surface of debris;
- Fill cracks and dents using mortar with resin;
- Treat small cracks and crevices with adhesive;
- Level the base using a sander;
- Then check the floor's levelness using a level.
To level the surface, it is best to use leveling mixtures that are made on the basis of special binder components. And remember that any coating must be durable, dry, clean and intact, without any cracks. If you pour a polymer composition onto a flexible base, the self-leveling floor will not last long.
Padding

Before making a polymer floor with your own hands, be sure to prime the surface. This will increase the adhesion of the base to the polymer. To close all the pores in the coating, it is necessary to apply the primer several times. It is best to treat concrete surfaces with two-component mixtures with mineral fillers.
Priming rules:
- The base must be impregnated with primer in a well-ventilated area;
- The composition should be applied with wide brushes or rollers;
- The next layer of primer must be applied after the previous one has completely dried;
- The polymer mixture can be poured onto the base one day after pre-treating the floor with a primer.
Dilution of dry polymer mixture

Typically, mixtures for polymer floors are divided into two components, which are located in two containers. To dilute the composition, you need:
- Take a deep container for mixing the components;
- Mix the ingredients according to the proportions indicated in the instructions;
- To obtain a homogeneous mass, mix the emulsion well using a construction mixer;
- Since the polymer begins to harden very quickly, it must be used immediately after dilution.
Important! Please note that when mixing the components, a reaction occurs, which results in the release of heat. To ensure that the quality of the self-leveling floor does not change, be sure to place the container with the composition in another container with cold water.
Pouring the floor

Now you need to install the self-leveling polymer coating on the floor. This process is very responsible, so try to strictly follow all the steps:
- When pouring the composition onto a small area, immediately level it. To do this, use a squeegee;
- When you apply the emulsion, go over the surface with a needle roller, then air bubbles will not form on the floor;
- The layer thickness should not be less than 1 mm, otherwise the surface will be fragile;
- When the coating has completely dried (from several hours to several days), treat the surface with polyurethane varnish.
Important! To produce high-quality pouring, it is desirable that there is no draft or temperature difference in the room. These factors may subsequently affect the service life of the coating. It is advisable that the room temperature should not be below 10 degrees.
The video shows in more detail all the stages of the work on pouring a polymer floor.
Installation of a polymer coating is a labor-intensive process that requires high-quality performance of all stages of the work. If you manage to competently implement the entire range of work in compliance with the pouring technology, the appearance flooring will not change even with prolonged use.
Features of the use of polymer floors in premises, types of coatings used, their disadvantages and advantages, preparation and installation on their own.
Contents of the article:
Polymer floors are a modern and ergonomic covering for all types of premises. It is applied using the pouring method and a perfectly flat surface is obtained. If the work is done correctly, the finished floor will feel like tiles to the touch, and appearance looks like linoleum. The thickness of such a product can range from 1 to 7 mm.
Main types of polymer floors

On the market of modern building materials you can find several main varieties of this coating, which differ in their characteristics and application:
- Epoxy urethane floor. Indispensable in rooms with high traffic intensity. It has great strength, but retains a certain level of elasticity.
- Polyurethane floor. Resistant to chemicals and temperature changes. This surface does not collect dust and looks perfectly smooth and aesthetically pleasing.
- Epoxy resin floor. It is distinguished by its high resistance to abrasion, as well as exposure to alkali, oil, acid, and moisture. Due to sanitary and hygienic standards, it cannot be used in all types of premises.
- Methyl methacrylate floor. It has significant installation requirements. At the same time, the resistance to external influences is somewhat worse than that of other types of coatings. Because of this, this mixture is the least popular.
Advantages and disadvantages of installing polymer floors

The most important positive aspects of using such a coating include:
- Ease of use thanks to perfect flat surface coverings.
- Temperature resistance. This floor is not afraid of frost, drafts, or heat, so you can successfully install a polymer floor in a garage or even in a sauna.
- Increased strength (wear resistance). Any type of polymer flooring lasts much longer than a number of other floor coverings.
- A variety of interior solutions and application possibilities - pay attention to this when carrying out renovations indoors.
- There is no need for waterproofing.
In addition, this type of surface can hardly be called natural. Many potential customers are concerned about the environmental safety of this type of coating. There are rumors that self-leveling floors emit resins that are undesirable for human health.
And here’s what experts say about this: of course, polymer flooring is not natural natural material. But all the volatile substances it contains evaporate during the polymerization (hardening) stage. After a week, that is, the period of complete hardening and readiness of the floor, it becomes 100% safe even for children's health.
In terms of sanitary and environmental characteristics, self-leveling polymer flooring is not inferior to many more familiar ones. natural materials. This is evidenced by the corresponding sanitary reports and quality and safety certificates issued for this type of coating.
Tools and materials for pouring polymer floors

What tools and materials are needed to independently pour any types of polymer floors:
- The polymer material itself is factory-packed;
- Tank (bucket, basin, other container) for mixing;
- Wide construction spatula;
- Roller for painting;
- Masking tape (adhesive tape);
- Construction level;
- Electric drill with mixing attachment.
Preparatory work before pouring a polymer floor

The service life and external characteristics of the future coating will depend on how correctly the work on preparing the surface for pouring is carried out. In other words, if you want the floors to please the eyes of the inhabitants for a long time, give your preparation the utmost attention. Neglecting this stage can lead to the fact that an incorrectly laid coating will be subject to deformation and subsequent destruction over time.
We should start with the fact that different types of foundations have different requirements. So, wood covering it is necessary to sand and also make sure that it is always dry. But such floors should not be primed.
A concrete floor or cement screed has a different porosity. Since they absorb moisture well, such a surface must be primed. You will also need a sealant to seal as much as possible of any cracks and seams.
If there is a old concrete, then you will have to remove the very top layer, and then sand the surface thoroughly. After sanding, use a vacuum cleaner to remove any raised concrete dust and particles.
At the stage of preparing the room and floor surface, you also need to worry about the ambient temperature. This directly affects the properties of the poured mixture and its drying. It is normal if pouring is done at a temperature of 5 to 25°C, and the humidity should be approximately 60%. If these conditions are not met, the floors will take longer to dry.
To ensure that the future floor has an ideal structure, a priming procedure is performed before pouring it. The primer fills any, even the smallest pores and prevents the entry of oxygen, which will increase the service life of the coating.
Some craftsmen add a little dry sand to the soil solution to increase the adhesive properties of the solution. In addition, in this case the finished solution acquires a slight roughness, and it becomes easier to work with.
The primer is applied in an even layer using a construction roller. If required, reapply another primer layer. To do this, you need to wait until the starting layer has completely dried, which is 12-16 hours on average.
Features of pouring a polymer floor with your own hands

The necessary information about mixing the working mixture and its preparation is always placed by the manufacturer on the packaging of its products. It is better to purchase materials from one brand.
Before pouring the future floor, it is necessary to carefully prepare the base (base level). If it is a board, then you should check each of them and secure them so that none of them dangles. All cracks must be sealed with cement mixture and sealant, otherwise the finished solution will flow into them and lead to unevenness of the coating as a whole.
The thickness of the self-leveling polymer floor is based on whether it will be self-coating or will serve as a base for other material on top of it. With its help, differences in surface levels of up to 30 cm are eliminated. Most often, the height of the finished polymer floor is 10 mm or slightly less.
Pour into a container prepared in advance (usually a basin or bucket) warm water, after which the dry solution is poured. It is important to maintain all proportions so that the coating has all the necessary qualities after drying. Ready solution should not contain air bubbles or any kind of lumps. Its consistency is somewhat reminiscent of liquid kefir.
The prepared solution is gradually poured onto the base of the floor and spread evenly over the entire surface with a construction spatula. It is important to work with a partner because you need to distribute the solution as quickly as possible. One more point: to move around the room you need to use special spiked shoes. To do this, you can take any old shoes and attach them to a section of board using tape. Self-tapping screws or nails are pre-filled onto each board.
After the solution is distributed over the surface of the room, it begins to be carefully processed paint roller. It is necessary to pay attention to ensure that all air bubbles are removed as much as possible - in this case it will be possible to achieve the most even, smooth, glossy surface. It will take no more than 40 minutes to complete the work, since after this period the solution begins to set and it will be incorrect to carry out further work.
The technology for the production of polymer floors should be organized in such a way that for each square meter of floor surface in a room, the average consumption of dry matter is approximately 1.5 kilograms. To fill, you need to prepare protective gloves and goggles to protect yourself from harmful fumes. The room must be well ventilated - this way the resins will evaporate much faster and the solution will dry out better.
After 2-3 days have passed after pouring the main polymer layer, you can begin leveling the floor. This is the finishing part technological process. The thickness of the last layer should not be more than 3 millimeters. After the finishing layer has completely dried, they begin to varnish the finished surface. It is best to use polyurethane-based varnish. This will create additional protection for the floor and increased resistance to the aggressive effects of alkalis, acids, and paints.
It will take approximately two days or more for complete hardening - this depends on the climatic conditions in the room. After the top layer has completely dried, you can begin applying the decorative coating layer.
Another good thing about polymer floors is that they can be used in a wide variety of decorative elements. Absolutely any desired pattern based on different colors and shades can be used as an image. With well-organized work and careful study of the instructions, you can independently obtain a result that will not be inferior to the work of an experienced master.
Caring for polymer floors indoors
Caring for this type of coating is not particularly difficult - as if you had to take care of ordinary parquet. Classic dry or wet cleaning is usually enough to keep it clean.
Used for cleaning polymer floors household chemicals, which has a significant acid content. This product is applied to the floor surface for 5-10 minutes and then removed. After this, the floors are washed with plenty of water. If there are stains from various pollutants on the surface, they are treated separately.
As for the treatment of polymer floors in industrial and commercial premises, the intensity of their use can be much higher. In such cases, there are barely visible cracks on the floor into which dirt particles accumulate. They cause the floors to become dull and lose their former attractiveness. Therefore, it is first necessary to remove accumulated dirt and dust using high-pressure apparatus. Next, the floors are washed, after which they can be varnished to give them the same glossy look.
However, in cases where floors will be frequently exposed to harsh chemicals, they require additional protection. The installation of polymer floors at this stage will be as follows: before pouring, the surface is covered with a special protective polish. It will require updating every 6 months. But you cannot leave detergents and other aggressive agents on the surface of polymer floors for a long time, since they are susceptible.
Polymer poured flooring has proven itself well in rooms where people walk barefoot or wear light shoes. It is recommended to fill floors with polymers in the bathroom, shower, kitchen, bedroom, and so on. In corridors and public areas, the coating will wear off faster due to contact with dirt and sand particles on shoes. In such cases, the floors will have to be restored more often, which is associated with additional costs.
How to pour a polymer floor - watch the video:
Thus, self-leveling polymer flooring is a finishing-type coating that allows you to achieve a perfectly smooth and absolutely flat surface that is resistant to abrasion and impact. To a certain extent, this type of floor covering is still novel for the domestic customer. Construction companies and repair teams take advantage of this to get larger rewards for services. But making polymer floors with your own hands is not so difficult if you follow the above advice and approach the filling process carefully.
When making a decision to install a self-leveling polymer floor, the owner must be aware that the work performed must be high level quality and last as long as possible. Therefore, in the future we will talk specifically about modern methods of producing self-leveling floors. The technology discussed below is not the most accessible and easiest.
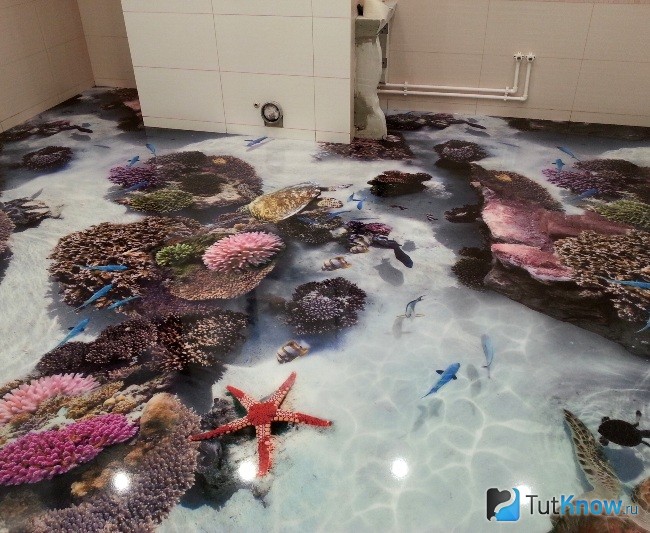
Self-leveling polymer 3D floors are currently recommended as a finishing coating. It will not only give the floor originality and originality, but will also make such a coating an equal component of the interior.
The essence of 3D floors is that, thanks to the decorative component based on high-strength polyurethane, such floors allow you to create a quasi-three-dimensional image. Such floors are made in two stages: first, the polymer is poured in the usual way, and then, when it is ready, the finishing coating is applied. Since transparent polymers are used, the resulting image will have a certain depth.
The aesthetic level of such floors is very high, which allows you to create real architectural compositions, even using components such as colored sand or marble chips.
Naturally, the implementation of this type of self-leveling floor will have its own nuances, which will be discussed further. For now, let's look at the steps required to create the main polymer coating.
Preparatory activities
The room intended for pouring must be thoroughly cleaned of dirt and debris, and all unnecessary objects (for example, baseboards) must be removed from it.
Next, you should prepare the materials and tools necessary for the work.. In particular, it is advisable to use a vacuum cleaner to remove debris, and to remove remnants of old paint, traces of glue, etc. – grinder. By the way, the quality and durability of the laid floor directly depends on the thoroughness of cleaning.
It is very important what material the coating is made of. For example, if you fill wooden base, then for better adhesion of the polymer to the surface, the wooden floor must first be sanded, open all detected cracks, and then degreased with special compounds. The most commonly used degreasing methods are conventional organic solvents - acetone, gasoline or white spirit. But for the next polymer filling It is worth using more effective formulations.
If there are no problems with disposing of the remaining degreasing solution, then you can use an alkaline solution of CM or simply add surfactants to the composition. Special compositions that degrease wooden floors are also sold (for example, from the Mellerud brand) - in this case, you can protect yourself from possible fungal growth.
Next, you should evaluate the moisture content of the floor. It should not be more than 10%, otherwise it will be impossible to properly fill such a coating with polymer. At the last stage, it is necessary to seal the cracks with special building mixtures.
Preparing the concrete floor for pouring is carried out in a certain sequence.
Estimation of relative humidity of concrete
It should not exceed 4%, otherwise the coating should be dried. The simplest method for assessing the suitability of a concrete floor for pouring based on its moisture content is to lay a regular rubber mat on it, which should be pressed firmly on top. If in a day concrete covering has not changed its color, then its humidity is within acceptable limits.
Checking the strength of concrete (if laying was carried out recently)
The compressive strength must be at least 20 MPa, and the tensile strength must be at least 1.5 MPa. You can perform such a check using improvised means. For this you need a chisel and a hammer. Having placed the chisel perpendicular to the surface of the concrete, it is necessary to apply several blows with a hammer to it with medium force - if the marks on the concrete are barely noticeable, and the concrete does not crumble after the impact, then its quality meets the requirements;
Determining the presence of a waterproofing layer
If it is not there, then work on arranging a self-leveling polymer floor will have to be stopped, since over time the process of peeling off the coating will begin. This circumstance is especially important for self-leveling floors installed in rooms with high humidity eg in bathrooms. If waterproofing is of poor quality, the resulting vapors will penetrate through the capillaries in the concrete to the inner surface of the polymer floor and cause its destruction.
All other preparatory operations for concrete base do not differ from similar wooden ones.
If a polymer floor is to be poured according to ceramic tiles, then it should be checked for possible voids (this may appear when the glue used to stick the tiles dries). The tiles that are lagging from the surface are removed, and the resulting voids are filled with putty. Next, the surface is degreased.
Prime the surface before pouring
The greatest danger when making self-leveling floors are air bubbles that can form in the thickness of the polymer during pouring. In addition, the primer ensures better spreading of the polymer over the surface being poured. This is very important because the setting process occurs extremely quickly.
The wooden surface should be primed in two or even three layers, which will ensure complete closure of the pores. Here it is most advisable to use primer mixtures with high viscosity, for example, from the brands Litonet Pro, Knauf, etc.
For concrete surfaces A two-component epoxy composition that does not contain mineral components that contribute to the formation of bubbles is suitable. The primer is carried out in two stages, and the secondary primer is done only after the first layer has completely dried.
It must be recalled that primer compositions are very toxic, so the room must be constantly ventilated. At the same time, you should not allow the temperature to drop excessively, since at +15°C and below the effectiveness of adhesion of the primer mixture to the base decreases. After complete drying, the primed surface should “rest” for about another day.
An integral part of the preparatory work is laying a thermal expansion joint around the entire perimeter of the room. To do this, you can use ordinary wooden slats made of hardwood wood. The presence of such seams will protect against possible deformation of the finished coating in the event of significant temperature changes.
How to prepare components for pouring
Poor quality filling will hopelessly ruin the coating, so at this stage should be taken with the utmost seriousness. To mix the components, you will need a low-speed electric drill with a wide paddle-shaped attachment. Even better if you have a construction mixer. The quality of the self-leveling floor depends decisively on the speed of the mixing process, since the finished composition must be used (that is, poured over the surface) as quickly as possible.
During the mixing of the components, an exothermic reaction occurs, as a result of which the temperature of the mixture rises. To ensure that the polymerization of the components does not occur too quickly, the container in which mixing is performed is placed in another filled with cold water. As a result, the temperature of the finished mixture will not rise as quickly.
For the same reasons room humidity should not exceed 80%. At higher humidity condensation occurs on the surface of the poured polymer, as a result of which the quality of the pour will decrease, and the setting time, on the contrary, will increase.
During the process of mixing the working mixture, it is necessary to promptly check the quality of mixing. Ordinary visual inspection(for example, for the presence of lumps) is not enough. Experts recommend checking the polymer-containing mixture for readiness for pouring as follows:
- a plastic ring with a diameter of 50 mm and a height of 30 mm (for example, a cap from a bottle of air freshener is suitable) is placed on a perfectly flat and smooth surface. This could be a piece of thick glass;
- the stirred mixture is poured into the ring, after which the ring will rise, and the mixture in the middle will pour out onto the glass surface;
- If the mixture spreads evenly, with a “spot” diameter of 18-20 mm, then it is ready for use. With a smaller spot diameter, the mixture will be too thick, and its subsequent leveling will be difficult, if not impossible. With a larger diameter, the mixture turns out to be more liquid, and the original components for filling should be added to it.
How to fill a floor
It is better to start the process from the wall, which is as far as possible from front door. Filling is done as evenly as possible in strips parallel to the wall of the room. Particularly problematic areas - between adjacent strips - should be smoothed out immediately, using a wide spatula for this purpose.
It is important to maintain a minimum difference in the thickness of adjacent strips. A needle roller will help with this; rolling it over the surface of the self-leveling floor will ensure its uniform thickness. At the same time, the quality of the pour is improved by removing possible air bubbles.
The final filling time is determined by the volume of the prepared mixture, but in most cases it should not exceed one hour. For proper quality of pouring, the interval between laying adjacent strips of polymer is also important - it should be no more than 10 minutes. After finishing the pouring, the surface must be covered plastic film. It will prevent contact with not completely frozen surface dust and dirt, and will also contribute to a more uniform hardening of the polymer.
Application of decorative 3D coating
The decorative layer can be formed in two ways - either with a picture with the desired image, or with a design directly applied to the coating. The second option will require acrylic paints that are not destroyed when exposed to ultraviolet radiation. The first way is cheaper, since now you can find a sufficient number of drawings that you like, which can then be printed on a plotter using banner fabric as a base. To increase durability, the fabric should be covered with a heat-protective vinyl film.
The image should have slightly larger dimensions than required, since it is always easier to cut off a piece of the image than to glue it onto the self-leveling floor - this is ugly and inconvenient.
To connect the 3D image to the base layer, it should first be primed using the same composition as for filling, but diluted with any organic solvent to half the concentration. Polymerization of the primer coating will occur within 20-24 hours.
The printed image is glued to the primer and rolled using a dry roller. At this time, you can only move on the surface of the coating in shoes with spikes on the soles, otherwise the coating will be damaged! The thickness of the transparent polymer coating should be within 3-4 mm (the greater the thickness, the brighter the effect of the 3D coating).
The preparation and application of transparent polymer for covering banner fabric is the same as for the main fill. Complete polymerization will occur in 20-30 minutes, after which to ensure greater durability the surface is covered with a layer of transparent varnish.
Video - Do-it-yourself self-leveling polymer floors
Traditionally, the floor is leveled with cement-sand screed, but it is difficult to work with, and getting a perfectly flat surface is even more difficult. You can make your work easier by using additives that increase the plasticity of the solution, allowing you to achieve a smooth surface. This technology is called liquid, poured or self-leveling floors, since the solution turns out to be really liquid and is precisely poured. You can select additives yourself, but it is time-consuming and difficult. After all, not only fluidity is important, but also the ability to level, hardening speed and other characteristics. Therefore, a more common method is to use ready-made mixtures, which are selected according to characteristics for specific tasks. With such mixtures you can make a self-leveling floor with your own hands. Not to say that there was an excellent result with self-production simple to achieve, but possible.
One of the varieties of poured floors is polymer, and they can be plain, or they can contain an image. These are so-called 3D floors. All of them are applied using the same technology, with their own characteristics. One caveat - polymer floors (and three dee) require an ideal base. On concrete slab it can be done using bulk technology. Therefore, it is imperative to study it.
Technology and sequence of actions
If you start looking for what mixture to buy to make a self-leveling floor with your own hands, you will get confused: there are different compositions with different characteristics. All of them are used in this technology, but for different needs and situations. There are two large groups:

Not much? But that's not all. In each of these groups there are quick-hardening compositions. On the one hand, this is good: repairs will take less time. On the other hand, if you lack experience (and where can you get it if you are making a poured floor with your own hands for the first time), the speed of hardening can result in the fact that while you stir all the lumps when the composition is congested, it will begin to set and there is no time to level it. There have been cases. For example, we were planning to fill a room of 16 square meters, and mixed two bags of a quick-hardening composition in a large tub. The time from getting into the water to setting is 25 minutes. All lumps were stirred for 15 minutes. The solution was poured onto the floor, but it hardly flowed anymore. We tried to level it, but it almost didn’t work. Then they quickly loaded everything into bags and took it to the trash heap. The conclusion is simple: to avoid such a situation, do not take quick-hardening compounds for your first experiment.
One more nuance. The compositions must be selected in accordance with the operating conditions: for interior or exterior work, if the room is periodically left without heating, frost resistance is needed. For laying heated floors there is also special compounds— the list of characteristics should indicate compatibility with heating.
Now about what self-leveling floors are made of. The composition may be based on cement or gypsum; in rare cases, both components are used, but there are special additives that neutralize the discrepancy (Starateli brand). When purchasing leveling agents and finishing compounds from different companies, pay attention to what they are based on. The fact is that gypsum and cement conflict with each other. They cannot be stacked one on top of the other. If the leveling agent is cement-based, then the finishing composition should also be made of cement. The same rule applies to plaster.

What you need to know
So, the main points and features of the self-leveling floor technology:

If the floor is leveled for laying tiles, laying a leveler is often sufficient. Small differences of up to 4-5 mm are leveled with a layer of tile adhesive. In general, look at the price: what will work out cheaper: pour a layer of liquid flooring or increase the consumption of tile adhesive. Both options are equivalent in terms of performance, so choose the less expensive one. Under all other coverings - laminate, parquet board, bag, linoleum, cork, carpet, etc. — a difference of no more than 2 mm per 1 meter is required. If there is no such result after using the leveler, you will have to add another finishing layer.
What do you need
In addition to bags of mixture, you will need some tools and equipment:

Work procedure: making a self-leveling floor with your own hands
The first stage is preparing the base. Everything that can be torn off, beaten off, cleaned off is removed. The cracks are widened, if they are too large, they are sealed with tile adhesive or a dry mixture for filling the floor, diluted with PVA glue. Small ones - up to 3 mm deep - are left without sealing, just cleaned well. Having finished cleaning, they clean everything well and collect dust with a vacuum cleaner.
The second stage is primer. It is better to take a primer from the same company as the liquid floor - a guarantee of compatibility. If you bought another one, check them for compatibility: look in the instructions with what compositions can be used - gypsum or cement based. It is necessary to prime thoroughly, completely saturating the entire base. It is faster to work with a roller on a long stick, but you can also use a brush or even a wide spatula. For loose materials, a single primer is not enough, and after the first has dried, a second, and maybe a third, is applied.

General sequence of work when pouring a floor. Using this technology you make self-leveling floors yourself
Stage three - installation of beacons. Lighthouses are displayed in different ways. First way: how to use it with a regular screed metal profiles. You can leave them in the floor, or you can take them out after the solution has set (primary hardening) and fill the holes with the same mixture. Second way : with a certain step, screw the screws into the floor, aligning the caps according to the level. This method is acceptable if you level the solution according to the rule. Then, when pouring, focus on the caps. Third way: make “rails” from a thick, quick-setting floor mortar. Basically, for this purpose they use a “U”-shaped profile for drywall, which is lubricated from the inside with grease. It is laid, back up, on level screws. Place the solution inside with a spatula, filling it to the very top. The trick here is to make sure there are no voids left. There is a modification of this method: along the laid screws, lay a roller of mortar into which to press the lubricated profile. The squeezed out and excess solution is collected; if it does not have time to set, you can try to use it again. Method four: use a laser plane builder.
Stage four - filling. You will have to work quickly: after 40 minutes, most compounds lose their elasticity. Therefore, it is more convenient to work with at least one assistant and two containers for filling. It is better to first measure out the required amount of water (pour into some containers, the number of which is equal to the number of batches), open the bags with the mixture, and arrange everything in rows. Install a threshold near the door so that the liquid floor does not spill out and you can make it even.
One person mixes the composition - pours in water, pours out the composition and stirs it with an electric drill and stirrer, the second person pours it and levels it out. The one who levels must put a special sole on thin metal rods on the shoes. If you don’t want to buy it, you can make it yourself (example in the photo).

Pour the composition onto the floor in a “snake” pattern. Although it spreads, it doesn’t spread so well that you don’t need to do anything at all. You will have to level, especially if you are laying the starting, coarse leveler in a decent layer. Depending on the chosen method of installing the beacons, you “drive” the solution either with a long mounting rail - as a rule, or with a wide spatula with teeth (if you use a plane builder, it is more convenient for them to work). To avoid crawling with it on your lap, it can be attached to a long handle. Some people prefer to disperse the solution with a toothed roller. With a sufficient layer thickness (from 5 mm) it does a good job; for thinner ones you need either a spatula or a rule. You have to work quickly - you need to fill the entire room before final hardening, and the next portion of the solution is being prepared.
As soon as the next portion of the solution is ready, it is poured out, continuing to level the new area, mixing the two zones at the edges. This way the entire surface is filled.
Stage five - waiting and checking the result. After pouring, close the doors - so that there are no drafts - and wait the required time. It's very different. Mixtures with cement take longer to set, with plaster - faster, but usually you can walk on the surface after 12-24 hours.
When specified the deadline will pass, take the two-meter rule and check the result. When using a coarse leveler, the difference can be 2-5 mm, or it can be measured in centimeters. Very much depends on skill. If you made a self-leveling floor with your own hands for the first time, and the differences were less than 10 mm, we can congratulate you on your success. This good result, and the existing unevenness will be leveled by the finishing leveler. It has a finer grain and is better distributed.
If you want a good result, find a good self-leveling mixture. Of course, it will need to be distributed over the surface, but it will level itself. The only disadvantage of this type of composition is their price. In general, it has been noted that the less experience, the more expensive the composition should be used to guarantee a smooth floor.
All the nuances and features of the construction of poured floors are well described in the video. There is also a demonstration of how to level the mixture and several brands that are recommended to be used.
Manufacturers of compositions for self-leveling floors
There are many companies on the market, both foreign and domestic. Some compositions are praised by everyone, while others have conflicting reviews. Here you need to understand that those who often encounter this work can, using a composition that is not very good in terms of characteristics, get excellent result. It’s more difficult for beginners: they don’t know how it should be, so they can’t correct it in time if something goes wrong. Therefore, it is unlikely that you will be able to save money: in order to get a good result, you will have to buy a composition for self-leveling floors with a very good characteristics and reviews. And these are expensive brands.
Here is a list of manufacturers and compositions, with a brief description:
- Bolars is inexpensive, but difficult to work with.
- ‘Prospectors – reviews vary.
- Pyramid - little experience.
- CERESIT CN78 - easy to work with, the surface is smooth, but expensive.
- IVSIL TIE-ROD-II is a self-leveling mixture based on gypsum; other compositions level a little worse.
- BROZEX NP-42 - the result is not bad, spreading is normal.
- Horizon Universal - difficult to work with.
- Vetonit Vaateri Plus is a self-leveling agent with good characteristics, it is easy to work, the surface is smooth, and it is expensive.
- Forbo 976 is a self-leveling mixture with good performance.
- Foundation T-45 - spreads and levels well, but is not suitable for thick layers (more than 10 mm).
- Plitonit (PLITONIT) - a composition for a thin layer has very good reviews.
- Kreps-RV and SL - according to reviews - normal characteristics at an affordable price.
These are, naturally, not all manufacturers, but those with which you can make a floor, and do not suffer (according to reviews of those who worked with them) ...
Polymer and 3D self-leveling floors
The technology for installing polymer floors is similar to installing self-leveling ones. There is also a liquid, relatively fluid composition that needs to be distributed over the surface. The difference is in materials. These are mainly polymers. They differ according to the type of binder component:
- polyurethane;
- epoxy;
- methyl methacrylate.
In terms of coating thickness, they can be very thin - this is dust removal coating and painting, or they can have a thickness of 1.5-4.5 mm, sometimes more. The compositions are mainly two-component - before application they are mixed in strictly measured proportions. Then, like self-leveling floors based on cement or gypsum, they are poured onto a flat primed surface (their own primer) and leveled.
Polymer floors can have a glossy or matte surface, or they can have a rough surface. In apartments and private houses (for bathrooms, kitchens, corridors) they mainly use a gloss or matte surface, in swimming pools or on open terraces - a rough surface, so that it is non-slip even when wet.

Volumetric floors with a pattern, which are also called 3D (three de) floors, are a special case of a polymer floor. The design is applied to a banner or special fabric. The main thing is careful study of the drawing and high quality print. This pattern is glued onto the prepared base, then a layer of transparent polymer is poured on top. After drying, another layer of abrasion-resistant varnish is applied. The result is the same beautiful pictures on the floor, which many people like so much.

The basis for the quality of a 3D floor is an ideal base and high-quality pattern
Self-leveling floor technology with a pattern
Step by step it looks like this:

The entire technology for installing a 3D floor is demonstrated in a video clip. After viewing, all ambiguities should disappear completely.
Those who want to make a volumetric self-leveling floor with their own hands (with a 3D effect) often have questions about where to buy materials. if we are talking about photo printing, then in an advertising agency engaged in banner advertising or in a printing house that has equipment for large-format printing on fabric.
If we are talking about polymer compounds, then the number of manufacturing companies is in the dozens. There are both domestic and imported. They, as a rule, produce the entire line - from primers to coatings with different characteristics. There are a lot of possibilities for tinting. Choose any from the catalog. This is if you plan to fill a plain floor. If you decide to make a floor with a pattern, in addition to the primer you will need one composition for the base (to match the background of the photo), as well as a transparent one. They can also sell all sorts of “chips” to create a shimmering, for example, floor, etc.

As mentioned, there are many manufacturers. Here are some, with a description of the materials they produce (which they sell):
- TeoKhim enterprise produces polymer floors under the Elakor brand (all three types of polymers)
- Etal and Etal UV - epoxides
- Remmers Epoxy (epoxies), Remmers PUR Aqua (polyurethane)
- Self-leveling polyurethane coating KT floor Enamel PU 01 - one-component (toxic, use a respirator)
- Polyepoflex - epoxy self-leveling floors
- Ultraflor - polyurethanes
- Poly-Flor - all three polymers (epoxy, polyurethane, methyl methacrylate)
- Epolast - two-component epoxy compounds
- Sikafloor-2530W - epoxy self-leveling floor
Actually, this is all technology. You see that it is not easy to make a self-leveling floor with your own hands, but it is possible. The main task is to qualitatively prepare the bases, as well as to meet the specified time before the compositions harden.
Another video on how to make plain polymer floors.


