Construction of a residential building is a labor-intensive and financially expensive process. Often, the construction of an additional floor during the construction of a house has to be abandoned due to a lack of finances. However, over time, home owners often wonder: how to increase living space in the house? It is possible to expand the living space in a house without adding new structures. The simplest solution is to use the attic as a living space. To magically transform a nondescript and dusty room into a cozy and functional room, it is necessary to carry out a complex of works.
When carrying out repairs or construction of an attic space, you should draw up a preliminary action plan. This will help avoid additional costs and optimize the conversion of the attic into living rooms. The sequence of actions is as follows:
- Plan and drawing. Before starting repairs, you should draw up a detailed plan drawing. There are specialized computer programs for this. You can do planning the traditional way by drawing up a project on paper. The drawings should take into account: the height between the floor and the ceiling, the dimensions of the rafter system elements and other main points.
- Definition of functionality. The residential attic floor can be turned into a bedroom, children's room, family recreation area or office.
Important!
The height between the floor and ceiling in a residential attic must be at least 2.1 meters. If the height is below the established indicator, the level of living comfort decreases.
Before you begin, you should determine the functional purpose of the attic space.
- Cleaning. Before you start construction work The attic needs cleaning. After cleaning, you should once again check the plan drawing with the actual room.
- Inspection. To make a room comfortable and safe for living, it is necessary to inspect its structural parts for possible breakdowns and damage, identify design flaws and carry out repairs.
- Planning and purchasing. After the estimate has been prepared and the choice building material and the roof covering has been produced, we begin purchasing.
A sample plan may include many sub-items, it all depends on the situation, architectural features structure and wishes of the residents of the house.
Choosing a roof covering
As you know, the attic crowns the entire structure of a private house, located under its roof. Therefore, the height of the roof and the choice of material for roofing are one of the main ones when arranging a living space. The most wear-resistant and durable types of coating include:
- metal tiles;
- roll materials With high content bitumen;
- asbestos cement sheets of regular or reinforced profile.
The choice of coating material depends on several factors, one of the most important being the type, slope angle, structure and architecture. It is the choice of coating material that is important in order to equip reliable protection from moisture and atmospheric phenomena, ventilation, create optimal temperature conditions and comfort in the room under the roof. When choosing a material, it is worth performing approximate calculations to take into account the degree of load on the roof of the house and rafter system. This will help increase the service life of the structure and avoid unpleasant situations (cracks, collapse).
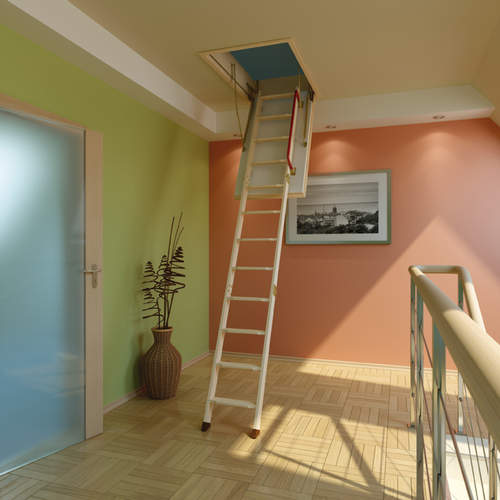
Stairs to the attic
Reconstruction of a dark and unattractive attic space is a complex undertaking. The question of how to equip the entrance to the attic worries many. The staircase is a classic solution, but it’s not that simple! There are a huge number of design options. Each type of staircase has its own characteristics and advantages, so making a choice is not easy.
Important!
A wide straight staircase, matching the design of the house, looks expensive, solid and aesthetically pleasing, but “steals” precious meters of living space.
A more democratic and inexpensive option for equipping the entrance to the attic space is a folding staircase structure. It is less monumental in appearance, but no less reliable in operation.
Types of non-stationary stairs for a private house:
- Folding design is a traditional ladder that you can make with your own hands, having basic knowledge.
- Retractable design - when assembled, it is hidden behind the hatch cover from view and does not interfere with the aesthetics of the interior.
- Sliding design– compact and reliable, consists of several sections and a sliding mechanism.
In order to make the arrangement of the entrance to the attic as comfortable as possible for each of the household members, it is necessary to calculate the size of the staircase and the number of steps. First of all, we measure the distance between the ceiling and the subfloor and make an approximate calculation based on the average height of the step. When all the calculations have been made, you can make an estimate for the purchase of the necessary material and make the structure yourself. Detailed information is on our website. When choosing a staircase to the attic of a private house, it is important to understand who will use it most often. If it is intended for elderly people or children, the requirements for the convenience and safety of entering the attic increase (making handrails or).
Insulation of a residential attic
To create comfortable living conditions in the attic of a private house, you should pay attention special attention insulation of the room. The work can be done with your own hands, without involving expensive specialists. The main thing is to follow these rules:
- The first step is to ensure the integrity of the roof and roof covering. If damaged areas or gaps in the coating are found, they must be sealed using construction tape. If the integrity of the roof covering is damaged on a large scale, restoration work should be carried out or it should be completely covered.
- Next, the integrity of the rafter system is checked. Remember that even minor deviations from the norm can cause a violation of the integrity of the entire structure.
- Special slats are attached to the rafter legs, which in the future will provide a gap for ventilation between the insulation layer and the roof. First, a hard covering, for example, roofing felt, is secured, and slats are attached on top of it.
Advice!
Reiki for ventilation gap must be attached exclusively along the rafter legs. If you attach it across, the strength of the structure will significantly decrease.
- We attach the insulation. The choice of material for attic insulation depends on the design features and financial capabilities of the home owners. To insulate a living space in the attic, you can choose:
- mineral wool;
- expanded polystyrene boards;
- kraft paper, straw or sawdust.
Eat unspoken rule choice of thermal insulation material: the steeper the roof slopes of the house, the denser the insulation should be. Expanded clay is often used as an option for insulating floors between floors. The use of expanded clay for concrete flooring in the attic of a residential building is especially important. When insulating a residential attic space, you should remember about vapor barrier. When choosing a material such as foil-coated mineral wool, additional vapor barrier layer not needed.
Correct and attic ceiling
Heating
Insulating the attic does not guarantee warmth in the room under the roof. Using the attic of a house as additional living space implies organizing a high-quality communication system. One of the aspects of a comfortable stay, especially during the cold season, is heating. Installing a heating system in the attic of a house makes it possible to use this space year-round. There are several options for solving the problem:
- Using a stationary heating system.
- Fireplace equipment in the attic.
- Using electrical appliances to heat a room.
Each of the proposed options is feasible, but has its own characteristics. To install a traditional heating system, you will need to run pipes into the attic. After this, the heated area is calculated and radiators are installed. Fireplace in the room under the roof - original idea. Undoubtedly, having a fireplace in a room is always cozy and warm. When carrying out construction, it is better to make an additional branch for the fireplace, which in the future will be connected to the general heating system of the house. The design of such a system is complicated by the need for a powerful feed pump. This will help cope with the increased workload. In addition, you need to take into account that a high-quality chimney must be installed for the fireplace, and this will lead to additional financial expenses. Using electric heating devices to heat a room under a roof is the most cost-effective way. It does not require the construction or arrangement of specialized premises, chimneys or compartments.
Advice!
When choosing equipment, you should take into account the power of the devices and remember the fire safety techniques of a private home.
Electric heating has disadvantages: high energy consumption, risk of fire, drying out the air in the room. When choosing the safest and most economical heating option, experts advise giving preference to an autonomous heating system.
Lighting
In order for natural light to freely enter the rooms under the roof, translucent structures are needed. In this case the only thing the right decision will become . Important point in the process of preparing for installing a window into the roof slopes - making a durable wooden frame which will help keep window frames and prevent possible deformation. The frame is installed between the rafter legs, so the width is ordered taking into account this distance and the thickness of the beams. Windows can be installed on gables or directly in the roof of the house. What are the advantages skylights?
- Saving on energy costs. Such windows allow you to increase throughput natural light by 40%.
- Exquisite design. Windows help create a unique atmosphere in the room under the roof; they organically complement the design, creating spaciousness in the room.
- Functionality. Manufacturers offer various configurations and functional loads of windows for attic spaces.
Regarding electrical wiring into the attic to create high-quality artificial lighting, that is, there are several proven methods:
- laying wires over the walls, hiding them in special plastic boxes;
- arrangement of hidden electrical wiring by laying the wires under the inner lining.
The first method is the simplest; you can do it quickly and easily with your own hands. The second method is more technically complex, since the fire safety standards and requirements for a private home must be taken into account. Hidden electrical wiring is installed during the installation of the frame, wall and ceiling cladding.
Important!
When installing hidden wiring, the copper wire is placed in a special corrugated metal hose. After this, it is mounted into the wall.
When the electrical wiring is installed in the attic, all sockets and switches are placed in their places, you can begin the most exciting stage - interior planning. Flights of imagination are welcome here! You can choose classic style solutions, cozy Country or gentle Provence. For young people you can create an urban room under a roof in the Loft style, and for children - a fabulous dream island.
Transforming a dusty and dark attic into a cozy and spacious room under the roof itself is a labor-intensive process and requires financial costs. Knowing the secrets and tricks, following the rules and advice of experts, you can quickly transform an uninhabited cold attic under the roof into additional living space.
Transforming an Abandoned Attic
When ensuring insulation of a private house and insulation of the roof along the rafters, one must not forget that special attention should be paid to such a place as the attic.
Development of attic floor insulation with mineral wool
Warm air tends to rise to the top, and therefore, in a temporarily unheated room, heat can escape through the cold attic space. Therefore, the issue of insulating the attic must be resolved without delay.
1 Why do you need attic floor insulation?
Insulating a cold attic floor with stone or mineral wool is generally necessary in lightly used rooms that are properly equipped with special roof ventilation.
The attic, or rather its ceilings, serves as a kind of boundary between heat and cold. In such places, the attic floors are exposed to intense moisture due to the formation of condensation.
However, you can properly insulate the floors in the attic of a house with mineral wool with your own hands. The very process of insulating the floor in the attic with mineral wool is the creation of a durable thermal insulation coating, which will have a low degree of thermal conductivity.
The technology itself for insulating mineral wool floors in the attic, as well as Energoflex thermal insulation for pipes, implies strict adherence to its stages and requirements.
The technology itself is quite simple and understandable. Good attic floor insulation using mineral wool helps close unwanted gaps.
To do this, the insulation must be laid tightly. In most cases, mineral wool is used to insulate the attic of a house.
The presented insulation is the most suitable for this type of work; it can also be used to insulate the floor surface in the living areas of the house.
By organizing good insulation with mineral wool, the most optimal temperature will be maintained in residential premises.
If the procedure is performed incorrectly, moisture rising from the floor of the house will lead to the formation of condensation.
It will accumulate on the ceiling and then seep through the ceilings. The resulting temperature difference in those areas where the attic floors adjoin the walls of the house initiates the formation of mold and microscopic fungi, which can be causative agents of allergic diseases.
1.1 Requirements for attic insulation
The process of insulating the attic floor and insulating the roof of the house with your own hands, or rather the level of its quality, has a direct impact not only on the size of heat loss, but also on the duration of the operational life of the entire truss structure and roof coverings.
The fact is that water vapor inside the heated room diffuses to the attic of the house. In order for the insulation used to provide a high degree of calculated efficiency of the thermal insulation layer, it must always be dry.
Based on this, the insulation must be protected from excessive humidification by vapors of rising heated air using a special vapor-proof material.
If the attic space is well insulated, it will not only provide high-quality thermal insulation, but will also help increase the service life of the entire roofing structure.
If there is no vapor barrier, steam will penetrate through the unprotected attic floors and condense on the floor surfaces.
This will lead to moisture flowing onto the rafters, which, under its influence, will begin to slowly rot from the inside.
As a result, the likelihood of destruction of the entire roofing pie increases. The thermal insulation performance of the structure is also reduced due to the fact that the tightness of the vapor barrier layer has been compromised.
Before insulating the attic, you need to drain the layer and remove moisture from the entire attic space. To do this, ventilation should be done through windows. They may be:
In order to ensure maximum ventilation intensity, the indicator of the total area of all ventilation holes should be equal to 0.2-0.5% of attic floors.
If all work is carried out correctly, then winter period Icicles will not form on the roof. The process of insulating the attic space itself is carried out not from the living quarters, but from the attic floor.
This is the most convenient way to lay insulation, the choice of which depends on the technology used and the design features of the structure.
1.2 Features of insulation of beam floors
When implementing such an insulation scheme using mineral wool, heat is retained in the space between the beams. Their usual height is almost always enough for this, but if necessary, several bars are packed on top.
Insulating the ceiling with mineral wool from the attic side
The lower part of the ceiling is sewn up using molded material, as when insulating the attic of a private house. For this, lining or sheets of plasterboard can be used.
The subfloor covering is laid on top of the beams. This can be a tongue and groove board, plywood sheet or OSB board. Mineral wool is placed on a pre-prepared special vapor barrier layer.
An alternative can be an ordinary film made using polyethylene. If the vapor barrier material is foil-coated, then it is laid with the shiny surface down.
The intermediate distance between the beams is filled with mineral wool with the required thickness parameters. The surface of the beams must be equipped with an additional insulating layer.
This will lead to blocking the so-called cold bridges and will significantly reduce the overall level of heat loss. If high quality timber was used to create the beams, then the finishing material is spread directly onto their surface.
Mineral wool is placed between them as when insulating a roof using polyurethane foam, and the attic floor is laid on top. The use of this technology is especially important in houses that are made of logs or beams.
It is important to reliably protect mineral wool from the smallest drops of moisture, this is especially true if the roof has minor coating defects that cause leaks.
The layer of mineral wool must be reliably protected from the effects of wind from the eaves. For this purpose, mineral wool slabs with a high degree of density are used.
2 Why is mineral wool used to insulate an attic?
In most cases, when insulating attic floors, the consumer's choice falls on mineral wool. Its advantage is that its installation does not require special skills.
Mineral wool has excellent thermal insulation properties. Its structure consists of thin glassy fibers, the length of which ranges from 2 to 60 millimeters.
Insulating the attic with mineral wool
High sound insulation characteristics are ensured due to the presence of a large number of air pores.
These pores are located in the space between the fibers and can occupy 95% of the total volume of the insulation. Mineral wool is presented in three varieties; it can be basalt glass and stone.
Basalt wool is made using molten basalt rocks, to which binding elements are added.
This may be a carbonate type rock, which regulates the acidity level of the substance, which entails an increase in the service life of the insulation. Glass wool exhibits high heat-resistant properties and can withstand temperatures up to +450 degrees Celsius.
2.1 Technology for insulating attic floors with mineral wool
When carrying out work related to mineral wool, it is important to comply with all safety requirements and regulations.
This is due to the fact that in the process of cutting and laying such material, the air is filled with tiny particles that can enter the respiratory organs and thus cause harm to human health.
During installation, be sure to ensure the availability of personal protective equipment. Goggles, a respirator and thick rubber gloves must be available.
The process of insulating attic floors begins with the selection of the necessary tools and additional materials.
The essence of insulation technology is that the insulation must be carefully laid in the space between the attic floors or beams.
To enhance the thermal insulation qualities, reliable vapor barrier protection should be used. Warm and moisture-saturated air will continuously rise from the living rooms and reach the top through the ceiling.
There, in the under-roof space, it will collide with a layer of insulation. Due to the fact that mineral wool is generally considered a vapor-proof material, it will absorb all the outgoing moisture inside itself.
If it is left without the necessary access to air and sunlight, it will gradually dry out and, ultimately, lose all its heat-insulating qualities.
The attic is cold interfloor covering 20 cm min of cotton wool
In order to avoid such destructive consequences, it is necessary to lay a vapor barrier material under a layer of mineral wool.
Before starting the main work, you will need to carefully calculate required quantity insulation.
The amount of cotton wool purchased depends on how many layers are planned to be used when covering the attic space. In addition, the thermal insulation thickness parameter directly depends on the features climatic conditions in the region.
Insulating the ceiling of a cold attic with mineral wool
Insulating the ceiling of a cold attic with mineral wool - advantages. Features of insulation of cold attic floors with mineral wool.
Insulating the attic floor in a private house - effective ways to retain heat
Insulating the attic floor of a house allows you to retain more heat inside the room, rather than wasting it on heating a cold attic. It’s good if it is used as a utility room (technical attic) or as an attic, but what if not? Then it makes no sense to waste resources on heating an unheated attic space.
That is why it is worth insulating the ceiling of a cold attic using thermal insulation materials. Insulation can be done from the attic side or from the room side (inside/outside). It is best to do this during the construction of the building, or immediately before finishing the room. But even during the operation of the house, there is no reason not to insulate the ceiling from the attic.
The thickness of the attic floor insulation is standardized using SNiP II-3-79 “Construction Heat Engineering”. This manual contains detailed recommendations regarding the selection and formula for calculating the heat transfer resistance of various thermal insulation materials. The calculations take into account not only the type of material, but also the average annual temperature, duration heating season, wall material Houses.
The technology for insulating the attic floor depends on the selected material.
Comparative characteristics of thermal insulation material with equal thickness
In this article we will look at the most popular insulation materials.
Insulation of the attic floor with mineral wool
Mineral wool is an insulation material whose fibers are arranged in a certain way. It is this randomness that leads to the formation of an air cushion between the fibers, which imparts its properties to the insulation. However, this same feature of cotton wool increases its ability to absorb moisture. To avoid this, you need to know how to install mineral wool correctly.
Advantages of mineral wool:
- high density;
- long service life;
- fire safety;
- ease of installation;
- the use of mineral wool for insulation of horizontal surfaces does not lead to caking, sliding and, as a result, the formation of cold bridges.
Among the disadvantages: the ability to absorb moisture.
Technology for insulating attic floors with mineral wool
There are three main ways to lay cotton wool: completely, in grooves or in cells (see photo). The choice of method depends on what load will subsequently fall on the floor. The most stable frame is obtained in the latter case.
 Insulation of the attic floor with mineral wool
First stage
It starts with laying a vapor barrier film. The film will allow you to remove steam that rises from a warm living space into a cold attic. To lay the film correctly, you need to carefully read the markings on it. It is imperative to maintain an overlap of 100 mm.
 Technology for insulating attic floors with mineral wool If insulation is carried out along wooden beams, then the film should go around all protruding elements. Otherwise, the beams may rot.
At the junction of the film and walls or other protruding surfaces, you need to raise it to a height equal to the thickness of the insulation plus 50 mm. and glue it with tape or wrap it on an insulation board.
Second stage
The insulation (cotton wool) is being laid. It's a pretty simple process. Plates or strips are easily cut with a construction knife to the required sizes.
When laying the sheet, you need to make sure that there are no gaps or the mineral wool material is not too compressed. Both will lead to a decrease in the quality of insulation. Typical mistakes in photos.

a) insufficient thickness of thermal insulation material;
b, c, d) the thickness of the attic floor insulation is incorrectly selected.
Useful tips for installing mineral wool
- insulation with foil will increase the material’s resistance to heat loss. The sheet is laid with the foil side down.
- the insulation should not protrude beyond the beam. If this situation occurs, the beam needs to be lengthened wooden beam or additional lath to the thickness of the insulation.
- Thin insulation laid in two layers retains more heat than one thick one. In this case, the slabs must be laid in a checkerboard pattern.
- if there are protruding structural elements in the attic, for example, a chimney pipe, you need to raise the insulation to a height of 400-500 mm. and secure it.
Third stage
Waterproofing is installed if the attic is not intended to be used and the rafter system is not protected by a waterproofing film. If the roofing material is separated from the attic with film, then you can proceed with the final stage.
Rough floor. It is laid on top of the insulation and serves as the basis for the final finishing.
Insulating the attic floor with foam plastic
The installation technology process is similar to insulating an attic floor with polystyrene foam.
The advantages of these materials:
Among the disadvantages: flammability.
Technology for insulating attic floors with polystyrene foam or polystyrene foam
The process of installing rigid foam-based insulation is more than simple and can be done with your own hands. The work can be divided into two stages:
- surface leveling. To ensure high-quality insulation, there should be no significant unevenness on the base floor. Such differences can be eliminated by screeding with sand-cement mortar.
- The slabs are laid end-to-end or between beams. The presence of timber increases the strength of the floor.
 Insulation of the attic floor with polystyrene foam Rough coating
Polystyrene foam must be protected from destruction with film in an uninhabited attic. In a frequently used or residential attic, you need to move somehow, so it’s better to install a subfloor made of OSB or sand on top of polystyrene foam or expanded polystyrene. cement screed.
Insulation of attic floors with sawdust
Sawdust is finely ground wood.
- naturalness;
- absence of toxic impurities;
- light weight;
- availability of material.
Technology of attic insulation with sawdust
- Before you start insulating them with sawdust, you need to prepare them. Namely, mix cement and water with sawdust in a ratio of 10:1:1.
- Pour the prepared mixture onto the attic floor and level it. It is worth noting that sawdust can only be used as insulation without using a frame in a non-residential attic. Otherwise, when walking on the floor, the sawdust will be compressed, and concrete screed will collapse.
- build a cellular structure from timber. Pour a solution with sawdust inside each cell. The advantage of this method is that a subfloor can be laid over the timber. And the attic will be usable
 Insulation of attic floors with sawdust
Insulating the attic floor with expanded clay
Expanded clay is produced by firing clay.
The disadvantage is associated with the difficulty of lifting expanded clay to the height of the attic.
Expanded clay is usually used when it is necessary to insulate the attic floor using slabs.
Technology of attic insulation with expanded clay
The work is carried out in three stages:
- The slab is inspected for the presence of cracks and cracks. They are sealed with mortar or covered with thick paper. Protruding elements do not create difficulties with filling expanded clay.
- install timber sheathing. In the future, a subfloor will be laid on it.
- loose insulation is poured onto the slab and leveled using a regular rake. Layer thickness 250-300 mm. You can move on expanded clay without restrictions.
 Insulating the attic floor with expanded clay Tip: when filling expanded clay, it is better to combine granules different sizes(diameter). This way you can avoid the appearance of voids.
Finally, a subfloor is installed or filled with sand-cement screed.
Please note that attic insulation wooden floor has some nuances:
- the tree is susceptible to rotting, which means the steam rising to the top must pass freely. Improper installation of films or the use of non-breathable materials, such as roofing felt, will lead to the destruction of wood in the future.
- When using foil insulation, you need to place it with the foil down. This way the wood will be protected from water and at the same time will not accumulate steam moisture.
 Errors in attic insulation
- The “correct” way is to use a superdiffusion membrane or vapor barrier film
- “Wrong” is to lay a special film without taking into account the markings or even ordinary film
The attic floor insulation diagram for various types of insulation is shown below.
 Attic floor insulation scheme – 1
  Attic floor insulation scheme – 2
Conclusion
In this article, we focused on the main stages and features of insulating the attic floors of a private house using insulation materials various types. We hope this information is useful to you.
Insulation of the attic floor with mineral wool, polystyrene foam, sawdust, expanded clay
How and how to insulate an attic floor with your own hands. Review of insulation materials and installation methods. Insulation of the attic floor with mineral wool, sawdust, polystyrene foam and polystyrene foam, as well as expanded clay
Insulation of cold attic floors: materials and methods
To understand why it is necessary to insulate the ceiling of a cold attic, let’s clarify a little why an attic is needed in a private house and what its purpose is. Our ancestors built houses that could stand for more than 100 years, while it was warm inside, and the wooden roof structure always remained dry.

Previously, they mainly built gable roofs with a slight slope of the slopes. This was done so that snow could remain on the roof in winter. Thus, snow was used as a natural insulation. One or two windows were made in the attic and kept closed in winter so that the trapped air acted as a heat insulator. In the summer, a slightly different situation occurred. Attic windows were opened at night so that the air cooled, and during the day, in hot weather, they were closed so that the air did not heat up too much, thus regulating its temperature.

When snow fell in winter, it fell as a continuous cover on the roof, simultaneously becoming natural insulation. Even in severe frosts, the temperature in the attic did not drop below zero. Thus, the air in the attic and the insulation of the ceiling made it possible to maintain the temperature in the house at +20-25 °C. The roof slopes were not insulated to prevent the snow lying on the roof from melting. The rafter system remained open, allowing it to be inspected and repaired if necessary. Therefore, in a cold attic, only the ceiling is insulated.
If the roof slopes are insulated, then the attic becomes a heated room, i.e. an attic, which has a completely different functional purpose.
Now it remains to find out how to insulate the attic floor in a private house, and what materials are used for thermal insulation.
Materials for insulating attic floors
Present on the market wide range materials for insulation. To make a choice, it is necessary to take into account the conditions in which the thermal insulation material will be used:
- The material must retain its properties when temperature conditions from -30 to +30 °C. It should not freeze in severe frosts and should not emit harmful substances in hot weather.
- It is necessary to choose fire-resistant insulation if there is electrical wiring in the attic.
- It is better to choose a moisture-resistant material so that when wet it does not lose its thermal insulation properties.
- The insulation should not quickly cake in order to fulfill its purpose for as long as possible.

Before deciding on the type of material for insulating the floor of a cold attic in a private house, you need to consider what material the ceiling is made of. If the attic floor is made of wooden beams, then you can use slab, roll and bulk insulation. In the case where the attic floor is made of concrete slabs, they resort to the use of heavy bulk or dense slab heat insulators. Their use makes it possible to make a cement screed on the floor.
Materials produced in slab and mat formats:
- mineral wool (mineral wool) in mats;
- foam;
- extruded polystyrene foam;
- seaweed;
- straw.

- mineral wool;
- glass wool;
- stone wool;
- seaweed ladders;

Bulk materials for attic floor insulation:
- expanded clay;
- ecowool;
- reed;
- sawdust;
- straw;
- slag;
- buckwheat tyrsa;
- foam granules.
 Insulation of attic floors wooden house must be made with environmentally friendly, natural and breathable material.
How to properly insulate an attic floor with mineral wool
Mineral wool is a common and modern heat insulator. Available in rolls or slabs (mats). It does not rot or burn, rodents and various kinds of microorganisms are also not afraid of it.
Insulating the ceiling of a cold attic with mineral wool begins with laying lining material on the floor. For budget option glassine is laid on the floor, but it is more expensive and quality option– flooring made of vapor barrier film. The film is laid with an overlap, and the joints are taped or secured wooden slats, which are fixed with a construction stapler.

The width of the insulation is selected based on the requirements of thermal engineering standards for each region. Mineral wool is placed between the joists tightly and without gaps. The joints are taped with tape. After the insulation is laid, level boards are simply laid on the joists, thus forming the floor in the attic. This simple solution for creating a floor allows the mineral wool to “breathe” and ventilate normally if it gets wet. To prevent moisture from entering the mineral wool, waterproofing material is laid under the roof.
Mineral wool is laid using personal protective equipment: thick clothing, goggles, gloves, respirator.
Insulation of attic floor slabs with extruded polystyrene foam
Expanded polystyrene or polystyrene foam are not very dense materials, so they are used when the attic floor is a structure made of joists and beams. If thermal insulation of the slabs is necessary, insulation of the cold attic floor with extruded polystyrene foam is used. This material is stronger and therefore denser than regular foam. Before laying it, the surface of the slabs should be leveled. There is no need for vapor barrier on the warm side of the floor, since concrete slabs have almost no vapor permeability.

A vapor barrier film is laid on the leveled concrete slabs. Next, slabs of extruded polystyrene foam are laid in a checkerboard pattern. The joints are blown with polyurethane foam. After the foam has dried and hardened, thermal insulation boards poured concrete mortar 4-6 cm thick. When the screed is dry, it is already suitable for use as a floor. Although you can go further and put any floor covering on the screed.
Thermal insulation of a cold attic with ecowool
Ecowool is a cellulose, lightweight and loose insulation material, consisting mainly of waste paper and newspapers. Other components - borax and boric acid - are used as flame retardants.
Before insulation, it is necessary to place a film on the floor. The procedure for laying ecowool occurs using a special blowing installation. The insulation layer is applied as a continuous cover, without creating cracks. Since ecowool contains a large amount of air, a layer of 250-300 mm is usually enough.
 Do not forget that over time, the material will shrink. Therefore, apply a layer of ecowool 40-50 mm more.
After the insulation of the cold attic floor with ecowool is completed, it must be moistened. You can do this with plain water or prepare a solution of 200 grams. PVA glue on a bucket of water. Soak a regular broom in this solution and moisten the cotton well. After drying, a crust forms on the surface of the cotton wool - lingin, which will not allow the cotton wool to move.
As you can see, there are plenty of ways to insulate the floor in the attic. Which one to use depends on each specific situation. The main thing is to follow the correct technology for laying thermal insulation! Then your home will always be warm, and the materials used will last for many years.
Insulating the ceiling of a cold attic with mineral wool, how to insulate the attic floor
How to insulate a ceiling in a cold attic. Insulating the attic floor with mineral wool and extruded polystyrene foam. How to properly insulate the floor in the attic.
How to insulate an attic in a private house with your own hands as efficiently and inexpensively as possible
I decided to dedicate this article to those people who want to insulate the attic of their house on their own without large financial costs. Next, we will get acquainted with thermal insulation materials suitable for these purposes and the nuances of their installation.
Stages of work
We will conditionally divide the insulation of an attic in a private house into:
Floor insulation
Floor insulation can also be divided into several steps:
Stages of floor thermal insulation
Preparation of materials
First you need to decide on the choice of thermal insulation material. There are quite a lot of options. However, our task is to insulate the ceiling with minimal financial costs.
- sawdust – thermal conductivity is 0.07 - 0.095 W/mºC. The main advantage of sawdust is that if there are wood processing plants nearby, they can be purchased very cheaply or even free.
Sawdust is an excellent natural insulation material.
The only thing, keep in mind that before using the sawdust it is necessary to dry it and also treat it with an antiseptic composition. Also, to protect sawdust from biological influences, you can use slaked lime mixed with carbide.
If sawdust has traces of fungal infection, it cannot be used for insulation;
Reed insulation mat
- Reed is another natural material that can be obtained for free. The thermal conductivity of reeds does not exceed 0.042 W/(m.K).
Reeds for thermal insulation are prepared late autumn with the onset of the first frosts, when the stems remain almost completely without foliage. Moreover, only mature plants can be used. Such stems are easily identified by their light yellow tint.
Penoizol is applied in liquid form
- penoizol is a modified polystyrene foam that is applied to the surface in the form of foam. The foam hardens within a few days.
Penoizol has a lower thermal conductivity than all the materials described above - 0.028 - 0.040 W/(m*K). In addition, penoizol is not susceptible to biological influences, does not burn and is not afraid of moisture.
The disadvantage of this material is that insulating the attic with foam insulation requires certain equipment. Accordingly, it will not be possible to cope with the work on your own. The cost of the material with the work of specialists is 1450-1500 rubles per cubic meter.
True, you can use dry penoizol in bags, but in this case its price will increase to 2000-2300 rubles per cubic meter;
Expanded clay for thermal insulation of floors
- Expanded clay is an environmentally friendly and fireproof natural material that is sold in the form of durable granules. The cost of expanded clay starts at an average of 1000 rubles per cubic meter, which allows it to be classified as a budget insulation material.
The disadvantage of expanded clay is more high thermal conductivity 0.1 – 0.18 W/(m*K). That's why For high-quality thermal insulation of the ceiling, expanded clay must be poured in a layer of at least 20 cm.
- mineral wool is also an environmentally friendly and fireproof material with low thermal conductivity (0.038 to 0.055 W/m*K). Typically, mineral wool is sold in the form of mats or rolls. Its main disadvantage is that it is quite high cost– from 2300-2500 rubles per cube of basalt mats.
True, you can use stone wool in rolls, the cost of which starts from 1,500 rubles per cubic meter. But, this material is less environmentally friendly than basalt wool.
Last time widespread received insulation based on cellulose - ecowool. This material is treated with an antiseptic and fire retardant, therefore it is fireproof and not susceptible to biological influences. The cost of ecowool is 1200-1500 rubles per cubic meter.
Everyone must choose the best way to insulate an attic in a private home, depending on the needs and availability of a particular heat insulator.
In addition to thermal insulation, you will need other materials:
- vapor barrier membrane;
- boards, OSB sheets or other material that can be laid on floor beams;
- antiseptic impregnation for wood.
Floor preparation
You can begin insulating the attic floor only after completing the following preparatory work:
- if there is a flooring on the floor beams, it must be dismantled;
- then the wooden beams must be treated with antiseptic impregnation. Instructions for the use of such compositions are available on the packaging;
- if there is no bevel (lining) of the ceiling, it needs to be done. To do this, you can nail boards to the beams from the inside, i.e. from the side of the room.
This completes the preparation.
Floor insulation
Insulation of the attic floor is carried out as follows:
- A vapor barrier membrane needs to be laid on the joists and eaves. The stripes must overlap each other. For reliability, the joints should be taped;
- Now the thermal insulation is being installed. Mineral mats must be positioned so that they fit tightly to the floor beams and to each other. The same applies to rolled material;
Example of laying mineral wool
- lay another layer of vapor barrier on top of the floor beams and thermal insulation with your own hands and glue it with tape;
- then boards or other material are laid on the floor beams. If the attic will be used as a living space, you can install joists to level the surface and lay a subfloor on top.
If the house has a concrete floor, to insulate the attic, you need to lay mineral mats or extruded polystyrene foam on the slab and pour a screed. In this case, the insulation on both sides must be covered with a waterproofing film, especially if mineral mats are used.
It must be said that the ceiling can be insulated not only from the outside, but also from the side of the room. True, in this case the choice of insulation is limited, since it will not be possible to use bulk materials.
Ceiling insulation with mineral mats
As an example, let's look at how to insulate a ceiling in a private house with isover, i.e. mineral mats:
- First of all, it is necessary to dismantle the roll. In this case, it is advisable to lay boards on top of the beams and secure them;
- a vapor barrier membrane is then attached to the beams and boards. To fix it, you can use a stapler;
- Now mineral mats should be laid in the space between the beams. To fix them, you can use slats located across the beams. Also, nails are often nailed to the beams, and threads are pulled between them;
Fastening the vapor barrier with a stapler
- after this you need to attach another layer of vapor barrier to the beams;
- To complete the work, you need to roll up, after which you can start arranging the ceiling.
Roof insulation
In most cases, roof insulation is not required. But, if you are going to use the attic space as a living space, then you cannot do without this procedure.
Do-it-yourself roof insulation in a private house can also be divided into several stages:
Stages of attic insulation
Preparation of materials
Since it is inconvenient to use bulk materials for roof insulation, you can use mineral mats. To save even more, you can make mats from reeds.
In addition to insulation, you will need the following set of materials:
- vapor barrier;
- nails and threads;
- wooden slats;
- antiseptic impregnation.
Treating rafters with an antiseptic
Roof preparation
Before you start insulating the roof, you need to do some preparatory work:
- First of all, inspect the rafter system for its integrity. If any parts are cracked or rotten, they must be replaced or repaired;
- if the thickness of the insulation exceeds the thickness of the joists, they must be increased. To do this, nail beams or boards of sufficient thickness to them;
- then all wooden structures must be treated with an antiseptic composition to protect them from biological influences.
Roof insulation
Do-it-yourself roof insulation in a private house is carried out as follows:
- The vapor barrier membrane should not touch the roof waterproofing. To provide space between these materials, you need to nail nails to the rafters and stretch the threads between them in a zigzag pattern;
Attaching vapor barrier to rafters
- Next, secure the vapor barrier membrane to the rafters with a stapler or small nails. Let me remind you that the smooth side of the vapor barrier should be facing the insulation. Tape the joints of the film with tape;
Insulating the space between the rafters with mineral wool
- Now you need to lay the insulation in the space between the rafters. To avoid cold bridges in the thermal insulation, place the mats close to the rafters and to each other . If gaps do form, they need to be filled with scraps of insulation..
To fix the thermal insulation between the rafters, you can also nail nails and stretch threads between them;
- after laying the insulation, you need to attach another layer of vapor barrier to the rafters;
- to complete the work, you need to perform the sheathing using slats or boards about 2 cm thick, to which finishing materials can be attached.
Insulation of gables
Now all that remains is to insulate the gables, if, of course, they exist. It must be said that it is more expedient to insulate them from the outside in parallel with the insulation of the entire facade. However, if the facade will not be insulated, then thermal insulation must be done from the inside.
For this we will need the same materials as for finishing the roof. The only thing besides them is to prepare beams or boards. Their width should correspond to the width of the insulation.
The insulation work is similar to the thermal insulation of ordinary walls:
- in order to provide ventilation space between the walls and the insulation, the slats must be secured to the gables in a horizontal position. The vertical step should be about half a meter, and the horizontal step should be several centimeters.
Installation diagram of slats on gables for arranging a ventilation gap
Keep in mind that the slats must form a smooth vertical plane. Therefore, if the gables are uneven, the slats must be leveled during installation;
- then a vapor barrier membrane is attached to the slats. During installation, make sure that the film does not sag;
- then installed vertical racks(bars or boards). To fix them, you can use self-tapping screws and metal corners. Make the distance between the posts a couple of centimeters less than the width of the mats;
An example of laying mineral mats in the space between the racks
- Now the space between the racks must be filled with insulation. If the racks are installed correctly, the mats will fit tightly and no additional fixation will be required;
- then attach a vapor barrier to the racks;
- At the end of the work, install the sheathing.
Now all that remains is to complete the finishing. The choice of finishing materials depends on the purpose of the home and the attic itself. If the house is used for permanent residence, and the attic will be heated, you can cover it with plasterboard and use any finishing materials.
Finishing a cold attic should be done with materials that are not afraid low temperatures. Therefore, from using wallpaper and plastic panels It's better to refuse.
Insulating an attic yourself, as you can see, is not at all difficult. Therefore, you can safely get to work, the only thing I recommend is that you first watch the video in this article. If any nuances are not clear to you, contact me with questions in the comments, and I will gladly help you "width=”640″ height=”360″ frameborder=”0″ allowfullscreen=”allowfullscreen”>
Insulating an attic yourself, as you can see, is not at all difficult. Therefore, you can safely get to work.
Insulating an attic in a private house with your own hands: the better to insulate, video and photo
Insulating an attic in a private house with your own hands: the better to insulate, video and photo
An equipped room in the attic can significantly expand the living space of the house. Often the attic floor turns out to be the most comfortable room in the house and is subsequently allocated to a children's playroom, living room, and sometimes even to a bedroom. The ideological inspirer of the technology for arranging the space between the ceilings and roof of a house as a living space is the famous French architect F. Mansart (his name has since served as the term defining this very space).
Preliminary work and planning nuances
Before making a room in the attic, the owner of the house must decide what kind of room he wants to arrange under the roof. After this, you can begin planning. If there is no attic at all in a private house, then the first priority will be to add an attic.
Optimal attic height
If it is available, it is worth considering the optimal height: if at the minimum point it does not reach two meters, the roof of the attic floor must be raised. After raising it, low built-up walls appear on the floor (about 1-1.5 meters), which makes the room more comfortable for living.
Only after the height is optimal for a normal living space can the second stage of development begin.
Main stages of work
Attaching an attic with your own hands is impossible without building a staircase. Usually the staircase is located in the corridor or hallway of a private house. Best material execution - wood, because it is durable, environmentally friendly and decorative.
 Stairs to the attic
 At the second stage, you need to install windows in the future room. If the window is not located in an extended wall, but in the roof, it is worth making a strong wooden frame for it in advance, capable of holding in the roof and bearing the load of precipitation (snow or rain) falling on it. The gap formed after installing the window between the window frame and the wall or roof must be immediately insulated with your own hands.
The next step is to frame the attic room. Both the walls and floor of the future room are covered with a frame. In addition, insulation is placed between the sheathing and the sheathing. At the same stage, electrical wiring and electrical elements are laid, after which it is worth carefully considering the location of sockets and communications in order to make holes for them in the drywall with your own hands.
The last stage is finishing the room, which takes place in several steps:
 There should be no gaps between the window and the wall
 - installation of plasterboard slabs (for greater strength, a second layer of plasterboard may also be required);
- puttying and sealing slopes and cracks between walls and window and door openings;
- strengthening joints and masking joints between plasterboard sheets.
Despite the fact that converting an attic into a room, at first glance, seems to be a completely simple matter, each stage of work has its own nuances, especially when it comes to thermal insulation of the attic floor.
Attic insulation
This is the most important step in equipping a room in the attic with your own hands, because heat loss through the roof of the house, without proper thermal insulation, is simply colossal.
The following materials are suitable for attic insulation:
- Polyurethane foam;
- Foam;
- Mineral or stone wool;
- Expanded clay (only the attic floor is insulated with it).

In the process of insulating an attic, the following stages can be distinguished:
- arrangement of sheathing (installation ceiling beams, on which the floor is laid);
- laying the selected insulation in the gaps between the beams;
- if you choose polyurethane foam, it is enough to blow it into the gaps between the beams, without first laying waterproofing, because this material repels water well;
- if mineral wool or expanded clay was chosen as insulation, you should lay a polyethylene waterproofing film under the material with your own hands;
- The final stage of attic insulation is the arrangement of the floor on the finished sheathing (for these purposes, you can use plywood sheets, although the best option is ordinary boards nailed to the floor beams).
Finishing and decoration
Once the insulation of the attic floor has been successfully completed, you can proceed to assembling the room frame. It is assembled from beams covered with sheathing and covered with clapboard. Insulation is also placed between the beams of the box.


After the box of walls is covered with sheets of plasterboard, you can begin further finishing and decorating the room.
First of all, you need to figure out which room will be there:
- children's playroom (in the children's room, as in the bedroom, insulation is of paramount importance);
- library;
- gym;
- recreation area: billiards, for example;
- workshop;
- utility room or dressing room;
- bedroom (in case there is not enough living space in the house), etc.
In fact, the attic space can be equipped for absolutely any room, including even a bathroom or kitchen. In addition, the space in the attic floor of the house can be used even more rationally and even divided into several zones and allocated for each separate room.

If you are equipping the attic as a children's room or office, you need to worry about high-quality lighting: in this case, the windows are made large. The location of the desk is determined depending on the placement of the window.
The location in the attic in no way dictates any special design of both the children's room and the office: it can be the same as in ordinary rooms.
Setting up an attic as an office is a great idea for those who, due to their duties, have to work a lot at home on the computer. The attic floor will be the quietest place, allowing you to concentrate on work without being distracted by various irritating factors, be it washing machine, vacuum cleaner, children's screams, etc.
Even while the attic is being attached and the further practical use of the floor is being planned, it is worth thinking about lighting. Ordinary chandeliers for a gable roof, of course, are not suitable, but lamps installed on walls or roof slopes are perfect. It is better to install several lamps in different places.
If you are confused by wooden floor beams, then they can be camouflaged with sheets of plasterboard. Most often, owners leave them in plain sight, decorating them as a stylized interior detail.
However, if you do not want to come up with any special design for the room in the attic, it can be equipped in the same style as the rest of the rooms in the house.
Expanding living space and organizing a comfortable place to relax is an issue that is relevant not only for residents of standard high-rise buildings, but also for owners of private or suburban living space. What do country houses and small country houses look like in most cases? Often they are one-story building, the design of which presupposes the presence of an attic or attic space, the arrangement of which summer residents often prefer to neglect and remember about it only when additional living space is needed. So the attic, which can fulfill all your desires for home improvement, turns into a dusty room, littered with unnecessary rubbish and used as a storage room, where it is difficult to find the necessary things. But sooner or later, an increase in the family or a desire to expand the living space of the house leads to the need to convert a dusty, dark attic into a bright and cozy room. In this regard, we have dedicated this article to this topic, in which we will tell you in detail how to turn an unsightly attic into living room, and also present many photo examples.
Room in the attic: how to cope with the lack of living space?
If you own a suburban living space, but despite this, you constantly trip over scattered children’s toys, do not find a common language with your family about the allocation of personal space and the rational organization of a recreation area, and also do not plan to put up with a catastrophic lack of space in the house, you need to arrange a room in the attic. She will not only become great place for privacy and a comfortable stay alone with your thoughts, but will also allow you to turn an unassuming country house with a constant lack of space into a cozy family nest.

Undoubtedly, the most favorable moment for converting the attic space is the stage of building a house, since it is at at this stage you can add a room to the house plan and decorate it with the same materials as the rest of the rooms. In addition, you can initially think through the layout of the attic: its dimensions, height, foundation parameters, which are necessary for arranging a residential attic.
Room in the attic photo


However, if you decide to convert the attic into a living space in an actively used room, you will encounter certain technical difficulties. It will be necessary to carry out measures related to strengthening floors, ensuring effective thermal insulation and a number of other necessary activities.

DIY attic room: sequence of events
If you are determined to convert the attic into living space, you just need to decide on the purpose of the room. There are a great many options: it can be a dressing room, a bedroom, or a living room, depending on your preferences. The next stage is to develop a design for the premises.

Having sketched out an approximate plan of the room on a piece of paper, pay attention to the height of the attic and the presence of walls, in the absence of which, calculate the height of the rectangular space of the room, which is at least two meters at the minimum point. If the height of the attic does not allow for the arrangement of the room, experts recommend raising the roof by building up walls whose height does not exceed one meter. Having reached a certain height of the walls, you can proceed to the next stages of construction.

Arrangement of the stairs
To go up to the room in the attic, you need to take care of the arrangement of the stairs. Most optimal place its placement is an entrance hall or corridor. The choice of material for arranging the stairs is an equally important task, since it must meet the following characteristics:

- It should be easy to wash;
- Possess high performance characteristics that ensure its durability;
- In addition, it should be characterized by high aesthetic qualities, thanks to which a staircase made of this material will become an elegant addition to the overall picture of the interior. All these requirements are largely met by wood, the use of which makes it possible to produce not only durable, but also high-quality stairs, both from an aesthetic and functional point of view.
Window arrangement
Like any other room, a room in the attic of a house cannot do without natural light, the only source of which is windows. Before you start installing a window opening, think about the location of the window and outline its exact placement. If your project involves installing a window on the roof, you need to take care of installing a wooden frame into which the window will subsequently be inserted. The need to equip the frame is explained by the additional weight of the window and precipitation, which the installation of an additional frame will allow it to withstand. After the installation of the window is completed, thermal insulation measures are carried out, since the gap formed between the wall and the window will contribute to heat loss.

Installation of the general frame
After the installation activities related to the arrangement of the window are completed, they begin to install the general frame, which consists of parallel boards nailed to the wall and intended for placing drywall fasteners on them. A frame of parallel wooden beams is also arranged on the floor, and insulation is immediately placed in the space between them, most often a basalt slab or glass wool, after which the floor is covered with a rigid base and decorative floor covering. Next, on the side of the inner surface of the roof, a frame for plasterboard is installed, onto which the plasterboard sheets. If the roof has a large slope, the frame beams must be fastened every 20 cm, and in order to increase the reliability of the fastenings, they must also be fastened crosswise. This will not only securely fasten the drywall, but also avoid the occurrence of cracks in the future. Having installed the frame, think over and carry out the installation of wiring and the location of sockets and switches in advance.

Drywall installation
Having previously insulated the walls and vapor barrier, you can begin installing drywall. Experts recommend placing plasterboard sheets in two layers, which will not only increase the strength of the walls, but also provide additional thermal insulation.

Using screws, fix the first layer of drywall at a distance of 30-40 cm, after which the second layer of drywall is fastened, changing the distance between the sheets to 20 cm. Next, insulate the gaps formed between the walls and windows. To do this, use sealant and cut strips of drywall. Next, the joints and corners are strengthened using specialized paper tape equipped with a metal insert.

Organization of heating in the room
Heating is one of the necessary conditions for creating conditions for a comfortable stay. Experts suggest taking into account several options for arranging heating in the attic:
- Arrange the fireplace;
- Focus on the use of electrical appliances;
- Install an autonomous heating system in the attic;
- Or use a stationary heating system.
Despite the fact that the first option is considered the most beneficial if you want to give the room a special touch of privacy and comfort, experts consider the last option to be the most favorable. This is due to the fact that if the house is currently actively used, and it is organized heating system, it is enough to carry out some additional installation measures, which involve leading pipes with radiators directly into the room located in the attic.

Lighting
Lighting a room in the attic under the roof - no less current question, about which it is necessary to say a few words, telling how to make a room in the attic. Previously, we noted that laying wires is at the stage of installing the overall frame. It will be important to clarify that in the attic room it is advisable to abandon aluminum wires, replacing them with copper ones. In addition, according to experts, it is better to refuse installation distribution boxes indoors in the attic, and rely on installing an autonomous circuit breaker.

Options for arranging a room in the attic
When you decide to arrange a room in the attic, you need to clearly understand its purpose. Previously cluttered, dusty non-residential attic can turn into a living room, bedroom, billiard room, library or even a greenhouse, which depends only on the preferences and needs of the home owners. A cozy attic furnished according to all the rules can turn into a comfortable relaxation area where they can spend free time all family members not only benefit the soul, but also benefit their health. A well-thought-out interior and equipment of a room in the attic will allow you not only to spend time there reading a book, but also exercising on exercise equipment and playing board games.

In the case where the area of the attic space allows, it is possible to arrange not one, but several rooms in the attic at once, for which it is necessary to carry out proper zoning of the room. Designers propose zoning the attic space using transparent partitions that allow light to pass through. This will allow you to arrange several rooms in the attic at once - a play corner and a room intended for relaxation. In the area of a spacious attic space, you can organize several rooms, this time separated by capital partitions, which is undoubtedly a more labor-intensive process. In most cases, owners of country houses prefer to equip a bedroom, which, located under a gable roof, turns out to be very cozy, especially when the basic rules for planning an attic space are followed.

For example, in this case, designers advise placing a double bed in the center of the room, while installing mezzanines along the walls for storing bed linen and other small household items. If you plan to install two beds at once in a room in the attic of a house, then it is better to place them in a part of the room with descending ceilings, while the center of the room should be left free. Thus, in the attic room you can equip:
- Game corner;
- Gym;
- Library and reading room;
- Billiard room;
- Recreation area;
- Row utility rooms, for example, a pantry.

In case of lack of living space and small area country house, in the attic you can arrange:
- Bedroom;
- Living room:
- Children's room.
Design of rooms on the attic floor: choosing a stylistic concept
Having prepared the attic for the arrangement of living space, you can safely begin choosing the main stylistic concept, design and arrangement of furniture in the future living room. For a bedroom located in the attic, experts advise giving preference to folk motifs or choosing romantic ones that have become popular. design directions. In addition, by decorating a room in a country, chalet or Provence style, you will make your bedroom no less cozy. In addition to the traditional trends that are appropriate in the decor of an attic space, it is also important to decorate a bedroom in the attic in a classic or loft style. The latter is most appropriate in the decoration of attic spaces characterized by an impressive area. By decorating a bedroom in a loft style, you will become the owner of a spacious and at the same time cozy sleeping area that meets the requirements for modern premises.

To decorate a living room, designers advise choosing a minimalist style, eclecticism, retro styles or styles in which spicy oriental notes are clearly visible. It is these styles that can turn your living room into a truly cozy and comfortable space.

Choosing a color scheme: how to visually expand a room?
Since the attic space in most cases is not characterized by a large area, it is better to decorate the bedroom or living room using light colors. However, this raises an equally important design task - to correctly design small room and at the same time avoid fading, which will adversely affect complete picture interior In this case, designers suggest resorting to a well-known design technique, the essence of which is that inclined walls must be painted in light colors, while vertical ones in richer, brighter shades. Recently it has been gaining popularity design technique, which involves combining the colors of the walls with the colors of the blanket or curtains.

When arranging a living room, you also cannot neglect the rational choice of tones and shades with which you plan to decorate. attic room. Thus, light shades such as light brown, light gray, beige, peach and white will visually expand the room and, at the same time, make it lighter, which is also important when arranging small attic spaces.

Choosing furniture to create a cozy atmosphere in the attic
To create a full-fledged design of a room in the attic, it is necessary to clearly think through not only the general stylistic concept and color design, but also the most optimal arrangement of furniture. Only in this case will you become the owner of the most harmonious and comfortable room.

Despite the fact that wood is the most suitable material for decorating an attic in a country house, experts do not recommend using excessively massive interior items in the design of an attic characterized by small area. Due to this, wooden bed, chest of drawers and bedside tables should be fairly compact in size. As for the shade of wooden furniture, designers recommend using a current technique when the shade of wooden furniture matches the color of exposed wooden beams and rafters. A bed in the attic can be installed near one of the inclined walls, separating it from the main room with a light curtain. Wardrobe in this case, they are installed near one of the gable walls.

To create a truly cozy and comfortable atmosphere the attic must be supplemented with a fireplace. The warmth of the fireplace will not only warm the room under the roof of the house, but will also create a truly unusual atmosphere in it. If you cannot install a fireplace in a room in the attic, in accordance with all fire safety requirements, the most the best option you will be able to install an artificial fireplace, which, like its original, not only looks stylish, but also visually hides small imperfections in the walls in the room.

Spacious living rooms in the attic: what to look for?
If you have a spacious room in the attic at your disposal, arrange it according to all the rules and take advantage of the spacious area of the room to create a real living room, in which there is room for a TV, upholstered furniture, a coffee table, and bookshelves. When arranging spacious living rooms, do not forget about the harmony of materials: natural light wood and stone, both light and dark tones, will create a cozy, homely atmosphere in the living room, which can be supplemented with live plants in pots and decorative tubs.

We must not forget about the “symmetry” of interior items, which will make the room visually more attractive, while maintaining balance and the necessary equilibrium. For example, symmetrically installed lamps, chairs and sofas with the same upholstery, as well as decorative pillow and a large number of living plants - all this will make your living room elegant and harmonious.
A warm attic is not only a place to store equipment, but also reduces heat loss in the house by 20%! Insulating the attic in a private house with your own hands will allow you to save significantly, especially since the whole process does not require special construction skills.
Warm and moist air from the lower floors of the house, according to the laws of thermodynamics, rises upward. From proper insulation the attic will depend on whether all the heat goes outside or lingers in the house. Hydro- and vapor barrier films will help solve the problem with excess moisture.

First of all, you need to decide further exploitation attic. If you plan to make it heated, there is no need to insulate the attic partition, nor do you need to organize a vapor barrier on the side of the lower floors. In this case, only the roof needs to be insulated.
The roofing pie from the inside out will look like this:
- vapor barrier - a vapor-proof film for rooms with forced ventilation or a vapor barrier membrane with minimal vapor permeability to remove excess steam from the room;
- insulation - can be anything, but with vapor permeability higher than vapor barrier;
- waterproofing - a simple waterproof film for non-hygroscopic insulation or windproof film with one-sided vapor permeability for insulation that accumulates moisture.

If the attic is non-residential, the attic floor itself must be insulated. To reduce humidity levels in your home, avoid using impervious films and insulation, allowing moisture to evaporate through the attic. And so that moisture does not spoil the rafters by condensing on inside, you need to choose anti-condensation waterproofing for metal roofs and ensure that the cold attic is well ventilated.

Private construction is increasingly characterized by the use of mineral wool rolls or basalt slabs. All thanks to:
- simple installation - thanks to different densities, mineral wool can be wrapped around pipes, rolled out on the floor or installed in a wall frame;
- high vapor permeability - steam-saturated air calmly passes through the mineral insulation without lingering in it and providing natural ventilation to the house;
- good sound insulation - dense basalt slabs perfectly muffles sounds;
- accessibility - you can purchase mineral wool at any hardware store, and the variability of shapes and sizes will allow you to choose insulation for any need.

There are also disadvantages - mineral wool loses its properties when wet, so one must not allow a dew point to occur in the insulation and ensure unhindered evaporation of moisture from the thickness of the slabs and mats.
Foam insulation is also quite popular, because it:
- relatively inexpensive;
- easy to install;
- does not lose properties when wet;
- has low thermal conductivity.
But due to the lack of vapor permeability, houses insulated with foam plastic have a greenhouse effect and must be equipped with forced ventilation. If condensation forms between the foam and the wooden elements, this leads to rapid rotting of the wood.

Sprayed insulation is convenient for quick and dense filling hard to reach places. Ecowool, made from cellulose, is vapor permeable and allows wooden structures to breathe. It is convenient to use for insulating small attic spaces.

But ecowool is afraid of getting wet, and to use it you will need special blowing equipment.
Polyurethane foam is a strong and durable material that is not afraid of moisture, suitable for insulation large premises. But, like any polymer insulation, it does not allow steam and air to pass through, so it is not recommended for wooden houses. Thanks to development construction industry Now insulation of polyurethane foam does not require the use of special equipment, since cylinders have appeared that operate from a construction gun on the principle of polyurethane foam.

Attic insulation technology
Depending on whether the attic will be habitable, the technology of its insulation also depends. For a warm attic, only the roof is insulated; for a cold attic, only the attic floor is insulated.
Insulation of a residential attic with mineral wool or polystyrene foam

If the house has already been built and you don’t want to dismantle the roof, you can do it from the inside:

After this, you can begin finishing the attic and begin to inhabit it!
A cold attic in a wooden house can be insulated with a minimum of cost and effort using ordinary sawdust. This method will improve the microclimate in the house due to natural ventilation. To do this, it is important to ensure maximum vapor permeability of the attic floor:
- you need to lay cardboard on the subfloor - just to prevent sawdust from falling through the cracks;
- a layer of sawdust 15-20 cm thick is poured;
- In no case should you cover the sawdust with waterproofing - they should be ventilated without hindrance;
- the floor is laid with a small gap between the sawdust and the boards.
How to properly insulate reinforced concrete attic floors is described in detail in the video:


