Are you thinking about how to construct a plasterboard ceiling with your own hands? For knowledgeable person It is not difficult to implement such an idea, and for a beginner it is a completely solvable task. This is a great way to save money and learn an important skill if you're doing it for the first time. Having mastered the ceiling, it will not be difficult for you to make slopes, piers, and cover the walls with this material. Drywall is very popular; almost no repair is complete without its use. And there are a number of reasons for this.
- Drywall, a sheet of which consists of gypsum lined with cardboard, is absolutely environmentally friendly. It does not release toxins and is non-allergenic. Therefore, ceilings are made from it in bedrooms, children's rooms and any other residential premises.
- Its surface is smooth, even and without cracks. Perfect for both painting and wallpapering.
- Good sound absorption, thermal insulation qualities.
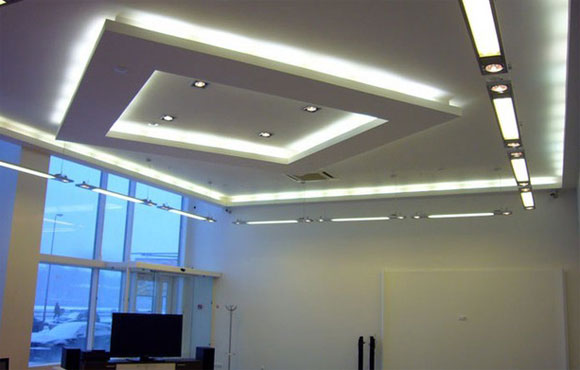
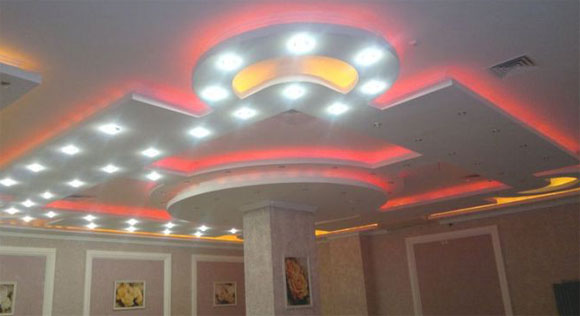
- Possibility of creating original design ceiling, for example, the construction of a multi-level structure using stucco.
- Plasticity (sheets can be bent by first moistening and then drying warm air, use for finishing curved surfaces).
- Helps hide communications ( ventilation ducts, water pipes, various cables), use built-in types of lamps.
So, having assessed all the advantages, you decided to equip the suspended ceiling using this finishing material. The next step is to choose its specific variety.
Types of drywall, their properties
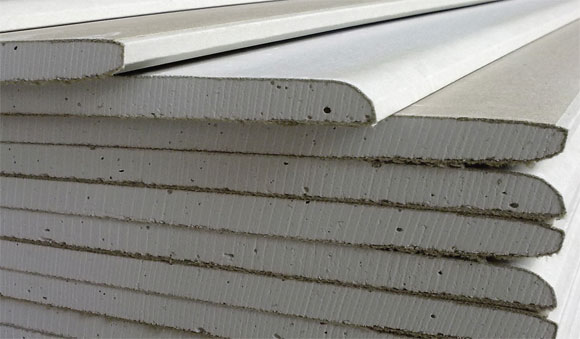
- GKL is a plasterboard sheet, lined on both sides with soft cardboard glued to the surface of the gypsum. The standard length of such sheets can be 2000, 2500, 2600, 2750, or 3000 mm, and the width is 1200 mm. They come in thicknesses of 12.5 and 9.5 mm. For residential premises it is better to use 9.5 to lighten the weight of the structure. Finished with gray cardboard.
- GKLO is a fire-resistant plasterboard sheet. It is usually not used in apartments, but only in factories, for finishing air ducts and communication shafts.
- GKLV - waterproof plasterboard sheet. They are used in bathrooms, kitchens, and toilets, but only if there is exhaust ventilation and the front surface is protected with waterproofing compounds, ceramic tiles, waterproof paints, primers or ceramic tiles. Finished with green cardboard.
- GKLVO — moisture resistant drywall ny sheet of increased fire resistance. Combines the properties of all of the above.
- GVL - gypsum fiber sheets. They are not covered with cardboard. Gypsum is reinforced with special fluffed cellulose waste paper. Such sheets have increased hardness and resistance to flame. They match standard sizes regular sheet, but their thickness is greater - 6 or 10 mm.
- GVLV - moisture-resistant gypsum fiber sheets.
Installation and installation of a suspended ceiling
This is a design of 4 main elements:
1. Sheets of drywall.
Sheets of moisture-resistant plasterboard
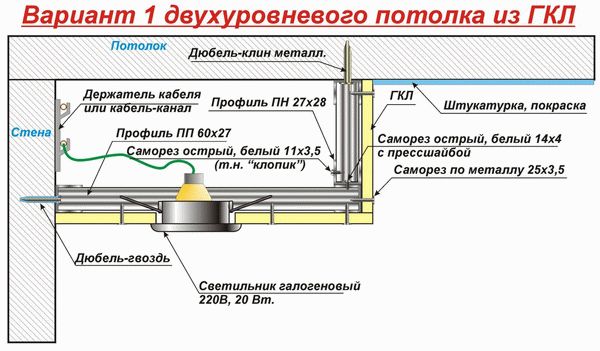
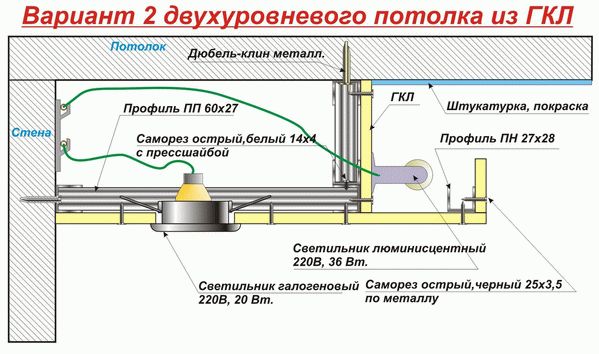
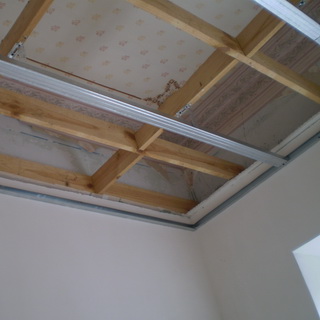
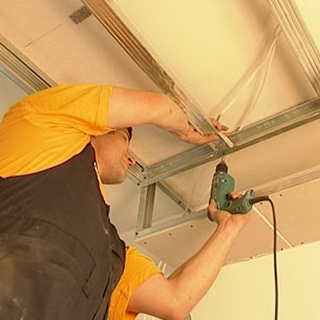
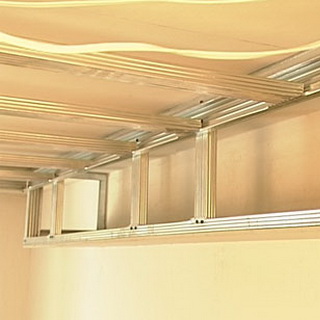
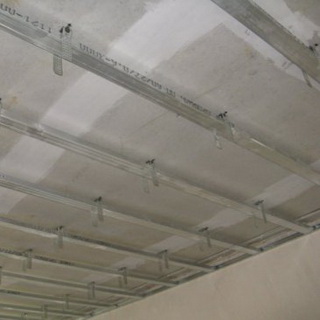
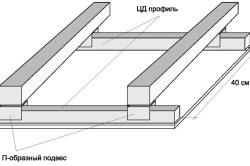
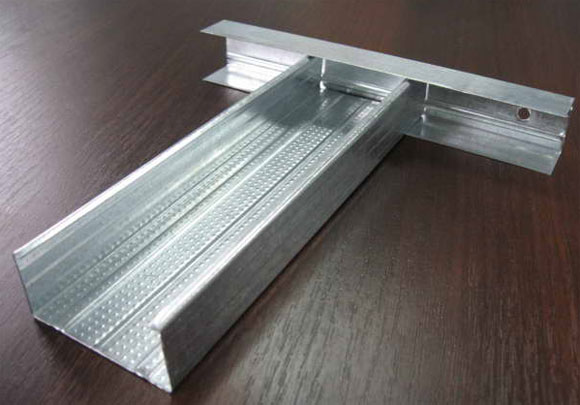
2. Ceiling guide profiles UD (28-27 mm) and ceiling profiles main CD (60x27 mm). Guides - are attached to the wall just below the ceiling level along the entire perimeter of the room. The main supporting profiles (longitudinal) are already inserted into them. Between them are the main secondary (transverse) profiles. Drywall sheets are attached to these profiles (both longitudinal and transverse). They can be recognized by their C-shaped curved edges, longitudinal corrugations and stiffening ribs.
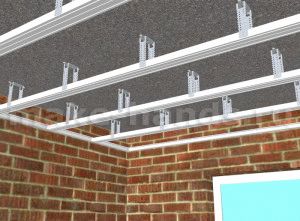
Connection of the main ceiling profile and the wall guide
3. Straight (universal) hangers and with a clamp. Most often, straight universal U-shaped suspensions are used, which are attached to the main ceiling, and the main profiles are already attached to them. The pendants have frequent holes in the sides. This allows you to screw a profile to them on different heights, adjusting it.
Location of suspensions on the base ceiling
4. Connecting elements: anchors and dowels, with the help of which hangers are attached to the ceiling, crab fasteners - fasten the main longitudinal profiles to the main transverse profiles, dowels, attaching guide profiles to the wall.
Typically, frames consisting of suspended profiles are divided into two types: single-level and multi-level.
The ceilings are made of plasterboard, respectively.
To install a plasterboard ceiling you will need the following tools:
- Level (preferably water)
- Roulette
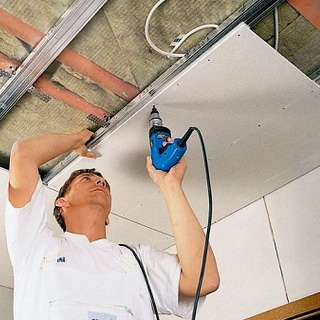
- Drill with a hammer drill with various attachments: for mixing the solution, for drilling (drill), for cutting out the necessary holes for lamps)
- Screwdriver
- Simple triangle or square (to measure right angles)
- Painting cord or pencil
- Construction hacksaw
- fishing line
- Plane
- Ceiling spotlight
For the final stage of leveling the ceiling you will need:
- Sandpaper
- Spatula
- Putty
- Construction knife
- Container for putty
- Reinforcing tape
How to make a plasterboard ceiling: step-by-step instructions
After all materials, tools and components are prepared, you can begin installation.
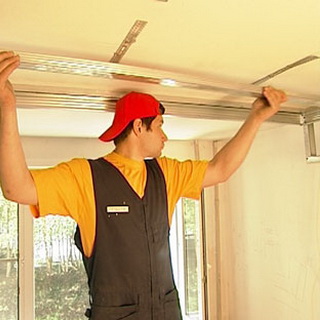
1. First, we determine how much lower the new suspended ceiling will be than the base one. A minimum of 10 cm will have to be sacrificed, because a standard built-in lamp will be 9 cm in height.
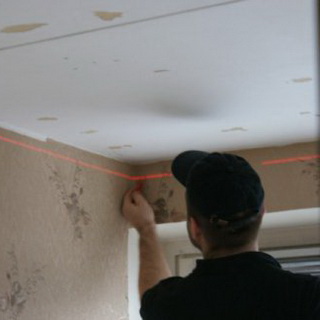
2. We make markings on the walls around the entire perimeter for attaching guide profiles. For these purposes, we measure the height of the room in all corners. Having chosen the lowest angle, mark the required distance from the floor (exactly from the floor, but not from the ceiling), mark the horizontal along the entire wall, using a water level. The lines can be marked with a paint cord at the points marked by the level.
3. Along the wall lines, we drill holes for the dowels in the wall in increments of 30-40 ms, then screw the guide profiles.
4. Now we attach the suspensions to the ceiling in increments of 60-70 cm, having previously outlined parallel straight lines, i.e. making markings to serve as a guide.
5. Insert the main profiles into the guides.

Frame of plasterboard ceiling: main profiles are inserted into guides and connected to hangers
6. We attach the main profiles to the hangers, then bend them. For evenness, it is advisable to tighten the fishing line or cord.
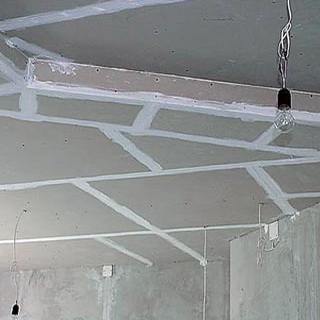
7. We attach the main secondary profiles to the main profiles. They are attached in places where it is planned to join sheets of drywall. The result is a kind of metal lattice, which is a single-level frame.
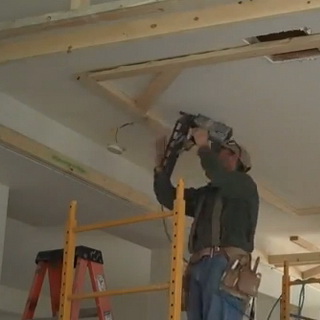
8. Lay the wires for future wiring. Don't forget to cut grooves through which the cable will pass. The grooves should be located in the wall from the switch to the ceiling. After running the cable, make the wiring in the ceiling, release the free ends for the lamps in pre-designated places.
9. The next stage is attaching drywall to the frame.
Attaching the material to the frame
After the metal frame is constructed, it is necessary to attach plasterboard sheets to it. This is not an easy procedure, the implementation of which will be divided into several stages:
Attaching a sheet of drywall to a metal frame: controlling horizontal lines using a spirit level
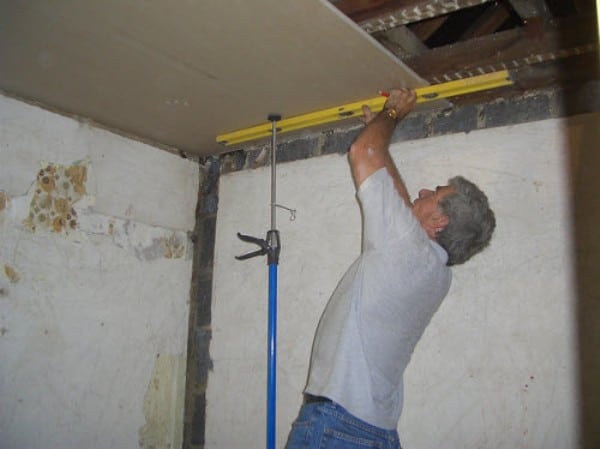
1. Cut using a hacksaw - a special one with fine teeth (or a regular stationery knife). It is best to cut sheets 120x250 or 120x125 cm. The main thing is that the ends of the sheet fit exactly on the supporting frame laths. The sheets should lie horizontally on a flat surface (preferably a table). Next, run a knife along the level along the drywall from the front side. Then slide the sheet off the table and break it. Then turn it over and cut the cardboard on the other side.
2. The edge formed after the cut is processed with a plane. It should turn out smooth, without kinks. All protruding edges are trimmed with a sharp knife.
3. Cut holes for recessed lights and ceiling sockets. They should be carefully measured, determining the exact location on the sheet, then marked, and then cut out using a drill with the required attachment or hacksaw. If pipes will pass through the drywall, then the diameter of the hole must be > 10 times the diameter of the pipe.
4. Finish the ceiling with plasterboard. Plasterboard slabs can be attached to frames in two ways: longitudinal and transverse. With transverse fastening, they are located perpendicular to the main supporting metal profiles. When longitudinal - parallel to the main supporting profiles. If there are additional laths, then the sheets must be fastened from their corner in two perpendicular directions. If there are no additional laths, then fastening is carried out from the end of the sheet or from its center. Self-tapping screws are installed 10-15 mm from the edge of the sheets. The screws are installed from the front surface of the sheet perpendicularly and to such a depth that their heads cannot pierce the cardboard and do not protrude above the front surface. They must also fit into a metal frame > 10mm deep. The length of the screws is selected based on the total thickness of the planned plasterboard sheathing. The maximum permissible distance from one screw to another is 150 mm. This value can be doubled if the slabs are covered multiple times. Screws in the guide profile should be installed closer to it back wall, then the screw will not be able to bend the profile flange inward. The cardboard should not be disheveled in the places where the screws will be attached. If the screws are deformed or were placed by mistake, they are removed and new ones are installed at a distance< 50 мм от неудачного места крепления.
Important! The joints of the sheets must be located on the profile!
Plasterboard boards do not need to be placed flush against the walls. It’s better not to putty the gap, but to cover it ceiling corner. Then, in case of expansion of the slabs, it will be possible to avoid deformation of the ceiling. When directly attaching the slabs to the ceiling, you need to work together, or use supports.
The plates should be placed horizontally, adjusted to each other and screwed to the frame with screws.
Important! Before installation, drywall must not< 2-х суток вылежаться в помещении, в котором он будет монтирован. Тогда он приобретет влажность и температуру помещения.
5. Puttying joints. Don't putty right away. Wait 2 days. Then inspect the joints for defects and eliminate them. Clean the surface from particles and dust. It is better to use reinforcing tape, placing it at all joints. It prevents cracking. If you use an expensive, high-quality putty, then it is enough to treat only the joints (and then paint it over the fiberglass with a spray gun), if it’s cheap, then you should putty the entire ceiling, and then paint it with a roller. Sequence of actions:
- clean the edges of the seam, moisten them, fill the seams with putty, pressing it in with a spatula;
- Having applied the main layer of putty, lay the reinforcing tape, pressing it in with a spatula. Do not leave any air bubbles. Cover the surface of the tape thin layer putty and wait for complete drying;
- sand the joints sandpaper;
- apply a layer of putty to the previously dried layer;
- apply another leveling layer of putty and let dry;
— Remove uneven surfaces with sandpaper.
Second level ceiling installation

Installation of the second level of plasterboard ceiling: construction figured frame
- Plan in advance, make a drawing of the design, mark it on the ceiling.
- Remove the height of the second from the first ceiling level.
- We attach the guide profile.
- We install the main guides of the second level to the main guides and stiffeners of the first.
- We bend the profile for the necessary radius sections.
- We route the wires for the lamps.
- Cutting out the slab the desired shape and fasten it, as on the first level.
- We cut out a strip of drywall and close the box.
- We install lamps.
- Plastering.
If you strictly follow the above instructions, then there will be no questions left about how to attach drywall to the ceiling. You can do everything thoughtfully and accurately. All you have to do is be patient, put in the effort, and you can get great results. ceiling structure, made with your own hands.
The modern building materials market offers various options finishing ceiling surface, one of which is drywall. The cost of installing a plasterboard ceiling is relatively small, but you can do the installation yourself by studying the detailed step-by-step instructions.
Advantages of plasterboard ceilings
Drywall is a universal finishing material and, practically, no renovation in the kitchen, living room, bathroom or bedroom can do without it. There are a number of explanations for this.
These ceilings:
- harmless to health;
- easy to install. The work is easy to complete even for a beginner;
- form a flat, smooth surface;
- make it possible to create single- and multi-level ceilings, curved shapes due to the plasticity of the material;
- have high level noise and sound insulation;
- hide communication systems (ventilation ducts, water pipes, various cables);
- They are light in weight, which is especially convenient during installation.
Drywall belongs to the class of materials that do not support combustion
But, despite such significant advantages, there are a number of disadvantages that should be taken into account when choosing a material.
The main disadvantages are:
- limited moisture resistance. This is especially worth considering when installing in bathrooms and kitchens. It is better to buy ones specifically designed for such conditions. plasterboard sheets and make sure there is a hood;
- a single-level ceiling reduces the height of the room by 5-10 cm, a multi-level ceiling - even more;
- It is believed that plasterboard is more suitable for old buildings; new buildings may shrink over time, as a result of which the surface lined with plasterboard may crack;
- Over time, drywall fades and needs to be revived with paint or even individual parts must be replaced.
Despite the shortcomings, do beautiful ceiling It is quite possible to make from plasterboard with your own hands in any room. If you choose the right material and subsequently use it carefully, The plasterboard ceiling will delight you with durability and functionality.
Types of drywall
For different types There are different types of drywall for different rooms and specific tasks.
The main ones are the following:
- GKL- an ordinary plasterboard sheet, which is lined on both sides with soft cardboard glued to gypsum. Length - 2000, 2500, 2600, 2750, 3000 mm, average width - 1200 mm. Thickness can be 12.5 mm and 9.5 mm. IN living rooms 9.5 mm is most often used to lighten the weight of structures. Main color – gray;
- GKLO is a fire-resistant plasterboard sheet. It is most often used in production premises for the purpose of masking air ducts and communication shafts;
- GKLV is a plasterboard sheet characterized by increased moisture resistance, and therefore it can be used to finish the ceiling in the kitchen and bathroom. But experts recommend setting up during subsequent operation exhaust ventilation and protect the front surface with waterproofing compounds, ceramic tiles, waterproof paints, primers. Main color is green;
- GKLVO— this is a plasterboard sheet with a high degree of moisture resistance and fire resistance;
- GVL- a specific plasterboard sheet, the main difference of which is that they are reinforced using special fluffed cellulose waste paper, but not cardboard. Standard thickness is 6.10 mm.
- GVLV are gypsum fiber moisture resistant sheets.
GCR is very fragile during transportation and storage and requires careful handling
Having chosen the material, you can begin installation.
Step-by-step instructions for installing a plasterboard ceiling with your own hands
The installation of plasterboard ceilings is divided into two stages: installation of the frame and fastening of the sheets into the sheathing. Final stage - decorative finishing surfaces. Last but not least, lighting is installed in the plasterboard ceiling., the choice of which should be decided in advance.
Material calculation
| Materials and components | Units of measurement | Consumption per 1 sq.m. ceiling |
| Wedge anchor for reinforced concrete ceiling | linear m. | 0.7 |
| PP profile 60/27 | linear meters | 2.9 |
| PP profile 28/27 | linear meters | according to the perimeter of the room |
| Straight hanger and LN 9 screw | pcs | 0.71.4 |
| Single level connector | pcs | 1.7 |
| Profile extension | pcs | 0.2 |
| Dowel | pcs | 2 dowels per 1 linear line. m PP profile 28/27 |
| Self-tapping screw TN 25 | pcs | 23 |
| Putty | kg | 0.4 |
| Reinforcing tape | linear meters | 1.2 |
It should be noted that it is better to purchase materials with a reserve of 10-15% more.
Required Tools
To install plasterboard ceilings with your own hands, you will need to stock up on the following tools and materials:
- water level;
- tape measure;
- screwdriver;
- painting cord (chokline) or pencil;
- construction hacksaw;
- plane;
- sandpaper;
- putty;
- construction knife;
- reinforcing tape.
The last materials are needed for the finishing stage.
Preparatory work - marking
In order to mark a plasterboard ceiling with your own hands, you need to carry out the following operations:
- determine the lowest point on the base ceiling and retreat approximately 25 mm from it (CD profile thickness);
- make marks on the walls using a water level;
- it is better to make a control line using a chockline or a building rule;
- Marks between the guides are applied in increments of 40-50 cm.
The galvanized profile for the frame has a very long service life - about 50 years
Having marked the entire room, you can move on to the next stage - installing the frame.
Frame installation
To install the sheathing, you must perform the following operations:
- fasten UD profiles around the perimeter of the room along the marked line. UD are attached using dowels with a diameter of 6 mm. The length of the dowel depends on the thickness of the wall;
- install a galvanized U-shaped strip suspension on the base ceiling;
- it is necessary to screw the consoles along the control lines, in increments of 50-60 cm. B concrete floors there are voids, so in this case it is better to use dowels with caps to improve fastening. For the ceiling itself, it is worth using screws of a larger diameter, for example, with a sleeve diameter of 6 mm, you should take screws 4-5 mm thick;
- attach the CD profile. Its length should be 5 mm less than the distance between the walls, which will further facilitate installation and reduce deformation (bending or twisting);
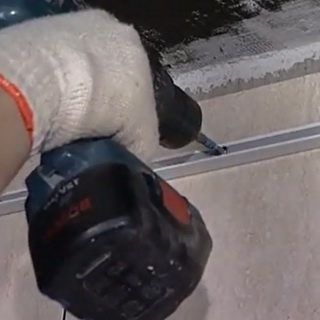
- install all CD profiles and fix them into the hangers using special small self-tapping screws.
At this stage, it is important to level the entire frame in height.
Fastening plasterboard sheets
Although you can do the installation of plasterboard ceilings yourself, it is a rather labor-intensive process. In addition, the sheet dimensions according to the standard are 2500x1200 mm in perimeter, so if you do the work alone, such a plate may break.
To facilitate the fastening of gypsum boards, you can use additional auxiliary devices - flat horizontal supports.
The room must have a constant temperature and no drafts.
- You should definitely pay attention to the fact that the slab must cover half of the CD profile, because the remaining part will be recorded on the next sheet;
- consumption of metal screws 25 mm long per plasterboard sheet is on average 60 pcs. It is not recommended to drive them tightly into the drywall; it is better that they are on the surface of the sheet or go as deep as 1 mm. Self-tapping screws are attached in increments of 10-15 cm;
- It is better to mount gypsum boards horizontally in a checkerboard pattern. This will avoid the appearance of cracks;
- It’s worth leaving 3-4 mm near the walls so that the drywall can “breathe” during temperature fluctuations;
- You should not cut sheets of plasterboard many times, firstly, this increases the consumption of material, and secondly, it will not be possible to join the slabs neatly.
the heads of the fastening screws should be sunk into the drywall so as not to interfere with further puttying or painting
Finishing work
After installing the entire plasterboard ceiling, you can begin the final finishing:
- glue the joints using serpyanka;
- cover them with putty and level them;
- you can install a reinforcing mesh and press it in with a spatula;
- align all seams.
Particular attention should be paid to the screws, filling them separately. After this, the ceiling is actually ready for priming and subsequent finishing.
Installation price
 The cost of plasterboard ceilings depends on many factors, the main ones being the area of the room, the type of material, and the number of levels. The price may vary slightly depending on the region.
The approximate cost of installing plasterboard ceilings with the assistance of specialists is indicated in the table:
The cost of work when contacting the company is low, but even without much experience you can do all the work yourself.
Step-by-step instructions on how to install plasterboard ceilings with your own hands can be seen in the video:
Preface
Installing suspended plasterboard ceilings is one of the most common ways to decorate a room, allowing you to realize even the most daring design ideas.
Required Tools and materials
 BoersGKLDowelsPencilknifeHammerHangers for gypsum boardsProfile for hlRouletteSelf-tapping screwsLadderExtensionLevelScrewdriver
Contents
Installing suspended plasterboard ceilings is one of the most common ways to decorate a room, allowing you to realize even the most daring design ideas. Long gone are the days when ceilings were simply whitewashed or wallpapered - modern technologies have stepped far forward, making it possible to create a real work of architectural art in a single room.
Suspended plasterboard ceilings can be various designs and configurations. Even a simple (classic) ceiling will stand out perfectly flat surface and increased resistance to cracking. In addition, do-it-yourself suspended plasterboard ceilings hide all the shortcomings made during construction (for example, differences), which are sometimes quite significant.
In addition to the purely pragmatic role of leveling differences, plasterboard suspended ceilings also perform an aesthetic function. In addition, when installing suspended ceiling you can hide it from plasterboard under the sheathing, utility networks, various equipment. The undoubted advantage of such ceilings is their ability to improve the soundproofing characteristics of a room, increase fire resistance and regulate humidity in the room. When there is excess moisture in the air, plasterboard, due to its absorbent properties, absorbs it, and when there is insufficient humidity, it releases it.
Pay attention to the photo: Various lamps can be mounted into suspended plasterboard ceilings that will zone the rooms.
What is a plasterboard suspended ceiling made of: material options (with photos)
What is a plasterboard suspended ceiling made of? This is one of the most common questions that arises among people who do not have sufficient practice in carrying out finishing work. In principle, to create a plasterboard ceiling it is almost always better to use moisture-resistant plasterboard. This is due to the fact that after installation of the ceiling itself there will be a series of painting and plastering works, that is, processes associated with high humidity. But if the ceiling contains a large number of bends (vaults, arches, etc.), then you should use non-moisture resistant plasterboard, as it bends better.
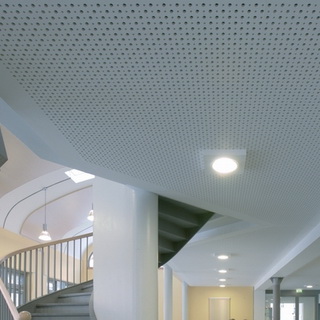

In addition to plasterboard sheets (GKL, GKLV, GKLO or GKLVO), sound-absorbing and decorative plasterboard boards can be used as a material for a suspended plasterboard ceiling. Depending on the properties and scope of application, they are divided into: perforated plasterboard sound-absorbing slabs (PPGZ), decorative plasterboard slabs (PGD) and decorative plasterboard moisture-resistant slabs (P1DV).
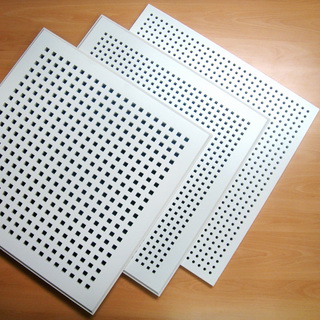
PPGZ are made from perforated plasterboard sheets, on the back side of which a sound-permeable spunbond non-woven fabric is glued. The front side can be painted with water-dispersion paints. PGD are products made from plasterboard sheets, the front side of which is painted with water-dispersion paints or covered with decorative films, wallpaper or other materials. PGDV differ from PGD boards in that they are made from moisture-resistant plasterboard sheets. The front side of such slabs is also painted with water-dispersion paints or covered with decorative films, wallpaper or other materials.
Sound-absorbing or decorative plasterboard boards are most often produced in the form of rectangles with side dimensions of 595 x 595 mm (thickness 8.5 and 10.5 mm), 1195 x 595 mm (thickness 10.5 mm), 2400 × 1200 mm (thickness 10.5 mm). 5 mm).
How to make a suspended ceiling from plasterboard: markings
 Before making a suspended ceiling from plasterboard, all construction and installation work must be completed in the room. finishing work(except for painting or wallpapering the walls), and the laying is completed engineering communications. The humidity in the room should not exceed 70%, and the temperature should not fall below +10 °C.
Before making a suspended ceiling from plasterboard. It is necessary to mark the level of the suspended ceiling around the perimeter of the room (using a level at least 1200 mm long, a water level and a tapping cord). To do this, mark the location of the bottom of the suspended ceiling in one of the corners. Then one water level tube is installed at this point and, moving the second tube along the remaining corners, the mark for the location of the bottom of the future ceiling is transferred to them. After this, the resulting points are connected using a chop cord.
Another important point before installing a suspended plasterboard ceiling is to draw a center line strictly in the center of the room (along or across). Parallel to it, to the left and to the right, at a given distance, straight lines are drawn along which the main profiles (bars) of the frame will be attached. On the resulting lines mark the places where the suspensions are attached.
How to make a suspended ceiling frame from plasterboard (with photos and videos)
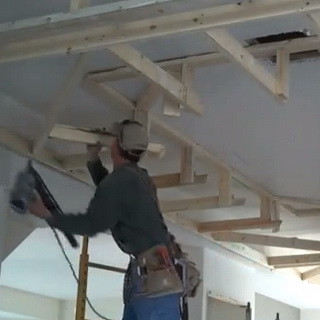
A suspended ceiling frame made of plasterboard, consisting only of load-bearing profiles or bars (single-level frame), is attached to load-bearing base using direct hangers. The main and supporting profiles (bars) are fastened together with a single-level connector for PP 60/27 profiles or, if the frame is wooden, with screws.

Look at the photo on how to make a suspended ceiling from plasterboard: the main and load-bearing profiles (bars), located at different levels (two-level frame), are attached to each other with a two-level connector for PP 60/27 profiles or, if the frame is wooden, with screws.

When installing a suspended plasterboard ceiling with your own hands, hangers are attached to the base ceiling using screws (if wooden floor or coating) or anchor elements (if reinforced concrete floor or coating). To prevent the formation of “sound bridges” between the suspension and the supporting surface, it is necessary to stick a sealing tape or apply a sealant. Sealing tape (sealant) should always be placed between frame elements and building elements made of other materials, such as concrete, plaster, etc. They should be separated in the same way building elements made of plasterboard sheets that have various functions, such as false ceiling and partition.
When installing a suspended ceiling made of plasterboard, after fixing the suspension, be sure to pull it down with some force to check its reliability and eliminate “free movement.” If the suspensions are not “tensioned,” as a result of their subsidence, the lined ceiling may become deformed and cracks will appear.
Then, according to the technology for installing suspended ceilings made of plasterboard, after leveling (by level) with the help of adjustable suspensions in one plane all the main profiles (bars), the supporting profiles (bars) of the frame are attached to them (using connectors or screws) in one or two levels in depending on the selected constructive solution. It must be taken into account that the ends of the main and load-bearing profiles (bars) should not touch the walls of the room and should be retreated from them by approximately 10 mm.
Check out the video of installing a suspended plasterboard ceiling to better understand the process technology:
Technology for installing suspended plasterboard ceilings: installation of sheets
Plasterboard sheets are sequentially installed on the mounted frame using a telescopic lift or, in the absence of one, supports. Fastening work must be carried out from the corner of the sheet in two mutually perpendicular directions. The spacing of self-tapping screws along the supporting profile (bar) of the frame should not exceed 150 mm.
Self-tapping screws must be spaced 15 mm from the edge of the sheet, and their offset on two adjacent sheets must be at least 10 mm. In this case, first screw in self-tapping screws near the base of the profile, and then along the edge, so as not to bend the profile wall inward. Self-tapping screws must enter the sheet of drywall at a right angle and penetrate the metal profile (bar) of the frame to a depth of at least 10 mm. According to the technology of a suspended ceiling made of plasterboard, a self-tapping screw should be wrapped in the material, sinking no more than 1 mm from the surface. At the same time, they should stretch the paper and not tear it. Deformed or erroneously placed screws must be removed and replaced with new ones, which must be placed at a distance of at least 50 mm from the previous fastening point.
Below are photos of do-it-yourself suspended plasterboard ceilings at each stage of installation:

Installation of plasterboard suspended ceiling structures
The frame of a suspended ceiling made of sound-absorbing or decorative plasterboard boards is a structure assembled directly during installation from ceiling profiles (PP 60/27) or T-shaped profiles (PT 24/32). A closed frame is obtained from PP 60/27 profiles.
T-shaped profiles are made of galvanized sheet steel with paint coating. The main and cross profiles are T-shaped and have dimensions (section) of 24 x 32 mm (PT 24/32). They serve to form a module depending on the size of the slabs. Perimeter corner profiles are made in the form of a corner with a section of 19 x 24 mm (PUP 19/24), they serve as a support for load-bearing T-shaped profiles and plasterboard boards.
False ceiling with closed metal frame It is recommended to make it from ceiling profiles (PP 60/27) with sound-absorbing or decorative plasterboard boards attached to it if you want to improve the sound-absorbing properties of the room. In this case, the main profiles are mounted directly to load-bearing structures using hangers. The supporting profiles to which the plasterboard boards are attached and the main profiles are located at different levels (two-level frame).
When installing a suspended ceiling of this design, it is necessary to pay attention to special attention to arrange the connection of its elements to the walls of the room.
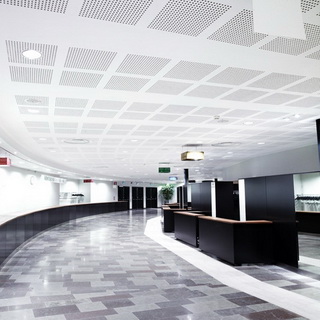
How to make a suspended plasterboard ceiling with an open frame
This section of the article describes how to make a suspended plasterboard ceiling with an open metal frame made of T-shaped profiles (PT24/32) with sound-absorbing or decorative plasterboard boards laid on them. This system improves the sound-absorbing properties of the room. Distinctive feature is high speed installation, the ability to quickly dismantle, as well as unhindered control over the overhead space.


The main profiles are attached directly to the supporting structures using hangers. Mutual position main, transverse and longitudinal profiles allows you to create modules (cells) with dimensions corresponding standard dimensions sound-absorbing or decorative plasterboard boards - 600 x 600 and 600 x 1200 mm.
On initial stage installation around the perimeter of the room, a corner profile PUP 19/24 is installed, attached to the wall with the smaller side (19 mm) with dowels with a pitch of no more than 500 mm. Each perimeter corner profile must be secured with at least three dowels. In the future, the main and transverse T-shaped profiles will rest on it.
How to install plasterboard suspended ceiling profiles
The main T-shaped profiles are mounted to the load-bearing base using quick-mounted hangers, which are attached to the load-bearing structures using dowels with a deviation from the wall of no more than 500 mm. The spacing of the main T-shaped profiles is 1200 mm. The individual main profiles are connected using a special device (lock) located on both sides of each profile. At the joints of the main T-shaped profiles, it is necessary to install additional hangers at a distance of no more than 100 mm from the joint.


Transverse T-shaped profiles are mounted perpendicular to the main profiles with a pitch of 600 mm, thereby forming frame cells (modular size -1200 x 600 mm). The T-shaped profiles are attached to the main profiles and to each other using a connecting device (lock) located on both sides of each profile. To create a modular size of 600 x 600 mm, it is necessary to install an additional longitudinal T-shaped profile 600 mm long perpendicular to the transverse and parallel to the main profile.
On final stage ceiling installation in cells 600 x 600 or 600 x 1200 are laid ceiling tiles(PPGZ, PGD or PGDV), which rest on the profile flanges. Slabs adjacent to walls, columns and other structures are cut in place and adjusted to vertical surfaces and laid on the perimeter corner profile. Installing the slabs into the frame should be done with gloves, as otherwise you risk getting it dirty. decorative coating slab or profile.
The video “How to make a suspended ceiling from plasterboard” describes in detail the technology for installing the structure:
Multi-level plasterboard suspended ceilings
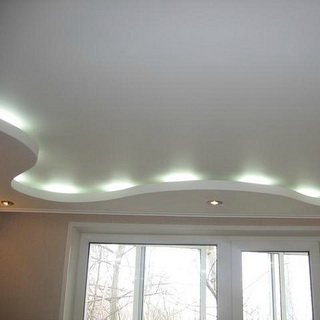
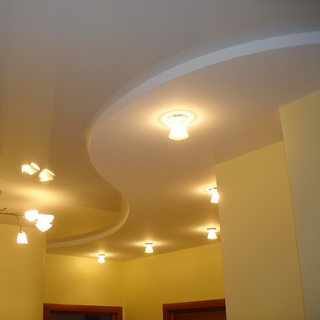
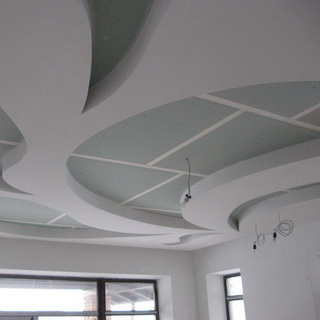
 The “pliability” of plasterboard allows you to create multi-level ceilings with bizarre curvilinear and three-dimensional shapes, that is, vaults and domes, curved friezes, “islands” built into the ceiling, recessed and convex areas.
The scope of application of multi-level ceilings is very wide. For example, in a room with excessive high ceilings you can lower their level to give the space proportionality. A narrow and long corridor in a room with a ceiling height of 4-5 m looks inharmonious. And installing a suspended ceiling made of plasterboard with your own hands will help solve this problem.
By lowering or rising, the ceiling makes it clear that in this place the living room turns into dining area, hallway or kitchen. At the same time, on different planes of the ceilings it is possible to emphasize them or simply perform certain functions.
It would not be superfluous to have a suspended ceiling made of plasterboard with different levels in a room with a “standard” ceiling height. For example, a small ledge along the perimeter of a room with a curved side surface, with an oval or round niche in the center of the ceiling. And if the room has a large area, a multi-level suspended ceiling will help create the appearance of delimiting residential areas.
Lamps located around the perimeter of the plasterboard suspended ceiling structure and hidden from view decorative elements, facing upwards, make the ceiling “floating”. It will appear tall, regardless of the actual size of the room.
Here you can see photos of options for suspended plasterboard ceilings made in rooms of various sizes:

- Features of material selection
- Fastening the guides
- Installation of ceiling profiles
- Drywall installation
- Necessary tool
Drywall is a very malleable building material. You can easily cut any shape from it. Such material properties make it possible to produce.
Nowadays, drywall is used in the most different interiors. It is released in in different forms, easy to decorate and fasten with standard parts. All this makes working with drywall accessible to anyone. Hanging is an opportunity to create any design and provide comfort in the home.
Features of material selection

Drywall is sheet material, in which between two layers thick paper(cardboard) a solid gypsum mass with filler is placed. In this case, the gypsum content by weight of the material exceeds 90%. Drywall is produced standard sheets 120 cm wide, 250 and 300 cm long, 6, 9 and 12.5 mm thick.
Ordinary drywall (gypsum board) does not have waterproofing properties. Therefore, moisture-resistant plasterboard (GKLV) should be used for the ceiling in the bathroom.
Return to contents
Suspension elements
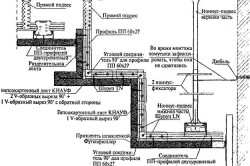
The suspended ceiling is horizontal plane made of sheets, which is installed on metal profiles attached to the wall and ceiling. In addition to sheets of drywall, the composition also includes fastening elements. To install suspended structure two types of profiles are used, guide and ceiling. The U-shaped guide is attached to the wall and is designed to fix plasterboard sheets and ceiling profiles at the desired height. The main brand is PN28/27 (28 mm – width, 27 mm – height).
The ceiling C-shaped profile is attached to the upper plane of the plasterboard and is designed for hanging sheets from the ceiling through a special fastener. The main brand is PP60x27 (60 mm – width, 27 mm – height). Both types are sold in lengths of 275, 300, 400 and 450 cm.
The plasterboard sheets are attached using special fasteners. Fastening directly to the ceiling is carried out using hangers. The suspension is a bar, in the middle of which there is a platform for fixing to the ceiling. On the sides of this platform the strip is perforated, which makes it possible to bend it at the required distance. The ceiling profiles are connected to each other using a “crab” fastening, which has a cross shape.
Return to contents
Step-by-step instructions: preparing for installation
Work on installing a suspended plasterboard ceiling with your own hands begins when the leveling of the wall is completely completed, especially in the upper part. Where the guide profile is attached, the wall should not have any bulges or other irregularities. It is better to install a suspended ceiling before finishing walls in the room.
The first stage of installation is marking the walls for installation. Typically, the ceiling height is different places the rooms are different. Therefore, the height of the ceiling in the corners and in the center of the wall is measured with a tape measure. Marking the wall should start from the corner where the ceiling height is lowest. Here it is necessary to mark the beginning of the guide profile.

If it is planned to install built-in lamps, then the distance from the ceiling to the profile is set to 80-100 mm. In the absence of built-in lamps, a distance of 50 mm is sufficient. Next, the mark is placed in another corner, but taking into account deviations in the height of the ceiling (the suspended ceiling must be installed parallel to the floor). A straight line is drawn between the marks.
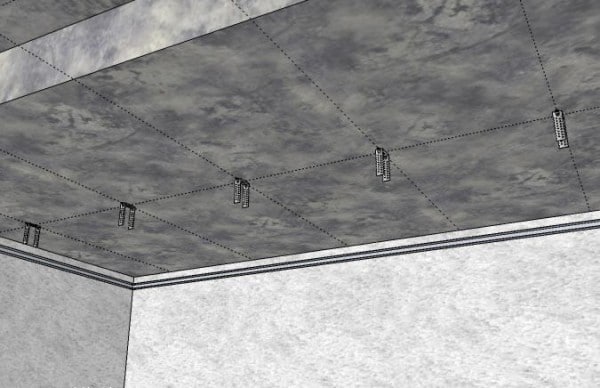
The next stage is marking the surface for the hangers. The marking is made in the form of parallel lines in the longitudinal and transverse directions, which are the projection of the ceiling profiles onto the ceiling surface.
The first lines are drawn parallel to the walls at a distance of 30-35 cm from them. This is how four lines are drawn. Then parallel lines are drawn in both directions so that the distance between them is 60-70 cm. These lines mark the centers of the ceiling profiles. Holes for hangers will be drilled along them.
Return to contents
Fastening the guides
The standard guides have holes for fastening, so they are applied one by one to the wall along the marked line, after which the holes are marked.
![]()
If there are no ready-made holes in the profile, then they are drilled in such a way that the first hole is made from the wall at a distance of 10-15 cm, and the distance between the holes is 60-80 cm.
Holes in the wall according to the markings are made with a hammer drill or electric drill (diameter about 8 mm). Plastic dowels are inserted into the hole. The maximum distance between fastenings is 1 m.
The guide elements are cut to the required length using a grinder or a hacksaw. Then they are installed one by one and secured with screws. Before installation, a sealing tape with an adhesive layer is glued to the outer surface of the elements. If necessary, the profiles are aligned using thin spacers.
Return to contents
Installation of ceiling profiles
Work on installing ceiling profiles begins with making holes in the ceiling for installing hangers. Holes are made along the marking lines on the ceiling with the condition that the distance between the hangers is 60-80 cm. The first hanger is attached to the wall at a distance of 30-40 cm from the wall. Based on these conditions, holes are made along all marking lines on the ceiling using a hammer drill or electric drill. Dowels are inserted into the holes.
Then the installation of the ceiling profiles themselves begins. First, profiles corresponding to the length of the smaller wall are installed. These elements must be installed in one length or, if necessary, from segments rigidly fastened together. The ends of the ceiling profile are installed in the cavity of the guides on opposite walls. Their location (central line) must strictly coincide with the lines on the surface. The ends are secured in the guide elements with screws.
The ceiling, which is installed perpendicular to the first profile, is precisely cut according to the distance between the mounted profiles. This element is guided strictly according to the markings on the ceiling and is fastened to another profile using a cross-shaped “crab” type fastening. This fastening fixes two sections of the mounted profile with an already mounted element in the form of a cross. All elements are mounted in this way, forming a kind of checkered suspension system.
Installation of hangers is carried out in the following order:
- The perforated parts of the suspension are bent from the mounting platform at a right angle, forming a U-shaped profile.
- Then the bottoms of the side parts of the plank are bent to the sides at right angles for attachment to the ceiling profile. The height of both side posts of the plank must be exactly the same. The height itself is determined by the selected distance between the ceiling and ceiling profile taking into account uneven ceiling heights at different points.
- The prepared pendant is secured in a dowel on the ceiling with a screw.
- The bent lower legs of the suspension are fixed to the profile, thus fixing it relative to the ceiling. The accuracy of installation should be checked by measuring the height from the floor.
The ceiling is the most visible part of the room. And therefore, arrangement appearance This surface should be given special attention. The traditional whitewashed ceiling is becoming a thing of the past, and is being replaced by unusual shapes multi-level ceilings with various lighting. So complex systems ceilings can be created using plasterboard - one of the most effective building materials.
Suspended ceilings provide ample opportunities in choosing a design, allowing you to create not just a flat plane, but also a structure that will carry other functions. And the most remarkable thing about using such material is that such systems are easy to create. Today we will talk about how to do it.
Drywall is universal building material. With its help you can create amazing and unusual design not only ceilings, but also other planes in the room.
Types of plasterboard ceilings
Today, plasterboard ceilings are conventionally divided into the following types:
- simple one-level. They are designed to hide various minor and not so minor defects of the main surface;
- multi-level structures. Allows you to add volume to the ceiling and change its geometry;
- structures that serve as the basis for securing such finishing materials like mirrors and glass;
Besides, plasterboard ceilings may vary in design. They are:
- with built-in lamps;
- with backlight LED strip;
- decorative.
Plasterboard structures can be erected in any room of an apartment or house:
Before you make a suspended ceiling from plasterboard, you need to understand a little terminology. The word “suspended” is a verbal interpretation, since such structures are a monolithic system that is suspended on a rigid frame.
Technology of suspended plasterboard ceilings
Now let's try to figure out how to make a suspended ceiling from plasterboard.
Basically, all work on arranging such a structure can be divided into 4 stages:
- selection and acquisition of materials;
- marking;
- frame installation;
- fixing ceiling tiles.
If you want to understand more deeply the issue of how to make a suspended ceiling from plasterboard, we advise you to look at our photo album, which contains detailed photographs of the entire installation process.
Materials for arranging a suspended ceiling
In order to end up with a rigid structure that will not crack at the joints, it is necessary to use only those materials that are intended for these purposes. These include:
- plasterboard sheets;
- metal profiles P-i L-shape, each element is 3 m long;
- metal hangers;
- dowels;
- short screws for fastening profiles and hangers;
- screws for fixing drywall;
- special tape (serpyanka) to reinforce joints;
- putty for sealing places where screws are screwed in and joints.
From the tools you will need:
- hammer drill or impact drill;
- grinder or hacksaw;
- rule;
- hammer;
- tracer for beating horizontal lines (chockline);
- laser or water level.
Ceiling markings
The next stage of work is the most critical, since the quality of the construction of plasterboard suspended ceilings depends on it. First, using a water level, you need to measure the differences in height of the base surface.
After this, begin marking the ceiling:
- First, a point is outlined at the level of which the ceiling plane will be located. In this case, it is necessary to take into account the presence of utilities behind its surface, as well as the type of lighting system. Depending on these factors, the plane of the suspended ceiling may be 5-15 cm lower than the base one;
- this point is marked in the most even corner of the room;
- using a water level, the mark is transferred to all walls;
- after this you need to connect all the points into a single line. If you did everything correctly, you will have a contour around the perimeter of the room. If the line does not converge, then you made a mistake somewhere (read: "


