Lack of snow protection can lead not only to damage to roofing and drainage systems, but also to damage to passers-by and parked cars.
To avoid such trouble, you can install a special snow guard.
The construction and installation of snow guards on the roof is not as complicated a process as it seems at first glance and is accessible even to a beginner in the construction business.
In this article you will learn why snow guards are needed and how to properly install them on the roof of a private house.
A snow retainer is a special design that allows snow not to fall from the roof, that is, the snow does not come off in one layer. Only melt water will flow down. Many people believe that it is not necessary to install such snow clamps, but as practice has shown, this is important detail which should not be neglected.
There are two main functions of this important design roofs:
- prevents sharp and sudden snow masses from falling off the roof itself;
- They hold the snow on the roof so that it melts there.
There are several types of such designs, and when choosing them, it is necessary to take into account several important factors:
- direct angle of inclination of the slope;
- how much precipitation (snow) will fall in the area;
- what material is the roof made of?
There are two main types of this design:
- type of snow retainer that allows snow to pass through;
- the second type is impermeable to snow.
The choice of any of the proposed designs depends on personal motives, as well as on the factors mentioned above.

Snow retention in action
It is interesting that in different stores there are different names: snow blocking fences, snow barriers, and so on. It is likely that the names characterize the functions of such installations.
For example, snow barriers keep all the snow on the roof (of any volume). And the snow will melt on the house in its natural way. The snow will not melt even in parts. Snow cutters - as the name suggests, this design allows you to divide a whole piece of snow cover into small pieces.
Some parts fall, others melt directly on the roof surface. The advantage of the design is that the snow does not fall in a continuous layer, which ensures safety for people and also does not damage the roofing.
Of course, snow guards come in different shapes, sizes, and materials of manufacture.. And before choosing, you should focus on how much snow should be retained.
Types of design, advantages
The most popular version of such designs is tubular type.
This unit is simple design from brackets into which two tubes of the same diameter, approximately 15-30 mm, are inserted.
In fact, this type can be considered universal and can be used on any material (wood, etc.).
And according to professionals, this type of design is considered the most effective. In addition, it can be installed on a roof that has been in use for a long time.
The bracket itself looks like a simple plate with “outlets” for pipes. Often its height is no more than 15 cm. It is attached to the pitched part using a special horizontal stick.
To do this, take special screws that can be attached to metal.
NOTE!
When installing this type of structure, it is necessary to install it along the line load-bearing wall . This is necessary so that the load is distributed evenly. The essence of the operation of such a device is the gradual passage of snow (snow will pass between the pipes).
This version of the snow retainer is popular and has received the status of the most promising installation. Also, the tubular structure must be installed exclusively along one line, the option of taking a running start is excluded. If the structure is the color of the roof, then it is almost invisible on the roof.
The process of installing such a system is quite simple:
- mark the holes and drill them with a drill;
- assemble the kit itself, but do not tighten the bolts;
- the existing assembled bracket must be secured through the roof to the sheathing;
- attach the lower part of the structure to the cornice ( at load-bearing wall level);
- Now just connect the components by tightening the bolts.

Tubular type
One more good option salvation from improper snowfall - snow stops (hooks). From the name it is clear that in appearance such structures resemble hooks.
But they can't hold much snow Therefore, it is best to use them in cases where the roof will be cleaned on a regular basis. Often such hooks are mounted on.
Experts advise using this option as an auxiliary option to other, more reliable systems, in places where there is a lot of snow.
Snow retainer - hook
Lattice type snow guard. This type of construction is suitable in places where there is a large amount of snow, since special grille can withstand strong pressure. The snow is retained on the roof, and only melt water flows down.
Install them at a large angle. The efficiency of such an installation is affected by its height (grille height). The color of the grille can be matched to the color of the roof.
The maximum height reaches 20 cm.

Lattice type
The corner version of the snow guard is relevant where there is not much snow. Most often they are mounted on or, because the structure itself is made from these materials.
From the name it is obvious that externally, this type installation resembles a corner on which there are special fastenings for installation. It is not recommended to install on slopes above 30 degrees.
They are attached directly to the roof itself, you can arrange them randomly, or in one line.

Corner view
Some people prefer to use wooden log as a way to retain snow. The option is not very common. You can meet him on the rooftops different types, for example, on a shingle roof. It is attached to the roof on large hooks.
L Naturally, the size of the log affects its capabilities, that is, the larger it is, the more snow it can hold. To have the effect of such a design, it is worth attaching it at a distance of 2-3 cm from the roof.
This causes a small amount of snow to melt and flow down the drain, while most of the sediment remains on the roof and melts naturally.
Installing snow guards on the roof with your own hands
 How to install snow guards on the roof? If you decide to install snow guards yourself, then you need to consider the type of roof and the amount of rainfall.
After that, buy what you need and begin the installation process itself.
In essence, there is nothing complicated here, you just need to know some rules for installing such a structure.
If you are building a house from scratch, or replacing the roof, immediately think about installing such structures. This will help you save time, effort and nerves.
The installation process itself does not take much time and does not require serious preparations . It is enough to know a couple of rules and step by step follow the existing algorithm of actions.
Since metal tiles are the most common roofing option, it is worth considering the option of installation on just such a surface. Learn more about installing snow protection on metal tiles.
CAREFULLY!
Its very design suggests that snow will fall on it very often, and its smooth surface cannot hold snow on its own. During the day it begins to melt and go flat, and this can lead to scratches on the surface of the metal tiles, which in turn will lead to corrosion and damage to the coating.
A roof of this type can accommodate different types of structures:
- tubular;
- lattice;
- corner
Installation of tubular type snow guards:
- first step - outline where exactly the snow retention system will be located;
- costs enhance special additional bar;
- an important stage of installation, assembly of the structure, but do not tighten the bolts;
- We begin to fasten the roofing material, where it is necessary to make holes on top for the fastening itself. Such holes should be located only on the lower wave, the one adjacent to the sheathing itself;
- Next comes attaching the structure to the slope using 8*60 mm bolts. Be sure to waterproof the holes using rubber pads. The very step between the bracket depends on two factors, the slope and length. For example, a step of 50 cm is quite enough, even for the most powerful structure;
- The last step of installing the system is pipe insertion. Still have questions? Watch the video below.

Installation of a tubular snow guard

Mounting pitch
It is important to remember that the system must be mounted only above a load-bearing wall.
Installing a snow guard on other materials
Corrugated sheeting is another popular type of roofing. Like metal tiles, it has  sensitivity to temperature changes.
It is critically necessary to install a snow guard on such a roof. Learn more about installing snow protection under corrugated sheets.
When the snow melts during the day and freezes in the evening, Ice flakes form which can scratch the material., and this will eventually lead to the fact that the galvanized coating deteriorates and scratches form in those places, as a result of which the material begins to rust.
If you choose this roofing material, you can also use tubular or lattice snow guards.
In fact, installing the structure on corrugated sheets is not a very complicated procedure, and almost no different from installation on metal tiles.
Installation of the structure on corrugated sheets:
- the fastening itself is carried out through the material;
- be sure to strengthen the sheathing;
- small holes for fastenings should be reinforced with rubber gaskets;
- installation of the structure should be carried out only on the lower part of the wave of material.

Installation of hooks
In cases where the structure is attached to a ready-made roof covering, you should understand that you will have to disassemble it in order to strengthen the sheathing and it is logical to think about this in advance - during construction.

Installation as an example various types roofs

Hole marking
Useful video
Video instructions for installing a tubular snow guard:
Conclusion
An element such as a snow guard is necessary on the roof of any building, regardless of the style and location. Installing an additional element will allow your roof to maintain its strength and reliability, and will also help ensure the safety of others.
Choosing the right and high-quality construction, carefully study what it is made of. Whatever type of snow guard you choose, it is not necessary to install it around the entire perimeter, since they can be correctly placed only in the right places on the roof.
It is enough to simply install them in the most dangerous places and this will ensure efficient functioning additional elements and at the same time save money spent on roofing equipment. Be careful when making a decision, consult with specialists and your choice will be fully justified.
In contact with
The harsh climate often forces the installation of protective structures on the roof to protect people passing by from the danger of heavy snow masses sliding from the roof. Snow guards that fit into the overall design do an excellent job of this task.
Snow guard for soft roof has its own characteristics.
- The installation of a soft roof involves small angle slope (maximum 15°), that is, with a fairly flat roof, an avalanche-like descent of snow masses is not so expected. So you can get by with installing less powerful snow guards.
- Unlike metal roofing, the surface of a soft roof is known to be rough. This, in turn, reduces the risk of snow sliding off the roof.
- Installing a snow retainer on a soft roof does not require major changes in the sheathing design, since under soft roof A solid base has been installed. It is to this that the snow retainer structure is attached.
Types of snow guards
— Tubular. Brackets are fixed to the rafters or roof sheathing and passed through them metal pipes, usually in two rows. This is somewhat reminiscent of curtain rods on a window. The thickness and weight of the snow cover that such a snow catcher is able to hold depends on the distances between the pipes, the lower pipe and the roof and its design strength. By reducing the pipe fastening pitch along the length, the permissible load increases significantly.
- Lattice. The design is approximately the same, only rectangular lattice sections are fixed to the brackets. Types of snow retainers are selected based on the design and type of roof.
— Snow hooks. On soft roofs such as bitumen shingles, small hooks are installed. The roof will have to be cleaned more often, since the holding capacity of such a snow retainer is not very large. The hooks are installed during the process, since a significant part of the bracket must be under the layer of roofing material. The hooks are placed on the roof in a row or in a checkerboard pattern at a distance determined by calculation, according to the snow load.
- Lamellar. Another variety of them is corner ones. The snow guard is installed on (Euro tiles, galvanized steel, etc.). Such snow retainers for soft roofs are justified with light snow loads. They are installed on roofs with a maximum slope of 30°.
Installation of snow guards on the roof
Usually the snow retainer is attached parallel to the roofing work. In some cases, they can be mounted over the finished coating.
Positioned parallel to the eaves, with a distance from the edge of the roof of about 35-50 cm. The choice of fastening method depends on the type of snow retainer.
For example, tubular snow retainers are installed in one line, and point, hook or corner ones are installed in a checkerboard pattern.
If the region is snowy, with sufficiently long roof slopes, snow guards are installed in two rows with a step of 5-5.5 m. If the snow load is insignificant, the device can not be mounted along the entire perimeter, but only in the most dangerous places - near paths, above the entrance, above the windows, above the car parking area and others.
Installation of tubular snow guards
Tubular models are usually sold complete with fasteners. Such snow retainers are secured to the sheathing through the roofing using screws. The fastenings are placed in increments of 0.6 - 1.1 m along the line of the supporting wall. Holes for screws in the roofing are sealed using rubber strips (they are included in the package).
Snow stoppers
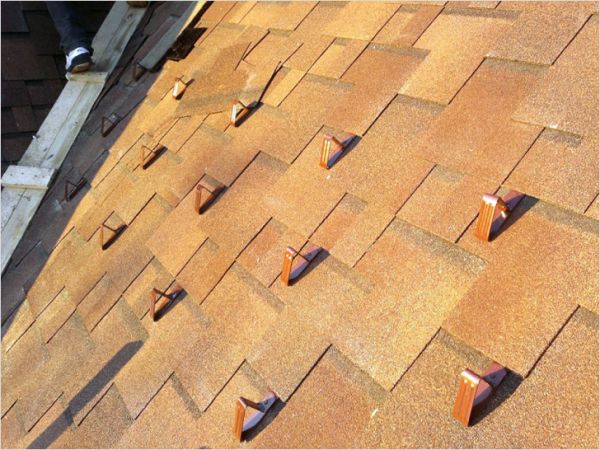
 For soft roofs, point snow retainers or snow stoppers are more often used. This is a narrow strip of steel that is bent into a triangle at the end. The material used to make snow stoppers is either galvanized steel or powder-coated metal.
It is better to install it parallel to the laying of the roofing material. Snow stoppers are screwed to the base and the fastening points are covered with the next sheet of roofing material.
If you still have to attach it to a ready-made soft roof, rubber seals are used to avoid leaks in the fastening area.
Installing snow retention on the roof is extremely important, otherwise the situation could have serious consequences:
- threat to the lives of people near the house;
- the risk of damage to property that is left near the house, say, a falling layer of ice can completely damage a car;
- causing damage to plants that are planted near the house;
- damage to the roof frame;
- breakage or deformation of drainage structures.
Regardless of the installation of a snow retainer on the roof, it also requires additional manual cleaning of the roof from snow and adhered ice.
If your home is located in a warm climate and snow and frost are the exception rather than the rule, then snow guards are not needed. Well, if there is frost and snow, then the possibility of snow falling off the flexible tiles is minimal, because the tiles have a rough coating. But even if there is even a slight chance of snow and ice melting, it is better not to risk it.
For flexible tiles, it is recommended to install Döcke PIE point snow retainers, which are installed in a checkerboard pattern in the eaves (lower) part of the slope. Such snow retainers for flexible tiles are metal corners with colored polymer coating on a long leg (Fig. 1):
Rice. 1 General form snow guard Döcke PIE
Snow guards Döcke PIE are used on roofs with a slope of 12˚ or more to protect people, vehicles and roof elements (gutters of the drainage system, flexible bitumen shingles Döcke PIE) from sliding of the snow mass. The color of the snow guards is chocolate (RAL 8017).
Döcke PIE snow guards are installed simultaneously with the roof covering. They need to be fastened to a solid base using galvanized rough or screw nails, followed by covering the fastening point with a tab over the underlying shingle (Fig. 2).

Rice. 2 Installation of the Döcke PIE snow guard
It is recommended to install snow guards primarily above entrance group and on slopes under which people walk and cars park. You should also take into account the angle of inclination of the slope and the length of the slope. The greater the angle and length of the slope, the greater the likelihood of uncontrolled snow falling.
The number of installed Döcke PIE snow retention devices depends on the roof pitch and the collection of flexible bitumen shingles. Figures 3 – 7 show installation diagrams for Döcke PIE snow retention devices on flexible bitumen shingles Döcke PIE at various roof angles.

Tilt angle from 12° to 45°
Tilt angle more than 45°
Rice. 3 – Installation diagram of Döcke PIE snow guards on flexible bitumen shingles Döcke PIE of the “Cologne”, “Sheffield”, “Honeycomb” collections or their analogues at various roof angles
Tilt angle from 12° to 45°
Number of snow guards Döcke PIE – 4.5 pcs. for 1 linear meter
Tilt angle more than 45°
Number of snow guards Döcke PIE – 7.5 pcs. for 1 linear meter
Rice. 4 – Installation diagram of Döcke PIE snow guards on flexible bitumen shingles Döcke PIE of the “Nice” collection or its analogues
at different roof angles

Tilt angle from 12° to 45°
Number of snow guards Döcke PIE – 5 pcs. for 1 linear meter
Tilt angle more than 45°
Number of snow guards Döcke PIE – 7.5 pcs. for 1 linear meter
Rice. 5 – Installation diagram for Döcke PIE snow guards
for flexible bituminous shingles Döcke PIE of the Liege collections,
"Chainmail" or their analogues at various roof angles

Tilt angle from 12° to 45°
Number of snow guards Döcke PIE – 5.8 pcs. for 1 linear meter
Tilt angle more than 45°
Number of snow guards Döcke PIE – 7.5 pcs. for 1 linear meter
Rice. 6 – Installation diagram of Döcke PIE snow guards on flexible bitumen shingles Döcke PIE of the “Zurich”, “Geneva”, “Krona” collections or their analogues at various roof angles

Tilt angle from 12° to 45°
Number of snow guards Döcke PIE – 4.5 pcs. for 1 linear meter
Tilt angle more than 45°
Number of snow guards Döcke PIE – 7.5 pcs. for 1 linear meter
Rice. 7 – Installation diagram of Döcke PIE snow guards on flexible bitumen shingles Döcke PIE of the “Granada”, “Genoa”, “Tetris” collections or their analogues at various roof angles
Special equipment in the form of modern snow retainers must be mounted on any roofing surface. Such devices can be made in two fundamentally different design solutions. The first option involves reducing the speed of snow mass melting, and the second type of snow retainers is a snow barrier and does not allow snow accumulations to pass through.
Installation required
Soft roofing coverings are characterized by the presence of certain features, which allow the use of a certain category of snow retainers.
Most often, this type of roofing material is used for arranging a surface with a slight angle of inclination, which minimizes the possibility of an avalanche-like descent of snow mass from the roof. It is for this reason that it is advisable to install snow retainers that do not have significant power and dimensions.
Besides everything else, flexible tiles has a significant level of roughness, which also prevents snow from sliding and makes it as easy as possible to fix the snow retention elements.
Under standard conditions, rope tow options are installed. The rope type is known as snow hooks or point snow retainers. Such structures are not designed to contain large snow masses and can be used as additional elements protection. The yokes are screwed to the sheathing base, and to mask the attachment point, another element of roofing material must be laid on top.
To install a flexible roofing surface, it is advisable to use special kits that are not only reliable and aesthetic, but also adapted to the characteristics of such material.
Manufacturers and cost

The main manufacturers of snow guards are represented by the traditional countries of Northern Europe. The highest quality and most effective products are produced in Finland, Denmark, Sweden and Norway. IN last years Quite good products began to enter the market Russian companies. One of the leaders among domestic manufacturers is.
The cost of snow barriers does not significantly depend on the manufacturing company, and the main pricing factors are represented by the material used in manufacturing and the dimensions of the structure.
All produced snow stops can be made of transparent plastic or painted to match the color of the soft roof in accordance with. The average cost of one yoke is about fifty rubles.
The highest quality products are produced by the following companies:
- KLOBER with a price from 80 rubles;
- BORGE with a price from 90 rubles;
- Flender Flux with a price from 120 rubles;
- MetalProfile with a price from 60 to 100 rubles.
Installation of snow guards on the roof
Installation of snow guards must be carried out during the process. To avoid damage, it is necessary to use special rubber gaskets as seals.
The yokes have the peculiarity that they require installation in. The standard design of such snow stops has a triangular shape with a long extending mounting plate, which is attached to the sheathing and covered with roofing material. To prevent leaks, the fixing strip should be covered with bitumen shingles..
Installation of snow stops and their fastening is carried out strictly according to the diagram. The location and number of clasp snow retainers directly depends on the roof slope and the type of roofing used.
- slope indicator from 30° to 40° - four elements per linear meter or in two rows, observing a checkerboard pattern;
 Alpin form. The roof angle is 30-40 degrees.
 Honeycomb shape. The roof angle is 30-40 degrees.
  "Brick" shape. The roof angle is 30-40 degrees.
  "Scales" form. The roof angle is 30-40 degrees.
- slope indicator from 40° to 60° - six elements per linear meter or in three rows, observing a checkerboard pattern;
 Honeycomb shape. The roof angle is 40-70 degrees.
  "Scales" form. The roof angle is 40-70 degrees.
  "Brick" shape. The roof angle is 40-70 degrees.
  Dragon Tooth Shape. The roof angle is 40-70 degrees.
  Alpin form. The roof angle is 40-70 degrees.
- slope indicator of more than 60° - installation of elements along the entire roofing surface.
When installing, you should Special attention parallelism of the fastening relative to the edge of the roofing. To place the first row, you should retreat eighty centimeters from the lower roof edge. Fixation is carried out using long self-tapping screws, and the lower edge of the yoke is attached through one wave.
Let's sum it up
The main advantages of installing high-quality snow retainers or snow stops are the receipt of additional roofing thermal insulation in combination with the uniform distribution of snow loads throughout roof structure. Such equipment is ideal solution to prevent collapses of snow masses and obtain uniform snow melting.
Properly selected snow retainers add additional aesthetics to the roof, ensure the safety of people as effectively as possible, and significantly reduce the level of possible damage.
Installation work on installing snow guards does not involve large material costs and can easily be done independently. In addition, such equipment guarantees a calm and safe life in your own home.
The technical characteristics of snow yokes vary slightly depending on the manufacturer, which allows the selection to focus on compatibility with the roofing and surrounding landscape design.
One of mandatory conditions When installing any roof, including soft roofing, its safety is important. Therefore, during installation, it is necessary to provide for the installation of elements such as snow retainers for soft roofs.
The snowmaker is important element to ensure safety, the main function of which is to prevent widespread, avalanche-like melting of snow and ice during thaws and spring snowmelt.
Lack of snow retention on the roof can have serious consequences, including:
- Threat to the lives of people passing near the house;
- Risk of damage to property left near the house, for example, a falling layer of ice can damage a car;
- Damage to plants planted near the house;
- Damage to roofing;
- Breakage or deformation of drainage structures.
And the organization of snow retention on a soft roof has its own characteristics compared to the same measures carried out on a metal roof.
According to the standards adopted in construction, the maximum slope angle allowed when installing a soft roof should not exceed 15 degrees.
That is, the roof turns out to be quite flat, and the risk of an avalanche of snow is not so great. Therefore, it is possible to use less powerful snow retention systems.
The second feature is that the soft roof covering has a rough surface, because upper layer roofing material consists of stone chips. This condition also reduces the risk of snow masses sliding off the roof.
The third feature is that when installing snow guards, you do not have to make major changes to the design of the sheathing, as is necessary to do in the case of a metal roof.
The fact is that for the installation of a soft roof, a solid base is mounted, to which the snow guards are attached.
Types of snow guards
There are several types of snow guards that are mounted on the roof. When choosing the type of device, the planned snow load, as well as the type of roofing, are taken into account.
- Tubular snow guards. They are an almost universal model, however, they are more often used on metal tile roofs or seam roofs. With a heavy snow load, it is advisable to install such devices in several rows.
- Lattice snow retainers. These devices are intended primarily for high-rise buildings, but they can also be used in the construction of cottages, especially for tile roofs.
- Point snow retainers. Devices used where the snow load is low. Can be used on soft roofs, installing them in a checkerboard pattern.
- Plate snow guards. These are metal structures installed on roofs with a slope angle of less than 30 degrees.
- Corner snow guards. Inexpensive devices that can be used with light snow loads.
Installation of snow guards on soft roofs
As a rule, installation of snow guards is carried out simultaneously with roofing work. If this was not done in a timely manner, then snow retention devices can be installed over the finished coating.
Snow guards are installed, placing them parallel to the eaves, retreating from the edge of the roof by approximately 350-500 mm. The method of mounting devices depends on their type. Thus, tubular snow retainers are mounted in one line, while corner or point ones are installed in a checkerboard pattern.
If a large amount of snow falls in the region where construction is taking place, and the roof slopes are long enough, then snow guards should be installed in two rows with a gap of 5-5.5 meters between them.
If the snow load is insignificant, you can not install devices along the entire perimeter of the building, but strengthen them in the most dangerous places - above the entrance, near paths, above windows, near a car parking area, etc.
If you plan to install tubular models, then, as a rule, they are sold complete with fasteners. Installation of such a snow retainer is carried out by attaching it to the sheathing through the roofing using screws.
Advice! Tubular snow retainers are installed along the line of the load-bearing wall to balance the load on the roof.
The distance between two adjacent fastenings should be 0.6 - 1.1 meters. The holes made in the roofing for screws must be sealed using rubber strips (seals are included in the mounting kit).
For soft roofs, snow stoppers or point snow retainers are more often used. This device is a narrow strip of steel that is bent at the end into a triangle. Snow stoppers are made from either galvanized steel or powder-coated metal.
Installation is best done while laying the roofing material, screwing the snow stoppers to the base and covering the place of its attachment with the next sheet of roofing material.
If a snow retainer for a soft roof is attached to an already finished roof, rubber seals must be used. This will avoid leaks in the mounting area.
Additional measures to protect the roof from the destructive effects of snow and ice
To protect the roof covering and other roof elements, you have to additionally resort to manually cleaning the roof surface from adhering ice and snow. Shovels and picks are used for this.
It is better to use for clearing snow wooden tools, but if it is necessary to break off ice, you have to resort to using ice axes or similar devices. However, when working with these tools, you need to exercise maximum caution so as not to damage the roofing with your actions.
It is necessary to clear not only the roofing itself of snow and adhered ice, but also the snow retainers, since ice accumulates on these devices, which prevents the normal melting of snow.


