How to make a rosebud from corrugated paper. Master class from Alla-Alushka


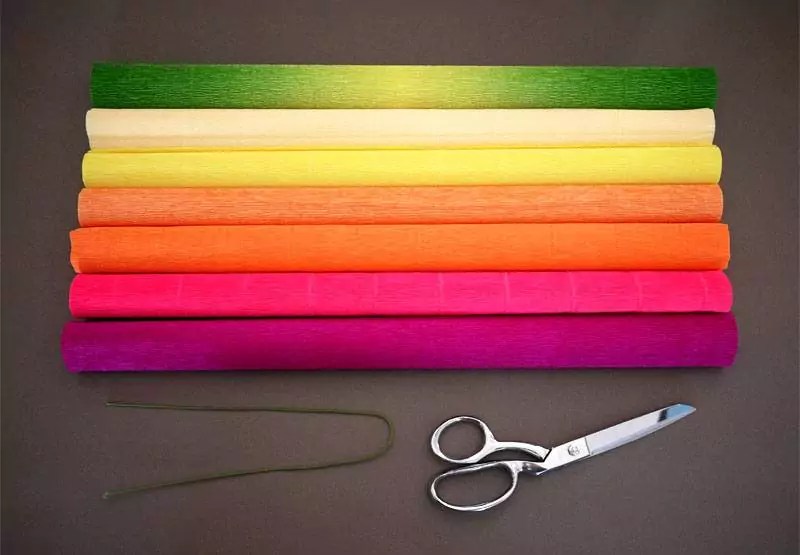
No matter how much I resisted doing MK, I still did it, although if I had not taken on one project, I would hardly have mastered it (MK) in the near future. Very often I am asked how I make such flowers. But I don’t even know what to answer. I came to this “recipe” through long attempts and training, although I will show you the features that I came up with today. I will show the example of the “Autumn Waltz” candy, although you can, of course, take any other candy. Here I indicate the sizes using a ruler, but I don’t use it, I do everything by eye. So, I cut 2 strips of corrugation 10 cm and 5 cm wide, respectively, and divide them into blanks about 8.5 cm high. Each strip should yield 5 rectangles + leftovers (we won’t need them).

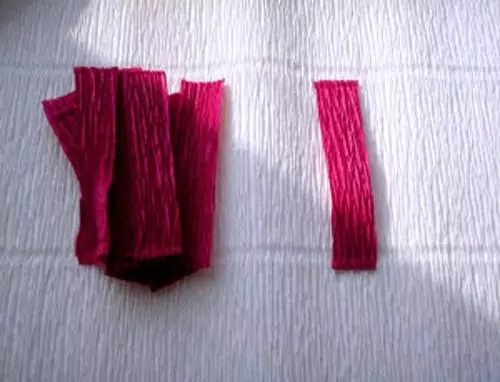
Take 1 wide piece, fold it in three and cut it. We do the same with another wide blank, but take only one rectangle, put the rest aside, we won’t need them. These are our future narrow petals. We also fold two more wide pieces in half and cut them. As a result, we get one large rectangle, 4 narrow and nine wide blanks for the petals.

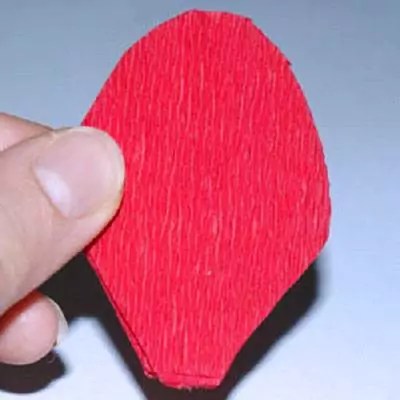
Let's start cutting out the petals. First, take the largest piece, fold it in half and round the top. It turns out almost a semicircle. Then we take the petal blank, fold it in half, round the corners on top, and vice versa at the bottom, cut off these corners. We do this with all the petals, both narrow and wide.

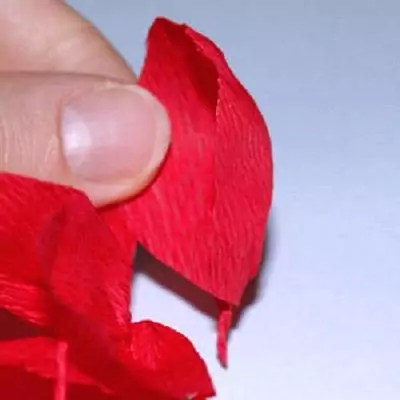
We begin to form the petals. First, use the thumbs of both hands to make a depression for the candy, but only in the center of the petal, do not stretch the edges. Then we take a skewer and begin to twist the petal onto it. This is where the “trick” of my rose recipe lies - you need to twist it tightly, almost 1.5-2 turns of the skewer. Then I just pull the skewer out. Thus, we are left with a STRONGLY curled half of the petal. We do the same on the other side. The photo shows how strongly the edges of the petal are curved. We perform this sequence of actions with all the petals, both narrow and wide.

Let's start assembling the flower. We take our large blank and place the candy on it. As you can see, in this blank I DO NOT make indentations for the candy, but I begin to wrap it very tightly, stretching the corrugation as I work. First I wrap it on one side, then on the other, and tie it with thread at the bottom. After this, you can give the bud a finished look by slightly bending the edges with your fingers.

Then everything is simple: first we work with narrow petals. Add a drop of glue to the very tip and glue it to the bud (all four petals). Next row we glue four wide petals, trying to place them in a checkerboard pattern relative to the narrow petals. We distribute the last five petals in the last row. However, you can not make a row of four wide petals, but distribute five wide ones immediately after the narrow ones. DO make sepals, don't be lazy! After gluing the sepals, you can run a skewer over each one, placing the skewer between the sepal and the flower. In this case, the sepals will seem to press against the flower and flow around it, and not stick out in different directions.

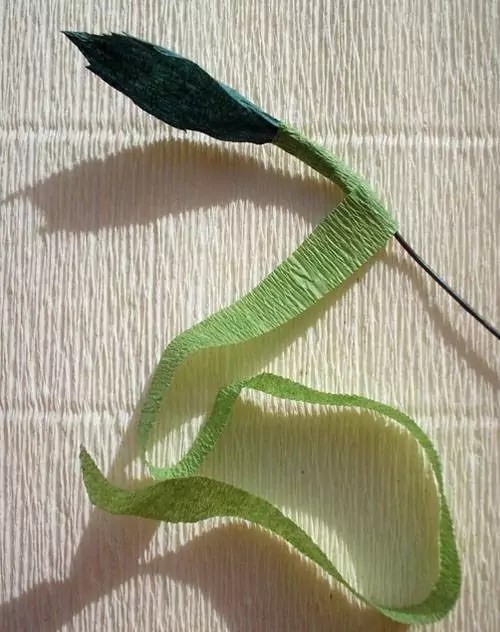
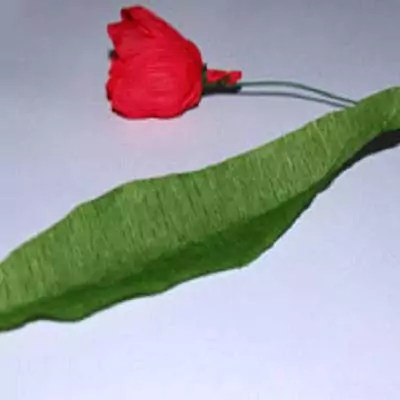
In general, we have made a flower, now you can carefully glue a toothpick, skewer, wire into it and use it at your discretion. But we will continue to work and make a souvenir single rose. My problem with assembling these flowers has always been that they come out quite wide base, and when using drut it was almost impossible to beautifully tap the flower stem. And since you can’t hide the “ugly” transition in this rose, I do this: I take a flower extension. These are used when, for example, you need to place an orchid in a bouquet. They have a fairly long water reservoir, which I cut off, leaving just a little bit. I cut the base of the rose at an angle, and pour plenty of hot glue into the remaining reservoir and practically “screw” the flower into it. And I leave it until it cools and sets.

We tape the extension, add leaves, beads, any decor you like and admire our rose. You can add a bud (as in the first photo) or several buds.
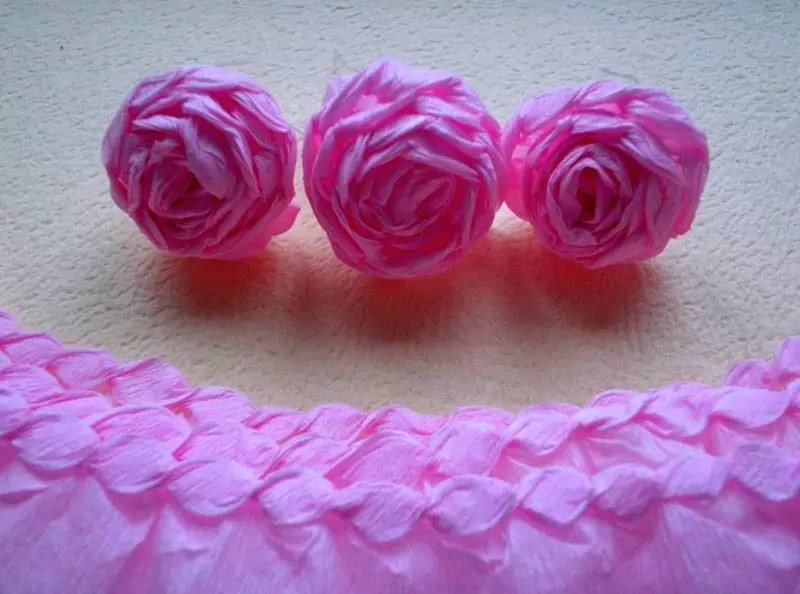
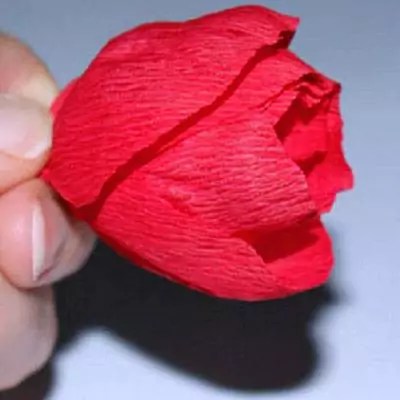
Since we started talking about roses, I’ll show you how to make a bud, but there are a great many such MKs in SM. We take two small rectangles, literally one turn of the candy. Fold them together and in half. Cut out a semicircle. We slightly move the outer petal down and to the side, literally by 2-3 mm.

We take the candy, tuck the tails (so that the candy is not firmly attached) and wrap the candy, first on the right, then on the left (or vice versa, whichever is more convenient for you, it just depends on which direction to move the outer petal, to the right or left, so that along the entire bud had two petals visible - see in the photo) and tie it with thread. Glue the sepals and twist them with a skewer. Our bud is ready. Now, depending on what it is intended for, we glue in a toothpick, skewer, wire, etc.

Now a little more “boring” theory. The formation of any rose comes down to the fact that we must form a bud and then glue the petals. Any MK contains exactly these steps. In addition, even the petals in any MK are the same - semicircular. And then each master decides for himself what and how he will do with these petals - stretch, twist, twist, trim, or do nothing else at all. You can also make a rose from petals of only one width. Depending on these steps, very different results will be obtained. Don't be afraid to experiment and don't strive to do " exact copy"your wish. This is unlikely to work, since making a copy is a boring task. Bring something of your own, good, unique, and then you will succeed. I wish you good luck in your creativity!!!
Source stranamasterov.ru/user/198397
For craftswomen who love all sorts of new creative ideas, as well as hand-made beginners, we recommend making flowers from corrugated paper with your own hands - this is an incredible experience you can use in any festive or everyday situation.
 Big flowers can be placed in a large vase, and they will significantly decorate and “revive” the interior. A surprise bouquet of paper flowers with sweets can be presented for a birthday loved one or give it to a child with a sweet tooth.
You can use paper flowers decorate living room or restaurant hall, they can be used as boutonnieres or made into bouquets and artistic compositions.

Flowers made of corrugated paper will not wither like living plants and will not fade in the sun like plastic ones. Such lightweight and natural material how paper is easy to process, does not cause allergies and is not harmful environment. It is a pleasure to work with both adults and children.
All you need is several rolls of multi-colored corrugated paper, scissors, glue, good mood And step-by-step master class. We are armed with detailed instructions and are ready to teach you how to make incredible bouquets step by step.
Paper flowers are the perfect decor for almost any holiday or event. If you learn how to make flowers yourself, it will be quite budget option for hall decoration or making individual souvenirs for guests and visitors of the event.
Detailed photo The instructions and our tips will help you make almost any paper flowers with your own hands. Corrugated paper you can do the following flowering plants , which cannot be distinguished from living ones:
- tulips;
- peonies;
- roses;
- chrysanthemums;
- chamomile;
- orchids;
- and in general - any flowers.

First flower - corrugated paper chrysanthemum, which will be easy to do even for beginners. Gather several sheets of paper into an accordion and then fasten them with thread.
What's great about the following designs is that you don't have to cut out each petal individually; you just need to roll up a piece of corrugated paper and properly process the edge, according to the type of flower.

Try to do it yourself spring dandelion, delicate carnation, lush peony or a touching chamomile.

For greater clarity, you can use templates for making flowers from paper.


 Finished petals will also help you make perfect flowers from paper.
Beginning hand makers get a lot of help when creating incredible floral masterpieces. video lessons with detailed comments from masters.
How to make flowers from corrugated paper for interior decoration?
Volumetric paper flowers often used when creating festive interior design.
 They are hung from the ceiling, tied to the backs of chairs and tables, decorated with walls and placed in huge vases.
 Full size flowers will serve as an unforgettable attribute of the original photo shoot. And these giant flowers are quite easy to make.
 Huge white roses will become wedding decoration and a chic detail for a festive photo zone. They can be made according to a template.

 Delicate and colorful spring flowers can be attached to the wall,arch or special screen.
How to make paper flowers: making bouquets
Today it is hardly possible to surprise with an ordinary bouquet, but bouquet with sweets hidden inside– this is a real surprise for those with a sweet tooth. If you know how to make flowers from corrugated paper, consider that you have already come up with an original and beautiful idea for your loved ones.
 Making a flower will not take you much time. And with the help of photographs and detailed explanations you will succeed wonderful English rose
with candy inside.
Making a flower will not take you much time. And with the help of photographs and detailed explanations you will succeed wonderful English rose
with candy inside.
We suggest you study MK.


 Crafts made from paper flowers often decorated with beads, leaves, decorative details
. Use a vase or small basket as a base.
Crafts made from paper flowers often decorated with beads, leaves, decorative details
. Use a vase or small basket as a base.
 What other flowers can be made for a bouquet? Yes, any - it can be small pansies, exquisite orchids or delicate peonies.
 I would like to dwell on the production of peonies in more detail.
To work you will need:
- corrugated paper white;
- food coloring or watercolor;
- water in a spray bottle;
- round microwave bowl;
- scissors;
- glue gun(hot);
- tape;
- floral wire for a stem or an old element from an artificial flower.

- Take paper and cut out a petal.
- Rotate the microwave bowl and attach the petal to it.
- Spray water from a spray bottle.
- Painting the petal paints different shades.
- Place the bowl and petal in the microwave for 30 seconds or until completely dry.
- Carefully remove the petal from the bowl. It will be concave in shape.
- We prepare the wire or old stem for gluing the petals.
- Attaching the middle and glue the petals around it.
- We decorate the stem with tape.
The rose is a noble flower and at first glance it may seem that it is very difficult to create this miracle on your own. We'll show you simple master classes on making roses from corrugated paper with your own hands step by step, and you will be convinced that this mission is not only doable, but also very enjoyable.
 Such a rose you can make it with your child.
 More large and lush roses
you will succeed with this simple master class:
More large and lush roses
you will succeed with this simple master class:
- You need to cut a fairly long strip from corrugated paper (the larger the strip, the larger the bud will come out).
- Wrap paper around wire- this will be the base of the bud. When winding a bud, each layer must be wrapped with glue.
- We cut out the petals of our future rose from paper - different in size and shape, so that the rose seems natural.
- Glue the petals to the base, apply glue to the underside of the petal.
- We use green paper to make sepals, which we will glue to the base of the bud.
 Another master class will tell you how to beautifully pack a bouquet for a gift.
Video: how to make flowers from corrugated paper
The products that will be discussed in this article have unique characteristics. Their excellent appearance is useful for memorable gifts. It is not difficult to create beautiful flowers from corrugated paper with your own hands without mistakes after studying the instructions below.
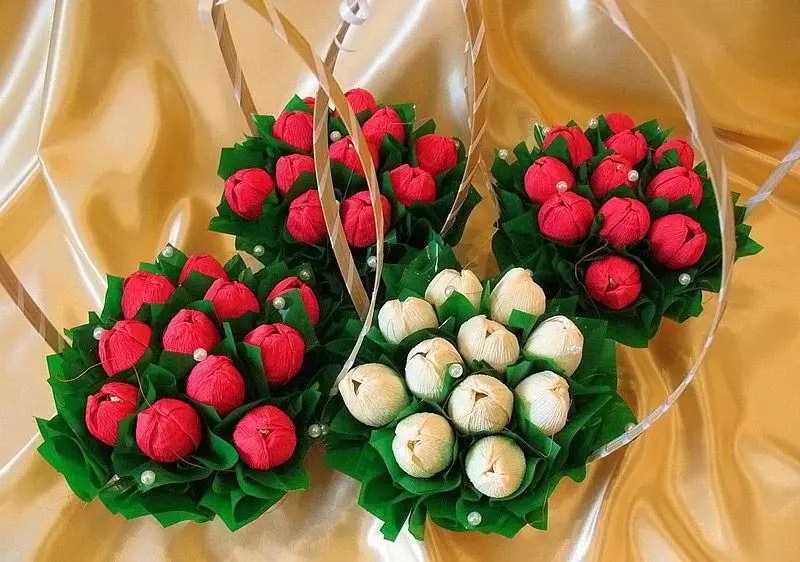
Experienced craftsmen hide delicious candies in tulip petals
Creativity helps to reveal your own talents and at the same time create products with truly exclusive characteristics. But some methods are overly complex and take too long. technological processes. Sometimes the high cost of components is a deterrent.
These and other disadvantages will be eliminated if you use corrugated paper:
- Its cost is not great. Therefore, you can work on large-scale projects without significant restrictions. Repeated experiments and trials will not be accompanied by large costs.
- Many commercial enterprises offer such materials. They can be purchased in classic stores or on specialized websites, with convenient delivery to to the right address. Supported in the corresponding directories wide range colors and textures.
- To correctly reproduce the technology, you will need inexpensive adhesives and simple tools.
- If mistakes are made, there is no need to create products again. Most algorithms provide for the connection of individual parts, so the problem is resolved quickly, without wasting time.

How to make flowers from corrugated paper with your own hands
In addition to basic materials, certain options flowers you need to prepare the following products:
- Strong and elastic wire of the required length. The power frame of the stems is created from it, so it must correspond to the expected loads.
- To divide the wire into specific sections and bend it, you will need wire cutters and pliers.
- Sharp scissors (large and nail scissors) are useful for cutting out large and small pieces.
- medium density create templates.
- The contours of the structural elements are marked with a simple pencil.
- To fasten them they use (such as PVA). You should verify experimentally that it does not change color when it hardens.

DIY roses from corrugated paper: step-by-step instructions
This table describes a more complex method. It will require all the components given above.
| Photo | Sequence of actions |
 | Petals in the form of “hearts” are drawn on cardboard. They change the value slightly to get 4-5 different patterns. |
 | To carefully cut out the workpieces, use scissors of a suitable size. |
 | To simplify subsequent assembly, the petals are stacked one on top of the other, taking into account the order in which they are attached to the stem. |
 | Creates the optimal shape. To do this, the areas with curves are slightly pulled out to the sides and the middle part is made deeper. |
 | Next you need to prepare the stem and leaves. They can be formed previously, like petals, or during joining with supporting elements designs. |
 | To obtain gentle rigidity, connect two wires with green tape. A small upper section (1-2 cm long) is bent. For this procedure you will need pliers. |
 | Formation begins by attaching the smallest petal. |
 | Next, larger elements are sequentially fixed. Instead of ribbon, you can use thread of a suitable color. |
 | Small leaves are attached to the bottom of the bud. |
 | Large leaves are glued to the stem. |
 | After completing the assembly of the entire product, the petals and leaves are given their final shape. The rose is then placed vertically in the vase. |
Important! This technology of attaching leaves and petals is used to make various flowers from corrugated paper. It is supplemented with special techniques for creating stamens and other plant elements.
The next method is faster. In it, a bud is formed from one piece. First, cut the tape to the required length (50-60 cm) and height (4-5 cm). One edge is folded inward. Next, this part, which is denser than the rest of the paper, is bent in the form of a flattened spiral. The corrugated material is fixed in the desired position without glue or other devices. The blank is formed in the form of a bud. The lower part is attached to the stem. Leaves are attached at the bottom.

Features of creating tulips and other flowers
For manufacturing, you need to prepare similar components, tools and materials. You will need paper different colors, corresponding appearance tulip petals. It is necessary to purchase three types of wire (with different diameters). It is used to create frame elements with varying rigidity and thickness.
The sequence of actions is given in the table:
| Photo | Description of technology |
 | Petals can be cut into blanks, as when making roses. But to simplify the process, such a blank is used. It is created from a strip 5-6 cm high. After folding, you should get a square 4-5 cm wide. |
 | All petals (8-10 pieces) are cut out from it at the same time. The lower part of the workpiece is made elongated. |
 | It is rolled up in the form of a cord. The petal itself is stretched beyond the edges and a depression is formed in the center, as in the first method of making a rose. |
 | The created petals are set aside and the production of stamens begins. They are made from small diameter wire. The upper parts are made of corrugated paper. |
 | Individual elements are attached to the stem with tape or thread. |
 | Leaves are cut out according to the template. These parts will turn out to be long, so they will need to be reinforced with medium-thick wire. |
Do-it-yourself corrugated paper is complemented with pearl beads, fabrics and other decorative items to create beautiful compositions. The following examples highlight the features of the manufacturing processes of other artificial plants. In lilies, the stamens are large in size. They are created from thick wire wrapped in white paper. To imitate pollen, the upper curved parts are coated with an adhesive solution. Next, dip it in semolina. To dry, such blanks are inserted vertically into a piece of plasticine.


Sunflower leaves and petals are cut, shaped and attached using the techniques discussed.

In chamomile you will also have to pay sufficient attention to the core:
| Photo | Actions |
 | You will need thick yarn. |
 | They create such a knot from it and fasten it with a thin yellow thread. |
 | By cutting off the top, you get the required workpiece. |
 | It is placed on a wire. |
 | For a strong connection, use green tape. |
Making flowers from corrugated paper with candies
Delicious treats inside the buds are a pleasant addition to the wonderful appearance of the products. This technique can be studied using the example of making poppies:
| Photo | Description of actions |
 | Petals are cut from blanks with or without application. |
 | Poppies have many stamens. Therefore, preparing such a product from corrugated paper will be useful. |
 | Candy is wrapped in it. |
 | The finished block is placed on a thick wire and secured with a strong green thread. |
 | Candies can be hidden in partially blossomed buds. |

What else can be made from corrugated paper?
They are formed from flowers. Such elements are used to create paintings and original design compositions. Below are the features of DIY corrugated paper:
| Photo | Description of actions |
 | For a large product you will need a sufficient amount consumables. Rose buds are created in the right quantity using one of the above technologies. |
 | The ball base is created from crumpled paper, which is held together in in the required form using thick strong thread. You can purchase a ready-made foam ball of suitable size. |
 | A foam cube with a rod is installed in the flowerpot. It is wrapped with corrugated paper tape, which is attached using adhesive composition in several places. |
 | The roses are fixed on the ball (with PVA glue). It is advisable to create a hole in it in advance for subsequent installation on the rod. |

Corrugated paper is a lightweight material that holds its given shape well. These properties are used to implement various creative plans.

If necessary, a fantastic background with the necessary parameters will be created quickly and without extra costs. The only significant limitation is suitable weather conditions. In strong winds and rain, openwork compositions will not withstand destructive external influences. For this reason, they are more often used in enclosed spaces.

Kids love bright, unusual products made from corrugated paper. They joyfully perceive the amazing transformations of the surrounding space.

You can use other instructions to figure out how to make crepe paper flowers. Tips will come in handy experienced craftsmen, study of current market offers in relevant product groups. But in any case, the following facts and recommendations must be taken into account:
- The cost of a standard roll of paper is from 60 to 120 rubles. You can make several bouquets of flowers from it. To save more, find direct suppliers.
- The first experiments are performed at relatively simple designs. Choose products with large components, the production of which does not require special care. As they acquire skills, they move on to complex compositions.
- This hobby is not just for adults. The creation of functional and beautiful objects is used for the harmonious development of children. With its help, fine motor skills of the fingers are improved, and good taste, a caring attitude towards things is brought up.
Bouquets are not only given, they are also used. Often, a large number of flowers are required to decorate various special events. You can create inexpensive and beautiful ones from corrugated paper with your own hands. This decor does not fade over time and can be stored for a long time.
Read in the article
Advantages and properties of corrugated paper
To perform original jewelry Corrugated paper is used, which has certain advantages:
- this is available and offered in stores;
- such material is packaged in rolls, which makes it possible to store it for a long time;
- It is easy to use; to create a composition you only need scissors;
- the workpieces are interchangeable, the parts are easy to connect and prepare again;
- The material is distinguished by a variety of textures and shades.

How to make beautiful flowers from corrugated paper with your own hands
Making flowers from corrugated paper with your own hands is quite simple. In this case, different manufacturing methods are used. Various blanks made from cut strips of paper are used. Eat special instructions that will help you create original ones.
Stages of creating a rose with your own hands from corrugated paper: step by step
Roses from this material are made in different ways. This produces a variety of compositions or simple flowers which are placed in a vase.
To make a flower from corrugated paper, you need to prepare the paper you need color palette, pieces of wire, scissors, sheets of cardboard, pencil and special glue. Step by step process listed in the table:
| Image | Step by step process |
 | Separate petals are drawn on cardboard, which should be of different sizes. When using different flowers it will look better. |
 | The material folds like an accordion. Petals are cut out using the supplied blanks. Rose leaves are also made. A small indentation for the bud is made in the blanks with your fingers. |
 | Individual pieces are cut from the wire. In this case, one end is bent with pliers for the core of the bud. Then the middle of the wire is wrapped in a small petal. The lower part is glued to the stem blank. |
 | A bud is gradually formed. In this case, the petals are glued from small to large sizes. |
 | Using a ribbon, corrugated strip or green thread, you need to wrap the base of the bud. Then the stem is wrapped and the prepared leaves are glued from it. The material is finally fixed with glue. |
 | The petals and leaves are straightened. |
Several flowers are made and placed in a vase or in a variety of wicker baskets. If only buds are needed for decoration, then the stem part is cut off.
You can make a rose in another way, in which the product is completed in a few minutes. It is necessary to cut a long strip of corrugated paper. Its width should be 8-10 cm. One edge is processed like a pie edge. The edges of the strip are pinched along the entire length with your fingers. Then the strip is rolled into a bud, and the edge is glued to the finished product. The made bud is wrapped in green thread. Ready elements mounted on a wire workpiece. At the same time, a whole bouquet is completed in one and a half to two hours.
Related article:
The correct application of this technology, described in the article, will be useful for creating with my own hands products with unique aesthetic and functional characteristics.
An interesting option is to create one yourself from corrugated paper. This design can be made from scrap materials in a couple of hours. They are made to decorate interiors and for banquets.
Technique for making a paper peony
You can create a beautiful peony from this material. This requires paper various shades, paper clips for fastening, wire, thread and scissors.
The table shows the sequence of work.
| Image | Creation process |
 | Multi-colored rolls are cut into sheets of the same size. |
 | The elements fold into an accordion, but the width should not differ. |
 | The accordion is attached with a paper clip. The edging of individual elements is trimmed in the form of petals. You can also simply cut off the corners to create triangles. |
 | The middle parts of all blanks are connected and stacked according to size. All sheets are collected into one assembled element and rewound in the middle. |

Comment
Designer of the studio "Cozy House"
Ask a question“When creating a peony, you can use 5-7 shades. In this case, an even transition from pale to rich tones is created.”
Related article:
It will be easier to show your talents if you carefully study decoupage for beginners step by step. This article provides detailed instructions, which will help you reproduce the technology at home without errors.
How to make a sunflower?
When deciding how to make flowers from corrugated paper, you should try making a sunflower. In this case, you need to prepare material of black, brown and yellow colors, PVA solution, pieces of wire and scissors.
The petals should be oblong in shape and have sharp tips. The leaves should be the same. Then all actions are performed according to the instructions:
| Image | Stages |
 | A strip is cut from a dark-colored sheet. The longer it is, the more magnificent the flower will be. |
 | Minor cuts are made on the larger side. In this case, the width between them should not be more than 4 mm, and the length of the cut should be about 1 mm. To speed up the procedure, the strip can be laid in several layers. |
 | The created blank must be twisted into a tube and wrapped with dark thread. It is necessary to straighten one edge to create a core. |
 | Then the petals are fixed with glue. The core is turned upside down and the petals are attached to it in a circle. Several rows of yellow petals are made and then green petals are formed. |
 | A rectangle is made from green-colored material that covers the wrapped core. The rectangle is glued in one part to the green petals, and then twisted around the wire blank. |
You can prepare the leaves in advance, which are best made wide. They are attached to the wire along with the winding of the stem.
Original tulips
You can create an original bouquet of corrugated paper from tulips. To work, you need to prepare corrugated paper, pencil, cardboard, scissors, wire, thread and PVA glue.
Creating tulips includes the following steps:
| Image | Job |
 | A petal is depicted on cardboard and cut out. You will need about 5-8 petals from paper. |
 | The petals are laid out separately. All elements need to have their ends curled. |
 | The edges of the petals need to be stretched a little and the base should be shaped into a cup. |
 | All parts are distributed in a circle. At the same time, a bud is formed. At the bottom, all the petals are curled and fixed with adhesive. |
 | The flower is attached to the end of the wire, which is used as a stem. |
 | A strip is cut out of green paper and wrapped around the stem. The cut leaf is slightly bent and glued to the stem. |
Useful information! You can try making tulips from paper and candy. To do this, you select candies in foil, they are attached to the wire, and then the petals are attached on top.
Making a Lily
Lilies are also created by the type of bud harvest. Their master class of flowers made from corrugated paper is distinguished by its complexity.
The process includes certain stages:
| Image | Stages |
 | Paper of yellow, green and lilac shades is being prepared. You will also need paints, glue, a piece of wire, a brush and scissors. |
 | From blanks rectangular shape petals are cut out. |
 | The ends of the parts are stretched and then curled with a pencil. |
 | At the base of the petals, spots of a dark shade are applied with watercolor paint. In this case, mix dark blue and brown. |
 | A stem is made from wire. The corrugated paper is then straightened and wrapped around the wire. |
 | A pistil is made on the stem |
 | The stamens are made of yellowish paper. In this case, the workpiece is cut off and cuts are made along its entire length. The resulting elements are twisted. |
 | Anthers are made from glue and semolina. A drop of adhesive solution is applied to the tip of the stamen and then dipped into semolina. Completed parts are painted. |
 | Leaves are made from thin pieces of green paper. They are given a curved shape. |
 | The stamens are glued to the pistil. Then three petals are attached, and after that the rest. |
 | A smooth transition is made to the flower stalk. Leaf blanks are attached with glue. |
Candies attached instead of pestles look unusual. They are wrapped in foil and attached to the stem blank.
Options for corrugated paper flowers with candies
Using beautiful flowers from corrugated paper, you can make a bouquet with sweets with your own hands. To do this you will need candy, corrugated paper for flowers and stems, wire, scissors and glue.
| Image | Stages of work |
 | A rectangle is cut out of paper, folded in half and rounded on the side. This piece is used to wrap the candy. To give the product a beautiful shape, the paper in the center is slightly stretched. One edge is secured with an elastic band. |
Making crafts from corrugated paper with your own hands is very fun and exciting. This beautiful and pliable material has gained great popularity among needlewomen. In addition, corrugated paper is inexpensive and boasts a huge variety of colors.
We bring to your attention several simple lessons on creating crafts from corrugated paper. They will help you study this fascinating process in detail and suggest a lot of new ideas for creativity.

We will need: corrugated paper of different colors, wooden skewers or sticks, glue and scissors.
Step one. Cut the paper into equal strips. We fold each strip in several layers and cut it into thin strips (not all the way!), as shown in the photo.

Step two. We wind each strip of the resulting fringe onto a wooden skewer, which we then remove. As a result, we will get curls along the entire length of the paper tape, which we wrap around a skewer to make a hyacinth inflorescence. Before doing this, we dip the tip of the skewer in glue. To make the inflorescence more magnificent, it is better to use two stripes with curls.

Step three. Cut from green corrugated paper thin stripes. Drop glue onto bottom part inflorescences and from this place we wrap the skewer with a green stripe to the end of the stem, where we secure it with glue.

Step four. Cut out two green rectangles different sizes, and from them - leaves, give them a convex shape. Next, glue the leaves to the stem.

Step five. We make the rest of the flowers in the same way. Inflorescences can be made from two multi-colored stripes. The more colors we use, the more interesting the composition will be.

A luxurious bouquet of hyacinths, made by yourself, is ready!

Topiary “Heart” made of corrugated paper

We will need:
- pink corrugated paper
- trimming pencil
- tree pot
- cardboard, foam, glue and scissors
- tree trunk - any stick of suitable size
- elements for decoration
Step one. Cut the pink corrugated paper into equal squares and cut out a large heart from the foam. Next, we decorate the heart using a three-dimensional applique using the trimming technique. To do this, press the pink square to the blunt tip of the pencil and press it down, as shown in the photo. We have a tube-end.

Step two. Apply glue to the tip of each end tube and glue the element onto the heart. We continue to attach the formed pieces of paper elements until we cover the entire surface of the heart. We try to place the end tubes very close to each other.

Step three. We trim the finished heart with scissors so that it looks even and neat. We fill the pot for the tree with any filler. Next, we cut out a circle from cardboard along the diameter of the topiary container with a hole for the trunk, decorate it using the trimming technique with green corrugated paper and install it in the pot. We also cover the trunk with a green paper strip, secure it in the pot, and glue it to the heart with the other end.

Step four. We decorate the tree with birds and satin ribbons. Decorate at your own discretion and flower pot. You can make such a wonderful souvenir with your own hands and give it to your loved ones or friends on Valentine's Day.

Easter egg stand

We will need: corrugated paper, cardboard for the base, scissors, decorative elements and glue.
Operating procedure:
- We make the base for the stand from cardboard.
- We cut out a fairly wide strip of corrugated paper and glue it onto a round cardboard base.
- We fill the inside of the stand with pieces of organza, lace or soft wire. Complementing our creation bright elements. You can use paper flowers, beads, pebbles and other decorations. The DIY egg stand is ready.
Corrugated paper pineapple

We will need: green and yellow corrugated paper, a short bottle with a low neck, golden foil, scissors, glue.
Operating procedure:
- From green paper we cut out leaves 2 cm wide and 8 cm long, and from yellow paper we cut out pineapple scales 2-3 cm wide and 9 cm long. Then we fold the scales in half and twist them in the fold.
- We close the bottle with a cork and wrap it around top part neck with golden foil. Next, we glue leaves from top to bottom on the neck of the bottle, and scales on the rest of it. We arrange them in a checkerboard pattern.
- We make a bottom with leaves and color the pineapple with a felt-tip pen with brown strokes.
Corrugated paper butterflies

These cute butterflies can be made in 15 minutes using the simple pattern we provided. For creativity we will need: corrugated paper, threads, scissors, glue and decorative elements.
Operating procedure:
- We cut out two pairs of wings of different sizes from multi-colored corrugated paper, put them on top of each other, and then tie them in the center with thread and straighten the wings. If the butterfly will be used as a pendant, there is no need to cut the thread.
- Next we make the body of the butterfly. To do this, cut out a narrow strip, bend it in half, make a cut as shown in the diagram, and wrap it around the central part of the butterfly. We twist the antennae from the cut ends.
- Glue sparkles or sequins onto the wings - and the fluttering beauty of the butterfly is ready.
A few more craft ideas
The most popular crafts made from corrugated paper are flowers. There are many simple and detailed diagrams. Here are just a few of them.


