Everyone who builds a private house wants to save a little. This is how the idea of making a roof with your own hands arises. And to do this, you need to correctly install the rafter structure and lay the roofing material, and each of these stages has its own nuances.


Types of structures
Today, roofing acts not only as protection for your home, but also as its distinctive architectural feature. Depending on the type of roof the house has, the overall impression of the facade is formed. For example, mansard roof makes the appearance of the house more conservative, while the exploited flat is built on top modern cottages in high-tech, modern, eco styles.

Flat
Despite their apparent primitiveness, flat roofs are the most difficult to construct. They are not very popular among Russian consumers, since they are associated mainly with Soviet-built high-rise buildings, but recently more and more people appreciate the convenience and functionality.
There are exploited and unexploited flat roofs. In the first case, the roof surface is used as an additional functional space. So, here you can lay out a garden, install a playground, organize a gym, or adapt it as a terrace. In the second case, the roof is just a roof.
It is worth noting that the design of the unexploited version is much simpler, so for self-construction it is worth choosing it.


Flat roofs place a lot of stress on the walls, so you should not choose this model if you live in a frame house. In addition, it is advisable to consult with a professional so that he can draw up a project and make all the calculations. From a financial point of view, even when contacting a specialist, the arrangement flat roof much cheaper than any other.
The biggest problem is removing snow from such a roof. In this case, it will have to be periodically cleaned manually so that the snow load does not become excessive for the structure. You will also need to organize a drain (best for flat roofs internal option is suitable). We must not forget that flat roof suitable for initially strong or additionally reinforced walls, otherwise the load-bearing walls may not withstand and crack.


Single-pitch
For full-fledged private houses one pitched roofs rarely chosen. This is due to their small decorative qualities. Indeed, the lean-to structure looks unfinished. Therefore, it is much more common to see a pitched roof over a private country house, outbuilding or garage. If it is chosen for a cottage, then it is most likely made in a modern style.
The first and main advantage of a pitched roof is its simplicity. Even a beginner can make a pitched roof, from drawing up a drawing to finishing. Complex calculations are not required here, you just need to know the basics of geometry. A pitched roof can withstand both snow and wind loads well. It is only important to install it correctly. As with a flat roof, savings are achieved due to the small amount of materials required.


One cannot help but mention the difficulties with ventilation. There is almost no free space under a pitched roof, so some difficulties may arise. It is practically impossible to make an attic under an ordinary pitched roof, as well as to allocate at least some space for an attic space. Most often, a pitched roof is used as unusual ceiling for the top floor, which imposes additional obligations for its insulation and waterproofing.
The most popular are designs with multi-level pitched roofing systems, which look much more unusual and futuristic, especially if the house itself is well integrated into the surrounding landscape and is made in modern stylistic directions.


Gable
Gable structures can be found much more often than single-pitch ones. This is due to their traditional appearance, which many residents associate with convenience and coziness. The construction of a simple symmetrical gable roof will also not take much time and effort and will be within the capabilities of even a beginner. However, in financially a gable roof is much more expensive than a shed or flat roof.
There is no need to maintain a gable roof: There will be no need to manually remove snow from it; at most, you will need to renew the paintwork from time to time. Another thing that speaks in favor of gable roofs is that they equally distribute the load on the walls. In the case, for example, with a single-pitch structure, more weight will fall on the “low” wall, while a gable structure distributes the weight between two parallel walls. In this regard, it can be erected over houses made of fragile, in the general sense, materials.
An example would be a frame cottage.


Before construction, it will be necessary to draw up a diagram or project, so that in the future the rafter system can withstand the weight of the roofing material. By the way, the rafter belt is made on the ground and only then transported to the installation site. Therefore, even not the strongest person can make such a roof, but professional builders Still, it is advised to work on a gable roof with a partner.
With preliminary calculations and proper preparation, the attic space under the roof can be turned into an attic, but the decision to build an attic floor is best made at the design stage of the building and the roof in particular, since a number of requirements are put forward for attics (especially residential ones).


hip
This type is one of the most popular. The four-slope design with two triangular slopes and two trapezoidal slopes is comfortable, functional and beautiful. The big advantage is that you can organize a spacious attic here - even after the roof is built. To do this, you will need to carry out some insulation and insulation work, but you will not need to dismantle the roof: everything can be done from the inside.


All hip roofs can withstand heavy snow and wind loads. The structure has four stiffening ribs, each of which carries approximately the same weight, which is why the structure acquires similar strength. There is another reason to choose a hip roof: with this type, you can make large eaves overhangs along the edges, which will protect the walls from rain or snow. Due to the fact that all overhangs are in the same plane, they are less destroyed, since they are all exposed to the same influence of negative factors environment.
An important advantage lies in the aesthetic side: a house with an attic under a hip roof looks more harmonious, not so elongated upward.


The disadvantages include the difficulty of constructing a roof of this type and the high cost. It will require not only significant financial investments, but also quite a lot of time. It will not be possible to make such a roof alone - you will definitely need a whole team. If there is an attic under the roof, and the windows are located directly in the roof itself, then water can leak through them if the installation was not carried out completely correctly. The solution would be to cover the windows from the outside, but this is impractical.

Half-hip
Half-hip roofing began to be popular in our country not so long ago. By appearance it is very similar to the classic hip one, but has one difference, which is that the end slopes do not fall to the level of the mauerlat, but remain slightly higher, as if opening part of the wall. As a result, you can make windows in a flat wall through which water will not leak.
The most popular are gable half-hip structures, but four-slope ones can also be found. It is worth keeping in mind that it is impossible to make a four-slope semi-hip yourself: you will need a correct plan, a project with all the calculations.
Compiling something like this requires special knowledge and skills.


Half-hip roofs have all the same advantages as hip roofs. An additional advantage the presence of walls in which you can make windows or organize access to a balcony is prominent. Much less materials will also be required for construction. However, the time spent on construction will increase noticeably, since the design of this type of roof is more complex.
When planning and designing, it is also necessary to take into account the type of roofing material, since it directly affects how rigid the rafter system should be. In addition, it is necessary to keep in mind that the rafter system will have more components. The process of laying the finishing material will also become more complicated.


Tent
The hip roof is also a popular hip roof, but it differs significantly from the hip and half-hip roofs. Here all four diagonals converge at one point, which is the peak of the roof. The design can be flat or high. It depends on climatic features: wind direction and strength, amount of snow, etc. Since the structure of the roof is similar to a tent, it got its name precisely because of this.


An important advantage is that there is no need to construct gables. This way you can save a significant amount building materials and time, thereby spending less money on construction. Another advantage is the low risk of leakage. Due to the pyramidal structure, precipitation easily rolls off the roof without stopping. On the other hand, this shape of the roof contributes to its uniform heating, so in the summer months you can use the attic or attic as a living space without worrying about additional heating. Finally, there is no need to install drainage here, since water will drain from the roof without touching the walls, thanks to the wide overhangs.
There are also some nuances. Thus, a hip roof is quite difficult to design on your own, since it involves a special structure of the rafter system. Building a rafter frame with your own hands is also not easy: there are many connections that must be highly reliable and rigid. Thus, the need to hire specialists leads to the fact that a large amount of financial resources will be spent on construction. It is also necessary to keep in mind the fact that there is a high risk of delamination of the finishing material (for example, tiles or slate).


Conical
A cone-shaped roof is often called a round roof due to the fact that it consists of many edges, as a result of which from a distance the base appears to be round rather than polygonal. This type of roofing is not typical for typical cottages. The conical structure can be found above mansions or castles, and also as part of a roofing composition with a bay window. The cone-shaped pattern gives the building an interesting fairy-tale look, distinguishing it from all other houses.
The positive qualities of the structure include its earthquake resistance. Thanks to the many stiffening ribs, as well as the rounded shape, such a roof will withstand any wind and snow loads, as well as earthquakes or other similar disasters.


Unfortunately, such roofs have more disadvantages than advantages. So, you cannot make a window in the roof itself. This is due to its shape, which tapers upward, as well as aesthetics: windows in a cone-shaped design do not look very attractive, spoiling the whole look. Another disadvantage is associated with this - the inability to organize an attic, because insufficient level illumination is a significant drawback. Construction materials will require much more than other roofs. We are talking not only about the rafters, but also about the finishing roofing material. The design and construction itself are quite complex, so you will need to hire specialists with the necessary knowledge.


Attic
This name summarizes several options at once roofing structures, however, an important factor is the presence of attic space under the roof. We are not talking about an ordinary attic space, but about a full-fledged attic. It has a number of requirements, one of the main ones being the height of the ceilings. Here it should be at least 2.5 m. The ceiling may be lower, but low ceilings should occupy up to 50% of the total space.


A mansard roof can be installed both at the planning stage and after construction is completed. Of particular interest are residential attic rooms, which cannot be organized under all roofs. So, it is problematic to place one under a single-pitched or double-pitched structure, but all hipped roofs imply the conversion of the attic into an attic in the future.
It is worth keeping in mind that some roofs do not necessarily need to be insulated right away. Sometimes it is possible to insulate and waterproof the roof from the inside when the need arises.

Another distinctive feature is the windows. If the attic was taken into account at the planning stage, then there may be built-in windows in the roof, lying in the same plane with it or specially attached, similar to birdhouses. It is undesirable to do without windows completely, so it is recommended that when converting an attic into an attic, there should also be windows there.
Keep in mind that roof windows are several times more expensive than ordinary ones, since they, like the roof, must prevent water and drafts from entering the attic.


Difficult
A roof with a complex structure is the most interesting, but it is also problematic to build it yourself. This is due to technical difficulties: you need to correctly calculate the load on the rafters, on the mauerlat. If the calculations are carried out incorrectly, there is a high risk of roof collapse or wall cracking.
As a rule, complex roofs are built with the aim of expanding the usable area of the house: under such a structure you can place a full-fledged attic room, or even two. In this case, the roof is insulated and prepared in advance, so that in the future you do not have to deal with it from the inside. A complex roof is not easy to process without completely disassembling it, since there are many joints, joints, and corners.


The advantages of complex roofs include their attractive appearance. It is always possible to design a structure so that it is fully consistent with the surrounding landscape. Among the disadvantages, complexity comes first. It is almost impossible to make such a roof on your own, so you will have to hire a team of professionals. In addition, an impressive amount of materials will be required both for the construction of the rafter system and for covering the roof.
All the variety of types of roofs will allow you to choose the option that is ideal for your cottage or home. You need to calculate your budget and strength in advance, and also pay attention to the surrounding environment - not every house will fit harmoniously. For example, a flat roof requires a modern landscape around it, while a conical roof requires as traditional a landscape as possible.


Preparation and tools
At the first stage it is necessary to carry out everything preparatory work, prepare all the necessary materials and tools. The list can be called standard. So, you will need mastic and sealant, end and cornice strips, construction knife, trowel, hammer and roofing mop. All these tools are suitable for laying soft roofs, because this type can be installed alone.


First you need to strengthen the existing rafter system. If you do it yourself, it is recommended that you familiarize yourself with the design features of the form you have chosen. In the vast majority of cases, the rafter frame is assembled on the ground, after which it is moved upward and attached to the Mauerlat. For reinforcement, you can use plywood, OSB boards or tongue and groove boards. Please note that plywood is not suitable if the attic or attic space is residential, since the material is highly flammable and releases toxic substances when heated.
It is better not to carry out work in winter. If it turns out that the installation is carried out in winter, then do not forget to leave compensation gaps of 3–5 mm between the seams so that the layers do not deform when expanding. In addition, you need to carefully process everything wooden parts antiseptic to prevent the appearance of microorganisms or molds.
This treatment will significantly delay possible rotting of the rafters, especially if you do not carry out the waterproofing quite correctly.


To build a truly high-quality roof, you need to follow some recommendations:
- When transporting materials intended for roofing, make sure that they do not bend or become deformed. This is especially true for easily bendable options such as corrugated sheets.
- If possible refuse mechanical loading, since rigid slings can deform some materials. Use soft slings or the manual method.
- Don't forget about drainage systems. We need to decide in advance internal drain will be designed or external. The design of the roof directly depends on this. For example, if you choose a flat option, you need to make a small slope towards the outer edges with an open drainage system or a small depression in the center with internal water drainage.


- When working with each of the finishing materials its specifics must be taken into account. For example, metal tiles or corrugated sheets are attached to the roof with dowels in places where the waves deflect, while soft materials can be attached anywhere.
- All installation work is carried out from top to bottom. This applies to both the reinforcing layer and the finishing layer. It is necessary to attach one sheet at a time; they are also transported upstairs one by one.
- The finishing of the ridge is done last. The material here should be overlapped to avoid moisture penetration in the future. It is the ridge joints that are the most vulnerable to water.


Sequence of work
It should be remembered that everything starts with design. It is the plan that is the fundamental condition that allows us to build a truly high-quality and beautiful roof in the future. So, it is necessary to clarify the dimensions of the roof, its height, the presence of windows, as well as the orientation of the roof. Remember that the orientation relative to the cardinal points is selected depending on the prevailing wind direction. The project must be drawn up according to all the rules, so that in the future you can avoid unpleasant surprises during both construction and operation.
If necessary, before starting work, it is necessary to install a reinforcing belt. It will slightly strengthen the walls and the Mauerlat, thereby removing some of the load from them, and it will be possible to choose a more weighty roof.
Reinforcement is relevant for not the most durable houses, for example, frame houses.

Check and process all available materials and tools. If something is missing, it is much easier to add to the list at the preparation stage than after the work itself has begun. Check materials for integrity and suitability. If there is any doubt about the quality, it is best to replace the part. The reliability and tightness of the roof largely determines how warm and cozy the house will be, so it is important that everything is of the proper quality.
After all preparations are completed, you can proceed directly to construction. Step-by-step instructions are given below.

Construction: technology
The easiest to construct is the gable structure. It is most often done with your own hands, without the help of professional craftsmen, so it makes sense to consider it.
Rafters can be hanging or layered. In the first case, the rafters rest against the side walls, as if serving as spacers, as a result of which the impact increases. To relieve the load, the rafters are additionally connected to each other by an additional beam called a tie. This helps reduce stress.

The layered version assumes the presence of a load-bearing wall in the middle. Another ceiling is created above it, against which the side slopes lean. It turns out that the load is distributed evenly between all three walls. However, most often there is a combined case, when part of the structure is layered, and part is hanging.
Please note that the rafter system is completely assembled on the ground, and only then installed in its rightful place. The rafters are attached to the Mauerlat, securely fixed (usually using metal brackets). First, the outer elements are attached, and then the intermediate ones. Once the main elements (legs) are securely installed, you can attach everything else.


Protective layers: installation order
The cushioning layer must be made in full accordance with the specified sequence. Failure to comply with the order will lead to the fact that the roof will leak, let in heat and drafts, and the rafters will rot.
- There must be a high-quality vapor barrier under the rafters. An ordinary vapor barrier film will do, which will prevent condensation from getting on the insulation and wooden parts.
- Next they are laid directly rafters.
- Next they put insulation. Please note that it is much more convenient to work with insulation in slabs, since it can simply be laid between the rafters without fastening, and it will hold securely. Also consider using foam insulation, which has the best heat-retaining properties.


- A layer of waterproofing is placed on the insulation. Experts recommend using new material– waterproofing membrane. It will protect against moisture without trapping condensation formed due to the collision of hot and cold air. The membrane is attached to the rafters using slats.
- Place on top of the slatted sheathing roofing material.
Please note that when self-installation the need to use quality materials so that if something happens it is possible to neutralize the consequences of minor mistakes. As for insulation, pay attention to mineral wool, however, do not use glass wool if a living room is planned under the roof.


Finish coating
A huge variety of materials can be used as the final roofing covering. Today there are many forms and types: some are suitable for warm climates, others for more severe ones; some can be installed manually, while others require the use of special equipment. However, each of the popular options has its own individual advantages and disadvantages.


All roofing materials are divided into two large types: soft and hard. In the first case, they are easy to bend, adjusting them to fit the required form. In the second case, the material is made in the form of panels, which are subsequently lifted one at a time and mounted on the roof in their original form. Both of them can be cut; only for soft materials a construction knife is used, and for hard materials a hacksaw is used.
Before you cover the roof, you need to decide which type is most suitable for you. Keep in mind that when working alone, it is best to use soft varieties, while pair or team work allows you to easily transport large panels to the top without damaging them. In both the first and second cases, it is better to prefer machine transportation: there is less risk of accidentally damaging the sheet, dropping it, or splitting it. We remind you once again that It is better to choose soft cables, as they will not put pressure on the roofing slabs and will not scratch them.


Types of roofing materials
As mentioned above, roofing materials are divided into two broad categories. The most common is bituminous shingles, which are classified as soft materials. The big advantage of this option is that it is suitable for all types of roofs, including even complex and cone-shaped ones. When installing, you won’t need any professional equipment - you can get by with the set of tools that every owner has.
As for performance, soft bitumen shingles have proven themselves to be a reliable material that can withstand pressure changes, exposure to precipitation and sunlight, and also has excellent decorative properties.

Slate is popular among sheet materials. Despite the fact that it is fragile and easily cracks under strong impacts, it withstands environmental influences very well. It is also important that slate is very inexpensive, so it is chosen when building country houses or when limited budget. It is worth keeping in mind that the heat and sound insulation qualities of slate leave much to be desired, so if possible, for a house in which people will live all year round, it is better to choose a more modern analogue.
Finally, The most worthy and at the same time expensive material is metal tiles. It greatly outperforms others in terms of aesthetics. Such a roof will look expensive and presentable, while the material will not lose its properties for many years. Metal tiles can last about fifteen years, while maintaining their original appearance. Unfortunately, there is one drawback here - poor sound insulation, so it is advisable to take additional care of this.


Mounting methods
It would seem that the finishing coating can only be attached with dowels or self-tapping screws, but in reality it turns out that these methods have to be abandoned. This is especially true for soft roofs. Thus, soft roofing materials are usually attached using the fusion method, also called the hot method. This approach ensures complete tightness, but many problems arise during operation.
For example, common cause If the attachment is not done well, the environmental conditions may be too humid, too hot or too windy. It is also important what characteristics the roofing material itself has.
To ensure maximum quality of work, they are carried out mechanically.


When choosing a screw fastening, care must be taken to ensure tightness at the puncture sites. For this purpose, specialized grouts are used. Some particularly resourceful owners choose polyurethane foam, however, professionals strongly do not recommend adhering to this method, since the foam is absolutely not intended for this, and the roof will soon leak.
Regardless of which method you choose, pay attention to the uniformity of fastening of materials: with the hot method, the seams must be smooth and beautiful, and when using screws, each of them must be carefully sealed. Such precautions will protect you from hasty repairs.


Corrugated sheet
Corrugated sheeting is a sheet material. With its wavy structure it is similar to slate, but this is where all the similarities end. Corrugated sheets refer to metal materials. The sheet is fully processed, covered with various layers to prevent corrosion.
For the roofing, special sheets of corrugated sheets are used, which are a modern analogue of the iron roofs that were so popular in the past. It is worth mentioning separately that corrugated sheeting is ideal for designing pitched roofs, but for complex round designs it is not advisable to use it.
The material has both its advantages and disadvantages, which are worth talking about in more detail. It should be noted in advance that there are many more advantages.


Advantages and disadvantages
The main reason why many choose corrugated sheeting is its cost. It is quite low compared to analogues, but corrugated sheeting is not inferior in performance properties. Another plus is the abundance color solutions: You can find almost any shade in the product line. The most popular colors are brown, dark green, burgundy, and gray. A corrugated roof does not burn and does not emit toxic substances into the atmosphere, which is why it is considered environmentally friendly. The service life is also impressive: such a roof can last up to 50 years, depending on the quality of the material.
As for the shortcomings, there are few of them. Many are alarmed by the simplicity of the material: it does not seem particularly interesting.
Another drawback is poor sound insulation: rain drumming on such a roof will thunder throughout the house - you will need to spend additional money on insulation and soundproofing work.

Characteristics and Features
Arranging a roof from corrugated sheets takes very little time and effort. No wonder this material is considered one of the easiest to install. To carry out installation correctly, you need to remember some nuances:
- It is best to select corrugated sheets that fully match the size of the roof slope. Then you will be able to close it without resorting to joining the elements.
- If it was not possible to select the panels according to the size of the slope, they resort to joining short elements: the sheets are laid overlapping by 15–20 cm, fastening them with self-tapping screws at each such joint. Silicone sealant is suitable for insulation.
The last stage of building a house is arranging the roof. Traditionally, a gable roof is erected for any residential building, and a single-pitch roof is erected for outbuildings. Technological processes for the installation, fastening and arrangement of a roof with a rafter structure in a gable roof version have been perfected for centuries, and these operations do not change depending on the type of roofing materials (clay tiles, corrugated sheets, metal tiles, asbestos slate, metal or plastic).
Types of gable roof
People say: “a roof like a house,” that is, they mean not only the shape, but also the reliability of the structure, which has a long list of advantages:
- A variety of roofing scheme options and architectural roof shapes;
- Simple calculations and cost-effectiveness of the roof;
- Natural runoff of precipitation;
- Simple geometric shapes of the roof ensure a low probability of water accumulation and roof leakage;
- Large usable attic area, it is possible to make an attic;
- Good maintainability, high strength, durability and wear resistance of a roof made of two slopes.

Three most common options gable roof:
- Symmetrical gable roof: This is the most popular solution due to its absolute reliability and ease of execution. Symmetrical slopes evenly distribute all loads on the mauerlat and walls of the house. The choice of roofing material does not depend on the type and thickness of the thermal insulation layer. The load-bearing load can be easily increased by making the rafter system from thicker timber; the jibs and spacers can be attached anywhere. Negative factor - a full-fledged attic will not work in such an attic - either there will be low sloping walls with many “dead” zones, or a small but rectangular room;
- Asymmetrical roof of two slopes: Different slope angles reduce usable area attic, but on one side you can make a full-fledged living space. Due to different roof slope angles, the load on the load-bearing walls and foundation of the house is distributed unevenly, which requires recalculation of the load-bearing capacity of the base and load-bearing walls home, recalculating the types of materials and their quantities, as well as changing methods of insulation, waterproofing and finishing;
- Asymmetrical gable roof with internal or external bend: Allows you to design living spaces without regard to the roof structure. The disadvantages are the same as in the paragraph above.

Preparing to build a house roof
The shape of the roof and its design can be selected based on the role played by the dimensions of the building, the material of the load-bearing walls, geographical location plot. These and other parameters specified in the project determine what loads a gable roof can withstand during operation.

The slope angle of the slopes has a certain optimal range, in which weather conditions have the least influence on the formation of maximum loads on the roof. If the slope angle is ≤ 400, then this limits the possibilities of equipping an attic or a full-fledged room in the attic, and a slope angle ≤ 100 increases the load on the roof from rain, wind or snow. If you definitely want to have an attic or a room in the attic space, it is better to use the option of a sloping asymmetrical roof, and if the walls of the house are more than 6 meters long, then the rafter system must be strengthened with additional purlins. 
When calculating building materials for gable roof it is necessary to proceed from the axiom that the weight of roofing materials should be as small as possible so as not to load the walls and foundation of the house. Wooden elements will be stronger not only by increasing their cross-section, but also by using suitable types of wood. The main parameter when calculating materials is the total area of the roof, and a symmetrical structure in this regard is easier to calculate than others - it is enough to know the perimeter of one slope, double its area, and get an accurate result.

The main load from the weight of the roof is borne by the long walls of the house, so the rafter system is built on the principle of distributing the load along the system. For a small house (≤ 6 m), it is more practical to use the system hanging rafters(without supports), when building a larger house, a system of layered rafters with a more complex configuration is used. 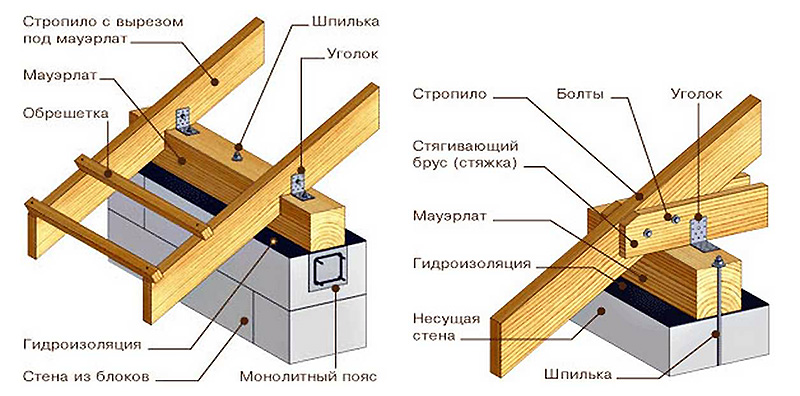
A finished gable roof for a private house consists of the following elements and components:
- Mauerlat is a wooden (sometimes metal, if the roof will be covered with rolled metal) beam or log that is attached to the surface of the external walls to support the rafters on it;
- A rafter system, the design of which is selected based on the design of the house;
- Struts (diagonal fastening of rafters to each other) and ridges (beams along the roof ridge for fastening the slopes);
- Lathing – used for installation of roofing and hydro-noise insulation elements;
- Insulation and moisture protection;
- Roofing covering.
How to mount the Mauerlat
The Mauerlat along the walls of the house holds the weight of the roof, evenly distributing it over the walls and base of the house. The width of the timber for the mauerlat should be equal to the width of the wall. The timber is impregnated with an antiseptic and substances that increase the fire resistance of the wood. The outer border of the Mauerlat should not protrude beyond the outer edges of the walls. 
The Mauerlat is attached in different ways. Steel wire Ø 8-12 mm is laid in the brick wall, holes for the wire are drilled in the wood, and through them the timber is tied to the wall. The timber can also be secured with staples, threaded rods of one or two teeth, metal plates, wooden pegs or anchors through the same holes in the Mauerlat. The gables and lower edges of the sheathing are attached either directly to the mauerlat, or to a beam of smaller cross-section, which is nailed (screwed) to the top frame.
Floor beams
When settling in beam floors For the roof of a private house, it is necessary to use a wooden beam with a cross-section of 200 x 100 mm. The larger the area of the house, the larger the section of the supporting beam should be. Begin the installation of beams by attaching the outermost elements along the long wall of the house. Then the points where the remaining floor beams will be attached are marked. 
The lathing is mounted on longitudinal beams, which are located at a distance of 50-60 cm, and attached to the mauerlat with nails 200 mm long or by any of the above methods. The beams are carried beyond the edges of the walls to a distance that determines the width of the cornice - from 30 to 50 cm. The cornice will be nailed (screwed) from below to these beams. Since a pediment will be installed at the ends of the roof, to attach the cornice and pediment, an insert is made into a groove on the transverse beam of the mauerlat. During construction sloping roof for the attic, the pediment will have a fairly large area, so it is necessary to ensure the design of the ebb and gable overhang. 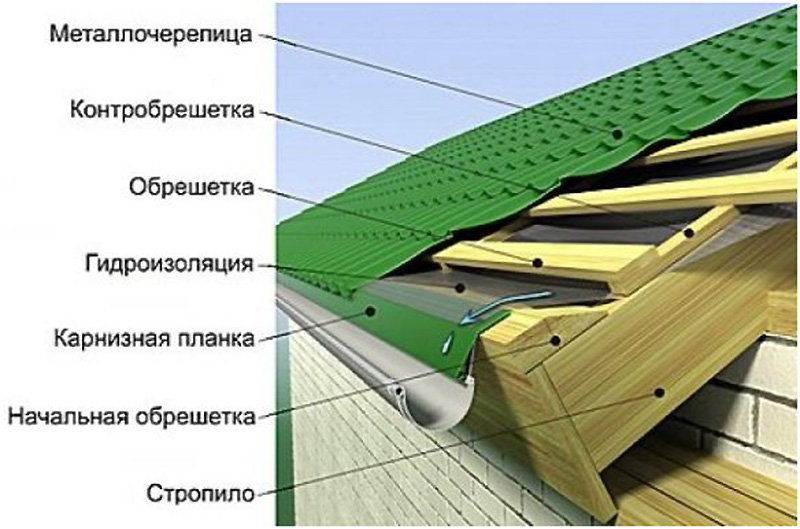
The rafters of a gable roof are several identical wooden beams same length and section. After installing the floor beams, a ridge beam is attached, for which beams with a cross section of 100 x 50 mm are secured along the central longitudinal axis of the house with spacers. Rack height in standard scheme gable roof is equal to the distance from the floor to the upper surface of the Mauerlat. Instead of timber for the ridge, you can use boards 50 mm thick.
Before installing the rafter system, it is recommended to make a scale template. To do this, the board from the rafter structure must be attached with one end to the beam, the other to the ridge, and mark its length. This will be the standard length of the rafters. 
The rafter system is also installed according to the template, observing the sequence of processes. After installation and fastening from the lower end of one rafter beam, you must immediately fasten the opposite rafter and connect the beams with their upper ends to each other through the ridge. The rafters are nailed to the ridge beam, and to the floor beam - with steel brackets or angles, self-tapping screws or anchors. For a roof of any shape with two symmetrical or asymmetrical slopes, boards are fastened lengthwise and crosswise under the rafters to give rigidity to the system.
Pediment and cornice
The pediment is sewn up after the construction of the rafter structure is completed. Modern materials are increasingly replacing traditional wood when sheathing gables, and now they use lining, siding, corrugated board, and other durable decorative finishing materials. Any cladding material is attached to a frame, which is mounted in advance. Regardless of whether or not there is a room or attic in the attic, it is necessary to leave a window opening in the gable - for ventilation and minimal natural lighting of the space. 
The cornice must be installed around the entire perimeter of the house - it is necessary for moisture and wind protection of the rafter structure, the walls of the house and the foundation. Since every self-respecting owner must make drains around the perimeter of the house, they are also attached to the eaves, and drain pipes to the walls. Plastic system The drainage system is mounted on plastic clamps. The bottom of the cornice boards or cornice frame is painted, sheathed with siding, clapboard or corrugated sheeting - in unison with the finishing of the pediment. 
The roof is mounted on the sheathing, and, based on the type of roofing materials, the sheathing is first done with vapor barrier, hydro- and heat-insulating materials. For roofing you can use ondulin, metal tiles, ceramic materials, soft tiles, etc.
- Self-tapping screws for roof construction must have the manufacturer's mark and EPDM gaskets ≥ 2 mm thick, otherwise roof leakage cannot be avoided;
- Poor-quality protective coating of fittings will quickly deteriorate under the influence of weather conditions, which will lead to leakage at fastening points and an unsightly appearance in the form of rusty or dirty spots;
- The absence of a snow retention system means the possibility of unexpected snow falling off the slopes, which can lead to failure of the roofing and drainage systems;
- Poor ventilation leads to the formation of condensation in the under-roof space.
Roofs of private houses are divided into several different categories, depending on the shape, structural elements, complexity of the device, and other things. When constructing a building, choosing the type of roof should take into account many factors: the amount of precipitation in a particular area, structural strength, wind load, arrangement of living rooms in the attic, etc.
The roof of a house performs several important functions at once:
- provides hydro- and sound insulation;
- creates a barrier from the wind;
- acts as a thermal barrier.
The durability of the structure depends on the quality of the structure itself and the roofing material. These indicators also affect the cost of heating rooms inside the building.
Flat and pitched roofs
The roofs of houses can be flat or pitched (sloping).
Depending on the architecture of the building, the appropriate roof structure is selected at the design stage. Drawings are created and calculations are carried out, taking into account all the features of the given architectural structure. The layout of the roof - attic or living quarters - is also thought out in advance.
 Country cottage with flat roof
 Flat structures are found mainly in countries that receive little annual rainfall. Since with heavy rainfall, water will accumulate on such a roof, and it may begin to leak. In the vastness of our country, pitched roofs are used in the construction of buildings. The plane of such structures is located at a certain angle, usually more than 10 degrees and depends on the amount of precipitation falling during the season in a given region.
You can learn more about all the other advantages and disadvantages of flat roofs from this special video.
Much more often they use roof designs for private houses with an inclined structure, which can have several slopes at once.
Attic and attic roofs
According to their design, roofs can be divided into attic and attic. In non-attic systems, the load-bearing elements of its structure simultaneously serve as the ceiling of the upper floor of the house. They can be ventilated or unventilated. U attic roofs present attic floor, which separates their structure from residential premises.

Roof purpose
When choosing the roof of a house, you should decide in advance how its space will be used: as a simple attic or living space. These points significantly influence which shape and type of roof is suitable for your home.
Main types of house roofs by shape
The roof structures of private houses can also be divided into several types according to their shape:
- single-pitched,
- gable,
- hip,
- multi-tongs,
- attic,
- tent,
- dome,
- conical,
- flat.
 Main types of roofs for private houses
 U pitched roofs The angle of inclination usually does not exceed 20-30 ⁰. The planes of attic roofs are set at an angle of 45-60⁰ in the lower part and 25-35⁰ in the upper part. For ordinary gable structures this figure is in the range of 25-45⁰.
Hip roofs require 4-8 planes for better removal rain and snow.
Beautiful roof structures for private houses are obtained by combining several gable elements or types, but maintaining such structures in good condition and installing them is not an easy task.

Shed roof
It has a fairly simple shape. At the same time, in the arrangement of private residential buildings, this type of roof is extremely rare, since with such a design the load on the rainwater drainage system increases significantly, and they simply do not look very nice.

 Private house with pitched roof
 In most cases, such roofs are used when constructing outbuildings of small width. If you nevertheless decide to equip this type of roof, then you will need enhanced drainage with greater throughput capacity.
Gable roof
Also having a very simple design, they are the most common type of roofs for private low-rise buildings. When arranging it, you can use almost any roofing materials.
 Diagram of a simple standard gable roof of a private house
 Hip (hatch) roof
The hip (hatched) roof is more common in the southern regions. With this type of roof arrangement, the attic has no pediments, and dormer windows, in most cases, are located at the intersection of the ridge with the hip ribs. The design of a hip roof is much more complex than a gable roof, so it is more often used in cases where the building needs to be given aesthetic appeal.
 Hip design hipped roof Houses
 Multi-gable roof
The multi-gable roof type is distinguished by an impressive number of different design options, depending on the size and number of gables (gables). It is recommended to trust its construction only to experienced professionals, since its arrangement is accompanied by the formation of sunken corners, which require very precise and careful roofing work.
 Installation of a multi-gable roof of a house
 Mansard roof
As a rule, they are equipped in cases where the attic is intended to be used for living quarters. This type of roof has a broken profile and, accordingly, is somewhat difficult to manufacture. Often a variety of multi-gable and gable roofs.
 Scheme of a sloping mansard roof
 Other types of roofs of private houses
In addition, conical, dome and combined types roofs Conical and domed roofs are often used as decorative or individual elements of more complex structures buildings. The combined type is one of the most common types of roofs, as it combines several elements of individual types.
 Private country cottage with conical roof
 Choosing the type and shape of roofs for private houses
When choosing the shape and type of roof, it is necessary to take into account the factors on which it depends. performance. First of all, you should pay attention to the slope of the roof. In snowy areas, it is advisable to select structures with simple and steep shapes, since snow will practically not accumulate on them.
In areas with strong winds, the strength of the wind load must be taken into account when choosing.
The higher it is, the greater the angle of inclination, area and height of the roof. In addition, it is necessary to take into account the fire safety requirements for roofs.
Read also
Insulating the roof of a house
Glass roofs for private houses
Many owners country cottages dream of enjoying the view starry sky. Roof projects for private houses may involve both partial glazing and the installation of a transparent dome. Glass roofing is installed on terraces, balconies, and verandas.

The roof shape for private houses and various types of structures is made in the form of an inclined plane, dome, or sphere. Panoramic glass roofs are mounted on several slopes, thereby significantly increasing the viewing area. When installing such a structure, it is necessary to use reinforced aluminum and steel profiles.

Glass roofs for private houses have their own distinctive features. When designing the structure, it should be taken into account that it will be necessary to periodically wash and repair the glass. The roof, like the windows, will fade over time from dust and precipitation on its surface. It is also advisable to install a heating system on the windows so that in cold weather ice and snow do not accumulate on them, and you can enjoy the views.
Materials for transparent roofs
To create transparent and, at the same time, warm and safe roofs, the following is used:
- triplex glass,
- plexiglass,
- polycarbonate,
- transparent slate.
Ordinary glass is not used to create transparent roofs because of its high fragility; if broken, the fragments can harm human health.
- Triplex is the safest material for creating a safe coating.
- Laminated glass also does not splinter when broken, however, the light transmittance is not very high and it is very thick.
- Wired glass is sometimes used for glazing roofs. If the glass breaks, the fragments will remain in the metal mesh frame.
- Plastic translucent materials - polycarbonate, plexiglass and slate - have excellent properties (lightness and high strength), which make them possible to use to create complex sliding structures.
Construction of a simple roof for a wooden country house
House roof projects usually involve maximum use of the attic space, for which purpose the room above is expanded and insulated. The resulting usable attic space can be used for housing.
Roof structure wooden house consists of a frame and a roof. The roof frame consists of load-bearing and fastening elements. The main part includes: rafters, mauerlat and sheathing. Important additional elements frame - crossbars, struts, racks, etc. They give rigidity to the structure.
 Design of roof elements of a wooden house
 The height and volume of the resulting room depend on two factors: the angle of inclination and the number of slopes. Typically, roof designs for country houses assume a gable broken shape. This design is most convenient for human life. Sometimes the plan includes a balcony on the second floor. It should be taken into account that at the maximum point the height of the attic floor should not be less than 2.2 m.

The inside of a regular gable roof can also be used as a living area. There are bedrooms or an office here. The height of the middle part of the room should not be less than 1.8 m.
The roof consists of materials that provide heat, hydro and vapor barrier.
When installing a roof special attention pay attention to the choice of insulation. It is also worth choosing a roofing material that is more suitable in terms of characteristics for your structure.
 Detailed diagram of the roof structure of a wooden house
 - Waterproofing provides protection from precipitation, so the coating should not have damage or even very small holes on its surface.
- Vapor barrier ensures the absence of condensation, which can cause dampness in attics and attics. Also, the inclusion of roofs for country houses in projects will help prevent dampness of the wooden structure. window openings which will allow for ventilation. The location and number of vents affects the ventilation of the attic and its illumination.
- produced depending on its design features. Rigid material is laid on monolithic floors. A screed is made on top and mounted flooring. The following materials are laid on wooden structures: vapor barrier material, insulation, a subfloor is made, and only then the floor covering is installed.

It’s not for nothing that we so often use the expression “roof over our heads,” because without diminishing the meaning strong walls, it is difficult to imagine a house without this element. What else but a durable roof will become a shield between you and bad weather, protecting you from precipitation and wind. Only after construction do they talk about the full completion of construction and the transition to interior decoration Houses. High-quality roof installation determines the comfort of the future home.
A do-it-yourself gable roof is a popular design in private construction, which is used in the construction of houses from the following materials: timber, logs, brick, block, even concrete. You can easily recognize a gable roof among the rest constructive solutions thanks to the house's triangle-like appearance.
The choice of this type of roof is explained by the availability of the materials used and the relative ease of installation, which even a novice house builder can perform.
Device
A gable roof, regardless of whether it is simple or mansard, consists of several structural elements shown in the schematic diagram:
Diagram of the arrangement of elements of the roof truss system


Types of rafter systems
There are several ways to make a gable roof for a private house. Their differences can be explained by the use different types rafter systems, of which there are only two:

Both of these systems are equally reliable; the attic roof assumes them sharing when combining hanging and layered rafters. Before carrying out work, professional roofing craftsmen create a drawing of a gable roof - a plan that reflects the location of all roof elements, according to which the necessary materials are calculated.
Roof calculation
Like any construction process, the roof structure of a house must be created with your own hands based on engineering calculations. For the convenience of its implementation, before building a gable roof, you need to sketch out a rough plan, which must indicate the length of the roof along the ridge, the exact length of the slopes, taking into account plumb lines. At this stage, the slope of the future roof should already be determined:
- If the main aggressive factor in the construction area is wind, then it should be 10-10 o so that its gusts do not tear off the roofing material.
- If construction is started in an area with a lot of winter precipitation, a slope of 35-45 degrees is more advisable, which does not make it difficult for snow to slide off the roof.
Making the calculation required material, it is better to round the obtained values up, without complicating the calculations by deducting holes for chimneys or roof windows, in order to avoid confusion.
The necessary calculations do not require knowledge of complex formulas, so anyone who has completed a school mathematics course can perform them. However, the more sophisticated and complex the gable roof of a house, the higher the complexity of the calculations and the design of the rafter system.
Mauerlat installation
If the calculations have been completed and the materials have been purchased, you can install the Mauerlat and then create the sheathing. Mauerlat is a kind of foundation for the future roof. Only this structure is not made of concrete, like the foundation for a house, but of pine timber.
Wood coniferous species- an ideal material for this, strong and light enough to distribute the weight of the roof evenly around the perimeter supporting elements Houses. It is placed along the roof slopes, between the rafters and top part walls.

Fastening rafter legs to the Mauerlat
To ensure greater safety of the Mauerlat and a long service life, a layer of waterproofing is laid between it and the wall, which is most often roofing felt. Depending on the material from which the house is built, the installation of the Mauerlat is carried out using various methods.
Do-it-yourself construction involves checking the reliability of the connection. If we are talking about wooden house, fastening can be done using pins or bars, in brick - they use metal wire, reinforcement, in buildings made of foam blocks, gas silicate - concrete screed.
Sequence of work
If there was step by step instructions on how to build a gable roof, it would start with how. Hanging ones should be assembled in advance using metal corners and bolts. The outer structures are installed first, and only then those located inside.
To create a layered system, you must first set up a bed on which the supports will be installed. The assembly can be considered complete after all rafter legs are secured as shown in the drawing. If their length is not enough to create an overhang, it is increased by attaching fillies.
The next stage is installation of the sheathing . Since its purpose is purely practical, the simplest, cheapest material is used, for example, unedged board or even a croaker. However, you should not neglect removing bark from the surface of the tree; this simple operation will increase its service life. Depending on what you plan to cover the roof of the house with, there are two types of sheathing:

The final stage of work and subsequent operation
Construction ends with laying of roofing material. Describe step by step the installation of each material, of which construction market There are so many presented, it will be difficult.
The gable roof design guarantees:
- Excellent resistance to gusts of wind;
- Light snow falling off the slopes;
- Protection from rain and cold;
- Durability and reliability.
If the installation was carried out with high quality using modern materials, then the roof will last for decades without requiring repairs or complex maintenance. Therefore, you should not save on roofing work, since a reliable roof is a long-term investment in your comfortable life!
Video instructions


