More and more people every day choose MDF panels as a finishing material for the walls of their home. It is believed that it is a worthy alternative to painting and wallpaper, but also has additional positive qualities.
In this article we will talk not only about installing MDF on walls, but also reveal the secret of the popularity of this material.
Why choose MDF

Before we move on to talking about installing MDF panels on walls, let's figure out why this material is becoming more and more popular every day. Of course, it has many advantages, but there are no less disadvantages, and some of them are so significant that they make repairing some rooms using these panels simply impossible.
So, what are the main qualities of MDF that would distinguish it from others? finishing materials:
- Installation of MDF panels on walls is a very simple process. and you can do it yourself, without involving professional builders. This largely affects the final cost of repairs.
- Since the installation of MDF panels on walls is carried out on a special sheathing, the free space between the wall remains for air to breathe, and this is very good, as it allows the accumulating condensate to completely dry out. Also, this space can be used for additional insulation walls if necessary.
- Conventional MDF panels are very susceptible to moisture. The boards themselves tolerate this contact with ease, but the texture pattern can be damaged, therefore, if you are choosing a material for finishing the walls in a complex room, such as a bathroom or kitchen, then you should choose special boards, but we will talk about this below.
- Panels are convenient for restoration of damage. If a defect has formed somewhere that cannot be masked, it is enough to replace the damaged segment, and you do not have to redo the entire repair.
- MDF panels can be used to cover not only walls, but also ceilings, this way you can decorate the entire room in the same style.
- Large selection decorative solutions . MDF panels can imitate natural wood or stone, and can also be completely plain. Such diversity allows you to create the most daring and original interiors.
- Relatively low price.
As you can see, the panels are good option to decorate your home, but before you go to the store and choose the designs you like, you need to know what these panels can be and which of them can be used in rooms with a complex atmosphere.
What types of MDF panels are there?

So:
- Ordinary panels without a protective layer. Most cheap option, which is only suitable for living spaces, such as a living room or bedroom (see Decorating the bedroom: looking for options). It is not advisable to use this material in the kitchen or bathroom, as it will quickly lose its appearance and will fall into disrepair.
- Laminated panels. This option is suitable for the kitchen. The panels do not absorb odors and can be washed using detergents. The only thing such panels are afraid of is mechanical damage, such as scratches. If at least one defect appears on the surface, the destructive effect will spread throughout the finish.
- Veneered MDF. Ideal option for residential premises. Veneered panels are no longer just an imitation of natural wood covering; a thin section of wood is actually glued onto them. The appearance of this material is excellent, but as a consequence this is reflected in the price, which can be several times higher than that of conventional panels.
- Cork MDF. The most expensive option, which uses cork veneer as a decorative layer. This option is perfect for a nursery, especially since the panels do not contain chemical components that could harm your or your child’s health.
- Sheet MDF. All of the above panels belong to the lining class, that is, they are assembled using tongue-and-groove technology. Sheet MDF does not have connecting grooves, and is attached as ceramic tiles on glue joint-in joint
Which of these options to choose for decorating your home is up to you, based on characteristic features premises and financial capabilities, but do not fall into savings. If you cannot afford laminated MDF for the bathroom, then it is better to abandon it altogether than to install ordinary panels that will become unusable in a few months.
Decorating walls with MDF panels is a method that has many advantages over other types construction work. The fact is that the technology allows installation in a fairly short time. A significant advantage is that there is no need to carry out additional processing of the coating. Cladding is carried out in different ways: glue and frame. It is the latter method that is considered the most labor-intensive.
This material has numerous advantages that make it indispensable. These include the following indicators:
- Simplicity of installation work. Even if you use the longest frame method, then the work will be much less than when laying drywall.
- Large selection of shades and textures. MDF wall panels allow you to choose an option that will appeal to any person and can create a completely unique interior.
- Possibility to get several results at once. Namely, to build a sheathing that will hide numerous communications and serve as the basis for insulation, as well as create a smooth decorative surface.
- Durability and reliability. Density MDF boards superior to some breeds natural wood, A decorative surface It is made in such a way that it is very difficult to damage it.
- Easy to care for. Indeed, cleaning is carried out using damp cloth. Any stain can be removed with alcohol solutions (except cosmetics).
 MDF panels allow you to create a unique interior design, and they are also easy to care for
 Note! The wood-fiber material is covered with a decorative layer by lamination or veneering. And the problem often arises that after removing stains with alcohol mixtures, numerous stains remain on the surface. Get rid of them by reapplying the solution. The main thing is to continue mashing until the liquid has completely evaporated.
Naturally, such positive properties they say that MDF panels for the wall are an excellent option. But we must not forget about some disadvantages:
- It is simply impossible to get a perfect smooth coating. There will always be a small joint between adjacent elements. If desired, it can serve as an excellent decorative component.
- An improperly constructed frame is a threat to human health. The resulting gap is great place for the growth of mold and fungi. The glue method has the same disadvantage.
- A damp room poses a threat to the covering material and frame. The risk of warping is quite high.
Thus, we can conclude that finishing MDF panels is advisable when it is planned to follow the installation technology.
 Despite the ease of installation, MDF panels have their drawbacks
 Preparation of tools and material
For quick and comfortable work it is necessary to prepare tools and purchase materials in advance. The event is carried out using the following devices:
- An electric jigsaw with a set of files that must be selected specifically for wood.
- Plumb and level. The laser tool has proven itself well.
- Pencil and tape measure. It is better to have an even strip or profile for accurate marking.
- Screwdriver. A drill that can switch to low speed is suitable.
- Stapler. A simple option is used for home work.
- Hammer.
 MDF installation panels requires special tools
 The frame method of attaching panels to walls requires more materials than the adhesive method, which requires only a special mixture and self-tapping screws (for mounting the first MDF element).
For cladding using the frame method you will need:
- Wooden beam, pre-impregnated with antiseptic. It is better to choose options with a section of 20*40 and 20*50. If possible, a metal profile is used - the same one is selected as for laying gypsum board slabs.
- Insulation that is glued directly to the wall. You can use options that fit into cells. They must be secured first.
- Metal hangers.
- Clamps – for fixing panels.
- Dowels. The condition of the base must be taken into account.
- Panels and additional elements, which are used to create beautiful angles and transitions.
- Consumables.
In principle, a limited amount of money will be required to install MDF panels cash. Of course, if you don’t pay attention to products that are covered with valuable wood veneer.

Surface preparation steps
Before covering the walls, you need to prepare the surface. It consists of several stages, each of which begins only after the previous one has been completed. The most important rule, the observance of which makes it possible to obtain the desired result, is a completely dry wall.
Work cannot be carried out in the following cases:
- Even minor damp areas are observed.
- The surface is covered with frost.
- There are traces of mold and mildew.
- The top layer is destroyed.
If there are no such troubles, then you can start preliminary preparation. It is completely identical for all methods of installing MDF wall panels.
Complete cleaning
One serious mistake is often made - wallpaper pasted on the walls remains. This absolutely cannot be allowed. They serve as an excellent breeding ground for bacterial growth. And with the adhesive method, it will not be possible to securely fasten the elements.
 You should completely get rid of old wallpaper and whitewash
 The whitewash layer is also removed, although many craftsmen claim that such a procedure is not necessary. In fact, when the need arises to apply a primer, it is old layer will interfere with its absorption. Therefore, it is better to clean the wall completely.
Fighting mold and mildew
Unfortunately, this problem occurs everywhere, especially in new buildings and old ones. wooden houses. It's quite difficult to fight her. There are recommendations that indicate that it is enough to treat the damaged areas with special solutions. Many manufacturers even produce them in spray form.
 After removing the old coating, it is necessary to remove fungus and mold
 It’s worth mentioning right away that you can defeat the fungus only by destroying its entire mycelium. Therefore, there is only one way out - removing the plaster to the base, thoroughly impregnating it with special solutions. Of course, the amount of work increases, but there is a possibility of completely eliminating the threat to health.
Note! Fighting mold (fungus) is a very long undertaking. It is necessary to eliminate sources of constant moisture penetration, and also to treat all contaminated apartments in apartment building. This will allow us to produce high-quality MDF sheathing panels.
This procedure is necessary even if you plan to install a frame. The fact is that any cracks can reduce the thermal insulation effect. The work is carried out using the following technology:
- The putty mixture is prepared. It is better to choose gypsum or acrylic compositions.
- Seams and cracks must first be widened. They are thoroughly cleaned of the remnants of the old solution.
- The area is well impregnated with primer compounds.
- Next, when the soil dries, the mixture is applied. All voids must be filled.
 Installation of MDF panels requires complete sealing of the wall
 Primer coating
This event allows you to increase the adhesion of materials, as well as to carry out the installation yourself more efficiently. For work, compositions that have deep penetration are selected. To further protect the surface, the mixture must contain antiseptics. The primer is applied in two layers, each of which is well dried. The walls are especially carefully impregnated before installing MDF panels with glue.
Note! Processing wooden surfaces should be carried out using similar technology. But the mixture must contain fire retardants, which will give the lumber fire resistance.
 Surface priming is a mandatory stage of preparatory work.
 Construction of the frame
It is impossible to sheathe walls with MDF panels without a well-built frame. Need to create reliable design which will withstand the load. Installation is carried out in several stages.
Marking
Before you start marking, you need to decide on the layout of the elements. They can be mounted: horizontally, vertically and diagonally. All positions can be combined, but this requires installing dividing decorative elements. For horizontal arrangement of fragments, the lathing is laid vertically on the wall with your own hands. Accordingly, for vertical cladding it is the other way around.
Marking is carried out according to this principle:
- To obtain vertical markings, a plumb line is used. According to its location, points are marked between which lines are drawn.
- If horizontal marking is required, a level is used.
 To apply vertical markings you will need a plumb line
 Fastening the guides
Covering walls with MDF panels on lathing is done using two methods. The choice of a specific method depends on the condition of the base.
- The guides are laid directly on the wall:
- This option is suitable for wooden beam, in which holes are drilled in increments of 30-40 cm.
- The guides are applied to the marking lines and the holes made are marked.
- Drilling and installation of dowels is carried out.
- The racks are securely fixed with screws. Next, you can install MDF panels.
- The frame is erected using additional suspensions:
- The technology is used in cases where the surface has significant unevenness and differences.
- Suspensions are installed according to the existing markings. The fastening pitch is 40-50 cm.
- The upper and lower guides are fixed around the perimeter.
- Racks are installed and secured.
Installation of panels on the frame
Wall cladding with MDF panels begins after complete preparation. The sheathing is once again checked for strength, and the joints are pulled. If necessary, communications are carried out, and the locations of sockets and switches are immediately marked. The cable is laid in cable channels, which are corrugated hollow tubes. They are fixed to the walls with their own hands.
Cladding work begins with cutting the products. But if there is significant curvature of the ceiling and floor covering, which has not been previously corrected, then each element is cut off after careful measurement.
Note! Facing material has a decorative front side, which can be significantly damaged when cutting off excess. Therefore, it is necessary to take into account the location of the teeth on the jigsaw file.
Installation of MDF panels on walls has the following technology:

- A ridge is cut from the first fragment, which is used for installation in the groove.
- The element is installed in a corner and screwed with self-tapping screws along the edge, which is located directly in the corner.
- Further, installation of MDF is quick and easy. Clamps are installed in the groove of the first part, which are fixed to the sheathing using a stapler or self-tapping screws (nails).
- The next fragment is installed exactly in the groove. If required, the location of the clamp is trimmed (on one or both sides), this is necessary so that the fixation is reliable.
- The last element is trimmed with a small gap to the wall. If you do not do this, it will be difficult to insert it. It is secured with self-tapping screws.
- Decorative elements are glued to cover the corners and screw locations.
- Facing MDF walls elements requires preparation of holes for sockets and switches. This drilling is carried out before installing each part. Drill bits are used for this.
From the above we can conclude that laying MDF material is not a labor-intensive procedure, but requires compliance with certain rules.
Attaching MDF panels to the wall is a process that is not difficult if you know all the features of the technology. I will tell you how to get the job done with a minimum investment of time and money; both options have been repeatedly tested in practice, which allows me to confidently say that fastening MDF is within the capabilities of any developer. It is important to follow all the recommendations outlined below and have a set of necessary tools and equipment on hand.
Panel fastening methods
Let's look at what methods there are for attaching MDF panels to the wall, there are only two of them:
- Sheathing device, which can be either wooden or metal; below we will analyze both options;
- Gluing panels– here it is important to choose a high-quality composition and properly prepare the base.
If you don’t know which option to choose, then you need to familiarize yourself with the advantages of each solution:
- When constructing the sheathing, the condition of the walls and their plane do not matter at all, because you will be constructing one, which will determine the position of the future surface;
- For wet rooms, a frame made of a metal profile is more suitable, since it does not change its parameters due to changes in humidity and is damaged much more slowly by water;
- If it is necessary to lay insulation under the finishing, then the lathing will be an ideal design option; it is very convenient to put any heat-insulating material under it;

- Bonding is ideal for those places where you need to preserve as much as possible more space. The elements are glued directly to the wall, and such finishing does not reduce usable area. In this case, the state of the surface has great value– You can’t glue panels anywhere.

Method No. 1 - construction of sheathing
Let's figure out how to fix MDF panels to the wall using a special frame, which is made either from wood or from a profile. Let's start by considering a more budget-friendly and affordable option using a wooden block.
The workflow looks like this:
- First of all, you need to buy a block from which the sheathing will be constructed; most often, a pine version with a cross-section of at least 30x30 mm is used, since the structure must be durable. When choosing a specific option, pay attention to such indicators as humidity (it should not be higher than 15%) and geometric parameters - the elements should be smooth, deformations should not exceed a few millimeters per linear meter;
- Then you need to treat the wood with a fire-retardant compound. This is necessary in order to prevent damage to the material by mold and woodworm, as well as to increase the resistance of the bar to fire. The work is done using a simple brush; all the features of the process will be indicated by the instructions, which are necessarily present on the packaging;

- Next, you need to take measurements using a tape measure; the length of the bars should be a few millimeters less than the distance between the walls or from floor to ceiling, otherwise you will have to squeeze the elements in. It is important not to confuse anything, so as not to spoil the material, and this often happens if measurements are taken carelessly;
Important!
If the MDF panels are placed horizontally, then the sheathing should be vertical.
And vice versa - for the vertical arrangement of panels you need to make a horizontal frame.
You must know in advance how the finishing will be done.

- The dimensions are carefully marked on the block, after which the elements are cut into pieces of the required length. When cutting special attention pay attention to the correct positioning of the hacksaw, it should be perpendicular to the block, often inexperienced craftsmen cut the material at random and all the ends are crooked;

- The bars are fastened either using quick installation dowels (when you have concrete or brick base), or using self-tapping screws (if you have wood walls). When working, constantly monitor the position of the elements so that the plane is level. It is best to check both each individual block and several already fixed racks, and do this in different positions of the level to ensure that no mistakes are made;

- If you decide to additionally insulate the surface, this should be done after constructing the frame. For work, it is best to use rolled mineral wool, which is easy to cut and very convenient to work with, just fill the space with it so that it stands tightly, after which you can proceed to the next stage of work;

- The panels can be fastened in three ways, and the first of them is the use of clamps, which is the name of the special fastener, which is a bracket. The second option is thin 3x20 mm self-tapping screws, which are screwed into a groove or tenon, and the third is thin finishing nails with a reduced head. Choose the solution that is most convenient for you personally, for me it’s easiest to use carnations, the work goes much faster with them;

- Lastly, the internal and external corners and connecting strips, if any, are attached. The easiest way is to glue these elements, even small finishing studs will be visible, and with the help of glue you can achieve the perfect appearance.

As for the option with a metal frame, it is suitable for rooms with changes in humidity, since the galvanized profile perfectly withstands adverse influences and does not deform over time.
Let's figure out how to attach MDF wall panels to a structure made of metal profiles:
- First you need to purchase the required number of main and wall profiles. Wall elements are placed around the perimeter and determine the plane of the future surface, and the main ones carry the load and support the entire structure;
- The work begins with attaching the wall profile; for this, a line is drawn along the perimeter and the elements are fastened to the walls, floor and ceiling. For work, either dowels or self-tapping screws are used, it all depends on the bases on which the installation is carried out;

- Then lines are marked along which the main profile will be located; it should stand at a distance of 40-50 cm. Direct hangers are attached along the lines, which will help level the surface, as well as strengthen it and make it resistant to loads. With the help of these elements, the alignment process will take place very quickly and very efficiently;

- Next, the main profiles are inserted into the resulting structure; the direction of the lathing depends on how the final covering will be positioned; we discussed this aspect above. The profiles are fastened to each other using small self-tapping screws, which among builders are called bugs or seeds;
- The hangers are bent to the profile, after which the correct position in which the elements are fastened is determined using a level. The excess ends are simply bent outward so that they do not interfere with carrying out further work, cutting off all the ends does not make sense, and this process takes too much time;

- Let's figure out how to attach MDF wall panels to metal frame. For work, clamps are used, which are screwed to the profile using the same seeds - small self-tapping screws. The work is best done using a screwdriver with a magnetic attachment, so you will lose much less fasteners;

- The last stage is the same as in the case of a wooden frame: you need to glue all the decorative elements and install the baseboards.
Method No. 2 - gluing panels
Fastening MDF panels to a wall without sheathing will be an excellent option where the walls are smooth and the finish on them is reliable, because you will have to glue the elements, and if the base is weak, then they can simply fall off after a certain period of time.
Let's figure out how to do the work yourself; there is nothing complicated in the process, the main thing is to follow a few simple recommendations and use only high quality materials.
The sequence of operations is as follows:
- First you need to check the base for damage and unreliable areas; if any, they need to be repaired. All problems must be eliminated in advance; the better the plane is prepared and the fewer flaws there are, the more attractive the final result will be. Sometimes you have to spend more time leveling the base than on the main work;
- Then the surface is treated with a primer deep penetration. This is necessary in order to strengthen the base and improve the adhesion of the adhesive to the surface. The composition is applied with a roller or brush, it is important to cover the entire wall evenly, but you should not allow smudges either;

- Next, the material is prepared - MDF panels, if necessary, the elements are cut into pieces the right size, cutting is done using a hacksaw or jigsaw, it is important to take accurate measurements and carefully cut the slabs;
- WITH reverse side the adhesive composition is applied, you can make dots on the surface, you can apply a rim around the perimeter and dots in the middle, the main thing is that there are many places for gluing;

- The element is carefully pressed against the wall and fixed in this position for a few seconds. Work continues until the entire surface is covered;
- Lastly, the corners and connecting strips are glued; for this, the same composition is used as for the main coating. Liquid nails are most often used - their price is affordable, and their quality meets the highest standards.

Important!
Sometimes a combined method is used, when MDF panels are glued to a wooden sheathing.
This option is good when you need to insulate the surface or in cases where it may subsequently be necessary to dismantle the coating.

What you need for work
Naturally, you will need a certain set of tools, I will list what should be on hand without fail:
| Hacksaws | If you are gluing panels, then you will only need a hacksaw with a fine tooth; the option for metal will also work. But if you make a frame out of wood, then you need another hacksaw with larger teeth. |
| Measuring tool | First of all, you need to have a tape measure, a building level and a pencil on hand for marking. In order for the ends to be perfectly even, you need to additionally purchase a square, which will simplify the work and allow you to draw corners |
| Screwdriver and hammer drill | If you use self-tapping screws, then you cannot do without this power tool. And to fasten the dowels, you need a more powerful option - a hammer drill with a drill of the required diameter |
| Glue gun | It is needed if you will be gluing elements. The device costs a little, but it is much more convenient to work with. |

If you don’t have the same hammer drill or screwdriver, then there is no point in purchasing them for a couple of hours of work. Borrow an instrument from friends or rent, it will cost much less.
Cut corners from MDF is better not with a hacksaw, but with a sharp construction knife, so the result will be much better, and the ends will be much neater and smoother, the main thing is that the blade is sharp and rigid and does not bend when pressed.
Conclusion
In my subjective opinion, work on MDF fastening one of the simplest and easiest, you only need to do it once in order to quickly and efficiently cladding both walls and ceilings. The video in this article will tell you additional information on the topic, and will also clearly show some important points of the workflow. If you still have questions, ask them in the comments under the review.
Methods for fixing MDF to the wall and ceiling, what glue is used for attaching the panels. Attaching to a metal sheathing, and how to do it wooden frame.
MDF panel how to attach to the wall
MDF panels are attractive in appearance. A wide selection allows them to be used in various rooms to create unique interior. They have many positive aspects, minimum disadvantages. However, after making the decision to cover the surface, the question arises: “How to attach the MDF panel to the wall”? The cladding methods are described below.
What are MDF panels for interior decoration: advantages and disadvantages
The material is made from fiberboard. By filing high temperature and the use of resins perform pressing of wood chips. This technology allows you to avoid using glue that contains toxic substances. Therefore, the panels are an environmentally friendly facing material.
MDF is produced in three types:
- Laminate – repeats the pattern of wood, marble and other materials.
- Veneer is made from shavings of valuable wood species.
- Varnished panels.
 Material Features:
- Easy to attach to surface. Fixation is carried out on a frame base and glue.
- Additional protection from noise and extraneous sounds.
- There is an option for leveling and insulating the surface with an attractive appearance.
- Hiding communications and wires.
- Easy care.
Negative aspects of cladding:
- when hanging objects on lined walls, you must use a fisher anchor;
- many types of material cannot withstand constant exposure to moisture;
- the material burns.
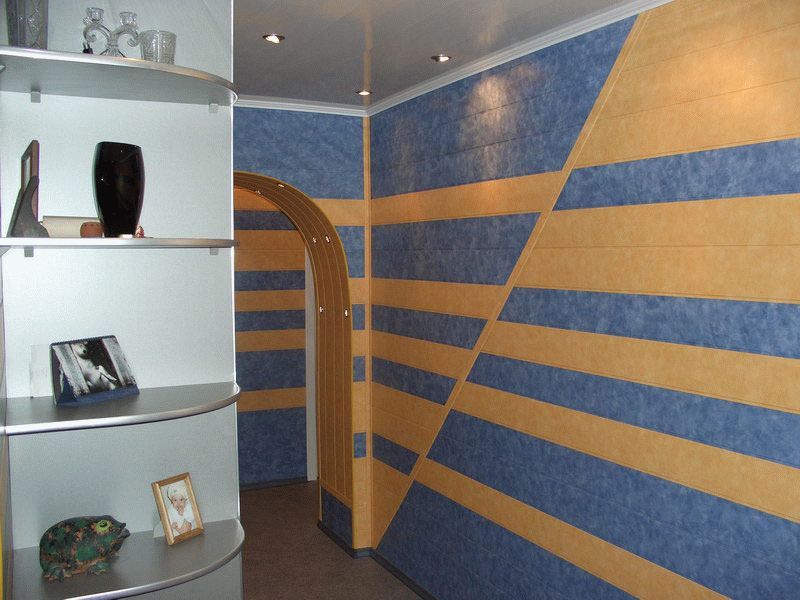
Despite negative aspects, with the help of panels they create beautiful design rooms, loggias and corridors.
MDF panel: methods of mounting to the wall
 There are 2 methods to attach the cladding to a rough surface. Each of them has its own characteristics.
Fixation on a frame base. The cladding is attached to a metal or wooden sheathing. To do this, you do not need to thoroughly level the walls, but you do need to make markings and prepare the material.
Fastening panels with glue. To do this, the adhesive solution must meet a number of requirements relevant to this work. Otherwise the panels will fall off.
The cladding is attached to:
- adhesive solution;
- liquid nails;
- polyurethane foam.
The positive aspects of this method:
- Installation time. It is faster to lay the cladding on a flat surface than to create a frame base and then attach the material.
- No screws are needed for fastening.
Flaws:
- Panels are not attached to curved surfaces. The wall needs to be made level.
- If 1 element is damaged, then the entire surface must be replaced.
- It is impossible to insulate a wall and hide communications there.
Knowing the installation features, there is precision in choosing the cladding fastening.

Mounting to a wall on a wooden frame
 The wooden frame is constructed in a dry room. Treated wood is used for this.
Advantages:
- installation is simpler than a metal frame;
- for the frame base you need slats of the same section;
- wood is an environmentally friendly material.
Flaws:
- do not install in damp rooms;
- do not use untreated bars;
- the tree is susceptible to small rodents and bugs.
Despite these disadvantages, well-treated and dried wood lasts a long time without deforming.
Sheathing using a metal profile
 Metal lathing is made using profiles. They are used to create a frame base in damp rooms, because the profile is coated with anti-corrosion material.
Advantages of metal construction:
- no need to level the surface to create a frame;
- all communications are hidden under the metal structure;
- insulate the wall;
- If the panel is damaged, it is possible to replace it without dismantling the entire surface.
Disadvantages of galvanized profile construction:
- The area of the room is reduced.
- If you need to hang an object on a surface, use anchors that can withstand the load.
To create a profile sheathing you need to incur additional costs.
Mounting to a wall without lathing or frame using glue
 The panels are mounted on adhesive base only if the surface does not deviate from the level and there are no significant defects.
Advantages of installing cladding with glue:
- Installation time. Minimum time spent on installation of cladding.
- No additional costs on fasteners.
- The space of the room or corridor is not reduced.
Negatives:
- there is no way to hide communications. For wiring you need to ditch the wall;
- there is no possibility of laying waterproofing insulation;
- do not apply this method in bathrooms due to dampness;
- If one panel is damaged, the entire surface must be dismantled.
To choose a method for attaching panels, you need to calculate and take everything into account external factors, such as humidity, temperature changes.
Do-it-yourself sequence of finishing MDF panels
 For the selected creation method flat surface using the frame, it is necessary to carry out a number of works in the following sequence:
- Measurements and calculations for purchase required quantity material.
- Wood processing if the frame is made of bars.
- Surface treatment with primer. In some cases, puttying.
- Marking on the rough surface for installation of a smooth and durable frame.
- Installation of sheathing.
- Fastening panels.
Sequence of work using the glue method:
- Assessing the surface for evenness.
- Priming the rough base.
- Marking for the first panel.
- Cutting the material to the required length.
- Applying glue.
- Fixing the cladding.
- Fastening corners and planks.
Properly done work will guarantee a long service life and a beautiful appearance.
Fastening without sheathing with self-tapping screws: operating instructions
 Panels without sheathing are attached with self-tapping screws only to a wooden wall. If the surface is made of another material, there is no need to take such risks, because due to the movement of the soil and the movements of the building, the screws will weaken over time. The panels will become loose and lose their appearance.
How to install MDF wall panels in the kitchen: fastening without slats
Glue method. In this case, the surface must be smooth, dry, and clean. The rough base is primed and markings are made for the first panel. The material is cut to the required length. The glue is applied with a notched trowel. When gluing panels you need to use a level. Evenness is mainly checked in the corners. After installation, wipe the surface with a damp microfiber to remove dust and glue residues.
What is better to secure: glue or liquid nails?
Each material used has its pros and cons.
Polyurethane foam expands when it dries. This may cause the surface of the cladding to bend. But, it will hold the rough base and panel together for a long time. If the material is damaged, dismantling will take a lot of time. It is used in damp rooms and during sudden temperature changes.
 Universal glue - a type that is used that holds the rough base (concrete, brick) and wooden elements together.
Liquid nails - a product suitable for gluing wooden elements with other reasons. Has many positive aspects:
- Can be used in wet areas;
- quick adhesion to the surface;
- long service life;
- adhesive strength.
The negative side is its considerable amount over large areas.
How to glue it to a concrete wall: mounting
The glue must have the following set of properties:
- Working with wood.
- Quality guarantee for gluing concrete and wood.
- Harden quickly.
- Moisture resistant.
- Alkali resistance.
Types of adhesive for installation of cladding:
- Compounds. Universal material– “Titan”, “Moment”.
- A special series is “liquid nails”, “macroflex”.
- Polyurethane foam.
 The glue is applied in a small dotted line to the MDF surface, wait the time specified by the manufacturer (if necessary) and apply to the surface.
Errors in working with " liquid nails“—there is no need to wait too long before fixing. The grip will decrease. Further, if the product on the surface of the panel is not wiped off in time, the appearance will be ruined.
Errors in working with foam. You need to use a construction gun.
Cladding on metal frame structures
MDF is fixed to the metal frame using clasps. They are attached to the profile with small self-tapping screws. When purchasing a kit, you need to pay attention to the contents. If the package contains not self-tapping screws but nails (for a wooden frame), then the “bugs” are purchased separately.
Metal profile frame set
 The frame base is no different from the sheathing for drywall. To do this, the surface is primed and marked.
The guide profiles are attached first. Everything is checked by level. NP is secured with dowel nails. They are also used to attach hangers for the rack profile.
The fastening step of the rack rail is 60 cm. If transverse ones are used for rigidity, their fastening step is the same. Clamps for panels are attached to the rack profile.
Beacons
These are the main planks in the sheathing. They are attached according to the markings. After determining a single plane on the wall, the NP is fixed at the corners on the ceiling and floor with dowel nails. The fixation must be mirrored. For evenness, tighten the threads and lower the plumb line. A laser level is also used.
Sheet fastening
 The MDF is fastened from the corner of the sheathing. It goes in this order:
- Measure and cut the first panel.
- A hole for lighting fixtures is cut out in it (if necessary).
- The panel placed in the corner, on one side, is secured with self-tapping screws. With another clips.
- Subsequent panels are secured using locks and clasps.
- Ceiling and floor skirting boards secured with glue.
- The last step is to fix the finishing corner. It covers the screws in the corners. Fix them with glue.
After the work is done, wipe the entire surface with a damp cloth.
How to sheathe on wooden sheathing
Wooden sheathing is simpler than metal sheathing. MDF is fixed using tongue-and-groove locks. To do this, use small “shoe” nails.
How to attach slats
Wooden slats are attached to the base according to the markings made. To do this, use dowel-nails - a concrete, brick base, or self-tapping screws - a wooden base.
What should be the distance between the slats?
 After fixing the main guides, moving 40-60 cm from the floor and from the ceiling, attach horizontal (vertical direction of the panels) or vertical slats. The step between them is 40-60 cm. Each fastening will be checked with a level for evenness.
Installation of sheets
MDF is fixed from the corner. The first panel is attached with self-tapping screws to the wooden frame frame. Subsequent sheets are connected with clasps. The panels must fit evenly and tightly to the frame. If there are protrusions wooden slats, they are trimmed with a plane or knife.
What is the best way to mount MDF sheets on the ceiling?
 An MDF ceiling is called a suspended ceiling. Because the best way is considered to be fixation on a frame base.
The sheathing is made of wood and metal profiles. It is no different from creating a standard sheathing. The spacing of the slats is 40-60 cm.
Finishing of the sheathed surface
After fixing the cladding, you need to glue the corners and dividing strips. They are fixed with liquid nails.
You must be careful not to let the glue get on the front side of the material. The appearance will be spoiled.
If the mixture gets on the panel, wipe it off immediately with a damp cloth.
Care
 The panels are not washed with products containing acids. Powders are also not used.
It is necessary to use a general cleaning product once a month. Once a week, wipe the surface with a soft microfiber soaked in water at room temperature without chemicals.
Steam cannot be used. When directing a jet from a steam generator, the panels will immediately lose their original appearance and become deformed.
The panels are fixed to a frame base - which is more durable - and to glue - in rooms without fumes and sudden temperature changes. Surface care does not require expensive products or effort.
Useful video
If your apartment has not been renovated for a long time, and the walls have lost their appearance over many years, MDF panels will be the best replacement for wallpaper or tiles. They are ideal for interior decoration premises, as they have an attractive appearance and are made from environmentally friendly materials. In addition, high-quality installation of panels can be performed by anyone with basic technical and construction skills. Today we will talk about the features of finishing a room with MDF panels and provide step-by-step installation instructions.
What is MDF
MDF is a panel finishing material obtained from woodworking waste through dry hot pressing of fine chips. When heated, wood releases a substance called lignin, which acts as a glue. The structure of MDF resembles felt made from wood fibers. The main advantage of such panels is their high moisture resistance. As a result, they are often used for covering walls, floors and ceilings in rooms with high humidity air, for example, in the bathroom or toilet. However, due to its attractive appearance, such finishing is often widely used in halls and offices. Surfaces lined with MDF in the corridor and loggia also look great. Material cost compared to tiles– low, but the walls will be perfectly smooth.
If you decide to install the panels yourself, then first you should prepare necessary tools and materials for work.
What you will need for installation
For high-quality MDF wall finishing you will need following materials and tools:
- Insulation ( mineral wool, penofol, polystyrene foam or extruded polystyrene foam). We'll look at each type in more detail a little later.
- MDF panels. There are many models that differ in thickness, color and structure, so the choice is yours.
- Slats or galvanized profiles for installing sheathing. Width and thickness – 40 and 20 mm, respectively. The length is selected depending on the size of the wall.
- Self-tapping screws are needed to fasten the panels to the sheathing.
- Clamps are special elements necessary for fastening panels to each other and to the sheathing. Often available complete with panels.
- A plumb line is a nut or any other small metal object, tied to a fishing line or thread.
- Construction level.
- Measuring tape.
- Pencil or marker.
- Plane.
- Metal corner (metal square). Needed for cutting pieces of panels for slopes.
- An electric jigsaw is used to cut MDF. You can also use a hacksaw or circular saw. The latter, due to its compactness, is very convenient to use. It can cut both wood and metal - simply by changing the complete circles.
- Hammer drill with concrete drill.
- A screwdriver, drill or screwdriver with a screw attachment.
Toolkit in the photo
Preparing the walls
Preparing walls before installing sheathing
Before you begin facing work, you need to make sure that the room is suitable for installing panels. If strong swelling of wallpaper, drywall, or peeling of plaster is visible on the walls, then you should first clean them of old finishing materials. Also, don’t forget about skirting boards and decorative corners(if any) used to hide the joints of walls and ceilings.
Helpful advice: It is advisable to remove the old finish completely, that is, up to the main wall. This way you will save on fasteners and reveal hidden surface damage.
When the walls are cleaned, you can proceed directly to installing the sheathing under the MDF panel, but first, let's find out what types of lathing there are.
Types of sheathing
The most popular technologies for installing MDF wall panels today are:
- Wooden sheathing. This design is easy to make and does not require a large number of fasteners. However, wooden sheathing requires pre-impregnation. special means, in order to prevent the appearance of fungus, rot, and mold. If the room has high humidity, then you should not use wooden sheathing in this case.
- Lathing made of galvanized profiles. Often, metal structures are used as sheathing for drywall, although they are quite suitable for covering walls with MDF panels. But galvanized profiles are not suitable for forming a frame on the floor due to their low strength. As for the ceiling, a structure made of light metal rather than timber is just right here.
Installation
The installation of lattice structures made of metal and wood has several differences. For example, when using galvanized profiles, they should be fastened only with powerful and long self-tapping screws. Using dowel nails in this case does not make sense - the tenacity between the profile and the fastener itself will be lost.
Most important point, on which the strength of the fit of the fasteners and the entire structure depends, is the fixation of the body of a self-tapping screw or dowel-nail (with wooden sheathing) at least 35 mm in the wall. For example, if the thickness of the rail or profile is 20 mm, and the MDF panel is 10 mm, then the depth of the groove for the mounting socket and, accordingly, the fasteners should be about 65 mm, or preferably more. The diameter of the fasteners is selected from 4 to 6 mm, depending on the density of the wall. The stronger it is, the smaller the diameter of the screw should be. All fasteners are equipped with a special socket. When drilling a groove, the diameter must be compared with the diameter of the body of the landing socket, and not its head, otherwise the safety margin will be insufficient.
Installation of a wooden structure
Installation of wooden sheathing
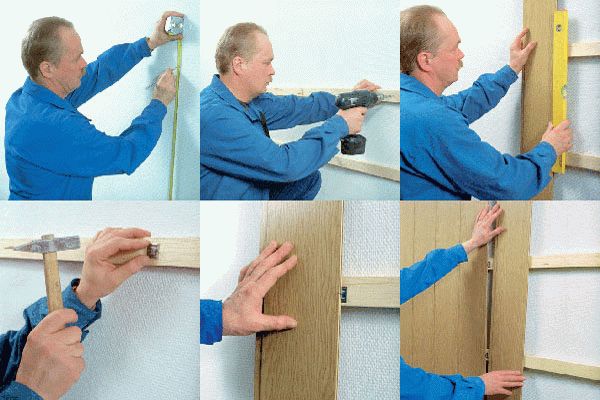
We start with installation vertical racks. We install the slats in each corner in pairs - so that they form a right angle, as well as along the edges of the door and window openings along the entire height of the room. To ensure that the racks take an exactly vertical position, we use a plumb line. Now in order:
- We apply the strip to the wall and outline it on either side with a pencil or marker.
- We make holes for fasteners using a hammer drill with a concrete drill. For structural strength, the drilling pitch should be in the range from 0.4 to 0.5 m.
- We drive the sockets for the fasteners into the holes and make marks of their location on the rack itself.
- We drill holes in the rail with a diameter slightly smaller than the mounting hole.
- We install the racks in place using self-tapping screws or dowel nails.
- We install horizontal bars in the same way. The step remains the same. Don't forget to decorate the slopes with slats.
- At the end, we remove the ledge elements at the joints of the structure using a plane.
Fastening the metal base
The procedure for installing a structure made of galvanized profiles is completely similar to the above. First, the racks are placed in the corners of the room and in the places of openings for marking the walls. Afterwards, holes are made for fastening and installation of vertical profiles. UD type profiles are used as racks. In the marked places, in accordance with a step of 0.4–0.5 m, insert horizontal profiles CD type. Afterwards, the transverse strips are attached to the racks and the wall. Elements between each other metal structure connected using ordinary self-tapping screws. As was said earlier, such a sheathing needs to be attached to the wall only with powerful fasteners (dowel-nails will not work).
Helpful advice: for cutting metal profiles, it is recommended to use a grinder or a hand-held circular saw with an appropriate attachment. The efficiency of a jigsaw even with a metal file is much less.
About thermal insulation
Installation of insulation
The installation of the sheathing is complete, but before moving on to the installation of MDF panels, the walls should be insulated. This will allow you to save a lot on heating the room, and also increase its thermal insulation. In addition, insulation additionally prevents the formation of mold, mildew and moisture in the voids of the sheathing. It is recommended to fill the cells in the sheathing with one of the following insulation materials:
- Penofol is a relatively new multilayer insulation material, which consists of polyethylene foam and polished foil with a reflectivity of 97%. It is fireproof, environmentally friendly, has good noise insulation and low vapor permeability.
- Mineral wool. The material has gained great popularity due to its high thermal insulation and moisture resistant properties.
- Foam plastic. Air is the best heat insulator, and this material consists of 98% of it. All this is thanks to the polystyrene granules that are formed in the foam during the production process. The material has high moisture and vapor resistance.
- Extruded polystyrene foam. This type of foam is obtained by melting with extrusion. The seal is not cheap, but it fully justifies its price. The material has excellent thermal insulation, as well as a high compression ratio. Therefore, it is often used to insulate floors.
Installation of this thermal insulation material very simple:
- Sheets are cut from a roll of insulation in accordance with the cell sizes (lathing pitch).
- After this they are attached to the wall using construction foam or silicone glue.
- Protrusions formed polyurethane foam are removed using a utility knife.
After insulating the walls, we move on to the most interesting part - the technology of wall cladding with panels.
Installation of MDF panels
Installation of panels
Laying the product should start from the corner. The installation procedure is as follows:
- We apply the panel to the corner and check whether it fits tightly to the sheathing. Then we evaluate the evenness of the surface using a building level.
- If all is well, from the corner side along the entire height of the structure we fasten the panel with self-tapping screws to the sheathing.
- Subsequent strips are connected using clamps, which are inserted into the groove of the panel. It is advisable to fix these staples with nails to the sheathing.
- In the groove first corner panel push the comb in next. In this case, it is necessary to control the tightness of their fit. If cracks are found, you should slightly trim the ridge of one panel with a knife and try to put it in place again.
- We attach the MDF plank to the sheathing using self-tapping screws along the entire height of the structure.
- The installation process is then repeated.
- The last panel must be pressed all the way to the penultimate one and secured at the free edge with self-tapping screws.
Important: If the last plank does not fit into the remaining space, you can still carefully shorten it in width using a jigsaw.
Slope finishing
This procedure is similar to installing panels. In addition, when finishing slopes, there are two decoration options. The first is to install the panel lengthwise, the second is to install it across. If the slope is small and its width does not exceed 1.8 times the width finishing panel– transverse cladding is performed. For wide slopes, you can resort to any of the methods.
Useful information: great view have slopes sheathed across, with alternating dark and light tones.
The finished look is given by fittings, thanks to which you can hide the corner joints between the panels. Folding corners cover up defects well. WITH inside You need to apply glue to them and press the product tightly to the sheathing in the corner. To hide the joints with the floor and ceiling, you can use a plinth.
Video instructions for working with wall panels
As you can see, there is nothing complicated in installing MDF panels, and this work can be done without the help of a builder. We hope that our article will help you produce high-quality finishing of the room, which will not only insulate your home, but will also last for many years.


