Surely every experienced motorist has old wheels in their garage that cannot be put to use. Most likely, they take up a lot of space, but the owner cannot decide to clean them. The best option in this situation is to modernize the old “shoes” for the car. With a little effort and resourcefulness, you can give old wheels a second life.
What kind of wheels can you paint yourself?
Today we will try to figure out how to paint car rims. First you need to figure out what they are and how to paint one type or another.
Car wheels come in two main types:
- stamped (steel);
- light alloy.
The painting of certain types is practically the same, Of course, you need to choose different paint, one that best suits the material from which the product is made.
Alloy wheels require special attention, since they are made of non-ferrous metals. They need processing before use. Typically, such wheels are treated with a primer, then sanded and painted.
Steel wheels can also be primed to increase strength and reliability. Most often used for this acrylic primer, which is not exposed to negative factors environment. Acrylic varnish is also used in the restoration, which ensures high stability and strength. We paint rims without any fear - this is a simple task that anyone can handle, even without special education.
Preparation
Important! In order to carry out painting efficiently and quickly, you need to thoroughly prepare for this.
To do this, arm yourself with the following items and devices:
- sandpaper;
- protective film;
- masking tape;
- napkin with soft coating;
- special degreaser for metal surfaces;
- paint and varnish for processing rims.
Most often, wheels are painted silver - this is the most universal color for wheels. With other colors your car will look more original and attractive, so you can choose any color for painting. Prepare yours workplace, there should be no foreign objects near you that could interfere with the work process. It is better to clean and wash the work area before starting so that small debris and dust do not fall on the surface of the product.

Painting process
We paint car rims step by step and very carefully so as not to miss anything. First, clean up the disks perfect condition:
- remove rust;
- level the surface;
- remove dirt and dust;
- getting rid of unevenness.
In this you Sandpaper will help a lot. If necessary, you can use other available materials that will not damage the base of the disk.
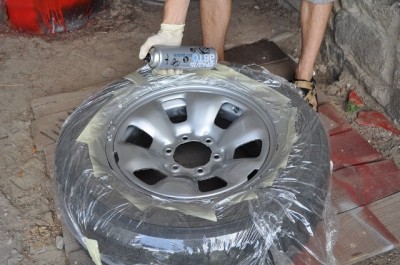
Before painting, we polish the disc and bring it to a state of perfect cleanliness. After this it covers the tire protective film, attach it with special adhesive tape. Press the film tightly against the tire so that it does not interfere with painting.

Next, we move on to the degreasing stage; to do this, thoroughly wipe the surface with a special liquid. After this treatment, the paint or varnish will stick to the surface longer and more reliably, appearance the wheels will be much better.

Prepare the paint for use: to do this, shake the paint thoroughly and spray it onto the surface of the disk from a distance of thirty centimeters. For best result It is better to paint in two or three layers. After applying each layer of paint, set aside drying time; it should be at least ten minutes. Use a protective respirator to avoid exposure to toxic fumes from varnish and paint. It is also better to wear protective sleeves on your hands to avoid chemical burns.
After successful painting, you can proceed to the varnishing stage. Apply the varnish in three thin layers, the interval between coats should be three minutes. It is very important to spray the varnish at a distance of thirty centimeters from the surface. Finally, you can coat your tires with a special liquid to protect them and improve their appearance. So, the new wheels and tires are ready and it is impossible to distinguish them from new wheels from production!
Advantages of do-it-yourself restoration
It’s just wonderful when a person has the opportunity to do certain things renovation work with your own hands. This is both economical and useful for one’s own development, because a person should always learn something new! In addition, creating something with your own hands brings indescribable psychological pleasure.
Just imagine how much money you need to spend to buy new wheels. You probably have everything you need to restore disks in your garage. If not, you can easily buy all the materials at your local hardware store. Just a few hours of your time, a little effort and new wheels for your car are ready!

Important! By creating new wheels with your own hands, you can make your desires and dreams come true, because only you have a clear idea of what exactly your car should be like.
When purchasing materials, be sure to pay attention to the manufacturer, because the durability of the product will depend on the quality of the varnish and paint. Low-quality paint materials quickly deteriorate, thereby worsening the appearance of the wheels. By saving on the purchase of paint, you risk repeating the restoration in a short period of time. Choose acrylic paints and varnishes for your work; they provide the highest protection and attractive appearance. You can familiarize yourself with the instructions in detail by watching the video, which details all the stages and subtleties of painting. car rims.
Video:
If anyone wants to repeat it, I will describe what is needed for this: 1) Raw materials for casting, for these purposes I mercilessly destroyed the ZMZ-402 engine block with a sledgehammer; it is made of AK4 casting alloy. In addition, I used a variety of engine scrap: pistons, pumps, manifolds and other parts of the internal combustion engine.
I want to say right away that you can pick up and buy alloy wheels r16 in an excellent center.
For melting, it is not necessary to unscrew the bolts and pins; during melting, they remain at the bottom of the crucible; you just need to periodically shake them out.
2) Furnace for melting (diagram in the previous post)
3) Crucible (any seamless pipe with a welded bottom)
4) Charcoal (regular one, which is bought for barbecue)
5) Opoki ( wooden frames to get the form)
6) Sifted sand and silicate glue (“liquid glass”)
Everything seems to be fine, if you forgot anything, ask. Operating procedure:
- 1) Prepared the mixture liquid glass with sand. I mixed it in a bucket with a construction mixer.
- 2) I took a cast from the workpiece (it should be larger than the future disk due to the allowance for turning). Pay attention to the relative position of the frames, I used furniture pins.
- 3) Waited until everything dried (the longer the better) about 3 days.
- 4) I started the fire, when it got hot, I put the crucible, added coals and turned on the blower.
- 5) I pour molten aluminum into molds. When the metal has hardened, I beat off the crust, sprues and vents.
- 6)Turning
- 7) Disk assembly. For these purposes, I bought 10 M8 screws with an internal hexagon and 10 M8 nuts with a nylon ring.
Raw materials for smelting

Remaining for new work

Furnace+crucible+motor scrap

Oven in operation

Molten aluminum 3 liters

Residues after melting shaken out of the crucible

I prepared the extra for the next work

Frames for mixture + sand + liquid glass


Mold with sprues and projections

Aluminum is poured and cools

Blank fresh from sand mold

Surface close up

Rough blank

Rough blank

Future disk

After turning

After turning


Bottom line
Next project is a garden cart (the wheels are already ready)
One of the most simple ways to make the car more attractive - install high-quality alloy wheels, since their range allows you to satisfy the needs of even the most demanding car owners. However, during operation, they may lose their former luster, as scratches, chips, peeling and abrasions appear on them, which negatively affects the external appearance of the machine, and also reduces the service life of the discs. Painting, which is easy to do with your own hands, can correct the situation.
Painting options for alloy wheels
In order to paint car wheels, you need special paint. The most popular types of paint for them:
- powder,
- acrylic,
- so-called liquid rubber.
Powder paint is considered the most wear-resistant and durable. It is created on the basis of special polymer materials. Often this paint is used by the manufacturer himself during industrial production. At home, powder paint is used extremely rarely, since its use requires specialized and very expensive equipment, as well as the complexity of the application process.
Acrylic paint is the most common among car owners. It is available in liquid form, so it can be applied from a spray can or spray gun. This paint has excellent adhesive properties, due to which it adheres well to the surface and reliably protects the disc from negative environmental factors.
Liquid rubber - new look painting material that is rapidly gaining popularity. It is a rubber-based paint that can be used both for application on the body vehicle, and on individual elements of the car, including rims.
Each of the presented types has its own advantages, however living conditions car owners opt for painting with acrylic paints.
Equipment and materials needed for painting
For quality work The following materials are needed:
- specialized paint for rims;
- primer;
- special varnish;
- sandpaper with different grain sizes;
- acetone or solvent;
- putty;
- gloves and respirator.
Important: when choosing paint, primer and varnish, it is preferable to use products from the same manufacturer.
Besides the right materials, you also need to acquire the necessary tools:
- A compressor and a spray gun, which allow you to make painting better (in fairness, it is worth noting that paint in cans also allows you to achieve good painting results).
- A grinder or electric drill with a grinding attachment, with which you can quickly and easily get rid of old coating and remove traces of corrosion.
- A heat gun, a hair dryer or a regular hair dryer - they are necessary to speed up the drying process of the paint.
If you have all the necessary equipment and materials, the work will not take much time and effort.
Dyeing process
Before you start preparing for painting, you need to remove the tires, as well as the plastic plugs, otherwise it will be impossible to paint the wheels properly.
Preparing for work
How to paint: description step by step
- We proceed to the primer, which is carried out in 2-3 layers. It is important to remember that before starting a new layer you must wait until the previous one has completely dried. Depending on the situation, it may also be necessary to sand with sandpaper before applying the final primer coat.
- We apply paint, holding the spray gun at a distance of at least 35–45 cm from the surface of the disc. Like the primer mixture, the paint is applied in 2-3 layers, and each new layer is sprayed only after the previously applied layer has completely dried.
- Applying varnish. The specifics of applying varnish are similar to the same process for primer and paint.
How to paint car wheels with your own hands
It is important to note: the varnish acquires peak protective properties only 6–7 days after application.
Security measures
In the process of painting work, you must adhere to certain safety rules:
- It is necessary to use special safety glasses to prevent contact with harmful substances in the eyes.
- It is recommended to carry out all work wearing special protective gloves.
- Alloy wheels should be painted in a well-ventilated area, otherwise there is a high risk of chemical poisoning.
Painting alloy wheels It’s easy to do on your own, without going to specialized auto repair shops, which will save you quite a lot of money. The only thing the car owner needs is time and strict adherence to the steps described above.
Of course, painting car rims at a specialized station using special equipment is probably best option, it will allow you to achieve excellent results.
Moreover, one way or another, it will differ from painting wheels with your own hands at home. However, one should not assume that the second option is so hopeless and unacceptable. As a rule, the main difference between painting wheels yourself is your personal labor costs. Although, this is only the first time, and then look, it will be possible to perform a similar procedure several times a month.
How to paint car rims with your own hands in a garage?
Equipment
I suggest, first of all, to go through the materials and necessary equipment. An ordinary electric drill with a set of various attachments will act as a sandblaster. By the way, a set of attachments can later be used for polishing a car body, as well as for polishing glass, so don’t skimp, buy the right equipment.
Dye
Before painting, you will need a primer in cans. The paint should be acrylic, try to buy varnish and paint from the same manufacturer. Why acrylic paint and not powder paint? I won't argue powder paint there is no equal, this ideal option, however, there is one caveat: the technology for applying this type of painting requires special, expensive equipment.
I doubt, however, that any of you have a miniature sandblaster or heat chamber in your garage. But who knows? If available, you should give preference to powder coating. Buy paint only from trusted authorized sales points, pay attention to the expiration date, as well as the amount of paint. Don't buy it back to back, it's better to stay.
Materials
The sandpaper should be of different grain sizes, from fine to coarse, it will be useful for preparatory work. Be sure to buy a solvent; you will need it to degrease the prepared surface. An old shirt or T-shirt will do as a rag - it doesn’t matter.
Now, you can, and as they say, from words to action... Let's start painting car rims with our own hands.
Surface preparation
The first step, of course, is to remove the old paint coating. Try to wash the disc as thoroughly as possible by using a brush and washing powder. I think your wife won’t mind if you borrow a handful of the miracle remedy called “Ariel” or “Tide”, it doesn’t matter. It would be best, of course, if you use drill attachments and perform a “total” cleaning of the disk.
In order to paint the wheels yourself, the entire surface of the disk should be treated without exception. Therefore, do not hide the drill with attachments far away, we need it again. IN hard to reach places, cracks and bends of the disc, work with your hands. While removing the old coating with sandpaper, occasionally rinse the disc with water.
Application procedure sandpaper should be like this: No. 200-400-600. After you finish sanding the disc, if necessary, you can use automotive finishing putty to eliminate minor defects on the surface of the disc. There will be defects in any way, since I doubt that you are going to paint the new disk, so minor “side effects” will be 100%.
Let's start priming the surface
Primer work is one of the the most important stages when painting car rims. As soon as the “stripping” and sanding of the disc is finished, treat it with a degreaser; solvent No. 646 will help you with this. After this, you can proceed directly to the priming process itself.
Important to remember! You need to start priming with inside disk. The process of spraying the primer, as well as all aerosol paints, should take place at a distance of 25-30 cm. Do not forget to shake (shake) the can from time to time. I think there is no need to explain that the primer layer should be uniform, do not overdo it.
Correctly, the primer should be applied in three layers. Make sure to allow each layer to dry properly for some time. As soon as the third layer is applied, I strongly recommend forcing it to dry. Since painting takes place, roughly speaking, “on your knees” in the garage, you certainly won’t have a heat-heated oven, so as an alternative, you can use an industrial hair dryer or, in extreme cases, your beloved wife’s hair dryer. How to take it from her - steal it, beg it, earn it - is your problem.
Do-it-yourself painting of car wheels and coating with protective varnish
The procedure for painting car rims is not fundamentally different from the priming procedure, so I see no point in repeating it. Do each of the stages sequentially, only now using paint. Remember safety precautions during use acrylic paint. Follow all the measures necessary to protect the skin of your hands, as well as other areas of the skin, take care of your eyes - use glasses.
The discs need to be coated with varnish in one or two layers, as I said earlier, it is advisable that the varnish and paint be from the same manufacturer. Apply the varnish according to the instructions on the package.
In theory, everything seems to have been missed. From now on, you can safely be proud of yourself, because you managed to paint your car's rims with your own hands. All that remains is to take the wheels to, and put the finished wheels on your car. Oh yes! Don't forget to thank your wife for the technical support, and return the hairdryer with powder to its place. (-:

Many car owners sooner or later are faced with a situation where the appearance of their wheel rims is not the same as before. First, small chips appear, then corrosion, and then during the next seasonal “change of shoes” we notice that the disc has begun to look like a piece of recycled metal. This is not surprising, because the wheels have a hard time - temperature changes, snow and ice, abrasive dirt and gravel, as well as potholes and de-icing agents. And there comes a time when a car on such wheels looks unattractive. In such a situation, you can contact specialists service center, who will put the rims in order for a decent fee, or you can paint the rims on your car with your own hands.
- primer;
- enamel;
- sandpaper of varying abrasiveness;
- “grinder” with a cup-shaped brush;
- degreaser (anti-silicone);
- rust converter;
What materials to choose and how to apply

First, a little about the materials. The enamel and primer must have the same base - either alkyd or acrylic. The first gives a good shine, but takes a long time to dry, the second has a worse shine, but dries in 2 hours.
Choose the application method yourself, but keep in mind that working with a spray gun requires equipment and experience. Therefore for independent work It’s better to follow the path of least resistance and purchase ready-made materials in aerosol cans. Moreover, now there are special acrylic enamels for discs that have proven themselves very well, the coating is very strong and durable. Accordingly, you also need to use an acrylic primer.
How does the process of painting car wheels work?
Maximum results can only be achieved with the tires removed, since the surface of the landing shelves (humps) may also require cleaning and painting. The development of corrosion on them causes loss of tightness, and the tire constantly bleeds air. Therefore, you first need to go to a tire repair shop. We disassemble the wheels and thoroughly wash the rims. It is better to do this at a car wash using chemicals. Further work should be carried out in a well-ventilated area or outdoors, avoiding dust.
The process of painting car rims takes place according to the following scenario:

After completing all the steps described above, leave the discs to dry. Tires can be installed no earlier than after 12 hours.
How to paint alloy wheels
 Discs from aluminum alloys Although they do not rust like steel ones, they are no less susceptible to chips and scratches. The painting of alloy wheels is different in that they can initially be painted in two colors, sometimes with enamel with a “metallic” effect, and this necessarily requires an additional layer of clear varnish. In addition to this, they often have a complex surface.
Preparation already requires greater accuracy and there is nothing to do with a grinder here. Only hand grinding. In this way, you need to smooth out all the defects, and then make the entire surface matte. Next, degrease and prime the bare areas. Just a regular primer will not work in this case; you need a special one for aluminum.


