What is an attic? It is known that in our area the attic can become anything - a warehouse, a workshop or a living room.
It all depends on the capabilities of the room and your imagination, but one thing is certain - the attic space needs to be used. How to equip the entrance to the attic with your own hands?
Arrangement of the entrance to the attic
 If you intend to equip functional room in the attic you need to think about choosing a place for the attic ladder. The attic staircase requires the presence of a hatch - a ceiling door.
It is most reasonable to equip a hatch with a ladder in the corridor, hallway or passage room. In many houses there are rooms that are not used as living rooms, where you can easily install a staircase to the attic.
In the old days, the entrance to the attic was arranged from the outside, but the prospect of climbing into such an attic on a frosty or rainy day would not please anyone.
The most extreme loft lifting mechanism would be several stools stacked together. But speaking in detail, to get there in a civilized manner you need a good attic ladder. She might be both stationary and folding, the latter are in great demand.
Folding options are compactly stacked on top after use, saving a lot of usable space. A beautifully decorated hatch can become a fresh element of the interior.
Manufacturers offer wooden options for small loads (up to 150 kg) and metal for more serious loads. Prices for such stairs vary from 7,000 rubles to the limit of the consumer's wallet. Choosing the most cheap option, you shouldn’t count on its quality, so isn’t it better to make a folding attic ladder with your own hands?
Let's look at some possible options for homemade stairs, the simplest for a beginner and more difficult for those who are confident in their abilities. At your service is a description of materials, work and drawings of the proposed stairs.
A simple two-piece DIY staircase
 This is the staircase that consists of two sections, one of which folds up. In the assembled version, the staircase is not hidden at the top, but remains in plain sight.
This may not be critical if the attic is in a workroom, garage, etc. Even in a hallway it may look quite appropriate, it all depends on the style of your home.
This staircase can be made in a few hours, you just need to prepare the necessary materials:
- Wood saw.
- Measuring instruments(roulette).
- Regular wooden staircase.
- Card loops, the width of which is equal to the width of the stringer - 4 pcs.
- Four bars 2–3 cm thick: two as long as the width of the hatch and two 20 cm longer.
- Self-tapping screws, anchors, loop and hook.
A stringer is a supporting beam of a staircase on which steps are laid.
There is no need to tell anyone how to make a ladder, but we will only note that its length should be approximately 30 cm greater than the distance from the floor to the hatch.
We take short bars:
- We connect the first block to the upper end of the stairs using loops.
- We securely fasten the second block to the bottom using a rigid method.
To make the structure more reliable, you need to take two slats and nail them with reverse side march obliquely. Just try to do this in such a way that the design did not interfere with movement on the stairs.
Measure exactly 2/3 of the entire length of the ladder from the bottom and cut it in this place. Next, connect these parts with card loops. The hinges are attached to the back of the ladder so that it can fold properly.
Secure the top bar directly under the hatch. The hook and loop are needed to ensure that the ladder does not open randomly. The hook is attached to the wall, and the loop is on the bottom bar.
The first attic staircase is simple, but it has the disadvantage of a visible staircase. There are other models shown in the photo - these are retractable, folding and telescopic.
Attic staircase designs


DIY folding ladder on hinges
 This is a folding attic ladder with a hatch, consisting of three sections, as well as an attic hatch. This option is very attractive for literally any room.
You will need to determine what the opening for the hatch will be, taking into account wishes and dimensions prospective visitors to the attic. For example, the opening for the stairs will be 125 x 70 cm.
In order to cut the hatch correctly, you need to add 7 mm on each side. Hatches for stairs to the attic should close well without compromising the thermal insulation.
Required materials:
- bars 5 x 5 cm – 2 short and 2 long;
- plywood 1 cm thick according to the size of the hatch.
At the ends of each block you need to make a cut to half the thickness, connecting glue and screws into a perfect rectangle. Using the means at hand, to prevent the diagonal from moving out, you can attach temporary triangles from thin plywood. Then we screw a sheet of plywood to the size of the rectangle.
Instead of locks we use door latch, any door handle or a cylinder of suitable shape. The latch holds the hatch closed well and opens easily. To conveniently open the hatch without using stepladders and stools, this handle needs to be specially made. IN special hole you need to insert a long cylindrical handle to open the hatch while standing on the floor.
Making hinges for opening the hatch
 All components for the hatch opening mechanism can be purchased ready-made, or you can also make it yourself.
In order to do everything yourself, you need estimate dimensions and angles using a cardboard mockup. We make parts from cardboard; you can practice on them with the length of the hinges so that the hatch can open to the required angle. Based on the resulting model, we make a mechanism for opening the hatch.
The main thing is through experience determine the length of the hinges, because this type attic stairs assumes the hinged method. In the drawings you can see how the hinge is installed; the logic of its operation is very simple - it helps to smoothly open and close the hatch.
Necessary materials that can be found in every garage:
- Metal corner – 2 pcs.
- Sheet metal.
- Metal strips 2 cm wide – 4 pcs.
We take two narrow metal strips and use a drill to make holes for an M10 bolt. We assemble the parts together in pairs, slightly pulling them together. Using the measuring carpenter's tool Malka, measure the opening angle of the hatch and we move our mechanisms exactly to this angle.
Using a jigsaw, cut out the part of the metal that will overlap with the corner. We remove the excess length of the metal strips and round the ends. After processing and removing excess metal, we assemble the mechanism - now the corner will lock in a certain position. Both mechanisms for two sides exact copies each other, but only mirrored.
Attic ladder fixation mechanism
The hinge mechanism is reliable, stopping the hatch with the ladder in the desired position thanks to the angle.
But for more reliability and smoothness To open the opening mechanism, you need to add another simple mechanism, similar to a hand.
For the “hand” you will need:
- Long strips of metal, 2 cm wide – 4 pcs.
- Corner - 2 pcs.
At the end of one of the strips you need to weld metal part, on which this strip will rest, and the corner will play role support element . We make simple hinges that, when the hatch is open, will maintain the bending angle, while supporting part of the weight of the structure.
In order for the load to be distributed evenly between two different hinges, this unit must be secured correctly. Yes, him needs to be fixed with the first hinges fully deployed.
Installation of attic stairs
 All that remains is to make the attic ladder itself; it should be 35 cm longer than the distance from the floor to the hatch.
The folding ladder will consist of three sections, the length of which it is important to calculate correctly. The first section is equal to the size of the hatch, the second section is slightly shorter than the first (it should not touch the ceiling when unfolded). The third section is equal to the remaining segment.
Materials for the stairs:
- Inch board 10 cm wide.
The angle of inclination of the hatch in the open position, which we previously measured with a small tool, is transferred to the board. Yes, we mark the slope for the steps.
Let's start marking the string boards for the steps along the lengths of the sections according to the order described above. The boards must be pressed tightly, secured with masking tape and marked equally, making the slopes of the steps in a mirror image.
The sections will be fastened again with hinges, so you need drill a hole for the hinge bolt on each section using a 25-point pen. Using a router we give all the edges a finished, neat look. We cut the boards exactly according to the sectional markings.
Need steps cut to width and sand, like bowstrings. At the places where the steps are marked, you need to make 5 mm recesses for them. We assemble all the parts using glue and PSh screws.
Hinges for folding stairs
To assemble the structure into a folding mechanism, you need to make a set of hinges.
Required materials:
- Metal strips 2.5 cm wide – 8 pcs.
- Bolts for the hinge 8 mm and self-tapping screws.
In order for the loops to serve and not bend, four strips need additionally weld the segments the same metal (about 1/3). We make holes in each strip - 2 small ones for fastening to the bowstring (one at the bottom and one under the finished piece), and one large 8 mm for the hinge (at the top).
The hinges need to be secured when the ladder itself is lying on flat surface. The hinge must be secured so that the hinge bolt lay down in the previously drilled hole, and the ends were along the edge of the bowstring. So secure all four loops.
Installation of stairs
We collect all the elements and install them in their places, and the first segment of the stairs is stationary and is needed attach with corners to the hatch cover.
We check the operation of the mechanism, if everything suits you, then we disassemble it again for processing. We varnish the wood metal primed and painted.
As you can see, there is nothing difficult in creating an attic staircase with your own hands, especially when photos of drawings are available on the Internet. You can make all the metal parts yourself, or it’s even easier to buy them ready-made. Then it’s a complete pleasure – all that remains is to assemble this construction set.
Often the exit to the attic is located in one of the living areas of the house. And when designing such an exit, many designers and architects previously had to decide which room would have to be “offended” by an ugly staircase in the corner. As a last resort, a stepladder was made and hidden in the pantry. And if necessary, the owners were faced with the task of pulling it out, carrying it to the hatch without hitting the TV on the way, putting it down and getting up.
And at the same time, it is desirable that the legs of the ladder do not move and the ladder itself does not fall until the person is in the attic. Bye modern market did not offer a wonderful alternative to all this trouble in the form special type a hatch behind which the ladder itself is hidden.
Why don’t you build something similar, because an attic ladder with a hatch is not such a complicated mechanism, and you can figure everything out if you want? Moreover, with our photo instructions, useful tips and video stories you simply have no chance of failing!
Of course, you can make an attic hatch for an ordinary stepladder. But ladders are the most inconvenient way to get upstairs, and also the most unsafe. Yes, it can be decorated somehow and even played with home interior, but still such stairs look rude and are frankly in the way. But sometimes, when there is neither time, nor desire, nor budget to build another option, this is quite acceptable. Moreover, later such a ladder can be replaced with a more convenient one, and a durable stepladder will work in any household, you must agree!
Modern designers are convinced that installing cold attic better, of course, is only a folding ladder, which can easily be hidden under a beautifully decorated hatch.
Such a staircase is really almost invisible, because a special plate is attached to its lower part, matched in color and texture to the ceiling. Look how light and graceful such stairs are in any home interior:
Do you like what you see? Then it probably became clear to you why no one hides modern attic stairs in the pantry anymore. They themselves hide behind a beautifully finished hatch, which is invisible against the background general design ceiling. And such cunning designs of the most different types you can easily build it yourself. Look at our photographic materials - you probably have the same parts and a couple of extra bars at home.
Basically, all “hiding” attic stairs are divided into two main types: folding and sliding. The first are blocks of three or four sections. They unfold using a special spring mechanism. Most often, such stairs are made of wood or a combination of wood and metal.
Individual view sliding stairs- This is a scissor ladder, or telescopic ladder, which can withstand quite a lot of weight and folds like an accordion. This classification is also called differently: sectional scissor stairs. The stability of such a ladder is ensured by a special mechanism for opening the lid, which fixes the entire structure in the desired position.
In more detail, telescopic blocks are ladder structures in which the first section is attached to another. The sections move along guides, while unfolding or folding. But keep in mind that for such models the opening in the ceiling will have to be made quite wide.
Sectional stairs are primarily good because they have the opportunity to have railings and handles on both sides, which will make climbing the stairs much easier and safer. While folding structures Unfortunately, such convenience cannot be provided.
But, if this is your first time deciding to make a hatch with a ladder, then give preference to a simpler, but no less reliable folding option:
In general, the whole structure looks something like this:

Step-by-step design instructions
The most durable and practical stairs are those that are made on a metal base with wooden steps. At home, of course, it is difficult to build something like this, but anyone can work with wood.
Step 1. Plan and design
So, first, carefully examine the schematic illustrations carefully prepared for you:


Do you have an understanding of exactly what the opening will look like? attic hatch and on which side will the ladder be attached to it? Then let's move on.
Step 2. Select fastenings for the hatch and ladder
It is the strength and quality of the mechanism that determines how easily the hatch will open and how much it will withstand the loads placed on it. The simplest mechanism that exists in this regard is hinges and latches. The only difference is how exactly you arrange them: according to long side flap, or along a short one, and where the hatch itself will open - up or down.
And here many home craftsmen resort to such tricks: they use not simple furniture hinges, but it adapts to car hoods, and the result is a hatch cover with a spring mechanism no worse than that of the most expensive industrial options. Such a spring helps lift a heavy ladder with a hatch and fix it in the desired direction.
Those. every time you go up to the attic, you will no longer need to use special effort to lift the usually massive manhole cover.


In addition, a bracket that will help fix the open hatch in a certain position will not be superfluous. This way, you will not allow the hatch to open at a greater angle than it was designed for, and the lid that flies down will not accidentally hit a person passing by on the head.

You can also use the so-called gas elevator for a massive attic hatch - such devices are actively sold today for heavy doors. All this will also help to easily open and close the hatch upward, and the gas elevator simply will not allow the lid to drop quickly and sharply.
After all, there are situations when a person decided to go down from the attic using a ladder, began to close the hatch cover behind him, and it simply slammed shut under its own weight. The result is a concussion and a rapid flight down. Think about it, because this is easy to avoid.
You can also use a steel chain to secure the hatch cover, as here:

Step 3. Install the spring mechanism
It is also necessary to consider not only its component elements for a folding ladder, but also the main spring mechanism. We are talking about a device that will provide reliable fixation the entire staircase structure in the closed position in the attic.
But keep in mind that the stronger and heavier this fixation turns out, the more effort you will then have to put in to open the ladder and unfold it. And the greater the load will be on the mechanism itself, but it does not last forever.


Another important point: the greater the inclination of the ladder itself, the greater the load will be placed on the place where it is attached to the attic floor. The smallest load will be at an installation angle of 90 degrees. But you can’t install a ladder that way, of course, so the optimal angle you can aim for is in the range of 65 to 75 degrees.
Step 4. Making an attic hatch
Now think about the design of the hatch itself. It may have one roof or two (upper and lower), additional holding mechanisms and even remote control.
Here is the detailed one step by step instructions, which will be convenient for you to use:
- Step 1. Take the necessary measurements and draw them on the plywood.
- Step 2. Make the side walls by applying glue to the joints of the future hatch.
- Step 3. Fasten all parts with screws.
- Step 4. Again coat all edges with PVA and glue the bottom.
- Step 5. Hammer the staples to secure them using a construction stapler.
- Step 6. Make a spacer from the MDF board.
- Step 7. Place the spacer in the box - this will give you an idea of where to apply the glue.
- Step 8. Using screws, attach the spacer to the prepared frame.
- Step 9. Draw a line on the bottom of the box and follow the markings with staples again.
- Step 10: Nail the bottom to the spacer.
- Step 11. Place thermal insulation on the bottom of the box.
- Step 12. Place window insulation into the cracks of the frame.
- Step 13. Using a stapler and screws, nail the lid to the box.
Our master classes will also help you, which wonderfully illustrate the process of making attic hatches with stairs from different materials And different designs:


Continuation:

Step 5. Install the hatch and ladder into the opening
Whether you made the hatch and attic ladder yourself, or you decided not to bother and purchased a ready-made structure, in any case, now you will have to face the same difficulties in the process of installing them.
So, if the ceiling of your attic is made of concrete, the opening for access to the roof must be made in advance - cutting it out later will be difficult. But in wooden floor the hatch should be installed between load-bearing beams, the distance between which is at least 60 centimeters, but not more than 1 meter.
It is important that when a person ascends and descends along such a ladder, the entire load is evenly distributed between the beams, so the hatch with the ladder must be installed so that the lid opens parallel to the beams, but not across them. Like here:

Another example of installing a hatch with a ladder in a wooden ceiling:

As you can see, using wooden triangles (kerchiefs) a special niche was built in the corners of the hatch cover, into which the insulation will then be inserted.

In fact, all this is one day’s work for experienced craftsman and great practice for a beginner. Feel free to get started!
Installation of fire escapes for the attic
In a separate chapter we will note the arrangement of attic hatches with stairs, which have another purpose - to be fireproof.
Let us explain in more detail. At the moment of a fire, when the exit from the house is blocked, the only option is the attic hatch. It’s enough just to climb up it and get out onto the roof, and from there you can go down either along the wall of the house or wait for help.
That is why so-called fire hatches are often installed in the attic, which help to evacuate from the house at the right time. Therefore, for this purpose, the hatch and ladder are made exclusively from metal, and only occasionally from wood treated with propylene. Naturally, the last option is less reliable.
Such designs are mandatory in office buildings, government and commercial banks, hotels and educational institutions. And also in all those rooms where fire itself is more possible and predictable. And the hatch and ladder look like this:

In terms of their design, fire escapes with an attic hatch are not very different from ordinary ones, in just a few respects:
- The hinges here are mounted only on the top side, and never on the bottom.
- Also, the sash should only open upward.
- The box is made reinforced, corner type.
Types and groups according to fire resistance time
Based on fire resistance, attic hatches are also divided into three main groups:
- First group. These are the best hatches in terms of protection from open fire, toxic smoke and gases. Their insulation consists of several layers, and the structure itself can withstand an entire hour of exposure to flame without losing its most important properties.
- Second group. Such structures have average fire insulation. Such a hatch can withstand fire for as long as half an hour without any special changes in its properties.
- Third group. X Good protection against fire, but the safety margin is small, only about 15 minutes. For a residential building this is the simplest and reliable option, because this time should just be enough for all household members to climb onto the roof.
Requirements for the manufacture of a fire hatch and ladder
Such products have special requirements for the gap between the hatch cover and attic floor: it should be minimal. And the box itself can even be made of wood, only if it itself has been previously impregnated with fire retardant compounds. But most often such stairs are made of metal with a thickness of 1-2 millimeters to 2 millimeters.
Naturally, the thinner the metal, the less it can withstand fire. Agree, if the walls are already on fire, and there is no way out of the windows or doors, then the stairs along which you can escape to the attic should certainly be intact, and not light up like a match.
And they often don’t know about such a moment. There are no special separate GOSTs for the production of such structures from stairs with a hatch. There are only recommendations and separate fire resistance tests. This includes such specific concepts as the material used to make a staircase with a hatch, the presence of a special seal that will not allow fire to spread, and heat-insulating material that does not support combustion. All this is spelled out in modern SNiPs 2.01.02-85.
And finally, we have prepared for you this nice bonus that will help you easily lift any objects up the stairs:

To access the attic (attic) a ladder is required. Since my attic space is not residential, i.e. "cold attic" then stationary ladder was not intended from the very beginning of construction.
However, access to the attic is necessary and this requires an attic hatch.
Having studied the proposals in the form ready-made solutions In Moscow, I came to the conclusion that it is best to make a hatch into the attic with your own hands - it will be much cheaper.
A folding staircase with a hatch to the attic just doesn’t cost real money - compared to its cost, it’s just something...
Having tried to find information on the Internet, much to my surprise, it didn’t lead to anything - in the search results for the queries:
- DIY hatch to the attic,
- do-it-yourself attic ladder, etc. opens a bunch of sites that contain almost the same article with a review of stairs.
Or a reprint of an article that was published on the site is provided ForumHouse by user Alli58ru- “Do-it-yourself folding staircase to the attic” and the same picture is given:
I also came across an article where a man made a hatch into the attic with his own hands using barn hinges as hinges.
But this option does not suit me, just like the one described in the article Alli58ru, since these options contain enough big gap between the hatch cover and the box on the hinge side. Although in the version with barn hinges this gap is smaller...
I wanted to make such a hatch into the attic with a folding ladder so that:
- it was insulated (hatch thickness from 50mm,
- so that the hatch has a rebate that extends a quarter of the way into the hatch
- so that there are no gaps around the perimeter of the hatch, i.e. so that the finishing of the hatch (in my case it will be either lining or imitation timber) extends slightly beyond the hatch on the sides.
In this case, the hatch should open normally.
To realize the normal opening of the hatch, which is quite thick, you need to choose the right hinges for the hatch to the attic itself.
Alli58ru I used these loops:


By the way, on some sites they reprint the same picture with the dimensions for a given loop - and the dimensions are not exact!
Having looked closely at the hinges on factory attic hatches with stairs, I noticed the following hinges:
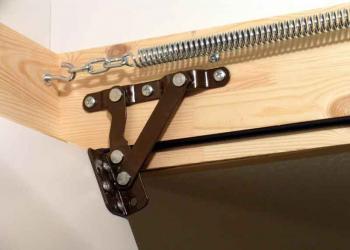
I decided to experiment with them.
In theory, the following logical schemes for the operation of loops are obtained:


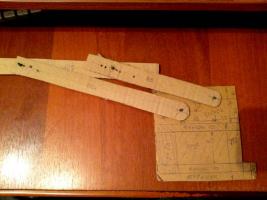
For testing, I assembled several hinges from hardboard and wooden blocks.
The dimensions can be viewed directly on the hinges themselves.
1
In this option, the hatch cover will bite right away - such a hinge is not suitable...


2
This is an option considered Alli58ru


3
This is the option I've settled on for now.


To test the operation of the hinges for the attic hatch, I made a a quick fix box for an attic hatch made of defective imitation timber measuring 90x60cm.
The hatch cover was also assembled from the same imitation timber and secured to 30x40mm bars. The lid turned out to be crooked, but I didn’t care - I still had to check the operation of the hinges first.
Here is the hatch box. Inside the box I screwed strips that form a quarter to which the hatch cover should press.
I set the thickness of the hatch to 60mm:


I also made the hinges for this hatch from wooden blocks of this type:

I screwed these hinges to the hatch cover and to the sides of the box with self-tapping screws:


I installed the resulting test hatch into the attic on four legs 150cm high.
View of the hatch from below. You can see the 30x40mm bars framing the hatch where insulation can be placed to organize an insulated hatch into the attic.
I screwed the hatch lock in the closed position. 
The box with the hatch to the attic is installed on legs. 
Fully open hatch: 
Side view 
Here you can see how much the rear part of the hatch moves forward from the edge of the box when it is fully open.
If the opening is limited in length and in the place where it will open, this must be taken into account. 
Hinge when the hatch is fully open 
Front view 


The hatch begins to open. It can be seen that the hatch begins to open in such a way that it does not interfere outer skin and a box. 


I discovered a problem with this implementation, namely:
When opening the hatch, the hatch trim gets bitten on the frame and the hatch does not open completely.
This may be due to the insufficient length of the levers in the hatch hinge. Don't know.
The photo shows the problem area: 

If the hatch casing is moved so that it is flush with the box, then the problem is solved. in this case, on the back side of the hatch (one hundred sides of the hinges) when it is closed, there will still be no gap, just like in the front, but in the area where the hatch is fully opened, you will either need to trim the hatch frame or somehow “play” with the hinge and look for a way out. ..
While I don’t have a solution, I had to leave the dacha.

I also figured out the timing for limiting the opening of the attic hatch to the desired angle.
So far I have made this “crane”:


In principle, you can make it so that it folds along the hatch box, and not on top. I haven't finally decided yet.
In this loop, the load on the hatch, which holds the weight of a person on the stairs, is transferred precisely to this node, and in the case of the implementation of the hinge for the hatch proposed Alli58ru There is also a limitation in the loop itself. Those. the load is more distributed.
On the other hand, many factory attic stairs have just this type of hinge.
The next step I made this type metal loops.
This is what happened:


I will write a separate post about their production a little later.
And finally, a few videos that I shot during testing:
This is the same hatch only with metal loops(no sound):
Update:
I think that the problem with the outer trim of the hatch biting on the edge of the box can be solved by lengthening the levers in the loop.
I played a little with the cardboard and the size of the arms in the loop and seemed to have found a solution.
Here's what happened:
Here I used a hatch pie like this:
- plywood 10-12mm
- a 40mm high block on it - then insulation there...
- we stuff the outer trim onto the block
I also immediately considered the option of using a 50mm bar instead of 40mm - it seems that it should also work as it should. 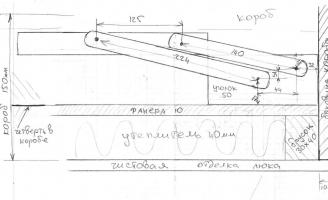
When opening the attic hatch it looks like this: 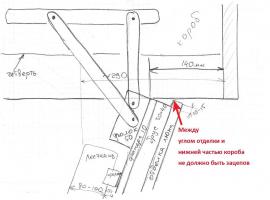
As can be seen from the picture, there should be no snagging between the trim and the bottom of the box. In theory for now.
It is also clear that when the hatch is open, the ladder will move forward from the edge of the hatch by about 14-15 centimeters.
For small hatches this can be critical.
The side view is like this: 
And this on cardboard: 
And here I put this loop on cardboard on a sheet of paper to illustrate how the loop should behave when opened: 

The new dimensions of the hinge arms are visible in the figure. It turned out that the dimensions were increased by only 10mm.
PS
But I still haven’t been able to find a normal spring. Everywhere you can only buy 30cm long springs - the type for doors - I don’t know if they will be suitable for a hatch or not.
Are there any options at this point? Are they sold anywhere?
I made new metal hinges with slightly changed dimensions.
When testing external finishing the hatch no longer touches the lower edge of the box.
Here's the video:
But how do you get into a well-appointed attic? It is almost impossible to do this without a ladder.
The best option for a convenient and safe climb to the attic is the original attic ladder. It can be located outside the room or inside - whichever is more convenient and expedient for the owners.
But it should be noted that to use internal staircase somewhat more convenient: to go up to the attic, you don’t have to go outside, where the weather conditions are not always excellent.
WITH  There are many types of attic stairs, including:
A)
stationary stairs
:
- screw.
b) portable ladders:
- attached,
- stepladders
c) folding stairs:
- scissor,
- sliding or telescopic,
- lever or folding,
- folding
How to make a choice?
It is worth considering that the use of stationary stairs is strictly limited by the impossibility of using them in small areas.
 Stationary attic stairs with wide flights, equipped with railings, however, are recognized as the most comfortable.
Folding stairs They represent a kind of transitional link between portable and stationary. They are almost as comfortable as the latter, but they do not require as much space. Their security level is much higher than that of mobile devices.
The choice must be wise and depend on several important factors:

Portable structures deservedly considered temporary option, which is usually used to get into a rarely used room.
Main disadvantage portable device– low degree of security.
Attic staircase
Dimensions and standards
 When arranging it, it is important to take into account the list of standards that any attic staircase must comply with:
1). Its height should not be more than 3.5 m.
As you grow this indicator the rigidity of the entire structure is noticeably reduced. In addition, falling from such a height is much more dangerous.
2). The width of a standard march should be on average from 65 to 110 cm.
 3). It is advisable that there are no more than fifteen steps.
4). The distance between individual steps can be about 19 cm.
5). The steps have a thickness of 18-22 mm.
6). If the ladder is folding, then the minimum load it can withstand should be 150 kg.
7). The traditional angle of inclination of the structure is 60-75 degrees.
A larger angle becomes dangerous for operation, and a small one will require more area.
The steps should not slide.
Their location must be parallel to the floor plane.
DIY process
 Build with my own hands such a device is not as complicated as it might seem.
Of course, it is unlikely that you will get an attic staircase from the official website that is beautiful and sophisticated.
But it's worth a try!
The drawings of stairs necessary for work can easily be found on the Internet. They are there for every taste.
The attic hatch is an important basis for any staircase.
It’s easy to do it with your own hands, using 50 by 50 mm bars.
What will be the procedure?

Materials and tools
To make an attic ladder yourself, you will need a whole list of necessary things:
- wood hacksaw;
- with a set or set of screwdrivers;
- with foam;
- roulette;
- different size anchors and screws;
- bars 20-30 cm thick;
- card loops.
In addition, you will need the usual ladder(already finished) with a length 30 cm greater than the height to the level of the opening.
Attic ladder of two sections
Design
We take a pre-prepared wooden ladder the right size. At the bottom and top of it we fix a couple of bars along the width: the bottom one is rigid, and the top one is hinged. Having measured two-thirds of its entire length, we cut the ladder with a hacksaw. We get two parts of the structure: the lower one will be shorter, and the upper one will be longer.
We fix a pair of slats diagonally to ensure rigidity. Using loops we connect the existing parts. We secure the upper block under the hatch with anchor bolts. Bottom part We fix it with a hook so that it does not open on its own. There is a loop on the stringer, above the cut point. The finished folding ladder is fixed to the wall surface.
We got a pretty comfortable one. Its main disadvantage can be considered unfinished appearance– all bars and fasteners are visible. But our device will perform its functions properly, and will completely solve the problem of going up to the attic and going down from there.
Installing the folding device
 The folding device will be made on bowstrings.
There is an attic in any country house. Very often this is an unused room, but in some cases some unnecessary things are stored here or even a room is being furnished. In any case, there must be access to it, and for this purpose stairs are made to the attic. They can be made from wood and metal - in this case, you can make them yourself. Or they can be beautiful forged - such designs are usually created to order.
Basic Requirements
Before building an attic staircase, you need to consider several of its features. Firstly, it must be convenient and safe to use. Moreover, these two indicators depend on the design principle of the stairs and the attic itself. An important role is played by taking into account the type of staircase, the width of its steps, and the height of the rise. The height of the stairs is calculated depending on what its design will be. If it is a folding type, then you need to carefully consider its dimensions when folded.
The steps should be of such size that it is comfortable and safe for anyone to climb them. The correctness of the design also depends on the location of the steps: the distance between them should not be too small or large. Failure to comply with these requirements will violate safety regulations.
The width of the flight of stairs to the attic must be at least 0.8 m. It is important that the angle of inclination is maintained: this needs to be thought through at the stage of designing the structure.
Types of stairs: folding or stationary?

The choice between these two types of structures depends on how large the area of the attic is. Of course, a stationary staircase is more reliable and safe, but it is also solid, that is, it requires a lot of space. This is why many people prefer folding attic ladders: they are convenient, take up little space, due to the fact that they can be folded. Most often, such structures consist of several sections that overlap each other, thereby saving space. Moreover, they can always be adjusted depending on the required size.
Or retractable?
These designs are becoming increasingly popular, due to their advantages:
- are cheap;
- easy to install;
- take up little space thanks to the accordion-shaped design;
- reliable;
- mask the structure with an attic hatch.
All these advantages make retractable stairs so in demand. How to make it yourself?
Self-installation of a retractable ladder: main steps
The very first step should be a thorough analysis and check of the dimensions of the hatch opening. This is necessary to ensure that the parameters you choose coincide with the dimensions of the stairs. Then the location of the bars is thought out - first at the bottom, then at the top. Special spacers are located between the opening and the staircase - they will help better fix the structure. When it is laid, the spacers can be removed.

Or outside?
If space does not allow you to install retractable stairs, you can replace them with an external structure. It will provide a connection between the outside world and the inside of your home. The main thing is to remember the safety rules, since the operation of such a structure has its own characteristics. During installation external staircase it is important to choose the right material: it must be resistant to sunlight, have increased abrasive wear, reliable and wear-resistant.
Wooden staircase
Wooden stairs to the attic are the simplest option, which you can create with your own hands. There are several ways to do this. Let's look at the simplest and most practical ones.
Method 1
To make an attic staircase, you first need to take measurements: we need parameters for the height of the room, the expected angle of inclination, which most often reaches 30 degrees, while the height is about 2.5 m. In order for the staircase to be reliable and correct from a design point of view, you need to think through and draw up the drawings correctly. The simplest wooden stairs are created on the basis of bars for stringers, bars corresponding to the width of the stairs for fastening, overhead hinges and boards from which we will make the steps. Yes, and don’t forget about the folding hangers - the hatch cover will be fixed on them. The installation process itself is as follows:
- Steps are installed and securely fastened between the stringers. This is done either using a tongue-and-groove type of fastening, or with self-tapping screws, or with glue. It is better to treat the steps with anti-slip pads - they will increase the safety of the structure.
- The staircase is first secured under the ceiling opening using two bars that are equal to the width of the staircase. Their connection is made with loops.
- We check how efficient the hinges are, and then finally tighten the fasteners.
This is the easiest way to create a staircase to the attic.

Method two
This is a more labor-intensive method of making a staircase, which can easily be installed even in a country house. It looks more aesthetically pleasing and has more reliable design, which is important in conditions of heavy load on it. The structure itself will be movable on one side, and the other half will be attached to the wall. To create such a staircase to the attic we will need:
- two boards of length corresponding to the height of the ceiling and the angle of inclination;
- boards for creating steps at least 0.5 m wide and about 3 cm thick;
- bolts, self-tapping screws as fasteners;
- card loops that will attach the steps.
It is important to arm yourself with a drawing - it will allow you to complete all the work efficiently and accurately. After determining the angle of inclination, you need to saw off the bars at the top and bottom so that they rest firmly on the floor. The boards along their entire length are divided into equal sections - here the steps will be located at the distance you need. The steps are fastened with card loops, and after the structure is completed, you can make it elegant by varnishing or painting it.

Metal stairs
Attic stairs made of aluminum look very beautiful, especially if your country house is decorated in the style of “minimalism” or “high-tech”. What's good about metal? Firstly, it is more reliable. Secondly, such structures are processed special compounds, which protect the surface from mechanical stress or corrosion. Thirdly, metal structures able to withstand heavy loads.
Metal stairs are considered the most popular among buyers. retractable type, which take up little space. They are relevant for premises that have small sizes, that is, where required rational use space.
How to do it yourself?
Despite all the difficulty technological process, you can make a metal staircase yourself. Moreover, it can be made of either metal or a combination of materials. To make the simplest metal staircase we will need to prepare:
- welding machine;
- mechanical saw;
- an emery wheel, which we will use to remove burrs on the metal;
- a circular saw and a clamp for joining parts if the staircase has wooden parts;
- pipes;
- steel sheets.
Please note that the quantity of materials is calculated based on the drawing. Welding machine we will make strong seams, so the staircase will be a monolithic and durable structure.
Such an aluminum or steel staircase will be constructed on the basis of a channel (size 8-10). The steps are made of sheet steel; if they are without additional finishing, you will need a grating on the steps that will protect against falling. The fences are made of angle steel, and the supports for the treads are made of reinforcement. First, support devices are installed and welded onto the beam, then brackets for fastening are welded.
Metal attic stairs can have wooden treads, but first you need to think about where the additional fasteners will be located. On metal steps The holes for the screws should be located at a distance of 15 cm from each other. A plywood backing is mounted to the metal treads - it is attached with mounting adhesive, which after hardening retains its shape.

Finished aluminum staircase
Very often many people prefer to buy ready-made designs rather than installing them yourself. But even in this case you will have to work hard, since they are delivered disassembled. How to assemble? General scheme the work is approximately as follows:
- First, a sketch of the future staircase is created.
- From metal profile or pipes are cut into 4 identical sections.
- The pipe is secured in a vice and thoroughly cleaned of rust.
- From metal sheet steps are cut out - they must be the same length.
- The steps are tried on a flat surface and adjusted to size.
- The steps are attached to the supports by welding - this is a more reliable option than angles and bolts.
- The bottom of the staircase is finished with rubber heels.
Forged structures: beautiful and modern
Very often in country houses The rooms are connected with the attic or attic by wrought-iron stairs. Moreover, they can be simple screw ones, or they can have ornate designs, which allows them to fit into any room stylistically. All spiral staircases can be divided into several types:
- in the first version, the staircase is supported by a central pillar and walls;
- in the second, the spiral staircase is removed from the walls and mounted on a support pillar with steps;
- in the third case, the staircase with a turn does not have a central pillar, but rests on spirally curved strings;
- the fourth option is a reliable metal staircase, which rests on a monolith pillar based on a steel pipe.
The most convenient are stairs, the span width of which is up to 900 mm with a diameter of the entire staircase design up to 2200 mm.
What if you buy it?

If you don’t want to do the installation yourself, you can always buy the same forged stairs, which are quite difficult to install yourself, much less come up with and make. Large selection Attic stairs are offered by many brands, not only in Russia, but also in other countries of the world. Let's look at the most popular:
- STANDART ISO PLUS (MINKA, Austria). This folding wooden ladder is made of quality MDF and is designed for a maximum load of 150 kg. There are special protective attachments on the legs, and the metal handrail ensures maximum safety. This compact staircase, the price of which is on average 8,200 rubles.
- The Danish company VELTA offers economy-class structures that can be installed in the attic or attic. For 6000 rubles you get simple stairs, which is compact: it consists of three sections that are conveniently assembled and retracted into the ceiling.
- FAKRO stairs are made from winter-harvested pine, therefore they are reliable and durable in use. This company offers wide range products that are compact and have a wide price range. The insulated hatch cover is the most important advantage that this ladder has. The price of models starts from 8,000 rubles. It is also important that all connections of the structure are reliable and durable, the steps are supplemented with anti-slip grooves, making operation safe and comfortable.

Conclusions
Now you know how to make a staircase to the attic with your own hands. Having the most at hand simple materials, you will create a laconic but comfortable wooden or aluminum structure.


