The dream of every gardener is to have a dry and spacious garden, the air in it should be fresh, but without drafts. In order to build such a miracle storage facility with your own hands, you need to provide it with supply and exhaust ventilation. Proper ventilation of the cellar will allow you to maintain optimal temperature and humidity conditions for storing vegetables, relieve it from excessive dampness and protect it from the appearance of mold. Knowing the basic rules for installing natural ventilation, you can make the cellar dry yourself.
Natural ventilation - the right device:
- to ensure good ventilation, 2 pipes are installed: supply and exhaust;
- air exchange will be better if the ventilation pipes are located in two levels and, if the storage design allows, in different places, which will avoid sucking in fresh air;
- the exhaust ventilation pipe is placed at the top - right under the ceiling;
- the supply pipe for the ventilation of the cellar, on the contrary, is at the bottom at a height of 50-60 cm from the floor;
- The figures below show the correct and incorrect cellar exhaust system;


- use more ventilation pipes with a smaller cross-section - undesirable, which is especially important for the northern regions;
- With such a cellar ventilation device, air exchange occurs due to the difference in the specific gravity of warm internal air and cold external air. This is a natural process, therefore ventilation of the cellar according to this scheme is called natural;
- the exhaust pipe must be installed above the roof ridge and insulated (it is made double) in the place where it passes through the cellar or attic. The higher the draft in the exhaust ventilation pipe, the greater it is;
- The cross-section of the ventilation pipes depends on the size of the cellar. So, with a cellar area of 6-8 sq. m, the exhaust pipe is required to have a cross-section of 120x120 mm, but if the cellar is equipped with only one pipe, then its cross-section should be at least 150x150 mm;
- For the manufacture of ventilation pipes, boards 30-40 mm thick are used. They are well adjusted, tightly knocked together and equipped with valves (latches) and dampers, which will allow you to regulate air exchange and temperature and humidity conditions;

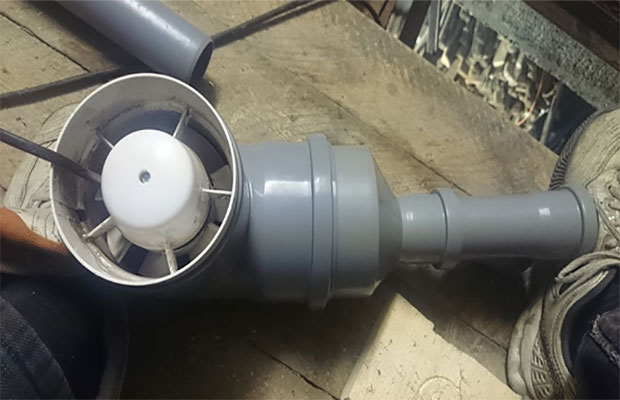
- if the cellar is small, then one two-channel pipe with wind catching is sufficient for its ventilation (see figure). With this design, the pipe has two - one for air flow into the cellar, the other for exhaust. Each channel can be equipped with an independent valve;

- ventilation of some types of cellars (for example, if it is located under a garage) can be arranged through a hatch covered with a grille. The grille is insulated on top with an old blanket or other insulation;
- check efficient work ventilation, you can attach pieces of thin paper to the outlet openings of the pipes. If there is convection, the paper will begin to sway;
- The second way to check whether the cellar ventilation is working is to place a bucket of hot coals in it. By the movement of smoke from the coals, you can observe the air flows inside the vegetable storage;
- insufficient ventilation can be easily detected by the following signs: stale and musty air; mold; feeling of dampness; condensation on the ceiling, bins, walls, shelving;
- To reduce humidity, the cellar needs to be ventilated. For this interior doors They make them with bars and in the fall they open everything that can be opened - hatches, doors, latches. At the same time, a box filled with large table salt or quicklime(they not only absorb moisture, but also disinfect the air);

- if, on the contrary, you need to increase the humidity in a cellar you built with your own hands, then you can spray water, sprinkle the floor in the cellar with wet sawdust, or put a box filled with wet sawdust.
When the cellar is in the garage
Ventilation of the cellar in the garage is important not only to maintain the temperature and humidity necessary to ensure the safety of food, but also to prevent dampness in the garage. Options for extracting a cellar in a garage:
- natural - based on the temperature difference between outside and inside the basement, causing continuous air circulation. Natural ventilation cellars in the garage are the most cheap option hoods.
- forced (artificial) - air flow is forced by fans. Fully mechanized garage basement ventilation using an all-in-one or software-controlled modular system starts at $1,000;
- combined - includes elements of natural and forced ventilation of the cellar.
Natural ventilation –
as in the case of a cellar in a house, in most cases natural ventilation is used to ventilate a cellar in a garage, the performance of which is quite sufficient for small volumes of vegetable storage. The scheme for natural ventilation of the cellar in the garage also provides for at least two pipes made of resistant materials. Most suitable material for ventilation pipes - metal or plastic, for example, PVC. Below is a ventilation diagram: on the left is a standard diagram; on the right is a diagram of the ventilation system for the cellar in the garage, which ensures ventilation of the garage itself.

As can be seen from the diagrams, proper ventilation of a cellar in a garage includes:
- supply and exhaust, located on different sides of the room. The best placement is in the far opposite corners;
- ventilation pipes must have the same cross-sectional diameter along the entire length;
- the fewer bends and turns there are in the supply and exhaust ventilation pipes of the cellar in the garage, the better. Ideally, there should be none at all;
- the supply pipe is located as close to the floor as possible. The pipe opening is covered with a mesh to prevent the penetration of rodents and other small animals;
- bottom exhaust pipe- as high as possible (closer to the ceiling);
- the top of the exhaust pipe is placed as high as possible - at a distance > 0.8 - 1 m above the ridge, and in the case pitched roof, counting is carried out from its highest part. The high location of the cellar ventilation exhaust pipe in the garage improves draft and prevents its outlet end from being covered with snow;
- Air exchange is adjusted through control dampers built into the supply and exhaust ventilation of the cellar in the garage. Dampers allow you to dry the cellar and regulate both the inflow and outflow of air. Dampers are indispensable for ventilating a cellar in a garage in cold winters, when it is necessary to dose the volume of air renewal, otherwise stored vegetables and preparations can be frozen;
- Both pipes are protected from above by canopies, protective covers or deflectors. This will prevent precipitation from getting inside, and also, if a deflector is used for exhaust, it will create a vacuum area around it, which will increase draft;
- Warm air comes out through the exhaust pipe, so condensation may form inside it in frosty weather. The condensate freezes, which reduces the air passage area until the air duct is completely blocked. To prevent such a situation, the pipe must be insulated, especially in the place where it passes through the roof. For insulation, impact-resistant materials are used. In addition, in winter the pipe must be periodically cleared of snow, and to facilitate the process, the outlet part of the pipe is made removable. This will allow you to clean only the clogged part of the pipe.
Proper natural ventilation of the cellar in the garage will ensure constant air circulation, and most of the room will be involved in air exchange. The cost of natural ventilation of the basement is insignificant, you won’t need to spend a lot of money, you can spend 1,500 rubles (purchase consumables, and make the ventilation device yourself). Main disadvantage natural exhaust: in the case when the air temperature outside is equal to or greater than the air temperature in the cellar, the air exchange stops.
Forced ventilation –
allows you to arrange a cellar hood in the garage so that the air exchange process does not depend on weather conditions. To do this, it is necessary to modernize the exhaust pipe: an electric fan is placed in it, creating an air vortex. Thus, air is expelled from the room, which ensures an influx of fresh air through the supply pipe. Air exchange can also be organized through one passage (using a double-leaf pipe). The forced method allows you to organize ventilation of the cellar in the garage and ensure constant air exchange in the summer, when the natural method is powerless.
If desired, you can arrange for a cellar in the garage ideal conditions food storage, for which fully mechanized basement ventilation is installed. In this case, the supply and exhaust of air in the room is provided by a monoblock ( modular system) and is controlled by software. The cost of such installations can exceed $1,000.
When the cellar is in the house
Cellar ventilation in a house performs two functions at once: it provides suitable conditions storage of products and does not allow deterioration comfortable stay people in the house. Improper ventilation of the cellar in the house can negatively affect comfort and coziness: dampness in the cellar and musty, stale air easily penetrates into the living spaces, and all residents of the house will have to breathe this air. A tightly closed lid or cellar door will not save the situation.
 The optimal ventilation scheme for a cellar in a house is shown in the figure. The scheme is suitable for both natural and forced (artificial) ventilation:
- the forced method involves installing a stationary fan; this method is used for air exchange in large-volume vegetable storage facilities. The cellar fan is placed on the exhaust duct;
- For natural ventilation, a fan is also used, but not permanently, but temporarily - installed for several days to dry the storage.
Features of cellar ventilation in the house:
- the supply pipe is laid through the part of the foundation located above the ground, then through the basement of the house;
- the supply pipe must have a minimum number of bends and a minimum length, and must not have narrowings or expansions;
- when installing cellar ventilation in the house, it is necessary to ensure that in winter the supply pipe is not blocked with snow;
- the part of the exhaust pipe located in a cold place must be insulated to prevent condensation;
- The cellar ventilation hood is located inside the wall of the house or in a special ventilation duct, which usually runs along the wall (for example, from the kitchen). In order to collect all the ventilation ducts together, it is better to make a cellar under the kitchen.
Proper ventilation is the key to a good indoor microclimate. The absence of dampness, fungus, mold, maintaining temperature and humidity conditions are indicators correct operation systems. When deciding to build a home cellar, you need to consider all the nuances in order to ultimately obtain the appropriate storage regime for fruits, vegetables, and canned products.
Correct microclimate in the cellar
The best ventilation, which is justified in all respects, for the construction of a cellar with natural air exchange. Requirements that a food storage room must meet:
- Proper air humidity. With high humidity: food quickly deteriorates and mold forms in the room. Properly installed waterproofing will help to avoid this.
- An influx of fresh air and removal of exhaust air is necessary.
- There should be no temperature changes to avoid freezing of products, as well as the formation of dampness.
Ventilation in the cellar: principle of operation
For proper operation ventilation system, two openings are provided in the cellar, which allow for the influx and removal of air masses. Pipes of the required diameter and length are supplied to these holes. Therefore, when designing a system, correct calculation is very important. Their location is important for proper air movement.

If the cellar is located under a building (house or garage), then the pipes are located in the walls of the building. In a separate building they are brought out through the ceiling. Large volumes of cold air must not be allowed to enter. At the same time, stagnant basement odor must be constantly removed.
Do-it-yourself ventilation in the cellar: key accents
Which pipes are suitable?
Two pipes (air supply and exhaust) made of asbestos or galvanized iron. What should be the length of the pipe is calculated as follows: the exhaust pipe runs along the corner of the cellar, starting one and a half meters from its floor (approximately 20 cm below the ceiling) and ending on the roof, at least 0.5 m above the ridge. The correct height affects the level of traction.

The supply pipe is installed in the opposite corner from the exhaust pipe, at a height of up to 0.3 m from the floor level. The diameter of the pipes is calculated based on the values approved by standards, so per 1 sq. m of cellar area – 26 sq. cm pipe section.
Let's say the cellar area is 10 square meters. m, then using the formula for the area of a circle, we will find the pipe cross-section we need.
R= √S/π = √(26x10)/3.14= 9.1 cm. This means the cross section the required pipe– 18 cm.
When making calculations, keep in mind that if the calculated diameter is, for example, 12.8 cm, you need to take higher value – 14.
Important! In order to obtain proper ventilation of the cellar, the cross-section of the exhaust pipe must be calculated with a coefficient of 1.15. That is, for a cellar with an area of 10 square meters. m - 20 cm (18x1.15), and for 5 sq. m – 16 cm.
Mandatory thermal insulation
Insulation of the exhaust pipe in the place where it passes through attic space, is required when installing it. Pipe serving as a drain warm air, in the cold it forms on its inner surface condensate. It freezes in the cold, reducing, and sometimes completely blocking, the path of exhaust air. It is also necessary to protect the exhaust and supply pipes with canopies that will not allow precipitation to get inside.
Attention! Adjust air exchange using dampers that are built into the pipes. Thanks to such devices, it is possible to change the intensity of incoming and outgoing air masses.
Ventilation from boards
For small sizes It is advisable to ventilate the premises in a cellar with one pipe. It is made two-channel. You can make a ventilation pipe for a free-standing cellar from boards 3-4 cm thick. It is a hollow rectangular structure with sides of 18 cm each. Inside there is a diagonal partition. To regulate the inflow and outflow of air, each channel has a valve.

Important! Supply and exhaust pipes should not be located at the same level. This rule does not apply to single pipe ventilation.
How to make ventilation in the cellar at home?
To install such ventilation, it is necessary to comply prerequisite– it should not disturb the comfort of the residents of the house with the odors that are present in the cellar. This fact may indicate that the cellar ventilation is not working properly.
The ventilation device in the cellar located under the house must be carried out in compliance with regulatory requirements to the installation of pipes and their sizes, depending on the height of the building and the area of the cellar. Only cellar ventilation with two pipes can be installed in the house.
Rules for installing cellar ventilation in a house

- The supply pipe “enters” horizontally into that part of the foundation that is located above the ground level. Having entered the room, the pipe turns 90° down and enters directly into the cellar, not reaching the floor 0.2-0.5 m. The supply ventilation pipe should not have many bends and its diameter should be the same throughout the entire length of the air duct.
- The entrance to the tributary, located low from the ground, may be covered with snow in winter. To prevent this, you need to constantly clear the rubble (if any happens). Also, it must be covered with a grill through which rodents and birds cannot enter.
- The exhaust ventilation of a cellar in a private house runs inside the wall, along the kitchen, or into a special channel.
- It is rational to arrange a cellar room under the kitchen, so the ventilation ducts will be combined.
- If you plan to build a sufficiently large room that serves the purpose of a cellar, you can arrange it forced ventilation. To do this, add to the diagram exhaust fan, which will not allow stale and musty air to stagnate.
Checking ventilation for efficiency
After completing the installation of ventilation in the cellar and all related work, you need to check how well it works, whether excess humidity. Performance can be checked using an ordinary match. To do this you just need to light it. As you know, from a school physics course, combustion is supported by oxygen, but if the air is supersaturated with carbon dioxide, then combustion is weak or completely absent. This means that a lit and brightly burning match indicates the presence of oxygen in the air and good operation of the system, while an extinguished match indicates that the ventilation is not working properly.

In a new cellar, after “commissioning” it is necessary to check the operation of the ventilation system
You can determine what the humidity is in the cellar using the long-known method - “a glass of water.” Poured into a glass cold water so that its walls fog up. After standing in the cellar for some time, the moisture from the glass will evaporate - ventilation copes with this indicator. If condensation flows down the walls of the glass in streams, the microclimate of the cellar does not meet the requirements. You can get rid of dampness by changing the operation of the ventilation system. As a preventive measure, paint the walls with slaked lime. Also, you can always keep a bucket of lime in the basement, which perfectly absorbs moisture.
In order for the ventilation of the cellar in the house to work correctly and meet all the requirements, such a stage as design cannot be neglected. After all, a malfunctioning system will subsequently not contribute to the preservation of products, but, on the contrary, will spoil them, at the same time growing mold fungi.
Ventilation in the cellar plays a very important role, because in the absence of regular air flow in the storage room fresh products dampness will appear. Setting up a hood in the basement is quite simple. And this can be done not only at one of the stages of construction, but also in an already finished building.
On what principle does the ventilation system work?
Before making ventilation in the cellar, study the principle of its operation. It is based on the laws of physics, which are relied upon when creating a scheme for arranging ventilation. According to it, to create ventilation, 2 holes must be provided. One of them is leaking into the basement. fresh air. Through the second hole, air, along with vapors, exits the cellar to the street. The scheme is quite simple, but for greater efficiency you need to run pipes to the holes. In addition, the operation of the system is greatly influenced by the location of the pipes for air supply and exhaust, as well as their level above the soil surface.
Ventilation pipes should be located directly in the basement walls. It is also common for residents to install a hood in the garage cellar. In the latter case, the pipes must pass through the room and exit above the roof of the building. Very important factor When creating a diagram, the height of installation of pipes from the cellar to the street is considered. If calculated incorrectly, the cellar hood will suck in too much cold air, which will negatively affect the shelf life of fresh vegetables. Experts also do not advise making too small holes for piping, as this will not allow evaporation to be completely removed, which will lead to loss of food.
There are a lot of opinions and advice on how to make a hood in the cellar. Let's explore the most useful recommendations concerning the creation of a diagram and the air circulation system itself for the basement. Many experts advise to provide a ventilation system during the construction of the basement. At this time, you can leave holes in the walls of the room into which pipes will be installed in the future. So as not to choose later suitable place for laying channels, we recommend including an exhaust system in the initial basement design.

The pipes used to circulate air must be the same size. If the room is different high humidity, the exhaust pipe can be taken with a diameter slightly larger than that of the supply pipe. One of the main rules is not to do the opposite, otherwise it will lead to air retention in the room. Another useful advice– do not place both pipes next to each other. In such a situation, the basement will not be fully ventilated. It is best to place the ducts in opposite corners so that the air passes through the entire room. The exhaust vent must be installed under the basement ceiling. This is due to the fact that the spent hot air will quickly rise to the top. This position of the pipe will contribute to uninterrupted air purification without the slightest stagnation under the ceiling.
The exhaust pipe should rise 1.5 m above the ridge. This will ensure sufficient air draft.
To equip the exhaust system, plastic pipes are most often used. Ventilation of the cellar in the garage should be arranged using pipes with a minimum of turns and bends. It is best that the channels are perfectly smooth and straight. In addition, each channel must have the same diameter along its entire length. Before ventilating the basement, install special dampers on the pipes. Their presence is especially important in winter, when you need to independently regulate the air supply and outflow. If the pipe heads are vertical, they will need to be protected from rain and snow. This can be done by using a decorative metal plate in the shape of an umbrella.
Types of exhaust systems - natural or forced?
Also, before you install ventilation in the basement, decide on the type of system. It can be natural or forced. Choose the most suitable option possible, taking into account the layout and volume of the basement. The first type of hood is based on a small difference in temperature and pressure inside and outside the room. Ventilation efficiency is greatly influenced by the location of the pipes. The air intake hole should be at a height of about 30 cm from the floor, and the exhaust hole should be at a distance of 20 cm below the ceiling. It is impossible to leave the latter lower, as otherwise the ceiling will very quickly begin to become damp. Such a system will not be enough for arranging large basements that consist of several rooms.
Ventilation of the second type also consists of pipes, but special fans must be installed in them to force the air to circulate in the room. The most simple system includes installation of a fan only in the exhaust duct. In this case, a vacuum is artificially created in the room, which helps to quickly draw air through the inflow hole. The fan power must be selected taking into account the area of the cellar. Often homeowners do things a little differently. They put fans on both channels. This is especially true for basements with several small rooms.
Ventilation installation - detailed algorithm
Almost every inexperienced person wonders how to properly build a cellar. To do this, you need to follow a certain algorithm:
- 1. If the ventilation system is installed after the construction of the basement, then a hole must be made in its ceiling for air circulation.
- 2. After this, a pipe intended for exhaust is lowered through the hole.
- 3. Fix the pipe under the ceiling surface no more than 15-20 cm below it.
- 4. Outside, the pipe should be raised 1.5 meters above the ground or above the roof.
- 5. In the corner of the ceiling opposite, you also need to make a hole and stretch a pipe into it for air flow. Place it at a height of at least 20 cm from the floor.
- 6. The outside supply pipe should not be too high. If it passes through the ceiling, then its upper part should be located no higher than 25 cm above the surface.
- 7. If the inflow pipe is led through the wall, then you will need to put a deflector or grill on it.
- 8. If ventilation installation is carried out inside a residential building with a stove or fireplace, then the exhaust pipe rises near the chimney. This will promote more active removal of air from the basement due to the difference in temperature.
- 9. At the end of installation, control valves must be installed on the pipes. They will allow you to enter the premises required quantity air.
After installing the system, you will need to check it for traction. To ensure normal air pressure at the inlet, a paper sheet is applied to the supply pipe. If it starts to tremble, it means that air is actively entering the room. The second method is to set fire to paper in a bucket inside the basement. Based on the direction of the smoke, it will be possible to determine where and how fast the air is moving.
What needs to be done to maintain the indoor microclimate
Having considered how to properly make ventilation, we suggest you understand further measures to care for the room. To maintain a comfortable microclimate in the basement, you need to perform certain procedures from time to time. So, to help reduce humidity in the room, ventilate it regularly. In the summer, be sure to open the doors and hatches of the room, as well as the valves on the pipes, once a week. The hot wind that gets inside will dry out the floor, walls and ceiling of the basement well.
Often, owners are faced with situations where they need to quickly increase the humidity in the room. To do this, you need to spray it with water from a regular spray bottle. You can also place a container with wet sand or sawdust in the basement. If you need to dry out the basement, then first of all you need to remove all the shelving and other furniture from it. All racks must be dried naturally in direct sunlight. Open the hatches and door wide and turn on the fan. The room must remain in this condition for at least 3 days. After this, proceed directly to drying the basement.

To get rid of moisture in a room, bring and leave several boxes of quicklime or coarse table salt in it. These substances absorb moisture very quickly. In addition, they effectively disinfect the surfaces of the room and the air in it. More old method is to use a candle. Install and secure it next to the exhaust vent. Light a candle and wait a couple of days. The flame generates better draft, due to which more processed raw air comes out.
Another way to dry quickly and efficiently is to use a fryer. It is easy to do it yourself using a regular metal bucket. First, make several holes in the container, then fill it with birch firewood. Next, light the logs and leave to burn for at least 12 hours. During this time, the room will quickly dry out, after which you can store your food in it without fear of losing it.
Processing the cellar to protect it from moisture is an important procedure for the freshness of food
The measures for caring for the cellar do not end with just drying the room. To extend the period of preservation of the cellar without moisture, the surface of the floor and walls must be covered with waterproofing compounds. If the walls in the room are made of concrete, use impregnation deep penetration. It must be applied in several layers, each of which will seep into the slabs and close the holes and cracks in them.
Sometimes a dried cellar is covered with roofing felt. It is considered a good insulator, but to use it, the walls and floor must be perfectly level. To do this, mastic is first applied to the surface, which needs to be heated, and then the insulator itself is laid on top.
Ecologically safe material Clay is used for waterproofing. It must be very oily, otherwise there will be no benefit from its use. Before applying the material, the basement floor must be laid out with stones, on top of which clay mixed with sand is poured. The layer should be approximately 10–12 cm. After application, the clay must be compacted between the stones, after which a layer of coarse sand must be poured on top. It will also need to be compacted. The only disadvantage of this method is that it takes a long time for the floor to dry. On average, this takes approximately 30–40 days.
Drying the basement using household appliances - fan or heater?
You can also get rid of excess moisture in the food storage room using household heaters and fans. In the first case, “wind-blown” and convector heater models are suitable. To dry wall and floor surfaces, install the heater in the center of the room. This way, the device will distribute heat evenly and none of the corners will remain damp. Don't forget that this drying method takes a lot of time. In addition, you will have to spend a lot on paying for electricity.
Often, basement owners use powerful steam generators. Due to its radiation, the food storage room dries out very quickly. As a result, you will spend a little less, because drying will take less time. Due to the effectiveness of this method, it is often used even in basements that have experienced a flood.
To get rid of moisture using a fan, the device must be placed in the center of the room and turned on. Complete drying in this way will take at least 4 days. Often, an ordinary old potbelly stove helps cellar owners. In such cases, the stove outlet pipe is led to the basement hood. You will have to heat the potbelly stove for at least 5 days until the basement surfaces are completely dry. If there is no exhaust hole in the cellar, then this method will not work.
A cellar is a room, most of which is below ground level. Moreover, its functions are not limited only to storage space for vegetables and other family supplies. In a modern private house, you can equip it with a workshop, a sauna, a sports hall, a billiard room, a boiler room and much more. But the main purpose of the cellar is to store vegetables, wines and other household preparations, which significantly frees up space in the house. To increase the shelf life, it is necessary that the temperature is within 5 degrees, the humidity does not exceed 90%, and there is a constant flow of fresh air. Therefore, proper ventilation of the cellar is extremely important to maintain the microclimate.
In addition, ventilation for the cellar is still necessary so that the wiring laid in the cellar for its lighting is not subject to excessive influence of humidity. Certainly, electrical cables laid in special sleeves, but proper ventilation serves as an additional protective factor.
Purpose of cellar ventilation
It is correctly designed and installed that ensures its correct functioning as intended. With air flow in the amount necessary for storing vegetables, their shelf life in a state suitable for food increases significantly.

If the cellar room is poorly ventilated, the air in it stagnates, the microclimate is disturbed, vegetables and other products spoil. After all, not only vegetables are stored in cellars; for example, many types of homemade sausages can be made there, and for them, a violation of at least one of the storage and preparation indicators threatens rapid spoilage.
However, excessive ventilation is also undesirable. After all, then a draft is created, which leads to accelerated drying of vegetables and sausages. So proper ventilation of the cellar must be ensured.
Therefore, when it is necessary to take into account all factors: the size of the room, the possibility of supplying electricity for arranging forced artificial ventilation, waterproofing of cellar walls, ceiling materials, foundation.
Return to contents
Natural ventilation device
The principle of natural ventilation is based on the difference in air pressure in the room.
To set up a natural cellar system, you need 2 pipes: exhaust and supply. The exhaust air exits through the exhaust vent. Air enters the supply room. In order to make ventilation, galvanized or asbestos-cement products are used. In this case, the diameter of the pipe is calculated by calculation: an area of 1 sq.m will be provided by a pipe of 26 cm.
The exhaust pipe is usually laid along the corner of the cellar. Its lower open end is located at a height of 140-150 cm above the cellar floor, that is, almost under the ceiling of the room.

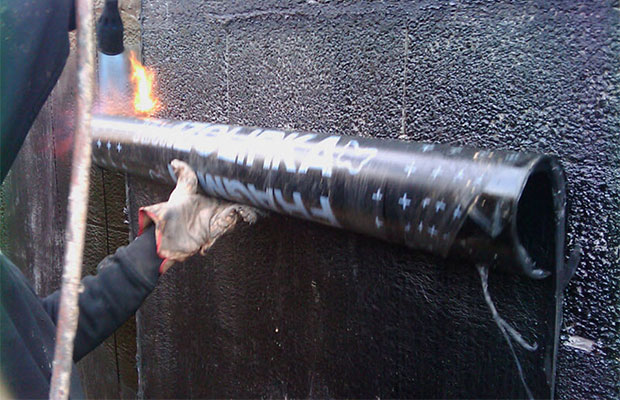
The exhaust duct structure is laid vertically through all rooms, going outside, it should be 50 cm higher than the roof ridge. To prevent condensation from accumulating on it, the part must be insulated. It is best for these purposes to use a larger diameter pipe into which the air duct pipe will be inserted, and the gap between them will be filled with insulation, which can be used as mineral wool 50 mm thick.
The supply pipe of the ventilation air duct is located in the opposite corner of the cellar in relation to the exhaust pipe. Her open end located below the exhaust and at a level of 40-60 cm from the cellar floor level. The supply pipe of the air duct rises above the level of the zero point of the house at a height of approximately 80 cm.
This is exactly the location ventilation ducts allows you to create the required pressure difference for air movement in the cellar. If the temperature difference inside the cellar is significant, then a draft is inevitable. To avoid this, it is necessary to install a special valve that will regulate the flow of circulating air. Such valves are installed on both the supply and exhaust pipes. In addition, to prevent insects and midges from entering the cellar, the upper opening of the supply pipe is covered with a mesh, which is periodically cleaned or replaced.
The advantages of natural cellar ventilation are:

- low cost: costs will affect only pipes and insulation;
- energy saving;
- possibility of self-installation;
- no need for constant monitoring - regulation is required only when there is a large temperature difference;
- compatibility with other ventilation systems installed in the house, which allows you to additionally build forced ventilation for the cellar.
After completing the installation of ventilation pipes, it is necessary to check their functionality. To do this, attach a sheet of plain paper to one of the ventilation pipes. At the same time, if you attach it to the exhaust pipe, the sheet should be attracted to the pipe, and slightly repelled from the supply pipe. In addition to the sheet, you can use a candle flame as a test for ventilation operation. To do this, you need to light a candle and bring it to the exhaust pipe - the flame will change its direction towards the pipe. When the candle is brought to the supply pipe, the flame, on the contrary, will be directed towards the cellar. After a successful check using one of the methods, the cellar ventilation system will be ready for operation.
However, in the future you should carefully monitor the air condition in the cellar. If mustiness, dampness, or condensation appears on the wall or ceiling, the efficiency of the ventilation system should be increased. This can be done by opening the valves or installing forced ventilation.
Return to contents
Forced ventilation of the cellar: features

Installation diagram of ventilation pipes in the cellar: A – Supply pipe; B – Exhaust pipe.
However, natural ventilation is not always enough to fully provide the room with fresh air. Therefore, if the area of the room is large and the height is close to 2 m, or the natural hood does not cope with its functions properly, then a forced cellar system will be required.
The construction of an artificial structure is quite complex engineering problem, the implementation of which will require significant efforts or the involvement of specialists.
Structurally this ventilation is a sequential installation on the supply or exhaust pipe of such elements as:
- duct heater;
- duct fan;
- sound muffler;
- filter cassette;
- duct fan;
- check valve;
- blinds and pipe sheathing.

At the same time duct fans differ in their types and other technical characteristics, for example, capacities. The direction of the fans should be such that the air goes outward when installed on exhaust pipes and goes inward when installed on supply pipes. In this case, the pipes themselves can be placed horizontally or vertically. The efficiency and durability of the ventilation system directly depends on the technical parameters of the fans.
The forced ventilation system can be automatic or mechanical.
However, in order for food to remain in it for a long time, it is necessary to ensure effective ventilation. In this article we will tell you how to properly make a hood in the cellar.
How does this work?
Natural ventilation must have 2 pipes: supply and exhaust. It is best to use a galvanized or asbestos pipe when constructing a structure. It is also important to correctly calculate the diameter: 1 sq.m of basement should be provided with 26 sq.m. cm duct area.
Necessary for fresh air to enter the cellar. For greater efficiency, it must be installed in a corner that is located on the opposite side from the installation site of the hood. 
Important! Choose a place to install the supply air duct so that winter time it wasn't covered in snow.
The supply air duct should be placed so that its open end is at a distance of 40-60 cm from the floor. It should completely penetrate the ceilings and rise above the roof by about 80 cm.
Thanks to it, there will be an outflow of stale air from the cellar. It is recommended to install it along the corner so that the lower end is under the ceiling.  It should pass in a vertical position through the entire cellar, the roof and extend beyond it by 50 cm.
To ensure that less condensation or frost collects in the air duct, it is insulated - another one is inserted into it, and the distance between them is filled with insulation.
Ventilation in a cellar with two pipes is carried out thanks to different specific gravity warm air inside and cold air outside.If there is a large temperature difference, there is a risk of a draft, which will lead to freezing of the cellar.  To prevent this, during construction they use gate valves on the air ducts, which allow air circulation to be adjusted.
Types of systems
Today, two types of ventilation systems are installed: natural and forced. The choice of one option or another is influenced by the volume and layout of the basement.
Forced
The design of the forced system includes pipes, but in order to ensure forced air movement, fans are built into them.
Did you know? The need and benefits of ventilation were known many centuries ago. However, then there were no special structures - just ventilation was carried out.
Typically, the fan installation location is the exhaust duct. With its help, it is possible to achieve artificial vacuum in the cellar, thanks to which fresh air can enter the room through the supply opening.
Depending on the volume of the cellar, fans of different power are selected. If basement has complex configurations; fans are installed on both channels.  When constructing a forced exhaust, you cannot do without the help of a specialist who will help you correctly calculate the intake and output of air flows, the diameters of the required air ducts and the power of the fans.
Natural
The main idea of creating a natural hood is to take into account the difference in pressure and temperature in the cellar and outside it. It is very important to correctly determine where the pipes will be located.  It is better to place the supply opening at a height of 25-30 cm from the floor, and the exhaust opening should not be lower than 10-20 cm from the ceiling. If you place it lower, dampness and mold will soon appear on the ceiling.
How to make calculations?
If you decide to make a hood in the cellar with your own hands, you should pay important attention to calculations related to pipe diameters.
 When constructing professional ventilation, complex calculations and formulas are used that are inappropriate for homemade design. We suggest that you familiarize yourself with the methodology that will be suitable for constructing homemade ventilation.
Important! Be sure to cover the opening of the draft pipe metal mesh, since without it rodents and insects can enter the cellar.
S=3x2=6 sq.m.
Taking into account the ratio that we took as a basis, the cross-sectional area of the pipe channel will be:
T=6x26=156 sq.cm.
Radius ventilation duct calculated using the formula:
R=√(T/π)=√(156/3.14)≈7.05 cm
D≈14 cm=140 mm.
If available only supply ventilation(exhaust is represented by a hatch), section inlet pipe can be slightly increased - an air duct with a diameter of 15 cm is quite suitable.
 To ensure effective air exchange, it is recommended to install an exhaust pipe whose diameter is 10-15% larger than the inlet pipe.
An air duct with the following diameter is suitable for the exhaust duct:
Dв=Dп+15%=140+21≈160 mm.
Installation of ventilation pipes
In this section we will tell you how to properly ventilate the cellar and what you should pay special attention to.
Where to place

The supply air duct is led outside from the surface of the ground. Its lower end should be located almost near the cellar floor, at a distance 20-30 cm.
To install the exhaust pipe, choose the opposite corner of the basement and place it close to the ceiling. One of its ends is led out through the ceilings onto the roof.
To improve efficiency ventilation structure use the following advice: place a deflector on the pipe above the roof surface.
By covering the pipe with a cap, you can create negative pressure, which will increase the efficiency of the ventilation system.
Did you know? In ancient Egypt, ventilation was first actively used. Cheops Priramid has a huge number of air ducts.
Material selection
The following materials are usually used to construct a hood:
 Asbestos cement pipes are very similar to slate pipes, which is why they received the same name. Both materials are quite durable, highly reliable and durable. Installation polyethylene pipes easy to do on your own.
 Installation
When installing the ventilation system, pay attention to such moments:
- When installing the system in a ready-made cellar, you will need to make a special hole in the ceiling.
- It is necessary to lower a pipe into the basement through this hole - it will draw out air. Fix it at the top, next to the ceiling.
- The part of the pipe that is located outdoors must be raised at least 1500 mm above the ground or above the roof.
- In the opposite corner of the basement, you need to make a hole in the roof and install a supply pipe through it. It should end at a distance 20-50 cm from the floor.
- The supply air duct should not protrude too much from the roof. It will be enough to raise it to 25 cm.
- When installing a supply pipe in a wall, a deflector must be placed on its outer end.
- If the house has a fireplace or stove, the outlet pipe should be installed near the chimney.

Important! Improper ventilation or lack thereof will lead to stale air, which is sure to leak into the house and can negatively affect people's health. To prevent this, check regularly for traction.
There is nothing complicated in installing a ventilation system; the main thing is to follow all the rules and recommendations.
In order to maintain the cellar in good condition and store food in it for a long time, it is necessary to take care of the microclimate.  It is very important to maintain low humidity in the basement. To do this, it is worth periodically ventilating the room. IN summer time it is recommended to keep open doors and dampers. Gusts of warm wind will quickly dry out the cellar.


