Every car owner wants the car to be beautiful, aesthetically pleasing and, if possible, exclusive. There is plenty of scope for this. At the same time, someone adds certain elements to the exterior of the car, painting the hood, wings and other parts. And someone achieves the desired result by giving the wheels an unusual appearance.
However, the painting of discs can also be caused by a more prosaic reason - the nondescript appearance of the discs acquired during operation. The result of this is the formation of various types of chips, dents and scratches on the surface of the discs.
There are two ways to paint car rims:
1. Contact a specialist to paint the wheels in industrial conditions by applying powder paint.
2. Paint it yourself using acrylic paints.
Of course, carrying out work in a high-quality specialized workshop gives excellent results, however, not every car owner can afford it from the point of view of financial capabilities. But applying paint in a garage is quite possible for almost anyone who knows how to paint correctly. This does not require any special education or specific skills. You just need to stock up on the necessary materials and patience, because the work ahead will be painstaking and require great care.
Materials and equipment
To perform high-quality painting car rims you need to prepare the following:
· Sandpaper. You will need 4 sheets of fine and coarse sandpaper. It is better if it is immediately prepared for fastening on grinding wheel, installed in a drill.
· Two rolls masking tape, having an average width.
· Paint (preferably acrylic) - four cans, you can different colors, if there is an intention to make original tuning.
· Acrylic primer- 2 cans.
· One can of automotive varnish intended for exterior use.
· Respirator.
· Solvent and rags for degreasing disks and removing stains from them.
Color palette acrylic paints much richer than powder ones. Depending on the quality of paint and primer purchased, as well as the conditions under which painting will be done, the entire process takes from two to five days.
The sequence of operations necessary for high-quality painting of wheels
Before you begin the actual work associated with painting wheels, it is important to clearly understand what needs to be done and in what order. The whole process is carried out in several stages:
1. First you need to make sure that the surface of the disk is even. This stage is best left to specialists who have special equipment for detecting irregularities on disks and straightening them.
2. Purchase all of the above materials and necessary tools, in case of their absence. When purchasing primer, paint and varnish, you should make sure that they are from the same manufacturer. Only compliance with this condition can give confidence that they will be compatible, which means they will fit securely and hold well. Experts recommend buying acrylic paint in cans. This will avoid the need to purchase special equipment such as a compressor or spray gun.
3. You should start by thoroughly washing the disc. This will allow you to get rid of any remaining sand and dirt, even if they are located in places where access is difficult. The washed discs are wiped dry with a rag, if possible, blown with compressed air and dried for several hours.
4. At this stage with discs and primer. This can be done without the use of technology, that is, manually, using sandpaper, but it is best to use a special attachment that is fixed in the drill. Cleaning must be carried out so efficiently that old paint there are none left even in the most hidden places.
5. The cleaned disc must be degreased using a solvent. After this procedure, the surface of the disk should dry well.
6. A primer is applied to a dry and clean surface. Best result is achieved if the primer is applied in three layers. After applying each layer, allow the treated surface to dry.
7. Now you can start painting directly. Like a primer, paint is applied layer by layer, and each applied layer also needs to dry. If you are too lazy to remove the tire and you decide to paint the rim on the assembled wheel (although this is not recommended), the surface of the tires should be covered with cellophane film or masking tape.
8. You will also need tape if you need to paint the disc in several different colors. In this case, the required pattern is laid out using tape, and each paint is applied according to its own patterns. This must be done very carefully to prevent the boundaries of the surface being painted from being blurred.
9. After completing the painting work in one or more colors and completely drying the surface of the disc, varnish is applied to it. This is done to give the paint layer additional reliability and strength. After applying the varnish, the disc must dry for at least 24 hours. After which you can mount tires on it and install the finished wheel on the car.
When performing each stage, it is imperative to use personal protective equipment, since both the dust of the old paint being removed and the fumes of the primer and acrylic paint are harmful to the human lungs.
During winter operation of the vehicle, all its parts, including rims, are subject to strong exposure to reagents that are sprinkled on the roadway. The paint gradually cracks and peels off from such exposure, and after a few years the discs lose their attractiveness. This is especially true for stamped discs made of steel, on which traces of corrosion also appear. What to do in such cases? The discs are essentially in perfect condition, throwing them away and buying new ones, no matter what, it’s basically not advisable from the point of view of financial costs. The best way out is restoration paint coating. Even if you turn to a specialized workshop for this service, this operation will still cost less than buying new disks. But you can do it differently, you can do everything yourself. Moreover, this does not require any special materials or special skills or abilities; you will learn everything along the way.
In order to paint rims on a car with your own hands, you need to make preparatory work, and also choose a paint and varnish material.
Which paint to choose
Today, two types of paint are used to restore discs:
- Powder;
- Acrylic.
The powder composition has certain advantages, for example, paints of this type are more durable and resistant to mechanical stress. In addition, when producing alloy wheels at manufacturing plants, powder coating is used. However, despite these advantages, the technology for applying such paint is quite complex and requires the use of specialized equipment (heat chamber and sandblasting). The fact is that dry powder is applied to the disc, which is fixed on the surface under the influence of high temperatures. There is another disadvantage of powder paint - when using it, you can only paint the entire product, and not its individual parts.
When using an acrylic composition, car enthusiasts will not have to face such problems. Acrylic paint has a brighter and more saturated color and palette, so you can choose the most suitable shade that will match the color of the car body. Painting car wheels using acrylic composition also has disadvantages. These include low resistance to exposure environment.
Based on the above, when deciding what to paint the rims with, it is better to give preference acrylic compounds. You can find this kind of paint in any specialty store. When choosing a manufacturer, remember - it is better to purchase paint and varnish from the same company.
Recently, for painting not only wheels, but also body parts, another covering material has begun to be used - liquid rubber. In terms of cost, number of shades and mechanical strength, it is comparable to acrylic paint. It is even easier to apply than acrylic. The most famous brand is liquid rubber "Plasti Dip".
In addition to paints and varnishes, you will need other materials.
Necessary equipment and materials
If you choose the powder painting method, then first of all you will need a sandblasting machine, which is used to thoroughly clean the worn disc of old paint, dirt and dust. In addition, with the help of this device you can perfectly level the surface of the product.
Advice! Sandblasting can be replaced a regular drill with various abrasive attachments.
You will also need a heat chamber, which is necessary for “baking” the powder paint. It is impossible to replace this type of equipment at home, so you will have to fork out more or still use a cheaper painting method.

Painting car rims with acrylic paint is a simple and cheap way to bring old rims back to life. To do this you will need to prepare:
- Brush;
- Washing powder or regular detergent for dishes;
- Sandpaper of different abrasiveness (from 200 to 600);
- Automotive finishing putty;
- Several cans of primer;
- Can of varnish (transparent);
- Can of solvent 646;
- Protective gloves, respirator and goggles.
As you can see, the second method requires much less financial costs, especially since most of this list is already in your garage. After everything is ready, you can start working directly.
Car wheel painting technology
First of all, make sure that the room in which you will work is well ventilated. Acrylic and varnish are not the best best combination for health. Wear goggles and gloves to avoid chemical burns and remove the wheels from the vehicle.
In order not to stain the tire, it must be sealed with masking tape along the rim. The adhesive tape must be applied as tightly as possible to the edge of the rim while simultaneously tucking it into the gap between the rim and the tire.


There is another option, you can remove the tires from the rim completely. If you are afraid to do this yourself, then you can contact a car service; this service will cost you little. Next, it is necessary to prepare the surface of the disks for subsequent processing.
Surface preparation
Use a brush and detergent to thoroughly remove old paint and varnish from the surface. To degrease the disc and remove paint residues, use a solvent or anti-silicone.


Advice! To get rid of the shabby paint and varnish material V hard to reach places use an awl or thin screwdriver.
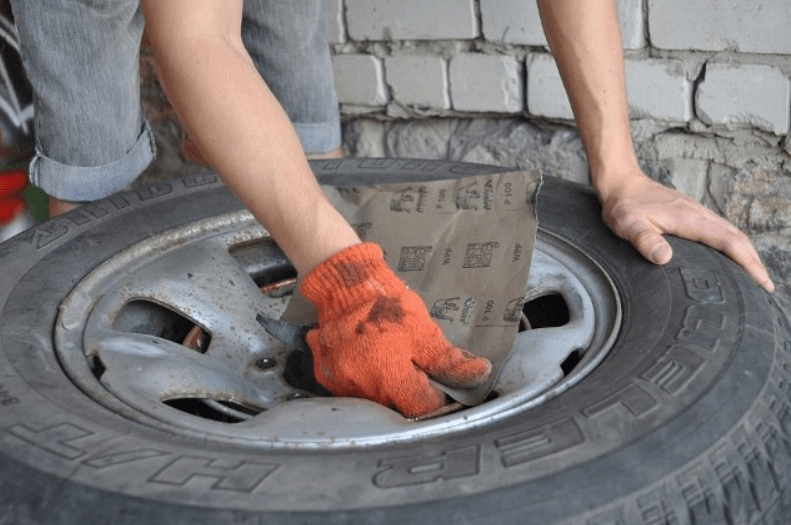
After this, go over the surface with sandpaper. At this stage, there is no need to rush; it is better to sand every millimeter of the disc for a long time and thoroughly. Use coarse sandpaper first, and the finest sandpaper at the very last stage. The surface to be treated must be periodically watered with water to remove any remaining sanded material and to better polish the disc.
Advice! It’s also not worth cleaning discs with fanaticism, since minor roughness and cracks will in any case hide layers of paint and varnish.
Of course, the old disk will have numerous chips, dents and other defects, which can be eliminated using automotive putty. When it's dry, go over the surface again with fine sandpaper and pour water on the disc.
Primer
The degreased and cleaned surface must be primed. To do this, you need to start applying the primer first on inner surface products, and then move on to the outside.


Advice! While spraying, shake the primer canister periodically.
To ensure that the repair (painting) of discs is carried out efficiently, try not to rush. The primer must be applied evenly, while holding the container with liquid at a distance of 25-30 cm from the surface. After you have applied the primer, let the disc dry and repeat the procedure (2-3 coats will be enough). In order not to wait long after each application of primer, you can use a regular hair dryer. In any case, it is better to start painting the wheels only the next day.
Painting and varnishing
Before using varnish and paint, carefully read the instructions for use of these materials, since drying time for liquids may vary depending on the manufacturer.
Dried and primed diks must be placed on polyethylene so that during painting, dust and dirt do not stick to them. The technology for applying paint is the same as for primer - we start with inside products and then move on to the external part. Apply 2-3 layers of paint, leaving the surface to dry for 15 minutes after each procedure. After that, wait 20-25 minutes and use the varnish. After the first application of varnish, it is necessary to check the surface of the discs for unevenness. If you find them, then go over them with fine sandpaper. Next, all that remains is to apply the final layer of varnish and wait until the product is completely dry (6-7 days). This completes the restoration of the discs.


In conclusion
Now you know how to paint wheel rims with your own hands. As you can see, this process does not take much time, and the money is several times cheaper than at a car dealership. The main thing is not to allow dust to settle on the newly painted surface, as this will greatly spoil the appearance of the products. In all other respects, just work calmly and carefully and the result will please you.
Photos were taken from a video posted on the My OBZOR channel. Thanks to the author!
Wheels are a very vulnerable spot on any car. They are the ones who take the maximum impact: impacts from oncoming stones, curbs, tree branches. Particularly susceptible to wear and tear alloy wheels, when hitting an obstacle, they can not only bend, but also crack or scratch in some places, and their appearance becomes unsightly. However, the situation can be corrected; special paint for discs is used for this.
Wheel rims are painted for two main reasons:
- if the discs have lost their original appearance and require restoration;
- painting for decorative purposes - for example, luminous paint for wheels will give the car originality and make it stand out from the crowd.
In the second case, special colors are often used that attract attention; chrome effect paint is often used for wheels.
Types of car paints
Painting wheels is not only a decorative move, but also protection. Modern coatings can reliably protect metal from corrosion. There are several types of such paints, they all differ in composition and purpose.
Powder
Powder paints for painting wheels are popular among car enthusiasts due to their durability and high resistance to various types of influences. Among the serious advantages is the possibility of application to almost any type of titanium and steel discs.

Minus powder paints It is believed that special equipment is necessary - the dye in powder form, according to the technology, must melt at a temperature of about 200 degrees. This is why powder technology is not suitable for aluminum - aluminum wheels can become deformed.
The coloring technology involves cleaning the stamp from the old coating using the sandblasting. Then the surface is thoroughly degreased, covered with primer and dye is applied in a special painting booth.
It will take at least a day for the paint to dry completely. Carry out such work in garage conditions You can do it yourself, but it’s not profitable.

Acrylic
Acrylic paint works well for painting wheels. This option is the best choice. Using acrylic is very convenient, and you can apply it yourself - the dye is sold in an aerosol, but you can also work with a spray gun. You can paint discs with aerosol acrylic paint quickly and efficiently, and at the same time inexpensively.

Among the main advantages are complete protection of the surface from the effects of precipitation. Road reagents also cannot harm the painted surface in any way. But it must be borne in mind that acrylic has average durability.
Spray paint for wheels is chosen in most cases because of its affordable price and ease of use - the spray allows you to get high-quality results in the fastest possible time.

Before applying spray paint, be sure to treat the disc with abrasive materials. Next, the contents of the container are thoroughly mixed (the container must be shaken for three minutes) - this way, color uniformity is achieved. Then, without fail, do a test spraying on any other area; if the paint is sprayed well and evenly, you can apply it to the discs.
Compared to powder dyes, the advantage here is the ability to dry quickly - the painted surface dries in just 10 minutes. Choice color range also extensive, spray paint is available in any shade, but silver paint (chrome-look) is popular.
If you add a little phosphor to acrylic, you can get luminous paint - the wheels will glow in the dark, which will attract prying eyes. The brightness of the glow depends on how much the phosphor is “saturated” with light.

Rubber
Rubber paints are in great demand among those who like to highlight their car and tune it in every possible way. The reason for the great popularity of such coatings is their versatility. They can be used not only on metal, but also on plastic and glass. The coating can be either matte or glossy, this gives buyers the opportunity to choose what they want.

There is also a rubber one on sale. fluorescent paint, which glows. The composition contains a special pigment - phosphor, which accumulates light during the day, and dark time days begins to emit it. This creates an interesting glowing effect.

Applying dye to cast wheels is very convenient. Spray rim aerosol paint in two or three thin layers. The surface will be smooth and even. The process may take an hour or more. In this case, the primer of the discs is as preparatory stage you can skip it.
In the video: painting wheels with Plasti Dip liquid rubber.
Popular products
Body
Body paints are a one-component alkyd composition produced in aerosols. The product has increased strength and wear resistance, and has good adhesion.

Body paint has an affordable price and low consumption (the optimal number of layers applied is two or three). Ideal as a paint for stamped wheels, as well as cast versions. Should be applied with a spray gun. How much material is needed to paint one wheel is usually indicated on the can, but the consumption is small.
Motip
Unlike Body enamels for Motip discs, these are acrylic-based compositions designed to give an attractive appearance. Products from Motip have all the advantages of acrylic paints; the compositions protect the surface from various influences and are characterized by high adhesion.
The palette includes black, white, and golden colors. The texture can be matte or glossy. All products are supplied exclusively in cans.

How to paint: spray the enamel onto a cleaned and degreased surface, holding the can at a distance of 30-40 cm. The material is ideal as paint for alloy wheels.
As an analogue, you can use Kudo products - these are paints in spray cans based on liquid rubber good quality.

What paint to use depends on the purpose - if you need to give the surface gloss and shine, and not just protect it from corrosion, then it is better to use acrylic and rubber coatings. Wheel painting glowing paint will make the car doubly original.
How to paint wheels yourself (2 videos)
Paints of different brands (25 photos)


Every car owner sooner or later faces the problem of aging car wheels - after endless kilometers on domestic roads, they get scratched, and the paint, if not peeling off, then definitely loses its original appearance. And this also happens when after a purchase new car I want something more original and, most importantly, unique, so that no one else has it. Therefore, the question often arises about how and with what to paint cast or stamped wheels on a car yourself, so as not to mess up the result.

You can, of course, buy new wheels or take the car to a service center so that the technicians can provide first-class service, but all this costs a lot of money. And if you doubt whether the wheels are painted yourself, look at the attached photos and see for yourself. In this article, we will analyze the entire process step by step to understand how to properly paint cast and stamped wheels on a car. Moreover, the process will not take much of your time or money.
What paint to paint car wheels
First of all, you need to decide what paint to paint your car's rims, and, of course, what color. For this purpose, there are two types of paints: powder and acrylic; Each of them has its own advantages and disadvantages that you should pay attention to before choosing.
- Powder paint is durable, wear-resistant and can last for a long time. The coating is not deformed or scratched. This is production paint, since it is what is used to coat new, freshly manufactured, alloy wheels. Negative side– complex application technology requiring special equipment; inability to paint part of the disc, for example, a scratched area.
- Acrylic paint gives more room for imagination due to the variety of color palettes. It is easier to apply and distribute it over the disk, and you can also expose a small piece of the surface. However, this coating is less resistant to damage, and if you drive carelessly over bumps, pieces of paint can quickly break off.
When choosing what paint to paint stamped, cast or forged wheels, it is better to give preference to powder, since it will last much longer, but if you still want brightness and variety, and you are ready for careful care of the wheels, then try acrylic - then for sure you can make your car the most original.
Preparing to paint rims on a car
If when deciding how to paint your car’s rims yourself, it doesn’t really matter what they are like “from birth,” but for the process of preparing for painting this is a significant nuance.
For example, how to properly paint alloy wheels. First, they must be carefully prepared - primed with a special primer intended for non-ferrous metals, otherwise the paint will peel off quickly. Steel and forged wheels do not necessarily require this, but the primer provides a base for the paint, then it adheres and sticks better.

The first stage of preparation is removing the old paint. To do this, use a stiff brush and a special detergent that will help you easily remove layers of old paint from the discs. If it remains in small areas that cannot be reached with a brush, use an awl or a thin screwdriver. Remember, in order to properly paint cast or stamped wheels yourself, when removing old paint, it is better not to damage the disk.
Next, go over the entire surface with coarse sandpaper - this process will take a little longer as you need to thoroughly sand the wheel if you want to paint it correctly. Gradually move to finer sandpaper until you have sanded the entire surface. Advice: periodically water the disk - then it will be better polished, and the sanded material will be removed without leaving a trace.

If the disk is not new, then you will need finishing putty, which needs to treat the surface and putty all chips, scratches and other defects that appear on the disc. After this, sand again with fine sandpaper, not forgetting to water.
- Dry the surface after the last step and degrease it with a solvent.
- Start priming on the inside of the car wheel, only then coat the outside.
- Shake the can of primer periodically while spraying so that it applies evenly; keep it about 30 centimeters from the disc.
- Apply two or three layers, allowing each to dry thoroughly - to speed up the process, use a hair dryer, a hair dryer or a regular cosmetic one, available in almost every apartment.

Allow all layers of primer to dry - for this purpose it is better to start painting the next day.
How to paint wheels on a car? Step by step instructions
After all the preparatory measures have been carried out, you can paint the car’s rims. To do this you will need the following equipment:
- paint and varnish (we recommend choosing from the same manufacturer - they will interact better with each other);
- a piece of fabric or polyethylene on which you will place the disc;
- protective film and masking tape to cover the wheel;
- sandpaper or abrasive paste;
- polish and silicone grease (optional).

Step 1. Spread a clean cloth or polyethylene on a free area - this will protect the surface from dust. Then cover the tire protective film and secure with the provided masking tape. Try not to let it climb onto the surface of the disks themselves.
Step 2. Carefully read the instructions for the selected paint and apply it following the manufacturer's recommendations. In this case, proceed with the same caution as with a primer - car wheels are painted in several layers, allowing each to dry. The exact exposure time depends on the paint, usually you need to wait about 10 minutes. Next, apply 2 layers of clear varnish, also following the instructions. The layers should be thin, the drying time before applying the next one is from 3 to 5 minutes.
Step 3. After completing the process, let the disc dry thoroughly, and in general, you can finish there. But to add shine, after about a week, go over the surface with polish - after that, the car wheels will shine like new. And the rubber can be renewed with silicone grease.

If necessary, you can paint the rims again if the first painting did not bring any results. desired result or a certain defect remains. Now you already have the necessary experience, and things will go faster and the result will be better.
You have to work hard to paint chrome wheels - the old coating cannot be easily removed either with sandpaper or grinder. We advise you to try sandblasting, it cleans the surface more thoroughly. The top can be covered with chrome (if, for example, it is damaged and needs restoration separate plot) or paint the disc using paint as described above.

So, you can paint car rims yourself. To do this, you only need special paint, varnish, time and a little skill. Knowing certain subtleties, you can get results no worse than turning to professionals in a car repair shop, but at the same time much cheaper. Look at the photos and videos that clearly demonstrate the process, and get started.
The appearance of any car is influenced not only by the condition of the car body and its external elements. To a large extent, the presentability of a car is influenced by and. The presence of scratches, rust stains, and paint chips clearly does not improve the appearance of the car.
Scratches and chips of paint will inevitably occur over time. The car owner then has only two options - purchase or paint the existing ones. However, painting work at a service station is not very cheap, since it is not considered easy to perform.
Everything will cost much less if you make the disks yourself. There is no difficulty in performing this operation, but it is quite painstaking and time-consuming.
Features of rims
First, let's look at the types of discs, as well as what tools and materials you will need for painting yourself.
So, now there are three types available. The simplest are stamped steel wheels. It is on them that the paint often flies off and rust spots appear. Therefore, they require painting work more often than the other two types.

Stamped steel disc
The second type is alloy wheels. Rust does not form on them, but over time scratches appear on them, which do not add aesthetics. Yes and after long-term operation they lose their shine, their appearance becomes faded.

Alloy car wheel
The third type of discs is forged. All reasons for needing painting are identical to alloy wheels.

Whatever type of car is installed, the surface of the disc will need to be prepared before carrying out work. This is especially true for stamped and forged wheels. During use, dents from impacts appear along the edges. Therefore, before starting all work, it is advisable to roll the discs to remove dents, otherwise they will be visible even after painting, spoiling the whole look.
Next, you need to choose the time; it will be difficult to complete all the work in a day, so it is better to immediately take into account that the car cannot be used for 3-4 days, unless, of course, there is a second set of wheels that can be replaced.
It would be better to carry out all the work on wheels from which the tires have been removed, but this condition is not necessary; it will just be a little more difficult to perform all the necessary actions on an assembled wheel.
Materials and tools for painting
Before starting work you need to purchase necessary materials. The availability of certain materials depends on the type of disc. The following materials are required for all types:
- Sandpaper of two types (coarse-grained, fine-grained);
- Painting tape;
- Degreaser;
- Thin film for covering non-paintable surfaces;
Video: Do-it-yourself painting of wheels
You will also need car primer For pre-treatment disk. You need to purchase an acrylic-based primer. For stamped ones you will need a regular primer for metal surfaces. And for light alloy and forged ones you need to purchase a primer for non-ferrous metals. For ease of work, it is better to take sprayable primer in cans.
Then you need. It also needs to be taken on an acrylic base. The color is at your discretion. If the discs are stamped, then there’s nothing special about them; they are usually painted black or white. As for light alloy and forged ones, this is a matter of imagination. You can choose any color for them or make a two-color coloring. But don’t forget about aesthetics; the wheels should fit well into the appearance of the car and not have a bright and provocative color.

Color range
The last thing you need is clear varnish to complete the final stage of work.
Wheel painting process
Preparatory work
Having all these materials, you can get to work. DIY painting begins with removing the old paint layer or protective layer. Basic work can also be done with a drill with a special attachment. But it will not be possible to completely clean the surface with a drill, since it will not be possible to work with it everywhere due to the shape of the disk.
After cleaning with a drill, those places where the nozzle did not reach should be cleaned with coarse paper. Special attention need to be given to places where there are bends. It is important to ensure that no old paint remains on the surface. If there are deep scratches, you can try to remove them with the same paper.

Sanding a disc with sandpaper
You need to take the issue of cleaning the surface seriously, otherwise the remnants of the old paint after applying the new one will be clearly visible, and the situation can only be corrected by re-cleaning the surface.
When carrying out work, it is better to carry out the entire complex on each wheel separately, rather than, for example, cleaning all the disks and then moving on to another stage.
Priming discs
After thorough cleaning, you can begin priming. Before applying primer, the disc must be degreased. If the work is carried out on a disk from which the rubber has been removed, then nothing additional needs to be done. And if the rubber is installed, all surfaces that will not be covered with soil must be covered with film and tape. You also need to close the tire inflation valve.

Primer
The primer must be applied in two layers with a break of 10-15 minutes between each layer. After applying the second coat, allow the primer to dry completely.
Wheel painting
Next we move on to painting. If the disc is painted with only one color, then it is enough to cover the unpainted surfaces and apply several layers of paint with an interval of 10-15 minutes between coats for the layers to dry.
If a two-color coloring is chosen, then the main paint is applied first, again in several layers. Afterwards it needs to be given time to dry properly. Then those places with the base paint already applied that will not be painted over with the second color should be covered with masking tape. 
After covering the unpainted surfaces, several layers of second paint are applied. After painting, you need to give the paint time to dry.
Final work
The final stage of painting the wheels will be applying varnish. Again, do not forget about protecting surfaces on which the varnish will not be applied. It is also advisable to apply the varnish in two layers.
To improve the appearance after painting, the tire can be coated with silicone grease for rubber parts, this will give it the appearance of a new tire, which, together with a freshly painted wheel, will look very good.
After completing the work, it is better to go to a tire service station to check the wheel balancing.


