Among modern decorative coverings for wooden floors, laminate is especially popular. However, this material requires exceptional levelness from the subfloor. Therefore, to install it, it is often necessary to level it. It is better to lay plywood under the laminate on wooden floor. Below are instructions with a video demonstration and photo illustrations on how to install the material correctly.
Pre-installation stage
Before you tackle the plywood itself, you need to organize workplace and stock up necessary tools. Leveling a wooden floor with plywood under a laminate requires special care and accuracy from the master, so to perform it you need to have basic tools:
- Screwdriver;
- Level;
- Roulette;
- Jigsaw;
- Dowels;
- Self-tapping screws.

You also need to make sure that the wood is suitable for laying laminate over it. “Ancient”, rotten boards must be removed, creaking ones must be repaired, and areas damaged by insects must be cut out. After updating the wooden boards, you can begin to check the degree of evenness of the floor.
Small differences in level can be easily corrected using a substrate. If the differences are more than 1 cm, then you need to lay the logs horizontally using a water level. As for the thickness of plywood, sheets thicker than 1 cm are installed under the laminate on a wooden floor.
Important! Decorative coating should not be thicker than the layer of plywood leveling the base.
In addition to the thickness of the plywood sheets, you need to decide on the grade of the material, which indicates the degree of its resistance to moisture. For floor repairs or reconstruction in residential premises, it is better to buy sheets of the FC brand, as well as FSF, but for the floor it is still better to take FC.
Attention! The FSF brand contains adhesive mixtures based on phenol-formaldehyde, so for a residential building it is better not to use them as a leveling layer for the floor, but they can be used in exterior work.
FC is considered the least moisture resistant plywood, but it is safer and less expensive. As for the grade of products, for leveling it is more correct to give preference to grades 3/4 or 2/3. It is also recommended to take at least one-sided sanded ones, then the laminate will lie perfectly flat.

Alignment methods and rules
Exists two methods of plywood leveling:
- Fastening pieces of plywood along the joists;
This method will require the most money and labor. Very important when this method lay the logs only so that their top is located exactly horizontally. The joints of the plywood pieces laid on top of the joists should fall directly on them. But under the plywood you can secure communications or install a layer of sound insulation, as well as insulation.
Important! When installing plywood on joists, you must adhere to 2 rules: 1-layer plywood must exceed 15 mm in thickness, and 2-layer sheets must be 9 mm thick.
Boards for creating logs can be taken with the following parameters: 4x8x10 cm, arranging them with a gap of 50 cm between the boards. The plywood is fastened like brickwork, so that there are no four seams in one place. Between the sheets themselves at the joint it is necessary to leave 2 mm, and between the places where screws are screwed in - up to 3 cm.

- Fastening a plywood sheet to a wood floor.
Installation directly on plywood boards is possible when level differences are small. Installation of the sheets can then be done using glue and securing them with self-tapping screws. In this case, it is allowed to use material with a thickness of 1.2 cm. As in the first method, about 2-3 mm gaps must be left between the pieces of plywood.

Leveling the floor with plywood - step-by-step instructions
Having figured out how to level a wooden floor under laminate with plywood using one of the methods, you can begin practical exercises.
Remember! If sudden changes in temperature are allowed in the room or the humidity rises above normal levels for a living space, then it is not recommended to use plywood for the floor.
Stages of installing plywood on a wooden base:
- Cutting sheet material.
Depending on the size of the room, the plywood is cut into equal pieces (it is most convenient to cut into squares with a side of 60 cm).

Important! You need to leave a gap of about 1 cm from the wall, and 2-3 mm between the seam joints.
The resulting pieces of sheets need to be inspected again; if there are squares with peeling edges and other material defects, then this piece should be replaced. Next, you should try on the resulting pieces on the floor, placing them like cages on chessboard, are numbered and pencil marks are left on them for the places where screws will be drilled in the future.

These holes are made in advance and countersunk with a drill so that later you can hide the screw head. To do this, use a drill with a large diameter.
- Preparation of cut pieces and base.
When the fitting of plywood pieces is completed, you need to thoroughly clean the base of debris, dust and dirt. And impregnate the plywood with a high-quality antiseptic to extend the service life of the base.
- Installation.
A video from the masters below will show more clearly and accurately how to install plywood under laminate on a wooden floor.
Plywood sheets are fastened with some offset in order to get no more than 3 seams at the joint. It is recommended to prime the floor before installation. According to the numbers, each piece of plywood takes its place and is fastened with self-tapping screws along the diagonals and perimeter (dowels can be made of plastic). Self-tapping screws should be located every 15 cm, and approximately 2 cm from the edge.

Pay attention! When working with plywood, the length of the screws is chosen to be at least 3 times thicker than the layer of sheet material.
- Sanding fixed sheets.

The last step is necessary if unsanded plywood was purchased. For this procedure, you need to borrow a parquet processing machine and sandpaper from somewhere. If the plywood is already sanded, then you can immediately lay the laminate or first treat the sheets with protective mixtures.
Flooring made from plywood sheets makes the floor stronger and more resistant to deformation. This surface is an excellent basis for laminate, parquet boards, and linoleum. Laying plywood over a wooden floor helps conserve heat and reduces the amount of energy needed for heating. Besides, top layer The coatings can be changed after some time if desired, leaving the base in place.
Laying laminate on plywood
Pressed wood boards successfully used for the construction of rough or finishing flooring. The material is inexpensive, easy to transport, and has obvious advantages:
- laying plywood under laminate on a wooden floor takes a little time;
- pressed veneer prevents rotting of the underside finishing coating thanks to good air exchange between the material and the wooden flooring;
- smooth surface extends service life flooring;
- plywood sheets weigh little, but have sufficient strength, hardness, and are resistant to external influences;
- the canvas is flexible and does not break during installation;
- the material does not have a pronounced odor, is safe for health, and is suitable for arranging wooden floors in any premises, including children’s, medical, etc.;
- rough flooring retains heat well and absorbs noise;
- the canvas is large in size and forms a minimum number of joints during installation;
- factory grinding makes the surface of the material non-slip and prevents movement of materials placed on it;
- Can be used for flooring in the kitchen, bathroom, toilet due to its high moisture resistance.
 Base for laminate
 Leveling a wooden floor with plywood also has some disadvantages:
- Instability to fire, rapid spread of flame. Plywood is compressed wood, so the level fire safety the leaf is not tall;
- The canvas is more expensive than chipboard, fiberboard;
- Laying plywood makes the wooden floor a few centimeters higher. This solution is not suitable for rooms with low ceiling.
 Laying plywood with glue
 Types of plywood used for work
The material varies depending on the type of wood veneer used in production. There are the following types of canvas:
What kind of plywood to lay on a wooden floor? There are different brands, suitable for certain types of work. In industrial construction, plywood of the FB and FOV brands is used. The FSF and FC categories are suitable for laying flooring in a residential area.
Canvas marked FC can be used to install a wooden floor under laminate in a nursery or bedroom. The material is impregnated adhesive composition, containing no phenol. The fabric does not pose a risk to human health. Such plywood sheets are quite durable and have an average level of water resistance.
 Plywood brand FSF
 FSF brand fabric is more resistant to water. The material is strong and durable regardless of temperature and humidity level. The canvas owes these properties to a special impregnation, which at the same time makes plywood sheet toxic, unsuitable for laying flooring in a residential building.
The canvas is attached to the joists or directly to the floor surface. The first method requires more effort and time due to the need to build a foundation. Leveling a wooden floor with plywood without joists is done using glue. This method is suitable if the rough surface is flat, strong, and has no differences in height.
 Laying on a wooden floor
 Installation on old wood flooring
Smooth, durable surface - good basis for laying plywood on a wooden floor. The advantage of this installation method is a slight rise in the surface after installation. Minimum thickness the sheet is 1.2 cm. The cut sheets are attached using special glue and self-tapping screws.
Tools and materials
 Necessary tool
 For correct fastening plywood to wooden floor The following tools and building materials are needed:
- electric saw;
- roulette;
- level;
- marker;
- self-tapping screws;
- screwdriver;
- construction vacuum cleaner (a broom will do);
- roller;
- sander;
- plywood sheets;
- substrate;
- primer;
- glue.
Preliminary preparation
 Layout of sheets
 Before you begin installation, you need to:
- Check the condition of the floor. It is necessary to strengthen loose elements, replace rotten, damp parts, and ventilate the room;
- Remove dust and dirt from the surface, prime the floor special composition for a wooden surface. Then you need to dry the base for 16 hours;
- Even out minor differences in height, up to 1 cm. To smooth out unevenness, you need adhesive tape and a special backing for plywood on a wooden floor. The joints between the strips of material are glued with adhesive tape;
- Place the sheets vertically to dry for 2-3 weeks at room temperature or slightly higher;
- Treat the dried fabric with an antiseptic solution;
- Ventilate building materials;
- Cover the plywood acrylic varnish in several layers. This treatment increases strength;
- Bring the plywood into the room two days before installation. The material is placed horizontally. This is necessary so that the canvas adapts to the microclimate of the room.
Marking and cutting
 Marking by size
 Plywood is cut in such a way as to minimize the number of joints. The material is sawn taking into account gaps of 3-4 mm between the sheets and 8-10 mm between the sheet and the wall. Indentations allow you to avoid swelling of the coating due to temperature fluctuations and increased humidity. The material tends to increase in size by several millimeters under the influence of the microclimate.
The plywood sheet is sawn with a jigsaw. It is necessary to carefully inspect the ends of the workpieces for delamination and sand the edges. It is convenient to cut the material into squares with sides of 50 or 60 cm. This helps to smooth out wooden surface, avoid installation defects. Each sawn square is numbered and indicated on the sheet layout diagram.
 Fastening with self-tapping screws
 The correct installation of plywood on a wooden floor is done as follows:
- Spread the underlay on the floor, seal the joints with tape;
- Lay out the sheets to cut the material as rationally as possible. Plywood is placed taking into account gaps in case of expansion of the sheet under load or temperature fluctuations. The gaps between the sheets are 3-4 mm, from the wall along the edge of the sheet there should be 8-10 mm;
- Cut the elements with a jigsaw. For spacious room squares with a side of 50-60 cm are convenient. All parts are numbered, the location of the elements is fixed on the diagram;
- Drill the holes. This is followed by countersinking with a slightly larger diameter drill. When laying with glue, additional fastening is required. Holes are made at a distance of 2 cm from the edge. The distance between the fastening elements is from 15 to 20 cm;
- Apply plywood adhesive to the wood floor. The layer thickness should be 2-3 mm;
- Lay the canvases, starting from a niche, podium, ledge. Then place the sheets from the center to the edges, moving the squares like brickwork;
- Press the material down with a roller to ensure a secure grip;
- Secure the material with self-tapping screws to ensure greater reliability and prevent displacement. The hats need to be thoroughly sunk. This will protect the bottom layer of the final coating from damage;
- Check the quality of the laid coating using a level.
 Installation on joists
 Installation of the canvas on a pre-constructed structure is more labor-intensive and takes more time. This method is good because it does not require leveling the old coating. The logs themselves should be the same in height. The base is installed on the tree if its surface is strong and durable. The construction of the structure is not recommended in rooms with low ceilings, because the floor in this case rises by 8-10 cm.
Preparatory stage
Before laying plywood on a wooden floor, you should clean the previous covering, remove dust, large and small debris. It is necessary to inspect the cracks near the walls and between the floorboards and fill the largest of them silicone sealant. Assembly adhesive is suitable for this purpose. The material should be cut into squares, then each piece should be marked. A diagram of laying sheets is drawn on paper. The squares are arranged in bricks so that each next row is offset relative to the previous one.
 Laying sheets along joists
 Logs are slats with a cross section of 40 by 15 mm and a length of 1.5-2 m. The guides are fixed on wooden boards using dowels or self-tapping screws. The logs are mounted so that their top forms a flat plane, and the slats serve as sheathing. The space between the guides is filled with material intended for heat and sound insulation. Cords and wires are hidden under the joists.
Wrote especially for you step by step instructions how to lay, starting from the choice of material and ending with the final polishing of the finished surface.
You need to mark, drill, and countersink holes on the sheets. Then comes the laying of the plywood floor itself on the wooden floor. Material is attached liquid nails or using self-tapping screws. In the second case, the caps should be thoroughly sunk into the canvas so that they cannot damage the bottom of the final coating.
Final processing
 Floor surface scraping
 At the end of the installation, the joints are treated with fine-grained sandpaper. A grinding machine with a special attachment copes with this task perfectly. This smoothes out minor irregularities and differences in height between adjacent sheets. Next, the floor surface is varnished in several layers.
Is alignment necessary?
The final floor covering can be very demanding on the base. When styling, you need to create a perfect flat surface. An old floor almost always requires adjustment in height, especially when it comes to installing the covering directly onto a subsurface without using a structure made of wooden joists.
 Flat base
 Laminate flooring and parquet board. The increased demands of the final coating are explained by the presence of a system of interlocking joints, which cannot perform their function when laid on an insufficiently flat surface. Changes in height lead to cracks and deformation of the floor. Places of loose joints subsequently become clogged with liquid and dirt.
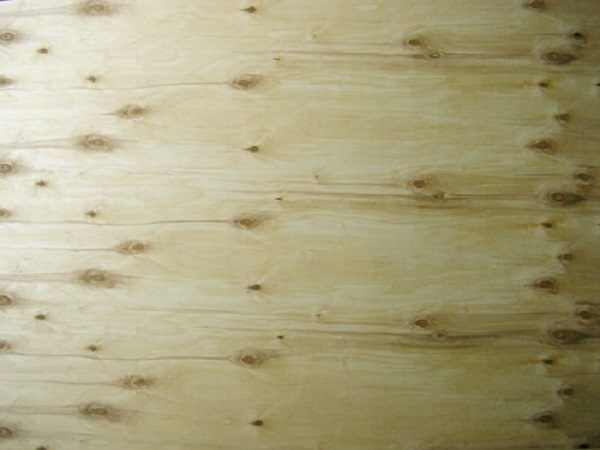
When laying laminate flooring, one of the main requirements is that the subfloor surface should be as smooth as possible, and the easiest way to achieve this is with plywood. Dense, smooth sheets can be easily mounted on any base, covering various defects, and also serve as additional thermal insulation. And the absence of “wet” processes significantly reduces the time for repairs, which is also important. Let's consider which plywood is best to lay on the floor under laminate, what to look for when choosing, and how to lay the material yourself.
The strength and durability of the plywood substrate directly depends on the thickness of the sheets, strength indicators, number of layers and type of processing. Therefore, when choosing plywood, you should pay attention special attention not in appearance, but technical specifications material.
Plywood thickness
The choice of plywood thickness depends on the type of rough base and the method of laying the sheets. If you plan to lay plywood on concrete screed, a thickness of 15 mm is quite sufficient; for a plank floor it is better to take a little more - 18 mm. In both cases, the sheets are laid in one layer. When installing on joists, it is recommended to attach plywood in two layers to avoid sagging of the material and to give the base maximum rigidity. Here you can take sheets 15 mm thick or make the bottom layer thicker, for example, 21 mm, and the top layer thinner (12-15 mm). The wider the distance between the joists, the thicker the flooring should be.

The thickness of plywood is determined by the number of layers of veneer it consists of. The thickness of each layer varies between 1-1.5 mm, so different manufacturers plywood of the same thickness can differ in the number of layers and vice versa. It should be noted that sheets with maximum number layers rather than thicker ones.
Sheet sizes
Based on size, plywood is divided into format and large format. The first type includes sheets with maximum dimensions 1525x1525 mm, for the second - from 1830x1525 to 3000x1500 mm. It is more convenient to work with smaller plywood, but at the same time, a large number of joints reduces the rigidity of the coating. When choosing the size of sheets, you must take into account the size and configuration of the room so that you have to trim the material as little as possible.

Material of manufacture
Based on the material used, plywood can be birch or coniferous. This means that in the first type the upper layers are made of birch veneer, in the second - from pine, spruce or larch veneer, as well as other conifers. The inner layers are usually made from cheap wood, both hardwood and softwood. Visually distinguishing the material is quite simple: birch plywood is lighter and has a weakly expressed texture, while coniferous has a more saturated color and a beautiful pattern on the surface.

The bending strength of birch plywood is 10-12% higher, so it is used where the floor is subject to increased loads. It is denser and heavier than coniferous, which is not always convenient during installation, and is also more expensive. Coniferous plywood is more practical: it is cheaper, lighter in weight and resistant to rot, fungi, and mold. This type is more suitable for installing a subfloor in a residential building, because there are no intense loads on the base, and moisture is often high.

Combined plywood is also produced, the structure of which includes both birch and coniferous veneer. This material combines good quality, strength, attractive texture and affordable cost, and it is most often used in furniture production and interior decoration.

Prices for plywood for flooring
plywood for floor
Grade and labeling
Depending on the quality of the material, there are four main grades and grade E - elite, the properties of which are regulated by GOST 3916.1-96. The types of veneer on the front and back sides may differ, which helps reduce the cost of products.
| Material grades | Characteristics |
|---|---|
| The highest quality. The presence of visible processing defects or wood defects is not allowed. The surface of the sheet should have an even color and pattern |
| Veneer high quality, no more than three defects per sheet are allowed: small knots up to 1.5 cm in diameter, closed cracks, brown veins, edge processing defects up to 2 mm wide. Inserts that differ in color or texture are also allowed, provided that their area does not exceed 2% of the sheet area |
| No more than 6 defects per sheet are allowed: fused or unfused knots, small cracks, wormholes with a diameter of up to 6 mm, dark veins. Also on the surface there may be minor dents, leaked glue, inserts of a different shade with an area of up to 5% of the total area of plywood |
| The number of defects is no more than 9 per sheet. These can be knots, wormholes up to 6 mm in diameter, inserts that differ in texture and color, cracks up to 2 mm wide, stains of leaked glue. Defects in edge processing and disruption of the fiber structure in certain areas are also acceptable. |
| Lowest quality material. Veneer may have a wavy surface, torn fibers, dents and cracks of varying lengths. There may be a large number of wormholes and small knots on the sheet, leaked glue |


The lower the grade of the material, the cheaper it is and the lower its performance properties, since the presence of cracks or wormholes reduces the bending strength of the sheet and its resistance to mechanical stress. The grade is indicated by two numbers that indicate the grades of the outer layers of veneer. For example, the numbers 1/2 in the marking of plywood mean that on one side of the sheet there is veneer of the first grade, on the other - of the second. The numbers 1/1 indicate that both sides of the sheet have first-grade veneer.


Grade 3 plywood is quite suitable for laminate flooring: it is inexpensive, but at the same time quite strong and durable. If the screed serves as a rough base, and the traffic of the room is low, in order to save money, you can use fourth grade plywood. It is not practical to use grade 1 and 2 plywood as a subfloor due to its high cost.
In addition to the type of plywood, you need to know other markings. According to GOST, sheets are marked with special paint on the reverse side. The marking must include the following designations:
- Name;
- brand;
- grade;
- emission class;
- type of material processing;
- sheet dimensions.
Of primary importance is the grade of material, which is based on the type of binder for the veneer sheets and determines the degree of water resistance of the plywood.
| Brand | Characteristics |
|---|---|
| Urea glue, which is relatively resistant to moisture, is used as a binder. The material has good strength, low toxic resin content, does not high cost. This type plywood is widely used in construction for interior work |
| The binder is phenol-formaldehyde resins, thanks to which the material has excellent resistance to moisture and mechanical stress. Due to the presence of toxic components, plywood of this brand is not suitable for residential premises |
| Bakelite varnish is used for gluing veneer. Finished sheets have maximum resistance to water and other negative influences. It is characterized by high cost, which limits the use of plywood in construction |
| Albumocasein acts as a binder natural adhesives. Of all types of plywood, this is considered the most environmentally friendly, but it is not resistant to moisture. |
| Melamine resin is used for gluing veneer. This binder provides high resistance to moisture and does not emit toxic compounds, so plywood of this variety can be used in residential areas |


Equally important is the emission class, which is designated by the letter “E” and the numbers 1, 2, 3 and indicates the content of formaldehyde resins in 100 g of material:
- E1 – less than 10 mg;
- E2 – from 10 to 30 mg;
- E3 – from 30 to 60 mg.
To avoid negative consequences For health reasons, E3 plywood should not be used in residential premises.

According to the type of surface treatment, the material is divided into polished and unpolished, and this is designated as follows:
- NSh – unsanded sheets;
- Ш1 – plywood sanded on one side;
- Ш2 – grinding on both sides.
The roughness that is present on the surface of unsanded sheets does not in any way affect the quality of laying the laminate, so there is no point in overpaying and buying sanded plywood. Moreover, it is inappropriate to use painted or laminated sheets, the cost of which is much higher than usual, but the performance properties are the same.


As for plywood manufacturers, the most preferable are the products of domestic companies, which combine good quality with a very reasonable price. For European manufacturers, the cost is higher, but for Chinese companies, the quality of plywood often causes a lot of complaints, and the characteristics of the material in most cases do not correspond to the declared ones.
Which plywood to choose?
So, after comparing the characteristics of plywood, you can confidently choose best option. The main criteria here are the reliability and safety of the material, while external characteristics do not play any role. For bedroom, nursery, living room the best option There will be 3 or 4 grade plywood of the FK brand with a thickness of 12-15 mm. Emission class is only E1, others are not suitable. As for the material of manufacture, there are no special recommendations; you can use both birch and coniferous plywood.
In the kitchen or hallway you need to select stronger plywood with a thickness of 15-18 mm, still of the same 3 or 4 grades. Recommended brand - FK or FKM, emission class E1. For convenience, you can use Sh1 plywood, mounting the sheets with the sanded side up. By smooth surface It’s easier to lay a heat-insulating backing, the material doesn’t cling to rough edges, and there’s less need to adjust.

How to lay plywood under laminate
Installation of plywood is quite simple and does not require special skills. Let's look at how to properly lay plywood under laminate on a subfloor made of boards. Before starting work, you should prepare necessary tools and materials:
- screwdriver;
- jigsaw;
- self-tapping screws;
- foamed polyethylene backing;
- plywood sheets;
- roulette;
- scotch;
- level.


It should be noted that the subfloor must be in good condition, and this applies not only to the boardwalk, but also to the joists. If the floor is very worn, separate areas rotten, it is impossible to lay plywood. Firstly, it is impossible to securely fasten the flooring to rotten boards, and secondly, the wood under the plywood will continue to deteriorate until one day the floor sag under your feet.
Step 1. Prepare the base. Remove the baseboards, check the integrity of the boards, strengthen loose areas with screws, and seal large cracks. If there are noticeable unevenness in some places, you need to remove them using grinder. Finally, the floor is vacuumed or swept to remove all excess.

Step 2. Measurements are taken carefully and the sheets are cut to minimize the number of joints. In this case, you need to take into account the mandatory gap around the perimeter of the room with a width of 8-10 mm and gaps of 2-3 mm between the flooring sheets.


Advice. After cutting the plywood, it is recommended to process the ends of the sheets sandpaper to remove burrs and loose fibers.
Step 3. The underlay is laid on the floor in strips end to end. The edges of the material should extend onto the walls by approximately 5-10 cm. At the joints, the substrate should be taped with tape to seal the heat-insulating layer. In addition, this will prevent the strips from moving when laying the plywood.

Step 4. The prepared sheets are laid one by one on the floor, leaving a gap from the wall. The joints between the sheets are shifted in each subsequent row by about a third of the sheet width. Be sure to check the horizontality of the flooring with a level to avoid differences in height (when installing laminate, maximum differences of up to 3 mm per meter are allowed).

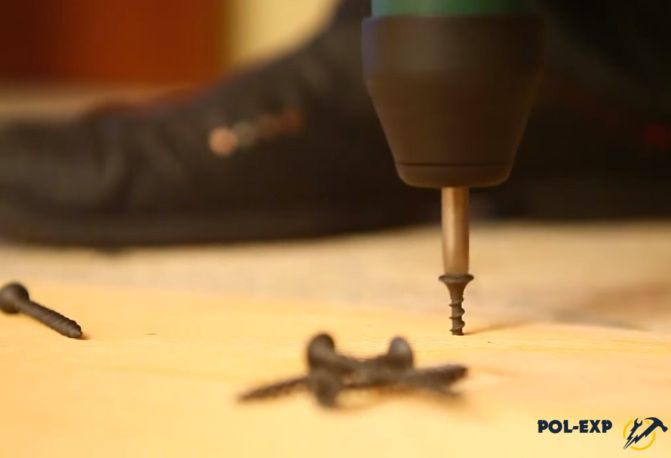
Step 5. Fix the plywood to the floor with self-tapping screws, screwing them in increments of 15-20 cm and always at the corners of each sheet. The fastener caps should be recessed by 1-2 mm.


After this, the floor is ready for laminate installation, and laying the flooring on such a base will not be difficult. The edges of the thermal insulation substrate protruding from the walls are cut off upon completion of all work, before attaching the baseboards.
Prices for Tarkett laminate
Tarquette laminate
Video - Which plywood is better to lay on the floor under laminate
Video - Laying plywood on a wooden floor
Many people, when renovating an apartment or house, choose laminate as a material for a new floor covering. Due to its characteristics and beautiful appearance, it has become very popular in recent years. The material has many advantages that play an important role in appearance, practicality and service life of the floor. The main difficulties arise at the installation stage. The fact is that it must be laid on a flat surface. If the floor in the home is concrete, then you will have to make a screed, and then lay the laminate. Things are more difficult for owners of houses with wooden floors. They will need to tear down the old boards and put in new ones. This will require a lot of effort, time and financial investment. Therefore, it is better to think about laying plywood on a wooden floor under laminate.
Advantages and disadvantages
Using plywood is a simpler and less expensive option when laying laminate flooring. Can be placed on uneven floors chipboard sheets and thereby level its surface. Plywood has several significant advantages and virtually no disadvantages, which makes it ideal option to solve this problem.
Advantages of plywood:
- The material is quite dense and durable. Thanks to this quality, the floor will be able to withstand heavy loads and not deform, which is a very important point. This factor has a positive effect on the service life of the laminate. There is no need to be afraid to place heavy furniture in the room. But it is important that the thickness of the plywood sheets is chosen correctly.
- Due to the light weight of the material, its transportation and installation does not require much effort.
- The installation process is very simple. It does not require special skills or knowledge. And due to the fact that plywood is produced in sheets, there is enough large sizes, the laying speed increases significantly.
- Thanks to your operational characteristics the material can bend, but it is very difficult to break it.
- High moisture resistance, which has a positive effect on the service life of the plywood itself, as well as the laminate laid on top of it.
- High thermal insulation properties prevent the penetration of cold.
- The cost of the material is low. And if you also do the laying of plywood on the floor under the laminate yourself, then a considerable amount of money will be saved in your wallet.
But there is also a drawback that can force a person to abandon the use of plywood, and this method of floor leveling in general. When using this material, the floor level will rise significantly, which does not suit everyone.
How to choose the right plywood
The choice of material should be based on compliance with several criteria, which will clearly affect the convenience, safety of use and service life.

When purchasing you need to take into account:
- Plywood thickness. Under the laminate on a wooden floor you need to install a material whose value is no less than 1 cm, but this is not enough. This will depend on the condition and characteristics of the rough flooring on which the sheets are planned to be laid; it must be smooth and rigid.
- Purpose of the room. If you plan to place heavy pieces of furniture in it, then you need to put plywood under the laminate, the thickness of which can eliminate the risk of deformation of both the first and second layers of coatings.
- Moisture resistance of the material. Based on this criterion, plywood is divided into 3 classes:
- FOF is the lowest, produced using phenol-formaldehyde glue, which is harmful to human health. Despite its high moisture resistance, it should not be used indoors;
- FC – average and most suitable option. The sheets are made using harmless glue and can be laid in any room;
- FSF is high, but does not withstand moisture well, so this option should also be discarded.

- Quality. Based on this criterion, plywood is divided into 4 grades:
- 1 – has no flaws, but is the most expensive;
- 2 – in some places there are knots and veneer inserts;
- 3 – there are many cracks and knots in the structure;
- 4 – the lowest quality of gluing, many cracks, knots, veneer inserts, the surface of the sheets may be uneven.

Pine or birch is used to make plywood. But the resin found in pine, when reacting with glue, can release harmful substances. Therefore, it is recommended to give preference to birch products. If the type of material and thickness are chosen correctly, the floor will last for decades.
Preparation for installation
Any job requires careful preparation. Installing plywood on a wooden floor is no exception. It is imperative to check whether there are any places in the floor covering that sag under the weight of a person. If there is, you will have to remove all the boards and repair or replace the joists. At in good condition floor, you can proceed to the next step.

To work you need to purchase necessary materials and tools:
- drill;
- jigsaw;
- screwdriver;
- grinding machine;
- building level;
- roulette;
- self-tapping screws;
- sandpaper;
- wood glue;
- sheets of plywood.
You should stock up on everything you need in advance so that later the installation process is not interrupted due to the lack of some tool or material.
Cutting sheets
At this stage you need to cut the material. To do this correctly, you should pay attention to the following points:
- room dimensions;
- the distance from the walls when laying near the walls should be 1-1.5 cm;
- the gap between adjacent sheets should be 0.8-1 cm;
- the principle of laying plywood: it is placed directly on boards or on logs mounted on top of them.


You also need to take into account that it is necessary to install plywood according to the principle brickwork, and not in one row. This is done to ensure that the edges of the four sheets do not meet in one place, and also to prevent the formation of long seams. This installation method will make the base more stable.

The standard sheet dimensions are 125x125 cm. Therefore, to prepare the main part of the pieces, it is recommended to cut the purchased plywood into four parts. All the rest will have to be adjusted to the size of the walls.
Before cutting, it is recommended to draw up a diagram, focusing on the above points, number each piece and mark its place on paper, so as not to get confused during installation. After cutting, you need to check if there are any delaminations on the edges of the sheets. If any are found, the damaged piece must be replaced with a whole one.
One of the most important moments is to check the evenness of the wooden subfloor. If there are differences of no more than a few millimeters on it, then it will be possible to use substrates for sheets. If the differences exceed the specified value, you will have to install logs. This method is considered one of the most labor-intensive and expensive, but if there is no other option, you will have to resort to it.

During installation, gaps may form between the joists and the floor. In these places you need to put pieces of plywood that fit in size. It is imperative to use a building level to control the horizontalness of the joists. Their top edges must be in the same plane. It must be remembered that when laying plywood sheets, their edges should be located on the joists.

After installation, you can fill the space that has formed between the bars. For this purpose, materials are used for noise and heat insulation. This space can be used for installation engineering communications. With this installation method, it is necessary to use plywood with a thickness of at least 1.5 cm.
Installation procedure
When everything preparatory work completed, installation can begin. To increase the service life of plywood, before installation it is recommended to coat the material with antiseptic agents and let it dry.

The sheets are placed in place according to the prepared diagram. To attach them to wooden base use self-tapping screws or special glue. In the case of glue, everything is simple, but if self-tapping screws were chosen as fastening elements, you will have to follow several rules:
- you need to make an indentation from the edges of at least 2 cm;
- the length of the screw must exceed the thickness of the plywood by 3 times.

Fasteners should be screwed along the edges and diagonally of the sheets. The distance between them should be within 15-20 cm. To reduce the risk of damage to the material, holes for self-tapping screws and their heads should be drilled at the fastening points.

At the last stage of the work, the coating is sanded, after which the substrate can be laid and the laminate can be laid.

There is nothing complicated about laying plywood. You just need to have desire, patience and enough free time. The advantages of this method of floor leveling clearly outweigh the disadvantages. If you take into account all the nuances and follow the recommendations during preparation and installation, the result will definitely please all members of your family.


Do you want to lay plywood under the laminate? Let's figure out whether this is a good choice for the base, what kind of plywood fits better everything and how to lay it on a wooden floor.
Laying laminate flooring on a wooden floor requires a good, level base. For this you can use different materials However, it is plywood that is extremely popular. This material is not only practical, but also inexpensive, and also has a number of qualities, among which it is worth mentioning the following:
- no unpleasant odor;
- Possibility of use when installing heated floors;
- material rigidity;
- excellent wear resistance, which will increase the service life of the laminate;
- high thermal insulation properties;
- ease of use and installation due to the large size of plywood sheets.
Laying laminate flooring on a wooden floor
True, there are some disadvantages. For example, many builders consider the significant disadvantages of using this material to be that when using it, the height of the flooring increases. For rooms with low height this is unacceptable. Another disadvantage is high hygroscopicity. Even the most premium may begin to unstick and delaminate due to moisture.
Before we start work, we need to choose the right plywood, since not every type suitable material for laying under laminate. The first advice from experts is that the thickness of the sheet should not be less than 1 cm, and ideally the thickness of the plywood under the laminate should exceed the thickness of the clean floor covering. You also need to choose a suitable brand, which depends on the level of moisture resistance of this material. To carry out work in an apartment, it is better to purchase FK brand plywood.

FK grade plywood
You can also find more in stores expensive sheets FSF, which are produced by adding phenol-formaldehyde glue. This material will be stronger and more moisture-resistant, but it is not advisable to use it in residential premises due to the fact that the glue poses a health hazard. Also, when choosing a product, do not forget that at least one side of the sheet must be well sanded. Be sure to check this in the store and make sure there is no mistake, otherwise you will have to do the sanding yourself. There are also several types of plywood:
- First grade material of the highest quality. The plywood sheets have no defects or cracks.
- The second grade is slightly worse in quality - there may be glue, small dents or minor defects on the surface of the products.
- You can find subtle wormholes on grade 3 plywood.
- The material that belongs to the fourth class is of the lowest quality - the product has many defects that could have formed during the manufacturing process.
All furniture must be removed from the room where we will be renovating. Then we remove the old baseboards. If it is plastic, there will be no problems with this, but wooden baseboard, most likely, you will have to dismantle it with a crowbar. You also need to remove all nails protruding from the floor. Before we lay down the base, thoroughly vacuum and wash your wood floor several times. In addition, you need to prepare the material itself.
Sheets of plywood should lie in the room where repairs are planned for at least a day. This will reduce the possibility of sheet deformation after installation.

Installation of plywood sheets under laminate
How to lay plywood on a wooden floor under laminate - step by step diagram
Step 1: Cutting the products
The cutting of the material should be carried out in accordance with the coverage area. When laying the base, do not forget to provide a distance of 1 cm from the walls, the gap between the sheets should be about 5 cm - this will avoid deformation of the material associated with temperature changes. Saw the material into squares of the size required by calculations and carefully inspect the material: the edges should not delaminate and there should be no defects.
By the way, to reduce the likelihood of their occurrence, use a jigsaw to cut products. First, lay out the sheets in accordance with the pattern in which you will lay the material. In order not to forget the location of the plywood, number it, also marking the places where the joists are attached. After this, be sure to impregnate each sheet with a special moisture-repellent impregnation.
Installation of laminate.


