The ability to handle carpentry and measuring tools is already a reason to try to solve such a problem. not an easy task how to install interior doors with your own hands. The work is simple, but tricky in its own way. It will take scrupulousness and even tediousness in marking and adjusting, otherwise it will not be possible to install the interior door with the frame correctly.
Features of installing interior doors
At first glance, nothing complicated, but this is only a superficial impression. The point is not just to install the frame and door leaf into the interior opening, but to do it beautifully, without distortions, scratches or sagging hinges. If this is your first experience, then it is best to make detailed step-by-step instructions for installing interior doors yourself before starting work. This is not shameful for beginners. Even experienced craftsmen often make notes with their own hands - what not to forget and what to pay attention to when installing a door frame on a specific interior partition.
During the installation process, you will need to solve two of the most difficult problems yourself:
- Correctly assemble and install the frame of interior doors, align and secure it so that the frame does not sag under the weight of the door leaf;
- With your own hands, mark and cut out the mounting grooves on the vertical post of the frame and on the end of the interior door leaf.
U experienced craftsman It takes 2-3 hours to install an interior door; a beginner will need at least a day to completely install the frame and hang the door leaf.
Advice! It is not necessary to stupidly follow the instructions for installing interior doors, which recommend sequentially installing lock fittings, attaching hinges, and only at the very end solving problems with hanging interior doors. The main thing is to install the frame and door leaf with your own hands with a fresh mind, and you can put off the trim, locks and handles with trim for the next day.
There will be a lot of measuring and sawing. All cuts are made by hand hand hacksaw, therefore, in addition to fresh forces, you will need to stock up on quality tools.
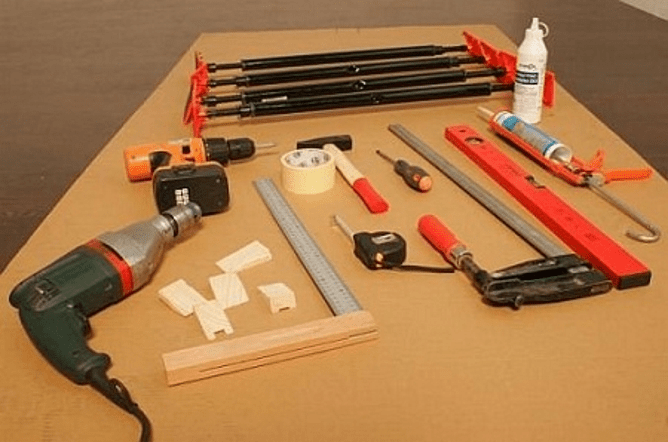
Tools for installing interior doors
A day or two before the start of work, you will need to assemble a working arsenal for working with lumber. You can collect it from friends or rent it. Why two days before installation? Because well before starting work, you will need to check with your own hands the serviceability and functionality of each tool:
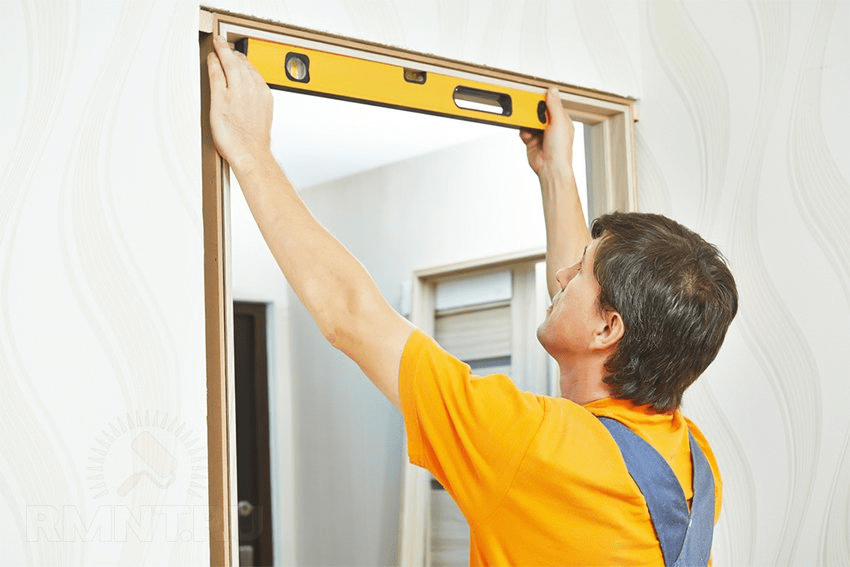
- Construction levels - small, 70-100 cm, and large, 150 - 200 cm, with a working bubble indicator. Usually they don’t pay attention to the condition of the camera and beacon, considering them to be in good working order, but at rentals you can sometimes find bent and even broken copies; this is the most important tool in installing interior doors;
- Marking tool - carpenter's corner with a ruler, tape measure and meter metal ruler. We check for the presence of angle marks at 90° and 45°;
- A screwdriver or electric drill with a bit attachment for cross-head screws. We check with our own hands how the cartridge holds, and the serviceability of the wiring - batteries;
- Cutting tool, you can cut the timber of interior doors with a jigsaw, but it is best to stock up on a pair of hacksaws - carpentry and metal. The first is used for cutting box parts, the second is used for fine cutting of platbands.
In addition to the tool, you will need a hammer, a clamp, a carpenter's chisel, polyurethane foam in a can, tape and gloves. There is little dust and waste generated when installing interior doors, but you will still have to periodically remove it with your own hands so as not to spread it throughout the apartment.
In addition, it would be correct to have a hammer drill with a bayonet blade in stock, because when installing an interior door frame, problems may occur with the doorway in the wall. Ideally, the gap between the frame posts and the ends of the opening should remain 10-20 mm, for normal alignment and foaming of the cracks. In reality, the opening may be uneven, and you will need to knock down part of the concrete or stone with your own hands, a hammer drill or a hammer and chisel.
How to assemble an interior door frame
The best option would be to purchase a ready-made door kit, which usually includes:

In this case, the entire process of installing the interior frame box comes down to transferring the second parts of the hinges onto the frame parts with your own hands, assembling the hinges with self-tapping screws and installing them in the opening.
The entire job will take less than two hours. One of the options for installing interior doors with your own hands in the video

The only drawback of the above scheme is that not all manufacturers modern models interior doors manufacture their products in kits designed for do-it-yourself installation. Most often, the customer buys a door leaf, and the trim and frame parts are purchased with the expectation of installing an interior door with a frame on their own.
How to install an interior door with your own hands
First of all, you need to lay out the door leaf on a level area. Next, the selected pair of beams is laid to the left and right ends of the sash. Using a tape measure, we measure the width and expected height of the future supporting frame. Then, using a building level and a tape measure, check the dimensions of the interior passage.
Important! This is done in order to determine whether the platbands will cover the edges of the hole in the wall, and what thickness of additional elements should be used.

If you “miss” the height or width of the frame, you will have to redo the trim yourself or, even worse, you will need to raise the interior door in height.
Assembling a door frame frame of any size
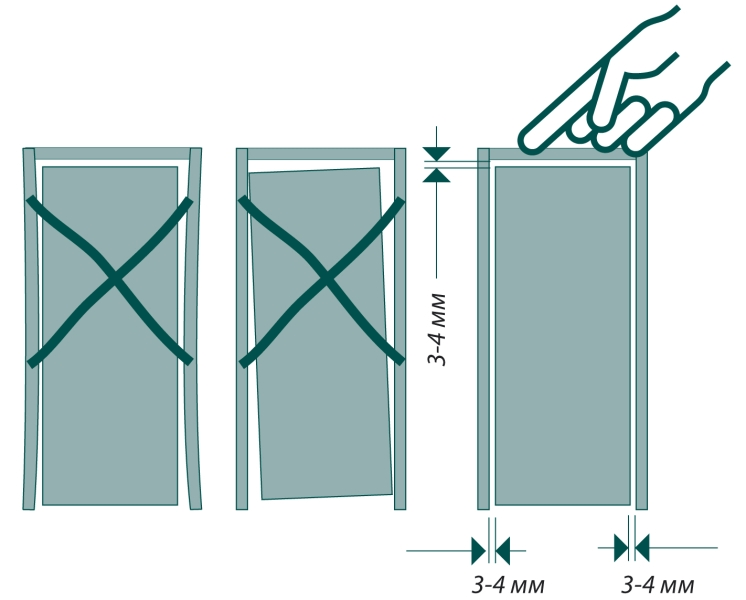
In order to install the interior door without distortions, it is important to correctly select the distance between the left and right posts so that the door leaf fits into the frame with a small gap, no more than 2 mm on each side. In this case, the door will open freely without jamming in the hatch.

The easiest way is to assemble the frame with your own hands using a clamp, a saw and two blanks. Vertical posts, as in the case of preparation, are placed at the ends, leveled and secured with clamps.
On the side of the upper and lower edges of the canvas, an allowance equal to the thickness of the timber is left on the workpieces. At the same time, on the left allowance, a cut line is applied with your own hands at an angle of 45° for further joining with the horizontal crossbars of the frame. Without disassembling the structure, markings are applied to cut out the grooves for the canopies, lock and handle.
If the interior door is too wide or complex shape, then usually at this stage they check the conformity of the configuration of the frame with the door to the shape of the interior opening. To do this on wooden plank drive a pair of nails at a distance from each other equal to the outer width of the frame. The plank must be secured above the opening, and a couple of plumb lines are hung on the nails. If the gap between the frame and the wall is 10-15 mm, then the calculation is correct.
Installing hinges on an interior door
After all checks have been completed, it is necessary to cut out mounting grooves for the awnings in the canvas using a chisel or carpenter's knife and hammer. The easiest way is to mill a niche using hand router, but, as practice shows, the work can be done with your own hands and without expensive power tools.

If this operation is difficult, then for interior doors you can use overhead hinges or models for drilling. To install, you only need to drill holes for screwing in the fasteners.
We fix the frame in the doorway
- We mark the level of the upper horizontal cross member of the frame with a marker on the steppe, this will help to complete correct installation horizontally and vertically;
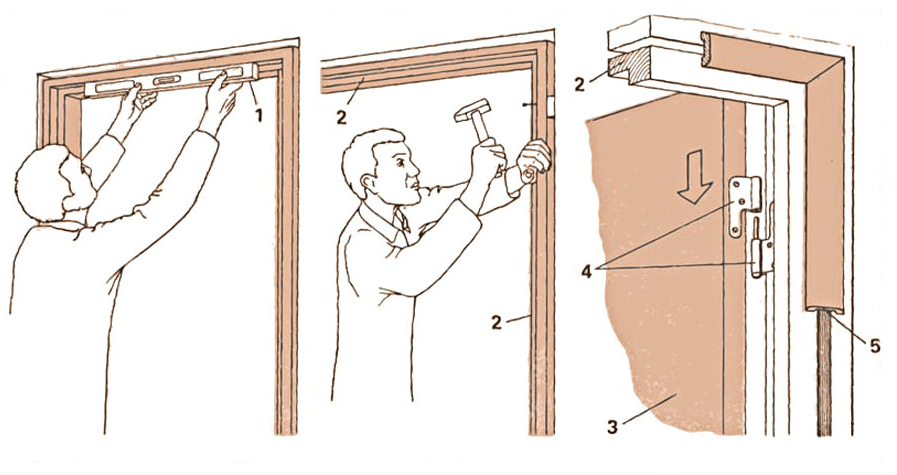
- Using wedges and a building level, we level the frame vertically and horizontally with our own hands. We fix the position of the frame in the opening with wooden plugs and wedges.

Advice! If the frame and door leaf are light in weight, then the frame can be fixed with mounting perforated petals to the wall of the interior partition.

Next you need to blow out polyurethane foam The space between the frame and the wall, while installation is being carried out on the polyurethane foam, must be checked again and, if necessary, finally leveled vertically using a long building level. We apply a small building level to the upper mark and, if necessary, we knock the frame to the desired height.

Installation of door leaf
After the loot is firmly fixed with hardened foam, it is necessary to install the mating parts of the canopies. To do this, initially the door leaf is raised with wedges so that there is a gap of 1-2 mm between the threshold and the lower edge.

All that remains is to install the sash on the awnings, and you can move on to decorative finishing interior doors.
Installing trim on interior doors
Covering the frame with platbands is not particularly difficult. First of all, install the vertical trim strips. The height of the plank is measured according to the mark made earlier, after which the platband is applied to the frame and the cut line is marked at an angle of 45 degrees.
Advice! It is best to make an undercut with your own hands using a thin hacksaw blade on metal. First stick tape onto the cutting line. The plank is nailed with wallpaper nails or placed on glue.
The second vertical casing is installed in a similar way. After the installation of the vertical parts has been completed, you can mark the cut line on the horizontal strip and install it on the door frame in the same way.
What are the sizes of extensions for interior doors?
Additional strips are used as additional element to increase the width or thickness of the door frame. Most often, installing extensions on interior doors is required in a situation where the wall is much thicker than the canvas, and there is a gap between them that needs to be closed.
The width of the additional slats ranges from 10 mm to 200 mm; for interior structures, the most common size is 10-20 mm, and often, due to the non-standard profile of the gap, the additional slats have to be ordered or cut out with your own hands from the trim strips.

How to install extensions on an interior door
If, after installing the box, the unpleasant fact is discovered that the vertical plane of the frame is recessed into the space of the interior opening relative to the wall surface, then the only way to correct the situation is to use additional strips.

You must first determine the size of the extension; to do this, place a building level on the wall and use a ruler to measure the distance to the front edge of the box. Thin strips are nailed with wallpaper nails, wide extensions are glued to the frame.
Professional advice on how to install interior doors
Among the features of installing home doors, the following problem areas can be noted.
Before installing the trim, you need to make sure that the frame or additional strip is located in the same plane with the surface interior wall. Otherwise, even if you do it perfectly with your own hands, a gap will definitely appear between the platbands.
The second problem that we have to face is the sagging of doors when incorrect installation. To correct the position, you need to remove the door leaf, place washers, or trim the edge and install the door in place.
Conclusion
Installing interior doors with your own hands will require a little practice in installing awnings and extensions, but in general the work is not difficult, and with the right skill you can hang the door in a few hours. The craftsmen claim that with each installation, the quality of their DIY work doubles.
Curtain tiebacks are an important and required part interior design, which carries a double function, being both a practical element in the design of curtains and a decorative accessory that allows you to add a bright and unique accent to the image of the window. Practical side grabs carry a functional load, using which you can easily regulate the proportion of illumination of the entire room.
Are you nearing the finish line in interior design? Your windows are decorated with beautiful and elegant curtains? But the desired image the interior of the room, previously formed in your imagination, does not appear in any way? And this is not surprising, because it is important to remember that the curtains are not always correctly selected, taking into account practical advice and recommendations from specialists is the key to a successful final result. A bright and unique result, oddly enough, is made up of little things.
Such details as curtain tiebacks will come to the rescue, which will not only add the “necessary” touches to the appearance of your window treatment, but correctly, easily and taking into account latest trends fashion will make the interior of the room new, stylish and unique. Just a few details on the curtains, and the decor of the entire window plays with unusual and interesting colors.
Curtain tiebacks are multifunctional: they subtly highlight the interior, look great, and successfully decorate windows, being an integral part of the completed composition.
Purpose, application: we take everything into account
The main purpose of tiebacks is to fix the curtain so that it falls, but only slightly falls in beautiful, neat and elegant folds.
Of the many advantages, the most significant are the following:
- regulate the flow of sunlight, or rather let in more light;
- give a unique image not only to the window, but to the entire room;
- can be of the most diverse types, which allows you to bring any creative ideas to life;
The tiebacks are attached at the level of the window sill, but this is not canon. Each owner can fix them at the level where he wishes.
Curtain ties are used in two cases:
- When curtains are placed on doors
- When curtains with drapery are placed on the windows.
What types of curtain ties are there? What rules and tips should you follow when choosing a curtain tieback so as not to disturb the harmony of the interior? Let's figure it all out together.
Rule 1. It is not necessary that the ties and textiles of the curtains be identical.
Rule 2. When choosing grabs, consider general style interior of the room.
The easiest way is to buy ready-made clamps, but it is much more interesting to do it yourself, given that their manufacture does not require specific knowledge and skills. Anything can serve as material for such decorative elements: ropes and cords, ribbons and chains, belts and toys, pieces of cord, even cutlery.

Types of curtain tiebacks. Which one to choose?
There are no limits to design ideas and creativity. Proof of this is the huge number of pickup options. These accessories can combine beads, rings, and fringe tassels. In general, everything that is at hand. The means at hand are the basis for future exclusive pick-ups. The main thing is that it is absolutely not necessary to resort to the help of professionals, sewing machine. There is no need to use special patterns or diagrams. Everything is simple and easy.
- Fashionable leather belt or suspenders.
Such grips will be ideal for the home office of a serious businessman or a room for a teenage boy.
- Hook lock.
This element for gripping can be found on women's handbags that are out of order. Give the hook-lock a second life, and the curtains will take on an exclusive look.
- Grips in the form of a toy.
Are the toys in your child's room more of a dust collector than a play tool? Has your child grown up and soft toys lost their significance? But the room has not ceased to be a child’s room, so use soft toys small size as a pick-up, and you will only benefit: toys again decorate the room.
- Clamp – cutlery.
When it comes to grips for kitchen curtains, the find will be forks or spoons. Bend them in the right direction, and that’s it: the curtains in the kitchen are, indeed, kitchen curtains. And the metallic shine from the instruments captivates the eye.
- Elegant porcelain and ceramics.
We continue to decorate the curtains on the windows in the kitchen. Take advantage of the idea when a cup left over from a stylish and expensive set can serve perfectly as a potholder. The only thing you need to make such clamps is a tool for cutting ceramics or glass. Make a hole instead of the bottom of the cup, and your tiebacks are something to follow.
- Vintage door handle.
The easiest and simplest option for grabs. Screw it in door handle into a wall, doorway or window frame, and your curtains can be decorated with simple and at the same time exclusive decorative elements.
- Textile grips.
This version of pick-ups is the most idea-rich method. Any textile, any texture, any color can satisfy the desires of the most capricious and creative designer. Tacks that contrast with the fabric of the curtain look great. For example, delicate and weightless tulle curtains will perfectly complement simple and rough burlap tiebacks. This option will be appreciated by connoisseurs of extravagant ideas. And if, in addition, the room is made in light beige tones, such a fusion of texture will become a real design masterpiece of the room.
- Magnetic grabs.
Magnetic curtain ties- this is an accessory, element, part that holds the curtain fabric using a magnet, which is located on both sides of the clip (it can be either sewn or not sewn). The variety of shapes and sizes of magnetic pickups opens up enormous opportunities for customers. You can pick up magnetic clip for every taste and color. They hold the curtain tightly, are durable and reliable in use.
- The era of romanticism.
Is your bedroom filled with the spirit of romanticism? Do you prefer delicate and pastel colors in room textiles? And the fabric of the curtains is weightless and transparent. The solution has been found. Find ancient coins, chains, metal buttons and medallions in “grandmother’s chest.” Use them to create curtain holders, and your curtains will be filled with the spirit of the romantic era, and the room will be filled with the charm of knightly choirs.
- Flower grips.
They are easy and beautiful to use. They are inexpensive and easy to make. Artificial flower for every taste: from a banal rose to a masterpiece iris, worn on a matching ribbon - it is not only aesthetically pleasing and feminine, but also harmonious, because the ribbon can subtly emphasize the elegance of the flower clip.
- Beads.
Are you attracted to luxury and solemnity? An excellent option as a decorative element would be beads or threads of beads. various shapes and colors. With such threads you can bring the room closer to oriental interior, where there is no place for modesty and simplicity. From bright beads to snow-white pearls, the decision is yours.
- Twine, braid, brocade ribbons, cord.
Twine is one of the simplest and easiest ways to transform curtains. It will fit perfectly into the interior of a nursery with nautical motifs, but in the living room it will look elegant if it is first tinted with gold paint. Cord tiebacks are an exclusive accessory that can present a room in a new way.
- A hook is a new life for an old piece.
Do you want to update something in the design of curtains, but you don’t have time for handmade or shopping? Use an ordinary coat hook as a hook, after first changing the angle of the hook to 900.
- Knitted knots
Tacks are not easy, requiring investment of effort and painstakingness. Make knots from rope, ribbons, fabric scraps, and use them as curtain holders.
- Clamps - pipes.
There are few connoisseurs of such grips, but there are still some. They look great in the interior country house, dachas or summer kitchen. Buy a pipe corner piece (more precisely, a pipe adapter), and your new element decor is ready for use.
- Composition from "everything that is"
Are you unable to get rid of broken hairpins, torn buttons, plaques and remnants of jewelry? And don't. Now they will be useful to you. Make a composition by combining details that suit your interior, and you will be surprised. New, beautiful, and most importantly exclusive tiebacks only for you.
These are, perhaps, the most popular and most common elements in human life - the basis for your future grips. Find your creativity, use your imagination and be determined.

Is there something missing to complete the image?
If you prefer classic grips made from tape, additional elements will help to add zest and make the grip unsurpassed:
- Buttons. Sew buttons in color or, on the contrary, play with contrast. The grips will become brighter and more interesting.
- Zippers sewn onto the fabric base of the tape will emphasize the solidity and elegance of the entire decorative element.
- Embroideries look great on tiebacks that complement ethnic interior or a country style room.
- Beads, bugles and beads will appeal to those who love elegance and solemnity in the interior.
Curtain tiebacks can do everything...
Using tiebacks, you can make a deep curtain drape, but it must be lush. With their help, you can give a narrower curtain an elegant and graceful look; just tie it to the window frame.
To correctly determine the location of the pickup, you need to measure the length of the curtain.
- In the event that the curtain only touches the window sill, the tiebacks are attached at a distance of 1/3 of the entire height, counting from the bottom. For example, the length of the entire curtain is 120 cm. This means that 1/3 of 1m 20 cm will be 40 centimeters. Therefore, the clip should be attached 41 cm from the bottom of the curtain or 81 cm from the top.
- For long curtains there are no restrictions or rules for attaching clamps.
Advice. It is important to remember that clamps both lengthen and expand the window area. This is affected by the height at which the clamp is tied.
If you want to visually make the window wider, fix the tiebacks below the middle of the curtain. If you want to lengthen the size of the window, place the decorative elements of the curtains above the middle.
Relying on their own imagination, guided by their own taste and style, imagining the final result of the interior design of the room, everyone chooses their own version of tiebacks.
Using curtain clips, you will make the window beautiful and noticeable, dim curtain fabric lively and boring interior design elegant and gorgeous. As you can see, tiebacks are not only a necessary accessory, but also a useful one.
Modern interior doors made of MDF have many advantages - attractive appearance, low price and practicality. MDF provides unlimited space for implementation design ideas, and an extensive range of sizes allows you to choose best option for interior openings of any depth and width.
It’s not difficult and self installation MDF doors, which makes it possible to save on the services of repair specialists.
Door selection rules
If you decide to install the door yourself, the first thing you need to do is take accurate measurements of the doorway, preferably without old box. The main parameters are its depth, width and height.
- The depth of the opening is the thickness of the wall according to which the door frame (frame) is selected;
- The width of the opening is the width of the door + approximately 8-9 cm for installing the door.
The standard size of doors for a bathroom is 60 cm, for a kitchen – 70 cm and for interior doors – 80 cm. Thus, for installation, for example, kitchen door, the opening width should be about 80 cm.

The MDF box itself has a standard thickness of 2.5 cm, multiply by 2, it turns out to be 5 cm. We add the necessary allowance for the free movement of the door - approximately 3 mm on each side. The remaining distance of 3-4 cm will be needed to adjust the correct position of the loot in space and its additional fixation using polyurethane foam;
- Opening height. This parameter plays a role not so much when choosing the height of the doors ( standard height modern door leaves - 2 meters), how much when choosing a frame design. It can be with or without a threshold. Calculation of the height of the door with a threshold is carried out according to the same scheme as the calculation of the width of the door. And if the door is installed without a threshold, then another 1-2 cm is added to the 3 mm margin for free movement of the door at the top (depending on the thickness flooring).
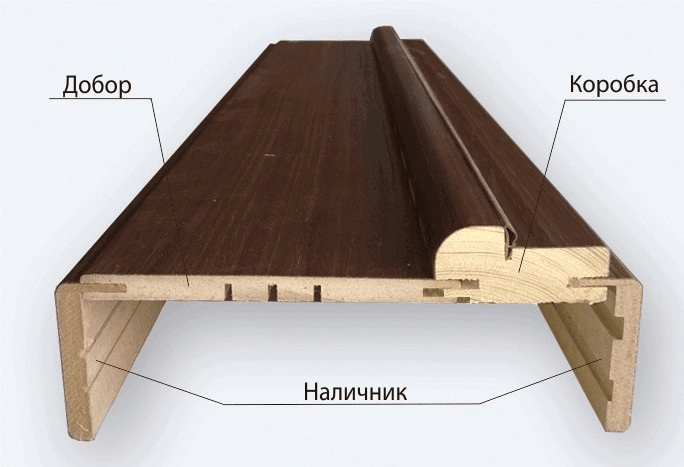
Based on the data obtained, the door and fittings for it are selected. The final set should look like this:
- Door leaf;
- box (2 vertical beams and one or two (if a threshold is provided) horizontal beams;
- vestibule slats (vertical and horizontal);
- additional strips (in case non-standard width opening);
- fittings (handle, hinges, lock (if necessary).
A set of necessary tools
Installing interior doors with your own hands is, although not particularly difficult, but a responsible and painstaking process that will be very difficult to carry out without the appropriate tools. To carry out all work accurately and quickly you will need:
- electric drill or hammer drill (depending on the material from which the walls are made);
- drills or drills 4 and 6 mm;
- hand saw with fine teeth;
- wood drill with a diameter of 4 mm;
- chisel;
- screwdriver or screwdriver with a Phillips head;
- tape measure and building level;
- miter box;
- quick installation dowels with a length of at least 75 mm and wood screws 3.5x60mm;
- polyurethane foam.
Do-it-yourself door installation: step-by-step instructions
The complexity of the process of installing a door with your own hands will depend on the initially selected model. More expensive options already come with hinges and a handle and have parts sizes ready for installation. Their assembly resembles a construction set, because the structural elements do not require adjustment, you just need to fasten them in a certain sequence, install the box in the opening, put the door on the hinges and decorate it finished design platbands.

We will consider more difficult option, when the door leaf is equipped only with blanks for the future door and has neither hinges nor handles. The first thing you need to do is dismantle old door and door frame.
Assembling a new loot
This process is carried out smoothly horizontal surface, i.e. on the floor (to avoid damage to the elements of the box, it is recommended to first lay a soft substrate).
First of all, the top crossbar of the frame is sawed off, taking into account the width of the door, allowances for freedom of its movement (in total ≈ 6 mm) and the thickness of the door (2.5 x 2 = 5 cm). Next, the vertical elements of the tray are mounted. They are laid out on the floor perpendicular to the top crossbar. All elements are in the “edge” position. When joining horizontal and vertical parts, a right angle should be obtained.
The door strips are temporarily inserted into the mounting grooves and the door is placed on them. Between door leaf and spacers ≈ 3 mm thick (for example, even strips of cardboard) are inserted around the perimeter of the box.

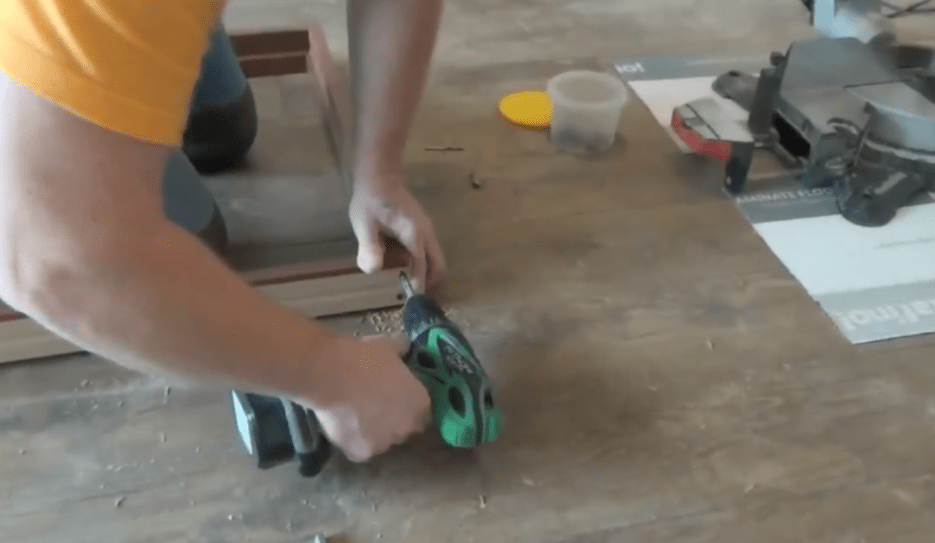
Taking into account the possibility of splitting MDF elements, it is strongly recommended to pre-drill the places for future screwing in of self-tapping screws with a wood drill of a slightly smaller diameter.
The attachment points should be located closer to the center of the parts. To connect each side of the box, two screws are enough.
Having received a U-shaped base, you need to cut off the excess vertical elements in length. In this case, we must not forget about the threshold (if it is planned) or the required distance from the floor (taking into account the thickness of the floor covering). Having measured the required length and trimmed off the excess, bottom part the boxes are fastened with a threshold part of the same width and according to a similar installation scheme top crossbar, or a mounting strip for temporary fixation correct contour Lutki (attached to the lower end sections vertical racks). The assembly of the box is now complete.
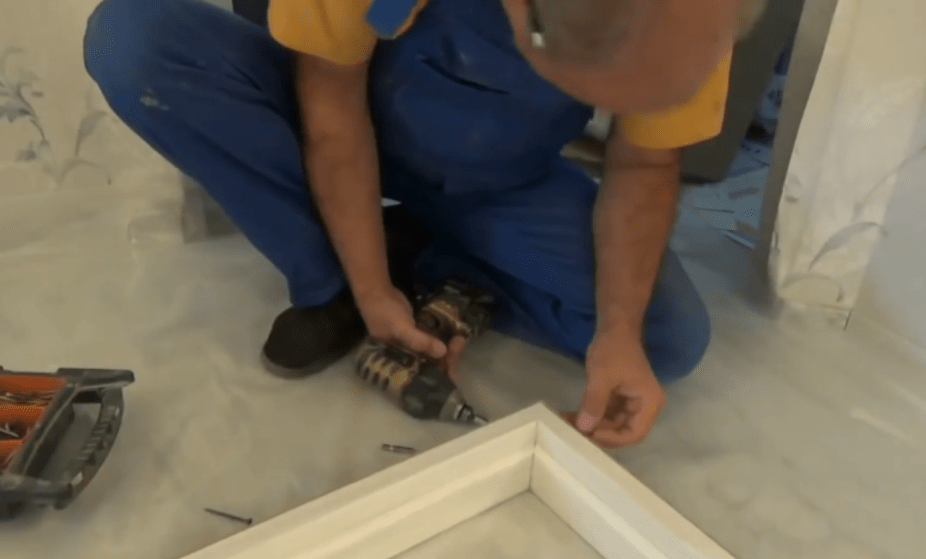
Insertion of loops
This process requires maximum precision and accuracy in work. The easiest way to do this is with a hand-held milling machine, but if you don’t have one, then you’ll have to use a hammer and a carpenter’s chisel.
Having inserted the folded hinges into the gap between the door and the frame, and placing them at a height of ≈ 250 mm from the upper and lower edges of the door, it is necessary to make appropriate markings on the door and the end of the door on the side where the hinges will be placed (taking into account the right or left opening of the door) .

Taking the door out assembled structure, by using available tools it is necessary to cut recesses in the door and the end of the door that correspond to the thickness and contour of the hinge plates. Next, the hinges are installed in the prepared “sockets” using self-tapping screws (usually they are included in the kit with the hinges).
Do-it-yourself loot installation
The assembled structure must be inserted into the doorway, controlling its correct horizontal and vertical position using a building level. The box is fixed using wooden wedges and self-tapping screws.

Door leaf installation
The next step is to install the door leaf with embedded hinges on the inserted frame. At the same time, the correctness of the vertical and horizontal gaps is checked. If the door opens and closes without interference, and all gaps are the same, then the installation was done correctly.
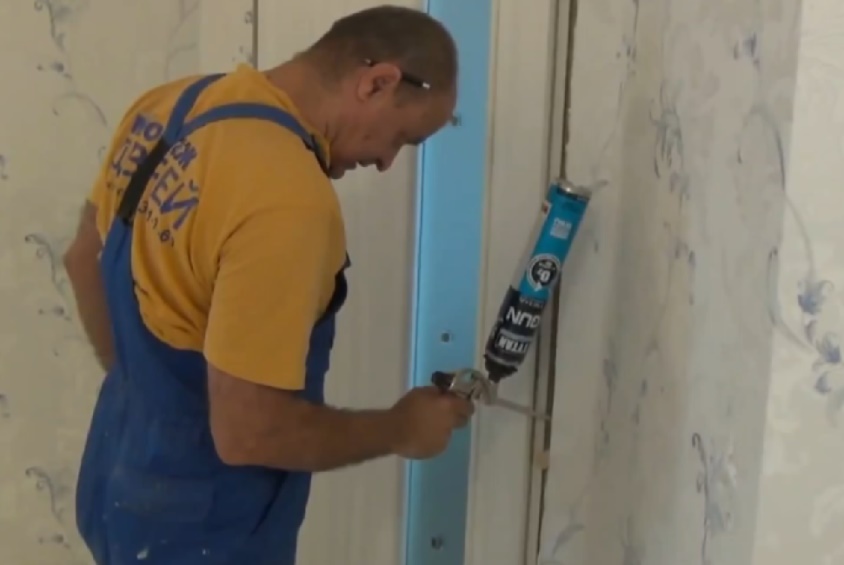
Final fixation of the box
Gaskets (for example, strips of cardboard of appropriate thickness (≈ 3 mm) must be inserted into the gap between the door and the frame along the entire perimeter of the structure. The next procedure is to fill the remaining space between the doorway and the frame with foam.
 We recommend purchasing a special gun for working with foam - this will make the process of installing the box easier and simpler
 After the foam has completely dried (≈ 12 hours), the protruding excess foam is cut off and the lower fastening strip is dismantled.
Installation of platbands
The easiest and best way to carry out this procedure is with a miter box and a saw with fine teeth. Having measured the required dimensions of the horizontal and vertical trims, they must be carefully sawed off at an angle of 45º.

Installation is carried out using thin self-tapping screws, followed by decorating their heads with special overlays in color with cash, nails without heads or mounting glue.
Design features
1 - Box
consists of a door frame frame 80mm wide. and an expander, ordered upon request, with which you can close a wall of any thickness from 100 mm. without additional fasteners and painting work.
2 - Material
the door frame and door frame are made of euro-timber, jointed along the width and length with a micro-tenon, and lined with veneer. On the door leaf, under the veneer layer, there is a backing of sheet MDF for complete adhesion of the veneer.
3 — Platband
platband (width 60-65mm, L-shaped). Attaches to the groove of the box or expander, without the use of screws or glue. The most accurate connection of the platband to the wall and ease of installation. At the customer's request, doors can be equipped with a flat, rounded platband or portal, which makes appearance doors more individual.
4 — Hinges “OTLAV” (Italy)
semi-jointed, barrel-shaped, made of high-quality steel, equipped with a ball axis. With a slight turn of the hexagon, the door is adjusted in the desired direction (down, up, back, forward, right, left) and can support the weight of the door up to 70 kg. The loop is covered with a decorative cap, which is matched to the light of the handle in accordance with the aesthetic needs of the client.
5 - Floating quarter
significantly improves sound insulation, hides the gap between the frame and the door leaf, the strike plate and the lock tongue, and also makes the appearance complete.
6 – Decor
decorative elements made from pieces of glass (fusing), stained glass, sandblasting allow you to give individuality to each door. It is possible to apply to the panel various types milling or aging effect.
7 — Handle “Colombo” (Italy)
multi-layer coating using precious metals and treated with a special protective varnish that is resistant to abrasion.
8 - Panel
consists of MDF, which significantly improves sound insulation. MDF is strong, durable and does not shrink. Eco-friendly material does not contain glue and formaldehyde.
9 – Castle “AGB” (Italy)
The lock mechanisms can be: “standard”, “plumbing” - toilet, bathroom, “turnkey” - office or second front door, “magnetic” or “card” lock - for modern hotels.
10 — Seal “DEVENTER” (Germany)
Good heat and sound insulation and slam-free closure. It is attached by cutting (without glue) into the groove of the door frame. The color is brown or beige depending on the color of the door veneer.
Lutka and platbands

The door hatch is fixed in the wall opening, and the door leaf is hung on it. One of the most important indicators The main advantage of the trap is its reliability and ease of installation. The main disadvantage of most chutes is the difficulty of adjusting to the width of the wall. To eliminate this drawback, a new constructive solution, use a telescopic Eurobox (Fig. 1). The Eurobox consists of a main tray (80 mm) and an additional expander (extension), with which you can close a wall of any thickness without additional fasteners and painting robots. Platbands G- figurative form are attached to the groove of the door hatch or expander without the use of glue and self-tapping screws or nails.
The door leaf is made with a floating quarter, this design allows you to make a gap between the door and the door leaf up to 7 mm, this prevents the door from rubbing and hides the lock tongue. For a canopy, barrel-shaped hinges are used (Fig. 1). The hinges are adjustable in three planes, made of high-quality steel and equipped with a ball axis to facilitate rotation, designed for a door leaf weight of up to 70 kg, the hinge is covered with a decorative cap, which is matched to the color of the handle in accordance with the aesthetic needs of the client. For better closure, a German seal from Deventer is installed in the door frame; it also provides good sound and heat insulation and slam-free closing.
Glazing and thresholds
Glazing
Door leaves are supplied from the factory complete with glass. But unique way Door glazing makes it easy to replace glass.
Thresholds
Interior doors are produced without thresholds. Firstly, this is argued by the fact that floor coverings specifically designed for flooring should be used. When finishing doors, a veneer coating is used, which has decorative effect, which will retain its appearance for many years, but is not intended for door thresholds. Secondly, exhaust vents are built into the doors used for bathroom premises. ventilation ducts, so that the doors do not interfere with air circulation, therefore it is created air gap between the floor and the door leaf is approximately 5mm.
Installation and operating conditions
The door block can be installed in a prepared doorway.
It is prohibited to install the product until the completion of “wet” processes (plaster, cement screed floors, etc.)
Barrel-shaped hinges are used to hang the door. Both halves of the loop have two rods built into them - a centering rod and an adjusting rod, designed to adjust the position of the loop in horizontal plane. By turning the hexagon, the door is adjusted in the desired direction.
To avoid rubbing, leave a gap between the door leaf and the door of up to 7 mm.
The door is installed in relation to the floor in such a way that there is an air gap of up to 5mm.
Mechanical parts must be protected from dirt and other foreign objects.
The core and tongue of the lock should move easily and operate silently.
The expander (extension) and platband have standard size, are cut at the installation site.
The door block must be protected from exposure to direct sunlight to avoid partial discoloration of the product.
Cleaning occurs with soapy water. It is prohibited to use abrasive and chlorine-containing products.
Delivered door block in packaging (foam plastic, polyethylene, cardboard), the canvas is ready for installation (glass, hinge, lock mechanism, seal, striker)
Doors from Meranti Plus meet the requirements of GOST 475-78 “Wooden doors. OTU" can be used indoors with a relative humidity of 40-60% and an ambient air temperature of 12-24°C.
Damage to the factory coating of the door block is not allowed.
Secret highest quality Our interior doors are manufactured using the latest automated equipment, as well as highly qualified factory personnel.
We draw your attention to the fact that differences in the pattern and shade of wood veneer are characteristic features products covered with natural veneer, emphasizing the beauty of natural wood.


